Memjet OWN-X Speedstar 1000 Instruction manual
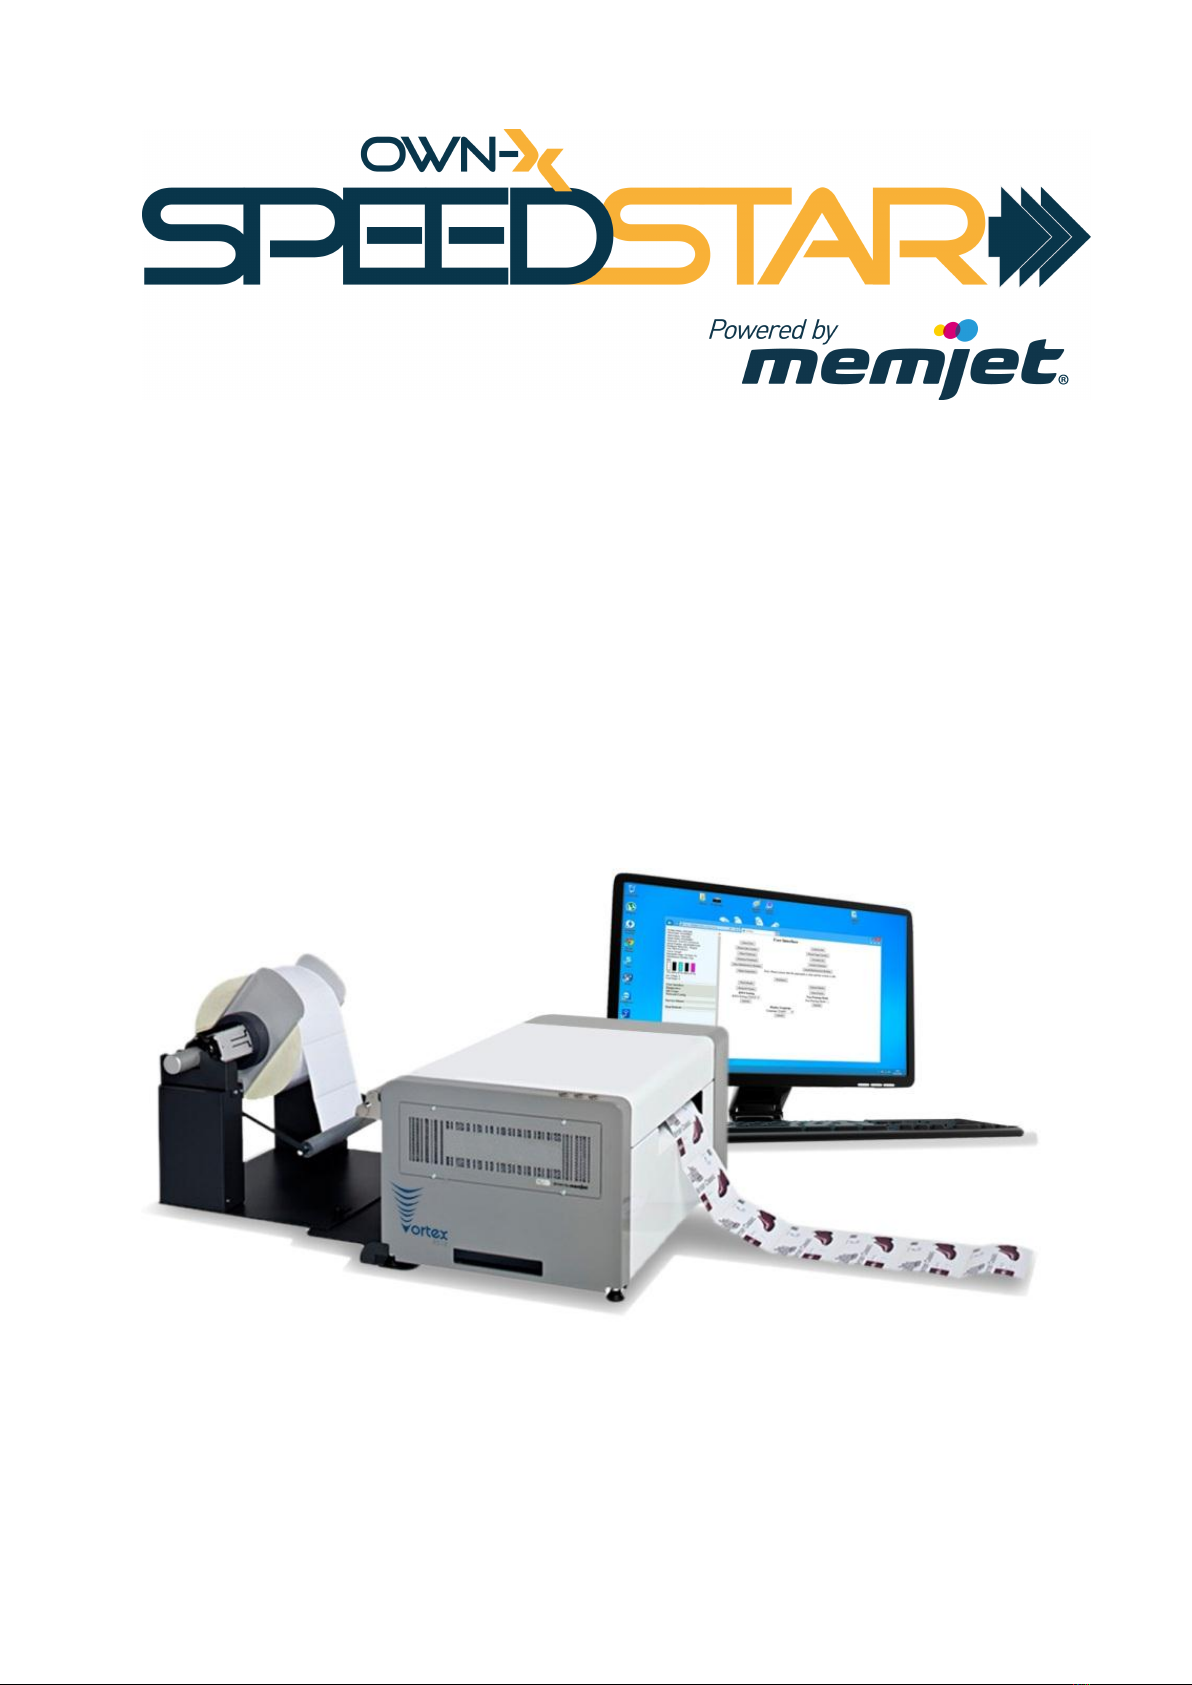
Quick User Guide
Speedstar 1000
-2-
Install the printer driver
There are two ways for installing the printer software. One is installing the printer as a USB device,
however this process doesn’t always work, as the driver software may conflict with previously
installed USB printer softwares.
The best way to install the printer is installing it as a network printer.
The steps of the network printer installation are the following:
NOTE: Do NOT connect the printer to the PC, laptop or network.
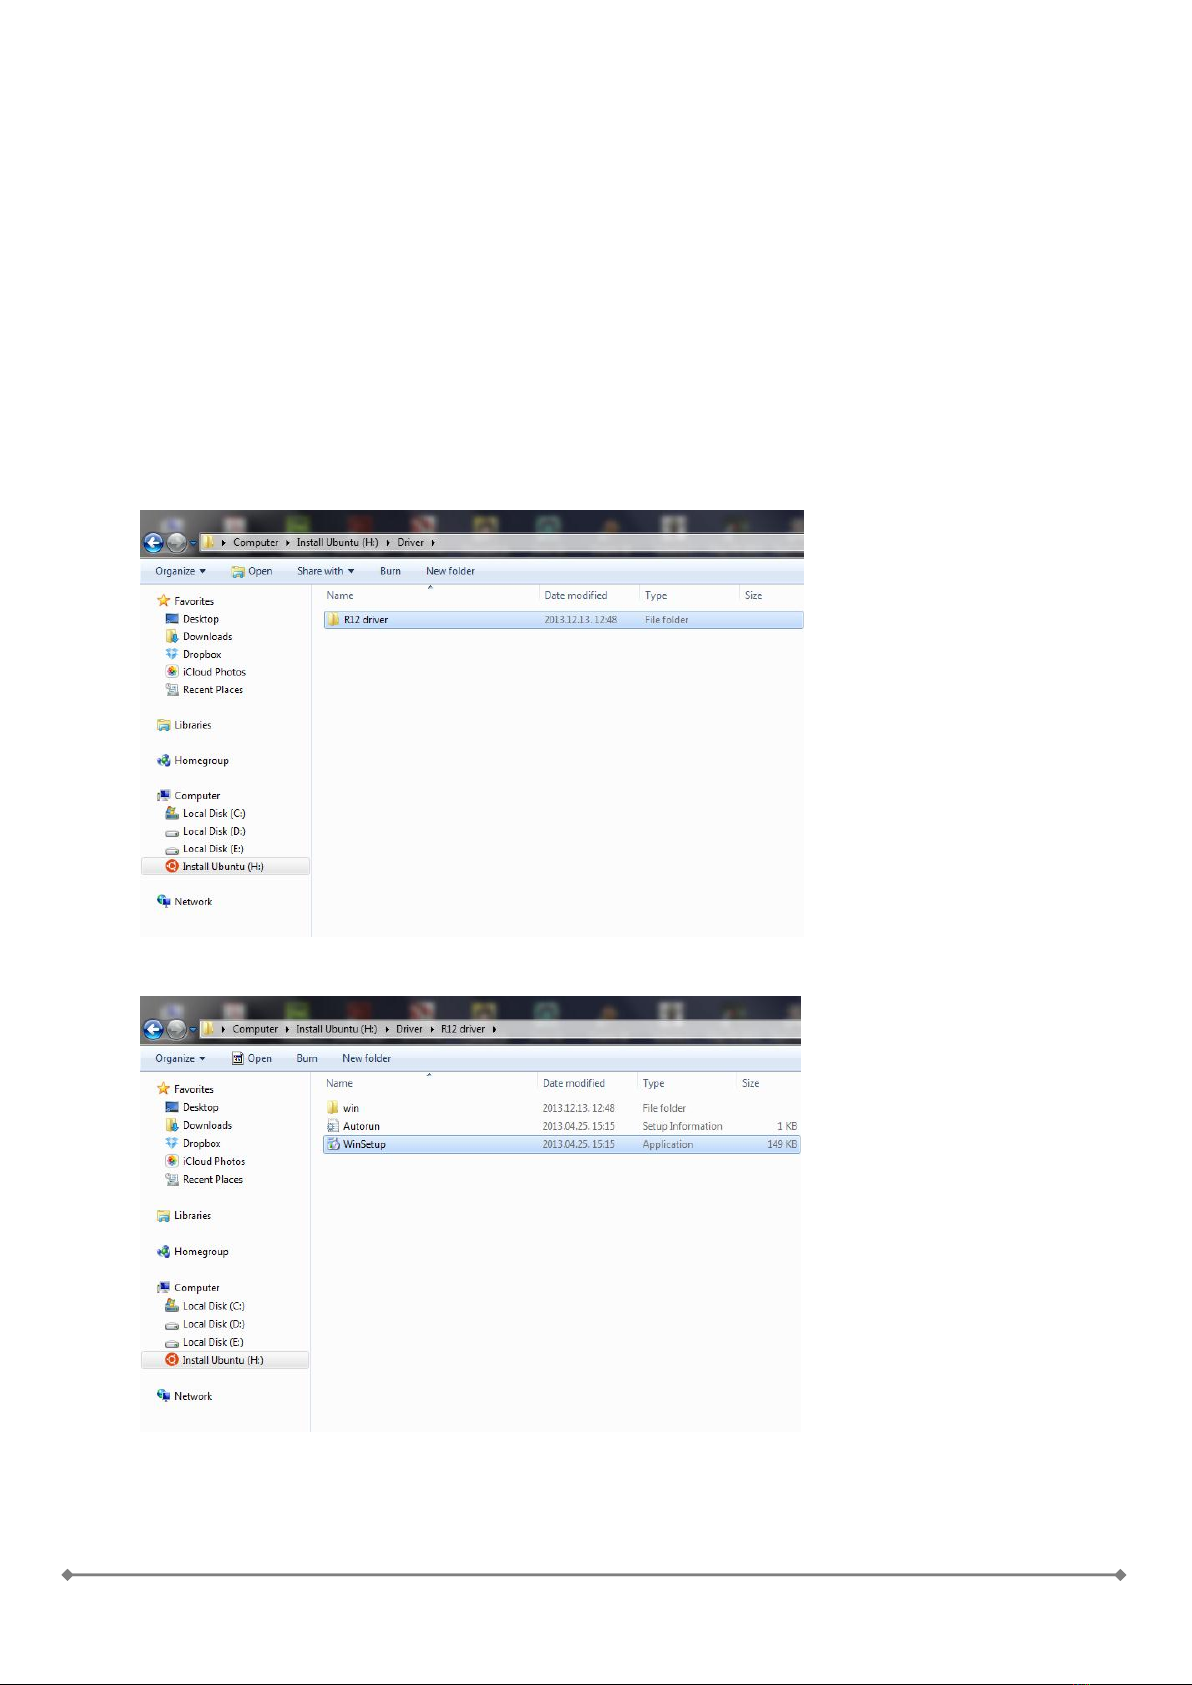
1. On the user PC or laptop, go to the folder that contains the printer driver software ’R12
driver’:
2. Open the folder and run the ’WinSetup.exe’ file:

-3-
3. As the installer starts, Windows will prompt for permission. Click ’Yes’:
4. The setup console will start:
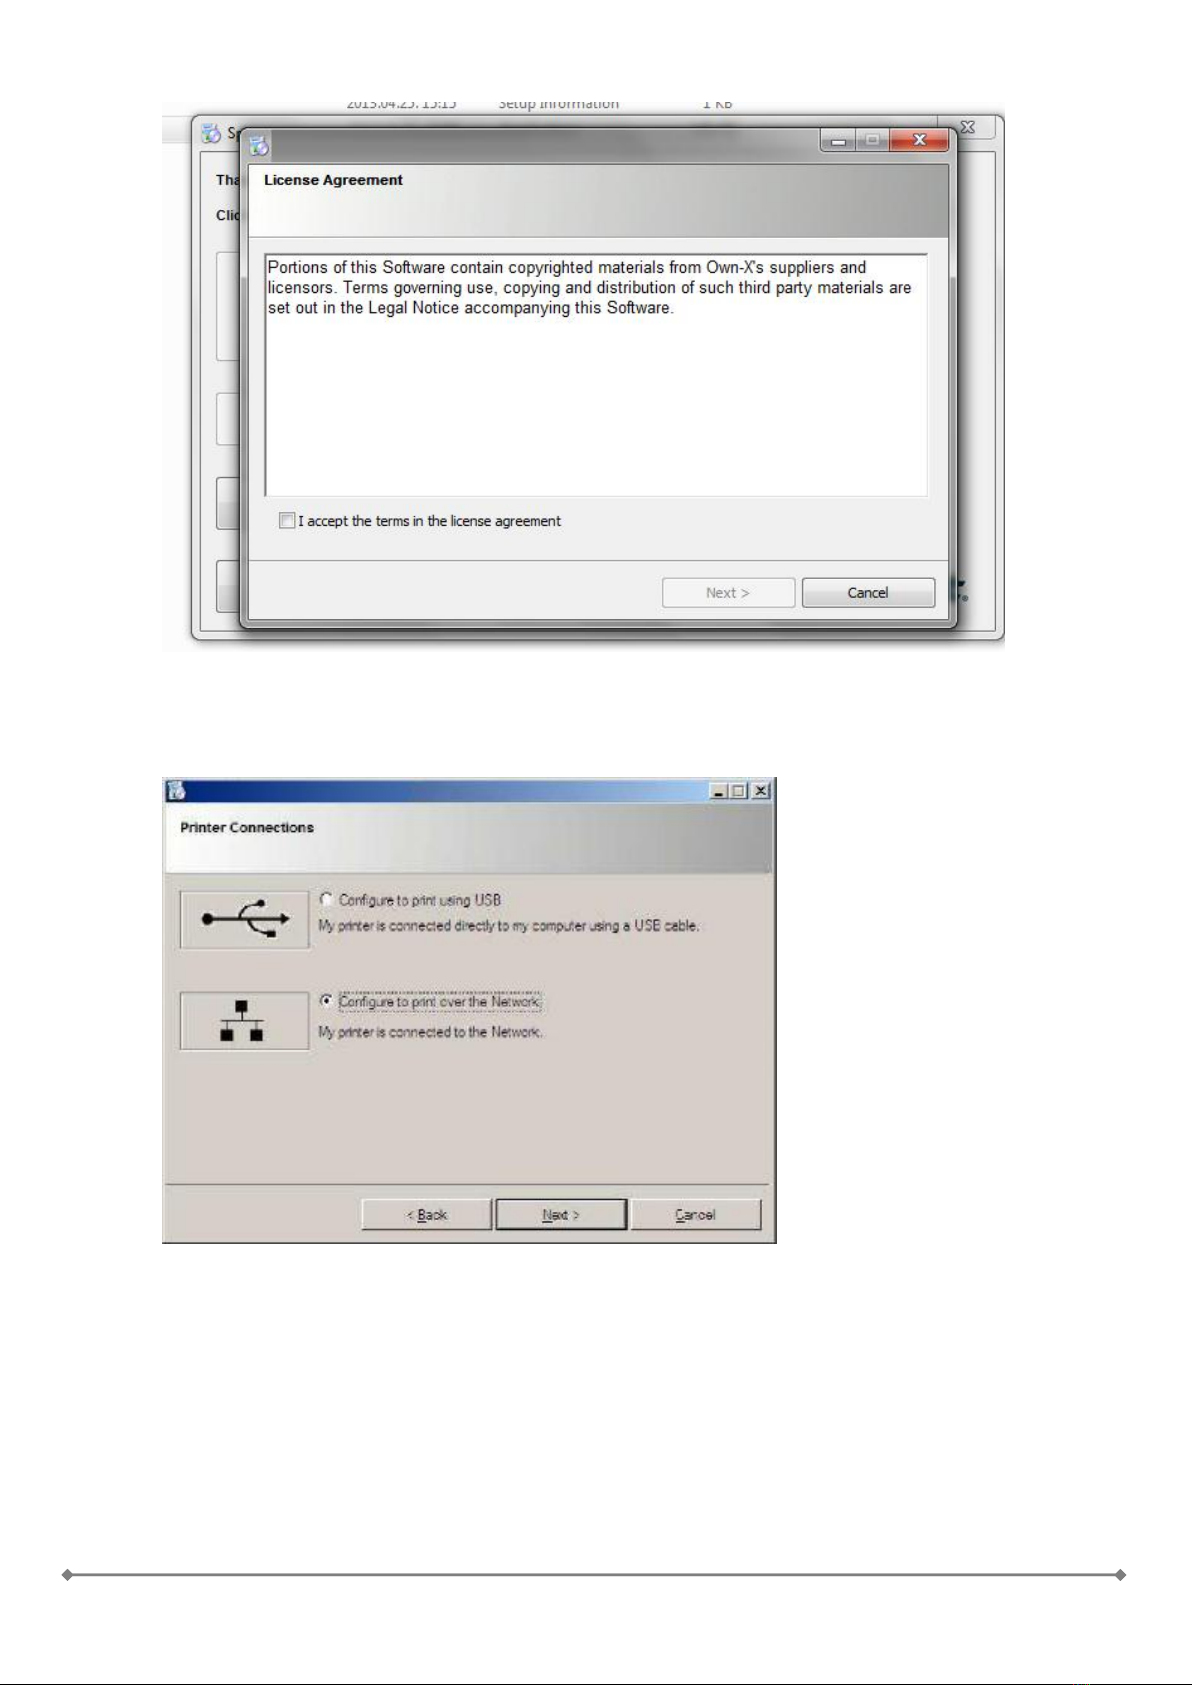
5. Click ’Install printer software’ and accept the terms in the license agreement, then click
’Next’.
-4-
6. When asked, select 'network printer'.
-5-
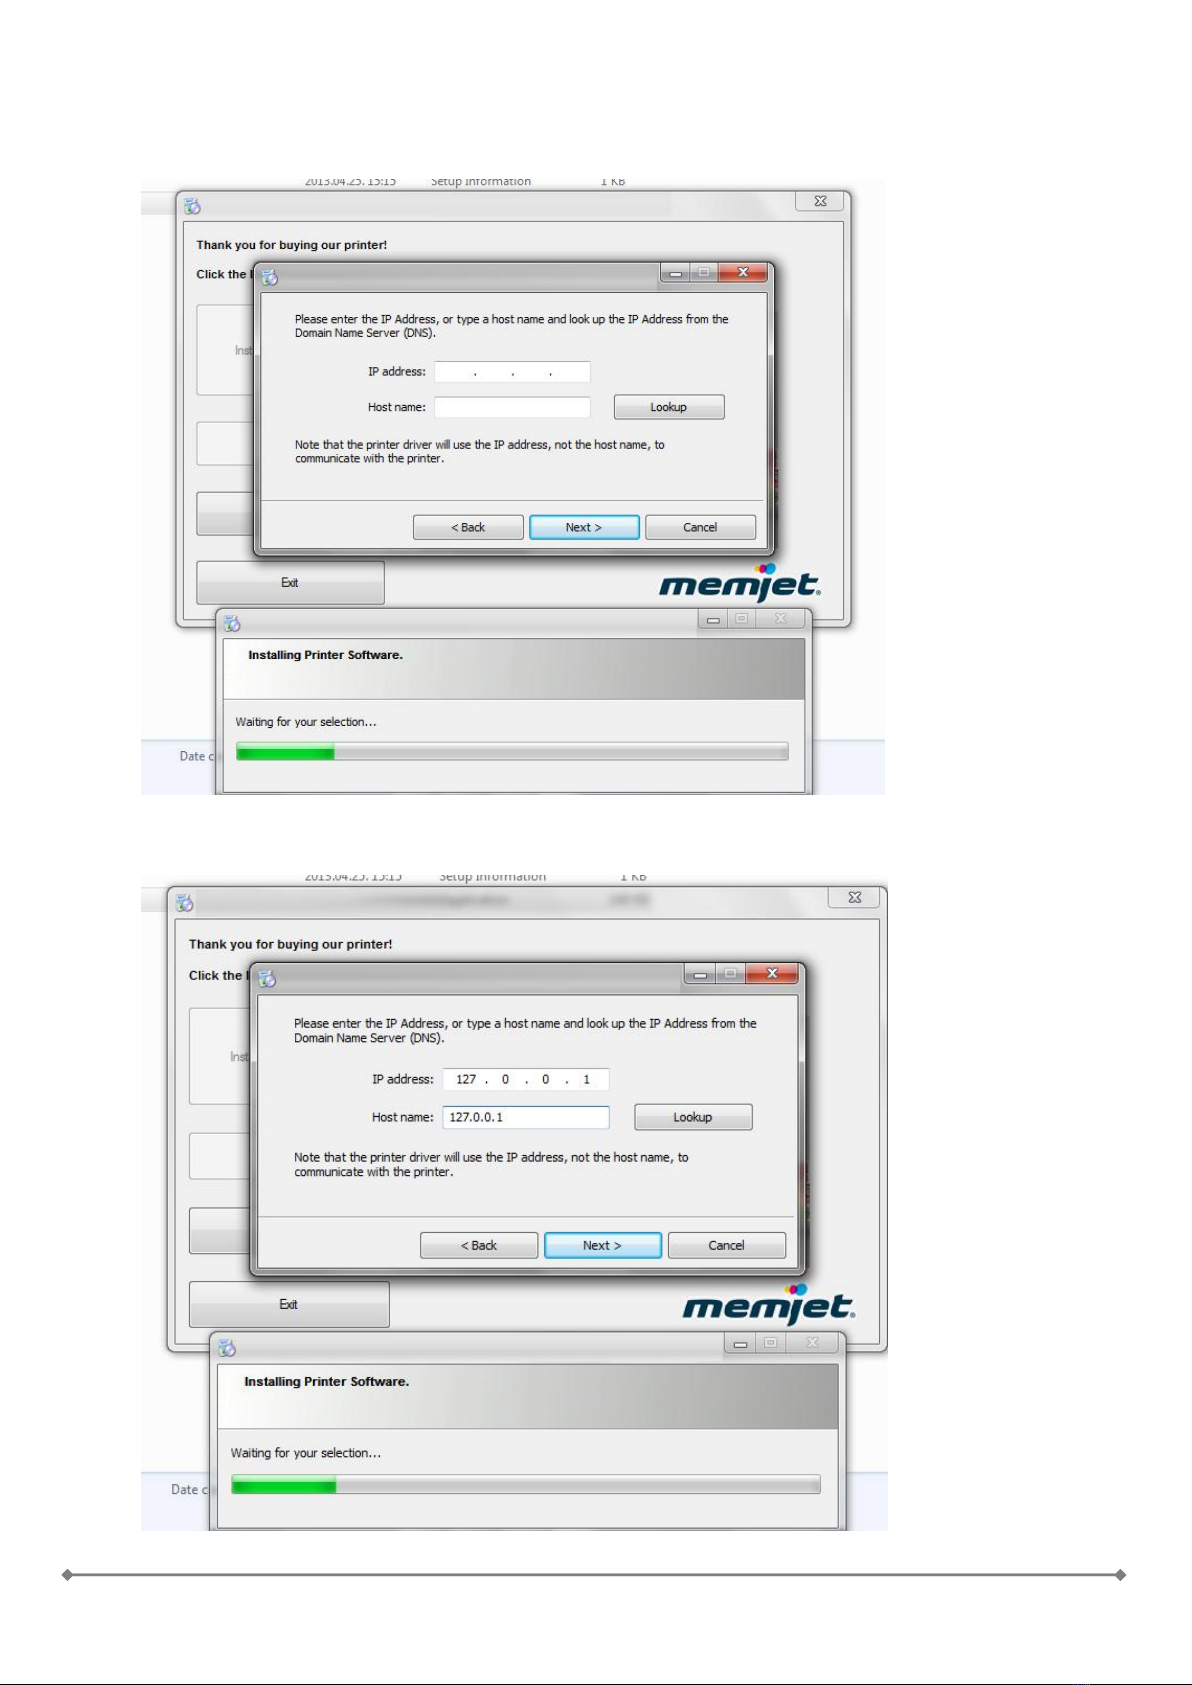
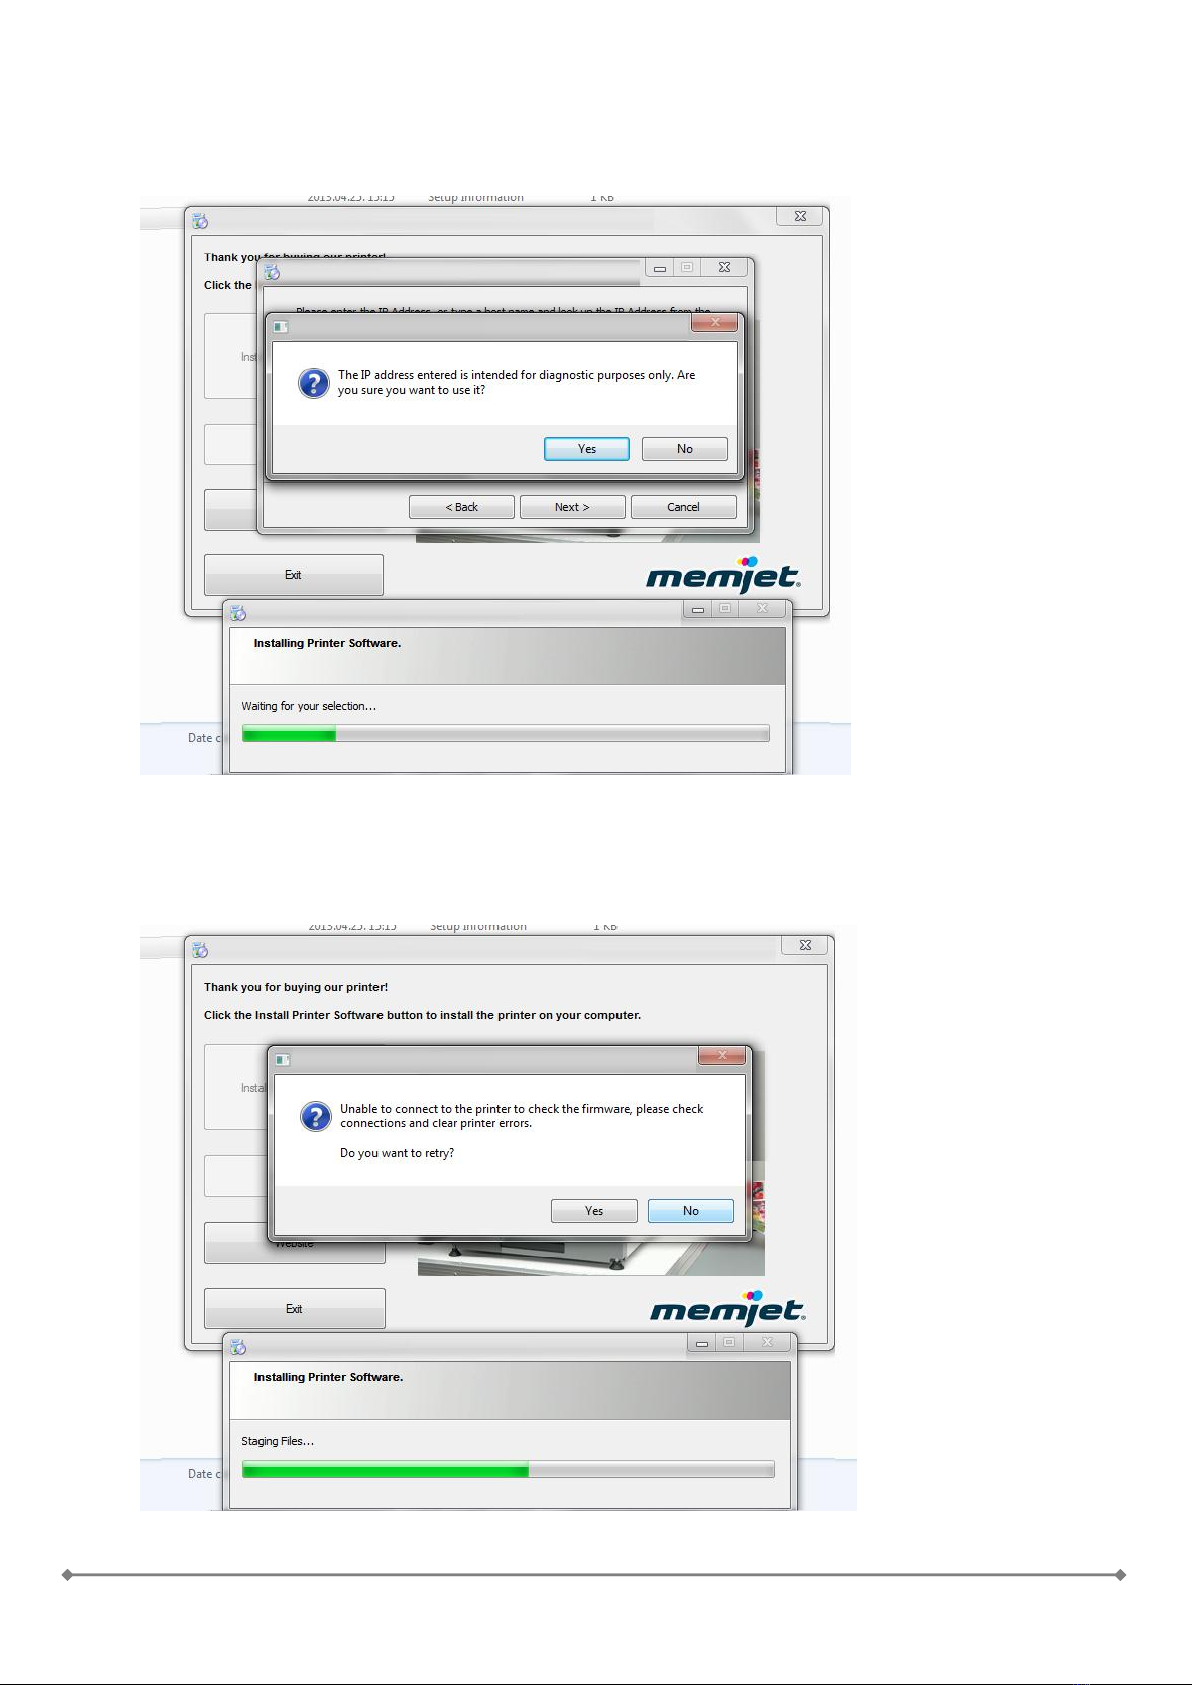
7. The installation will begin and a new window will pop-up to configure
the printer’s IP address.
8. Use the following IP address (127.0.0.1) settings and click ’Next’:
-6-
9. Another window will pop-up to confirm that you really wish to use the
given IP address. Click ’Yes’
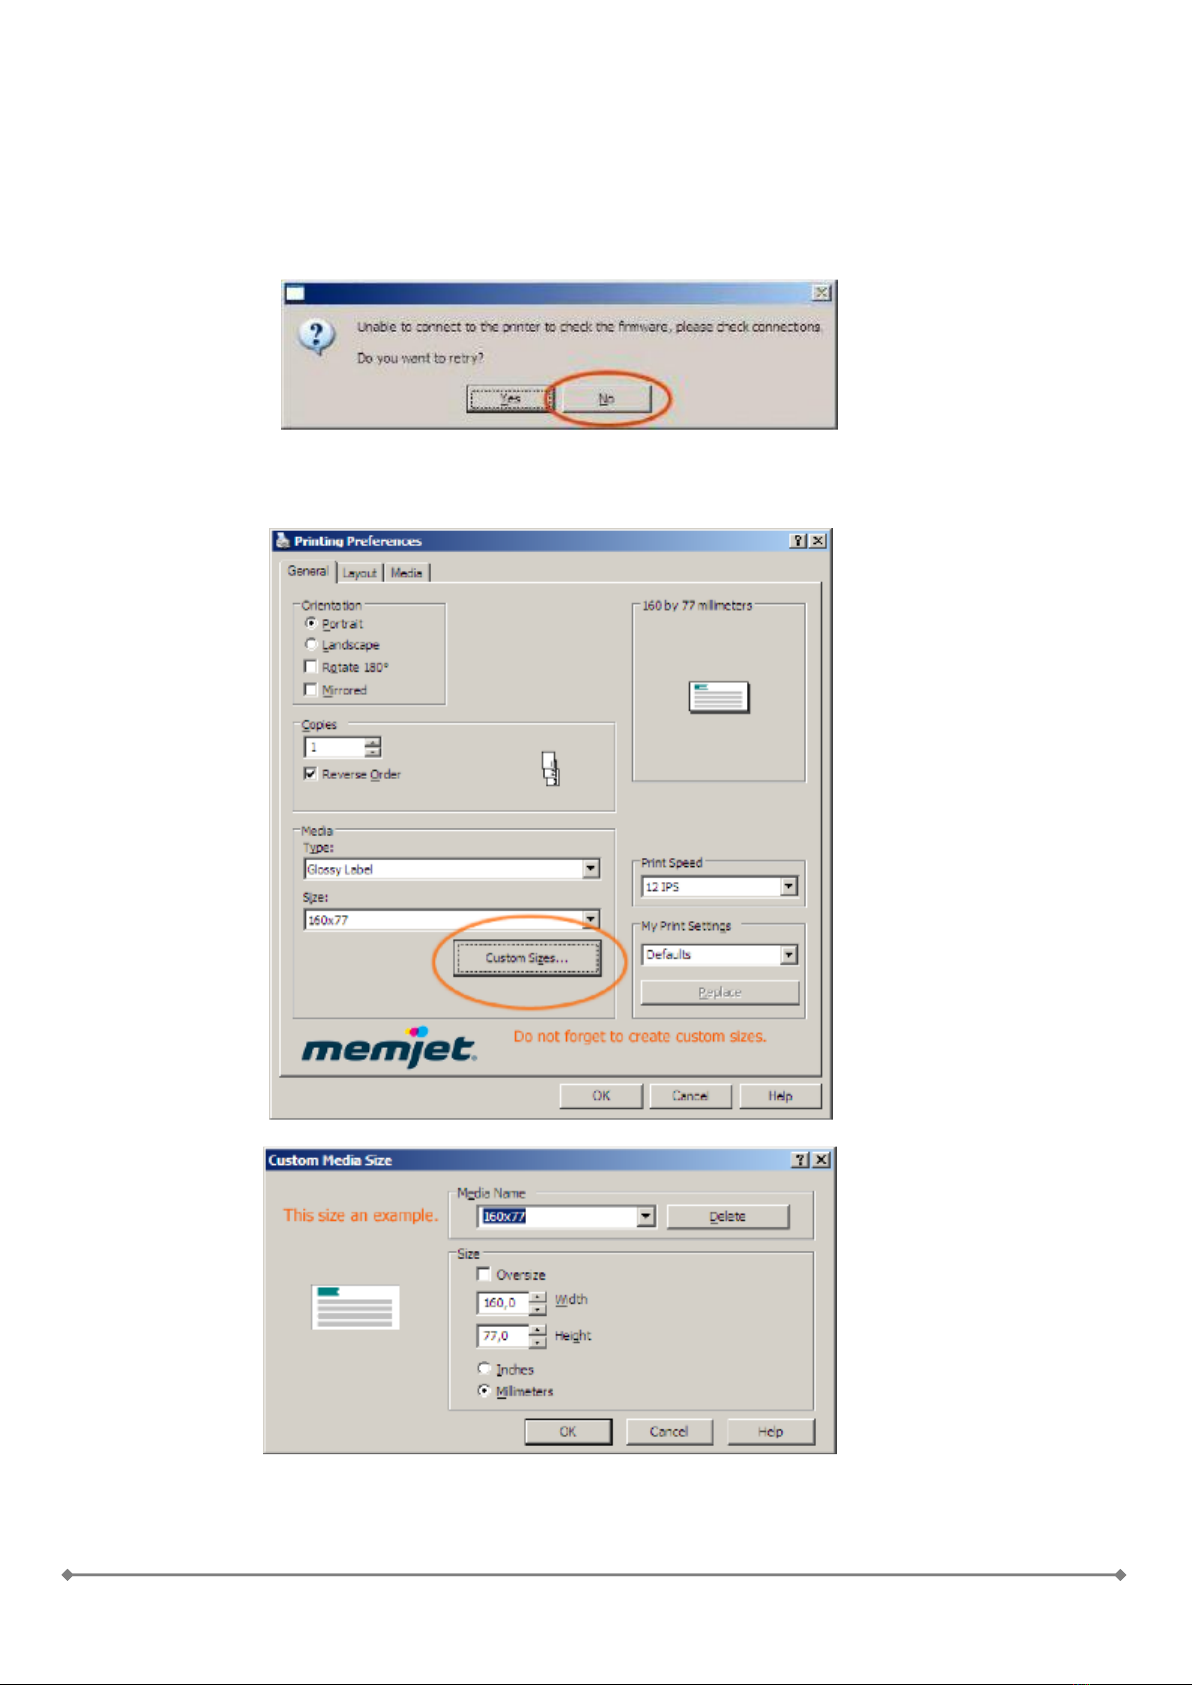
10. As the printer is not connected a window will appear stating, that the
software is unable to connect to the printer. It will ask, whether to
retry. Click ’No’
-7-
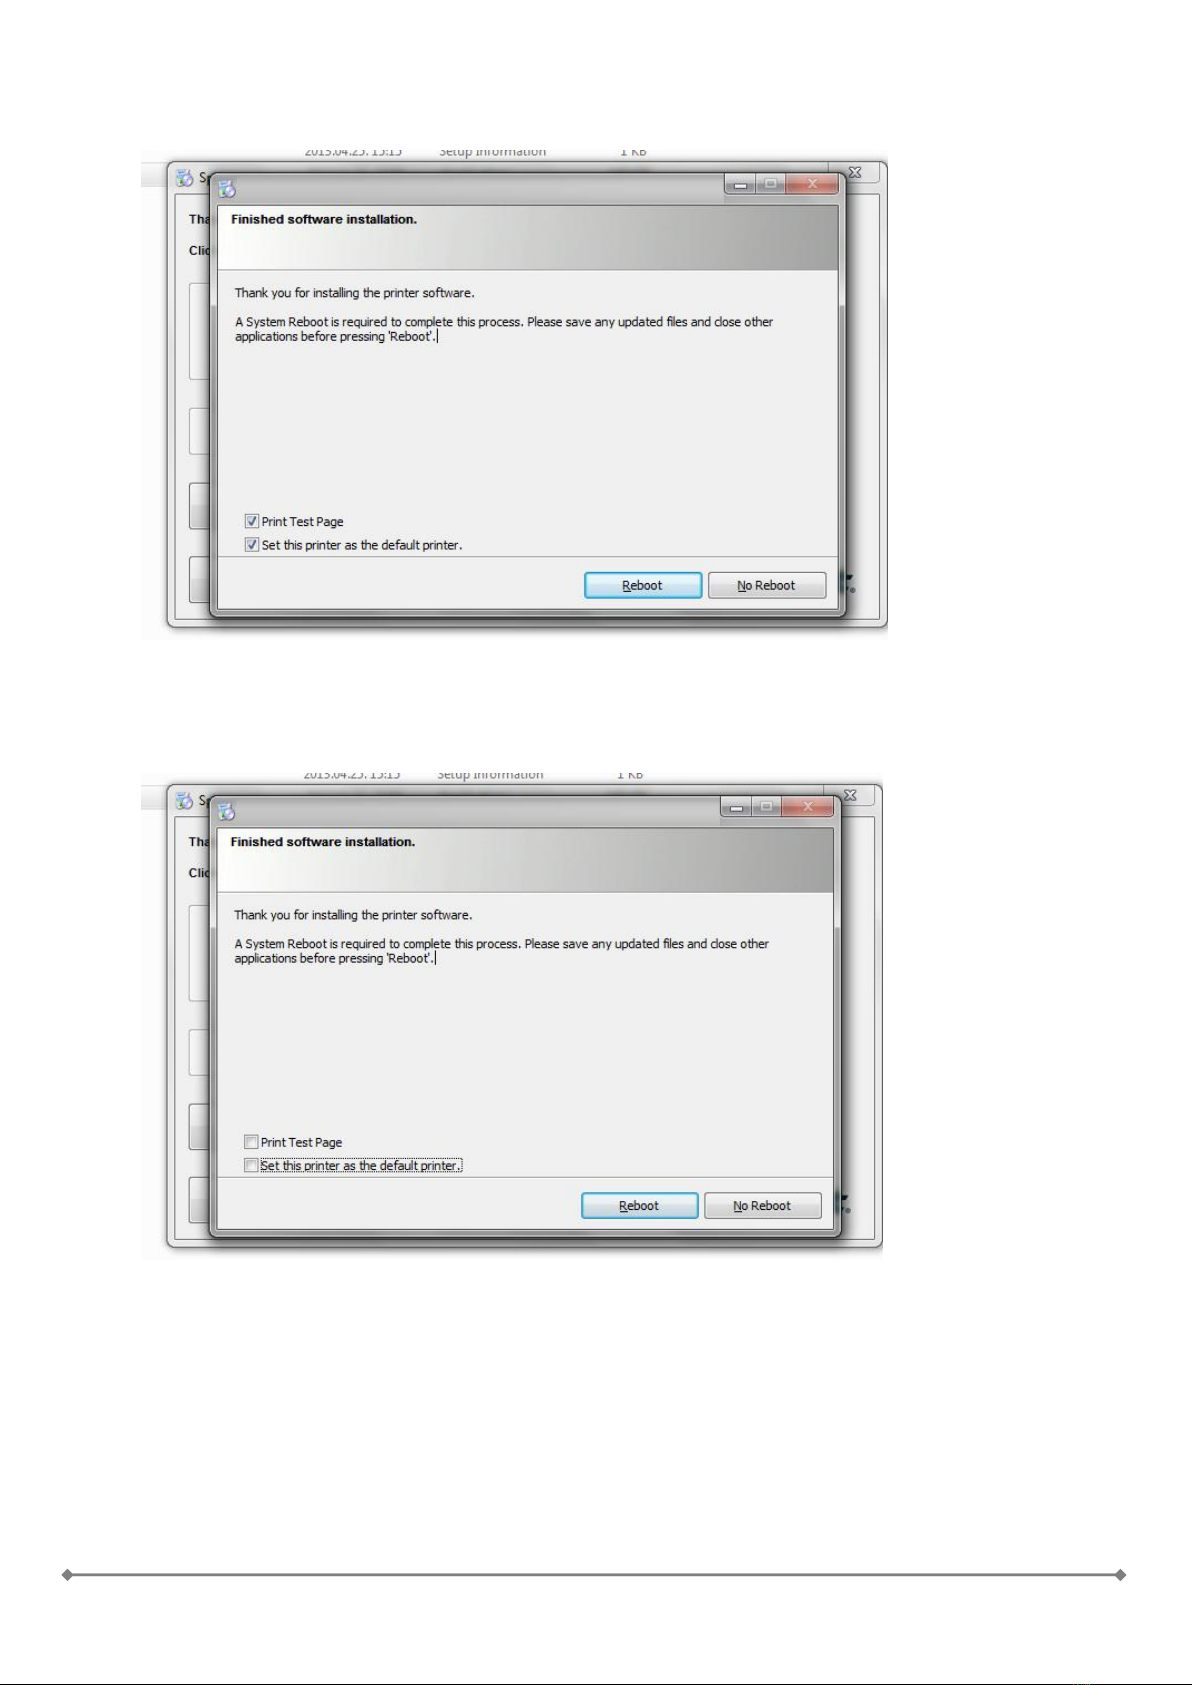
11. After that the installer will finish and a new window will appear.
12. At the bottom of this new window there are two checkboxes ’Print Test
Page’ and ’Set this printer as default’. Uncheck both boxes and click
’Reboot’. This will restart your computer.

-8-
13. After restart open the Windows Start menu and open the ’Devices and
Printers’ menu:
14. From your list of printers select the SpeedStar printer. Open the device
options with the mouse right button click and select ’Printer properties’

-9-
15. In the device properties window go to the ’Ports’ tab. In the list below you
will see that the printer is configured with a network connection
(IP_127.0.0.1 Universal TCP/IP Port). From the list select the USB001 –
Virtual printer port.
At the bottom the ’Enable bidirectional support’ checkbox also needs to be
unchecked! Otherwise the printer will not print any print jobs.
-10-
16. Click ’Apply’ and connect your printer to your PC with a USB cable. The
printer is ready to use and you can also access the printer Toolbox for
further changes, if required.
During setup the software may ask for 'Run firmware update'. Please select 'No'.
Before printing do not forget to create custom sizes when printing. See example here:
Installation finished.

-11-
Driver Specifications –Printer Preferences
General Tab
Orientation: Portrait(default),
Landscape, Rotate 180° and
Mirrored
Copies:
Lets you choose the number of
copies to be printed. If choose
the reverse order then the jobs
starts printing after the last page
is arrived.
Print Speed:
6IPS is the Best quality mode
with 1600*1600 dpi.
12IPS is the normal with
1600*800 dpi.
My Print settings:
Access your custom print
settings for various jobs that
you uploaded through the
„Media Profile Upload+ in the
Toolbox- Media type and
media size are defined by the
Speedstar
Series Driver and included during installation.
Field
Values
Media Type
•Default
•SpeedJet Glossy Label
•SpeedJet Matte Label
•SpeedJet Standard Label
•SpeedJet Vellum
Media Size
•Letter 8 ½ x 11 in
•Legal 8 ½ x 14 in
•Statement 5 ½ x 8 ½ in
•Executive 7 ¼ x 10 ½ in
•A4 210 x 297 mm
•A5 148 x 210 mm
•A6 105 x 148 mm
•4 x 6 in
•5 x 7 in
•5 x 8 in
•
•
•
•
•
4 x 10 in
4 x 11 in
4 x 12 in
8 x 10 in
Env. Monarch 3 7/8 x 7 ½ in
Env. Com 10 4 1/8 x 9 ½ in
Env. DL 110 x 220 mm
Hagaki 100 x 148 mm
100 x 150 mm
1 x 1 in
Print Speed (and
Quality)
•12 IPS
•6IPS
Color Section
•Color
•Monochrome
My Print Settings
Defaults
-12-
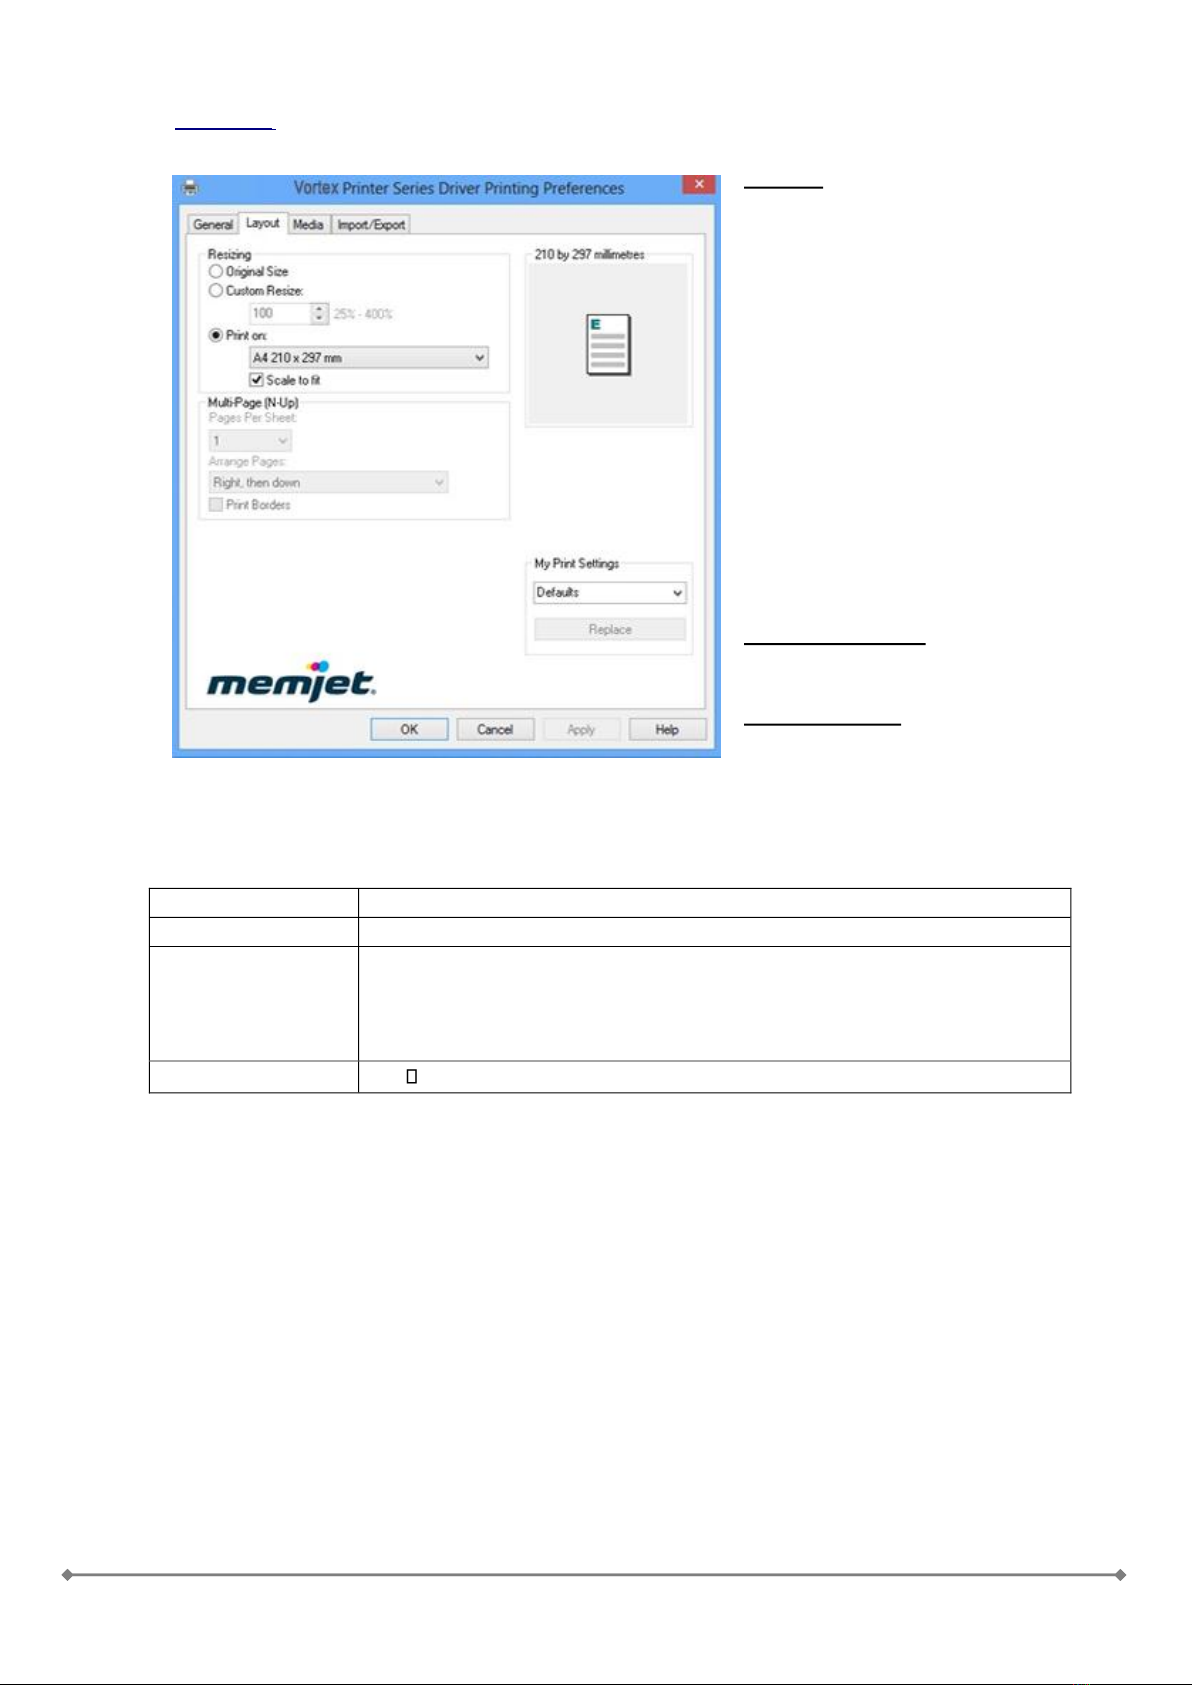
Resizing –
Lets you specify the
Original Size or
Custom Resize: lets you
resize the original as a % of
normal size. The printer will print
the document in the size you
selected regardless of the size of
the paper selected.
Print on: lets you specify
the particular size of paper that
you want to print on regardless of
the size of the original document.
Checking “Scale to Fit”
automatically resizes the
document to fit on the new page
size.
Multipage per N-UP
If would like to print more pages
on the same sheet
My Print Settings: Access your
custom print settings for various
jobs that you uploaded through the “Media Profile Upload” in the Toolbox.
Field
Values
Multi-Page (N-Up)
Pages per Sheet: 1,2,4,9,16
Arrange Pages
•Right, then down
•Down, then right
•Left, then down
•Down then left
My Print Settings
Defaults
Layout Tab
-13-
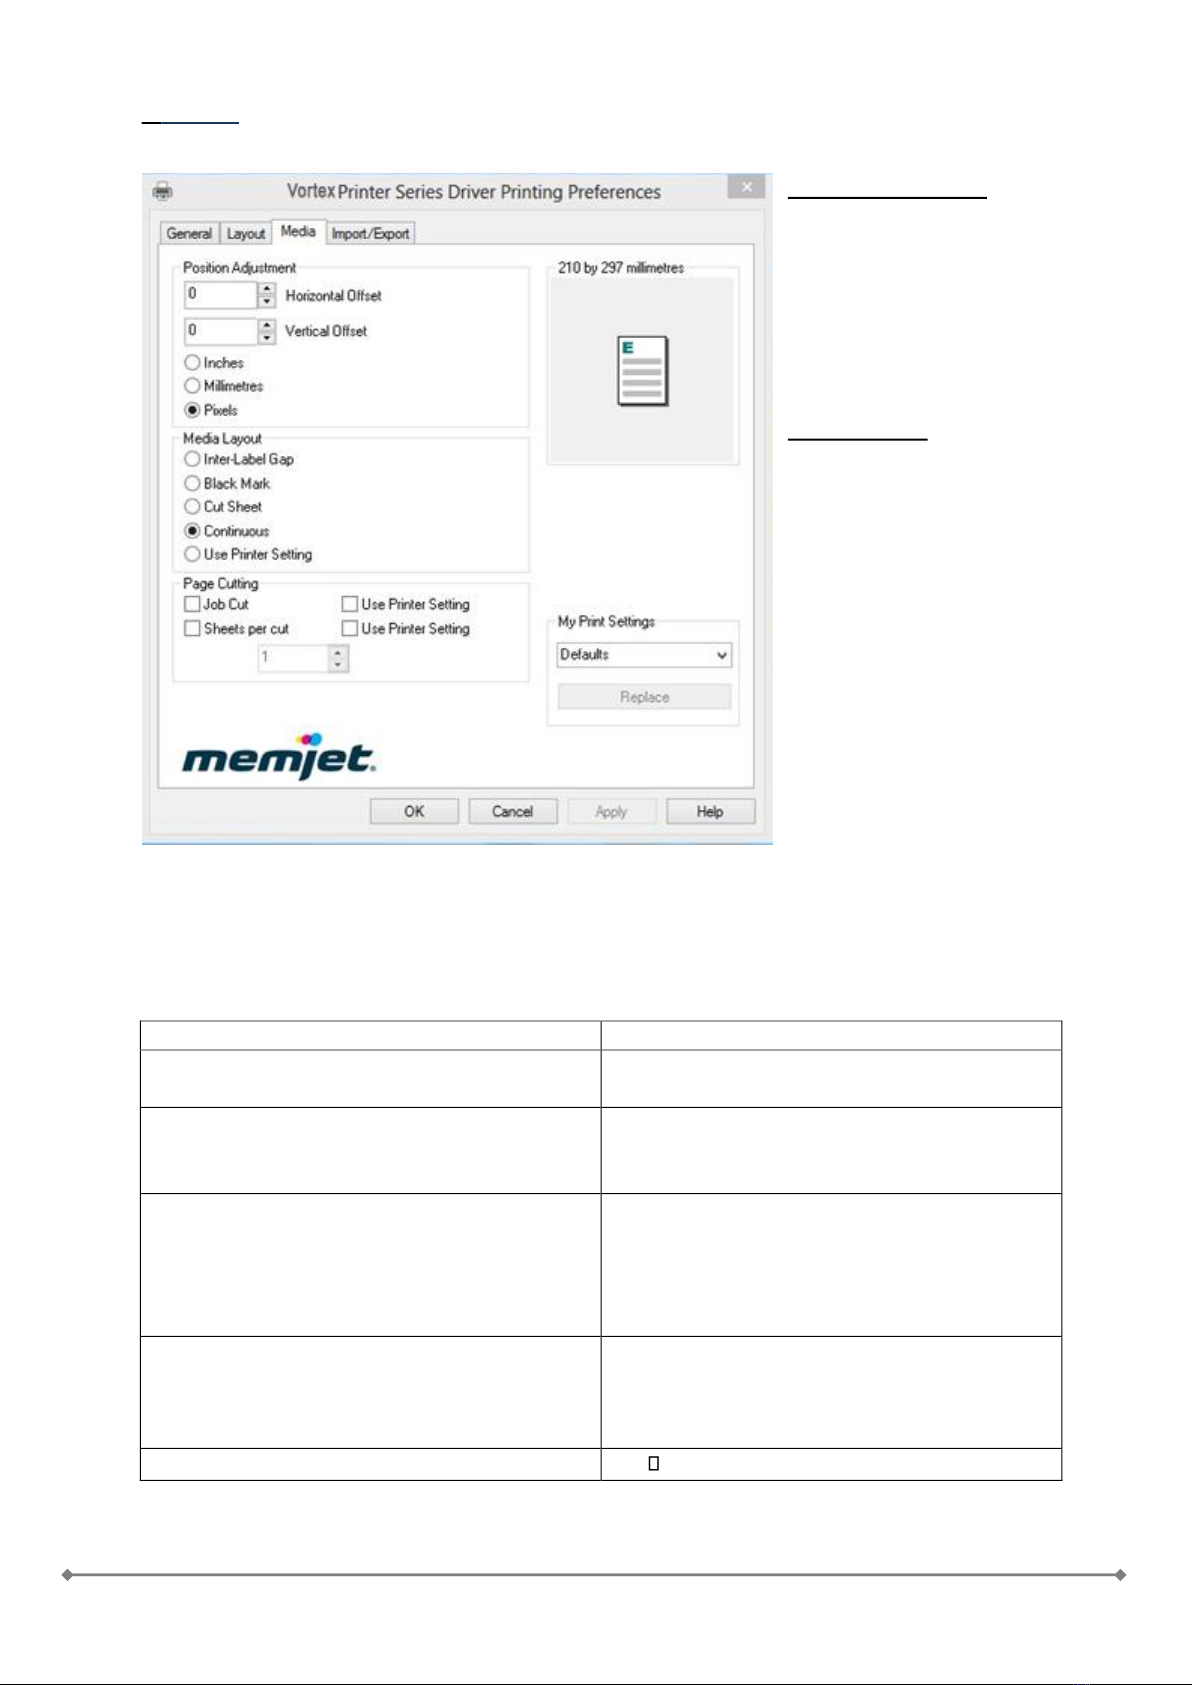
Media Tab
Printing Adjustments:
Allows you to make minor
positioning changes to the
print area in relation to the
media if needed.
NOTE: Only works on jobs
using less than the full
print area (less than 8.5"
wide).
Media Layout:
Possible to set what kind of
print jobs will arrive.
Inter-Label Gap: the media
has labels form
Blackmark: the media has
blackmark on the
DOWNSIDE
CUTSheet: cut after the
medium size
Continuous: in this mode the
machine will print fluently
Use printer setting: the
engine has some setting what
can check with the
nvm_getset command. For more information about the engine, please read the documentation.
My Print Settings: Access your custom print settings for various jobs that you uploaded through the
“Media Profile Upload” in the Toolbox.
Field
Values
Position Adjustment
•Horizontal Offset
•Vertical Offset
(offset units)
•Inches
•Millimeters
•Pixels
Media Layout
•Inter-Label Gap
•Black Mark
•Cut Sheet
•Continuous
•Use Printer Setting
Page Cutting
•Job Cut (cut at end of job
•Sheet per cut (number of pages before
cutting)
•Use Printer Settings
My Print Settings
Defaults
-14-
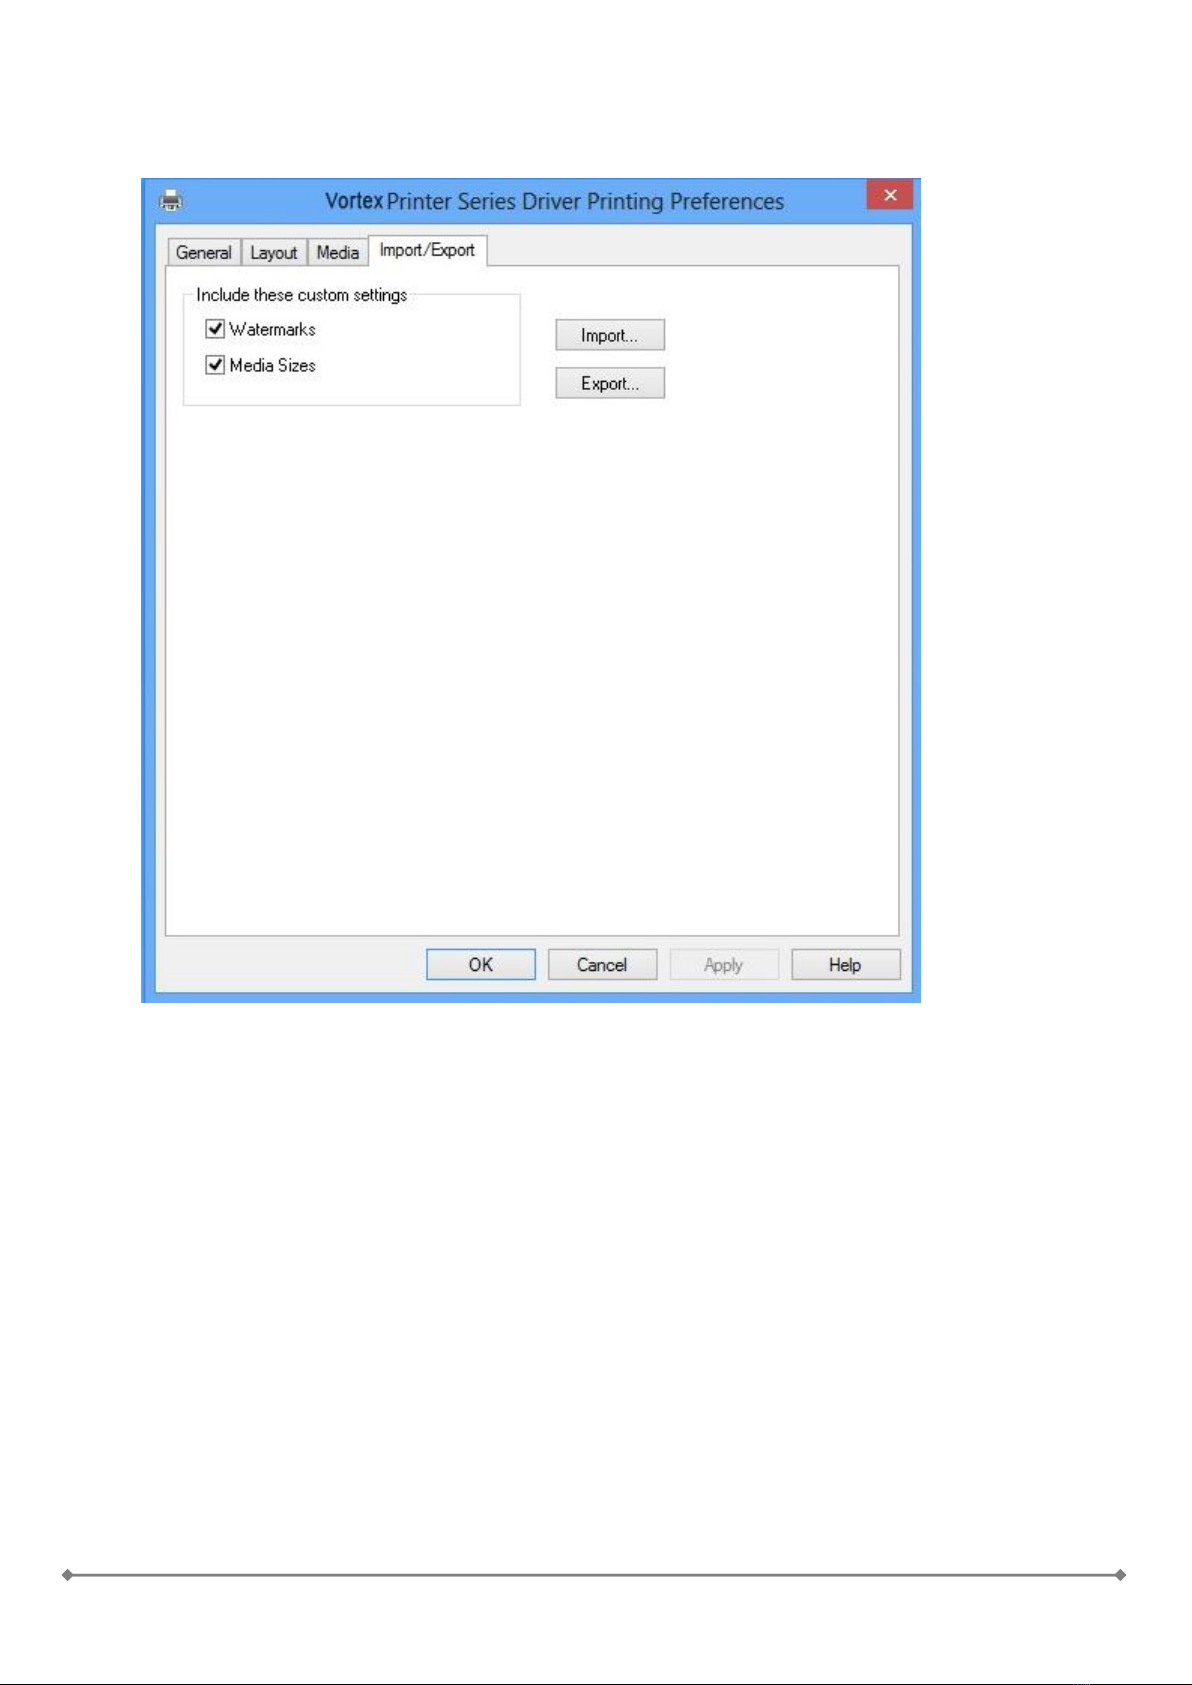
Import/Export

-15-
Label printing, generating print jobs.
For printing labels the operator has two options:
Print label from a labeling/graphical or other software
Print labels from print jobs.
Printing labels from software
Printing labels from any kind of software is quite easy. The operator just needs to set all
preferences within the Speedstar Series Driver (paper size, printing speed, number of copies,
etc.)
Printing labels from print jobs.
To help the whole process it is recommended to install the driver on the personal computer
then change the following:
1. Go to Start/Devices and Printer
2. Right click on Speedstar Series
3. Go to Printer Configuration
4. Go to Ports tab
5. Change port from TCP/IP to FILE (or Print to File)
Print jobs are pre-defined printjobs which could be usable in the future. The Speedstar
printer is only working with .PRN files which can be generated from the driver of the printer.

-16-
Buttons and Led signals
The first button from the left is the Power button, with an integrated Green led. The second button is
the Cancel / Clear Error with a Red led and the last one is the Feed/Unfeed with a Yellow led. The
power button only sorts two GPIO pins so it does not require any kind of software for its operation,
consequently it can be used to power on the engine during the manufacturing process even if there
is no firmware on the machine. The other buttons need the custom firmware components added by
the “V851R_CustomFW.tcl” to be running.
The integrated leds in the buttons are used to give further information about the printer’s current
state, these are listed in the Led Table below:
Led Table:
Green Led: Power Status
Led On: Engine ON
Led OFF: Engine OFF
Red Led: Cancel Job / Clear Error
Led Off: Normal operation-> Button press will Cancel current job
Led On: Error detected -> Button press will start the Clear Error procedure, further error info
can be denoted by the yellow led’s status described below
Led Blinking: Doing work (cancelling or clearing error)
Yellow Led: Feed / Unfeed
Button press will initiate Feed or Unfeed process depending on the current paper status of
the printer.
Led Blinking : Doing work (feeding on unfeeding)
Led On + Red Led On: Engine in Paperpath related error state, denotes Paperjam in 95% of
the time
Led Blinking + Red Led On: Engine in Paperpath_end_of_roll error state, so there is no paper
in the printer or it is unable to detect it
-17-
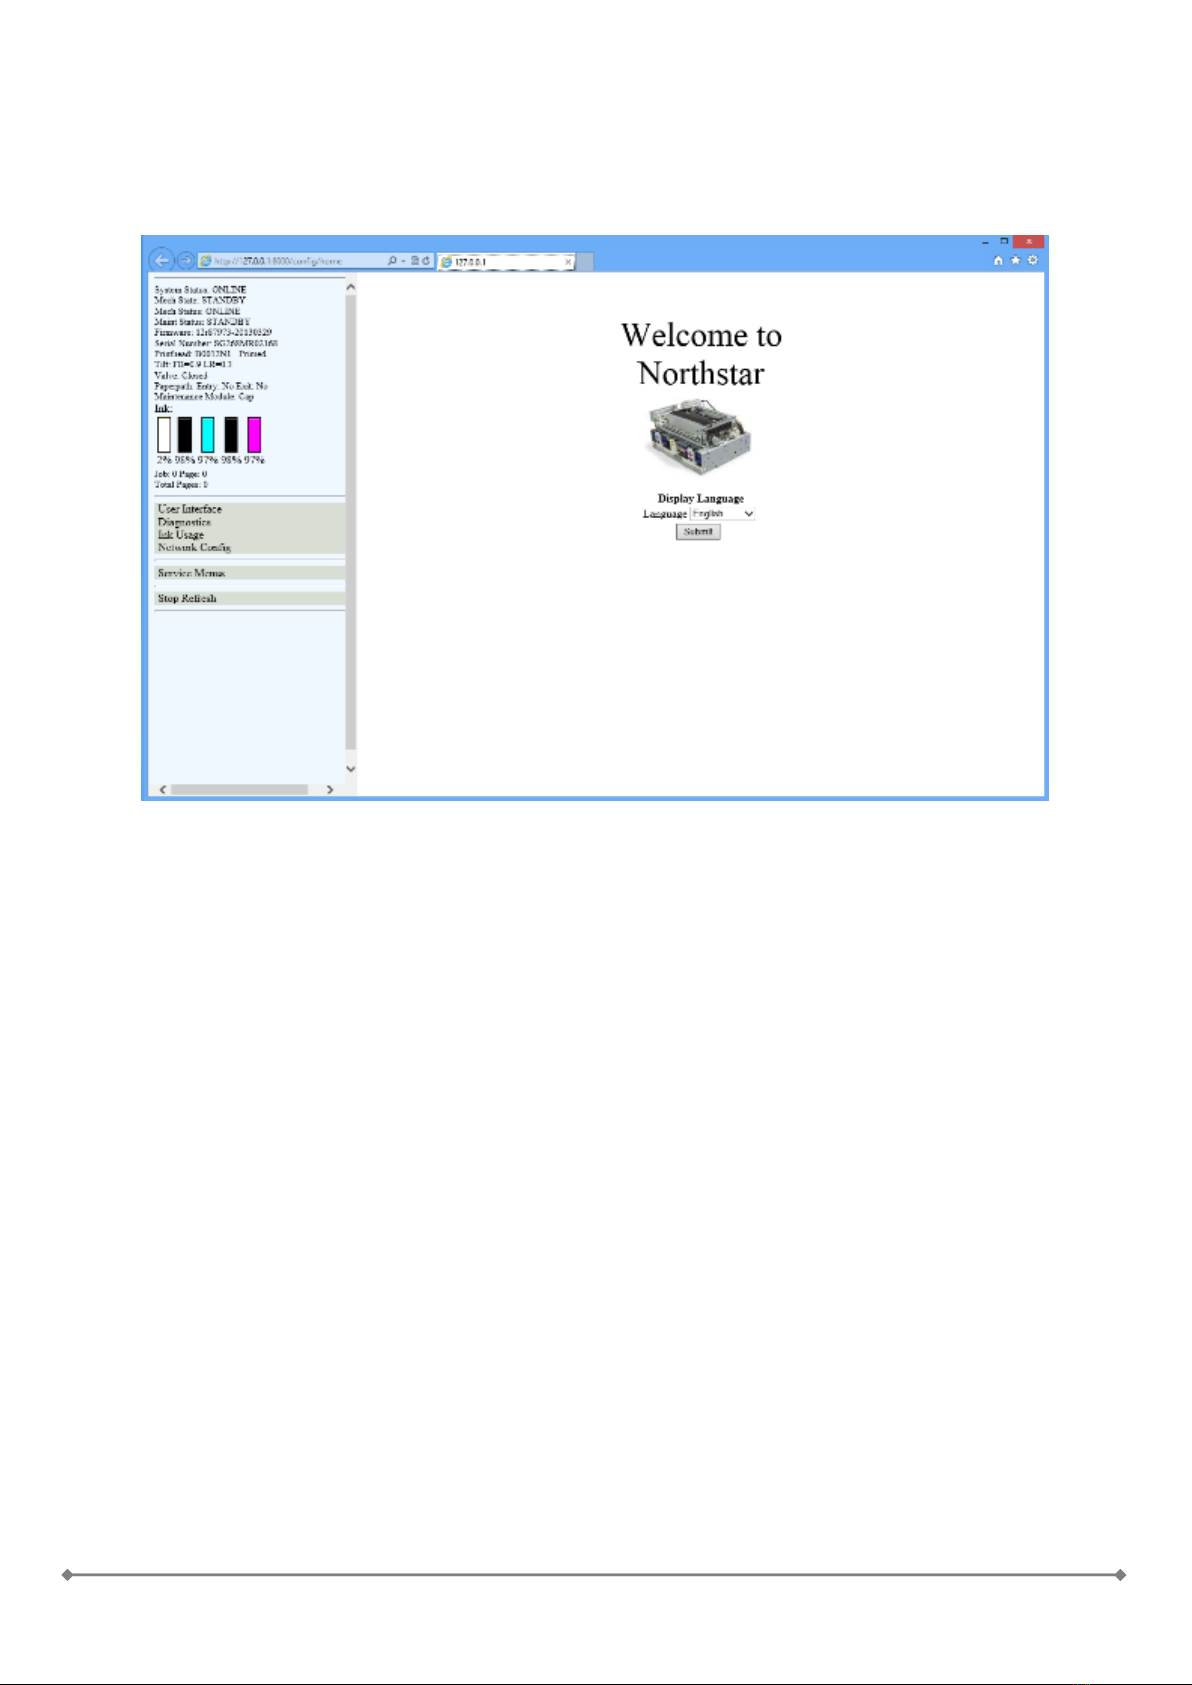
Toolbox
On the welcome screen you can set your language and see the left side the status panel of
the engine. If the engine is ONLINE then can print and do anything.

-18-
User Interface
Provides access to the Printer User Control screen. From this screen you can Clear Errors,
Cancel a Job, Reset the Job Counter, and Reset the Page Counter. You can also perform some
maintenance and operating tasks such as:
Clear Error: If the engine is in error status, possible to delete with this button. There are some fatal
state what can’t possible to delete.
Cancel job: delete the actual jobs. For example, if the machine is in error state and don’t delete the
jobs, then after cancel job will print out gain the missed jobs.
Reset job counter: this will reset the job counter
Reset Page Counter: this will reset the page counter
Wipe Printhead: this is a cleaning service issue. It will make a little clean on the printhead.
Circulate Ink: Purges air from the lines and primes the system after replacing the Ink Tanks or
Printhead Cartridge.
Release Printhead: Performs the same task as the Cover Release Button on the Printer. Pumps the
ink back into the Ink Tanks and opens the Printhead Cover to remove/install the Printhead
Cartridge.
System Deprime: Pumps the ink back into the Ink Tanks prior to replacing the Printhead Cartridge or
transporting the Printer.
Eject Maintenance Module: this will give out the service station. If would like to remove it then
use this at first. If not possible to use this button still can remove it manually.
Install Maintenance Module: this will call home the service station.
Wiper Inspection:
Shutdown: Turns the Printer off from your computer.
Pinch Media: this will feed the media.
Retract media: this will unfeed the media
Request Pause: send pause command
Clear Pause: clear pause state
KWS setting: 0, default, 7- IMPORTANT! if change the default settings then the printhead
loose his warranty!
Non Printing Mode:
Language:
Shutdown the Printer: this will shut down the engine. After this the printer needs to be switched off
too.

-19-
Diagnostics
From this screen you can see the current status of your Printer. You can also:
Print Sample Page –Prints type and color bands to check print quality.
Print Configuration Page –Shows the current configuration of the Printer including Firmware
Version, Network Connection, Printer Serial Number and more.
Print Diagnostic Page –Shows basic printer information, memory, Network Settings, Event Log and
RAM partitions.
Print Demo Page –Prints a 4-color sheet.
Print Color Bars
Print Ink Channels

-20-
Ink Usage
Allows you to monitor the estimated amount of ink left in each of the five Ink Tanks. You can
monitor ink use and consumption and schedule Tank changes (saving down-time during a print run.)
NOTE –Ink Usage only works when you start with a new Tank and leave it in the Printer
Table of contents
Other Memjet Printer manuals

Memjet
Memjet VIPColor VP750 User manual

Memjet
Memjet Printware iJetColor Press Service manual

Memjet
Memjet icube 1-3 Owner's manual

Memjet
Memjet VIP Color VP5 Series User manual

Memjet
Memjet AstroJet M1 User manual

Memjet
Memjet Quadient Rena MACH 6 User manual

Memjet
Memjet AstroJet M1 User manual

Memjet
Memjet C6010 User manual

Memjet
Memjet SFP User manual

Memjet
Memjet MACH 5 User manual


