Memjet VIPColor VP750 User manual

VIPColorVP750/VP700
UserGuide
Printer

2
Copyright©2020VIPColorTechnologiesPteLtd.Allrightsreserved.
Nopartofthisdocumentmaybephotocopied,reproduced,ortranslatedtoanotherlanguagewithoutthe
priorwrittenpermissionofVIPColorTechnologiesPteLtd.
Tradema rks
FirefoxisatrademarkoftheMozillaFoundation.
IntelandIntelCorearetrademarksofIntelCorporationintheU.S.and/orothercountries.
JavaandOracleareregisteredtrademarksofOracleand/oritsaffiliates.
Microsoft,Windows,andWindowsServerareregisteredtrademarksofMicrosoftCorporationintheU.S.A.
and/orothercountries.
MemjetisatrademarkofMemjetLtd.
Edition
Edition4,Feb2020
FCC
ThisdevicecomplieswithPart15oftheFCCrules.Operationissubjecttothefollowingtwoconditions:
(1)thisdevicemaynotcauseharmfulinterference,and(2)thisdevicemustacceptanyinterference
received,includinginterferencethatmaycauseundesiredoperation.

3
SafetyPrecautions
ElectricalShockHazard
Donotdisassembleanypartofyourprinter.Therearenouser‐repairableparts
insidetheprinter.Disassemblyofanypartoftheprinterwillvoidallwarranties.
FireHazard
Keeptheprinterwellawayfromallheatsourcesandflammablesubstances.
Switchyourprinteroffimmediatelyandunplugthepowercordfromthewall
socketifyounoticeanyofthefollowing:
• Smokerisingfromtheprinter.
• Anacridsmellcomingfromtheprinter.
• Sparksbeingemittedfromprinter.
Contactyoursupplierassoonaspossibl
e.
WARNING:HazardousMovingParts
Keepfingersandotherbodypartsawayfromtheprinter.
Installation
• Installtheprinteronaflat,levelsurface.
Theprintermustremainlevelatalltimes.Tiltingtheprintermaycauseundue
leakageofinkandaffectperformanceandprintquality.
• Avoidwidetemperaturevariations.
Installtheprinterinaprotectedlocationawayfromdirectsunlight,open
windowsoranyotherplacessubjecttotemperatureextremes.
PowerSupply
InputRating 100–240VAC,50/60Hz,3.6A
OperatingTemperature 15°Cto35°C
• AlwaysusethePowerbuttononthecontrolpaneltoturntheprinteroff.
Removingpowertotheprinterinanyothermannermaydamagetheprinter.
• Useonlythesuppliedpowercord.
Useofanyotherpowersuppliesorcordsmaydamagetheprinterandvoidyour
warranty.

4
PrinterUsage
• Ensureadequateventilationtotheprinter.
Blockingventilationopeningsaroundtheprintermaycauseittooverheatand
becomedamaged.
•Keepliquidsandheavyobjectsawayfromtheprinter.
Heavyobjectsmaywarptheoutershell,damagingtheprinter.Liquidsmay
discolorordamagetheskinand,iftheypenetrateit,maydamagetheprinter
beyondrepair.
• Useonlyauthorizedconsumables.
UseofanyprintheadotherthanauthorizedMemjettechnologyprintheadswill
damagetheprinterandvoidyourwarranty.Useofunauthorizedinksorink
cartridgesmaydamagetheprinterandwillvoidyourwarranty.
•Clearmediajamspromptly.
Toavoidfurtherproblems,promptlyattendtoallmediajams,aswellasany
othercauseofprinterfailure.
• Ifyouaremovingtheprinter,allowsufficienttimeafterinstallationforthe
temperatureandhumidityoftheinternalsoftheprintertoarriveatequilibrium
withthesurroundings.

5
Contents
SafetyPrecautions .........................................................3
UsingthePrinter.......................................... 7
PartsofthePrinter ........................................................ 8
UsingtheControlPanel .................................................... 9
SelectingtheSecurityLevel.......................................... 11
ChoosingLabelMedia.................................................... 12
LoadingLabelMedia ..................................................... 15
PrintingLabels .......................................................... 17
ChangeDefaultSettingsinPrinterDriver............................. 17
SelecttheMediaType ................................................ 19
AdjustAlignmentforPrinting........................................ 20
PrintingBorderless(Full‐Bleed)Labels .................................. 21
SavingCustomMediaSizeSettings....................................... 22
TurningOffthePrinter................................................... 23
ManagingPrinterSecurity(Administrator)............................... 25
EmbeddedWebServer(EWS)............................................ 27
OtherSupportTools..................................................... 36
PrinterMaintenance.....................................37
GuidelinesforPreventiveMaintenance................................... 38
ReplacinganInkCartridge ............................................... 39
CleaningthePrinthead................................................... 40
ReplacingthePrinthead ................................................. 41
Opening/ClosingtheClamshell........................................... 45
CleaningDebrisfromtheCuttingZone................................... 47
CleaningtheSensors..................................................... 48
ReplacingtheOutputModule/CutterAssembly........................... 49
ReplacingtheServiceStation ............................................ 53
ReplacingtheTransferWiperAssembly.................................. 56
ReplacingtheAerosolFanFilter ......................................... 58
ReplacingtheWasteInkAbsorber ....................................... 59
Troubleshooting.........................................61
IfErrorMessagesAppear................................................ 62
PoorPrintQualityorIncorrectPrintout .................................. 66
OtherPrintingProblems ................................................. 69
ClearingaMediaJam..................................................... 70
ClearingCloggedInkNozzles............................................. 70
AdjustingSensorSensitivity ............................................. 72
Appendix................................................73
SystemRequirements.................................................... 74

6
ConfigOptionsontheControlPanel ...................................... 76
PrinterInterface(GPIO)Specifications................................... 81
RegulatoryInformation .................................................. 83
WorldwideVIPColorTechnologiesContacts .............................. 86

UsingthePrinter7
Chapter 1
UsingthePrinter
PartsofthePrinter8
UsingtheControlPanel9
ChoosingLabelMedia12
LoadingLabelMedia15
PrintingLabels17
PrintingBorderless(Full‐Bleed)Labels21
SavingCustomMediaSizeSettings22
TurningOffthePrinter23
ManagingPrinterSecurity(Administrator)25
EmbeddedWebServer(EWS)27
OtherSupportTools36
NOTE: Oncetheprinterhasbeensetup,besuretochangethesecuritypasswords
usingtheEmbeddedWebServer(EWS).SeeChangePasswordsonpage25.
8UsingthePrinter
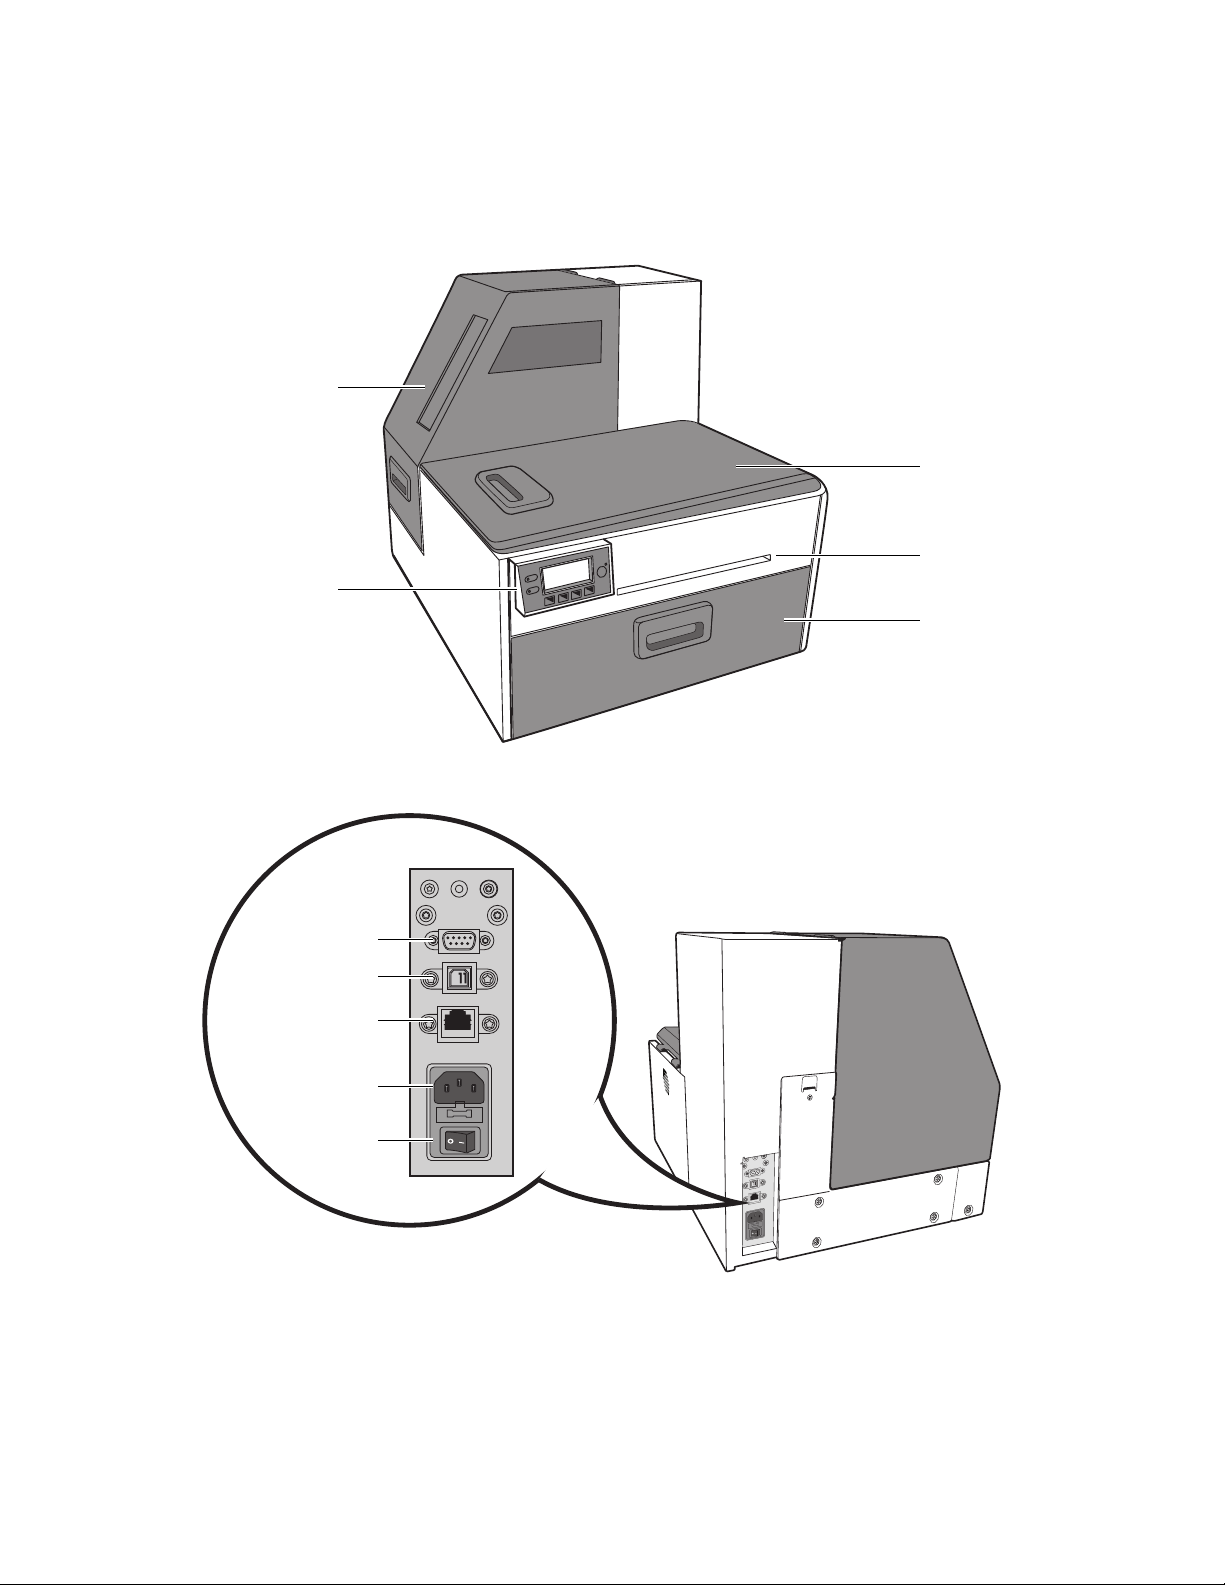
PartsofthePrinter
ControlPanel
TopCove r
FrontCover
OutputSlot
MediaCover
GPIOPort
USBPort
EthernetPort
PowerSocket
PowerSwitch
UsingthePrinter9
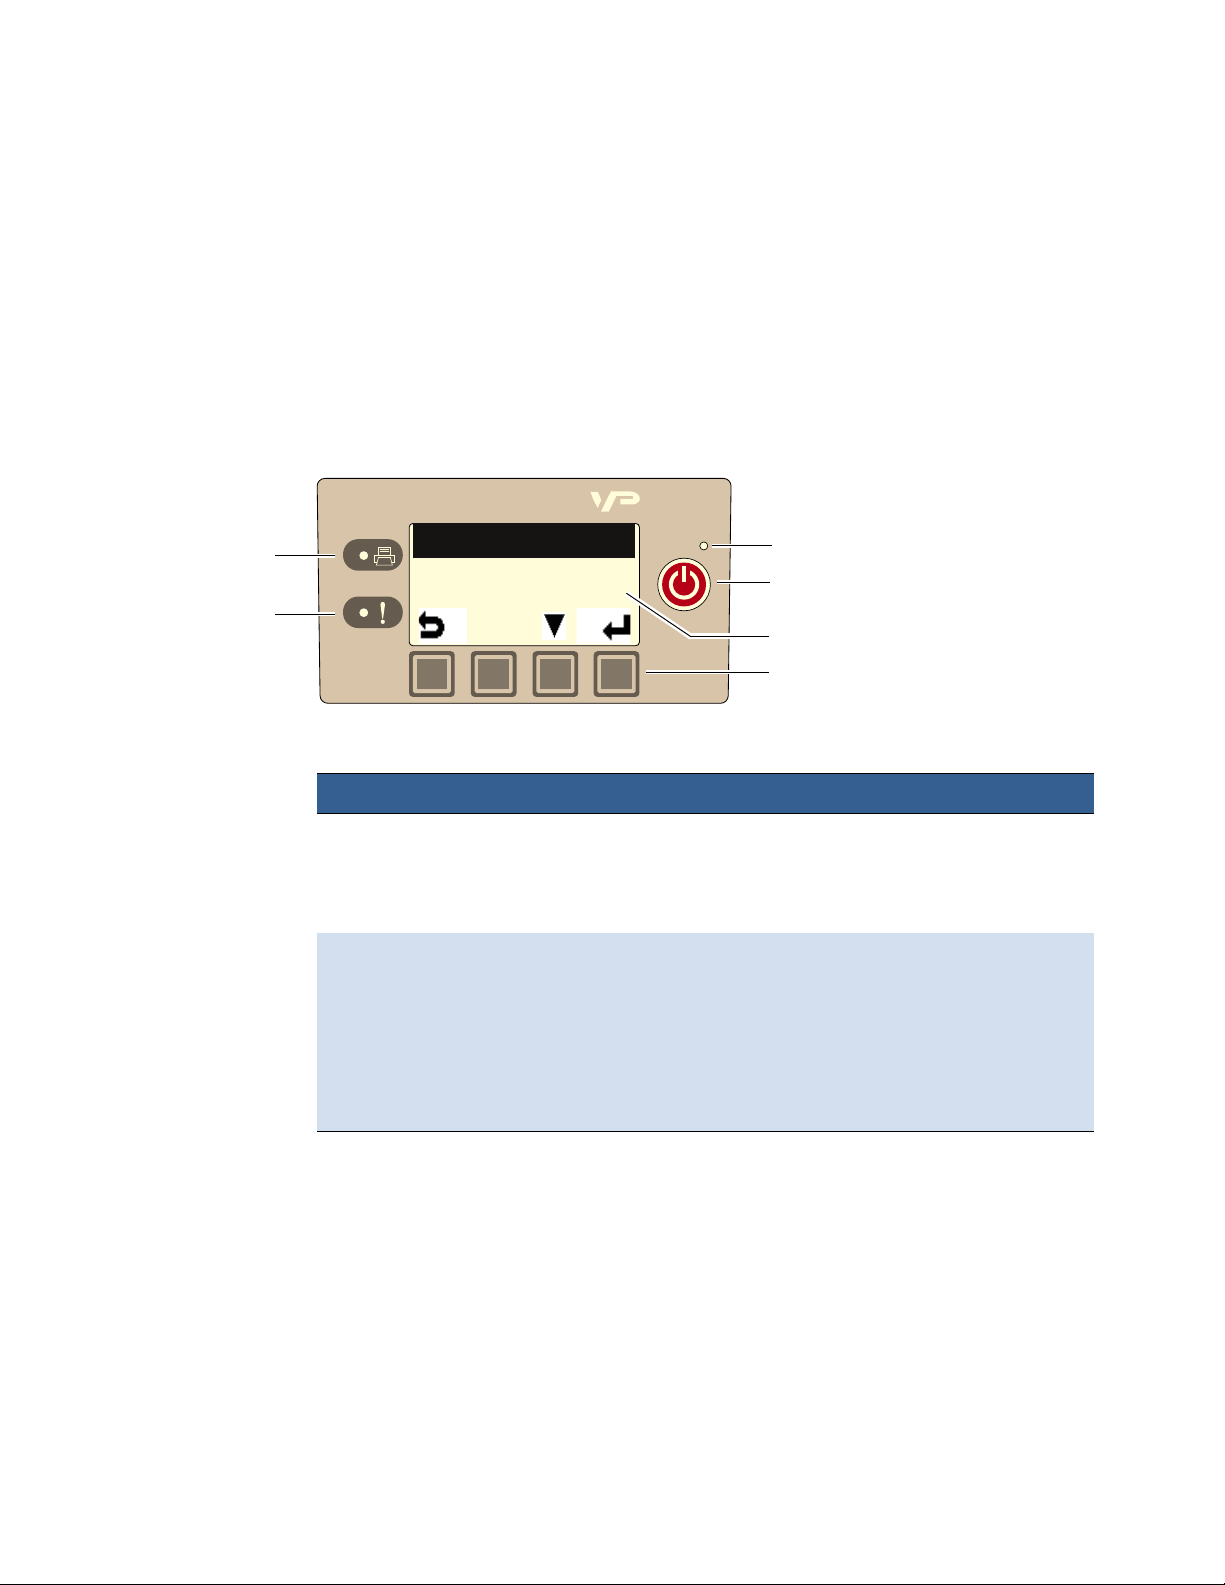
UsingtheControlPanel
Theprinterisreadytoprintwhenthecontrolpaneldisplays
Printer Online
.TheData
andStatusLEDstogetherwithmessagesindicatetheprinterstatusandany
potentialproblems(Table1).
Thecontrolpanelalsoshowstheestimatedlevelsoftheinkcartridges.Inthe
examplebelow,theyellowinkcartridgelevelisbetween25to50%.
Theiconsabovetheprinterbuttonsindicatetheirfunctions,whichchange
dependingonthecurrentoperation(seeTable2).
Table1PrinterLEDs
Printerisreceivingdatafromthecomputer.
Thereareprintjobsintheprintermemory.
Printer Online
PowerLED
PowerButton
PrinterButtons
DataLED
StatusLED
InkStatus
LED Description
DataLED
Blinking
On
StatusLED
Blinking • Printheadisbeingserviced,or
• Attentionneeded;amessagewillbedisplayed.(SeeIfError
MessagesAppearonpage62.)
On • Anerrorhasoccurred;amessagewillbedisplayed.(SeeIf
ErrorMessagesAppearonpage62.)

10UsingthePrinter
Theiconsabovetheprinterbuttonsindicatetheirfunctions(Table2).
• Whentheprinterisonline,press (
Config
)toaccesstheconfigurationmenus.
TheoptionsaredescribedinConfigOptionsontheControlPanelonpage76.
•Press and toscrollthroughthemenus.
• Press (
Select
)toselectanoptionorsetting.
• Press (
Return
)toreturntothepreviousmenu.
C
K2
M
K1
Y
Printer Online
CONFIGURATION
1. Setup
Table2PrinterButtons
Config AccesstheConfigurationmenus.
Up, Down Movethroughthemenuoptions.
Select Selectamenuoptionorconfirmasetting.
Return Returntopreviousmenu.
UnloadMedia Unloadthelabels.
Pause, Resume Pauseorresumeprinting.
IfprintingRolltoRoll,theprinterpausesfor10seconds,
thenprintsthenextpageandpausesagain.Itwill
continuetoprintandpause.
Cancel Cancelprinting.
Function Description

UsingthePrinter11
SelectingtheSecurityLevel
Bydefault,theprinterpowersupinsecurityLevel0(operator),whichdoesnot
allowchangestosomeprinterparameters.Tomakechanges,selectsecurityLevel1
(supervisor)andenterthepasswordprovidedbyyouradministrator.
SecurityLevel2givesadministratoraccesstoallfunctions.
C
K2
M
K1
Y
Printer Online
CONFIGURATION
1. SETUP
SETUP
2. SECURITY
SECURITY
2. Level 1
(Config)
(Select)
(Select)
(Select)
ENTER PASSWORD
Press , toset.
Press tomovetonextdigit.
1. Onthecontrolpanel,select (
Config
)
SETUP
SECURITY
Level 1
or
Level 2
.
2. Enterthe3‐digitpassword.
3. Press toreturntothemainmenu.

12UsingthePrinter
ChoosingLabelMedia
Ensurethatthelabelmediameetstherequirementsfortheprinter(seeTable3and
thefollowingillustrations).Alwaystestthemediafirsttoseeifitmeetsyour
expectations.Tocheckthecompatibilityoflabelmedia,printthebarcodestestpage.
Table3Mediaspecifications
Mediatype Gloss,semi‐gloss,andmatte.
Labelwidth 2.0”to8.5”(50.8mmto215.9mm)
Labellength Continuous/RolltoRoll:Maximum48”(1.219m)
RolltoCut/PrintandPresent:Maximum48"(1.219m)
Labelthickness Maximum0.01”(0.3mm)(includingliner,ifany)
Minimum0.005”(0.13mm)
Coresize 3”(76.2mm)
Rolldiameter Maximum8”(203.2mm)
Printmode
Detection
Coatingon
JI
Minimum Maximum
I 3.0”(76.0mm)cardboardcore 3.0”(76.0mm)cardboardcore
J N/A Upto8.0”(203.0mm)
theoutside
Figure1MediaRoll
MediaTypeandDimensions
MediaHandling
• RolltoCut
•PrintandPresent(non‐peel)
• RolltoRoll
•Gap
•Continuous
• Blackmark

A
BC
D
E
Minimum Maximum
A 0.125”(3.0mm) 0.3”(8.0mm)
B 0.0 2.0”(50.8mm)
C 0.0 0.4”(10mm)
D 2.0”(50.8mm) 8.5”(216.0mm)
E 2.0”(50.8mm) 40.0”(1016.0mm)
E
G
H
D
Minimum Maximum
D 2.0”(50.8mm) 8.5”(216.0mm)
E 2.0”(50.8mm) 40.0”(1016.0mm)
H 1.0”(25.4mm) 8.5”(216.0mm)
G 0.125”(3.0mm) 0.3”(8.0mm)
Reversesideoftagstock
UsingthePrinter13
Figure2Gap(Transmissive)Media
Figure3BlackMark(Reflective)Media

14UsingthePrinter
PrintTestPage
Load4”x4”orlargerlabels(withinter‐labelgaporcontinuous).
C
K2
M
K1
Y
Printer Online
CONFIGURATION
2. MAINTENANCE
MAINTENANCE
1. PRINT TEST PAGE
PRINT TEST PAGE
1. Barcodes
(Config)
(Select)
(Select)
(Select)
SampleBarcodesTestPage
1. Onthecontrolpanel,select (
Config
)
MAINTENANCE
PRINT TEST PAGE
Barcodes
.
2. Verifythefollowingonthetestpage:
• Labelisprintedinblackwithnoothercolorvisible.
• Thetextislegible.
• Thebarcodesarereadable.
• Noinksmear,colormixorstreaks.
UsingthePrinter15
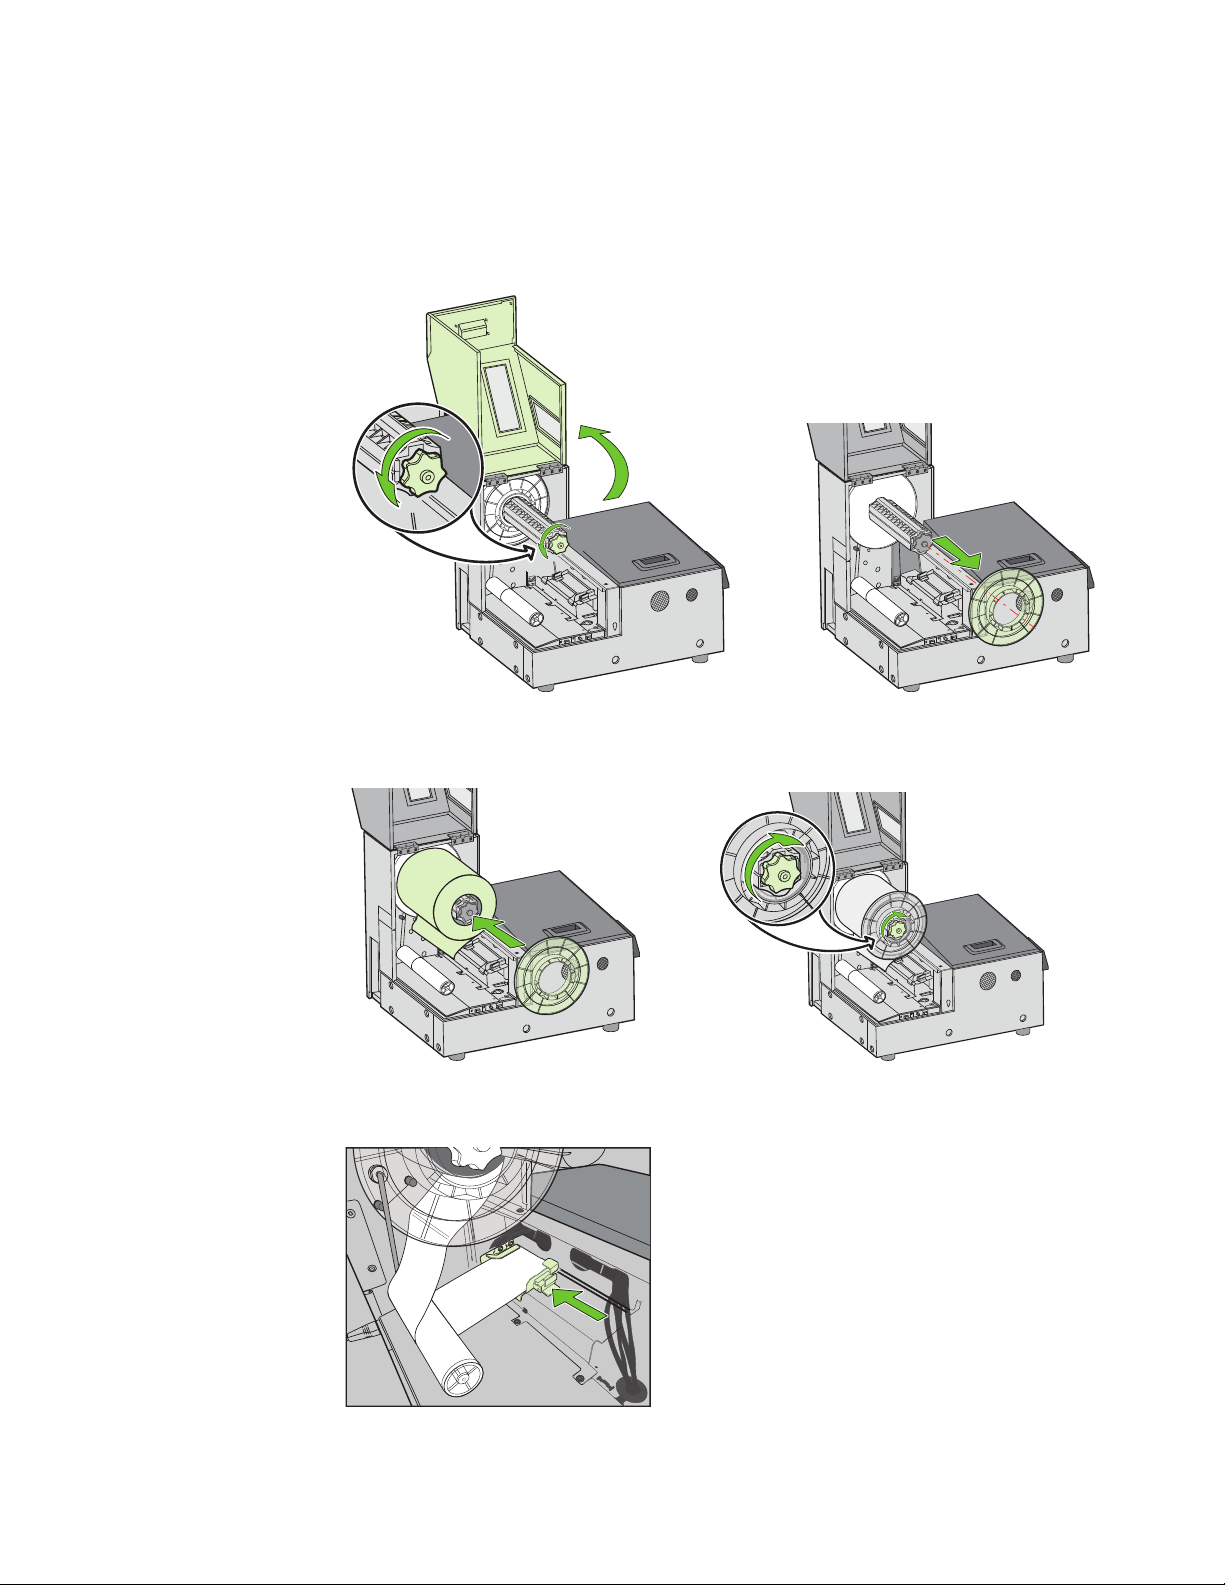
LoadingLabelMedia
1. Openthemediacover.Loosentheknobandremovetherollcover.
2. Loadthemediaroll.Replacetherollcover,withtheflatsideagainstthemedia
roll.Thentightentheknobfully.
3. Feedthemediaunderthearmandintothemediafeedslot.Waitfortheprinter
toloadthemedia.Thenslidethemediaguidetotheedgeofthemedia.

16UsingthePrinter
4. Closethemediacover.

UsingthePrinter17
PrintingLabels
Theprinterisreadytoprintwhenthecontrolpaneldisplays
Printer Online
.
1. SelectthePrintcommandfromyourapplication.
2. SelecttheprinterandclicktheSetup,Propertiesorsimilarbutton.
Theprintsettingsdisplayedarethedefaultsthatweresetintheprinterdriver.
3. Changetheprintsettingsifneeded.
NOTE: Ensurethemediasettings(e.g.labelsize)matchthemedialoadedinthe
printer.
4. Printthedocument.
Anychangestothesettingsonlyapplytothecurrentprintjob.Onceyouexitthe
application,thechangesmaybelost.Makethechangesintheprinterdriverifyou
wishtokeepthesettingsasthedefaultforallprintjobs.
ChangeDefaultSettingsinPrinterDriver
Toselectthedefaultprintsettingsthatwillbeusedforallprintjobs:
1. FromtheWindowsStartmenu,selectDevices and Printers1.
2. Right‐clicktheprinter,andselectPrinting preferences.
Theprintingpreferences(Figure4)aredescribedinthefollowingpages.
3. MakethechangesandclickOKtosave.
1. ForWindows7.ThestepswilldifferforotherWindowsversions.

18UsingthePrinter
Figure4PrintingPreferences
Printpageswithoutanygap(continuousmediaonly)
Renderentiredocumenttodiskbeforesendingto
theprinter.Selectthisoptioniflabelsareskipped
whenprintinglargefiles.
Sheetspercut–Cutafterprintingthespecifiednumber
oflabels.
PrintandPresent–Print,cut,andpresentlabel.Remove
thelabeltocontinueprinting.
RolltoRoll–SelectRolltoRollifarewinderisused.
Choosewhethertoprintthefirstlabelorprintmultiple
jobswithoutcutsin‐between.
Adjusthorizontalandverticalprintposition.
SeeAdjustAlignmentforPrinting.
SelecttheMediaTypethatmatchesthemedia
loadedintheprinter.
Displayaprintconfirmationmessagepriortoprinting.
Usethesettingsonthe
printercontrolpanel.
Adjustthevariousoffsets
Selectthisoptioniflabelsareskippedwhen
printingsmalllabels.
Selectthisoptiontoremoveprintartifactswith
imagefilewithmultiplelayers.

UsingthePrinter19
SelecttheMediaType
Selectingthemediatypethatmatchesthemediayouareprintingonwillusually
givethebestprintresults.
PlainPaper Plain(uncoated)paperandlabels.
MatteCoatedLabel Mattecoatedlabels.
PremiumMatteCoated
Label
Mattecoatedlabels.Thisoptionusesmoreinkfor
bettercolor.
GlossyLabel Glossylabels.Thisoptionoptimizesprintqualityanddry
time.
PremiumGlossLabel Glossylabels.Thisoptionusesmoreinkforbettercolor.
SelectthisMediaType: Whenyouareprintingon:

20UsingthePrinter
AdjustAlignmentforPrinting
Alwaysprintafewtestlabelstocheckthealignmentoftheimage.Iftheimageisnot
centered,adjustthetopofformand/orleftedgeoffsetsontheMediatabofthe
printerdriver.
ApositivevalueforTop of Formadjuststheimagetowardsthetopofthelabel.
ApositivevalueforLeft Edgeadjuststheimagetowardstheleftofthelabel.
+–
–
+
Offsetsettings
This manual suits for next models
1
Table of contents
Other Memjet Printer manuals

Memjet
Memjet C6010 User manual

Memjet
Memjet AS-1180C User manual

Memjet
Memjet Printware iJetColor Press Service manual

Memjet
Memjet icube 1-3 Owner's manual

Memjet
Memjet SFP User manual

Memjet
Memjet MACH 8 User manual

Memjet
Memjet Quadient Rena MACH 6 User manual

Memjet
Memjet VIP Color VP5 Series User manual

Memjet
Memjet AstroJet M1 User manual

Memjet
Memjet MACH 5 User manual


