Memjet SFP User manual

Memjet SFP
Windows User Guide
23-9-1-5-4-4_Win v4.2
28 July 2011

28 July 2011 - v4.2
Confidential.
Page 2 of 110
Read this before you go any further
The following symbols are used in this document to highlight warnings, potential hazards, or
best practice procedures, and have the following meanings:
Danger – potential risk of personal injury, including electrical shock, burns etc.
Warning – potential risk of damage to printer and/or surroundings.
Important – what you need to know to get the best from your printer.

Safety
28 July 2011 - v4.2
Confidential.
Page 3 of 110
•Safety
Risk to personal safety
Do not disassemble any part of your printer. Electrical shock hazard.
There are no user-repairable parts inside your printer. Disassembly of any part of your printer
will void all warranties.
Keep your printer well away from all heat sources and flammable substances. Fire hazard.
Switch your printer off immediately and unplug the power cord from the wall socket if:
•you see smoke rising from your printer
•you notice an acrid smell coming from your printer
•you see any sparks being emitted from your printer.
Contact your supplier as soon as possible.
Risk of damage to printer or surroundings
Install your printer on a flat, level surface
Your printer must remain level at all times. Tilting the printer may cause undue leakage of ink
and may damage your printer.
Use the Power button on your printer to power it down
Removal of power to your printer in any other manner may damage your printer.
Switching off your printer
Do not switch off your printer if any of your ink tanks have been removed. Always ensure all
the ink tanks are installed before doing so. Failure to do so may compromise ink delivery in
your printer.
Ensure adequate ventilation to your printer
Blocking ventilation openings around the printer may cause your printer to overheat and
become damaged.
Keep liquids and heavy objects away from your printer
The outer shell is plastic. Heavy objects may warp it, damaging your printer. Liquids may
discolor or damage the skin and, if they penetrate it, may damage your printer beyond repair.
Use only the supplied power supply and cord
Use of any other power supplies or cords may damage your printer and void your warranty.
Use only authorised consumables
Use of any printhead other than those authorised Memjet technology printheads will damage
your printer and void your warranty.
Use of unauthorised inks or ink tanks may damage your printer and will void your warranty.
Use only appropriate paper
Inappropriate paper may cause damage to your printer. In particular, you should not use:
•transparencies
•kinked, curled or cockled paper
•paper which is too thick

Safety
28 July 2011 - v4.2
Confidential.
Page 4 of 110
•paper with any staples or pins in it.
Clear paper jams promptly
To avoid further problems, attend to all paper jams and any other cause of printer failure
promptly.
Avoid large temperature variations
Install your printer in a protected location away from direct sunlight, open windows or any
other places subject to temperature extremes. If you are moving the printer, allow sufficient
time after installation for the temperature and humidity of the internals of your printer to
arrive at equilibrium with the surroundings.
Avoid shaking or bumping the printer
Your printer is a complex piece of equipment. Heavy shaking or bumping may damage it.

Getting the best out of your printer
28 July 2011 - v4.2
Confidential.
Page 5 of 110
Getting the best out of your printer
Turning off power to your printer
Your printer is best left powered on when you are not using it. However, if the printer will not
be used over an extended period of time (e.g. a couple of weeks), it should be turned off using
the Power On/Off button. All ink tanks and printhead must be installed before you turn off
your printer.
Do not remove consumables unless replacing them
Printheads and ink tanks should remain in the printer once installed. Their removal and re-
insertion is not recommended unless replacement is necessary.
Your printer works best on a firm, vibration-free surface
Undue vibration may cause print problems on your documents.
Use paper appropriate to the task
Use plain paper for all documents where possible. Use presentation paper for higher print
quality demands.
Store paper appropriately
Paper quality is vital to ensure printout quality. When not in use, store your paper flat, in a
clean, dry and shady place. If the paper came in resealable packaging it is recommended that
you store it in that package.
Keep the paper tray clean for optimum printer performance
Paper always sheds particles, and these accumulate in the print tray over time. These particles
may get carried under the printhead and cause print quality problems. Regular cleaning of the
paper tray and removal of obvious loose particles from paper before loading the paper tray
will minimise these problems.

Table of Contents
28 July 2011 - v4.2
Confidential.
Page 6 of 110
•Contents
Getting to know your Memjet printer 10
What is in the Box 10
Main components 11
Printer 11
Printhead cartridge 14
Ink tanks 15
Features 16
Control Panel 16
Connector bay 17
Setting up your printer 18
Unpacking your new printer 18
Locating the printer 20
20
Installing the ink tanks 20
Installing the printhead 23
Loading paper 28
Loading A4/Letter size paper 28
Loading US Legal size paper 29
Using intermediate paper sizes 30
Installing printer drivers 32
Installing a USB driver 33
Installing a network driver 40
Installing a network driver on a Server 45
Assigning a static IP address 45
Installing additional printers 47
Updating your printer drivers 48
Updating printer firmware 49
Repairing printer drivers 51

Table of Contents
28 July 2011 - v4.2
Confidential.
Page 7 of 110
Uninstalling older printer drivers 53
Printing with Memjet 56
Getting ready to print 56
Choosing your paper 57
Print options dialog box 57
Printing a test page 57
Cancelling a print job 59
Using print properties 60
Printer properties Help 60
Print settings profiles 61
Borderless prints 62
Page orientation 62
Custom paper sizes 62
Multi-page (N-up) 64
Manual duplex 65
Booklets 66
About resizing 68
Using the manual feed tray 68
Common printer messages and alerts 72
Paper Out 72
Ink low 73
Out of ink 74
Paper jam 74
Managing your printer 79
Accessing the Toolbox application 79
Toolbox information screens 80
Supplies information 80
Printhead details 81
Ink details 81
Usage information 82
Toolbox settings screens 82
General Settings 82

Table of Contents
28 July 2011 - v4.2
Confidential.
Page 8 of 110
Network Settings 83
IP Configuration settings 83
Toolbox Troubleshooting screens 84
Event Log 84
Maintenance 85
Memjet maintenance 86
Extended maintenance activity 86
Restoring print quality 86
Printhead cleaning via the User Maintenance button 86
Printhead cleaning using Printer Properties Services tab 87
Printhead cleaning using the Toolbox 88
Resetting original configuration settings 88
Factory default printer settings 88
Factory default printer driver settings 89
Supplies and accessories 90
Paper 90
Recommended paper 90
Choosing the right paper 91
Paper storage and handling 91
Ink 92
Sourcing new ink 92
Ink storage and handling 92
Replacing ink tanks 92
Printhead cartridge 92
Sourcing new printhead cartridges 92
Printhead cartridge storage and handling 93
Replacing the printhead cartridge 93
Troubleshooting 96
Initial checks 96
Printer installation problems 96
Cannot install USB printer 97
Excessive tilting of printer 97
Rear door open 97

Table of Contents
28 July 2011 - v4.2
Confidential.
Page 9 of 110
Test page does not print 97
Printing problems 98
Paper picking problems 98
Paper jams due to paper curl 99
Attention lamp is lit 99
Can no longer print to a networked printer 100
Print options greyed out 100
Cannot access Toolbox Home Page 100
Toolbox links are not working 100
Printer slows down between pages 100
Error/operational status messages 102
Control Panel status messages 102
Alert windows status messages 103
Specifications 105
Appendices 106
Relocating your Memjet printer 106
Local relocation 106
Remote relocation 106
Unpacking your printer 108
Repackaging your printer 109
Notices and Regulatory statements 110

Getting to know your Memjet printer
28 July 2011 - v4.2
Confidential.
Page 10 of 110
•Getting to know your Memjet printer
•What is in the Box
When you open the box containing your new Memjet printer, you will find the following:
The Memjet printer
A Memjet printhead cartridge
Ink Tanks in their Blister Pack.
A software and documentation CD
A Quick Start guide
A power supply and power cord

Getting to know your Memjet printer
28 July 2011 - v4.2
Confidential.
Page 11 of 110
•Main components
Use this section as a reference when reading this document. It identifies and locates the
components that will be mentioned throughout the rest of this document.
•Printer
Front view
1
Printer cover
4
Paper tray
2
Output tray
5
Control panel
3
Paper stop
6
Cooling vents
Paper tray
1
2
3
4
5
6
1
2
3
1
Paper width guide
2
Tray extension release clips
3
Paper length guide

Getting to know your Memjet printer
28 July 2011 - v4.2
Confidential.
Page 12 of 110
Rear views
Manual feed tray closed
1
Recessed connector bay
4
Rear access door latch
2
Manual paper feed tray
5
Rear access door
3
Paper feed Open tab
Manual feed tray open
1
Manual paper feed tray
3
Paper guide
2
Rear access door
4
Paper feed Open tab
1
3
2
4
3
1
2
3
4

Getting to know your Memjet printer
28 July 2011 - v4.2
Confidential.
Page 13 of 110
Internal view
1
Printer cover
4
Printhead
7
Ink tank (in slot)
2
Printhead latch
5
Ink tank slot lid (open)
8
Ink tank slot
(showing coupling)
3
Fluidic couplings
6
Ink tank slot lid (closed)
1
2
3
3
4
4
5
6
7
8

Getting to know your Memjet printer
28 July 2011 - v4.2
Confidential.
Page 14 of 110
•Printhead cartridge
1 & 10
Handles
5
Foil vacuum bag
2
Nozzles protective tape
6
Cardboard packing box
3 & 8
Protective cover Flaps
7
Cover retaining clip
4
Protective cover
9
Electrical contacts tape
1
10
2
3
8
4
5
6
7
9

Getting to know your Memjet printer
28 July 2011 - v4.2
Confidential.
Page 15 of 110
•Ink tanks
1
Ink tank blister pack
2
Pull tab
1
2
Getting to know your Memjet printer
28 July 2011 - v4.2
Confidential.
Page 16 of 110
•Features
The features of the printer that you will use most frequently are highlighted in this section.
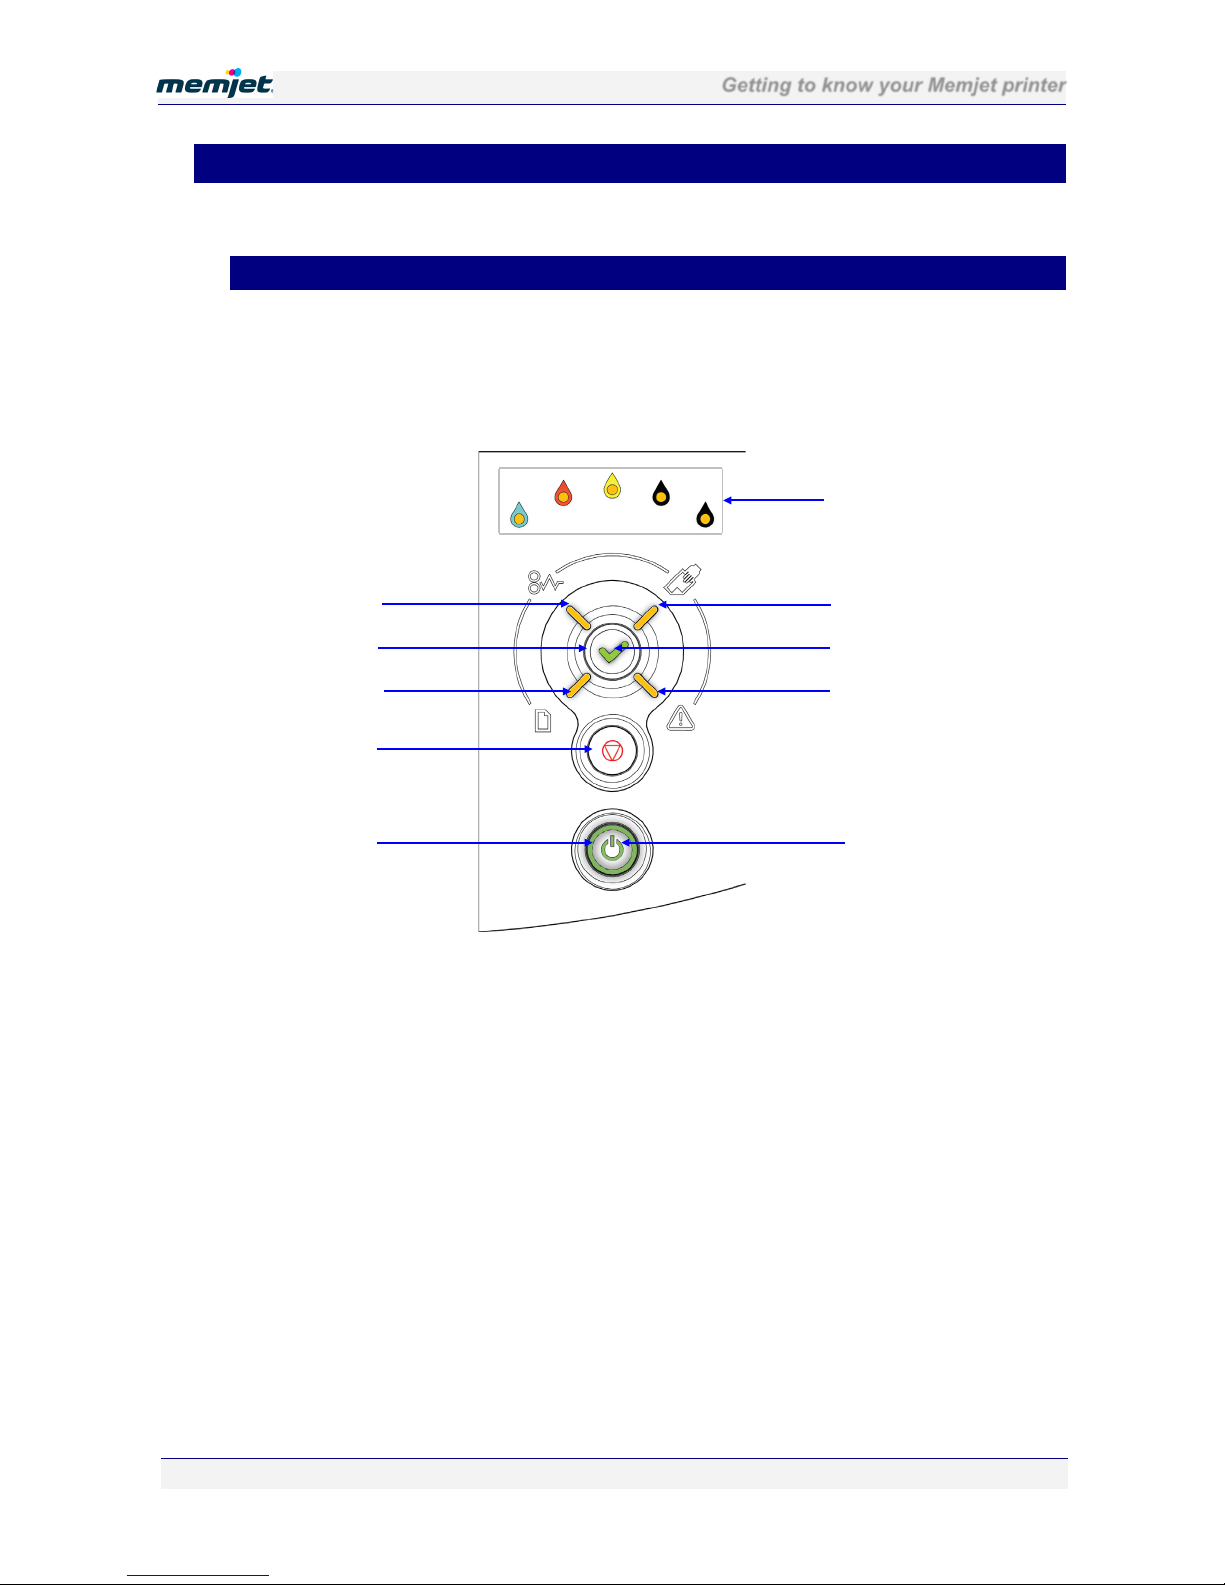
•Control Panel
The Control Panel has three control buttons along with nine indicator lamps to communicate
printer status information.
The Power On/Off and OK/Resume buttons are also backlit, as shown below.
1
Paper Jam lamp
6
Power lamp
2
OK/Resume button
7
Attention lamp
3
Paper Out lamp
8
OK/Resume lamp
4
Stop/Cancel button
9
Manual Feed lamp
5
Power On/Off button
10
Color Ink Supply lamps
2
4
5
6
10
9
1
7
3
8
Getting to know your Memjet printer
28 July 2011 - v4.2
Confidential.
Page 17 of 110
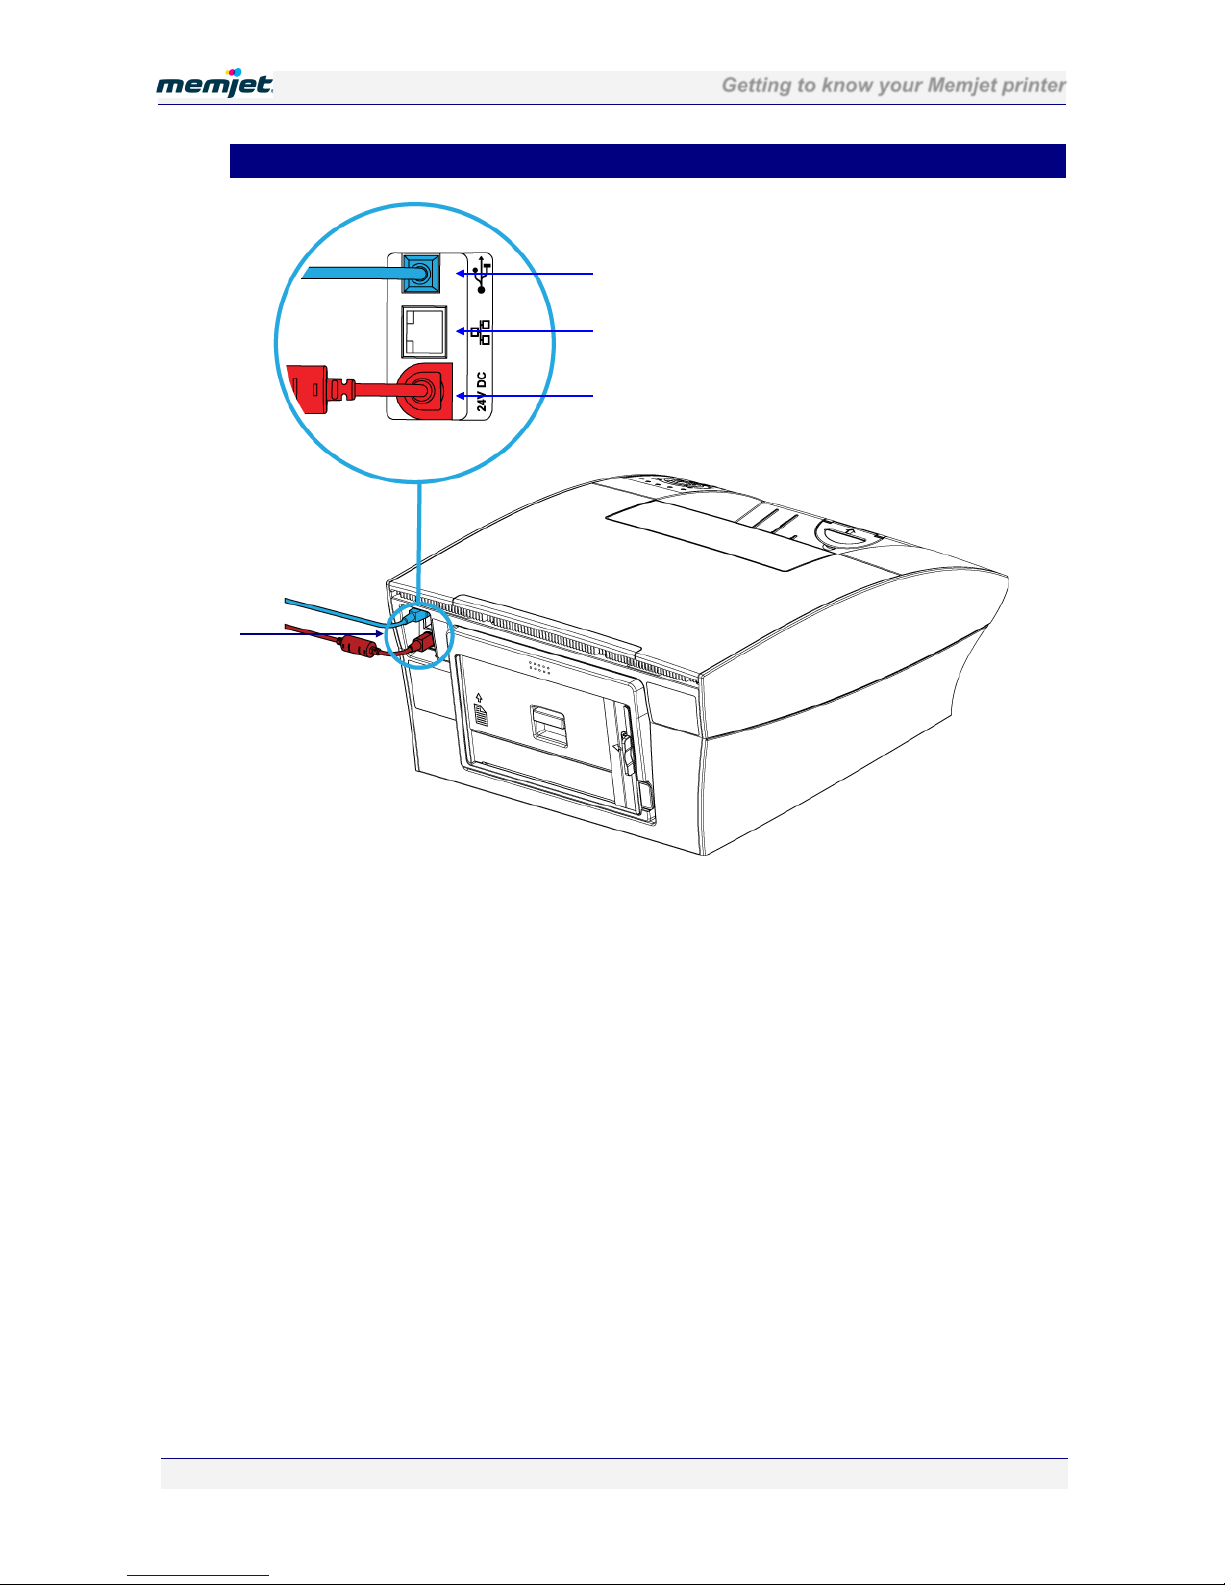
•Connector bay
1
Recessed connector bay
3
Ethernet port
2
Power socket and cable
4
USB port and cable
1
4
3
2
Setting up your printer
28 July 2011 - v4.2
Confidential.
Page 18 of 110
•Setting up your printer
Printer installation consists of :
•Removing your printer from its packaging.
•Installing it on a desktop (see page 20).
•Powering up your printer (see page 20).
•Installing the ink tanks (see page 20).
•Installing the printhead (see page 23).
•Loading paper in the front paper tray (see page 28).
•Installing the printer driver (see page 32).
The included Quick Start Guide provides a quick reference to the process described here.
Refer to that document for a pictorial overview.
•Unpacking your new printer
Take care when unpacking your new printer and try not to destroy the packaging materials.
The packaging materials should be retained in case you ever need to transport your printer to a
remote location. See Remote relocation on page 106.
To unpack your new printer:
1. Ensure the printer box is upright and on a level surface.
2. Open the box and identify the Shipping Checklist (see page 10).
3. Carefully extract all the contents of the box and check the contents against those shown in
the Shipping Checklist. See Unpacking your printer in the Appendices on page 108.
If there is any variation between what has been delivered and what is described in the Shipping
Checklist contact your supplier before proceeding.
4. Check for any physical damage to the packaging or any of its contents prior to
installation.
DO NOT use any damaged components – bring them to the attention of your supplier.
5. Remove any obvious packing material in or around the printer and any external transport
stays or tapes on the components.

Setting up your printer
28 July 2011 - v4.2
Confidential.
Page 19 of 110
Removing the paper picker stay
Before loading any paper into the paper tray for the first time, remove the packing material
used to lock the paper picker during transport.
DO NOT dispose of this packing material. Should you need to repackage the printer for
transportation to a remote site you will need to re-use this to avoid damage to the paper picker.
Figure 1 Paper tray and packaging material
Removing the printhead latch stay
Before you can open the printhead latch you will need to remove the printhead latch stay,
used to ensure the printhead latch remains closed during transport.
DO NOT dispose of this packing material. Should you need to repackage the printer for
transportation to a remote site you will need to re-use this to ensure the printhead latch remains
closed during transport.

Setting up your printer
28 July 2011 - v4.2
Confidential.
Page 20 of 110
•Locating your printer
Your printer must be located on a firm, flat level surface. Failure to do so may cause leaking of
ink in the printer and onto surroundings, possibly resulting in a damaged and unusable printer.
Space requirements
To ensure proper access to the printer and adequate ventilation during use, refer to the figure
below for the various clearances required on each side of the printer.
•Powering up your printer
To power up your printer:
1. Connect your printer to the power supply. See Connector bay on page 17 for the location.
2. Connect the power supply to the mains power.
Your Memjet printer power supply is auto-sensing, there is nothing to adjust. For
specifications see page 105.
3. Press your printer Power On/Off button. When first installing your new printer, all the
color ink supply lamps will be blinking, as well as the On/Off button.
DO NOT connect the USB cable provided with the printer now. You will be asked to do so when
you install the printer drivers. See Installing a USB driver point 1 on page 33.
•Installing the ink tanks
Original ink tanks are supplied in a blister pack as shown in the Ink tanks section on page 15.
When installing a new Memjet printer, use ONLY the ink tanks provided in the packaging.
Specifically, DO NOT install a USED ink tank.
To install the ink tanks in your printer:
1. Lift the printer cover and the four ink tank slot covers to reveal the ink tank slots (see the
printer Internal view on page 13).
Table of contents
Other Memjet Printer manuals

Memjet
Memjet AstroJet M1 User manual

Memjet
Memjet Quadient Rena MACH 6 User manual

Memjet
Memjet Printware iJetColor Press Service manual

Memjet
Memjet AstroJet M1 User manual

Memjet
Memjet MACH 8 User manual

Memjet
Memjet C6010 User manual

Memjet
Memjet MACH 5 User manual

Memjet
Memjet OWN-X Speedstar 1000 Instruction manual

Memjet
Memjet AstroJet M1 User manual

Memjet
Memjet AS-1180C User manual


