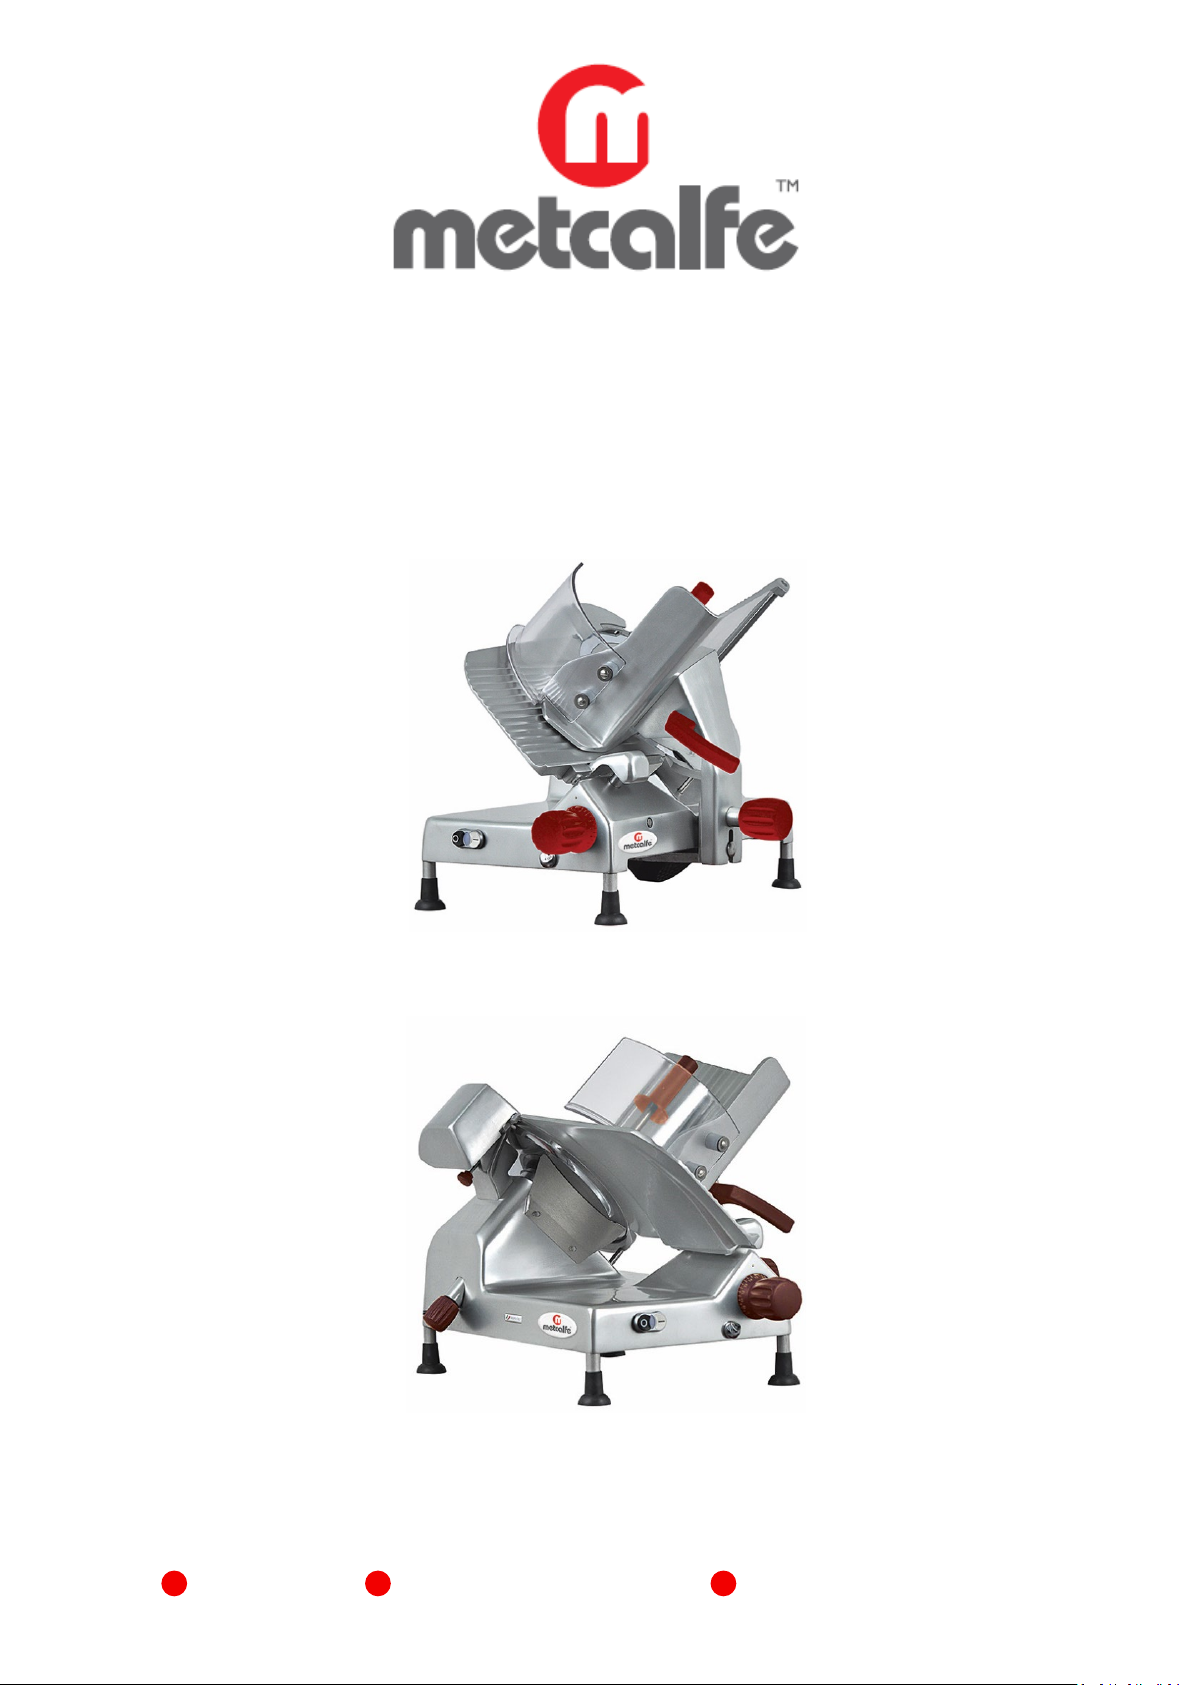
Metcalfe NS300XHD Manual

Metcalfe Extra Heavy-Duty Gravity Feed Slicers
(Gear Driven)
NS300XHD & NS350XHD
Installation & Operating Instructions
NS300XHD
NS350XHD
t 01766 830 456 e sales@metcalfecatering.com wwww.metcalfecatering.com

1
Index
Your Slicer ……..……………………….…………………….………………………. 2
Technical Data ………………..…………………………..……………….…………. 3
Dimensions ……………..……….……………………..…….………………….. 4
Optional Extras ……………..………………………………………………………… 5
Installation
Suitable Products for Slicing …..……..…………….……………… 6
Unpacking ……………………………….…………………………………. 6
Installation …………….………………………………………………….. 6
Operation ………………………….…………………………………………………….. 7
Cleaning Instructions
Disassembly …………………………..………………………………….. 8
Cleaning …………..…………………..………………………………….. 9
Reassembly after Cleaning ……………….………………………… 10
Sharpening the Knife …………………………………………………………… 11
Lubricating your Slicer …………………………….……………………………. 12
Slicer Safety Tips ……………………………….…………………………………. 12
Troubleshooting ……………………………….………………………………..…. 13
Maintenance ………………………………………………………………………. 13
Spare Parts & Service ……………….…………………………………………… 14
Product Information ……………….……………………………………………… 14
Warranty ………………………….………….………………………………………. 15

2
Your Slicer
(Image may differ to actual slicer)
Sharpening
Attachment
Table
Perspex
Guard
On & Off Switches
Centre Plate
Spindle Knob
Slice
Deflector
End Device
Handle
Knife
End Device
Centre
Plate
Table Support
Arm
Fence Plate
Table Locking
Knob
Rubber Feet
Thickness
Selection Knob
Table
Handle
Lubricating Screw

3
Metcalfe Extra Heavy Duty Slicers
Features
•High quality, gear driven, gravity feed slicer
•Hollow ground chromed carbon steel blade
•Designed to effortlessly handle heavy loads like bacon and large pieces of meat that might
cause slipping and/or blade stoppage on a belt driven machine
•Transparent slicing guard to ensure ultimate user safety whilst slicing
•Easy set thickness control for precision cut
•Bottom runner slides on ball bearings for smooth glide
•Entirely detachable for easy cleaning
•CE Approved
•Large base to ensure slicer has a large capacity to cope with large products
•Built-in, self-aligning sharpening and de-burring unit
•Table, Bottom Runner, Centre Plate, Knife and Sharpening unit are detachable for easy, safe
cleaning
Specifications
Model Blade
(mm) / (Inch)
Phase
(Ø)
Motor
(Volt)
Frequency
(Hz)
Current
(Amp)
Power
(kW)
NS300XHD 300 / 12 1 220 50 1.36 0.30
NS350XHD 350 / 14 1 220 50 1.36 0.30
Capacity
Model Cutting Capacity
(mm)
Carriage Movement
(mm)
Max Slice Thickness
(mm)
NS300XHD ● 205 □175 x 270 290 14
NS350XHD ● 240 □200 x 270 290 14

4
Dimensions | Shipping Information
Model Overall Dimensions
D x W x H (mm)
Net Weight
(Kg)
Packed Dimensions
D x W x H (mm)
Packed
Weight (Kg)
Volume
(m3)
NS300XHD 560 x 680 x 610 34 600 x 710 x 520 37 0.222
NS350XHD 560 x 700 x 640 36 800 x 820 x 620 41 0.222
NS300XHD
NS350XHD

5
Optional Extras
Painting Customisation
For more information and prices please contact the sales department (see page 14).
Teflon Coated Parts, 20%
increased in gliding property
Stainless Steel Knife Remover
Aluminium Knobs Kit
Stainless Steel Guard
Product Hold Bar for Gravity Plate
Serrated Blade
Tray Extension Device
Plastic Cover

6
Installation
Suitable Products for Slicing
The following are products that can be sliced:
•All types of cold cuts (cooked, raw, smoked)
•Cured meats (Bresaola, Parma Ham, Serrano Ham & Salami etc)
•Boneless meat (cooked or raw at a temperature of no lower than +3°C)
•Bread and cheese (those that can be sliced, such as Gruyere, Fontina, etc.)
The following are products that cannot be sliced because they could cause damage to the machine:
•Frozen food (Only with Serrated Blade see page 5)
•Deep-frozen food
•Food with bones (meat & fish)
•Vegetables
•Any other products not meant for consumption
Unpacking
Unpack the slicer immediately after receipt. Please inspect the slicer to ensure there is no damage and that all
parts are included i.e. Knobs, Feet and Knife Removing Tool. If the machine is found to be damaged, keep all the
packaging material and contact us or contact your source of the equipment immediately.
You should receive with your slicer: 1 x Metcalfe Tasteless Oil 1 x Flat Head Screwdriver
1 x Instruction Manual 1 x Knife Removing Tool
If any of the above items were not received with your slicer, please refer to page 14 for contact details and inform
us immediately for replacements.
Please ensure that you complete the product information section on page 14.
Installation
1. Read this manual thoroughly before installation and operation. DO NOT proceed with any installation nor
operation if you have any questions or do not understand anything in this manual. Please see Metcalfe
Catering Equipment Ltd contact details on page 14 to resolve any queries you may have.
2. Make sure to clean and sanitise the entire slicer before use (see Cleaning Instructions on Pages 8-10).
3. Select a location for the slicer that is level, smooth, solid, dry, non-skid and suitable to withstand the weight
of the slicer plus the food to be sliced.

7
Operation
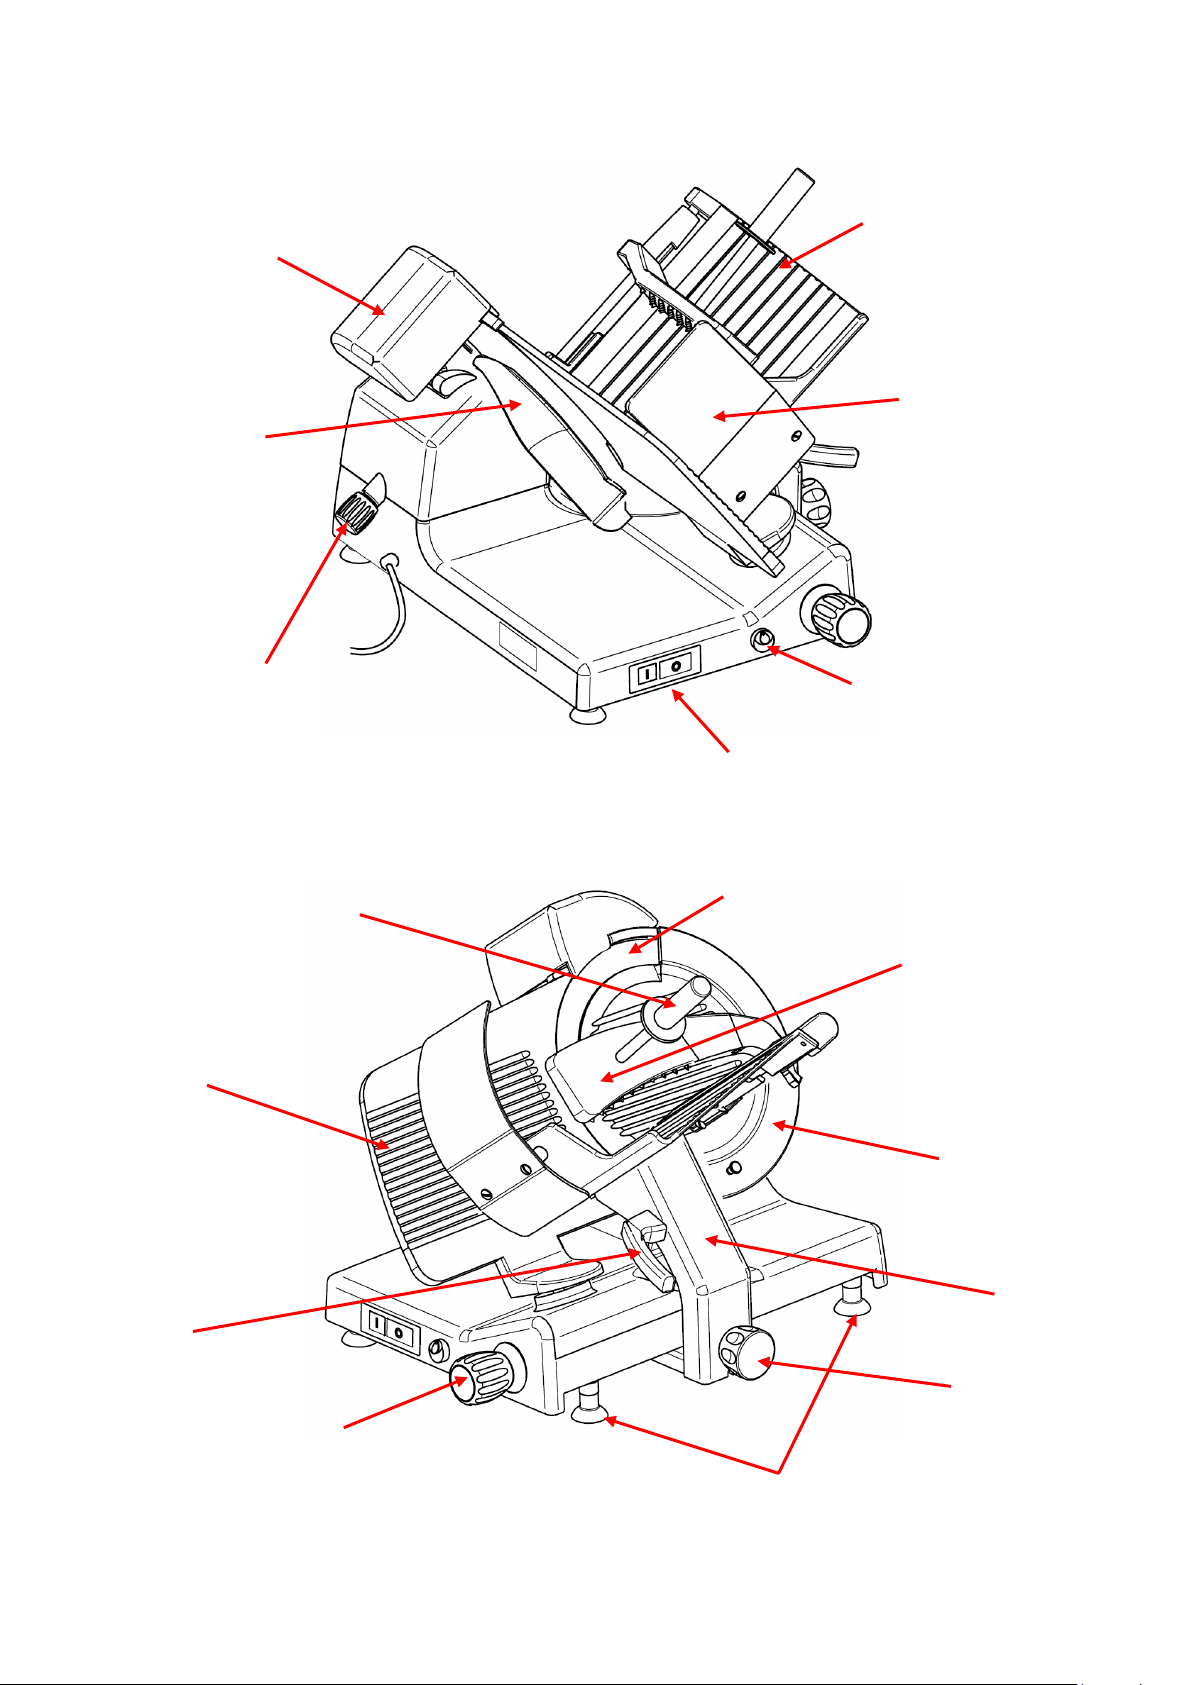
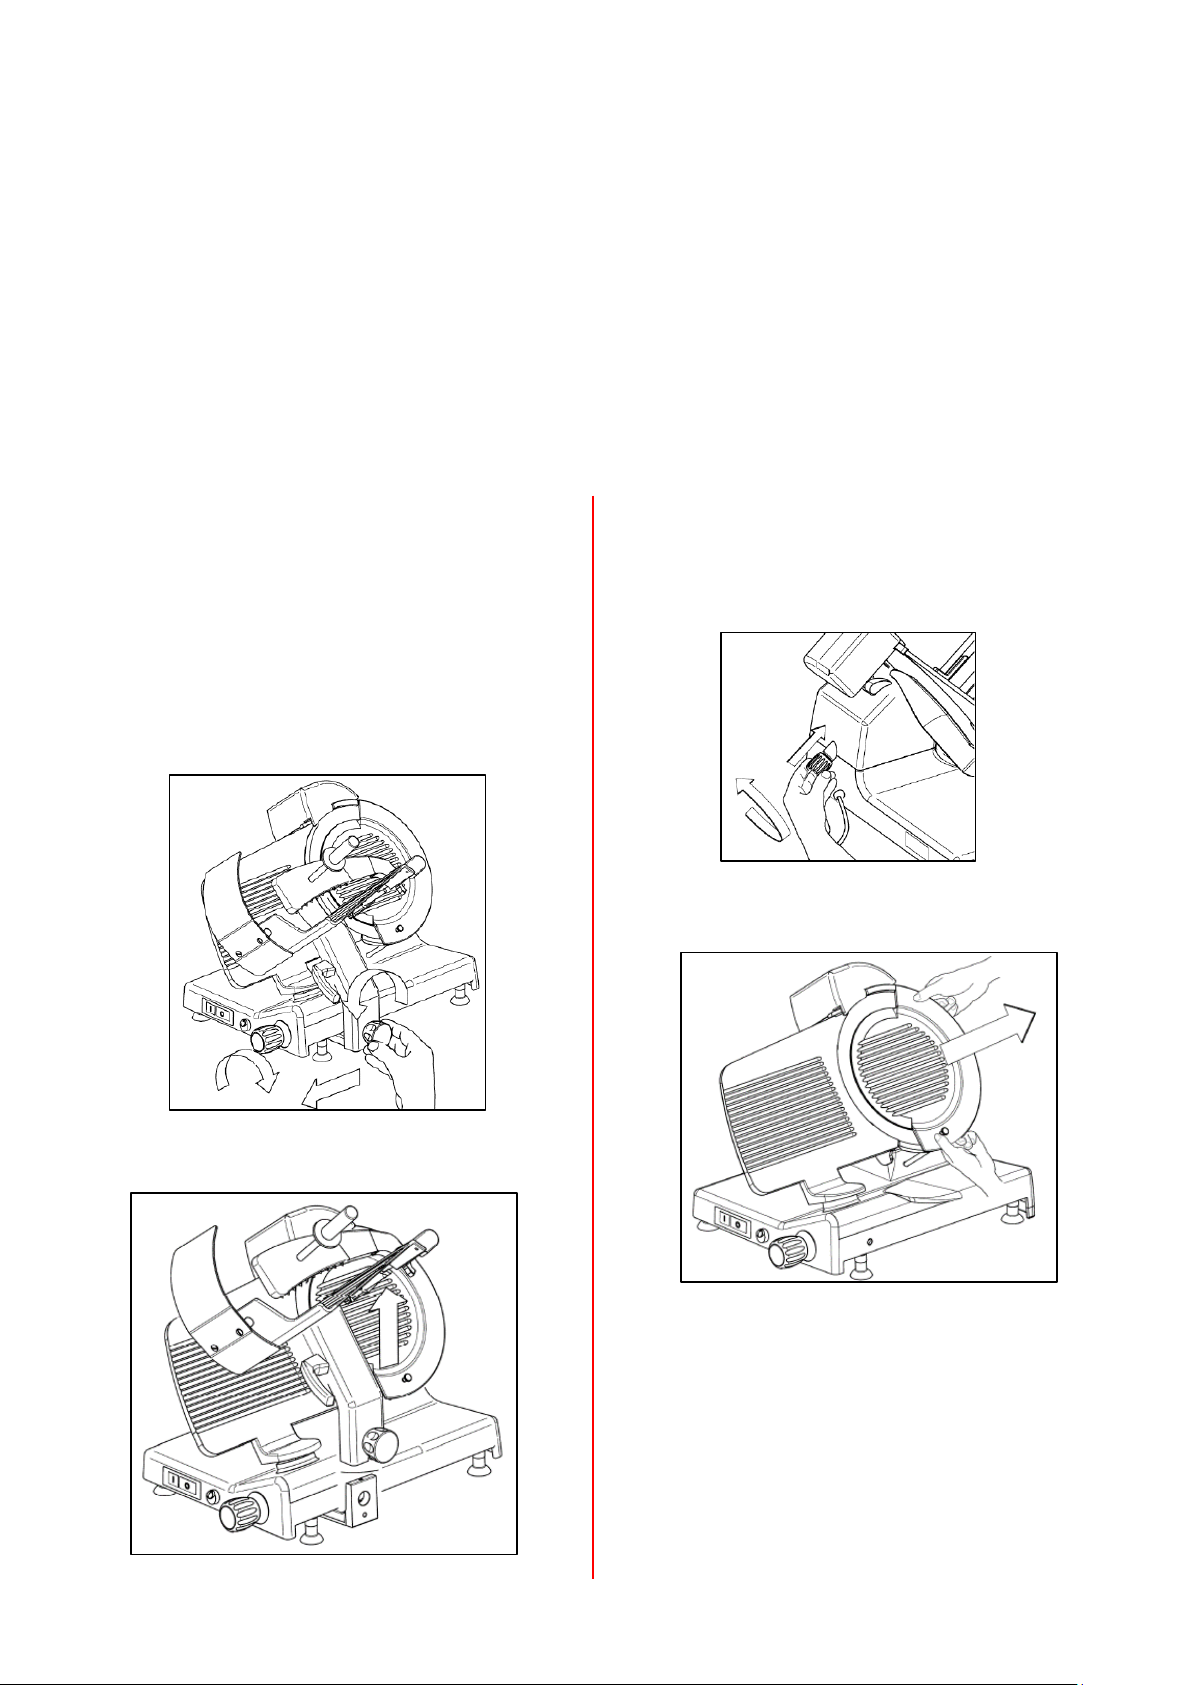
1. Ensure the slicer is turned off and that the
thickness selection knob is set to “0”.
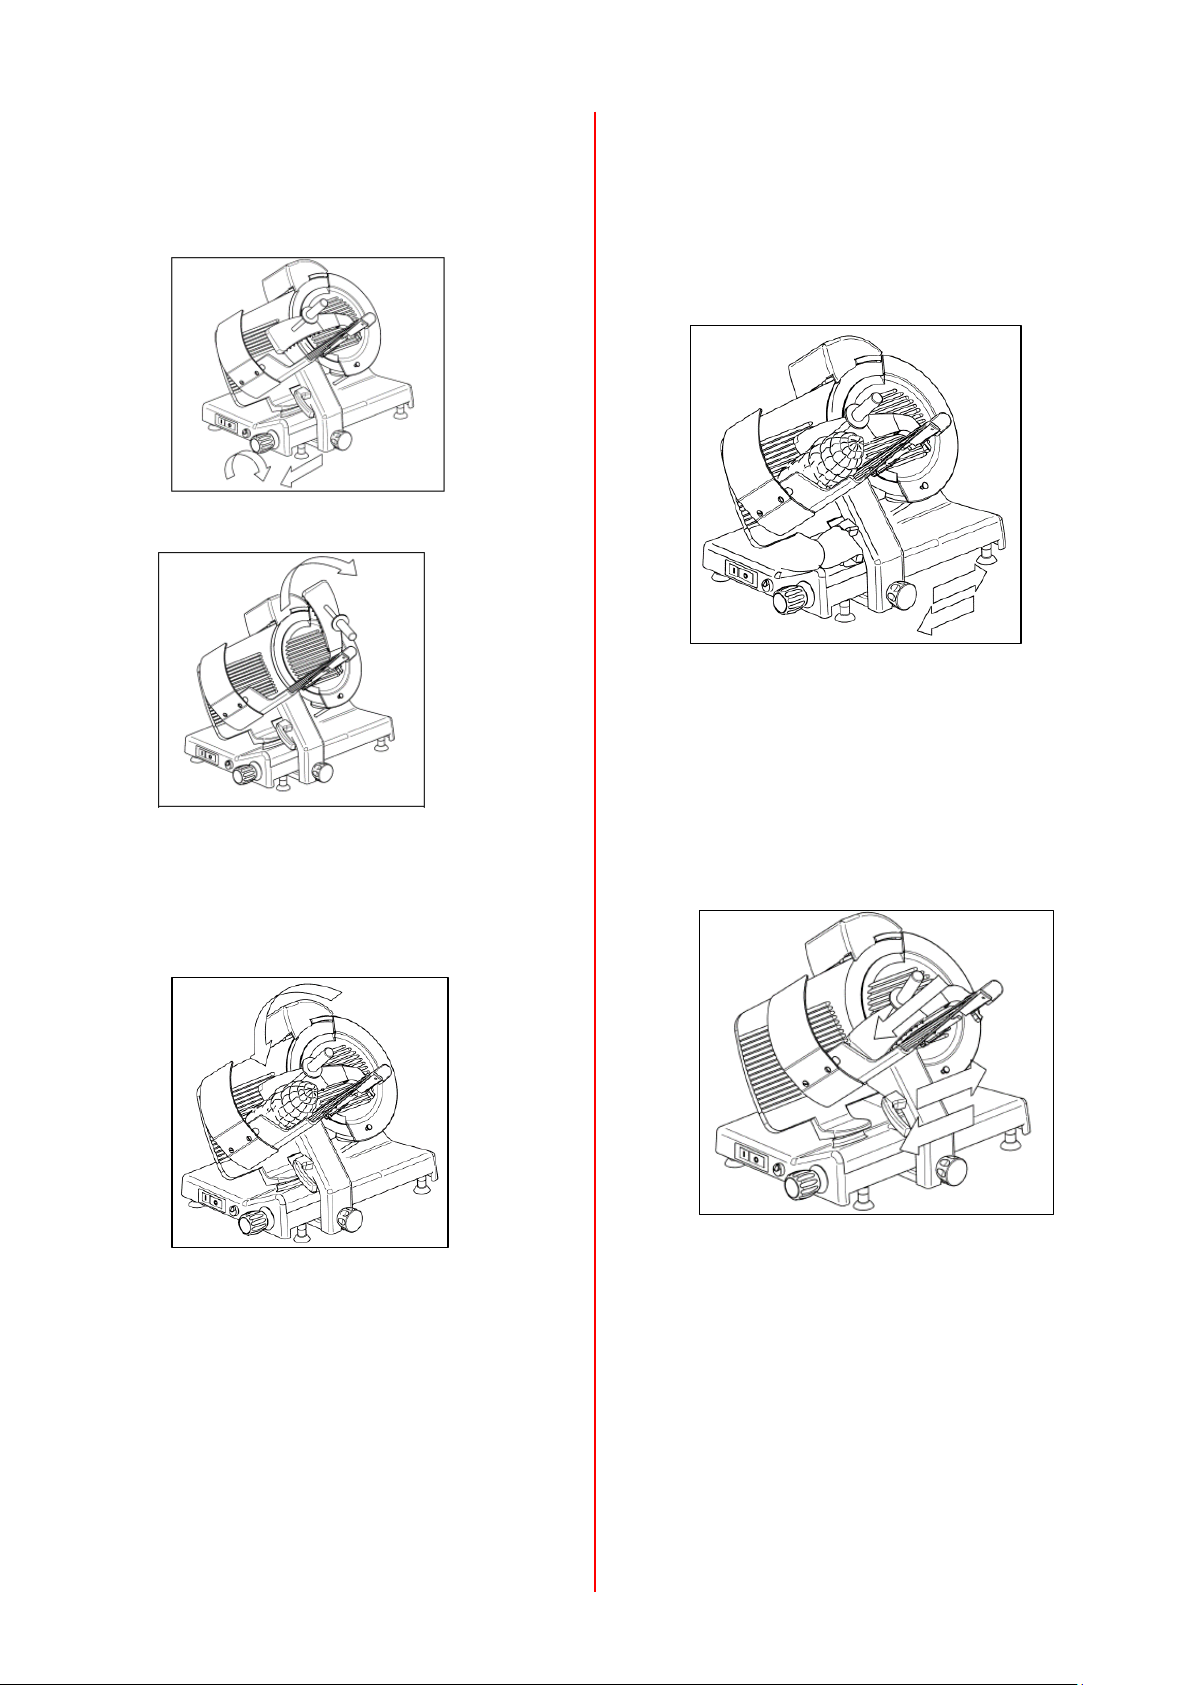
2. Pull back the carriage completely (towards
the operator) to the loading position.
3. Lift the end device up, into the rest position.
4. Place product onto the table, the product will
press against the fence plate because of its
weight. Block it with the end device by
lowering it onto the product and pressing
down slightly.
5. Rotate the thickness selection knob anti-
clockwise to the desired setting.
6. Turn the slicer on by pushing the start button.
The power indicator light, which is located
between the on/off switch, will illuminate.
DO NOT hold the food product with your hand.
Never put your hand on or around the table
while the slicer is on. The end device handle is
the only part of the slicer you should touch
while slicing.
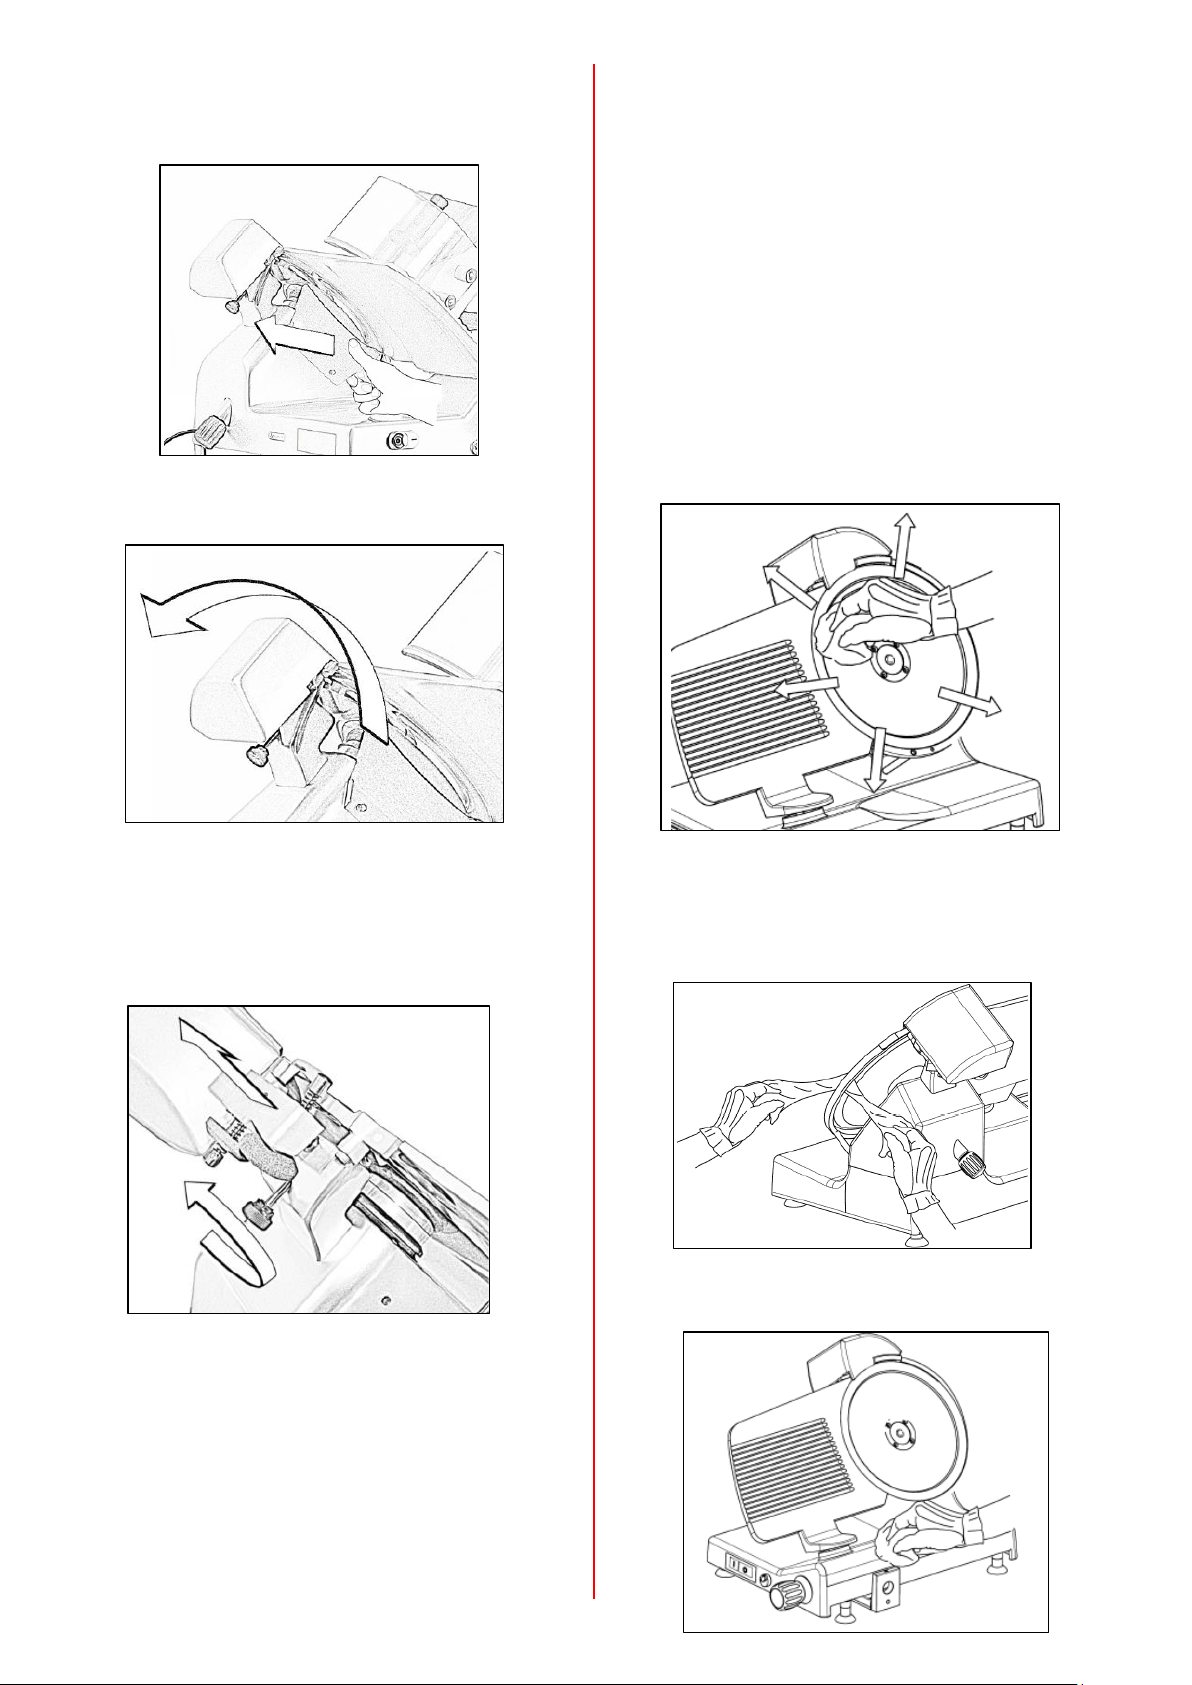
7. Grip the handle attached to the meat table
support and manually push the carriage back
and forth. This handle and the end device
handle are the only parts of the slicer you
should touch while slicing. DO NOT catch slices
with your hands, let slices drop onto the
receiving area.
If a product needs to be adjusted during slicing,
first turn the slicer off and then pull the table
all the way towards you.
8. When the weight or size of the product does not
allow a proper slice, use the end device handle
and apply some pressure to the product.
9. After the last slice stroke, pull the carriage all the
way towards you. Turn the slicer off by pressing
the stop button, the power indicator light will go
out. Turn the thickness selection knob clockwise
until it stops to close the slicer table.
10. You can now unload the product from the table.

8
Cleaning Instructions
Daily cleaning should be considered mandatory for all equipment used in the preparation of food. When using a
meat slicer and with the possibility of cross contamination, these units should be cleaned before slicing each new
product. Once your slicer makes contact with any food product, the entire slicer, including removable parts, must
be thoroughly cleaned. This process is to be repeated at the end of each working day. If the machine has not been
used for a while it must be cleaned before use.
In order to ensure the slicer is cleaned properly and to avoid damage, the instructions below should be followed.
Disassembly
Turn slicer off and unplug from mains.
Turn the thickness selection knob clockwise past “0” until it stops so the fence plate covers the blade.
Disassembling the table
•With the thickness selection knob on “0” pull
back the carriage all the way to the left.
•Whilst supporting the table, turn the table
locking knob anti-clockwise all the way until
you hear the click of the pin locking into place.
It may be necessary to move the thickness
selection knob 1-2mm over the ‘0’ position at
the same time.
•Once fully unscrewed lift the whole of the table
and carriage from the machine.
Disassembling the centre plate (blade cover)
•Unscrew the centre plate spindle knob (anti-
clockwise) and remove from the rear of the
machine.
•Lift the centre plate using the knob located at
the bottom.
Disassembling the knife
•Fit the knife removing tool (supplied with
machine) over the knife and secure it by
tightening the two knobs.
•Once the knife removing tool is secure loosen
the four screws securing the knife to the pulley.
•Pull off the knife removing tool with the knife
ALWAYS REMOVE HOLDING THE KNOBS.

9
Disassembling the slice deflector
•Remove the slice deflector by moving it to
the left
Disassembling the sharpener
•Lift the sharpener cover.
•Loosen the screw at the rear of the knife
sharpener without removing it (about 10
turns).
•Then remove the sharpener by pulling it
upwards from the slicer.
Cleaning
•Only use warm water and a mild detergent to
clean all parts, using a soft, spongy cloth and
nylon brush.
•Do not use other metal products to scrape or
remove stubborn deposits of sliced product.
•Never leave any leftover product on the slicer
(Clean at least once a day).
•DO NOT clean the unit, or any parts of the unit
in a dishwasher.
•Rinse all parts after cleaning with clean water
and dry with a soft cloth.
•Do not use abrasive cleaners, acids, steel wool
or high pressure water jets which might
damage the machine.
•Clean the machine body with a damp cloth or
sponge, rinsing frequently with hot water. Dry
carefully.
Cleaning the knife
•To clean the knife whilst still on the machine,
use a damp cloth on the blade and move it
slowly from the centre outwards to the edge.
•Dry the knife in the same way.
•To clean the back knife guard, pass a damp
cloth between the blade and the back knife
guard.
•Clean the machine body with a damp cloth or
sponge, rinsing frequently with hot water. Dry
carefully.

10
Reassembly After Cleaning
Reassembling the sharpener
•Ensure the screw at the rear is loose (about
10 turns). Reposition the sharpener and turn
screw until tight
Reassembling the slice deflector
•Insert the slice deflector over pins and slide
back into position.
Reassembling the centre plate
•Insert the centre plate over the knife and
ensure that the square section joint is in its
proper place.
•Insert the centre plate spindle completely and
rotate clockwise to secure.
Reassembling the table
•Insert the table on the carriage
•Tighten the table locking knob
•Check that the table moves freely from left to
right
•Check that the thickness selection knob works
correctly

11
Sharpening the Knife
When and How Often to Sharpen the Knife
•Symptoms of a dull knife are excess waste on the unsliced portion.
•The blade needs to be sharpened periodically to provide consistent slices and maximum food product.
•Sharpening the blade lightly every few days is more effective than heavy sharpening at less frequent intervals.
•WARNING: The blade can be sharpened up until the distance between
the cutting edge of the blade and the inside border of the blade guard ring
is no more than 6 mm, corresponding to a decrease of about 10 mm of
the size of the original diameter. Once this value has been reached, it is
NECESSARY TO REPLACE THE BLADE.
Sharpening the Knife
NOTE: Before starting check that the grindstones have been cleaned.
•Turn the slicer off and rotate the thickness
selection knob clockwise until it stops and
the slicer fence plate covers the knife.
•Pull back the carriage all the way to the left.
•Clean and dry both sides of the blade before
sharpening. Please refer to cleaning
instructions.
•Lift the sharpener cover.
•Loosen sharpener release knob by turning it
anti-clockwise several times (1).
•Lift sharpener up (2), rotate it clockwise 180°
(3) and lower it into position with the knife
fitting between the two stones.
•Tighten sharpener release knob to secure
sharpener.
•Plug in and select the start button on the slicer.
•Push the sharpening stone button (4) and keep
it pressed for 10-15 seconds
•Press the deburring button (5) for 2-3 seconds
(more could damage the blade edge).
TURN SLICER OFF before inspecting.
•Return the sharpener body to the rest position
and close the cover.
•Tighten sharpener release knob.
•Clean the entire slicer.

12
Lubricating Your Slicer
NOTE: Use only the tasteless oil provided or white Vaseline oil. Do not use vegetable oils!
Lubricating the bottom runner guide bars (weekly)
•Move the carriage as close as possible to the operator
•Insert the oiler in the special hole/lubricating screw
•Squeeze the oiler so that a small amount of oil goes
into the hole
•Remove the oiler and slide the carriage 3 to 4 times.
Lubricating the transversal guide rods of the table and end device (weekly)
•Put a small amount of oil on the rod and slide
the group 3 to 4 times.
•Clean as necessary removing any excess oil.
Slicer Safety Tips
To avoid serious personal injury:
•NEVER touch the slicer without training and authorisation from your supervisor or if you are under the age of
18. Read this instruction manual first.
•ONLY install the slicer on a level, non-skid surface that is non-flammable and located in a clean, well-lit work
area and away from children and visitors.
•NEVER HOLD THE FOOD PRODUCT WHILE SLICING. Hold only the end device handle while slicing.
•BEFORE CLEANING, SHARPENING, SERVICING, OR REMOVING ANY PARTS always turn the slicer off, turn the
thickness selection knob clockwise until it stops and unplug power cable.
•NEVER touch rotating knife.
•ALWAYS keep hands clear of all moving parts.
•ALWAYS turn slicer off, turn the slicer thickness selection knob clockwise until it stops.
•NEVER place the power cord over the unit.

13
Troubleshooting
If the slicer is not working correctly please check the list below before contacting an engineer or Metcalfe
Catering Equipment Ltd.
Problem Possible Causes Action Required
Pressing the start button does not start
the machine. No electricity. Check that the plug is correctly inserted.
Pressing the start button the machine
starts but the working light does not
come on.
Light is defective.
Do not use the machine if the light does
not work.
Contact Service for assistance.
The machine starts but the motor heats
up too much and gives off a bad odour. Defective motor. Do not use the machine.
Contact Service for assistance.
The machine vibrates. Defective transmission. Contact Service for assistance.
Excessive resistance in cutting the
product. The blade is not sharp. Sharpen the blade.
The blade slows or stops under stress. Loose belt. Contact Service for assistance.
Sharpening is no longer regular.
Grindstones are excessively
dirty. Clean the grindstones.
Grindstones are worn out. Replace the grindstones.
Contact Service for assistance.
The sliced product is frayed and
irregular.
The blade is not sharp. Sharpen the blade.
The blade is excessively used.
Replace the blade.
Contact Service for assistance.
The machine does not stop when the
button is pressed. Control circuit is defective.
Pull out the plug to stop the machine
immediately and contact Service for
assistance.
If the problems persist and the assigned solution does not remedy the problem, please call our Service Department.
Maintenance
Only the maintenance listed below is recommended for the operator to carry out, all other maintenance should
be done by an approved engineer:
•Knife sharpening.
•Lubrication of the bottom runner guide bars and end device (weekly).
•Check the condition of the electrical cable and the cable gland on the base of the machine (periodically).
•Replace knife.
•Replacing the sharpening stone.
Maintenance to be carried out by engineer only:
•Replacing the components of the electrical system under the base.
•Repairing the structural parts, repairing and/or replacing components under the base.

14
Spare Parts and Service
For more information on Metcalfe spare parts, accessories, and service support, including breakdown drawings
and parts lists please contact us on the details below.
Please always quote the Serial Number of the machine. This can be found on the serial number plate which is
located on the right-hand side of the machine’s base.
Metcalfe Website www.metcalfecatering.com
Metcalfe Telephone Number 01766 830 456
Additional copies of this instruction manual can be obtained by either visiting our website or contacting the sales
department.
Product Information
Please complete the below details and keep in a safe place. Ensure that you complete the Model No & Serial No
sections for future reference when enquiring about spare parts and technical assistance.
Company Name: ___________________________________________________________________________
Company Address: _________________________________________________________________________
_________________________________________________________________________
_________________________________________________________________________
Model No: ________________ Serial No: _______________________ Date of Purchase: ___________________
Name of Dealer: ______________________________________________________________________________
Please retain this information for your records

15
Metcalfe Warranty
All Metcalfe products are guaranteed against defects in material and workmanship for a period of one year from
date of Invoice, except where specially noted.
The Company's obligation under this warranty is limited to repairing or replacing, without charge, any part or parts
found to be defective under normal use, in accordance with the specified operations manual and capacity ratings.
On all return to factory warranty items, it is the responsibility of the purchaser to return the entire unit to the
factory, in a clean condition, properly packed and labelled.
All repairs, alterations or replacement of materials or parts not authorised by Metcalfe will automatically void all
warranties in their entirety.
All Metcalfe slicers (except Simple Line) are covered by a 2-year warranty (1st year parts and labour, 2nd year parts
only) and full after sales service.
All Metcalfe SP mixers are covered by a 3-year warranty (1st year parts and labour, 2nd & 3rd year parts
only) and full after sales service.
There is a limited 6-month warranty on the following:
•Mixer attachments (beater, whisk and dough hook)
•Parts purchased or supplied for the repair of Metcalfe equipment
This warranty does not cover the following:
•Failure due to neglect, abuse, careless handling or misuse of machine
•Failure caused due to improper maintenance
•Blender clutches
•Knives and gears on can openers
•Sharpening of slicer blades
•General wear and tear
Metcalfe and its suppliers reserve the right to make changes in design and specification to any product without
prior notification.
2/2021
Metcalfe Catering Equipment Ltd
Haygarth Park
Blaenau Ffestiniog
Gwynedd, LL41 3PF
t 01766 830 456 e sales@metcalfecatering.com wwww.metcalfecatering.com
This manual suits for next models
1
Table of contents
Other Metcalfe Kitchen Appliance manuals

Metcalfe
Metcalfe HPC Configuration guide

Metcalfe
Metcalfe EP10 Manual

Metcalfe
Metcalfe TS22 Manual

Metcalfe
Metcalfe MP60 Manual

Metcalfe
Metcalfe NS300A Manual

Metcalfe
Metcalfe Ti22R Manual

Metcalfe
Metcalfe NS250HD Installation guide

Metcalfe
Metcalfe EC12 User manual

Metcalfe
Metcalfe NSV300HD Manual

Metcalfe
Metcalfe A300 Specification sheet

Metcalfe
Metcalfe EP10 User manual

Metcalfe
Metcalfe TS12R Manual

Metcalfe
Metcalfe NSV350HD Manual

Metcalfe
Metcalfe NS220 Manual

Metcalfe
Metcalfe NS370XHD Manual

Metcalfe
Metcalfe RET300 Troubleshooting guide

Metcalfe
Metcalfe NS350A Datasheet

Metcalfe
Metcalfe NS250HD Manual

Metcalfe
Metcalfe Ti32R Manual

Metcalfe
Metcalfe NSL220 Manual