Metra Electronics 99-8249 User manual

The World’s best kits.®MetraOnline.com © COPYRIGHT 2019 METRA ELECTRONICS CORPORATION REV. 8/14/19 INST99-8249
INSTALLATION INSTRUCTIONS
99-8249
Attention! Let the vehicle sit with the key
out of the ignition for a few minutes before
removing the factory radio. When testing the
aftermarket equipment, ensure that all factory
equipment is connected before cycling the
key to ignition.
KIT FEATURES
• ISO DIN radio provision with pocket
• ISO DDIN radio provision
• Built and painted in multiple colors to match the factory
color and appearance
KIT COMPONENTS
• A) Radio housing trim panel • B) Radio brackets • C) Pocket • D) Phillips screws (8)
TOOLS REQUIRED
• Panel removal tool • Phillips screwdriver
• 10mm socket wrench
TABLE OF CONTENTS
Dash Disassembly ...............................................2-3
Kit Preparation .......................................................4
Kit Assembly
–ISO DIN radio provision with pocket ..................5
–ISO DDIN radio provision .....................................6
WIRING & ANTENNA CONNECTIONS
(sold separately)
Wiring Harness: 70-1761 • TYTO-02 (amplified models)
Antenna Adapter: 40-LX11
Steering Wheel Control Interface: ASWC-1
A B C D
Toyota Camry 2015-2017

1.800.221.0932
|
MetraOnline.com
2
DASH DISASSEMBLY
1. Unclip and remove the console storage
tray. (Figure A)
2. Push down on the collar below the shift
knob, then unscrew the shift knob.
(Figure B)
3. Remove (2) Phillips screws from the
shifter trim, then unclip and remove the
trim. (Figure C)
Continued on next page
(Figure A) (Figure B) (Figure C)

REV. 8/14/2019 INST99-8249 3
DASH DISASSEMBLY (CONT)
4. Remove (2) Phillips screws securing the
factory pocket, then unclip and remove
the pocket. (Figure D)
5. Unclip and remove the vent panel above
the radio. (Figure E)
6. Remove (4) 10mm screws securing the
radio/climate control panel (2 above and
2 below). (Figure F)
7. Slide the radio and climate control
assembly out, then unplug and remove.
Continue to Kit Preparation
(Figure D) (Figure E) (Figure F)

1.800.221.0932
|
MetraOnline.com
4
KIT PREPARATION
From the factory radio/climate control panel:
1. Slightly loosen (10) Phillips screws
securing the radio brackets to the radio.
(Figure A)
2. Remove (4) Phillips screws securing the
climate controls, then unclip and remove
the controls. (Figure A)
3. Remove (2) panel clips from the radio.
(Figure A)
To the 99-8249 radio brackets:
4. Secure the climate controls to the
brackets using the factory screws.
(Figure B)
To the 99-8249 radio trim panel:
5. Attach the factory panel clips to the
panel. (Figure C)
Continue to Kit Assembly
(Figure A)
(Figure C)
(Figure B)

REV. 8/14/2019 INST99-8249 5
(Figure B)
KIT ASSEMBLY
(Figure A)
(Figure B)
(Figure C)
ISO DIN radio provision with pocket
1. Secure the radio bracket/climate control
assembly to the radio housing trim
panel with (4) Phillips screws supplied.
(Figure A)
3. Secure the pocket to the bracket/panel
assembly with the (4) remaining Phillips
screws supplied. (Figure B)
5. Remove the metal “DIN” sleeve and
trim ring from the aftermarket radio.
6. Slide the radio into the assembly and
secure with screws supplied with the
radio. (Figure C)
7. Locate the factory wiring harness and
antenna connector in the dash and
complete all necessary connections to
the radio. Metra recommends using the
proper mating adapter from Metra and/
or AXXESS. Test the radio for proper
operation.
8. Secure the radio assembly into the dash
and reassemble the dash in reverse
order of disassembly.
Climate controls not
shown for clarity

1.800.221.0932
|
MetraOnline.com
6
KIT ASSEMBLY
ISO DDIN radio provision
1. Secure the radio bracket/climate control
assembly to the radio housing trim
panel with (4) Phillips screws supplied.
(Figure A)
2. Slide the radio into the assembly and
secure with screws supplied with the
radio. (Figure B)
3. Locate the factory wiring harness and
antenna connector in the dash and
complete all necessary connections to
the radio. Metra recommends using the
proper mating adapter from Metra and/
or AXXESS. Test the radio for proper
operation.
4. Secure the radio assembly into the dash
and reassemble the dash in reverse
order of disassembly.
(Figure A) (Figure B)
Climate controls not shown for clarity

REV. 8/14/2019 INST99-8249 7

KNOWLEDGE IS POWER
Enhance your installation and fabrication skills by
enrolling in the most recognized and respected
mobile electronics school in our industry.
Log onto www.installerinstitute.com or call
800-354-6782 for more information and take steps
toward a better tomorrow.
®
Metra recommends MECP
certified technicians
The World’s best kits.®MetraOnline.com © COPYRIGHT 2019 METRA ELECTRONICS CORPORATION REV. 8/14/19 INST99-8249
INSTALLATION INSTRUCTIONS
99-8249
If you are having difficulties with the installation
of this product, contact our Tech Support line
either by phone at 386-257-1187, or email at
techsupport@metra-autosound.com. Before
doing so, look over the instruction booklet a
second time and ensure that the installation was
performed exactly as the instruction booklet
is stated. Have the vehicle apart and ready to
perform troubleshooting steps before contacting
Metra/Axxess Tech Support.

The World’s best kits.®MetraOnline.com © COPYRIGHT 2019 METRA ELECTRONICS CORPORATION REV. 8/14/19 INST99-8249
INSTRUCCIONES DE INSTALACIÓN
99-8249
¡PRECAUCIÓN! Todos los accesorios, interruptores,
paneles de controles de clima y especialmente las
luces del indicador de las bolsas de aire deben estar
conectados antes ciclar la ignición. Además, no
quite el radio de fábrica con la llave en la posición o
de encendido ni con el vehículo funcionando.
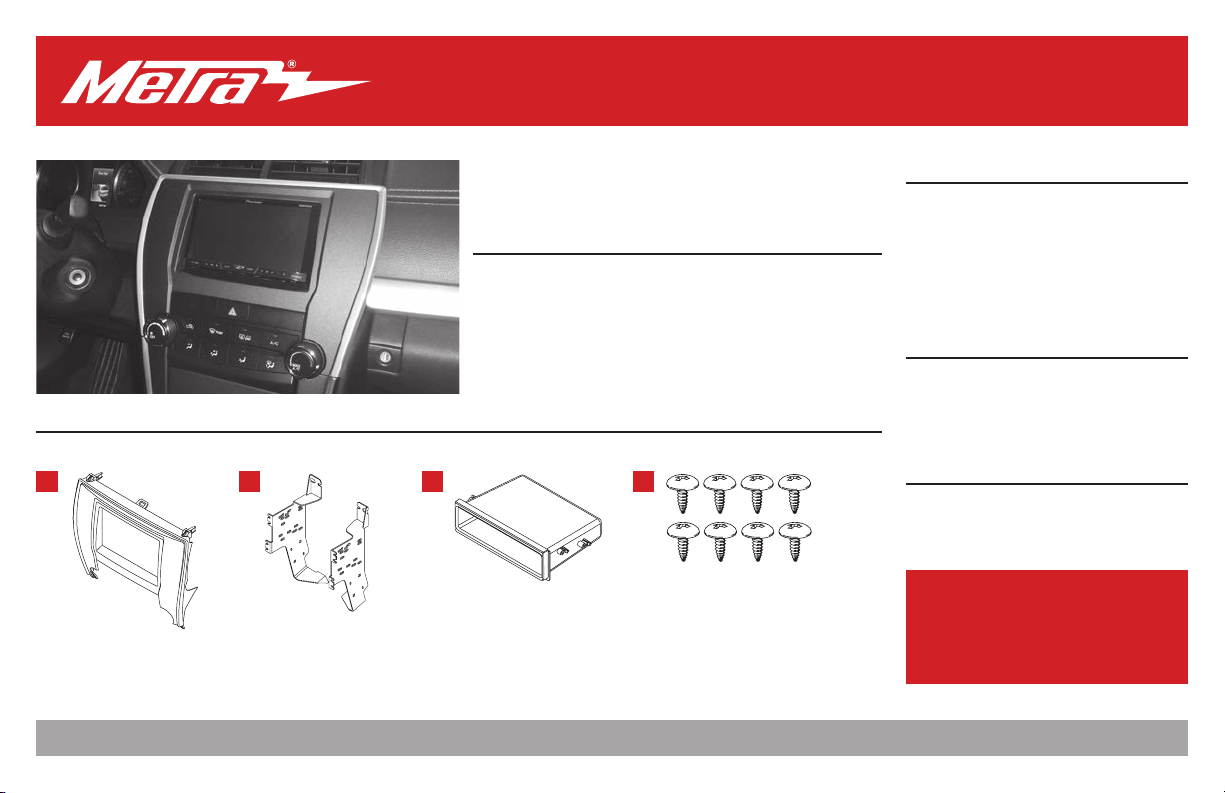
CARACTERÍSTICAS DEL KIT
• Provisión de radio ISO DIN con cavidad
• Provisión de radio ISO DDIN
• Hecho y pintado en múltiples colores para igualar el color
y la apariencia de fábrica
COMPONENTES DEL KIT
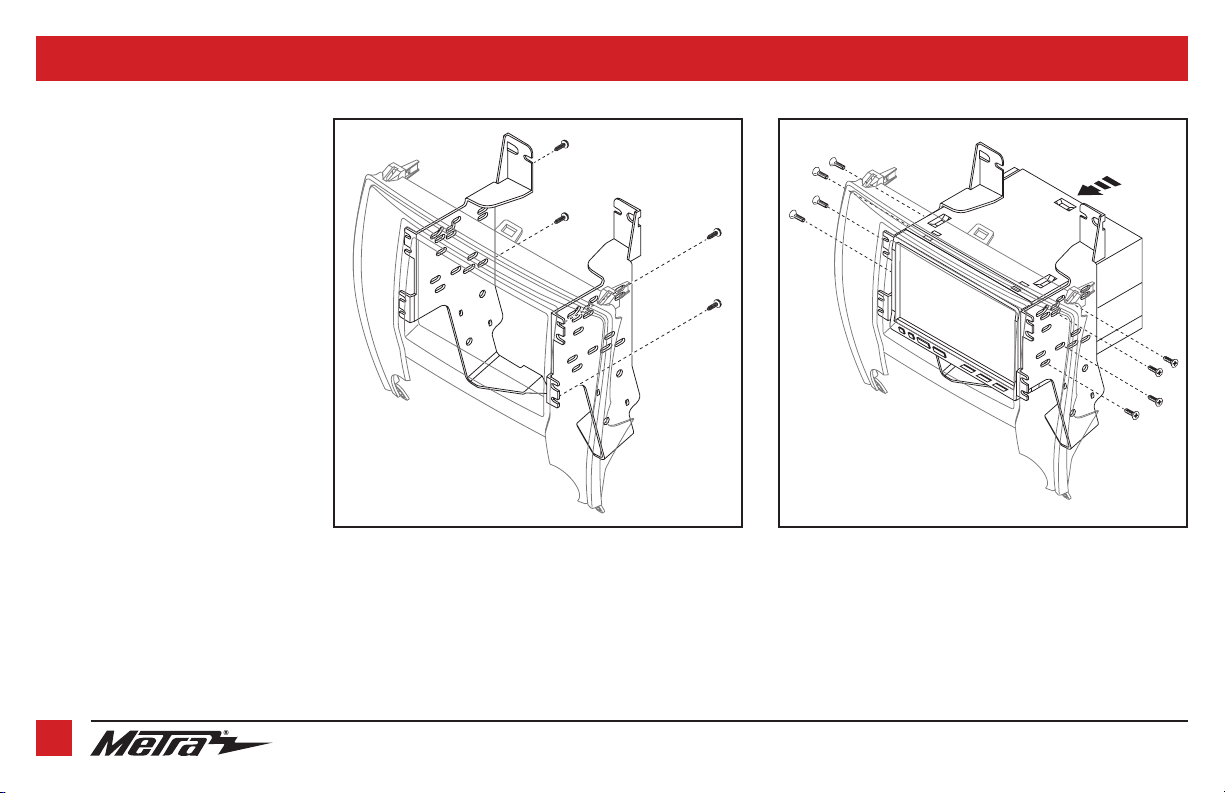
• A) Panel de la moldura del radio • B) Soportes del radio • C) Cavidad • D) Tornillos Phillips (8)
HERRAMIENTAS REQUERIDAS
• Herramienta para quitar paneles
• Destornillador Phillips
• Llave de tubo 10mm
INDICE
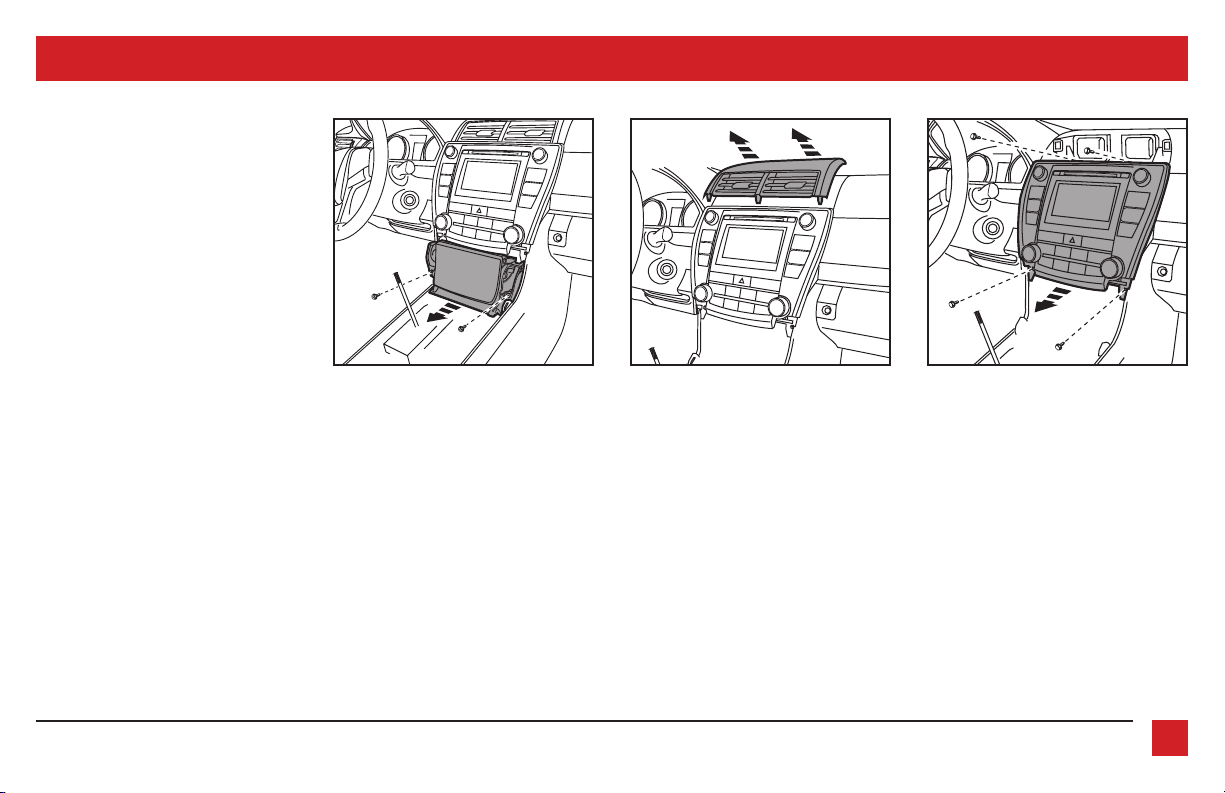
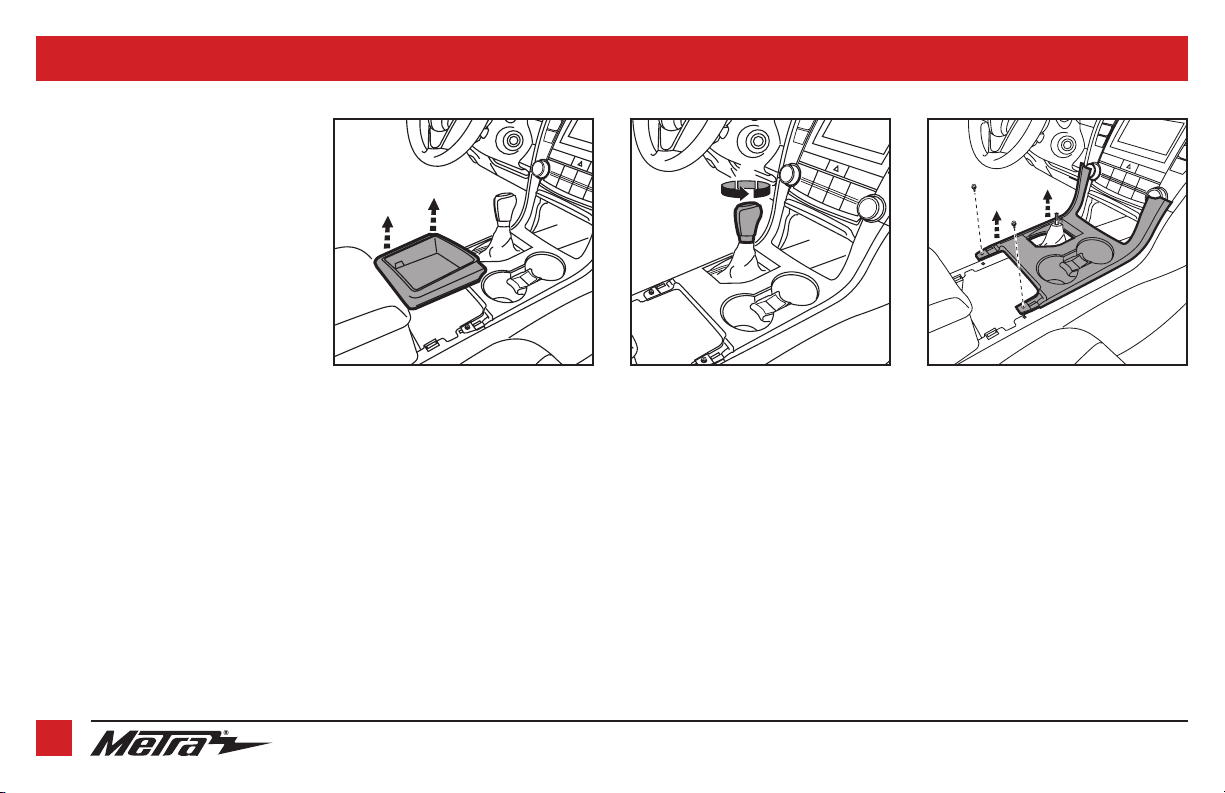
Desmontaje del tablero .....................................2-3
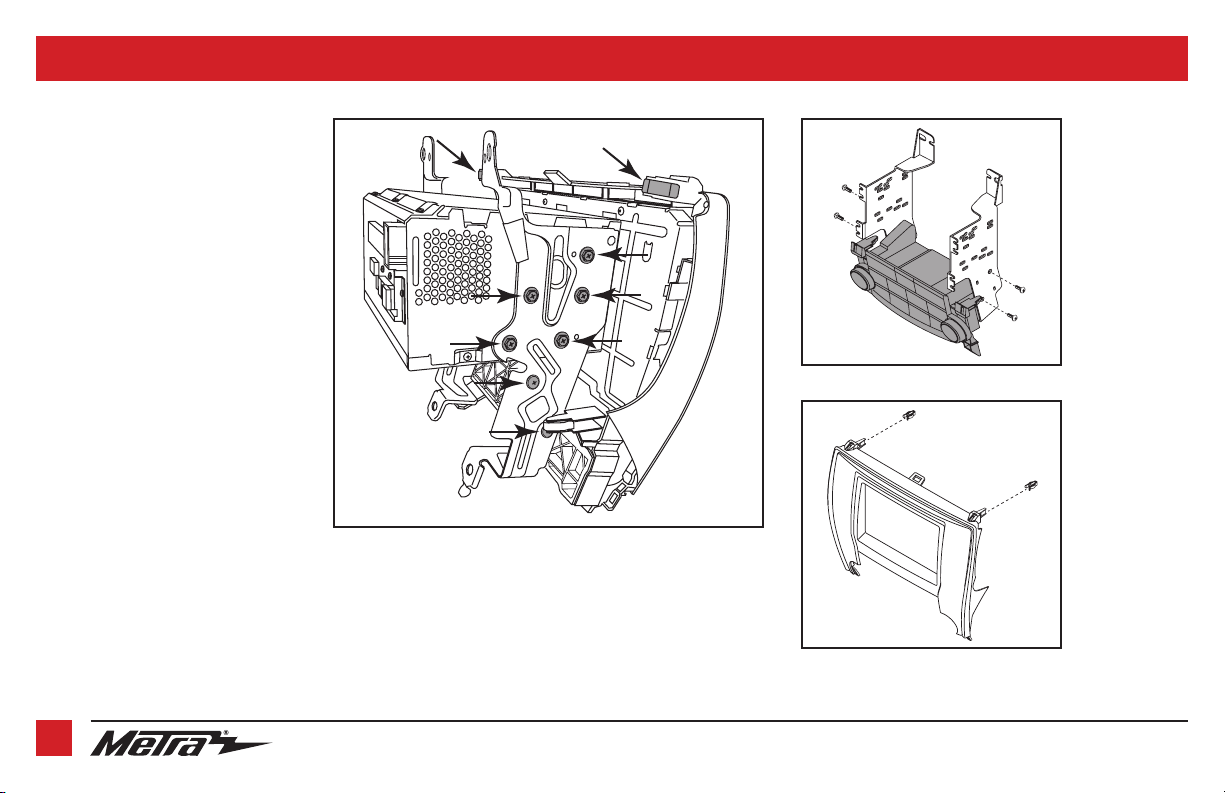
Preparación del kit .................................................4
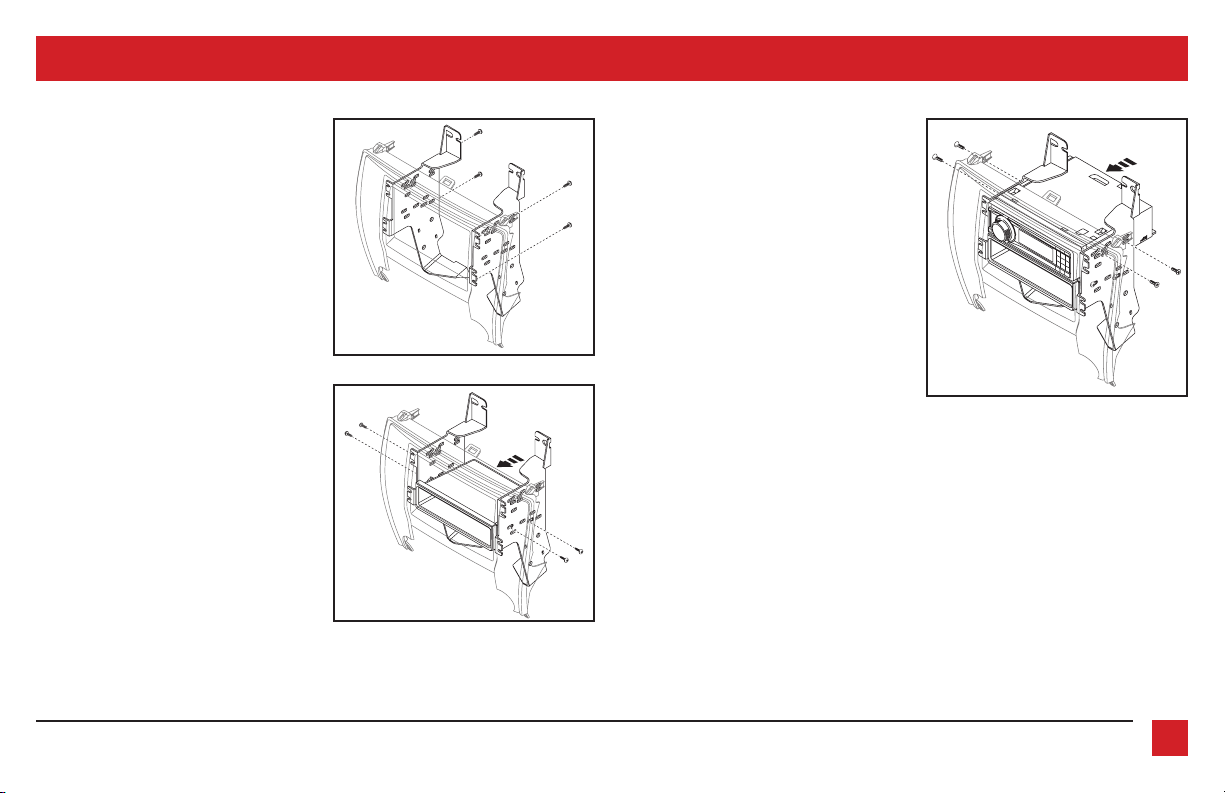
Ensamble del kit
–Provisión de radio ISO DIN con cavidad .............5
–Provisión de radio ISO DDIN................................6
CABLEADO Y CONEXIONES DE ANTENA
(se venden por separado)
Arnés de cables: • 70-1761
• TYTO-02 (modelos
amplificados)
Adaptador de antena: 40-LX11
Interfase de control en volante: ASWC-1
A B C D
Toyota Camry 2015-2017

1.800.221.0932
|
MetraOnline.com
2
DESMONTAJE DEL TABLERO
1. Desenganche y quite la charola de
almacenamiento de la consola. (Figura A)
2. Empuje el collar debajo de la perilla de
la palanca de velocidades y después
desatornille la perilla. (Figura B)
3. Quite los (2) tornillos Phillips de la
moldura de la palanca de velocidades,
desenganche y quite la moldura.
(Figura C)
Continúa en la siguiente página (Figura A) (Figura B) (Figura C)

REV. 8/14/2019 INST99-8249 3
DESMONTAJE DEL TABLERO (CONT)
4. Quite los (2) tornillos Phillips que sujetan
la cavidad de fábrica, desenganche y
quite la cavidad. (Figura D)
5. Desenganche y quite el panel de la
rejilla de encima del radio. (Figura E)
6. Quite los (4) tornillos de 10mm que
sujetan el ensamble del radio y clima de
fábrica (2 arriba y 2 abajo). (Figura F)
7. Deslice el conjunto de radio y control de
clima hacia afuera, luego desenchúfelo
y retírelo.
Continuar la preparación del kit
(Figura D) (Figura E) (Figura F)

1.800.221.0932
|
MetraOnline.com
4
PREPARACIÓN DEL KIT
(Figura A)
(Figura C)
(Figura B)
Desde el panel de control de clima / radio
de fábrica:
1. Afloje ligeramente (10) los tornillos
Phillips que sujetan los soportes de la
radio a la radio. (Figura A)
2. Retire (4) tornillos Phillips que
aseguran los controles climáticos, luego
desenganche y retire los controles.
(Figura A)
3. Retire (2) clips del panel de la radio.
(Figura A)
A los soportes de radio 99-8249:
4. Asegure los controles climáticos a los
soportes con los tornillos de fábrica.
(Figura B)
Al panel de recorte de radio 99-8249:
5. Fije los clips del panel de fábrica al
panel. (Figura C)
Continúe con el ensamble del kit

REV. 8/14/2019 INST99-8249 5
ENSAMBLE DEL KIT
(Figura A)
(Figura B)
(Figura C)
Provisión de radio ISO DIN con cavidad
1. Conecte el conjunto de soporte de
radio / controles climáticos al panel de
la carcasa de la radio con (4) tornillos
Phillips “suministrados. (Figura A)
2. Monte la cavidad en el ensamble de
soporte/panel con los (4) tornillos
Phillips restantes suministrados.
(Figura B)
3. Quite la manga de metal “DIN” y el
anillo de moldura del radio de mercado
secundario.
4. Deslice el radio en el ensamble y
sujételo con los tornillos suministrados
con el radio. (Figura C)
5. Localice el arnés de cableado de
fábrica y el conector de la antena en
el tablero y haga todas las conexiones
necesarias al radio. Metra recomienda
que use adaptadores adecuados de
acoplamiento de Metra y/o de AXXESS.
Pruebe el radio para verificar que
funcione correctamente.
6. Asegurar el ensamble del radio en el
tablero y vuelva a armar el tablero al
revés de como lo desarmó.
Los controles climáticos
no se muestran para
mayor claridad.

1.800.221.0932
|
MetraOnline.com
6
Provisión de radio ISO DDIN
1. Conecte el conjunto de soporte de
radio / controles climáticos al panel de
la carcasa de la radio con (4) tornillos
Phillips “suministrados. (Figura A)
2. Deslice el radio de mercado secundario
en el ensamble y sujételo con los
tornillos suministrados con el radio.
(Figura B)
3. Localice el arnés de cableado de
fábrica y el conector de la antena en
el tablero y haga todas las conexiones
necesarias al radio. Metra recomienda
que use adaptadores adecuados de
acoplamiento de Metra y/o de AXXESS.
Pruebe el radio para verificar que
funcione correctamente.
4. Asegurar el ensamble del radio en el
tablero y vuelva a armar el tablero al
revés de como lo desarmó.
ENSAMBLE DEL KIT
Los controles climáticos no se
muestran para mayor claridad.
(Figura A) (Figura B)

REV. 8/14/2019 INST99-8249 7

The World’s best kits.®MetraOnline.com © COPYRIGHT 2019 METRA ELECTRONICS CORPORATION REV. 8/14/19 INST99-8249
INSTRUCCIONES DE INSTALACIÓN
99-8249
KNOWLEDGE IS POWER
Enhance your installation and fabrication skills by
enrolling in the most recognized and respected
mobile electronics school in our industry.
Log onto www.installerinstitute.com or call
800-354-6782 for more information and take steps
toward a better tomorrow.
®
Metra recomienda técnicos
con certificación del Programa
de Certificación en Electrónica
Móvil (Mobile Electronics
Certification Program, MECP).
EL CONOCIMIENTO ES PODER
Mejore sus habilidades de instalación y
fabricación inscribiéndose en la escuela de
dispositivos electrónicos móviles más reconocida
y respetada de nuestra industria. Regístrese en
www.installerinstitute.com o llame al
800-354-6782 para obtener más información y
avance hacia un futuro mejor.
Si tiene dificultades con la instalación de este
producto, comuníquese con nuestra línea de soporte
técnico, ya sea por teléfono al 1-800-253-TECH, o
envíe un correo electrónico a techsupport@metra-
autosound.com. Antes de hacerlo, revise el folleto
de instrucciones por segunda vez y asegúrese de
que la instalación se realizó exactamente como
se indica en el manual de instrucciones. Tenga el
vehículo separado y listo para realizar los pasos de
solución de problemas antes de ponerse en contacto
con el soporte técnico de Metra / Axxess.
Other manuals for 99-8249
1
Table of contents
Languages:
Other Metra Electronics Automobile Electronic manuals
Popular Automobile Electronic manuals by other brands

Easylife
Easylife EL4866 instruction manual

ECVV
ECVV FV Rover Jaguar MixCAM installation manual

GU Electronic
GU Electronic AD-4G-151223 manual

Saab
Saab 32 025 603 installation instructions

Audiovox
Audiovox CMT405 operating instructions

Proxel
Proxel EPS-DUAL 2.0 with DISPLAY Installation instructions & user manual

Xpresskit
Xpresskit PKUCG2X installation guide

Continental Refrigerator
Continental Refrigerator KIBES brochure

HY Technologies
HY Technologies B-2681-04 user manual

Directed
Directed Directechs DB3 installation guide

Axxess
Axxess AXDSPL-HD1 installation instructions

VDO
VDO VIEWLINE 110 MM - MOUNTING 11-09 installation instructions