1
Important Safety Instructions TroubleShooting
WARNINGS:
1. Read Instructions - All the safety and operating instructions must be read before the product is operated.
2. Retain Instructions - The safety and operating instructions should be kept product for future reference.
3. Heed warnings - All warnings on the product and in the operating instructions should be adhered to.
4. Follow instructions - All operating and use instructions should be followed.
5. Installation - Install in accordance with the manufacturer's instructions.
6. Power sources - This product should be operated only from the type of power source indicated by the marking adjacent to
the power cord entry. If you are not sure of the type of power supply to your home, consult your product dealer or local
power company.
7. Grounding or polarisation - the is not required to be grounded. Ensure the plug is fully inserted into the wall outlet
or extension cord receptacle to prevent blade or pin exposure. Some versions of the product are equipped with a power
cord fitted with a polarized alternating line plug (a plug having one blade wide than the other). This plug will fit onto the
power outlet only one way. This is a safety feature. If you are unable to insert the plug fully into the outlet, try reversing the
plug. If the plug should still fail to fit, contact your electrician to replace your obsolete outlet. Do not defeat the safety
purpose of the polarised plug. When using an extension power-supply cord or a power-supply cord other than that
supplied with the appliance ,it should be fitted with the appropriate moulded-on plugs and carry safety approval
appropriate to the country of use.
8. Power cord protection - Power-supply cords should be routed so that they are not likely to be walked on, kinked or
pinched by items placed on or against them, paying particular attention to cords from plugs, receptacles and the point
where they exit from the appliance.
9. Overloading - Do not overload wall outlets, extension cords or multiple sockets, as this can result in a risk of fire or
electric shock.
10. Ventilation - The product must be properly ventilated. Do not place the product on a bed, sofa, or other similar surface.
Do not cover the product with any items such as tablecloths, newspapers, etc.
11. Heat - The product should be situated away from heat sources such as radiators, heat registers, stoves, or other
products) including amplifiers that produce heat.No naked flame sources,such as lighted candles, should be placed on
the apparatus.
12. Water and moisture - To reduce the risk of fire or electric shock, do not expose the product to train, dripping, splashing or
excessive moisture such as in a sauna or bathroom. Do not use this product near waterfor example, near a bathtub,
washbowl, kitchen sink, laundry tub, in a wet basement, or near a swimming pool and the like.
13. Object and Liquid Entry - Never push objects of any kind into this product through openings, as they may touch
dangerous voltage points or short-circuit parts that could result in a fire or electric shock. Never spill liquid of any kind on
the product. Do not place any object containing liquid on top of the product.
14. Cleaning - Unplug the product from the wall outlet before cleaning. The cabinet of the subwoofer may be cleaned by
dusting with a dry cloth. If you wish to use an aerosol cleaning spray, do not spray directly on the cabinet; spray onto the
cloth. Be careful not to damage the drive units.
15. Attachments - Do not use attachments not recommended by the product manufactures, as they may cause hazards.
16. Accessories - Do not place this product on an unstable cart, stand, tripod, bracket or table. The product may fall, causing
serious injury to a child or adult, and serious damage to the product. Use only with a cart, stand, tripod, bracket or table
recommended by the manufacturer or sold with the product. Any mounting of the product should follow the manufacturer's
instructions and should use a mounting accessory recommended by the manufacturer.
17. Moving the - A product and cart combination should be moved with care. Quick stops, excessive force and
uneven surfaces may cause the product and cart combination to overturn.
18. Unuse periods - The power cord of the appliance should be unplugged from the outlet during lightning storms or when the
apparatus is left unused for a long period of time.
product
product
Caution:
Explanation of Graphical Symbols:
To reduce the risk of electric shock, do not dismantle the product and do not expose the apparatus to rain or moisture. No
user-serviceable parts inside. Refer servicing to qualified personnel only.
“
”
The lightning flash within an equilateral triangle is intended to alert you to the presence of uninsulated dangerous
voltage within the product's enclosure that may be of sufficient magnitude to constitute an electric shock to a person or
persons.
The exclamation point within an equilateral triangle is intended to alert you to the presence of important operating and
6
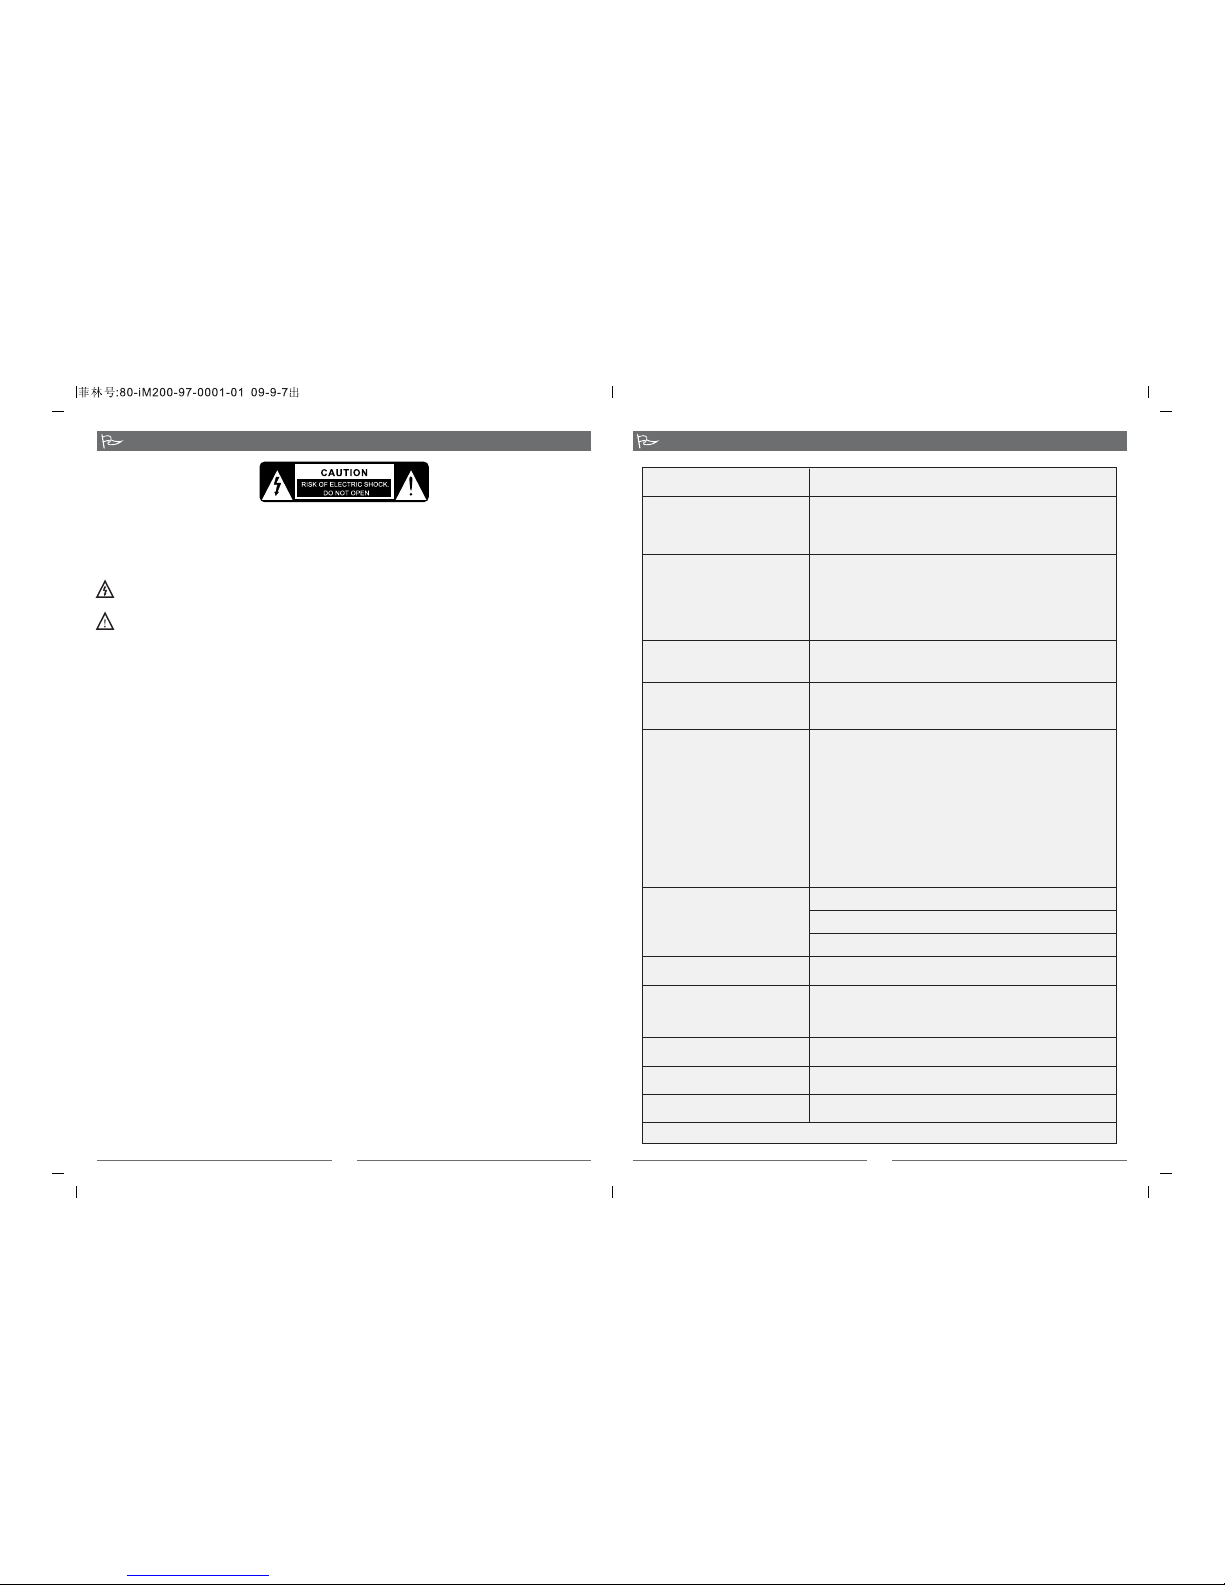
·
·
·
Ensure the dock insert is correct for the iPod type.
Remove the iPod and check for obstructions and foreign
objects on the interfaces.
Reseat the iPod again and test.
·
·
Ensure the power cable is correctly plugged into the wall,s
AC socket.
Ensure the iPod is firmly seated on the iDock
·
·
·
·
·
Ensure the system is plugged in and your iPod is turned ON,
and a music track is selected and played.
Depress the Play/Pause button on the remote control.
Increase the volume level.
Remove your iPod from the iDock, and wait briefly before
reinserting again. You might need to do this for several times.
Ensure your iPod is running with compatible software.
Frequently Asked Questions
(FAQ)
If the problem still exists, please contact the distributor or seek professional advice.
Your iPod does not dock properly
No Sound (iDock)
No sound and your iPod is not
charging
No sound after quickly undocking
or docking your iPod
Your iPod does not respond to the
iDock remote control buttons
shown:
·
·
Remove your iPod from the iDock and wait for 5 seconds.
Next reinsert the iPod to the iDock.
Unplug the power cable for 1 minute and the reinsert it
again. This will reset the system.
·
·
·
·
·
·
Remove your iPod from the iDock and pause briefly
before reinserting. You might need to repeat this several
times.
Try using the remote control from different locations. If it
works somewhere else, then strong lighting or other room
ambience might be affecting the Infrared signal.
Ensure no obstructions are in between the Infrared
sensor and the remote control. Wipe off any dirt or oil
stains on the lens of the remote control.
Ceck the remote control batteries and ensure the cell
positive side is facing up in the compartment tray.
Try replacing with fresh batteries.
Upgrade the software inside the iPod. For more details,
Check if the audio source is working well
Check if the audio and speaker cables well connected
Check if the volume at right level
Static sound heard when
volume knob is turned
What are the products
supported?
Where to place this speaker
Check if the source file is not corrupted, play a different song
and test.
Check if the satellite cable well connected, and ensure
source connection is correctly inserted
One or more satellite no sound
No Sound
Sound is distorted
Turn off the playback source first, then turn the speaker volume
knob several times. Playback again and monitor. The static
noise is due to dust, so simply turning the volume will remove it
easily.
It is magnetically shielded so can be placed near LCD TV
Monitor without any distortion
Any playback devices such as PC, notebook, CD/DVD
player, Media Players with 3.5mm stereo plug.
Solutions