Micromax T55 User manual

T55
Quick Start
Guide
www.micromaxinfo.com

1
CONTENTS
USER INTERACTIONS AND RESPONSIBILITIES ...........3
UNDERSTANDING YOUR PHONE....................5
INSERTING THE SIM CARD ......................6
CHARGING THE DEVICE ........................7
USING THE HANDSET KEYS ......................8
ON SCREEN BUTTONS .........................8
BASIC PHONE FEATURES ........................9
SIGNING IN WITH YOUR GOOGLE ACCOUNT...........9
CALLING..................................9
MAKING AND RECEIVING CALLS ..................9
WHEN YOU RECEIVE A CALL:...................11
CONTACTS ..............................12
MANAGING YOUR CONTACTS...................12
MESSAGING .............................12
MULTIMEDIA ..............................13
CAMERA ...............................13
SAR INFORMATION ..........................15
SAR COMPLIANCE .........................15
SAR RECOMMENDATIONS ....................15
METRO®BY T-MOBILE INFORMATION ...............16
SERVICE ...............................16
ACCOUNT DETAIL:.........................17
PAYMENT OPTIONS:........................17
MYMETRO®.............................18
FOR ASSISTANCE:.........................18
PLEASE FOLLOW US AT:......................19
METRO TERMS AND CONDITIONS OF SERVICE ........20
BILLING FOR PREMIUM AND THIRD-PARTY SERVICES ....22

2
WI-FI CALLING...........................22
FCC CAUTION:............................24
SAFETY PRECAUTIONS ........................26
TAKING CARE OF YOUR DEVICE ...................28
DEVICE RECOMMENDATIONS ...................28
TEMPERATURE AND HUMIDITY ...................29
RECYCLE YOUR PHONE ........................29
DISCLAIMERS..............................30
COPYRIGHT ...............................31
http://www.sartick.com/
The SAR-Tick label
confirms that your
mobile phone
complies with
international
exposure standards

3
User Interactions and
Responsibilities
(IEEE 1725, Section 9.2)
a) Do not disassemble or open, crush, bend
or deform, puncture or shred.
b) Do not modify or remanufacture, attempt
to insert foreign objects into the
battery, immerse or expose to water or
other liquids, expose to fire, explosion
or other hazard.
c) Only use the battery for the system for
which it is specified.
d) Only use the battery with a charging
system that has been qualified with the
system per CTIA Certification
Requirements for Battery System
Compliance to IEEE 1725. Use of an
unqualified battery or charger may
present a risk of fire, explosion,
leakage, or other hazard.
e) Do not short circuit a battery or allow
metallic conductive objects to contact
battery terminals.
f) Replace the battery only with another
battery that has been qualified with the
system per this standard, IEEE-Std-1725.
Use of an unqualified battery may
present a risk of fire, explosion,
leakage or other hazard.
Only authorized service providers shall
replace battery. (If the battery is non-
user replaceable).
g) Promptly dispose of used batteries in
accordance with local regulations.
h) Battery usage by children should be
supervised.

4
i) Avoid dropping the phone or battery. If
the phone or battery is dropped,
especially on a hard surface, and the
user suspects damage, take it to a
service center for inspection.
j) Improper battery use may result in a
fire, explosion or other hazard.
For those host devices that utilize a USB
port as a charging source, the host
device's user manual shall include a
statement that the phone shall only be
connected to CTIA certified adapters,
products that bear the USB-IF logo or
products that have completed the USB-IF
compliance program.

5
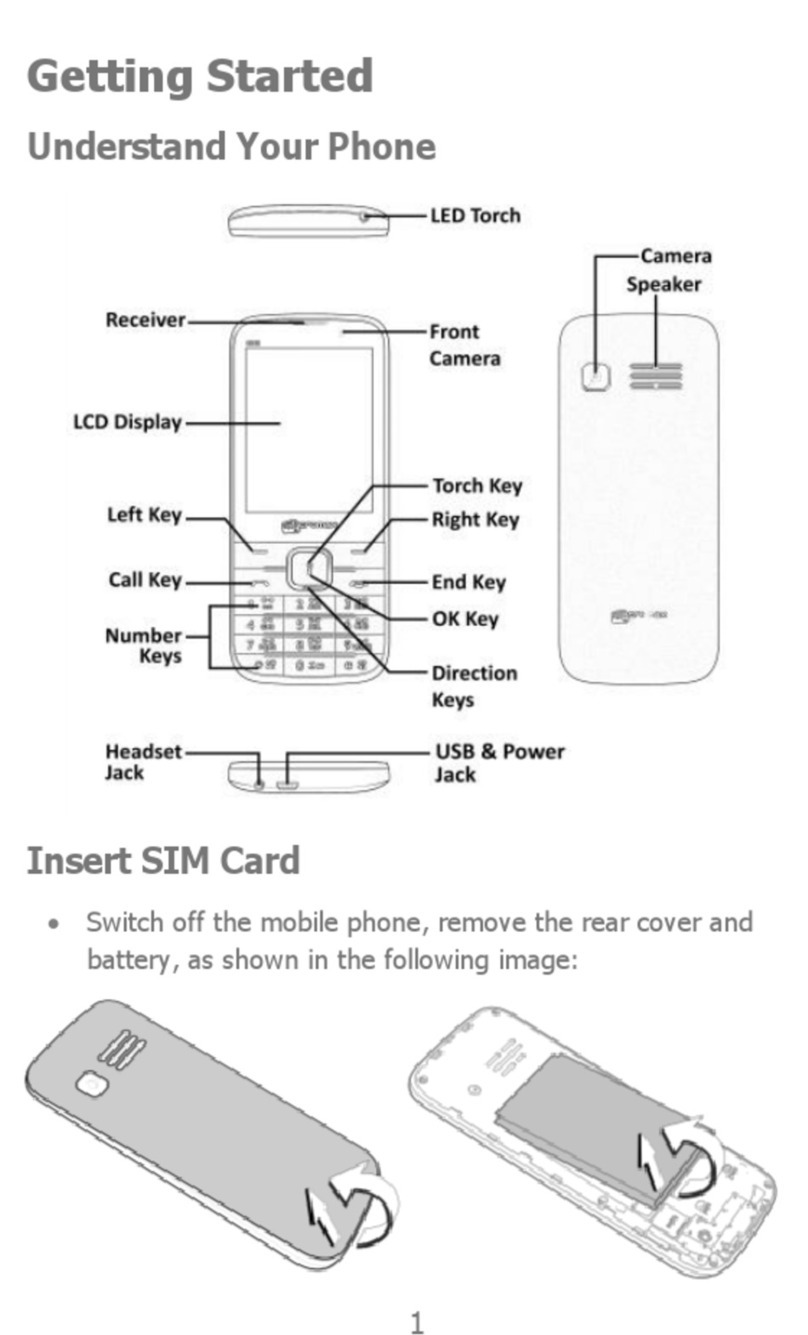
Understanding Your Phone
Top of the phone
Bottom of the phone
1
USB Jack
(Type-C)
8
Volume Up/Down
2
LED Front
Flash
9
Power On/Off
3
Display
10
3.5mm Headset
Jack
4
Microphone
1
1
Fingerprint
Sensor
5
Noise
Cancellation
Microphone
12
Rear Camera
6
Internal Ear
13
LED Flash

6
Speaker
7
Front Camera
14
External
Speaker
(Speakerphone)
Inserting the SIM Card
1. Turn off your phone and remove the
back cover and battery as shown.
2. Place the SIM card and micro SD
card (if available) in the slot(s),
as shown.
3. Replace the battery, then the back

7
cover of the phone.
Please keep the SIM card out of the
reach of children.
Charging the Device
Before first use, it is recommended that
the device is fully charged. To charge the
device, use the travel adapter and
USB-C data cable included in box with the
handset. Alternately, you can also charge
by connecting the device to a PC/Laptop via
the USB-C data cable. Maximum charging time
for the device is approximately 3 hours.
The device can be charged with the
travel adapter/USB-C data cable or
connecting the device to PC via the
USB-C data cable

8
Using the Handset Keys
Using the
Handset Keys
Functions
Long press the
Power On/Off key
to turn the phone
on or off.
Press once quickly
to wake the screen
or to turn off the
screen.
Long press to
view quick
options to Power
Off/ Restart/
Screenshot/
Emergency.
Adjust the volume
using the Volume
keys.
On Screen Buttons
Keys
Functions
Opens the most recently used
applications.
Short tap opens the Home

9
Screen.
Long tap to open Google
Assistant.
Back key or opens the previous
screen.
Basic Phone Features
Signing in with your Google Account
Your Google Account lets you take full
advantage of applications and services
offered by Google Android market. Create
or sign into your Google account to access
Gmail, Google Play Store, Google maps and
more.
Internet connection is required
for setting up Google account.
To sign in to your Google Account, go to
→→Accounts →Add account →Google.
Follow the registration steps to
successfully configure your Google mail.
Calling
Making and Receiving Calls
Open the Dialer application icon.
Enter the desired number from the
keyboard icon directly and touch
icon to place the call or select a
contact from Favorites icon or

10
Contacts icon by touching these
tabs, then choose the contact and tap
to place the call.
You can also use the Recent Calls tab
to place a call by choosing from
the list.
To end the call, tap the icon.

11
When you receive a call:
Incoming call: When your phone gets an
incoming call, you can answer a call
or decline a call.
Received call: Tap icon to
disconnect received call.

12
Contacts
Swipe up from the bottom of the screen
to open the App Tray.
Tap the contacts icon.
Tap icon to create a new contact
and press the "Save” button to add a
new contact.
Managing Your Contacts
Scroll up or down to find a contact or
tap the search icon and enter the
first few letters of the name to find
the contact.
Mark contact as a favourite in your
phonebook, tap icon to add your
contact in the favourite list.
Messaging
To compose, send or receive messages slide
your finger up on the home screen to open
the app tray. Tap icon to access
View list of
favorite contacts

13
messaging.
Tap to compose a message. To start
a conversation, enter name or phone
number in the search bar.
Tap type in the recipient's number
or select contact(s) from the contact
list.
Tap to send the message.
Multimedia
Camera
Tap icon to capture your memorable
moments.
Tap icon to open the camera.
The camera will detect and autofocus
the selected object.
Captu
re
Vide
o
mode
Swap
between
Front and
Back
Tap to view
pictures
in Gallery
Camer
a
Effec
ts
Camera
Setting
s
Flash
Modes
Camer
a
Modes

14
To re-focus another object just tap on
that object you want to focus.
Capture the moment simply tap icon.

15
SAR Information
SAR Compliance
Your device is designed not to exceed
the limits of emission of radio waves
recommended by international guidelines.
SAR (Specific Absorption Rate) is the
measurement of body-absorbed RF
quantity when the device is in use. SAR
value is ascertained according to the
highest RF level generated during
laboratory tests.
The SAR value of the device may depend
on factors such as proximity to the
network tower or use of accessories.
The SAR value of the device at the head
and body are 1.10W/kg and 1.40W/kg
averaged over 1 gm of human tissue.
The SAR limit for mobile devices is 1.6
W/kg.
SAR Recommendations
Use a wireless hands-free system
(headphone, headset) with a low power
Bluetooth emitter.
Keep your calls short and use SMS
whenever more convenient. This advice
applies especially to children,
adolescents and pregnant women.
Prefer to use your handset when the
signal quality is good.
People having active medical implants
should preferably keep the handset at
least 15 cm away from the implant.
Maintain a preferable distance of 15 mm
from the device.

16
Metro®by T-Mobile
Information
Service
You will need the following information
when activating service:
•Your name, address and an eight-digit
number that you will use to access your
account (your personal identification
number “PIN”).
Your serial number (IMEI) and SIM card
number. If your phone has a removable
battery, to locate the serial number,
remove the phone from the box and remove
the battery cover from the phone. The
serial number is located near the bar
code. It will be 14 to 18 digits. If your
phone does not have a removable battery,
check the box label or phone settings to
locate the serial number. The SIM card
number can be located below the bottom
bar code on the back of the SIM card
holder.
Your choice of Metro plan and services
including unlimited data, talk and text
plans.
Install the battery, if applicable, and
SIM card in your new phone by following
the step by step instructions in this
phone’s User Guide.
Once your phone is powered up, dial
1.888.8metro8 (1.888.863.8768) to
connect with an activation representative
who will assist you in activating your
phone. You can also activate your phone

17
online by visiting metrobyt-mobile.com.
(As soon as your service is activated, be
sure to fully charge the phone’s battery
before using it again.)
Don’t hesitate to ask your Metro
representative for more information on
additional features and services or visit
metrobyt-mobile.com.
Account Detail:
•Text Message Reminder. Metro provides a
text message reminder on your phone
before payment is due.
•E-statement. View your statement summary
online. (Only available in select
states.)
•Call Detail. View your call detail online
for a listing of all local calls made
during the service cycle. (Additional
charge applies.)
Payment Options:
There are several ways to pay for your Metro
service.
•AutoPay. Your credit or debit card is
automatically debited two days before
payment is due.
•Express Pay.
Pay by credit or debit card online at
metrobyt-mobile.com.
•By Mail. Include your account number and
phone number on your check or money order
and mail to Metro by T-Mobile, P.O. Box
5119, Carol Stream, IL 60197-5119.

18
•By Phone via Automated System. Pay by
credit or debit card from your Metro
phone by dialing 1.888.8metro8.
(Convenience fee applies.)
•Store Payment Machine.* Accepts cash,
debit or credit card (with PIN).
(Convenience fee applies.)
•Over the Counter.* Pay at an Authorized
Payment Location with cash, credit or
debit card.
•eWallet.
Sign up for MyAccount through metrobyt-
mobile.com and create your own secure
eWallet where you can safely store cards
for quick payment and set up autopay.
•Text to Pay. The secure and easy way to
pay your monthly Metro service. Register
your credit or debit card with the Metro
eWallet service and simply respond to a
text from PAYNOW (729699) to pay.
* Not available at all locations.
MyMetro®
•Manage your Metro account right on your
phone.
By dialing any of the customer service
numbers you can change your rate plan,
change your features and pay for service.
Just follow the instructions on your phone.
For Assistance:
Please visit your local Metro store or
refer to the following options if you need
additional assistance.
•Sign up for MyAccount to view account

19
details, check your balance, make a
payment, manage eWallet and more.
•Metro automated customer service from any
phone 1.888.8metro8 and follow the
prompts (1.888.863.8768)
•Online information metrobyt-mobile.com
Please follow us at:
@metrobytmobile
facebook.com/Metrobytmobile
Copyright:Metro, MetroPCS and other words,
slogans, designs and devices are registered
or unregistered trademarks of T-
Mobile USA, Inc. Copyright © 2019 T-Mobile
USA, Inc. All other trademarks and other
intellectual property are the properties of
their respective owners.
Your device may not work if you alter its
original software. This device will only
operate with firmware versions that have
been approved for use by Metro and the
device manufacturer. If unauthorized
firmware is placed on the device, it will
not function.
Hearing aid compatibility:This phone has
been tested and rated for use with hearing
aids for some of the wireless technologies
that it uses. However, there may be some
newer wireless technologies used in this
phone that have not been tested yet for use
Table of contents
Other Micromax Cell Phone manuals

Micromax
Micromax X396 User manual

Micromax
Micromax A310 User manual

Micromax
Micromax A62 User manual

Micromax
Micromax L2 User manual

Micromax
Micromax Q55 Bling User manual

Micromax
Micromax X771 User manual

Micromax
Micromax E471 Manual

Micromax
Micromax A94 User manual

Micromax
Micromax A108 User manual

Micromax
Micromax E460 User manual

Micromax
Micromax AE90 User manual

Micromax
Micromax X501 User manual

Micromax
Micromax Q392 User manual

Micromax
Micromax X512 User manual
Micromax
Micromax Q2+ User manual

Micromax
Micromax X245 User manual

Micromax
Micromax A093 User manual

Micromax
Micromax A54 User manual

Micromax
Micromax X395- Convertible User manual

Micromax
Micromax A66 User manual