Micromega Apex Pointer + User manual

APEX POINTER™
+
UTILISATION
INSTRUCTIONS
HANDBUCH
0459
ISTRUZIONI
INSTRUCCIONES
INTRUÇOES
F
GB
D
I
E
P

Apex Pointer
™
+
MANUEL D’UTILISATION 0459
INTRODUCTION
Nous vous remercions d’avoir choisi le localisateur d’apex Apex Pointer +. Il est compact,
convivial et d’une précision incomparable pour déterminer en quelques secondes la
longueur de travail exacte. Veuillez lire soigneusement les instructions d’utilisation et de
sécurité pour en tirer le meilleur parti.
INDICATIONS
Apex Pointer+est un appareil électronique qui détermine la position du foramen apical.
CONTRE-INDICATIONS
■Ne pas utiliser Apex Pointer +sur des patients qui ont un pacemaker implanté ou un
autre équipement qui a été signalé comme incompatible avec l’utilisation de petits
appareils électriques.
■Ne pas connecter Apex Pointer +à d’autres instruments et ne pas l’utiliser en
combinaison avec d’autres instruments ou systèmes.
■Mises en garde
• Ne pas utiliser de piles rechargeables. Seules des piles AA alcalines de type non-
rechargeable doivent être utilisées.
• La pince et le clip de lèvre doivent être connectés aux cordons de mesure après
avoir connecté les électrodes de mesure à l’unité. (marqué “PROBE” (Sonde)).
• Ne pas déconnecter les électrodes de mesure de l’unité avant de déconnecter la
pince et le clip de lèvre des cordons de mesure.
PRÉCAUTIONS
■Respecter les précautions suivantes pour ne pas détériorer Apex Pointer +ou obtenir
des valeurs affichées erronées :
• Eviter tout contact entre l’électrode de mesure et la lime dentaire avec des éléments
métalliques : prothèses fixées, obturations ou tout autre instrument.
• Eviter le contact d’Apex Pointer +avec des liquides.
• Eviter l’exposition d’Apex Pointer+à la lumière solaire directe ou à une température
supérieure à 70oC.
• Ne pas utiliser Apex Pointer +en présence de matières inflammables.
• Utiliser uniquement des piles alcalines de 1,5 Volt AA non-rechargeables et
s’assurer qu’elles sont insérées dans le bon sens de polarité. L’instrument peut être
endommagé en cas d’erreur de polarité.
Co
2
F

SPÉCIFICATIONS
■Apex Pointer +a une procédure d’autotest interne automatique lorsqu’il est mis en
marche.
■Apex Pointer+ne nécessite pas de calibrage : il est prêt à l’emploi dès la fin de l’autotest.
■La mesure est indépendante de l’état du canal : sec, humide, en présence de sang, de
solution saline, d’hypochlorite, ou d’autres liquides. Le type et la dimension de la lime
n’ont qu’une influence négligeable sur les valeurs affichées.
■Un affichage net à cristaux liquides (LCD), largement dimensionné fournit des données
simples et facilement exploitables.
■Les valeurs affichées sont directement reliées à la position de la pointe de la lime dans
le canal et à sa distance par rapport à la constriction apicale et à l’apex (foramen).
■Apex Pointer+utilise 4 piles standards 1,5 Volt AA.
■Une faible consommation d’énergie et un arrêt automatique garantissent une vie
prolongée des piles.
■Des indications sonores attirent l’attention du praticien lorsqu’il travaille dans la région
apicale.
■Le clip de lèvre et la pince peuvent être stérilisés dans un autoclave.
DESCRIPTION
Affichage LCD
Indication de la
position de la lime
Indication de la
constriction apicale Mise en marche (ON)
Bipeur Marche/Arrêt
(BUZ)
Indication de l’apex
Indication du bippeur
Connection
Arrêt (OFF)
Compartiment des piles
Voyant de charge des piles
Cordon de mesure Pince
Clip de lèvre Pile AA
3
Sonde de contact
F

REMPLACEMENT DES PILES
1. Eteindre l’appareil.
2. Déconnecter le cordon de mesure du connecteur de la sonde.
3. Ouvrir le couvercle du compartiment à piles en poussant
le clip de blocage vers le panneau frontal de Apex Pointer +
et soulever le couvercle.
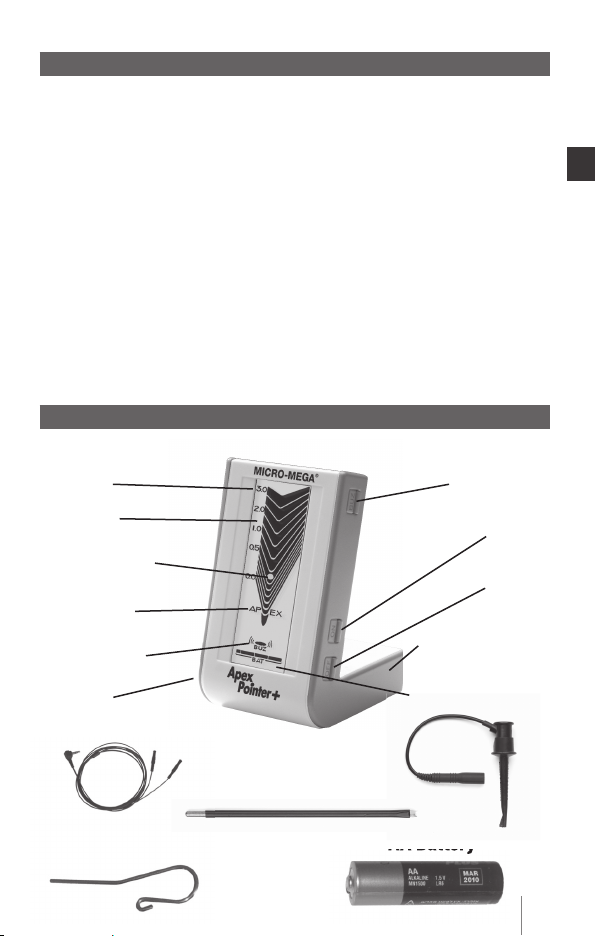
4. Placer les 4 piles AA alcalines non rechargeables de
1,5 Volt dans le compartiment dans le bon sens de polarité
en se conformant aux repères.
5. Remettre le couvercle en s’assurant que le clip de fixation est correctement fixé.
6. Apex Pointer+est maintenant prêt à fonctionner.
UTILISATION
1. Insérer la fiche électrique du cordon de mesure dans le connecteur sur le côté gauche
de l’instrument (marqué “PROBE”).
2. Mettre Apex Pointer +en route en appuyant brièvement sur le
bouton “ON”. Attendre que l’autotest soit terminé et qu’un bip
bref retentisse. L’affichage LCD est le suivant :
3. Vérifier que l’indicateur de charge des piles présente au moins
2 barres, sinon remplacer les piles.
4. Avant de placer les électrodes sur le corps du patient, mettre
en contact le clip de lèvre à la pince et vérifier que “File beyond
apex” est affiché.
5. Accrocher le clip de lèvre à la lèvre inférieure du patient et la
pince (ou la sonde de contact) à la lime.
• Important : la pince et le clip de lèvre doivent être
raccordés aux cordons de mesure après la connexion
des électrodes de mesure au connecteur de l’unité
marqué “PROBE”).
• Il ne faut pas déconnecter les électrodes de mesure
du connecteur de l’unité avant de déconnecter la
pince et le clip de lèvre des cordons de mesure.
6. La position de la pointe de la lime par rapport à l’apex est
indiquée sur l’écran d’affichage.
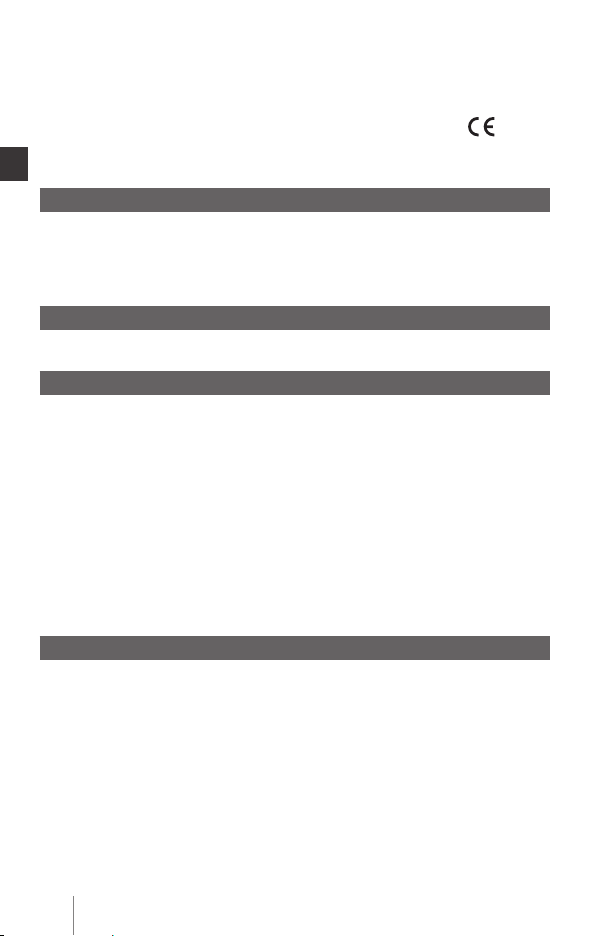
INDICATION DE LA POSITION DE LA LIME
■Zone pré-apicale
• Insérer prudemment la lime dans le canal et observer l’écran d’affichage de Apex
Pointer+. Les lignes en forme de V montrent la position de la pointe de la lime - la ligne
supérieure qui peut encore être visible indique la position de la pointe de la lime par
rapport à la constriction apicale et à l’apex.
4
Ecran
d’affichage
après
l’autotest
F

CONTRÔLE DU BIPEUR
■Lorsque l’on appuie sur le bouton supérieur du côté droit de l’écran, le bip est stoppé.
L’indicateur “BUZ” sur l’écran LCD passe de
■Pour réobtenir le bip, appuyer de nouveau sur le bouton.
ARRÊT AUTOMATIQUE
■Apex Pointer+s’arrête de lui-même après 2 minutes de fonctionnement si au moins une
des électrodes de mesure n’est pas connectée (lèvre ou lime).
■Vous pouvez également éteindre l’instrument à tout moment en appuyant un bref
instant sur le bouton “OFF”, qui est le bouton situé le plus bas sur le côté droit de
Apex Pointer+.
Lime
dans la zone
pré-apicale
Lime à la
constriction
apicale
Lime
à l’apex
(foramen)
Lime
au-delà de
l’apex
• La ligne avec la zone elliptique brillante avec sa partie inférieure associée à la valeur 0,5
indique la constriction apicale.
• Lorsque la lime atteint cette position – un bip répétitif se déclenche pour alerter le
chirurgien-dentiste.
■Zone apicale
• L’écran est divisé en 5 régions entre la constriction apicale et l’apex. Au fur et à mesure que
la lime progresse dans cette région, la fréquence du bip augmente. Lorsque l’apex est atteint,
la ligne V marquée 0,0 commence à clignoter. Lorsque l’apex est franchi, une indication
supplémentaire sous le mot APEX commence à clignoter et le bip devient continu.
5
à
F

PRÉCAUTIONS LORS DE L’UTILISATION
■Il est recommandé de ne pas utiliser Apex Pointer+sur des patients avec un pacemaker
implanté ou avec d’autres implants électriques.
■Eviter tout contact entre l’électrode de mesure et la lime dentaire avec des éléments
métalliques : prothèses fixées, obturations ou autres instruments.
■Eviter des niveaux de liquide élevés dans la cavité camérale ou dans le canal pour
empêcher la conduction électrique directe entre la lime et les tissus mous. Dans ce
cas, assécher le canal avec de l’air.
■Noter que des canaux avec des apex ouverts peuvent entraîner des mesures erronées.
■Les mesures dans des canaux non ouverts empêcheront le bon fonctionnement de
l’appareil.
■Eviter le contact d’Apex Pointer + avec des liquides.
■Eviter l’exposition d’Apex Pointer +à la lumière solaire directe ou à des températures
supérieures à 70°C.
■Ne pas utiliser Apex Pointer +en présence de matières inflammables.
■Utiliser seulement des piles alcalines AA de 1,5 Volt et s’assurer de leur insertion dans
le bon sens de polarité. Un sens de polarité incorrect peut endommager l’instrument.
Ne pas utiliser de piles rechargeables.
MAINTENANCE
■En dehors du remplacement occasionnel des piles, votre Apex Pointer +ne contient
pas d’autres éléments dont l’utilisateur peut assurer la maintenance. Tout service et
réparation doivent être effectués par du personnel qualifié. Apex Pointer +et ses
accessoires doivent être nettoyés avec un chiffon imprégné de savon et d’eau.
NE PAS UTILISER DE PRODUITS CHIMIQUES OU DE DETERGENTS.
■Le clip de lèvre et la pince doivent être stérilisés entre deux traitements dans un
autoclave (134°C).
GARANTIE
■Deux ans pour les appareils.
■Six mois pour les câbles.
■La garantie s’applique pour des conditions normales d’utilisation. Toute modification
non autorisée ou tout dommage par accident entraîne une suppression de la dite
garantie.
SPÉCIFICATIONS TECHNIQUES
• Modèle Apex Pointer+
• Type CE
• Standard de sécurité IEC60601-1
6
F

CONDITIONS ENVIRONNEMENTALES POUR LE TRANSPORT
• Température -10° à +70°C
• Humidité relative 10 % à 90 % sans condensation
• Pression 500 hPa à 1060 hPa.
CONDITIONS ENVIRONNEMENTALES POUR LE FONCTIONNEMENT
• Température 10-40°C
• Humidité 30-75 % HC (NC)
• Pression atmosphérique 10 15.5 PSI
EXPLICATION DES SYMBOLES
Le système est alimenté en énergie de manière autonome avec un équipement amovible
avec un élément BF appliqué et sans éléments entrée/sortie de signal. L’unité est un
équipement ordinaire et n’est pas destinée à être utilisée en présence de mélanges
inflammables.
• Alimentation électrique 6 Volts DC (4 x 1,5 volt - piles AA non-rechargeables)
• Consommation électrique 0,45 watt
• Tension de mesure 60 mV maximum
• Courant de mesure 11 µ
• Dimensions 70 x 90 x 120 mm (l x L x H)
• Affichage Ecran à cristaux liquides
• Poids 220 grammes (piles comprises).
MICRO-MEGA®
BP 1353 - 5-12 rue du Tunnel - F-25006 BESANÇON cedex
Tél.: + 33(0)3 81 54 42 42 - Fax: + 33(0)3 81 54 42 30
mmb@micro-mega.com - www.micro-mega.com
Eléments appliqués BF Attention, consulter
les documents
d’accompagnement
7
F

Apex Pointer
™
+
USER MANUAL 0459
INTRODUCTION
Congratulations for the purchase of the Apex Pointer+apex locator. Your new instrument
is compact, user friendly and provides incomparable precision in determining immediate
and exact working length in the root canal. Please read carefully the operation and safety
instructions to achieve the best advantages from the unit.
INDICATIONS
Apex Pointer+is an electronic apparatus for determining the apex location.
CONTRAINDICTIONS
Do not use the Apex Pointer +on patients with implanted heart pacemakers or other
equipment which have been warned against use of small electrical appliances.Do not
connect the Apex Pointer +to other instruments and do not use it in combination with
other instruments or systems.
WARNINGS
■Do not use rechargeable batteries. Only AA type non-rechargeable alkaline batteries
should be used.
■The file clip and the lip clip should be connected to the measuring cables after
connecting the measuring electrodes to the unit connector (marked PROBE).
■It is forbidden to disconnect the measuring electrodes from the unit connector before
the file clip and the lip clip disconnection from the measuring cables.
PRECAUTIONS
■To avoid damages to the Apex Pointer +or false display values ensure the following:
• Prevent contact between the measuring electrode and the dental file with metal
crowns, bridges, filling materials or another instrument.
• Avoid the exposure of the Apex Pointer+to liquids.
• Avoid exposure of the Apex Pointer +to direct sunlight or heat above 70oC.
• Do not use the Apex Pointer +in presence of flammable materials.
• Use only 1.5 Volt AA non-rechargeable alkaline batteries and make sure to insert
them in the correct direction. Wrong direction may harm the instrument.
M
8
GB

SPECIFICATIONS
■The Apex Pointer +has an automatic internal self test procedure operating when the
instrument is turned on.
■The Apex Pointer +does not need any calibration, it is ready to use immediately after
self test has elapsed.
■The measurement is independent of canal conditions – dry, humid with blood, Saline,
hypochlorite, or other liquids. File type or size might have only a negligible influence on
the displayed values.
■Large intuitive liquid crystal display (LCD) provides simple and intuitive data.
■The displayed values are directly related to the file tip location in the canal and to its
distance from the apical constriction and the apex.
■Apex Pointer+ uses easy to replace 4 standard 1.5 Volt AA batteries.
■Low power consumption and automatic turn off promise long battery life.
■Controlled audible indications with varying tone sequences draw the practitioner’s
attention when working in the vicinity of the apical region.
■The lip clip and the file clip can be sterilized in an autoclave.
DESCRIPTION
LCD display
File Location
Indication
Apical Constriction
Indication Off Button
Buzzer On/Mute
Apex Indication
Buzzer Indication
Signal Jack
Battery Compartment
Battery Level Indication
On Button
Measuring cable File clip
Lip clip AA Battery
9
Touch probe
GB

BATTERY REPLACEMENT
1. Turn off the instrument.
2. Disconnect the measuring wire from the probe connector.
3. Open the battery compartment cover by pushing the
locking clip towards the front panel of the Apex Pointer +
and lift the cover.
4. Place 4 x 1.5 Volt AA non-rechargeable alkaline batteries
into the compartment in the correct directions according to
the indication marks.
5. Put back the cover ensuring that the locking clip is fixed properly.
6. Apex Pointer+is now ready for work.
GETTING TO WORK
1. Insert the electric plug of the measuring wire into the signal jack on the left-hand side
panel (marked ‘PROBE’) of the instrument.
2. Turn on the Apex Pointer +by pressing shortly on the “ON”
button. Wait until the self test is completed and a short beep is
heard. The LCD appearance is the following:
3. Verify that the battery indicator shows a level of at least 2 lines,
otherwise replace the batteries.
4. Before applying the electrodes to the patient’s body connect
the lip clip to the file clip and verify that the display shows “File
beyond apex”.
5. Connect the lip clip to the patient’s lower lip and the file clip
or the touch probe to the file that is inserted into the treated
root canal.
• Important: The file clip and the lip clip should be
connected to the measuring cables after connecting
the measuring electrodes to the unit connector
(marked PROBE).
• It is forbiddentodisconnectthe measuring electrodes
from the unit connector before the file clip and the lip
clip disconnection from the measuring cables.
6. The location of the file tip in reference to the apex will be
indicated on the display.
FILE LOCATION INDICATION
■Pre-apical zone
• Carefully insert the file into the canal and observe the display of the Apex Pointer+. The
V shaped scale lines show the location of the file tip – the upper line that can still be seen
indicates the location of the file tip with respect to the apical constriction and the apex.
10
Display after
self test
GB

BUZZER CONTROL
■When the upper button on the right-hand side panel is pressed, the beep is muted. The
“BUZ” indicator on the LCD changes from
■To recover the beep, press the button again.
AUTO-SHUT OFF
■The Apex Pointer +turns itself off after 2 minutes of operation if at least one of the
measuring electrodes is not connected to the lip or to the root canal respectively.
■You may also shut off the instrument whenever you wish by pressing shortly on the
“OFF” button which is the lowest button on the right-hand side panel of the Apex
Pointer+.
File at pre-
apical zone File at apical
constriction File at apex
foramen File beyond
apex
• The line with the bright elliptical area at its bottom associated with the reading 0.5
indicates the apical constriction.
• When the file reaches this position – a beating beep starts to alert the dentist.
■Apical zone
• Between the apical constriction and the apex the scale is divided into 5 regions. As long as
you insert the file deeper into this region the beep tact increases. When the apex is reached
the V line marked with 0.0 starts to blink. When the apex is intruded an extra indication
below the word apex starts also to blinks and the beep becomes continuous.
11
to
GB

12
USER PRECAUTIONS
■We recommend not using the Apex Pointer +on patients with implanted pacemakers
or other electrical implants.
■Prevent contact between the measuring electrode and the dental file with metal crowns,
bridges, filling materials or another instrument.
■Avoid high level of liquid in the cavity or in the root canal in order to prevent direct
electrical conductance between the file and the soft tissue. In this case dry the canal
with air stream.
■Note that canals with open apices may cause erroneous measurements.
■Measurements in canals without patency will prevent proper operation of the instrument.
■Avoid the exposure of the Apex Pointer+to liquids.
■Avoid exposure of the Apex Pointer +to direct sunlight or heat above 70oC.
■Do not use the Apex Pointer +in presence of flammable materials.
■Use only 1.5 Volt alkaline AA batteries and make sure to insert them in the correct
direction. Wrong direction may harm the instrument. Do not use rechargeable batteries
MAINTENANCE
■Besides occasional battery replacement, your Apex Pointer +does not contain any
user serviceable parts. Any service and repair should be performed by authorized
service personnel.
■The Apex Pointer+and its accessories may be cleaned with a cloth impregnated with
soap and water. DO NOT USE CHEMICAL AGENTS OR DETERGENTS.
■The lip clip and the file clip be sterilized by autoclave (134oC).
GUARANTEE
■Two year for instruments.
■Six months for cables.
■The guarantee is applicable under normal conditions of use and will be deemed void in
the event of accidental damage or any unauthorized modification.
TECHNICAL SPECIFICATIONS
• Model Apex Pointer+
• Type CE
• Safety Standard IEC60601-1
The system is internally powered continuous operated movable equipment with BF applied
part and without signal input/output parts. The unit is ordinary equipment and is not
intended for use in the presence of flammable mixtures.
• Power Supply
6 Volt DC (4x1.5 volt - AA non-rechargeable batteries)
• Power Consumption 0.45 Watt (typical)
• Measuring voltage 60mV (maximum)
• Measuring Current 11µA
• Dimensions 70 x 90 x 120 mm (W x D x H)
• Display Reflective Liquid crystal
• Weight 220 gr (including batteries)
GB

13
ENVIRONMENTAL CONDITIONS FOR TRANSPORTATION
• Temperature -10° to +70°C
• Relative Humidity 10% to 90%, non condensing
• Pressure 500 HPA to 1060 HPA.
ENVIRONMENTAL CONDITIONS FOR OPERATION
• Température 10-40°C
• Humidity: 30 – 75% RH (NC)
• Pressure: 10 – 15.5 PSI
EXPLANATION OF SYMBOLS
BF applied parts Attention, consult
accompanying
documents
GB

Apex Pointer
™
+
GEBRAUCHSANWEISUNG 0459
EINFÜHRUNG
Glückwunsch zum Kauf des Apex-Suchgerätes Apex Pointer +: Es ist kompakt,
benutzerfreundlich und von unvergleichlicher Genauigkeit und Geschwindigkeit bei
der Bestimmung der genauen Arbeitslänge. Lesen Sie bitte die Bedienungs- und
Sicherheitsanweisungen sorgfältig durch, um daraus den größten Nutzen zu ziehen.
INDIKATIONEN
Apex Pointer +ist ein elektronisches Gerät zur Bestimmung der Position des Foramen apicale.
GEGENANZEIGEN
■Verwenden Sie das Apex Pointer +nicht bei Patienten, die einen Schrittmacher oder
ein anderes Gerät implantiert haben, das als inkompatibel mit dem Gebrauch kleiner
elektrischer Geräte gekennzeichnet ist.
■Verbinden Sie das Apex Pointer +nicht mit anderen Instrumenten und verwenden Sie
es nicht in Kombination mit anderen Instrumenten und Systemen.
■Warnung:
• Keine aufladbaren Batterien verwenden. Es dürfen nur nicht aufladbare Alkali-
Mangan-Batterien der Größe AA verwendet werden.
• Die Feilenklemme und der Lippenhaken dürfen erst mit den Messleitungen
verbunden werden, nachdem die Messelektroden an die Einheit angeschlossen wurden
(Anschluss „PROBE“).
• Die Messelektroden nicht von der Einheit trennen, bevor die Feilenklemme und der
Lippenhaken von den Messleitungen getrennt sind.
VORSICHTSMASSNAHMEN
■Beachten Sie die folgenden Vorsichtsmaßnahmen, um das Apex Pointer + nicht zu
beschädigen oder falsche Anzeigewerte zu erhalten:
• Jeden Kontakt zwischen der Messelektrode und der Zahnfeile mit Metallteilen
vermeiden: feste Prothesen, metallische Füllungen oder jedem anderen
Instrument.
• Vermeiden Sie es, das Apex Pointer +Flüssigkeiten auszusetzen.
• Vermeiden Sie es, das Apex Pointer +dem direkten Sonnenlicht oder einer
Temperatur über 70oC auszusetzen.
• Verwenden Sie das Apex Pointer+nicht in Gegenwart entflammbarer Materialien.
• Verwenden Sie nur nicht aufladbare Alkali-Mangan-Batterien der Größe AA von 1,5
14
D

Volt und stellen Sie sicher, dass sie in der richtigen Polarität eingesetzt werden. Im Falle
eines Polaritätsfehlers kann das Gerät beschädigt werden.
SPEZIFIKATIONEN
■Das Apex Pointer +führt beim Einschalten einen internen automatischen Selbsttest durch.
■Das Apex Pointer +benötigt keine Kalibrierung: Am Ende des Selbsttests ist es
betriebsbereit.
■Die Messung ist unabhängig vom Zustand des Kanals: trocken, feucht durch Blut,
Salzlösung, Hypochlorit oder andere Flüssigkeiten. Der Typ und das Maß der Feile
haben nur vernachlässigbaren Einfluss auf die angezeigten Werte.
■Eine groß dimensionierte deutliche Flüssigkristallanzeige (LCD) liefert einfache und
leicht auszuwertende Daten.
■Die angezeigten Werte sind direkt mit der Position der Spitze der Feile im Kanal und
ihrem Abstand zur apikalen Verengung und zum Apex verknüpft.
■Das Apex Pointer +verwendet 4 Standard-Batterien 1,5 V AA.
■Geringer Stromverbrauch und automatisches Abschalten garantieren eine verlängerte
Lebensdauer der Batterien.
■Akustische Signale machen den Arzt aufmerksam, wenn er in der Nähe des Apex arbeitet.
■Der Lippenhaken und die Feilenklemme können in einem Autoklaven sterilisiert werden.
BESCHREIBUNG
LCD-Anzeige
Anzeige
der Position der Feile
Anzeige der
apikalen Verengung Ein (ON)
Piepton An/Aus
(Buz)
Anzeige des Apex
Anzeige des Pieptons
Anschluss
Aus (OFF)
Batteriefach
Batterieladeeanzeige
Messleitung Feilenklemme
Lippenhaken Batterie AA
15
Kontaktsonde
D

AUSTAUSCH DER BATTERIEN
1.
Gerät ausschalten
2.
Messleitung vom Sondenanschluss trennen.
3.
Deckel des Batteriefaches durch Drücken des Verschlussclips
in Richtung der Vorderseite des Apex Pointer +öffnen und
Deckel anheben.
4.
Die 4 nicht aufladbaren Alkali-Mangan-Batterien Größe
AA von 1,5 V mit der richtigen Polarität entsprechend den
Markierungen in das Fach legen.
5.
Deckel wieder aufsetzen und dabei auf das korrekte Einrasten des Befestigungsclips achten.
6.
Das Apex Pointer +ist jetzt betriebsbereit.
VERWENDUNG
1.
Den Stecker der Messleitung in den Anschluss auf der linken Seite des Gerätes (markiert
mit “PROBE“) stecken.
2.
Das Apex Pointer +durch Drücken der Taste „ON“ einschalten.
Abwarten, bis der Selbsttest abgeschlossen ist und ein kurzer
Piepton zu hören ist. Die LCD-Anzeige sieht wie folgt aus:
3.
Überprüfen Sie, ob der Batterieladeanzeiger mindestens 2 Balken
anzeigt, sonst: Batterien ersetzen.
4.
Bevor die Elektroden auf den Körper des Patienten gesetzt
werden, verbinden Sie den Lippenhaken mit der Feilenklemme und
kontrollieren Sie, daß die Anzeige «File Beyond Apex» zeigt.
5.
Klemmen Sie den Lippenhaken an die Unterlippe des Patienten und
die Feilenklemme (oder die Kontaktsonde) an die Feile.
• Wichtig: Die Feilenklemme und der Lippenhaken dürfen
erst an die Messleitungen angeschlossen werden,
nachdem die Messelektroden mit dem mit “PROBE“
markierten Anschluss der Einheit verbunden wurden.
• Es ist untersagt, die Messelektroden vom Anschluss
der Einheit zu trennen, bevor die Feilenklemme und der
Lippenhaken von den Messleitungen getrennt sind.
6.
Die Position der Spitze der Feile bezüglich des Apex wird auf dem Bildschirm angezeigt.
ANZEIGE DER POSITION DER FEILE
■Apex vor dem Bereich
• Vorsichtig die Feile in den Kanal einführen und den Anzeigebildschirm des Apex Pointer +
beobachten. Die V-förmigen Linien zeigen die Position der Spitze der Feile: Die obere Linie, die
noch sichtbar sein kann, zeigt die Position der Feilenspitze bezüglich der apikalen Verengung
und des Apex.
16
Anzeigeschirm
nach dem
Selbsttest
D

KONTROLLE DES PIEPTONS
■Drückt man auf die obere Taste an der rechten Seite des Bildschirms, wird der Piepton
gestoppt. Die Anzeige „BUZ“ auf dem LCD-Bildschirm geht von
■Zum Reaktivieren des Pieptons erneut auf die Taste drücken.
AUTOMATISCHES AUSSCHALTEN
■
Das Apex Pointer+schaltet sich nach 2 Minuten Betrieb selbst aus, wenn mindestens eine
der Messelektroden nicht angeschlossen ist (Lippe oder Feile).
■Sie können das Gerät auch jederzeit durch kurzen Druck auf die Taste „OFF“ ausschalten.
Feile im Bereich
vor dem Apex Feile bei der
apikalen Verengung Feile am Apex Feile über den
Apex hinaus
•
Die Linie mit dem hellen elliptischen Bereich, deren unterer Teil dem Wert 0,5 zugeordnet
ist, zeigt die apikale Verengung an.
•
Wenn die Feile diese Position erreicht, wird ein wiederholter Piepton ausgelöst, um den
Zahnchirurgen aufmerksam zu machen.
■Apikaler Bereich
•
Der Bildschirm ist in 5 Gebiete zwischen der apikalen Verengung und dem Apex eingeteilt. Je
nach Vordringen der Feile in diesem Bereich erhöht sich die Häufigkeit des Pieptons. Wenn der
Apex erreicht ist, beginnen die mit 0,0 markierte V zu blinken. Wenn der Apex überschritten
ist, beginnt eine zusätzliche Anzeige unter dem Wort APEX zu blinken und der Piepton wird
dauerhaft.
17
zu
D

VORSICHTSMASSNAHMEN BEIM GEBRAUCH
■
Es wird empfohlen, das Apex Pointer +nicht bei Patienten mit einem implantierten
Schrittmacher oder anderen elektrischen Implantaten zu verwenden.
■
Jeden Kontakt zwischen der Messelektrode und der Zahnfeile mit Metallteilen vermeiden:
feste Prothesen, metallische Füllungen oder andere Instrumente.
■
Vermeiden Sie einen zu hohen Flüssigkeitsspiegel in der Kammerhöhle oder im Wurzelkanal,
um eine elektrische Leitung zwischen der Feile und des weichen Stoffes zu verhindern. In
diesem Fall trocknen Sie den Kanal mit Luft.
■
Beachten Sie, dass Kanäle mit einem offenen Apex zu falschen Messungen führen können.
■Messungen
in Kanälen, die nicht offen sind, verhindern das angemessene Funktionieren
des Gerätes.
■
Vermeiden Sie es, das Apex Pointer +Flüssigkeiten auszusetzen.
■
Vermeiden Sie es, das Apex Pointer +dem direkten Sonnenlicht oder einer Temperatur
über 70°C auszusetzen.
■
Verwenden Sie das Apex Pointer +nicht in Gegenwart entflammbarer Materialien.
■
Nur Alkali-Mangan-Batterien von 1,5 Volt der Größe AA verwenden und sicherstellen,
dass sie in der richtigen Polarität eingesetzt werden. Falsche Polarität kann das Gerät
beschädigen.
WARTUNG
■
Außer gelegentlichem Austausch der Batterien enthält Ihr Apex Pointer +keine anderen
Teile, für deren Wartung der Anwender sorgen muss. Alle Service- und Reparaturarbeiten
müssen durch qualifiziertes Personal durchgeführt werden. Das Apex Pointer +und sein
Zubehör müssen mit einem mit Seifenwasser getränkten Tuch gereinigt werden.
KEINE CHEMISCHEN PRODUKTE ODER REINIGUNGSMITTEL VERWENDEN.
■
Der Lippenhaken und die Feilenklemme müssen zwischen zwei Behandlungen in einem
Autoklaven (134°C) sterilisiert werden.
GARANTIE
■Zwei Jahre für die Geräte.
■Sechs Monate für die Kabel.
■Die Garantie gilt für normale Verwendungsbedingungen. Bei unautorisierten Eingriffen
oder Fallschäden verliert die Garantie ihre Gültigkeit.
TECHNISCHE DATEN
• Modell
Apex Pointer+
• Typ CE
• Sicherheitsstandard IEC60601-1
Das System wird autonom mit Energie versorgt mit einer abnehmbaren Einrichtung mit
einem angewandten NF-Element und ohne Signal-Ein-/Ausgangselemente. Die Einheit
ist eine gewöhnliche Einrichtung und nicht zur Verwendung in Gegenwart entflammbarer
Gemische bestimmt.
18
D

UMGEBUNGSBEDINGUNGEN FÜR DEN TRANSPORT
• Temperatur: -10° bis + 70°C
• Relative Feuchtigkeit: 10 % bis 90 % ohne Kondensation
• Druck: 500 hPa bis 1060 hPa
UMGEBUNGSBEDINGUNGEN FÜR DEN BETRIEB
• Temperatur 10-40°C
• Feuchtigkeit 30-75% o. K.
• Atmosphärischer Druck: 10 15.5 PSI
ERKLÄRUNG DER SYMBOLE
• Elektrische Versorgung: 6 Volt DC (4x1,5 V–nicht aufladbare Batterien AA)
• Elektrischer Verbrauch: 0,45 Watt
• Messspannung maximal 60 mV
• Messstrom 11 µA
• Maße 70 x 90 x 120 mm (H x B x T)
• Anzeige reflektierende Flüssigkristallanzeige
• Gewicht 220 Gramm (einschließlich Batterien)
Angewandte NF-
Elemente Achtung,
Begleitdokumente
beachten
19
D

Apex Pointer
™
+
ISTRUZIONI 0459
INTRODUZIONE
Congratulazioni per l’acquisto del localizzatore di apice - Apex Pointer +: È compatto,
interattivo e di una precisione senza precedenti per determinare in alcuni secondi la
lunghezza di lavoro. Leggete accuratamente le istruzioni per l’uso e le raccomandazioni
per la sicurezza per trarne i massimi vantaggi.
INDICAZIONI
Apex Pointer +è un apparecchio elettronico che determina la posizione del foramen apicale.
CONTROINDICAZIONI
■L’uso di Apex Pointer +è sconsigliato per i pazienti che portano un pacemaker
impiantato o un qualsiasi dispositivo che sia stato dichiarato incompatibile con l’uso
di apparecchi elettrici.
■Non collegate l’Apex Pointer +ad altri strumenti e non utilizzarlo in associazione ad
altri strumenti o sistemi.
■Avvertenze
• Non utilizzare pile ricaricabili. Devono essere utilizzate esclusivamente pile AA
alcaline di tipo non ricaricabile
• L’elettrodo a clip per lima e l’elettrodo a gancio labiale devono essere connessi
ai cordoni di misura dopo aver collegato gli elettrodi di misura all’unità.
(marcata(“PROBE” (SONDA)).
• Non scollegate gli elettrodi di misura dall’unità prima di aver scollegato l’elettrodo a
clip per lima e l’elettrodo a gancio labiale dai cordoni di misura.
PRECAUZIONI
■
Rispettare le raccomandazioni seguenti per non danneggiare l’Apex Pointer +o ottenere
valori errati:
• Evitare qualsiasi contatto dell’elettrodo di misura e della lima odontoiatrica con
elementi metallici: protesi fissate,otturazioni o qualsiasi altro strumento.
• Evitare il contatto dell’Apex Pointer +con liquidi.
•
Evitare l’esposizione dell’Apex Pointer +alla luce solare diretta o a temperature superiori
a 70°C.
•
Non utilizzare l’Apex Pointer +in presenza di prodoti infiammabili.
•
Utilizzare esclusivamente pile alcaline da 1,5 Volt AA non ricaricabili e verificare che
le polarità siano rispettate. Lo strumento puo essere danneggiato in caso di errore di
polarità.
Co
a
20
I
Table of contents
Languages:
Other Micromega Dental Equipment manuals
Popular Dental Equipment manuals by other brands

Yeti
Yeti IQ Waxer NT light 230 V Instructions of use

Durr Dental
Durr Dental VistaRay 5 Installation and operating instructions

Heka Dental
Heka Dental UnicLine 5D OPERATING AND TECHNICAL INSTRUCTIONS

TPC
TPC ProClean Extra Oral Suction Operation manual

Ivoclar Vivadent
Ivoclar Vivadent Programat CS2 Short instructions

DentalEZ
DentalEZ StarDental 430 SWL Torque quick start guide