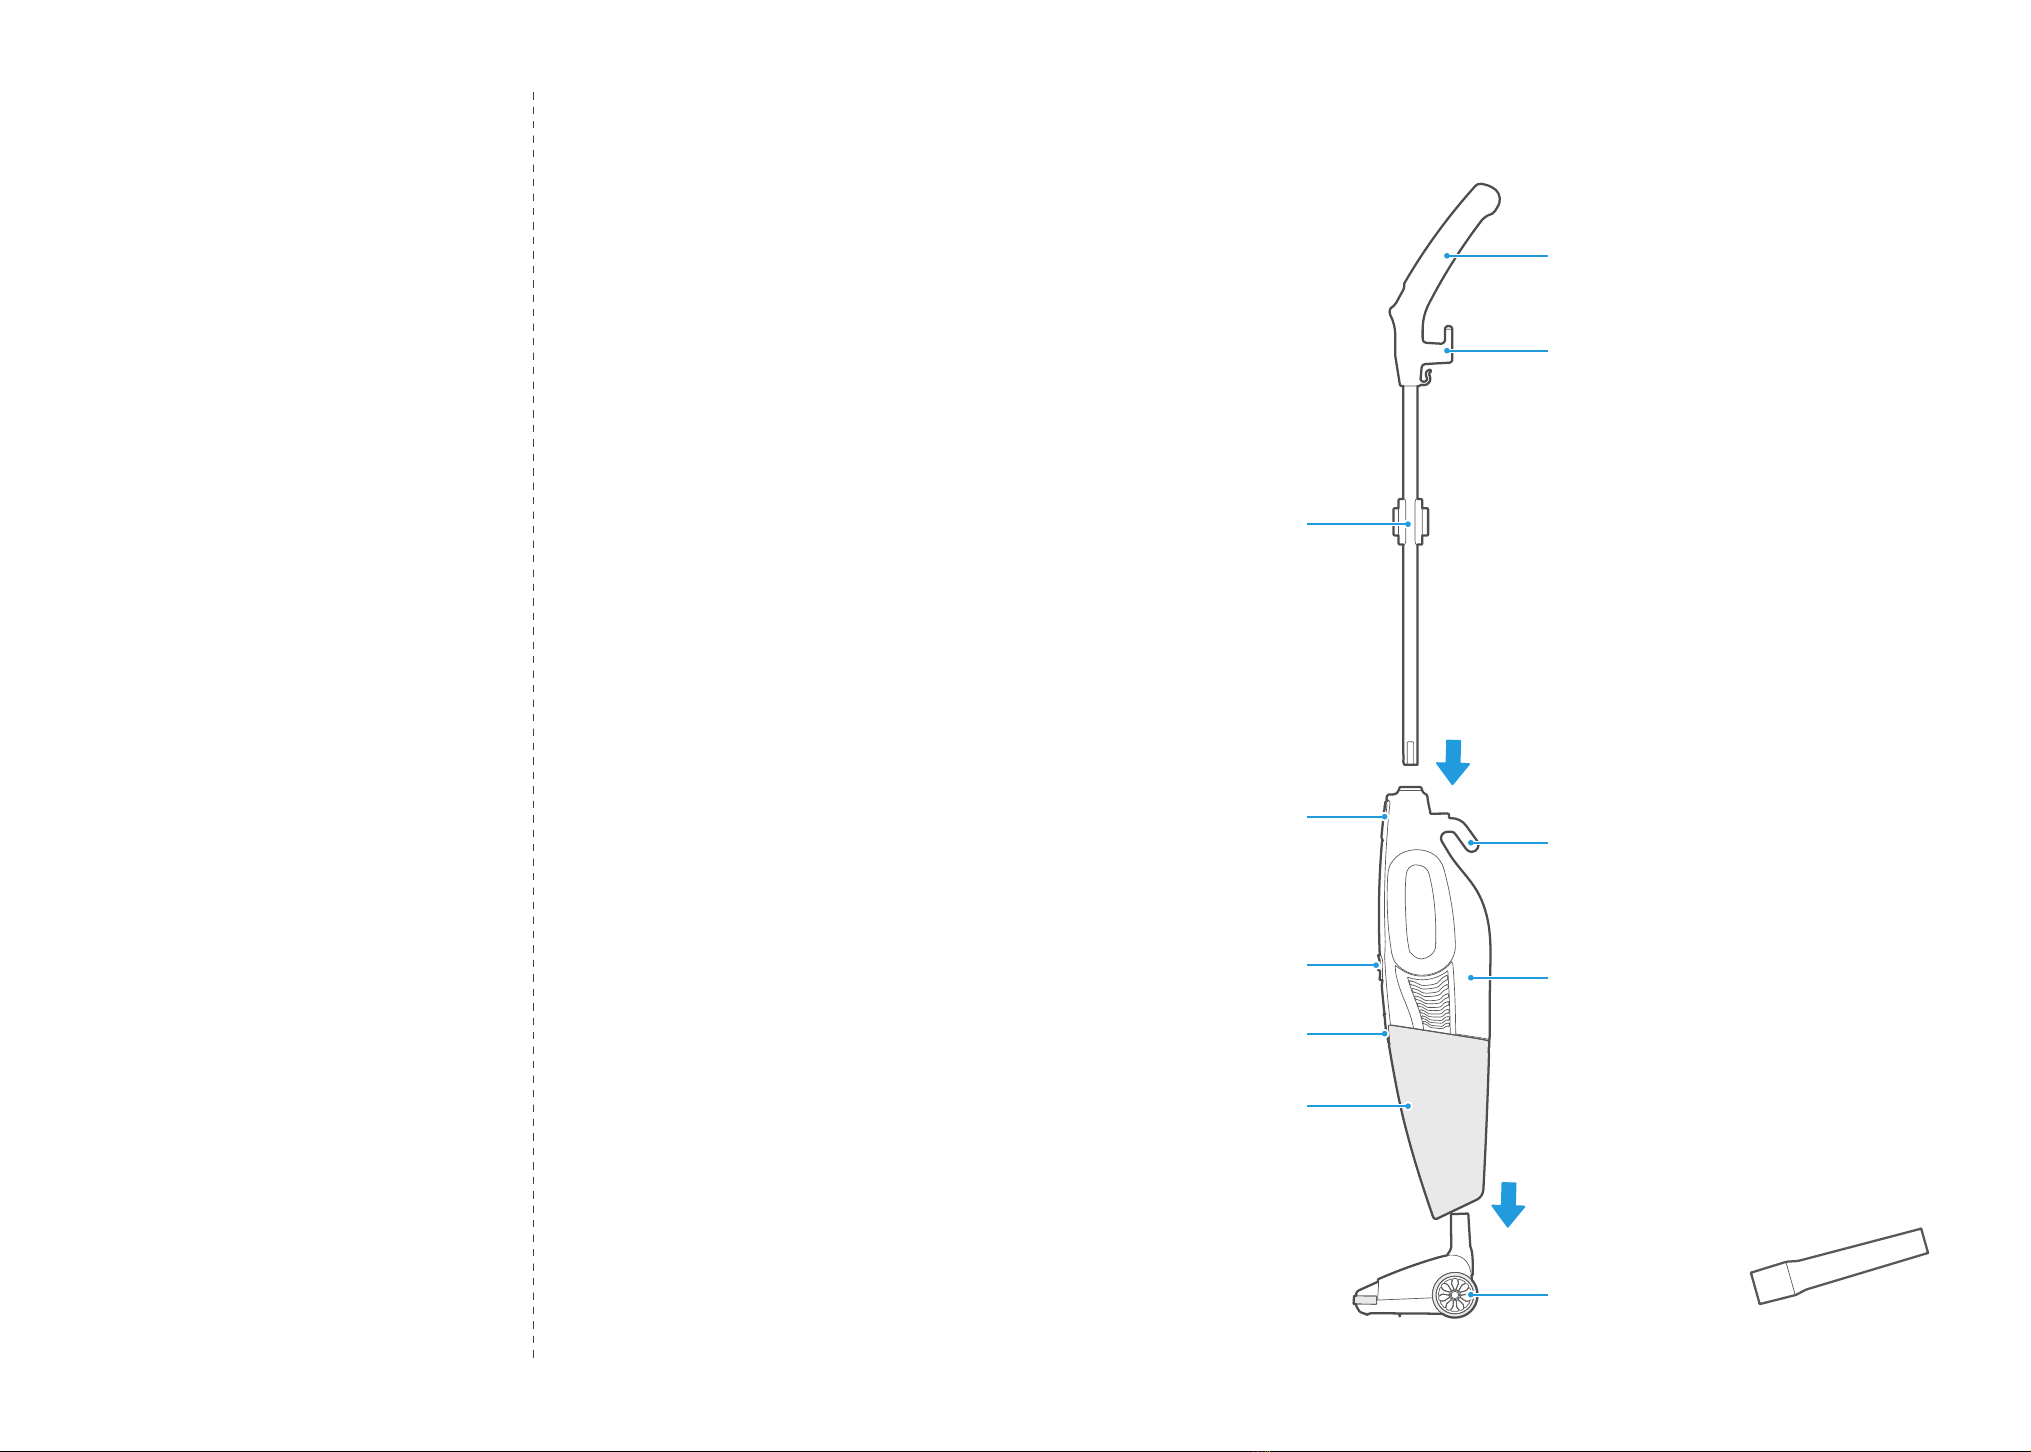
Midea U1 User manual

TEL 400-8899-315
江苏美的清洁电器股份有限公司
地址:苏州市相城经济开发区漕湖大道39号
编码:215000
网址:www.midea.com
版本号:U110-06-R2.0
执行标准 : GB4706.7-2014 / GB4706.1-2005 / GB4343.1-2009 / GB17625.1-2012
Jiangsu Midea Cleaning Appliance Co.,Ltd
Address : No.39 Caohu Avenue, Xiangcheng Economic Development Zone, Suzhou
Post : 215000
www.midea.com
Version No. :U110-06-R2.0
Executive standard :GB4706.7-2014 / GB4706.1-2005 / GB4343.1-2009 / GB17625.1-2012
U1
VACUUM CLEANER
INSTRUCTIONS MANUAL
吸尘器
使用说明书
使用产品前请仔细阅读本说明书,并请妥善保管
微信扫一扫,服务立马到
Please keep this instruction Manual carefully,
and read it before operating

目录 Contents
产品介绍
使用说明
维护保养
异常处理
安全说明
保修须知
2
4
6
8
10
12
产品介绍 Product Introduction
Product Introduction
Product Operation
Product Maintenance
Trouble Shooting
Safety Introduction
Warranty Information
2 3
Handle
手柄
Upper Winding Hook
上绕线钩
Under Winding Hook
下绕线钩
Main Body
主机身
Crevice Tool
扁吸
Brush
地刷
Accessory rack
附件架
Dust Cup
尘杯
Handle Release Button
手柄释放按钮
Dust Cup Release Button
尘杯释放按钮
Power Switch
电源开关
X1
X1

使用说明 Product Operation
其他附件说明
Other accessories
产品使用
Product Operation
适用于吸家具缝隙,角落,天花板等小缝隙处
的灰尘及毛条。
1
It is used for cleaning little crevice and corner
of furniture or platfond.
电源开关: 电源开关有两个不同位置,按“I”端开启吸尘器,按“O”端关闭吸尘器。
1
The power switch has two dierent positions, Press "I" to start the vacuum cleaner,
Press “O” to close the vacuum cleaner.
产品操作 : 垂直使用本产品:释放电源线,插入220V插座中,将手柄杆插入主机,选择正确的附件(扁
吸或者地刷)并且将其和主机吸入口连接;
2
Product Operation : Use this product vertically: Release the power cord and insert into
the 220V socket; Insert the handle lever into the main body. Select the correct
attachment (crevice tool or brush) and connect it to the suction of main body.
配件使用:扁吸
Use of accessories:Crevice tool
缠绕和释放电源线: 本吸尘器带有上、下绕线钩,可用来缠绕电源线,方便收纳。要释放电源线时,
只要顺时针或逆时针旋转上绕线钩即可快速释放电源线。
3
手持使用本产品 :按下手柄释放按钮并且将手柄杆从主机上取下;根据清扫需要选择扁吸或者附件
刷插入吸口。
Press the release button of the handle and remove the lever from the main body;Select
crevice tool or brush to insert the suction nozzle according to the cleaning requirement.
注意 Caution
整机运行时有气流高速流动声属于正常现象。
It is normal phenomenon that has the voice of high speed airflow while the product running.
注意 Caution
Wind and release the power cord: The vacuum cleaner has upper and under winding hooks,
which can be used to wind the power cord for easy storage. To release the power cord, the
power cord can be released quickly as long as it is rotated clockwise or counterclockwise.
4 5

Push
按住
a
a
Remove
取出
b
b
维护保养 Product Maintenance
尘杯清洁
Dust cup cleaning
倾倒垃圾:取出过滤器,再倾倒垃圾。请靠近垃圾桶,确保灰尘不会洒出。
2
Dump the garbage: Remove the filter, Please close to the trash can to make sure the dust
is not spilled.
清空尘杯中的灰尘后,若过滤器堵塞严重时可在冷水中冲洗过滤器,晾晒24小时后安装到尘杯里面。
3
Clean the dust in the dust cup, If the filter is blocked seriously, the filter can be washed in
the cold water, and it will be installed in the dust cup after 24 hours.
卸下尘杯:按住尘杯释放按钮,从机身上取出尘杯。
1
Remove the dust cup: Hold the dust cup release button and remove the dust cup from the
main body.
Remove the filter
取出过滤器
Dump the garbage
倾倒垃圾
注意 Caution
提示 Tips
提示 : 为了达到最好效果,请每次使用完毕后清空尘杯,清理尘杯过滤器。尘杯是可以用水洗的,为保证产品达到
最佳效果,请每隔3个月更换一次过滤器(可视实际使用情况而定)。
Tips : For best results, clean the dust cup and clean the dust cup filter after each use.The dust cup can
be washed with water, so as to ensure the best eect of the product, please change the filter every 3
months (depending on the actual usage).
各过滤部件清洗后必须干燥后才可装回使用,建议阳光下晒24小时确保彻底干燥后在使用;必须确保各部
件安装到位,否则会引起产品故障;不可将水渗入吸尘器电器元件内,否则可能会引起产品故障。
After cleaning the filter parts, they must be dried before they can be put back into use. They are
recommended to be exposed to the sun for 24 hours to ensure that they are thoroughly dried and
then used. Must ensure that all parts are installed in place, otherwise the product will fail; Do not leak
water into the vacuum cleaner components, or it may cause product failure.
1. 请勿使用洗衣机清洗尘杯过滤器;
2. 请勿使用吹风机干燥过滤器,需自然晾干;
3. 各部品需完全干透后方可装机使用;
4. 小心替换尘杯内的过滤器;
5. 没有安装过滤器时禁止使用吸尘器;
6. 请小心更换尘杯。
1. Do not use the washing machine to clean the dust cup filter.
2. Please do not use the dryer to dry the filter.
3. The filter parts can be put back for use only after being cleaned and dried.
4. Be careful to replace the filter in the dust cup.
5. Do not use the vacuum cleaner when installing the filter.
6. Please carefully replace the dust cup.
6 7

异常处理
本品在使用时如发现异常,请先查阅下表。
处理方法
可能原因
电源插头未在插座上插牢
电源插座没有电
吸尘器开关没有打开
电机热保护器动作
过滤器破裂
过滤器未安装到位
更换过滤器
重新安装过滤器
重新插入插头
检查断路器
按下机器的电源开关
拔掉插头,等待热保护器恢复
吸尘器完全不工作
吸力减弱
异常情况
For other failures, please contact the local service outlet or call the service hotline : 400 8899 315
Solution
- Reinsert the plug
- Check the circuit breaker
- Press the machine's power switch
- Unplug the plug and wait for the thermal
protector to recover
- Change filter
- Reinstall the filter
The vacuum
cleaner does
not work
Possible causes
- The power plug is not properly plugged
into the socket
- No electricity on the power socket
- The vacuum cleaner switch is not turned o
- Motor thermal protector acts
- Filter break
- The filter is not in place
Suction
becomes
weaker
Problem
中国RoHS
备注 :
中国RoHS管控物质或元素
铅 汞 镉 六价铬 多溴联苯 多溴二笨醚
×
○
×
○
○
○
○
○
○
○
○
○
○
○
○
○
○
○
○
○
○
○
○
○
○
○
○
○
○
○
○
○
○
○
○
○
○
○
○
○
○
○
○
○
○
○
○
○
○
○
○
○
○
○
○
○
○
○
○
○
○
○
○
○
○
○
○
○
○
○
○
○
○
○
○
○
○
○
电子电路
开关
电源线
电机组件
电机罩组件
金属伸缩管
软管组件
附件组件
出风板组件
尘杯组件
中框组件
机体组件
过滤组件
零部件名称
Remarks:
China’s RoHS control substances or elements
(Pb) (Hg) (Cd) (Cr(VI) (PBBs) (PBDEs)
Component name
×
○
×
○
○
○
○
○
○
○
○
○
○
○
○
○
○
○
○
○
○
○
○
○
○
○
○
○
○
○
○
○
○
○
○
○
○
○
○
○
○
○
○
○
○
○
○
○
○
○
○
○
○
○
○
○
○
○
○
○
○
○
○
○
○
○
○
○
○
○
○
○
○
○
○
○
○
○
Electronic circuit
Switch
Power cord
Motor assembly
Motor cover assembly
Metal extension tube
Hose assembly
Accessory assembly
Air-out board assembly
Dust cup assembly
Mullion assembly
Body assembly
Filter assembly
其他无法处理的故障,请联系当地售后服务网点或拨打全国服务热线 : 400 8899 315
1. 本表格依据SJ/T 11364的规定编制。
2. ○: 表示该有害物质在该部件所有均质材料中的
含量均在GB/T 26572规定的限量要求以下。
3. ×: 表示该有害物质至少在该部件的某一均质材料
中的含量超出GB/T 26572规定的限量要求。
4. 本表中的有×的所有部件均符合欧盟的RoHS指令,
即“欧洲议会和理事会关于在电子电气设备中限制
使用某些有害物质的第2011/65/EU号指令”
及其修正案。
CHINA ROHS
In case of mis-function, please refer to the following table.
TROUBLESHOOTING
1. This table is formulated according to SJ/T 11364.
2.○: The content of the harmful substance in all
homogeneous materials of the component is
below the limit prescribed in GB/T 26572.
3. X: The content of the harmful substance in all
homogeneous materials of the component is
above the limit prescribed in GB/T 26572.
4. All parts marked with X in this table comply with
EU RoHS directive, i.e. “Directive 2011/65/EU
Restriction of the Use of Certain Hazardous
Substances in Electronic and Electrical
Equipment” and the amendments.
8 9

10 11
SAFETY INSTRUCTIONS
SAFETY
WARNING
● Do not place the appliance close to heat sources, radiation, or burning cigarette.
Do not use the appliance to remove the following objects:
(1) All liquids such as water and solvents.
(2) Lime, cement, ash and other construction dust and garbage.
(3) Hot objects, such as cigarette butts.
(4) Sharp objects, such as glass shards, etc.
(5) Inflammable and explosive articles, such as gasoline or alcohol products.
● Do not let children play with or operate the appliance to prevent accidents.
● Your appliance is an electric appliance: It must be used appropriately.
Do not leave the operating appliance unattended.
● The power must be turned o during cleaning, maintenance or when in storage.
● Do not pull the power plug to turn o the appliance.
Hold the plastic part of the plug to remove it from the power socket.
● The power supply voltage must correspond to that of the appliance charging voltage.
● Keep the power cord away from sharp objects to prevent it from being damaged.
● To prevent fires do not immerse the appliance in water, do not expose it to any heating appliances.
● Do not drag the power cord when moving the docking station.
● In the case of below situations do not use the appliance and send it immediately to the nearest
approved maintenance facility :
(1) The appliance fell and consequently damaged
(2) The power cord is damaged
● Stop operating the appliance if the suction inlet is blocked to prevent damages (such as overheating)
to the motor or deformations to the vacuum plastic parts occasioned by overheating motor.
● Do not press the dust cup button during handling to prevent the machine from falling o.
安全说明
安全警告
● 请勿将吸尘器接近热源,辐射或者燃烧的烟头,严禁吸入下列物体:
1. 水及溶剂等一切液体。
2. 石灰、水泥灰等建筑粉尘及垃圾。
3. 发热物体,如未熄灭碳头、烟头。
4. 锐利碎片,如玻璃等。
5. 易燃易爆物品,如汽油或酒精制品。
● 切勿让小孩玩弄、操作吸尘器,以免发生意外 ;
● 您的吸尘器是一台电动器具:它必须按照正常使用条件进行使用,切莫让吸尘器在无人看管情况下独自运转;
● 清洁、维修或暂时不用吸尘器时,必须切断电源 ;
● 切断电源:不可拉电源线,应用手拿住插头塑料部位拔下插头 ;
● 检查确认供电电压必须与吸尘器充电电压一致 ;
● 不要让它穿越锋利的物品,以免损坏电源线 ;
● 切忌将吸尘器浸入水中,避免接近发热器具或暴晒,以免发生火灾 ;
● 切勿拖拉电源线来移动充电座 ;
● 下列情形时,请不要使用吸尘器,并及时送至本公司指定的维修部检修
1. 发生跌落并出现明显损坏或运转不正常;
2. 电源线破损 ;
● 避免在吸入口堵住的状态下长时间运行,以免电机损坏及吸尘器发热变形。
● 搬运过程中不得按尘杯按钮,以防机器脱落轧伤。

12 13
保修须知
美的真空吸尘器严格遵照国家“新三包”规定进行保修服务。
用户在正常使用产品的情况下,提供相关免费维修服务。
● 家庭整机保修两年,电机保修三年,充电产品的充电器、电池保修半年;
● 非家庭整机及其主要部件保修半年;如:经营、商用、公司集体的产品。
● 保修期内用户可享受免费上门维修(特殊地区除外)服务;“免费上门维修”限桶吸产品。
● 保修期界定:
1.以有效保修凭证的开具日期作为保修期的起始日期;
2.没有有效保修凭证的,按出厂日期后6个月作为保修期的起始日期;
3.若既无有效保修凭证也无出厂日期的,则按该产品的最早上市日期后6个月作 为保修期的起始日期;
4.网购产品15天界定期以收货日期计算,后期保修可按发票日期计算。
● 保修期内维修更换的零部件归本公司所有,保修期外维修更换的零部件归用户所有;
● 其他事项按照国家“新三包”规定执行;
● 凡属下述情况之一的,不在保修范围内:
1.用户搬运、使用、维护、保管不当而损坏的;
2.使用充电电压低于187 V 或者高于240 V 而损坏的;
3.未按产品使用说明书要求使用、维护、保养而造成损坏的;
4.非本公司专业服务人员拆卸、维修的;
5.因不可抗力(如雷电、火灾、地震、水灾等自然灾害)造成损坏的;
6.产品超出保修期的;
7.发票或保修卡上记录的型号或编号与商品实物不符合的。
● 以上情况我公司将实施收费维修,费用类型包括维修费、零部件费,具体费用标准在相关部门允许范围内。
● 由代理商、经销商、零售商自行承诺的额外服务与附加的非原厂配置赠品,由原代理商、经销商、
零售商负责服务。
1. 本产品只限于家用,非家用出现任何问题本公司概不负责。
2. 如您发现产品需要服务时,请直接联系当地特约服务网点或我司服务 热线400-8899-315。
3. 如来信,请留下您的联系电话,以便您能尽快得到回复。
注意
WARRANTY INFORMATION
Midea appliance strictly comply with government policies .
Our company provide free maintenance service for the products operated under normal usage.
●The warranty period is two years for residential or home usage, three years for the motor,
and six months for charging products and battery
●The warranty period (including main components) is six months for non residential or non home usage.
It applies to, but not limited, business oces, commercial entities, cleaning companies fleet of appliance.
●During the warranty period, you will benefit from no cost home maintenance services
(except for some special areas); the no cost maintenance is only applicable to the barrel products
●Definition of the warranty period:
(1) The date for issuing the valid warranty certificate should be taken as the starting date of the warranty period
(2) Without a valid warranty certificate, the first day after 6 months from the delivery date
should be taken as the starting date of the warranty period
(3) If there is no valid warranty certificate, no packaging date, the first day after six months from market release
should be taken as the starting date of the warranty period
(4) Date is defined as being 15 days after receiving the products; the warranty period will start from that date.
●The manufacturer is responsible for replacing the components during the warranty period;
Components replacement is the responsibility of the user beyond the warranty period;
●Other matters follow the government policies;
●The warranty does not apply to the following situations:
(1) The appliance is damaged due to improper usage (including storage) and operation by the user.
(2) The appliance is damaged due to incorrect charge voltage utilization (below 187 V or above 240 V ).
(3) The appliance is damaged due to failure of following procedures as described in this manual for
maintenance, cleaning and usage.
(4) Disassembly, repair by people other than the company’s specialized service personnel.
(5) Damages due to natural causes (such as lightning, fire, earthquake, floods and other natural disasters).
(6) The warranty period has expired.
(7)
The product type or serial number noted on the invoice or warranty card is not in conformity with
the actual product.
●
If any of the above written situations arise, the user will solely bear all the charges related to the
maintenance including the cost of spare parts. The cost is defined according to standard charges.
●Any commitment for extra services, additional gifts made by original agents, distributors or retailers
are their sole responsibility and the manufacturer cannot be held responsible or liable.
1. This product is limited for home usage and the company is not responsible for any problems caused by other usage.
2. For service, please directly contact the local special service outlet or our service hotline 400-8899-315.
3. Please indicate your contact phone number or email for faster response.
Caution

WARRANTY CARD
日 期
故障内容
产品型号
处理内容
维修单位名称
电 话
维修员签名
维修记录
用户姓名
电 话
通讯地址(邮编)
购买商店
维 修 点
编 号
发票号码
购买时间
保 修 卡
Date
Problem description
Product model
Detailed information
Service technician name
Tel
Service technician signature
Record of Maintenance
User name
Tel
Contact address (Post code)
Purchase location name and address
Service/maintenance supplier
Serial No.
Invoice No.
Purchase date
Warranty card
修理时需出具发票 Original proof of purchase (store invoice) is required for any service request.tips
保 修 卡
1. This warranty card should be immediately filled after purchase.
2. Keep this warranty card for your records; it does not need to be returned to Midea.
3. Bring / provide the warranty card and original invoice for service requests.
1. 此保修卡在购买本公司产品时立即填写。
2. 此保修卡请妥善保存,购买者不必将卡寄回本公司。
3. 维修时请携带此证及有效发票正本。
注意 Caution
PRODUCT PARAMETERS
Product Technical Parameters
Model Rated Frequency Rated PowerRated Charging Voltage
产品参数
产品技术参数
型号 额定频率 额定功率额定充电电压
U1 25.2 V220 V ~400 W
14 15
Other Midea Vacuum Cleaner manuals

Midea
Midea C100-B Administrator Guide

Midea
Midea MD-VC2121B User manual

Midea
Midea MSB 5.700bs Administrator Guide

Midea
Midea M6 User manual

Midea
Midea MVC-14D User manual

Midea
Midea C5 PRO Administrator Guide

Midea
Midea M7 User manual

Midea
Midea MVC-16T-B User manual

Midea
Midea VSS5800 User manual

Midea
Midea MCS2045BS User manual

Midea
Midea MVC-V18P Wiring diagram

Midea
Midea Eureka I5C User manual

Midea
Midea MVC-RTB2-R User manual

Midea
Midea MVC-P300 User manual

Midea
Midea KH19P User manual

Midea
Midea VCR09 User manual

Midea
Midea P5 Series User manual

Midea
Midea S8+ User manual

Midea
Midea MVC-V18PR User manual

Midea
Midea V18P01FP25NA User manual