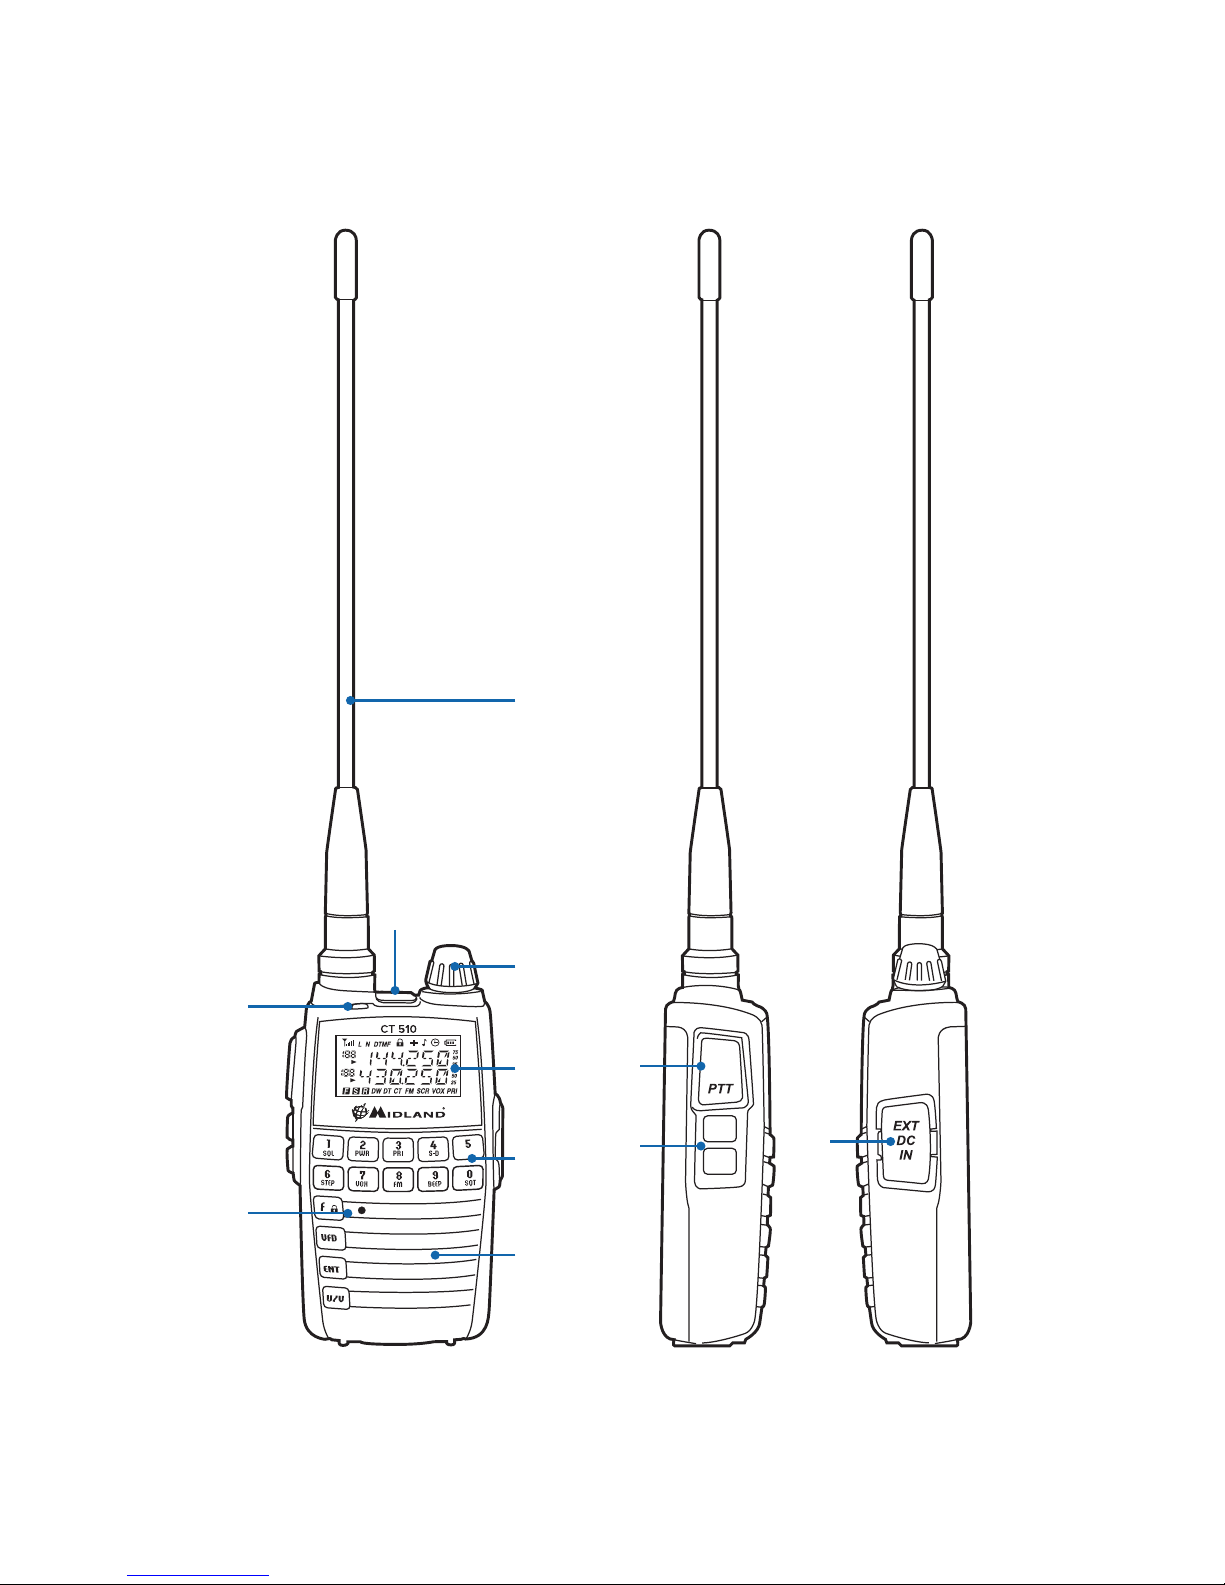
Midland CT 510 User manual

CT 510
” Instruction Guide

Instruction Guide Midland CT510
What’s in the box 32
Maintenance 32
Main Function 33
Description of the device 34
LCD Display 34
Transceiver 36
Antenna/accessories installation 38
Battery Pack 38
Antenna 39
Installing the belt clip 39
Installing an external microphone/speaker 39
Wrist belt 40
Battery charger 40
Operating modes 41
Frquency Mode “VFO” 41
Memory Mode “MR” 41
Channel Mode “CH” 41
Modo FM 41
MENU mode 41
Basic operations 42
Switching power on/off 42
Frequency adjustment 42
Transmission 42
Keypad lock 42
Multi-function side keys operation (via software) 43

Instruction Guide Midland CT510
Shortcut operations 44
Number key operation 45
Menu operations 48
Description and setting of the menu functions 49
Reset 54
Storing and deleting a memory channel 55
Storing a frequency 55
Deleting a memory 55
Storing and deleting FM radio channels 56
FM radio channels storage 56
FMW mode selection 56
Deleting FMW memory channels 56
Technical specific tions 57

Instruction Guide Midland CT510
What’s in the box
• CT 510 transceiver
• Antenna
• Li-Ion battery pack 1300mAh
• Belt clip
• Desktop charger with wall adaptor
• Earphone
• Wrist belt
• Quick guide
If any item is missing, please contact your MIDLAND dealer.
Maintenance
Your transceiver is an electronic product and should be treated with
care .The suggestions below will help you to fulfill any warranty obli-
gations and to enjoy this product for many years.
• Do not attempt to open the radio. Non-expert handling of the unit
may damage it and will void the warranty.
• Do not use the radio if the antenna is damaged.
• Do not store the radio under the sunshine or in hot areas.
• Keep the radio dry. Rainwater or damp will corrode electronic cir-
cuits
• Do not store the radio in dusty or dirty areas.
• If it appears that the radio diffuses peculiar smell or smoke, please
shut off its power immediately and take off the battery from the
radio.
• Do not transmit without antenna.
• Do not use detergents, alcohol or abrasive substances. Clean the
radio with a soft cloth.
• Switch off the radio before entering inflammable or explosive areas.

Instruction Guide Midland CT510
Main Function
• Dual band (VHF/UHF) and channel name displayed
• Frequency band:144-146MHz & 430-440MHz (Rx / Tx).
• Working mode: UHF-VHF, VHF-VHF or UHF-UHF
• Output power: 2W VHF / UHF
• 128 stored channels
• Scrambler
• Compander
• VOX function
• 212 DCS codes and 50 CTCSS tones
• “VOICE” function
• SOS emergency function
• Channel spacing selectable between 25kHz and 12,5 kHz
•Optional viewing on display display of channel number, channel
number + frequency or only frequency
• Inverted frequency function
• Scan
• FM radio
•Frequency step: 5 kHz, 6.25 kHz, 10 kHz, 12.5 kHz, 25 kHz, 37,5 kHz,
50 kHz, 100 kHz
• Selectable tx power: high or low
• Li-Ion battery pack 1300mAh
• Frequency Offset: 0-69.950 MHz
• Shift repeater
• BCLO (Busy Channel Lock Out) function
• Roger Beep tone at start/end transmission
• TOT (Time out timer)
• Keypad lock
• Frequency scan with CTCSS/DCS
• Priority scan
• DTMF
• Function/channel reset
• 1750 Hz tone for repeaters
• Accessory jack: 1 Pin 2,5mm

Instruction Guide Midland CT510
Description of the device
LCD Display
Indicators Functions
Indicates the working frequency, the channel
number on function menu
Keypad lock
Displays the selected channel number or function
menu when the radio is in MR mode (memory)
Automatic power off
Beep Tone
CT CTCSS
DT DCS
Function menu Selection
DW Monitors a signal in both VFO and MR mode at the
same time

Instruction Guide Midland CT510
VOX VOX Function
Battery capacity indicator
FM Activation / deactivation FM radio
PRI Reception of priority channel while receiving or
scanning a signal
Shows the received signal strength and tx power
LLow power indicator
NNarrow band indicator
DTMF DTMF function activated
Positive/Negative shift icon
Scrambler attivato

Instruction Guide Midland CT510
Transceiver
1
2
8
4
6
4
5
7
9
10
11
3

Instruction Guide Midland CT510
1. Antenna. Connect here the supplied antenna.
2. BUSY/TX. The led turns green during reception and turns red du-
ring transmission.
3. MIC/SP. Jack for microphone/earphone connection.
4. POWER/DIAL: Press and hold for 3 seconds to turn on and off the
transceiver. It is also used for the frequency setting, menu selections
and volume adjustment.
5. LCD Display
6. External DC. This jack allows the connection to an external DC po-
wer source and to a programming cable
7. Multifunction keypad
8. Built-in microphone
9. Speaker. The internal speaker is located here.
10. PTT. Press it to transmit and release it to receive after your transmis-
sion is completed
11. Multi-function keys. Black key: Monitor. Press it to open the
squelch. To adjust the volume hold it down and rotate the DIAL key.
Orange key: Emergency call button

Instruction Guide Midland CT510
Antenna/accessories installation
Battery Pack
Slide the battery cover latch to unlock and then slide the battery cover
towards the bottom to remove it.
Install the battery pack into the battery compartment.
Return the battery cover back and slide the battery cover latch to the
lock position.
RESET
YES ?
DEL ?
DEL ?
12
RESET
YES ?
DEL ?
DEL ?
12
RESET
YES ?
DEL ?
DEL ?
12
Battery Cover
latch

Instruction Guide Midland CT510
Antenna
The supplied antenna provides good
performances in either VHF or UHF bands.
To install the antenna screw it clockwise onto
the connector of the transceiver.
Turn it counter-clockwise to remove it.
Note: Do not transmit without antenna.
Installing the belt clip
Use the screws to fix the belt clip o the radio.
Installing an external microphone/speaker
Open the cover of the mic/speaker jack and
insert the mic/speaker plug.
RESET
YES ?
DEL ?
DEL ?
12
RESET
YES ?
DEL ?
DEL ?
12
RESET
YES ?
DEL ?
DEL ?
12
Cover

Instruction Guide Midland CT510
Wrist belt
Lace the wrist belt through the hole on the back of the radio.
Battery charger
When the display shows the icon it means that the battery pack is
out of power and needs to be recharged.
1. Charging with wall adaptor only. CT 510 can be charged directly
with the wall adaptor (EXT DC jack).
2. Desktop charger. The battery recharge can also be done with the
supplied desktop charger: there’s no need of the whole radio, just
place the battery pack into the proper cradle. The red led indicates
that the battery is being charged, while the green led means that
the recharge has been completed.
3. USB power supply cable. If you have a PC, the battery can be char-
ged with the supplied USB power cable.
The icon will inform you about the battery status.
Icon State
Blinking Charging
Full Completed
RESET
YES ?
DEL ?
DEL ?
12

Instruction Guide Midland CT510
Operating modes
Frquency Mode “VFO”
In this mode, you can use the POWER/DIAL knob to change the fre-
quency or input the frequency by keypad directly.
Memory Mode “MR”
Under VFO mode, if you have stored one memory channel at least, press
VFO to enter Memory mode MR.
The display will show the frequency and the channel number at the left
top.
Channel Mode “CH”
When you have stored one memory channel at least, turn on the radio
while keeping pressed ENT: you enter CH mode.
Modo FM
CT 510 operates also on the FM radio frequency FM: 88.00 – 108.00 MHz.
To set the scan frequency range and store your favorite channels, see
paragraph “Shortcut operations”, step 7.
MENU mode
To enter MENU mode, press F/ and ENT. The options to choose are 26 in
total. See chapter “Menu operations”.

Instruction Guide Midland CT510
Basic operations
Switching power on/off
To turn on the radio press the POWER/DIAL knob for 3 seconds.
If the ‘POWER ON’ voice is not heard, it means that the vocal announce-
ment is disabled. See par. “Shortcut operations”.
Frequency adjustment
CT 510 can operate in VFO mode, allowing a free tuning throughout the
frequency band.
If you turn the POWER/DIAL knob clockwise, you will select a higher fre-
quency, while counter-clockwise you will select a lower frequency.
Transmission
1. Push PTT to transmit; the led BUSY/TX will turn red.
2. Relase PTT to return to reception.
3. During transmission, the tx power level indicator will appear in the
left upper side of the LCD.
4. When the low power is activated, the display shows ‘L’.
Keypad lock
To prevent accidental pressure of the keys, you can activate the keypad
lock function (manual or automatic). See step 21 in chapter “Menu ope-
rations”.
1. Enter Menu mode by pressing F/ and ENT.
2. Rotate the POWER/DIAL knob to select item 21: KEY LK.
3. Confi m by pressing ENT.
4. Rotate the POWER/DIAL knob to choose one of the two options:
Manual and Auto.
5. Confi m by pressing ENT.

Instruction Guide Midland CT510
6. The display shows .
7. To unlock the keypad press F/ for 3 seconds.
Note:
•In this mode, if you rotate the POWER/DIAL knob you will adjust the
volume.
• To lock manually the keypad, push the F/ button for 2 seconds.
Multi-function side keys operation (via software)
CT 510 provides two multifunction side keys, that have the same op-
tions.
By the programming software, you can set their functions according to
your requirements.
1. None.
2. Monitor and volume adjustment (Default: multi-functional black
key). If you keep pressed this button, the radio will turn to monitor
function; the volume will be indicated on the LCD. Rotate the PO-
WER/DIAL knob to adjust the desired level.
3. 1750 Hz CALL Tone. This function can be assigned to the side key.
When you press this button, you generate a 1750Hz tone that al-
lows to communicate through repeaters. Then, release this key and
transmit by pressing PTT.
4. Emergency call (Default: multi-functional orange key). When this
function is activated, press briefly this button and PTT to send an
alarm signal. Exit by pushing any key.

Instruction Guide Midland CT510
Shortcut operations
To speed up the activation of some functions, you can press F/ along
with another one. Here below the list.
1. Squelch threshold adjustment.
Press F/ and 1/SQL to enter the squelch threshold setting. Select
the desired level (from 0 to 9) by rotating the POWER/DIAL knob.
2. High/low power adjustment
Press F/ and 2/PWR to enter the high/low power setting; you can
select it by rotating the POWER/DIAL knob. If the low power is
selected, “L” will appear at the bottom of the LCD.
3. Priority scan setting
To set the priority scan press F/ and 3/PRI; this function is availa-
ble in MR or CH mode.
4. Shift offset direction setting (Repeater shift)
Press F/ and 4S-D to enter the shift offset direction in VFO mode.
Rotate the POWER/DIAL knob to select downwards ‘-‘ or upwards
‘+’. When the repeater shift is enabled, the LCD will show the relati-
ve icon (‘+’ or ‘-‘ depending on what you chose).
5. Channel spacing setting
Press F/ and 6 STEP to enter the channel spacing setting. Rotate
the POWER/DIAL knob to select the desired setting; you can choo-
se amongst: 5/6.25/10/12.5/25.0/37,5/50.0/100.0 KHz.
6. Enabling / disabling the VOX function
Press F/ and 7 VOX to activate/deactivate the VOX function. Select
ON or OFF by rotating the POWER/DIAL knob.
7. FMW Radio mode
Press F/ and 8 FM to enter the FMW radio mode; at the bottom of
the LCD, the FM icon will appear. To select the desired frequency ro-
tate the POWER/DIAL knob or edit it directly with the keypad. The
frequency range is 88.00 - 108.00 MHz. To exit push again F/ and
8 FM. In FMW radio mode, CT 510 can monitor the receiver signals
in the amateur band. When you receive a call, the radio switches
temporarily in FM mode. After 5 seconds from the end of the call,
the radio returns to FMW mode.

Instruction Guide Midland CT510
8. Keypad beep setting
Press F/ and 9 BEEP to enter the keypad beep setting. rotate the
POWER/DIAL knob to select amongst OFF / TONE /VOICE.
9. CTCSS / DCS setting
Press F/ and 0 SQT to set CTCSS sub-audio tones and DCS digital
codes. If you push again F/ you set the tones in reception and/or
transmission. To switch between CTCSS and DCS press repeatedly
the VFO key.
OFF → CTCSS → DCS N → DCS I → OFF.To select a CTCSS tone or a
DCS code rotate the POWER/DIAL knob; press ENT to confi m and
U/V to exit.
10. Scan
Press F/ and VFO to start scanning. To change the scanning direc-
tion rotate the POWER/DIAL knob.
The scan can be done in VFO, MR and CH modes.
11. Channel storage
Press F/ and U/V; rotate the POWER/DIAL knob to store the
desired channel. Press ENT to confi m.
12. Menu mode
Press F/ ENT to enter the menu mode. See chapter “Menu opera-
tions”.
Number key operation
In VFO mode, you can select a frequency directly by editing the number
on the keypad. If this number is out of band, the display will show “ER-
ROR”. In MR mode this number selects a stored channel.

Instruction Guide Midland CT510
FUNCTIONS SET BY MENU
Step Icon and Function
Available Selection Step
1 TX_SEL (priority transmission)
BUSY / EDIT 1
2 APRO (voice mode)
OFF / COMP / BCLO / ON / SCRM 2
3 BCLO (busy channel lockout)
OFF / ON 3
4 W/N (wide/narrow band)
WIDE / NARROW 4
5 SCAN (scan list)
ADD / DEL 5
6 OFFSET (shift frequency setting)
0.000 - 99.950 MHz 6
7 CH_NAM (channel name)
0 - 9, A - Z, +, -, /, _ 7
8 NAM_SW (channel name displayed)
OFF / ON 8
9 OPENS (Power-on display)
OFF / DC / MSG 9
10 MSG (Power-on message)
0 - 9, A - Z, +, -, /, _ 10
11 D_WAIT (dual watch)
OFF / ON 11
12 LAMP (Black light setting)
OFF / ON / AUTO 12
13 DC (battery voltage)
CURRENT VOLTAGE 13
14 1750_S (note setting)
OFF / 1 - 15 S 14
15 TOT (time-out-timer)
OFF / 30 - 360 S 15
16 RX_SAV (battery saving)
OFF / 1-1 / 1-2 / 1-3 / 1-4 16
17 SCANS_S (scan mode selection)
CO / TO / SE 17
18 SCAN_V (scan velocity setting)
100, 150, 500 mS 18
19 APO_SW (automatic power off)
OFF / 30 - 180 S 19
20 RX_ALT (emergency alert reception)
OFF / ON 20
21 KEY_LK (keypad lock)
AUTO / MANUAL 21
22 VOX_LV (VOX level adjustment)
1 - 9 22
23 VOX_DV (VOX delay adjsutment)
0.5, 1.0, 2.0, 3.0 S 23
24 FM_STP (FM radio frequency step setting)
5/6,25/10/12,5/25/37,5 - 50/100kHz 24
25 SK_CTS (CTCSS scan)
67.0 - 2541.0 Hz 25
26 SK_DCS (DCS scan)
D023N - D754N, D023I - D0754I 26

Instruction Guide Midland CT510
Menu operations
Press F/ : “F” will appear at the left bottom of the LCD.
To enter the menu mode, press ENT; “MENU” will be displayed.
Rotate the POWER/DIAL to select the menu items and press ENT to enter
the desired menu.
Choose the desired setting and confi m by pushing ENT.
Press U/V to exit and return to the latest setting. Then push VFO to exit
the menu mode.
Other manuals for CT 510
4
Table of contents
Other Midland Transceiver manuals

Midland
Midland ALAN 255 ESP E40 User manual

Midland
Midland 79-900 User manual

Midland
Midland D-200 User manual

Midland
Midland G7E XT User manual

Midland
Midland G14 Manual

Midland
Midland M24 Plus User manual

Midland
Midland BASE CAMP PMR446 User manual

Midland
Midland G11 PRO Manual

Midland
Midland 75-785 User manual

Midland
Midland CT690 User manual

Midland
Midland 13-881B User manual

Midland
Midland G18 Manual

Midland
Midland ALAN 48 PLUS MULTI B Manual

Midland
Midland 77-104XL User manual

Midland
Midland Alan 52 Multi Manual

Midland
Midland G7 Pro User manual

Midland
Midland ALAN 100 PLUS B User manual

Midland
Midland 13-513 User manual

Midland
Midland 88 User manual

Midland
Midland G8E-BT Manual