Automatic rinsing / descaling Automatic descaling Automatic descaling Frequently asked questions Frequently asked questions
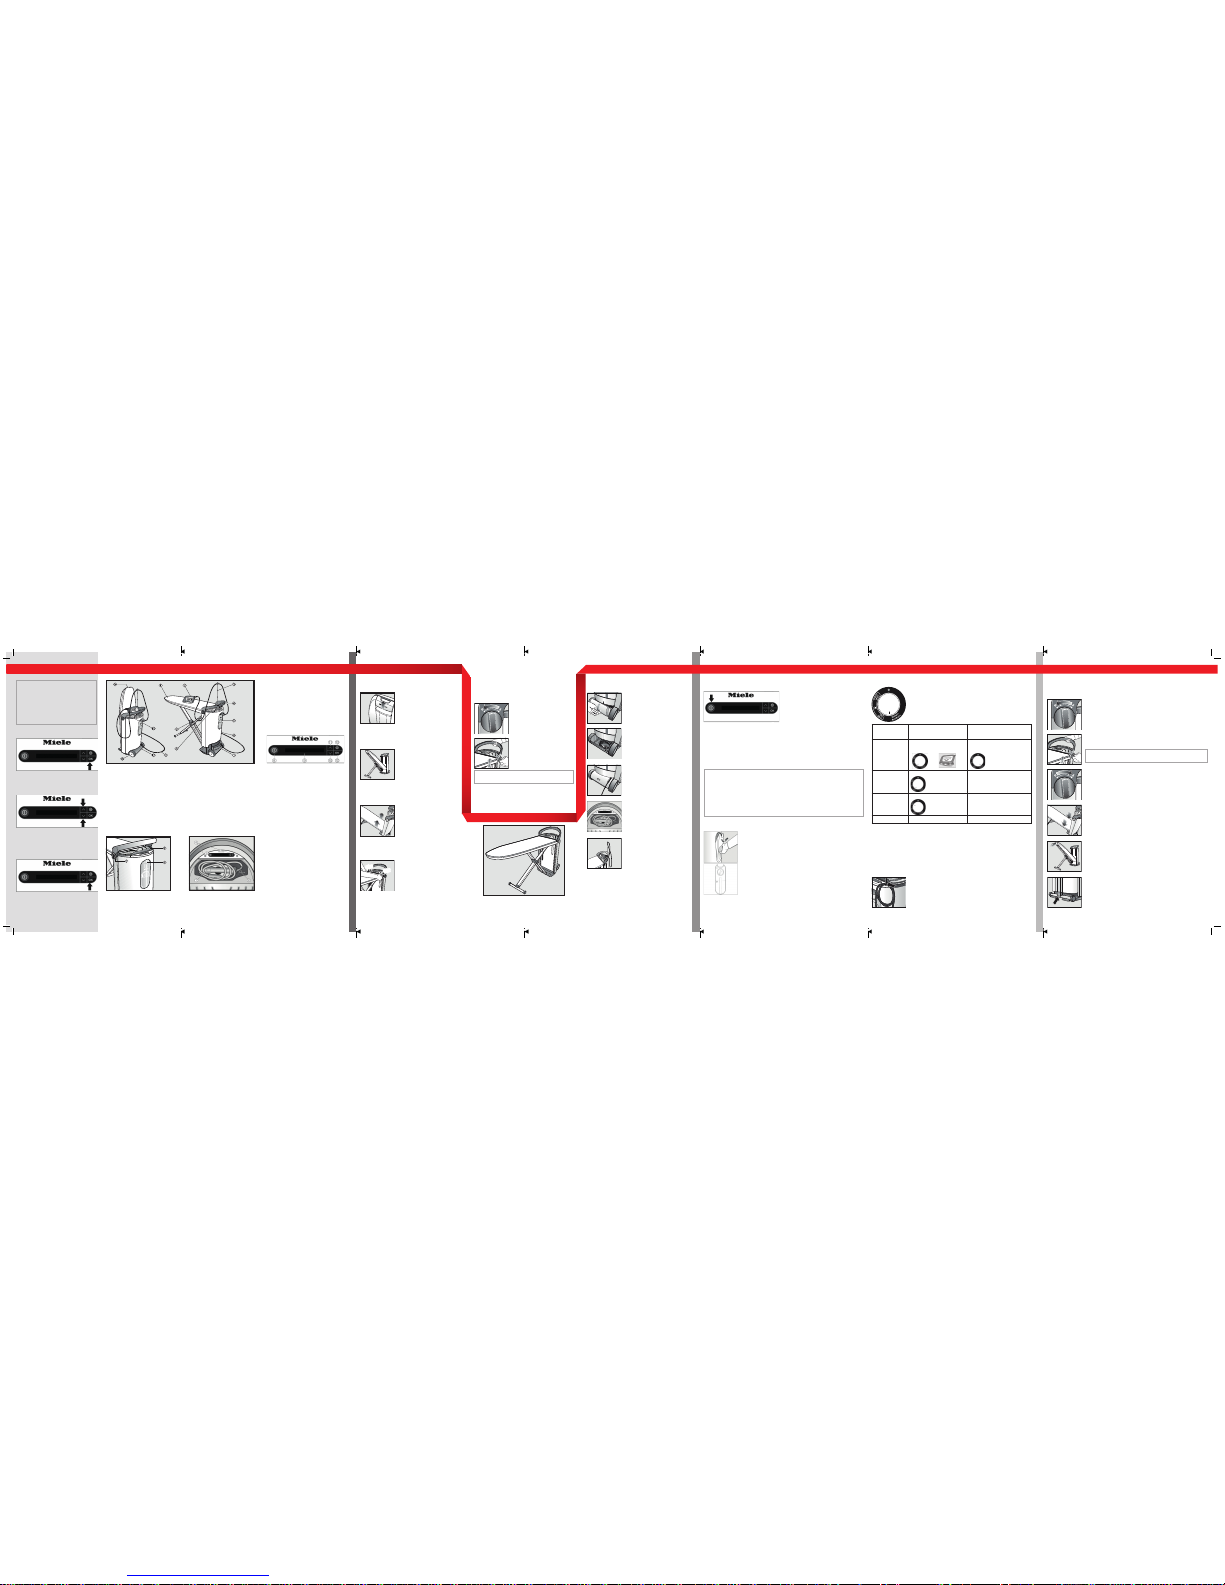
Automatic rinsing
ĺAdjust the steam ironing system to its highest working height.
ĺIf the message "Fill water container" is shown in the display, fill the water cont-
ainer (see "Filling the water container").
ĺIf the message "Empty residual water container" is shown in the display, remo-
ve and empty the residual water container.
ĺClean and dry the residual water container.
Make sure that the metal disks (contacts) at the top of the residual water con-
tainer are cleaned and dried properly. These metal discs send a signal to the
steam ironing system when the residual water container is full or if it is inserted
into the tower.
The discs will not function correctly if they are dirty or damp.
ĺSlide the residual water container back into the tower until the container clicks
into place. Clean the water container and fill it up to the level marking
ĺRemove the residual water container out of the tower when prompted to do so.
ĺRinse the water container thoroughly. Make sure there are no residues of the
descaling tablets remaining in the water container.
ĺFill the water container with fresh water at least up to the level marking.
ĺPut the water container back into the tower.
Descaling
After an activation period of approx. 1hour, the descaling solution is drained
from the steam generator into the residual water container.
The steam generator is then rinsed with water. This rinse cycle takes approx.
5minutes. During this time, the "Rinse (5 min.)" message is displayed.
During the rinsing cycle, the display shows "Rinsing".
As soon as the rinse cycle is completed, the water is drained completely into the
residual water container and the message "Empty residual water container" is
displayed.
Rinsing the soleplate
The iron must not be warm from previous use. Let the iron cool down for at least
60minutes before rinsing the soleplate.
ĺMake sure that the non-stick soleplate has been removed from the iron.
If the non-stick soleplate is still on the iron, remove it now.
ĺRefill the water container with fresh tap water.
ĺRemove the steam hose of the iron or the steamer from
the steam connection on the tower.
ĺSelect "Descale".
ĺConfirm the selection by pressing the OK button.
ĺSelect "Start descaling".
ĺConfirm the selection by pressing the OK button.
Filling with descaler
ĺFill the water container with fresh water up to the level
marking.
ĺAdd 1 descaling tablet to the water container.
ĺPress the OKbutton to display the next process step.
ĺPut the water container back into the tower.
ĺFollow the instructions in the display.
Finish
Finish
Start
Start
Automatic descaling
The steam ironing system must be descaled regularly to ensure that it functions
correctly.
The messages in the display will guide you through the descaling process. The
entire descaling process takes approx. 90minutes.
To optimize the descaling process, start the procedure while the system is still
cold after switching the steam ironing system on.
This way, you avoid a delay of up to 3hours that may be caused by the cool-
down phase.
Emptying the residual water container
ĺSet the steam ironing system to its highest working posi-
tion in order to remove the residual water container when
prompted to do so.
ĺRemove the residual water container from the tower.
ĺDrain the residual water container.
ĺClean and dry the residual water container.
Make sure that the metal disks (contacts) at the top of the re-
sidual water container are cleaned and dried properly.
ĺSlide the residual water container back into the tower until
the container clicks into place.
ĺSet the temperature selector on the iron to cold so that the
line on the selector is pointing to the indicator light.
ĺPlug the steam hose of the iron into the steam connection
on the tower.
ĺIf the steam ironing system is switched off, switch it on
now.
As soon as the steam ironing system is ready for use and
steam is available, proceed with the next step.
ĺHold the iron over a sink or a heat-resistant container.
ĺPress the button on the iron for around a minute and tilt the iron. with the tip
of the iron pointing downward slightly.
Hot water and steam will come out of the iron and dislodge any deposits that
have built up. As soon as there is only steam coming out, you can release the
button.
During the rinsing process, hot water and steam come out of the iron.
Danger of injury by burning. Never direct the iron at people, animals or
electrical appliances of any kind.
ĺNow set the temperature selector on the iron to the highest
temperature settingLinen/Cotton.
The indicator light on the temperature selector will light up
yellow while the iron is heating up. As soon as the indicator
light goes out, the rinsing process is complete.
ĺMove the iron over a soft, absorbent cotton cloth while it is
still hot. Press the steam button briefly 2-3 times in the
process.
The descaling process is now complete. The steam ironing
system can now be switched off or used.
Problem Possible cause and solution
The steam ironing
system cannot be
switched on.
The appliance does not have any power.
ĺCheck whether
- the plug is plugged in.
- the fuse in your fuse panel is OK.
The height of the
ironing board can-
not be adjusted.
The ironing board is not locked into place on both sides of the
tower.
ĺUse both hands to pull the ironing board upwards into a ho-
rizontal position until this audibly clicks into place on both si-
des of the tower.
The iron does not
heat up.
The appliance is switched o.
ĺUse the button on the control panel to switch the steam iro-
ning system on.
The steam hose is not plugged in properly.
ĺPlug the steam hose into the steam connection on the tower
again.
The iron has not been used for some time.
ĺMove the iron or activate the steam button .
The steam button is locked.
ĺUnlock the steam button by pushing the slider on the iron
forward.
The temperature set on the temperature controller has
already been reached.
ĺSet the temperature controller to a higher temperature if
necessary.
The appliance is rinsing.
ĺWait until the rinsing process has been completed (see "Au-
tomatic rinsing").
The display is indicating a malfunction.
ĺPlease remedy the indicated fault as described in the opera-
ting instructions.
The steam ironing system is damaged.
ĺContact Miele Service.
With the help of the following guide, minor faults in the performance of the appliance,
some of which may result from incorrect operation, can be remedied without contacting
the Service Department. For further details, see the operating instructions.
Problem Possible cause and solution
When using the
steam button on
the iron, drops of
water or deposits
escape from the
steam nozzles.
The temperature selected is too low.
ĺSet the temperature selector on the iron to at least tempera-
ture setting Silk/Wool.
The iron has not yet
reached the selected temperature.
ĺWait until the iron has reached the selected ironing
temperature.
During a longer ironing break, condensation
has accumulated in the steam hose.
ĺAfter a break in ironing, do not direct the first burst of steam
onto the garment.
Deposits have formed in the soleplate.
ĺRinse the soleplate as described in "Automatic descaling".
The fan on the
ironing board is not
running.
Steam was not used.
ĺThe fan only runs when the steam function on the iron is
activated
The steam is not ready yet.
ĺWait until the message "Ready" appears in
the display to indicate that steam is ready.
The water container is empty or missing.
ĺRefill the water container with fresh tap water and replace it
in the tower.
The steamer is connected to the steam ironing system.
ĺThe fan only runs when the iron is connected. Connect the
iron if required.
There is a fault with the steam ironing system.
ĺContact Miele Service.
Display
message
Possible cause and solution
Drain valve fault
Switch on/off The descaling or rinsing processes have not been
carried out properly.
ĺPress the button to switch the steam ironing system off
and then back on again.
ĺIf the fault message continues to be displayed, contact Mie-
le Service.
Release steam
button The iron has switched itself o because it has not been used for
a period of time
and the steam buttonhas locked.
ĺUnlock the steam button by pushing the slider for conti-
nual steam on the iron forward.
Drain valve fault
Switch on/off The residual water container has not been detected.
ĺPress the button to switch the steam ironing system off
and then back on again.
After switching the steam ironing system o and back on, the
residual water container has not been detected.
ĺPress the button to switch the appliance off.
ĺClean and dry the metal disks (contacts) on the residual wa-
ter container.
ĺUse the button to switch the steam ironing system back
on and follow the instructions shown in the display:
ĺRemove the residual water container and fill it with fresh tap
water.
ĺPut the filled residual water container back in the tower.
ĺRemove the residual water container again when you are
prompted to do so by the appropriate message in the
display.
ĺEmpty and dry the residual water container.
ĺPut the empty residual water container back in the tower.
The steam ironing system is ready for use again and continu-
es with the process that had been started when the fault was
detected.
There is a fault with the steam ironing system.
ĺIf the fault message continues to be displayed, contact Mie-
le Service.
Frequently asked questions