Beper MATIX 50.971 Quick guide

Cod.: 50.971
Cod.: 50.971
• SISTEMA STIRANTE - MANUALE DI ISTRUZIONI
• STEAM STATION - USE INSTRUCTIONS
• CENTRALE VAPEUR - MANUEL D’INSTRUCTIONS
• BUEGELSTATION - BETRIEBSANLEITUNG
• CENTRO PLANCHADO - MANUAL DE INSTRUCCIONES
• STATIA DE CALCAT - MANUAL DE INSTRUCȚIUNI

pag. 3
pag. 8
pag. 13
pag. 19
pag. 25
pag. 31
For further information and/or for instructions for use in other languages, please visit: beper.com
ITALIANO
ENGLISH
FRANÇAIS
DEUTSCH
ESPAÑOL
ROMÂNĂ
Fig.A
Fig.B Fig.C
7

3
Sistema stirante Manuale di istruzioni
IT
AVVERTENZE GENERALI
LEGGERE QUESTE ISTRUZIONI PRIMA DI USARE L’APPAREC-
CHIO.
Prima e durante l’uso dell’apparecchio è necessario seguire alcune
precauzioni elementari.
Dopo aver tolto l’imballaggio assicurarsi dell’integrità dell’apparec-
chio. In caso di dubbio non utilizzare l’apparecchio e rivolgersi a per-
sonale professionalmente qualicato. Gli elementi dell’imbal laggio
(sacchetti di plastica, polistirolo, ecc.) non devono essere lasciati alla
portata dei bambini, in quanto potenziali fonti di pericolo.
Assicurarsi sempre che la tensione di rete elettrica sia uguale a quel-
la indicata nell’etichetta dati tecnici e che l’impianto sia compatibile
con la potenza dell’apparecchio.
Non tirare mai il cavo per scollegarlo dalla presa di corrente elettrica.
Assicurarsi che il cavo non sia in contatto con superci calde o ta-
glienti.
Non utilizzare l’apparecchio con il cavo danneggiato.
Se il cavo di alimentazione è danneggiato, esso deve essere sostitu-
ito dal Costruttore o dal suo Servizio Assistenza Tecnica o comunque
da una persona con qualica similare, in modo da pre venire ogni
rischio.
Collegare l’apparecchio esclusivamente ad una presa di corrente
elettrica alternata.
In generale è sconsigliabile l’uso di adattatori, prese multiple e/o pro-
lunghe. Qualora il loro uso si rendesse indispensabile è necessario
utilizzare solamente adattatori e prolunghe conformi alle vigenti nor-
me di sicurezza.
Questo apparecchio dovrà essere destinato solo all’uso per il quale
è stato espressamente concepito. Ogni altro uso è da considerarsi
improprio e quindi pericoloso, nonché far decadere la garanzia. Il
costruttore non può essere considerato responsabile per eventuali
danni derivati da usi impropri, erronei ed irragionevoli.
Per evitare surriscaldamenti pericolosi si raccomanda di svolgere in
tutta la sua lunghezza il cavo di alimentazione.
Prima di effettuare qualsiasi operazione di cambio degli accessori o
di pulizia disinserire l’apparecchio dalla rete di alimentazione elettri-
ca.
Non lasciare esposto l’apparecchio ad agenti atmosferici (pioggia,
sole, etc.).

4
Sistema stirante Manuale di istruzioni
DESCRIZIONE PRODOTTO Fig.A
1. Termostato
2. Manico
3. Indicatore di temperatura
4. Base poggia ferro
5. Blocca ferro posteriore
6. Pannello di controllo
7. Unità base
TERMOSTATO Fig.B
1 IMPOSTAZIONE: per bre sintetiche o seta (temperatura compresa tra i 70 ed i 120°)
2 IMPOSTAZIONE: per lana (temperatura compresa tra i 100 ed i 160°)
3 IMPOSTAZIONE: per cotone (temperatura compresa tra i 140°e 210°)
4 IMPOSTAZIONE: per lino (temperatura compresa tra i 170 ed i 225°)
PANNELLO DI CONTROLLO Fig.C
1 Indicatore on/off’
2 Tasto di indicazione di mancanza d’acqua
all’interno della tanica
3 Livelli di vapore:
a)livello basso
b)livello medio
c)livello alto
4 Tasto di controllo del livello di vapore
5 Tasto di accensione/spegnimento
6 Tasto di reset
7 Indicatore di sostituzione ltro anticalcare
Non tenere l’apparecchio vicino a fonti di calore (es. termosifone).
Questo apparecchio non deve essere utilizzato da persone (compre-
si i bambini) con capacità siche, sensoriali o mentali ridotte; da per-
sone che manchino di esperienza e conoscenza dell’apparecchio, a
meno che siano attentamente sorvegliate o ben istruite relativamente
all’utilizzo dell’apparecchio stesso da parte di una persona responsa-
bile della loro sicurezza.
Assicurarsi che i bambini non giochino con l’apparecchio.
Allorché si decida di smaltire come riuto questo apparecchio, si rac-
comanda di renderlo inoperante.
SI RACCOMANDA INOLTRE DI RENDERE INNOCUE
QUELLE PARTI DELL’APPARECCHIO SUSCETTIBILI
DI COSTITUIRE UN PERICOLO. QUESTO APPAREC-
CHIO NON DEVE ESSERE UTILIZZATO DAI BAMBINI.
TENERE L’APPARECCHIO ED IL SUO CAVO FUORI
DALLA PORTATA DEI BAMBINI.
8. Ferma lo
9. Contenitore di calcare
10. Serbatoio
11. Vano di apertura del serbatoio dell’acqua
12. Piastra
13. Tasto vapore
14. Blocca ferro anteriore

5
Sistema stirante Manuale di istruzioni
IT
Blocca ferro anteriore e posteriore
I supporti di blocco del ferro anteriore e posteriore sono necessari per posizionare il ferro in condizioni di sicurez-
za durante la stiratura e per riporlo in condizioni di sicurezza una volta terminato lo stiro.
Pulsante di accensione/spegnimento
Per accendere l’apparecchio, collegarlo alla corrente e premere il tasto di accensione. L’apposito indicatore si
illuminerà e l’indicatore di ‘basso di vapore’ lampeggerà.
Per spegnerlo, tenere premuto per qualche istante il tasto di accensione, nchè il suo apposito indicatore ed il
tasto di livello basso di vapore si spegneranno. Scollegare poi il sistema stirante dalla presa di corrente.
Tasto di controllo del livello di vapore
Il livello di vapore può essere selezionato tra basso, medio ed alto attraverso il tasto di controllo del vapore.
Una volta scelto l’indicatore si illuminerà. Attendere sino allo spegnimento dell’indicatore e procedere poi con
l’utilizzo del ferro.
Termostato
Girare il termostato e selezionare l’impostazione di utilizzo desiderata a seconda del tessuto dell’indumento che
si vuole stirare.
Indicatore di temperatura
Quando il ferro è caldo, l’indicatore di temperatura si illuminerà.
Una volta che il ferro avrà raggiunto la temperatura selezionata, l’indicatore luminoso si spegnerà.
Tasto vapore
Dopo aver premuto il pulsante di accensione/spegnimento e scelto il livello di vapore desiderato, il tasto del
vapore di riferimento sul display inizierà a lampeggiare. Una volta terminato il lampeggio, il tasto si illuminerà e
si potrà procedere con l’utilizzo.
Se si vuole utilizzare il vapore, premere l’apposito tasto nchè quest’ultimo non fuoriuscirà dalla piastra.
In caso contrario, l’apparecchio potrà essere utilizzato solamente per la stiratura a secco senza vapore.
Indicatore di mancanza di acqua e tasto reset
In mancanza di acqua nella tanica, l’apposito indicatore si illuminerà accompagnato da un segnale acustico.
Una volta inserita l’acqua all’interno della tanica, premere il tasto reset e attendere che l’acqua vada in teme-
pratura.
INDICATORE DI SOSTITUZIONE FILTRO ANTICALCARE
L’apparecchio è dotato di ltro anticalcare.
Una volta che la spia anticalcare si è illuminata, procedere con la sostituzione del ltro. Prima di inserire il nuovo
ltro lasciarlo per un ora immerso in acqua.
Una volta inserito, premere contemporaneamente per qualche secondo il tasto di controllo del livello di vapore
(4) ed il tasto di reset (6).La spia anticalcare si spegnerà.
PRIMO UTILIZZO:
1 Rimuovere eventuali adevisi, fogli o imballaggi della piastra del ferro.
2. Rimuovere il contenitore di calcare ed immergerlo per un minuto nell’acqua.
NB: Eventuali strani odori o piccole scorie provenienti dall’unità durante i primi utilizzi sono normali.
Quando si accende l’apparecchio, è possibile sentire un leggero suono. Questo rumore è dovuto al pompaggio
dell’acqua all’interno del ferro da stiro.
Durante il processo di riscaldamento, è possibile che per qualche secondo fuoriesca automaticamente del va-
pore dalla piastra

6
Sistema stirante Manuale di istruzioni
UTILIZZO DEL FERRO DA STIRO:
L’apparecchio ha due differenti funzioni.
E’ possibile utilizzare la stiratura a secco o a vapore.
Stiratura a secco
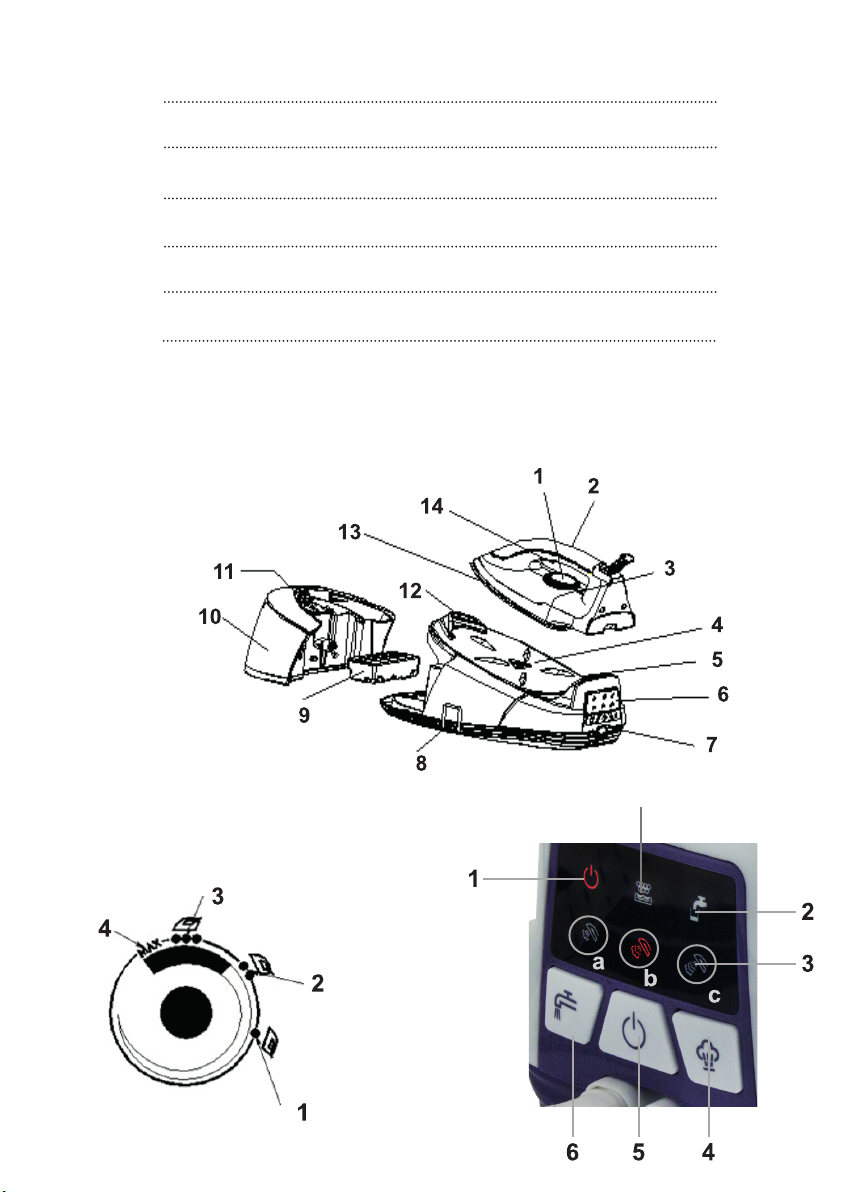
1. Posizionare il ferro sull’apposito cuscino isolante termico.
2. Collegare l’apparecchio alla presa di corrente. Subito dopo si sentirà un suono. Premere il pulsante di accen-
sione/spegnimento nchè l’apposito indicatore si illuminerà.
3. Posizionare il termostato sull’impostazione desiderata, selezionabile a seconda del tipo di tessuto dell’indu-
mento che si andrà a stirare. L’indicatore di temperatura si illuminerà ed il ferro inizierà a surriscaldarsi.
4. Quando la spia dell’indicatore di temperatura si spegnerà, signica che la temperatura è stata raggiunta. A
questo punto si può procedere con la stiratura.
ATTENZIONE: Non toccare mai la piastra del ferro nchè non si è totalmente raffreddata.
Stiratura a vapore:
1.Afferrare ed esercitare una leggera pressione sul manico del serbatoio d’acqua per estrarlo. Sollevare l’appo-
sito vano di apertura della tanica e riempirla d’acqua, quindi richiudere.
La massima capacità del serbatoio d’acqua è di 1.2L, mai superare il livello indicato dalla parola MAX. Si consi-
glia di utilizzare acqua distillata.
2. Riposizionare correttamente il serbatoio.
3. Posizionare il ferro sul cuscino isolante termico.
4. Collegare la spina alla presa di corrente, subito dopo si sentirà un suono. Premere il pulsante di accensione/
spegnimento nchè l’apposito indicatore si illuminerà assieme all’indicatore di vapore.
Scegliere il livello di vapore desiderato, premendo uno dei tre appositi pulsanti. Una volta selezionato, l’indica-
tore di riferimento si illuminerà. Assicurarsi che ci sia abbastanza acqua nel serbatoio.
5. Posizionare il termostato sull’impostazione desiderata, selezionabile a seconda del tipo di tessuto dell’indu-
mento che si andrà a stirare. Subito dopo l’indicatore di temperatura si illuminerà.
6. L’acqua nel serbatoio inizierà a surriscaldarsi e non appena il ferro avrà raggiunto la temperatura desiderata,
l’apposito indicatore si spegnerà. (L’operazione può richiedere qualche minuto).
Quando l’indicatore del livello di vapore selezionato si illuminerà, il ferro da stiro sarà pronto per la stiratura a
vapore, che fuoriuscirà premendo l’apposito innesco presente sul ferro.
7.Se durante l’operazione ci fosse carenza di acqua nel serbatoio, questo verrà segnalato attarverso l’apposito
indicatore ed un segnale acustico.
In quel caso, procedere riempiendo il serbatoio attraverso l’apposito vano. Premere quindi il tasto reset per
riattivare la funzione di rilascio di vapore.
8. Dopo aver terminato di utilizzare l’apparecchio, tenere premuto il tasto di accensione per qualche istante.
L’apparecchio emetterà un leggero suono, si spegnerà e tutti gli indicatori si spegneranno.
In alternativa, posizionare l’apparecchio sul cuscino isolante termico. Se non fuoriesce vapore dalla piastra
dell’apparecchio entro una decina di minuti, il ferro si spegnerà automaticamente.
Rimuovere l’apparecchio dalla presa di corrente.
ATTENZIONE: Non toccare mai la piastra del ferro nchè non si è totalmente raffreddata. Non direzionare mai
il getto di vapore in prossimità di persone e/o animali
PULIZIA DEL FERRO DA STIRO
Togliere la spina dalla presa di corrente elettrica.
Per rimuovere incrostazioni o resti di amido dalla piastra del ferro, utilizzare un panno umido o con un detersivo
non abrasivo quando la piastra è ancora calda. Per le macchie ostinate esistono detersivi speciali. Asciugare
sempre la piastra del ferro dopo ogni pulitura.
Pulire il corpo del ferro da stiro con un panno umido senza detersivi. Non utilizzare pagliette metalliche o deter-
sivi abrasivi.
RIPORRE IL FERRO DA STIRO
Spegnere il ferro da stiro posizionando il termostato regolabile su 0 e scollegare la spina dalla presa di corrente.
Lasciare raffreddare il ferro da stiro sull’apposita griglia. Riporre il sistema stirante avendo l’accortezza di non far
toccare i cavi di alimentazione con le parti calde del ferro da stiro.
Riporre sempre il sistema stirante su una supercie stabile e lontano dalla portata dei bambini.

7
Sistema stirante Manuale di istruzioni
IT
DATI TECNICI
Potenza: 2000-2400W
Alimentazione: 220-240V ~ 50-60Hz
In un’ottica di miglioramento continuo Beper si riserva la facoltà di apportare modiche e migliorie al
prodotto in oggetto senza previo preavviso.
Il simbolo del cestino barrato riportato sull’apparecchio indica che il prodotto, alla ne della propria vita
utile, dovendo essere trattato separatamente dai riuti domestici, deve essere conferito in un centro di
raccolta differenziata per apparecchiature elettriche ed elettroniche oppure riconsegnato al rivenditore
al momento dell’acquisto di una nuova apparecchiatura equivalente.
L’adeguata raccolta differenziata per l’avvio successivo dell’apparecchio al riciclaggio, al trattamento e allo smal-
timento ambientalmente compatibile contribuisce ad evitare possibili effetti negativi sull’ambiente e sulla salute e
favorisce il recupero dei materiali di cui è composto.
L’utente è responsabile del conferimento dell’apparecchio a ne vita alle appropriate strutture di raccolta. Per
informazioni più dettagliate inerenti i sistemi di raccolta disponibili, rivolgersi al servizio locale di smaltimento
riuti, o al negozio dove è stato effettuato l’acquisto.
Chiunque abbandona o cestina questo apparecchio e non lo riporta in un centro di raccolta differenziata per riuti
elettrici-elettronici è punito con la sanzione amministrativa pecuniaria prevista dalla normativa vigente in materia
di smaltimento abusivo di riuti
CERTIFICATO DI GARANZIA
La garanzia di applicazione è valida 24 mesi dalla data di acquisto per difetti di materiale o di fabbricazione.
La garanzia è valida unicamente presentando il certicato di garanzia e il documento di acquisto (scon-
trino scale) che certichi la data di acquisto e il nome del modello dell’apparecchio acquistato.
Se l’apparecchio dovesse richiedere assistenza tecnica rivolgersi al venditore o presso la nostra sede. Questo
per conservare inalterata l’efcienza del vostro apparecchio e per NON invalidare la garanzia. Eventuali ma-
nomissioni dell’apparecchio da parte di personale non autorizzato invalideranno automaticamente la garanzia.
Condizioni di garanzia
Se ci sono guasti a causa di difetti di materiale e/o fabbricazione durante il periodo di garanzia, garantiamo la
riparazione del prodotto gratuitamente.
Non sono coperte dalla garanzia tutte le parti che dovessero risultare difettose a causa di:
a. Danni da trasporto o da cadute accidentali,
b. Errata installazione o inadeguatezza impianto elettrico,
c. Riparazioni o modiche operate da personale non autorizzato,
d. Mancata o non corretta manutenzione e pulizia,
e. Prodotto e/o parti di prodotto soggette a usura e/o consumabili (es.: lampade, batterie, lame)
f. Mancata osservanza delle istruzioni per il funzionamento dell’apparecchio, negligenza
o trascuratezza nell’uso.
L’elenco di cui sopra è a titolo meramente esemplicativo e non esaustivo, in quanto la presente garanzia è
comunque esclusa per tutte quelle circostanze che non possono farsi risalire a difetti di fabbricazione dell’ap-
parecchio.
La garanzia è inoltre esclusa in tutti i casi di uso improprio dell’apparecchio ed in caso di uso professionale.
Beper Srl declina ogni responsabilità per eventuali danni che possano direttamente o indirettamente derivare a
persone, cose ed animali domestici in conseguenza della mancata osservanza di tutte le prescrizioni indicate
nell’apposito “Libretto Istruzioni ed avvertenze” in tema di installazione, uso e manutenzione dell’apparecchio.
Assistenza tecnica
Per l’assistenza tecnica e/o riparazioni fuori dal periodo di garanzia ci si può rivolgere direttamente all’indirizzo
sottostante.
BEPER SRL
Via Salieri, 30
37050 - Vallese di Oppeano - Verona
Tel. 045/7134674 – Fax 045/6984019
e-mail: assistenza@beper.com

8
Steam station Use instructions
GENERAL SAFETY ADVICE
READ THE OPERATING INSTRUCTIONS CAREFULLY BEFORE
FIRST USE OF THE APPLIANCE.
Read the following instructions carefully, since they give you useful
safety information about installation, use and maintenance and help
you avoid mishaps and possible accidents.
Remove the packing and make sure that the appliance is intact, with
special attention to the supply cable. The elements of the packing
(plastic bags, polystyrene, etc) do not have to be accessible to the
children, in order to preserve them from danger sources.
It is recommended not to throw these packing material in the dome-
stic waste, but to deliver them to the appropriate station of collection
or destruction refusals, asking eventually information to the manager
of the Sanitation Department of your own municipality.
Before connecting the appliance make sure that the mains voltage
corresponds to the data specied on the label.
If the plug does not suit the socket, let it be replaced with another
suitable plug by qualied personnel only, which shall also ensure that
the section of the socket cables is suitable for your appliance power
absorption.
Never pull the supply cord to unplug the appliance.
Make sure that the supply cord never comes into contact with hot or
cutting surfaces
Do not use this appliance if the supply cord is damaged. In case of
damage, it must be replaced by the manufacturer, its service agent or
similarly qualied persons in order to avoid a hazard.
Only connect this appliance on alternating current
Generally, the use adaptors multiple plugs and/or extensions is not
recommended; should they be necessary, please use only simple or
multiple adaptors and extensions in compliance with the safety rules
in force, making sure that the capacity absorption limit marked on the
simple adaptors and the extensions and the maximum power limit
marked on the multiple adaptor are not exceeded.
This appliance is to be destined to its special purpose only.
Any other use is to be considered as improper and thus dangerous.
The manufacturer cannot be responsible for any damages deriving
from improper, wrong or incautious use.
To avoid any heating risk, it is recommended to unroll completely the
supply cord and to unplug the appliance, when not used.

9
Steam station Use instructions
EN
Before cleaning, always unplug the appliance.
To protect against electric shock, do not immerse cord, plug or any
parts of the appliance into water or other uids.
Do not hold the appliance with wet hands or feet.
Do not hold the appliance with naked feet.
Do not expose the appliance to atmospheric agents such as rain,
wind, snow, hail.
Do not use the appliance near explosives, highly ammable mate-
rials, gases, burning ames, heaters.
Do not allow children, disabled people or every people without expe-
rience or technical ability to use the appliance if they are not properly
watched over. Close supervision is necessary when any appliance
used by or near children.
Make sure that children do not play with this appliance.
If you decide not to use the appliance any longer, make it unservice-
able by simply cutting the supply cable after disconnecting the plug
from the socket.
ALSO MAKE ANY DANGEROUS PARTS UNSERVICE-
ABLE, ESPECIALLY FOR CHILDREN WHO COULD
PLAY WITH THE APPLIANCE.
PRODUCT DESCRIPTION Fig.A
1. Temperature
2. Dial handle
3. Temperature indicator
4. Thermal insulating cushion
5. Rear support
6. Control panel
7. Unit base
TEMPERATURE DIAL Fig.B
1 IMPOSTAZIONE: per bre sintetiche o seta (temperatura compresa tra i 70 ed i 120°)
2 IMPOSTAZIONE: per lana (temperatura compresa tra i 100 ed i 160°)
3 IMPOSTAZIONE: per cotone (temperatura compresa tra i 140°e 210°)
4 IMPOSTAZIONE: per lino (temperatura compresa tra i 170 ed i 225°)
PANEL CONTROL Fig.C
1 Power indicator
2 Lack of water
3 Steam level indicator:
a) low level
b) medium level
c) high level
4 Steam level control button
5 Power button
6 Reset button
7 Anti-calc indicator
8. Cord clamp
9. De-calc box
10. Water tank
11. Filling aperture cap
12. Soleplate
13. Steam trigger
14. Front support

10
Steam station Use instructions
Front & Rear support
You can put the iron on the front & rear support during operation and you can also secure the iron into front &
rear support for storage after nishing ironing.
Power button
Plug in the appliance and press down the Power button, the power indicator will be illuminated, also the low
steam level regarded as defaulted one and its indicator will ash. Press down the Power button for a while, both
the power indicator and low steam level indicator will be extinguished, and the appliance will be disconnected
from the power supply.
Steam level control button
The steam level can be selected low, medium or high with the steam level control button. Any one to be selected,
its indicator will ash, after a few minutes, the indicator will be changed to illuminating. At this time, the appliance
can produce steam and you can use the steam for ironing.
Temperature dial
Turn the dial to set ironing temperature to meet the garment changed.
Temperature indicator
When the iron is heating up, the temperature indicator will be illuminated. Once the iron has reached the selected
temperature, it will extinguish. The temperature indicator will be cycled on and off as the iron maintains the se-
lected temperature during ironing.
Steam trigger
After pressing down the Power button and choosing the desired steam level, it indicates the steam can be used
for ironing until the corresponding steam level indicator is changed ashing to illuminating. At this time, press
the steam trigger with a little force, the steam will be sprayed from the soleplate continuously. When loosen the
steam trigger, the appliance can only be used for dry ironing without steam.
Lack of water indicator and reset button:
If less water in the tank, the indicator will be illuminated, following with two beeps can be heard, the steam gene-
rator stops working. It prompts you need to add water into the tank.
If less water in the tank, the lack of water indicator will be illuminated, at that time, you need to rell the water
tank. After rell the water tank with water, press the reset button once to make the lack of water indicator be
extinguished and then you can release steam for ironing.
ANTI-CALC FILTER INDICATOR
The item is equipped with anti-calc lter.
Once the anti calc indicator is turned on, replace the lter. Before changing it, put the lter in the water for one
hour. After changed, press for some seconds the steam level control button (4) and the reset one (6) at the same
time. The anti-calc indicator will turn off.
BEFORE FIRST USE
1. Remove any sticker, protective foil or storage cover from the soleplate.
2. Heat up the iron to maximum temperature and iron over a piece of damp cloth for several minutes for the
purpose of removing any residue on the soleplate according to the section of “Steam ironing”.
3. Before rst use, detach the de-calc box and then immerse it into the water for more than one minute.
NOTE: It is normal that strange odor comes out from the unit for the rst use. This will cease after a short while.
NOTE: Some particles may come out of the soleplate when you use the iron for the rst time. This is normal; the
particles are harmless and stop coming out of the iron after a short while.
NOTE: When you switch on the appliance, the steam generator may produce a pumping sound. This is normal;
the sound tells you that water is pumped into the steam generator.
NOTE: During the heating process of the soleplate, there will be little steam coming out from the soleplate auto-
matically and this phenomenon will continue for about 3 seconds, This is normal.

11
Steam station Use instructions
EN
USING YOUR STEAM STATION IRON
The appliance has two iron portions. You can use dry ironing or steam ironing. The details refer to the following:
Dry ironing
1. Put the iron on the thermal insulating cushion.
2. Connect the plug to wall outlet, together with one beep can be heard. And then press down the Power button,
the power indicator starts to illuminate.
3. Turn temperature dial to your desired setting, which is depended on the fabric of garment, and the temperature
indicator will illuminate. Refer to IRONING TIPS latter. The iron starts heating.
4. When the temperature indicator turns off, the selected temperature is reached. You now can start ironing.
WARNING: Never touch hot soleplate at any time before cooling down!
Steam ironing
1. Grasp and press the water tank’s handle to take out of the water tank, then open the lling aperture cap and
ll water into the water tank. You had better use puried water with less calcium particles. After it, close the lling
aperture cap. The max capacity of water tank is 1.2L, the water level shall not be exceeded the MAX mark.
2. Replace the detachable water tank properly.
3. Put the iron on the thermal insulating cushion.
4. Connect the plug to wall outlet, together with one beep can be heard. And then press down the Power button,
the power indicator starts to illuminate, also the low steam level regarded as defaulted one and its indicator will
ash. And you can select other steam level by pressing the steam level control button according to your requi-
rement. When being selected, its corresponding indicator will ash.Make sure that there is enough water in the
tank.
5. Turn temperature dial to your desired setting, which is depended on the fabric of garment, and temperature
indicator will illuminate. Refer to IRONING TIPS latter.
6. The water in the tank will be heated, after a few minutes, the temperature indicator will be extinguished, which
indicates the soleplate temperature has achieved the selected temperature. And when the indicator of selected
steam level has been changed ashing to illuminating, it indicates you can take out of the iron and iron the gar-
ment with steam by pressing the steam trigger of the iron.
Caution: 1) Do not touch hot soleplate at any time before cooling down!
2) Don’t emit the steam directly to the people.
7. During operation, if there is less water in the tank, the lack of water indicator will be illuminated, following with
two beeps can be heard. At that time, you should rell the water tank through the lling aperture or move out of
the water tank to rell it. After it, press the reset button to reactivate the steam release function.
8. After nish ironing, press and hold the Power button for a while, following with one beep can be heard, and
the appliance will be turned off and all the indicators will be extinguished. Or you can put the iron the thermal
insulating cushion, if there is no steam sprayed out from the soleplate within 10 minutes, the appliance will be
turned off automatically. Remove the plug from the wall socket. But the soleplate is still hot, never touch it with
hand, place it on the thermal insulating cushion until it cools down completely.
CLEANING
Unplug the supply cord.
To clean the body of the appliance, simply use a moist cloth. Do not use solvents or detergents which may harm
the body material.
HOW TO STOCK YOUR STEAM STATION
Switch off the appliance by the button on 0 and unplug the supply cord.
Let the iron cool on the iron rest. Stock the steam station and pay attention that the supply cord does not touch
the hot parts.
Always stock the steam station on a stable surface and keep it away from children.

12
Steam station Use instructions
TECHNICAL DATA
Power: 2000-2400W
Power supply : 220-240V ~ 50-60Hz
For any improvement reasons, Beper reserves the right to modify or improve the product without any
notice.
The European directive 2011/65/EU on Waste Electrical and Electronic Equipment (WEEE), requires
that old household electrical appliances must not be disposed of in the normal unsorted municipal
waste stream. Old appliances must be collected separately in order to optimize the recovery and
recycling of the materials they contain, and reduce the impact on human health and the environment.
The crossed out “wheeled bin” symbol on the product reminds you of your obligation, that when you
dispose of the appliance, it must be separately collected.
GUARANTEE CERTIFICATE
This appliance has been checked in the factory. From the date of original purchase a 24 month guarantee ap-
plies to material and production defects. The purchase receipt and the guarantee certicate must be submitted
together in case of claim to guarantee.
The guarantee is valid only with a guaranty certicate and proof of purchase (scal receipt) indicating
the date of purchase and the model of the appliance
For any technical assistance, please contact directly the seller or our head ofce in order to preserve the applian-
ce’s efciency and NOT TO void the guarantee. Any intervention on this appliance by non-authorized persons
will automatically void the guarantee.
GUARANTEE CONDITIONS
If the appliance shows defects as a result of faulty material and/or production during the period of guarantee, we
guarantee repair free of charge on condition that:
- The appliance has been used properly and for the purpose for which it has been intended.
- The appliance has not been tampered with, otherwise it is not maintainable.
- The purchase receipt shall be presented.
- The appliance showing a fair wear and tear shall not be covered by this guarantee.
Therefore, any part that could be accidentally broken or having visible signs of use in consumable products
(such as lamps, batteries, heating elements…) the aesthetic parts are excluded from the guarantee, and any
defect whatsoever resulting from non-respect of the rules for use, negligence in usage and/or maintenance of
the appliance, carelessness, wrong or improper installation, damage during transport and any other damage not
attributable the supplier.
For every defect that could not be repaired within the guarantee period, the appliance will be replaced free of
charge.
In any case, if the part to be replaced for defect, breakage or malfunction is an accessory and/or a detachable
part of the product, Beper reserves the right to replace only the very part in question and not the entire product
TECHNICAL ASSISTANCE
Even after the guarantee period we will always pay attention to repairs for defected appliances.
For technical assistance and/or repairs after the guarantee period you can directly contact the below address:
CONTACT YOUR DISTRIBUTOR IN YOUR COUNTRY OR ATER SALES DEPARTMENT BEPER. E-MAIL as-
sistenza@beper.com WHICH WILL FORWARD YOUR ENQUIRIES TO YOUR DISTRIBUTOR.

ES
13
Système repassant Manuel d’instructions
FR
PRECAUTIONS GENERALES
LIRE ATTENTIVEMENT LES INSTRUCTIONS SUIVANTES AVANT
LA PREMIERE UTILISATION DE L’APPAREIL.
Avant et durant l’utilisation de cet appareil il est nécessaire de suivre
précautions élémentaires suivantes.
Après avoir enlever l’emballage, s’assurer de l’intégrité de l’appareil.
En cas de doute ne pas utiliser l’appareil et s’adresser à un pro-
fessionnel qualié. Les éléments d’emballage (sachets plastique,
polystyrène, etc.) ne doivent pas être laissés à la portée des enfants,
car potentiellement dangereux.
Il est recommandé de ne pas jeter les éléments d’emballage dans les
déchets ménagers, mais de les déposer dans les centres de traite-
ment des déchets appropriés, en demandant éventuellement conseil
au gérant du centre de sa commune de résidence.
Toujours s’assurer que la tension électrique soit la même que cel-
le indiquée sur l’étiquette des données techniques et que le réseau
électrique soit compatible avec la puissance de l’appareil.
En cas d’incompatibilité entre la prise électrique murale et celle de
l’appareil faire changer la prise de l’appareil par un professionnel
qualié. Ce dernier devra s’assurer que la section des câbles de la
prise soit adaptée à la puissance absorbée par l’appareil.
Ne jamais tirer sur le câble d’alimentation pour débrancher la prise
électrique.
S’assurer que le câble n’entre pas en contact avec des supercies
chaudes ou coupantes.
Ne pas utiliser l’appareil si le câble d’alimentation est abîmé.
Si le câble d’alimentation est endommagé, pour éviter tout risque, il
devra être substitué par le constructeur, par son service d’assistance
technique ou toute autre personne de même qualication.
Brancher l’appareil exclusivement sur une prise de courant alterné.
Il est en général déconseiller d’utiliser des adaptateurs, prises mul-
tiples et/ou rallonges. En cas de nécessité, utiliser seulement des
adaptateurs ou rallonges conformes aux normes de sécurité en vi-
gueur.
Cet appareil ne devra être utilisé que pour l’usage pour lequel il a été
conçu.
Tout autre usage sera considéré comme inapproprié et donc dange-
reux, et engendrera l’annulation de la garantie.

14
Système repassant Manuel d’instructions
Le constructeur ne peut être tenu pour responsable en cas de dom-
mages causés par une utilisation incorrecte, inappropriée et dérai-
sonnable.
Pour éviter tout risque d’échauffement il est recommandé de dérouler
entièrement le câble d’alimentation et de débrancher l’appareil de la
prise de courant en cas d’inutilisation.
Avant d’effectuer toute opération de nettoyage ou entretien, débran-
cher l’appareil de la prise de courant électrique.
Ne jamais immerger l’appareil dans l’eau ou d’autres liquides.
Ne pas toucher l’appareil avec les mains et pieds mouillés ou humi-
des.
Ne pas utiliser l’appareil si vous êtes pieds nus.
Ne pas laisser l’appareil exposé aux agents atmosphériques comme
la pluie, le soleil …
Ne pas laisser l’appareil près d’une source de chaleur (ex. Radiateur)
Ne pas laisser les enfants, les personnes avec des capacités physi-
ques, sensorielles ou mentales réduites, ou manquant d’expérience
ou de connaissance technique, utiliser cet appareil sans surveillance
S’assurer que les enfants ne jouent pas avec cet appareil.
DÈS LORS QUE L’APPAREIL DOIT ÊTRE DÉTRUIT, IL
EST RECOMMANDÉ DE COUPER LE CÂBLE D’ALI-
MENTATION, ET DE RETIRER TOUTES LES PARTIES
SUSCEPTIBLES DE PRÉSENTER UN QUELCONQUE
DANGER, EN PARTICULIER POUR LES ENFANTS
QUI POURRAIENT UTILISER CET APPAREIL COMME
UN JEU.
DESCRIPTION DU PRODUIT: Fig.A
1. Thermostat
2. Manche
3. Indicateur de température
4. Base d’appui du fer
5. Bloc du fer postérieur
6. Panneau de contrôle
7. Unité de base
8. Bloc l
9. Récipient de calcaire
10. Réservoir
11. Compartiment d’ouverture du réservoir d’eau
12. Plaque
13. Pulsant vapeur
14. Bloc du fer antérieur

ES
15
Système repassant Manuel d’instructions
FR
THERMOSTAT Fig.B
1 PROGRAMMATION: pour bres synthétiques ou soie (température comprise entre 70 et 120°)
2 PROGRAMMATION: pour laine (température comprise entre 100 et 160°)
3 PROGRAMMATION: pour coton (température comprise entre 140° et 210°)
4 PROGRAMMATION: pour lin (température comprise entre 170 et 225°)
PANNEAU DE CONTRÔLE: Fig.C
1 Indicateur on/off’
2 Pulsant d’indication en cas de manque d’eau à l’intérieur du réservoir
3 Niveaux de vapeur:
a) Niveau bas
b) Niveau moyen
c) Niveau haut
4 Pulsant de contrôle du niveau de vapeur
5 Pulsant d’allumage/d’éteignement
6 Pulsant de reset
7 Indicateur lumineux de remplacement du
Bloc du fer antérieur et postérieur
Les supports de bloc du fer antérieur et postérieur sont nécessaires pour positionner le fer en
conditions de sécurité pendant le repassage et pour le remettre en conditions de sécurité une fois
terminé le repassage.
Pulsant d’allumage/d’éteignement
Pour allumer l’appareil, le brancher à la prise de courant et appuyer sur le pulsant d’allumage. L’in-
dicateur approprié s’illuminera et l’indicateur de «basse vapeur» clignotera.
Pour l’éteindre, tenir appuyé pour quelque instant le pulsant d’allumage, jusqu’à ce que son indica-
teur approprié et le pulsant du niveau de «basse vapeur» s’éteindra. Débrancher ensuite le système
de repassage de la prise de courant.
Pulsant de contrôle du niveau de vapeur
Le niveau de vapeur peut être sélectionné entre bas, moyen et haut à travers le pulsant de contrôle
de vapeur. Une fois choisi l’indicateur s’illuminera. Attendre jusqu’à l’éteignement de l’indicateur et
procéder ensuite avec l’utilisation du fer.
Thermostat
Tourner le thermostat et sélectionner la programmation d’utilisation désirée en fonction du tissu du
vêtement que vous voulez repasser.
Indicateur de température
Quand le fer est chaud, l’indicateur de température s’illuminera.
Une fois que le fer aura rejoint la température sélectionnée, l’indicateur lumineux s’éteindra.
Pulsant de vapeur
Après avoir appuyé le pulsant d’allumage/d’éteignement et choisi le niveau de vapeur désiré, le pul-
sant de vapeur de référence sur l’écran commencera à clignoter. Une fois terminée le clignotement,
le pulsant s’allumera et vous pourrez procéder avec l’utilisation.
Si vous voulez utiliser la vapeur, appuyer sur le pulsant approprié jusqu’à ce que ce dernier ne
sortira pas de la plaque.
Dans le cas contraire, l’appareil pourra être utilisé seulement pour le repassage à sec sans vapeur.

16
Système repassant Manuel d’instructions
Indicateur de manque d’eau et pulsant reset
En cas de manque d’eau dans le réservoir, l’indicateur approprié s’illuminera accompagné d’un
signal acoustique.
Une fois insérée l’eau à l’intérieur du réservoir, appuyer le pulsant reset et attendre que l’eau arrive
à température.
INDICATEUR DU FILTRE ANTICALCAIRE
L’appareil est équipé de ltre anticalcaire.
Une fois que l’indicateur anticalcaire soit illuminé, procéder avec le remplacement du ltre. Avant
d’insérer le nouveau ltre laisser le pour une heure plongé dans de l’eau.
Une fois inséré, il faut appuyer en même temps pour quelques secondes le pulsant de contrôle du
niveau de la vapeur (4) et le pulsant de mise à zéro (6). L’indicateur anticalcaire s’éteindra.
PREMIÈRE UTILISATION:
1 Enlever des éventuels adhésifs, feuilles ou emballages de la plaque du fer.
2. Enlever le récipient de calcaire et plonger-le pour une minute dans l’eau.
NB: Des éventuelles odeurs étranges ou de petits déchets provenant de l’unité pendant la première utilisation
sont normaux.
Quand vous allumez l’appareil, il est possible d’entendre un léger son. Ce bruit est dû au pompage de l’eau à
l’intérieur du fer à repasser.
Pendant le procédé de réchauffement, il est possible que pour quelque seconde sorte automatiquement de la
vapeur de la plaque.
UTILISATION DU FER Â REPASSER:
L’appareil a deux différentes fonctions.
Il est possible d’utiliser le repassage à sec ou à vapeur.
Repassage à sec
1. Positionner le fer sur le coussin approprié isolant thermique.
2. Bancher l’appareil à la prise de courant électrique. Aussitôt après on entendra un son. Appuyer sur le pulsant
d’allumage/d’éteignement jusqu’à ce que l’indicateur approprié s’illuminera.
3. Positionner le thermostat sur la programmation désirée, sélectionnable en fonction du type de tissu du vête-
ment que l’on voudra repasser. L’indicateur de température s’illuminera et le fer commencera à se réchauffer
4. Quand le témoin de température s’éteindra, cela signie que la température a été rejointe. À ce point on peut
procéder avec le repassage.
ATTENTION: Ne jamais toucher la plaque de fer jusqu’à ce qu’elle ne soit pas refroidie
Repassage à vapeur:
1. Imposer et exercer une légère pression sur le manche du réservoir d’eau pour l’extraire. Soulever le compar-
timent approprié d’ouverture du réservoir et le remplir d’eau, et ensuite refermer-le
La capacité maximum du réservoir d’eau est de 1.2 L, ne jamais dépasser le niveau indiqué du mot MAX. Nous
vous conseillons d’utiliser de l’eau distillée.
2. Repositionner correctement le réservoir.
3. Positionner le fer sur le coussin isolant thermique.
4. Brancher la che à la prise de courant, juste après vous entendrez un bruit. Appuyer sur le pulsant d’allumage/
d’éteignement jusqu’à ce que l’indicateur approprié s’illuminera ensemble à l’indicateur de vapeur.
Choisir le niveau de vapeur désiré, en appuyant l’un des trois pulsants appropriés. Une fois sélectionnée, l’in-
dicateur de référence s’illuminera. S’assurer qu’il y ait sufsamment d’eau dans le réservoir.
5. Positionner le thermostat sur la programmation désirée, sélectionnable en fonction du type de tissu du vête-
ment que l’on voudra repasser. Juste après l’indicateur de température s’illuminera.

ES
17
Système repassant Manuel d’instructions
FR
6. L’eau dans le réservoir commencera à se réchauffer et une fois que le fer aura rejoint la température désirée,
l’indicateur approprié s’éteindra. (L’opération peut demander quelques minutes).
Quand l’indicateur de niveau de vapeur sélectionné s’allumera, le fer à repasser sera prêt pour le repassage à
vapeur, qui sortira en appuyant sur le déclencheur approprié présent sur le fer.
7. Si pendant l’opération il y a un manque d’eau dans le réservoir, cela sera signalé à travers l’indicateur appro-
prié et un signal acoustique.
Dans ce cas, procéder en remplissant le réservoir à travers le compartiment approprié.
Appuyer sur le pulsant reset pour réactiver la fonction de libération de vapeur.
8. Après avoir terminé d’utiliser l’appareil, tenir appuyé le pulsant d’allumage pour quelque instant. L’appareil
émettra un léger son, il s’éteindra et tous les indicateurs s’éteindront.
En alternative, positionner l’appareil sur le coussin isolant thermique. Si la vapeur ne sort pas de la plaque de
l’appareil dans une dizaine de minutes, le fer s’éteindra automatiquement.
Enlever l’appareil de la prise de courant.
ATTENTION: Ne jamais toucher la plaque du fer jusqu’à ce qu’elle ne soit pas totalement refroidie. Ne jamais
orienter le jet de vapeur à proximité de personnes et/ou d’animaux.
NETTOYAGE DU FER A REPASSER
Débrancher la prise du courant électrique.
Pour enlever toute incrustation ou reste d’amidon de la plaque du fer, utiliser un chiffon humide ou avec un pro-
duit non abrasif quand la plaque est encore chaude.
Pour les tâches persistantes utilisez des produits spéciques.
Essuyer toujours la plaque du fer après chaque nettoyage.
Nettoyer le corps du fer avec un chiffon humide sans utiliser de détergents.
Ne pas utiliser d’éponge métallique ou produits abrasifs.
RANGEMENT DU FER A REPASSER
Eteindre le fer à repasser en positionnant le thermostat réglable sur 0 et débrancher la prise de courant.
Laisser refroidir le fer à repasser sur la grille prévue à cet effet. Ranger la centrale vapeur en prenant soin de ne
pas mettre en contact le cable d’alimentation avec les parties chaudes du fer à repasser.
Toujours ranger la centrale vapeur sur une surface stable et hors de la portée des enfants.
DONNÉES TECHNIQUES
Puissance: 2000-2400W
Alimentation : 220-240V ~ 50-60Hz
Dans un soucis constant d’amélioration, Beper se réserve le droit de modier ou améliorer le produit
sans aucun préavis.
Le produit en n de vie doit être détruit selon les normes en vigueur relatives à l’élimination des
déchets et ne peut être traité comme simple déchet ménagé.
Le produit doit être détruit dans un centre d’élimination des déchets adapté ou être restitué au reven-
deur dans le cas d’une substitution avec un autre produit équivalent neuf.
Le fabricant prendra à sa charge les frais occasionnés pour la destruction du produit selon les termes
de la loi en vigeur.
Le produit est composé de pièces non biodégradables et substances qui peuvent polluer l’environnement si
détruites de façon inapropriée . Par ailleurs, certaines parties de ces matières peuvent être recyclées évitant ain-
si toute pollution pour l’environnement. Il est de votre et notre devoir de préserver la santé de l’environnement.
Le symbole indique que le produit répond aux normes requises par les nouvelles
directives introduites en faveur de l’environnement (2011/65/EU) et que le produit doit être détruit de façon ap-
propriée au terme du cycle de vie.
Si besoin, informez-vous auprès des autorités locales compétentes en matière d’élimination des déchets de
votre commune.
Toute personne qui ne tiendra pas compte de ces règles d’élimination des déchets indiquées dans ce para-
graphe en répondra selon la loi en vigueur.

18
Système repassant Manuel d’instructions
CERTIFICAT DE GARANTIE
La garantie d’application est valable pour 24 mois à partir de la date d’achat pour des défauts de matériel ou de
fabrication.
La garantie est valable uniquement en présentant le certicat de garantie et le document d’achat (ticket
de caisse) qui certie la date d’achat et le nom du modèle de l’appareil acheté
Si l’appareil devrait demander l‘assistance technique s’adresser au vendeur ou auprès de notre siège. Ceci pour
conserver inaltérée l ‘efcacité de votre appareil et pour NON invalider la garantie. Des éventuelles manipula-
tions de l’appareil de la part du personnel non autorisé invalident automatiquement a garantie.
CONDITIONS DE GARANTIE
S’il y a des pannes à cause des défauts de matériel et/ou de fabrication pendant la période de garantie, nous
garantissons la réparation du produit gratuitement.
Elles ne sont pas couvertes de la garantie toutes les parties qui devraient résulter défectueuses à cause de :
a. Dommages de transport ou de chutes accidentelles,
b. Installation erronée ou inadaptation de l’installation électrique,
c. Réparations ou modications effectuées par un personnel non autorisé,
d. Manque ou incorrect entretien et nettoyage,
e. Produit et/ou parties du produit relevant de l’usure et/ou consommables (ex : lampes piles, lames)
f. Manque d’observation des instructions pour le fonctionnement de l’appareil, négligence dans l’utilisation
La liste indiquée ci-dessus est à titre purement exemplaire et non exhaustif, car la présente garantie est donc
exclue pour toutes les circonstances qui ne peuvent pas dériver des défauts de fabrication de l’appareil.
En outre la garantie est exclue dans tous les cas d’usage impropre de l’appareil et en cas d’usage professionnel.
Beper S.R.L. décline chaque responsabilité pour des éventuels dommages qui peuvent directement ou indi-
rectement dériver à des personnes, des choses et des animaux domestiques, en conséquence au non-respect
de toutes les prescriptions indiquées dans le « livret des instructions et des précautions » approprié, en thème
d’installation, d’utilisation et d’entretien de l’appareil.
ASSISTANCE TECHNIQUE
Pour l’assistance technique et/ou des réparations en dehors de la période de garantie, vous pouvez vous adres-
ser directement à l’adresse indiquée ci-dessous:
LE SERVICE APRÈS-VENTE EST EFFECTUÉ PAR VOTRE REVENDEUR OU PAR
L’IMPORTATEUR/DISTRIBUTEUR DES PRODUITS BEPER.
ÉCRIVEZ UN E-MAIL AU assistenza@beper.com POUR CONNAITRE LE CENTRE SERVICE AGRÉE BEPER
LE PLUS PROCHE DE CHEZ VOUS.

19
Buegelstation Betriebsanleitung
DE
ALLGEMEINE ANLElTUNGEN
1. Diese Anleitungen aufmerksam lesen, denn sie geben wichtige
Hinweise zu Ihrer eigenen Sicherheit bei Installation, Benutzung und
Service. Sie können dadurch Störungen und Unfalle vermeiden, die
u.U. Ihre Sicherheit beeintrachtigen können.
2. Beim Auspacken überprüfen, ob das Gerät unversehrt ist, insbe-
sondere Anschlußkabel.
3. Im Falls der Kabel ist zerstört, die Reparierung oder die Ersetzung
dürfen nur von Fachkräfter durchgeführt warden oder sie können
erhbeliche Gefahren für den Benutzer entstehen.
4. Vor Geräteanschluß überprüfen, ob der Netzstrom und die
Schildwerte übereinstimmen. Das Gerät kann Schäden erleiden,
wenn einer nicht geeigneten Spannung unterliegt.
5. Bei Nichtubereinstimmung von Gerätestecker und Steckdose las-
sen Sie die Steckdose durch einen geeigneten Typ von qualizier-
tem Fachpersonal ersetzen, das auch überprüfen soll, ob der Dur-
chschnitt der Steckerkabel der vom Gerät aufgenommenen Leistung
entspricht.
6. Die Benutzung von Paßstücken, Vielfrachsteckdosen und/oder
Verlangerungskabel ist in der Regel nicht ratsam, insbesondere in
Badezimmer oder Duschraum. Müssen diese Teile unbedingt verwen-
det werden, so benutzen Sie nur Einfach-oder Vielfrachpaßstücke
bzw. Verlangerungskabel, die den geltenden Sicherheitsvorschriften
entsprechen.
Darauf achten, daß die auf dem Einfachpaß stuck bzw. Verlange-
rungskabel angegebene Stromleistungsgrenze und die auf dem Viel-
fachpaßstück angegebene Hochstleistungsgrenze nicht uberschrit-
ten werden.
7. Gerät bei beschädigtem Anschlußkabel oder Stecker nicht be-
nutzen.
8. Bei Störung und/oder Fehlbetrieb Gerät ausschalten und nicht
eingreifen. Zur eventuellen Reparatur das Gerät nur zu einer Beper
Vertragsservicestelle bringen und nur den Einsatz von Originaler-
satzteiler, verlangen. Die Nichtbeachtung dieser Anleitungen kann
die Sicherheit des Gerätes beeintrachtigen.
9. Gerät nur für der vorgesehenen Zweck, einsetzen. Jede andersar-
tige Benutzung ist ungeeignet und deswegen gefährlich. Für Scha-
den, die durch unsachgemäße und unvernunftige Handhabung ve-
rursacht werden, wird nicht gehaftet.

20
Buegelstation Betriebsanleitung
10. Gerät keinesfalls ins Wasser bzw. in andere Flüssigkeiten tau-
chen.
11. Gerät nicht in der Nähe von Sprengstoffen, stark brennbaren Ma-
terialien, Gasen oder Flammen bedienen.
12. Gerät nicht von Kindern oder Ungeschickten unbewacht bedie-
nen lassen.
13. Gerät nicht mit nassen oder feuchten Händen und Füßen berüh-
ren.
14. Für absolute Betriebssicherheit nur vorgesehene Zubehörteile
verwenden..
15. Gerät nicht im Duschraum und bei Badewanne oder beim Wa-
schbecken benutzen: die Anwesenheit von Wasser könnte le-
bensgefährlich sein.
16. Stecker niemals an der Leitung bzw. an dem Gerät aus der
Steckdose ziehen.
17. Das Kabel nicht herabhängen lassen.
18. Gerät nicht den Witterungseinüssen (Regen, Wind, Schnee, Ha-
gen usw.) aussetzen.
19. Bei Nicht benutzen bzw. Reinigen den Gerätestecker aus der
Steckdose ziehen.
20. Falls Sie entscheiden, das Gerät nicht mehr zu verwenden,
dann ist es empfehlenswert, das Gerät durch Abschneiden des An-
schlußkabel außer Betrieb zu setzen, nachdem der Stecker aus der
Steckdose gezogen wurde. Es wird ferner empfohlen, die Gerätetei-
le, die lebensgefährlich sein können, außer Betrieb zu setzen, be-
sonders für die Kinder, die mit dem Gerät außer Gebrauch spielen
können.
21. Beim Nichtgebrauch, vor dem Einfügen oder Entnehmen seiner
Bestandteile und vor dem Durchführung von Reinigungsarbeiten
muß das Gerät vom Strom abgeschaltet werden.
22. Es wird empfohlen das Gerät sauber zu halten um die o.g.
Funktionsstörungen und Feuer -Gefahr zu vermeiden.
23. Achten Sie darauf, dass alle die das Gerät benutzen, diese Anlei-
tungen lesen.
24. Diese Anleitungen aufbewahren.
Table of contents
Languages:
Other Beper Iron manuals

Beper
Beper 50.933H Quick guide

Beper
Beper P204FER004 User manual

Beper
Beper P204FER250 Quick guide

Beper
Beper P204FER200 Quick guide

Beper
Beper 50.050 Quick guide

Beper
Beper 50.815 Quick guide

Beper
Beper 50.937 Quick guide

Beper
Beper P204CAL200 Quick guide

Beper
Beper 50.971 Quick guide

Beper
Beper 50.101 Quick guide

Beper
Beper Vaporex 50.934 Quick guide

Beper
Beper Stirello Quick guide

Beper
Beper 50.200 Quick guide

Beper
Beper 50.943 Quick guide

Beper
Beper 50.000 Quick guide

Beper
Beper 50.161 Quick guide

Beper
Beper P204FER003 Operating and maintenance manual

Beper
Beper 50.002 Quick guide

Beper
Beper 50.001 Quick guide

Beper
Beper P204FER100 Quick guide