Miele S2 Series Manual

TECHNICAL INFORMATION
S2 Canister Vacuums
© 2012 Miele USA

Technical Information
2
S2 Canister Vacuums
Table of Contents
AWarning and Safety Instructions.......................................................................4
1General Information....................................................................................................4
2Cleaning and Care......................................................................................................4
2.1Vacuums and Accessories .............................................................................4
2.2Dust Compartment .........................................................................................4
BModification History............................................................................................5
CTechnical Data.....................................................................................................5
DLayout of Electrical Components......................................................................7
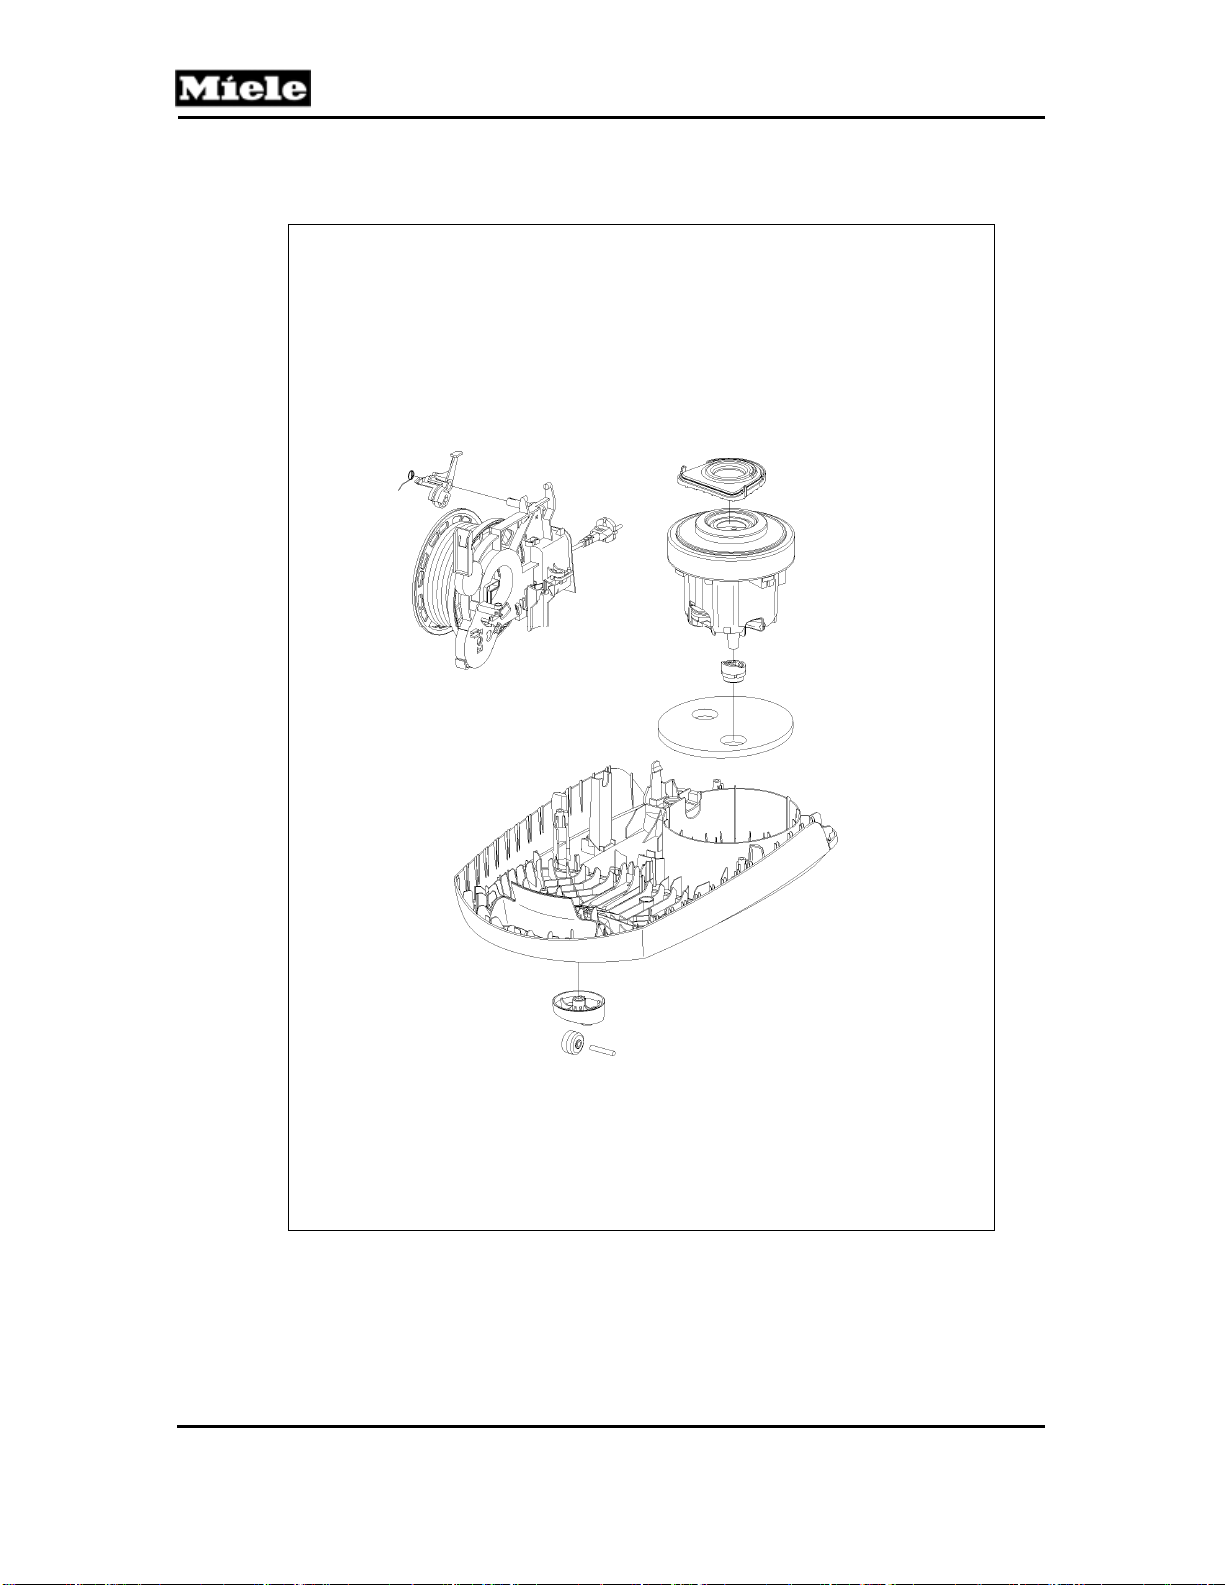
010Casing Bottom, Motor.......................................................................................10
2Function....................................................................................................................11
2.1Casters.........................................................................................................11
4Service......................................................................................................................11
4.1Caster Removal............................................................................................11
4.2Motor Removal.............................................................................................12
4.3Cord Reel Removal......................................................................................13
4.4Cord Removal...............................................................................................14
020Casing Top.........................................................................................................17
2Function....................................................................................................................18
2.1Bags.............................................................................................................18
2.2Bag Change Indicator...................................................................................18
2.2Filters............................................................................................................19
4Service......................................................................................................................19
4.1 Bag Holder Removal ....................................................................................19
4.2 Bag Change Indicator Removal....................................................................19
4.3 Casing Top Removal....................................................................................20
4.4 Motor Protection Filter Frame Removal........................................................21
4.5 Cover Frame Removal .................................................................................21
4.6 Air Inlet Regulator Removal..........................................................................23
4.7Changing the Bag.........................................................................................23
4.8Replacing the Super Air Clean Filter ............................................................24
4.9Replacing the Active Air Clean or Active HEPA Filter...................................24
4.10Replacing One Type of Filter with Another...................................................25
4.11Changing the Dust Compartment (Motor Protection) Filter...........................25
030Controls, Electronic..........................................................................................26
2Function....................................................................................................................27
2.1Suction Power ..............................................................................................27
3Fault Repair..............................................................................................................27
3.1Vacuum Cleaner Cannot Be Switched On....................................................27
3.2 Vacuum Cleaner Shuts Itself Off or Overheating Indicator LED Lights Up...28
4Service......................................................................................................................28
4.1Cap Removal................................................................................................28
4.2Electronic Removal.......................................................................................30
4.3 On/Off Switch Removal ................................................................................30
040Suction Hose, Accessories..............................................................................31
2Function....................................................................................................................32

Technical Information
3
S2 Canister Vacuums
2.1Accessories..................................................................................................32
3Fault Repair..............................................................................................................32
3.1Suction Power Too Low................................................................................32
4Service......................................................................................................................33
4.1Telescopic Suction Hose Locking Piece Replacement.................................33
4.2Pushbutton Replacement (for Telescopic Hoses).........................................34
List of Figures
Figure D-1: Control Panel (at Rear of Vacuum)......................................................................7
Figure D-2: Internal Component Layout..................................................................................7
Figure D-3: External Component Layout (with Basic Suction Hose).......................................8
Figure D-4: External Component Layout (with Electro Accessories).......................................9
Figure 010-1: Support Roller and Axle..................................................................................11
Figure 010-2: Caster Removal..............................................................................................12
Figure 010-3: Electronic Retainer..........................................................................................12
Figure 010-4: Motor...............................................................................................................13
Figure 010-5: Cord Reel and Motor.......................................................................................13
Figure 010-6: Cord Reel Retainer on Side............................................................................14
Figure 010-7: Cord Reel, Unwound.......................................................................................14
Figure 010-8: Cord Reel Clamped to Reel Assembly Body ..................................................15
Figure 010-9: Screws Securing Cord Reel............................................................................15
Figure 010-10: Cord Reel Tabs.............................................................................................16
Figure 020-1: Bag Change Indicator.....................................................................................18
Figure 020-2: Filter Types.....................................................................................................19
Figure 020-3: Bag and Holder...............................................................................................19
Figure 020-4: Bag Change Indicator Removal......................................................................20
Figure 020-5: Casing Top Removal ......................................................................................20
Figure 020-6: Filter Frame Retaining Tabs ...........................................................................21
Figure 020-7: Cover Frame Screws......................................................................................22
Figure 020-8: Cover Frame Removal....................................................................................22
Figure 020-9: Air Inlet Regulator...........................................................................................23
Figure 020-10: Changing the Bag.........................................................................................24
Figure 020-11: Replacing the Super Air Clean Filter.............................................................24
Figure 020-12: Replacing the Active Air Clean or Active HEPA Filter...................................25
Figure 020-13: Changing the Dust Compartment Filter.........................................................25
Figure 030-1: Rotary Selector Switch....................................................................................27
Figure 030-2: Cap Screws ....................................................................................................29
Figure 030-3: Notches...........................................................................................................29
Figure 030-4: Tabs................................................................................................................30
Figure 040-1: Accessories ....................................................................................................32
Figure 040-2: Telescopic Locking Piece ...............................................................................33
Figure 040-3: Pushbutton Replacement................................................................................34
List of Tables
Table C-1: S2 Data Sheet, US Models....................................................................................6

Technical Information
4
S2 Canister Vacuums
A Warning and Safety Instructions
1 General Information
All repairs should be performed by a trained technician in strict
accordance with national, state and local codes. Any repairs or
maintenance performed by unqualified personnel could be dangerous.
When servicing, modifying, testing or maintaining appliances, all applicord
laws, regulations and accident prevention guidelines must be observed.
All regulations of the appropriate utility supply companies and standards
relating to safety (not limited to electrical safety) are to be complied with.
Before any service work is started, the vacuum cleaner must be
disconnected from the power supply.
Even with the vacuum switched off, voltage may be applied to some components.
Do not leave the vacuum unattended when it is plugged in. Turn off and
unplug the vacuum before opening the cover.
After work has been completed, a visual as well as an operational check
should always be performed.
2 Cleaning and Care
2.1 Vacuums and Accessories
The vacuum cleaner and other plastic components can be cleaned using a
damp cloth or a cleaner made especially for plastics.
Warning!
Do not use abrasive, glass or all-purpose cleaning solutions, as these can
cause considerable damage to the plastic components of the vacuum or its
accessories.
2.2 Dust Compartment
The dust compartment can be cleaned using another vacuum, if available, or
a dry cloth or brush.
Monitor the bag change indicator and inspect all filters regularly. Replace
them when necessary according to the operating instructions.

Technical Information
5
S2 Canister Vacuums
B Modification History
When? Who? What?
7/18/2012 Jessica Naples S 2121 (HomeCare) model info added
8/10/2011 Jessica Naples Cord reel troubleshooting and cord
removal added
11/20/2009 Jessica Naples Conversion for Website
6/17/2008 Armin Mannert Initial compilation
C Technical Data
Model S 2110 S 2120 S 2121 S 2130 S 2180
Weight, without
accessories 13.2 lbs (6kg)
Radius
of operation 30' (9m)
Bag capacity 1.2 gal (4.5L)
Noise insulation Yes
Motor gentle start Yes
Suction power
adjustment Rotary switch
On/off switch for Park
System No
Bag type G/N
Super Air Clean filter Yes No
Active Air Clean filter No
Active HEPA filter No Optional No Yes
Bag change indicator Yes
Electric exhaust filter
change indicator No
Overheating indicator
light No
Blower function No
Filter grille Yes
Automatic cord rewind Yes

Technical Information
6
S2 Canister Vacuums
Model S 2110 S 2120 S 2121 S 2130 S 2180
Accessories supplied
2 single connectable
suction hoses
(Easylock) Model-dependent
2-part stainless-steel
suction hose Model-dependent
3-part stainless-steel
telescopic suction
hose (TriScope) Model-dependent
Electro-telescopic
suction hose No Yes No
Suction hose holder Integrated
Suction hose
connection Cylindrical stub
Universal floor
attachment SBD 350-3 SBD 470-3 SBD 450-3 SBD 350-3
Electrobrush/
Rechargeable
electrobrush Optional accessory SEB 228 Optional accessory
Turbo brush Optional accessory
Upholstery nozzle/
Dusting brush Yes/Yes
Crevice nozzle/
Extended crevice
nozzle Yes/No
Electrical connection - USA models only
Power rating 1200W
Voltage 120V
Fuse rating 15A
Power consumption 0.3 - 1.4 kWh
Table C-1: S2 Data Sheet, US Models

Technical Information
7
S2 Canister Vacuums
D Layout of Electrical Components
Figure D-1: Control Panel (at Rear of Vacuum)
Figure D-2: Internal Component Layout
1 Cord reel W16
2 Electronic
3 Main switch Q1
4 Motor

Technical Information
8
S2 Canister Vacuums
Figure D-3: External Component Layout (with Basic Suction Hose)
1 Handle 13 Bag
2 Air inlet valve 14 Motor protection filter
3 Release button 15 Exhaust filter (model-dependent)
4 Easylock suction hose 16 On/off footswitch
5 Adjustment knob for telescopic
suction hose(model-dependent) 17 Park System
6 Connection receptacle 18 Power cord
7 Suction hose (model-dependent) 19 Footswitch for automatic cord rewind
8 Telescopic suction hose
(model-dependent) 20 Bag change indicator
9 Release button for dust compartment
cover 21 Accessory holder for 3 accessories
10 Suction power regulator 22 Suction hose
11 Floor attachment Not shown Suction hose holder (on underside of
appliance)
12 Carrying handle

Technical Information
9
S2 Canister Vacuums
Figure D-4: External Component Layout (with Electro Accessories)
1 Handle 12 Socket for electro accessories
2 On/off switch for electrobrush 13 Bag
3 Lock release button 14 Motor protection filter
4 Electro-telescopic wand 15 Exhaust filter (model-dependent)
5 Elbow 16 On/off footswitch
6 Plug for electro accessories 17 Park System
7 Electro telescopic wand release button 18 Power cord
8 Release button for dust compartment cover 19 Footswitch for automatic cord rewind
9 Suction power regulator 20 Bag change indicator
10 Electrobrush 21 Accessory holder for 3 accessories
11 Carrying handle 22 Suction hose SES 116

Technical Information
10
S2 Canister Vacuums
010 Casing Bottom, Motor

Technical Information
11
S2 Canister Vacuums
2 Function
2.1 Casters
The appliance has three casters that can rotate through 360°. The caster
rollers are mounted on steel axles. The roller contact surfaces are covered
with a soft plastic coating.
4 Service
4.1 Caster Removal
1. Lever out the support roller and axle with a flathead screwdriver. See
Figure 010-1.
Figure 010-1: Support Roller and Axle
2. Lever out the caster; see Figure 010-2.

Technical Information
12
S2 Canister Vacuums
Figure 010-2: Caster Removal
4.2 Motor Removal
1. Remove the casing top. See Section 020-4.3.
2. Remove the cap. See Section 030-4.1.
3. Release the electronic retainer, Figure 010-3, Item 1, and tilt it upwards,
Figure 010-3, Item 2.
Figure 010-3: Electronic Retainer
4. Remove the cover frame; see Section 020-4.5.
5. Lift the motor (Figure 010-4, Item 1) up and out of the appliance.
6. Disconnect the connection to the cord reel.

Technical Information
13
S2 Canister Vacuums
Figure 010-4: Motor
Note:
When re-installing, the rubber seal must first be installed in the cover frame.
4.3 Cord Reel Removal
1. Remove the casing top. See Section 020-4.3.
2. Remove the cap. See Section 030-4.1.
3. Release the electronic retainer, Figure 010-3, Item 1, and tilt it upwards,
Figure 010-3, Item 2.
4. Remove the cover frame; see Section 020-4.5.
5. Disconnect the cord reel (Figure 010-5, Item 1) from the motor (Figure
010-5, Item 2).
Figure 010-5: Cord Reel and Motor
6. Free the cord reel assembly from its retainers (Figure 010-5, Item 3, and
Figure 010-6, Item 1).

Technical Information
14
S2 Canister Vacuums
Figure 010-6: Cord Reel Retainer on Side
7. Disconnect the cord reel from the electronic.
8. Release all wires from their guides.
9. Remove the electronic retainer.
4.4 Cord Removal
Note:
Use only a genuine Miele cord for the correct vacuum model number.
Note:
Never replace the cord end.
1. Remove the cord reel. See Section 010-4.3.
2. Unwind the cord completely. See Figure 010-7.
Figure 010-7: Cord Reel, Unwound

Technical Information
15
S2 Canister Vacuums
3. Clamp the cord reel to the body of the cord reel assembly to immobilize it.
See Figure 010-8. Failure to clamp the cord reel can allow it to rotate,
changing the spring tension and affecting operation. The reel can also
separate from the body, releasing the tension spring. Always clamp the
reel to the body before performing any cord repair.
Figure 010-8: Cord Reel Clamped to Reel Assembly Body
4. Once the clamp is in place, remove the 2 T10 screws from the cord reel.
See Figure 010-9.
Figure 010-9: Screws Securing Cord Reel
5. Release the tabs holding the two halves of the cord reel together. See
Figure 010-10. The top of the reel will lift straight up.

Technical Information
16
S2 Canister Vacuums
Figure 010-10: Cord Reel Tabs
6. Remove the cord from the cord reel.
7. Install the new cord.
8. Reassemble the reel halves. Do not remove the clamp until the cord reel
halves are fully assembled.
9. When the reel has been reassembled, remove the clamp and retract the
cord slowly, leaving a 6” tail. Once the cord reel is installed in the vacuum
it is important to do an operational check and ensure that the cord
extends and retracts correctly.

Technical Information
17
S2 Canister Vacuums
020 Casing Top

Technical Information
18
S2 Canister Vacuums
2 Function
2.1 Bags
A clean bag is essential to the maximum efficiency of the vacuum. A clogged
bag can cause restricted airflow resulting in poor suction or, in extreme
cases, an overheat condition can occur resulting in the vacuum shutting off.
Changing the bag is relatively easy; the most important thing to remember is
to use the correct bag. A list of bags and the models in which they are used
can be found in the product line information in the operating manual.
2.2 Bag Change Indicator
Figure 020-1: Bag Change Indicator
To test the bag change indicator:
1. Connect the floor attachment to the suction hose.
2. Switch on the vacuum cleaner.
3. Set the selector to full power.
4. Lift the floor attachment from the floor. If the window in the bag change
indicator is completely red, then the bag must be changed. See Section
020-4.7 for instructions.
The display function is set for mixed dust (dust, hairs, threads, carpet fluff,
sand, etc.).
If large quantities of fine dust (e.g., from drilling holes in masonry, fine sand,
etc.) are vacuumed, the bag pores are quickly blocked. The bag change
indicator then indicates “full” even though it is not actually full. However, the
bag should still be replaced.
If large quantities of hair, carpet fluff, etc., are vacuumed, the indicator might
not react until the bag is stuffed full.

Technical Information
19
S2 Canister Vacuums
2.2 Filters
Miele canister vacuums use several types of filters (Super Air Clean, Active
Air Clean, Active HEPA) to provide a clean, healthy environment. See Figure
020-2. Vacuum model will dictate filter(s) type. See Table C-1.
Figure 020-2: Filter Types
Note:
Changing from one type of filter to another type is permitted. (e.g., Active Air
Clean to Active HEPA). See Section 020-4.10 for instructions.
4 Service
4.1 Bag Holder Removal
1. Open the casing top wide.
2. Remove the bag (Figure 020-3, Item 1).
3. Press the holder (Figure 020-3, Item 2) downwards on one side.
4. Remove the holder from its guide.
Figure 020-3: Bag and Holder
4.2 Bag Change Indicator Removal
1. Open the casing top.
2. Lever the bag change indicator from its guide using a small flathead
screwdriver; see Figure 020-4.
a Super Air Clean
b Active Air Clean
c Active HEPA (High Efficiency Particulate Air)

Technical Information
20
S2 Canister Vacuums
Figure 020-4: Bag Change Indicator Removal
4.3 Casing Top Removal
1. Open the casing top wide.
2. Lever out the hinge arms, Figure 020-5.
Figure 020-5: Casing Top Removal
This manual suits for next models
5
Table of contents
Other Miele Vacuum Cleaner manuals

Miele
Miele S 447i User manual

Miele
Miele S 500 Series Manual

Miele
Miele SEB 228 Electro Plus User manual

Miele
Miele HS14 User manual

Miele
Miele S 8390 User manual

Miele
Miele S 5000 series User manual

Miele
Miele S 4000 Series User manual

Miele
Miele S 6210 User manual

Miele
Miele SA 1 Series User manual

Miele
Miele STB 20 Turbo XS User manual

Miele
Miele Olympus HS12 User manual

Miele
Miele Dynamic U1 User manual

Miele
Miele S 2000 User manual

Miele
Miele S5 S5980 User manual

Miele
Miele HS05 User manual

Miele
Miele S 6000 User manual

Miele
Miele HS11 User manual

Miele
Miele S401I - User manual

Miele
Miele SEB 217-3 User manual

Miele
Miele HS14 User manual