Milesight Urbana GO03 User manual

PK00003001_00 1
Urbana Smart Solutions Srl
Device dimensions
Dimensioni del dispositivo
Gateway Outdoor
Quick Start Guide
GO03
Installation must be carried out and inspected by a
specialist or under his supervision. When working on
instruments, turn OFF the main power!
L’installazione dev’essere effettuata e vericata da uno
specialista o sotto la sua supervisione diretta. Intervenire
sull’apparecchio solo una volta rimossa l’alimentazione!
Createdby Fengquan Li
fromthe Noun Project
Devices to which it connects
Dispositivi con cui si collega
Cosa trovi dentro la confezione
What’s inside the package
Urbana
IoT
Metering
Sensor
Lighting
Sensor
Other
Application
Parking
Sensor
Housing Solid Case
Material Plastic
Dimensions 250 x 172 x 92 mm
(without antennas)
Mounting Wall or Pole Mounting
Input Voltage
(PoE Injector) 100~240 VAC, 50/60 Hz
Input Power 3.6 W Typical, 4.8 W Max
Operating Temperature -40°C to +70°C
1x Cellular Antenna
1x GPS Antenna
1x Wall Mounting Kit
1x Pole Mounting Kit
1x PoE Injector
1x LoRa®Antenna
1x GO03
Device description
Descrizione del dispositivo
1LoRa®Antenna Connector
2Vent Plug
SIM Slot
SYS: System Indicator
LoRa: LoRa Indicator
LTE: Cellular Indicator
3
4LED Area & Type-C Port
& Reset Button
5
6
DC Power Connector
(Solar Connector)
Ethernet Port (PoE)
7Mounting Bracket
Powered by

PK00003001_00 2
Urbana Smart Solutions Srl
Il Gateway da esterno é un dispositivo LoRaWAN®in grado di creare una rete LoRaWAN®locale grazie
alla connessione remota con un server.
È compatibile con lo standard LoRaWAN®della LoRa Alliance®e richiede la relativa infrastruttura di rete
per operare.
ITALIANO
Gateway da esterno
Informazioni sul dispositivo
ENGLISH
Gateway outdoor is a LoRaWAN®device capable of creating a local LoRaWAN®network thanks to the
connection with the remote network server.
It is compatible with the LoRaWAN®standard of the LoRa Alliance®and requires the related network infra-
structure to operate.
Gateway outdoor
Device Info
The LoRa®logo is a trademark of Semtech Corporation or its subsidiaries.
LoRaWAN®is a mark used under license from the LoRa Alliance®.
Use of the LoRa Alliance®and LoRa Alliance®Member marks is pursuant to license from the LoRa Alliance®.

PK00003001_00 3
Urbana Smart Solutions Srl
PROCESSO DI INSTALLAZIONE
INSTALLATION PROCESS
WARNING
Rimuovi il dispositivo dalla scatola
Remove device from the box1 2 Insert the SIM card into the device according to the di-
rection icon on the device. If you need to take out the SIM
card, press into the SIM card and it will pop up automati-
cally. Tighten the SIM dust cover with wrench to prevent
water inltration into the device.
OPTIONAL: SIM CARD INSTALLATION
Follow the
instructions on
the device.
Segui le
indicazioni sul
dispositivo.
3 4
ANTENNA INSTALLATION OPTIONAL: ETHERNET CABLE
Avvitare l’antenna nell’apposito connettore. L’antenna
esterna deve essere installata verticalmente. Far passare il cavo Ethernet attraverso il pressacavo e
avvitare il pressacavo sul gateway, quindi serrare il
pressacavo con una chiave.
Screw the antenna into the antenna connector ac-
cordingly. The external antenna should be installed
vertically.
Pass the Ethernet cable through the cable gland and
screw the cable gland to gateway, then tighten the
cable gland with wrench.
5
CASE 1: PoE SWITCH
NOT PROVIDED
NON FORNITO
OR
CONNECT TO PoE
CASE 2: PoE INJECTOR
Collegare la porta Ethernet del dispositivo ad uno switch
PoE tramite cavo Ethernet. Lo switch PoE deve soddisfare
lo standard IEEE 802.3 af.
Connect device’s Ethernet port to a PoE switch via
Ethernet cable. PoE switch must meet IEEE 802.3 af
standard.
Collegare la porta Ethernet del dispositivo ad un iniettore PoE
tramite Cavo Ethernet. L’iniettore PoE deve soddisfare IEEE
802.3 af standard.
Connect device’s Ethernet port to a PoE injector via
Ethernet cable. PoE injector must meet IEEE 802.3
af standard.
Continue
Createdby Rainbow Designs
fromthe Noun Project
Inserire la scheda SIM nel dispositivo con verso indicato
nell’icona sul dispositivo. Se è necessario estrarre la SIM,
premerla per espellerla in automatico. Stringere il coperchio
antipolvere della SIM con una chiave per evitare che l’acqua
penetri nel dispositivo.
PK00003001_00 4
Urbana Smart Solutions Srl
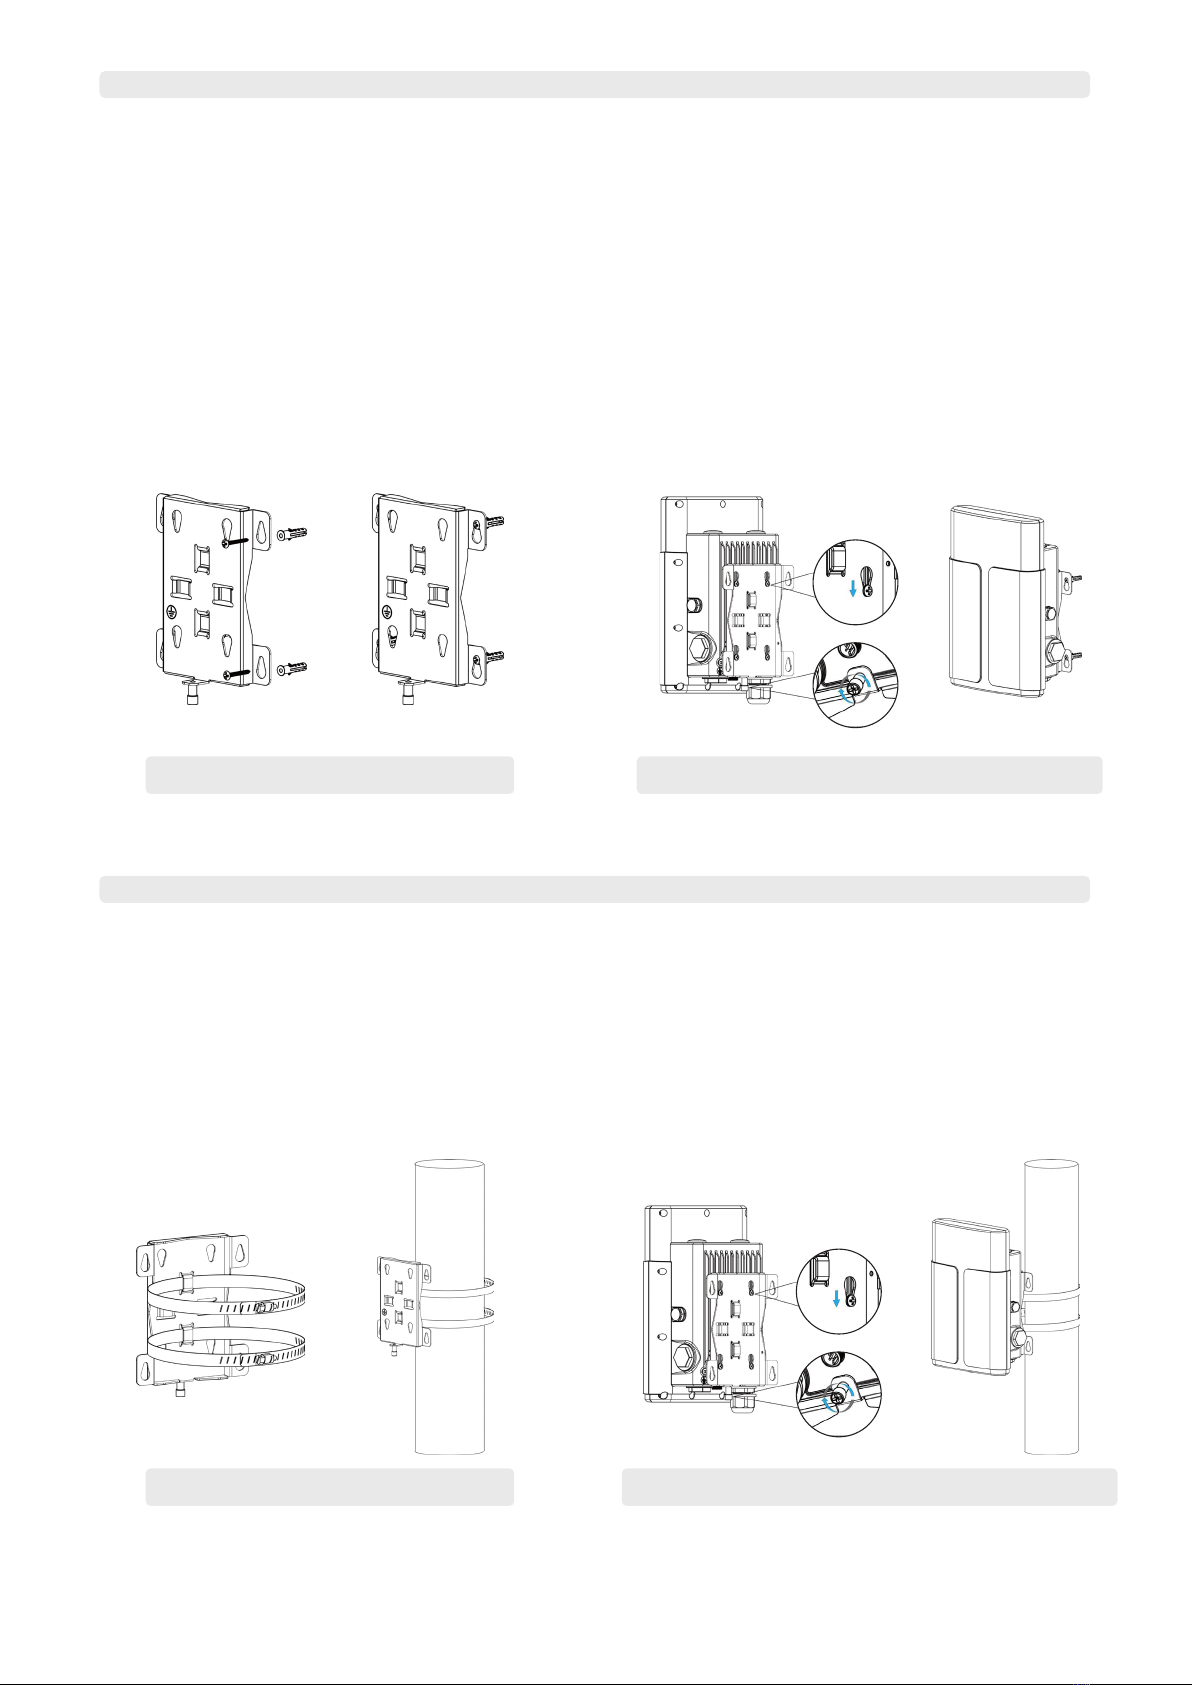
Make sure you have mounting bracket, hose clamps
and other required tools
1. Loosen the hose clamps by turning the locking
mechanism counter-clockwise.
2. Straighten out the hose clamps and slide it through
the rectangular rings in the mounting bracket, wrap
the hose clamps around the pole.
3. Use a screwdriver to tighten the locking mechani-
sm by turning it clockwise.
6
7
WALL MOUNTING
POLE MOUNTING (HOSE CLAMP)
Assicurati di avere staffa di montaggio, tasselli, viti per mon-
taggio a parete e altri strumenti necessari.
1. Allineare la staffa di montaggio orizzontalmente alla
posizione desiderata sulla parete, utilizzare un penna-
rello per contrassegnare quattro fori di montaggio sulla
parete, quindi rimuovere la staffa di montaggio dalla
parete.
2. Praticare quattro fori con una profondità di 32 mm utiliz-
zando il trapano con una punta da 6 mm nelle posizioni
contrassegnate in precedenza sul muro.
3. Inserire rispettivamente quattro tasselli a muro nei fori.
4. Montare la staffa di montaggio orizzontalmente alla
parete ssando le viti di montaggio a parete nei tasselli.
5. Appendere il dispositivo alla staffa di montaggio tramite
le viti di ssaggio sul retro del dispositivo.
Assicurati di avere staffa di montaggio, fascette stringitubo e
altri strumenti necessari
1. Allentare le fascette stringitubo ruotando il meccanismo
di bloccaggio in senso antiorario.
2. Raddrizzare le fascette stringitubo e farle scorrere at-
traverso gli anelli rettangolari nella staffa di montaggio,
avvolgere le fascette stringitubo attorno al palo.
3. Utilizzare un cacciavite per serrare le fascette ruotando
il meccanismo di ssaggio in senso orario.
Step 1, 2, 3, 4
Step 1, 2 Step 3
Step 5
Make sure you have mounting bracket, wall plugs, wall
mounting screws and other required tools.
1. Align the mounting bracket horizontally to the desi-
red position on the wall, use a marker pen to mark
four mounting holes on the wall, and then remove
the mounting bracket from the wall.
2. Drill four holes with a depth of 32 mm by using
your drill with a 6 mm drill bit on the positions you
marked previously on the wall.
3. Insert four wall plugs into the holes respectively.
4. Mount the mounting bracket horizontally to the wall
by xing the wall mounting screws into the wall
plugs.
5. Hang the device to the mounting bracket via
bracket mounting screws on the back of device.

PK00003001_00 5
Urbana Smart Solutions Srl
Il dispositivo è pronto per la congurazione in locale.
The device is ready for local conguration.9
Check our website for more information
urbanasmart.com
Controlla il nostro sito per maggiori informazioni
urbanasmart.com
L’installazione è completata
Installation is complete10
8
Segui la Guida Rapida per controllare la congurazione
di rete
Follow Quick Start Guide to check Network
Conguration

PK00003001_00 6
Urbana Smart Solutions Srl
This device is compliant with the CE certication mark in respect with the following regulations.
Council Directive 2014/53/EU
Questo dispositivo è conforme al marchio di certicazione CE in relazione ai seguenti regolamenti.
Direttiva del Consiglio 2014/53/EU
CE
Certication
Certicazioni
CE
ITALIANO
ENGLISH
Other Milesight Gateway manuals

Milesight
Milesight UG67 User manual

Milesight
Milesight LoRaWAN UG6 Series User manual

Milesight
Milesight UG63 User manual

Milesight
Milesight SG50 User manual

Milesight
Milesight UG63 User manual

Milesight
Milesight UG63-868M User manual

Milesight
Milesight UG65 User manual

Milesight
Milesight Urbana GI03 User manual

Milesight
Milesight UG56 User manual

Milesight
Milesight UG65 User manual


