Milesight UG63 User manual

Mini LoRaWAN®Gateway
UG63
User Guide
2
Preface
Thanks for choosing Milesight UG63 LoRaWAN®gateway. UG63 delivers tenacious
connection over network with full-featured design such as extended hardware watchdog,
VPN, fast Ethernet and beyond.
This guide shows you how to configure and operate the UG63 LoRaWAN®gateway. You
can refer to it for detailed functionality and gateway configuration.
Readers
This guide is mainly intended for the following users:
- Network Planners
- On-site technical support and maintenance personnel
- Network administrators responsible for network configuration and maintenance
©2011-2022 Xiamen Milesight IoT Co., Ltd.
All rights reserved.
All information in this user guide is protected by copyright law. Whereby, no organization or
individual shall copy or reproduce the whole or part of this user guide by any means
without written authorization from Xiamen Milesight IoT Co., Ltd.
Related Documents
Document
Description
UG63 Datasheet
Datasheet for UG63 LoRaWAN®gateway.
UG63 Quick Start Guide
Quick Installation Guide for UG63 LoRaWAN®gateway.
Declaration of Conformity
UG63 is in conformity with the essential requirements and other relevant provisions of the
CE, FCC, and RoHS.

3
For assistance, please contact
Milesight technical support:
Email: iot.support@milesight.com
Tel: 86-592-5085280
Fax: 86-592-5023065
Address: Building C09, Software
Park III, Xiamen 361024,
Fujian, China
Revision History
Date
Doc Version
Description
Mar. 18, 2022
V1.0
Initial version

4
Contents
Chapter 1 Product Introduction.........................................................................................................6
1.1 Overview................................................................................................................................. 6
1.2 Advantages............................................................................................................................ 6
1.3 Specifications........................................................................................................................ 7
1.4 Dimensions............................................................................................................................ 8
Chapter 2 Access to Web GUI............................................................................................................9
Chapter 3 Web Configuration.......................................................................................................... 11
3.1 Status....................................................................................................................................11
3.1.1 Overview................................................................................................................... 11
3.1.2 Network.....................................................................................................................12
3.1.3 VPN............................................................................................................................12
3.2 LoRaWAN............................................................................................................................. 14
3.2.1 Packet Forwarder.................................................................................................... 14
3.2.1.1 General...........................................................................................................14
3.2.1.2 Radios............................................................................................................ 15
3.2.1.3 Noise Analyzer..............................................................................................17
3.2.1.4 Advanced.......................................................................................................17
3.2.1.5 Custom.......................................................................................................... 20
3.2.1.6 Traffic.............................................................................................................20
3.2.2 Network Server........................................................................................................ 21
3.2.2.1 General...........................................................................................................21
3.2.2.2 Application.................................................................................................... 23
3.2.2.3 Profiles...........................................................................................................27
3.2.2.4 Device............................................................................................................ 30
3.2.2.5 Multicast Groups..........................................................................................33
3.2.2.6 Packets.......................................................................................................... 34
3.3 Network................................................................................................................................ 37
3.3.1 Interface....................................................................................................................37
3.3.1.1 Port.................................................................................................................37
3.3.1.2 Loopback.......................................................................................................40
3.3.2 VPN............................................................................................................................41
3.3.2.1 DMVPN.......................................................................................................... 41
3.3.2.2 IPSec.............................................................................................................. 43
3.3.2.3 GRE.................................................................................................................46
3.3.2.4 L2TP............................................................................................................... 47
3.3.2.5 PPTP.............................................................................................................. 49
3.3.2.6 OpenVPN Client............................................................................................51
3.3.2.7 Certifications................................................................................................ 52
3.4 System..................................................................................................................................53
3.4.1 General Settings...................................................................................................... 53
3.4.1.1 General...........................................................................................................53

5
3.4.1.2 System Time................................................................................................. 55
3.4.1.3 SMTP..............................................................................................................56
3.4.1.4 Email.............................................................................................................. 57
3.4.2 User Management...................................................................................................58
3.4.2.1 Account......................................................................................................... 58
3.4.2.2 User Management....................................................................................... 58
3.4.3 SNMP........................................................................................................................ 59
3.4.3.1 SNMP............................................................................................................. 59
3.4.3.2 MIB View........................................................................................................60
3.4.3.3 VACM............................................................................................................. 61
3.4.3.4 Trap................................................................................................................ 61
3.4.3.5 MIB................................................................................................................. 62
3.4.4 Device Management............................................................................................... 62
3.4.5 Events........................................................................................................................63
3.4.5.1 Events............................................................................................................ 63
3.4.5.2 Events Settings.............................................................................................64
3.5 Maintenance........................................................................................................................65
3.5.1 Tools..........................................................................................................................65
3.5.1.1 Ping................................................................................................................ 65
3.5.1.2 Traceroute.....................................................................................................65
3.5.2 Schedule................................................................................................................... 66
3.5.3 Log............................................................................................................................. 66
3.5.3.1 System Log................................................................................................... 67
3.5.3.2 Log Settings..................................................................................................67
3.5.4 Upgrade.....................................................................................................................68
3.5.5 Backup and Restore................................................................................................69
3.5.6 Reboot....................................................................................................................... 69
Chapter 4 Application Examples.....................................................................................................71
4.1 Restore Factory Defaults...................................................................................................71
4.1.1 Via Web Interface.................................................................................................... 71
4.1.2 Via Hardware............................................................................................................72
4.2 Firmware Upgrade.............................................................................................................. 72
4.3 Ethernet Connection...........................................................................................................73
4.4 Packet Forwarder Configuration...................................................................................... 74
4.5 Connect to Milesight IoT Cloud........................................................................................75
4.6 Application Configuration..................................................................................................77
4.7 Device Configuration..........................................................................................................80
4.8 Send Data to Device........................................................................................................... 81
4.9 Connect to UG65/UG67 Gateway.....................................................................................83

6
Chapter 1 Product Introduction
1.1 Overview
UG63 is a robust 8-channel indoor LoRaWAN®gateway. Adopting SX1302 LoRa chip and
high-performance CPU, UG63 supports connection with more than 2000 nodes. UG63 has
line of sight up to 15 km and can cover about 2 km in urbanized environment, which is
ideally suited to smart office, parking lots, campuses, hotels, exhibition centers and many
other indoor areas. It also applies to provide coverage for indoor blind spots.
UG63 has integrated with mainstream network servers (such as TTI, ChirpStack, etc.) and
Milesight IoT Cloud. Besides, it also supports a built-in network server for easy deployment.
Figure 1-1
1.2 Advantages
Benefits
-High performance NXP industrial processor with big memory
-Embedded network server and compliant with several third party network servers
-MQTT, HTTP or HTTPS protocol for data transmission to application server
-Rugged enclosure, optimized for wall or pole mounting
-3-year warranty included
Security & Reliability
-Enable unit with security frameworks like IPsec/OpenVPN/GRE/L2TP/PPTP/ DMVPN
-Embedded hardware watchdog to automatically recover from various failure and
ensure highest level of availability
Easy Maintenance

7
-Milesight DeviceHub provides easy setup, bulk configuration, and centralized
management of remote devices
-The user-friendly web interface design and various upgrading options help
administrator to manage the device as easy as pie
-Web GUI and CLI enable the admin to achieve quick configuration and simple
management among a large quantity of devices
-Users can efficiently manage the remote devices on the existing platform through the
industrial standard SNMP
Capabilities
-Link remote devices in an environment where communication technologies are
constantly changing
-Industrial ARM Cortex-A7 processor, high-performance operating up to 528 MHz with
low power consumption, and 4 GB eMMC available to support more applications
-Support wide operating temperature ranging from -20°C to 50°C/-4°F to 122°F
1.3 Specifications
Hardware System
CPU
528 MHz, ARM Cortex-A7
Memory
4 GB eMMC Flash, 256 MB DDR4 RAM
LoRaWAN
Antenna
2×Internal Antennas
Channel
8 (Half/Full-duplex)
Frequency Band
CN470/IN865/EU868/RU864/US915/AU915/KR920/AS923-1&2&3&4
Sensitivity
-140dBm Sensitivity @292bps
Output Power
27dBm Max
Protocol
V1.0 Class A/Class B/Class C and V1.0.2 Class A/Class B/Class C
LBT
Support
Ethernet
Ports
1 × RJ-45 (PoE PD supported)
Physical Layer
10/100 Base-T (IEEE 802.3)
Data Rate
10/100 Mbps (auto-sensing)
Interface
Auto MDI/MDIX
Mode
Full or half duplex (auto-sensing)

8
1.4 Dimensions (mm)
Software
Network Protocols
PPPoE, SNMP v1/v2c/v3, TCP, UDP, DHCP, DDNS, HTTP, HTTPS, DNS,
SNTP, Telnet, SSH, MQTT, etc.
VPN Tunnel
DMVPN/IPsec/OpenVPN/PPTP/L2TP/GRE
Management
Web, CLI, DeviceHub, Milesight IoT Cloud, Yeastar Workplace Platform
Power Supply and Consumption
Power Supply
1. 1 × 802.3 af PoE input
2. 5V by Type-C Port
Consumption
Max 3.3 W
Physical Characteristics
Ingress Protection
IP30
Dimensions
Ф 115 x 21 mm
Color & Material
White, PC+ABS
Mounting
Desktop, Wall or Ceiling Mounting
Others
Reset Button
1 × RST
LED Indicators
1 × SYS, 1 × LoRa
Built-in
Watchdog, RTC, Timer
Environmental
Operating
Temperature
-20°C to +50°C (-4°F to +122°F)
Storage
Temperature
-40°C to +85°C (-40°F to +185°F)
Ethernet Isolation
1.5 kV RMS
Relative Humidity
0% to 95% (non-condensing) at 25°C/77°F

9
Chapter 2 Access to Web GUI
This chapter explains how to access to Web GUI of the UG63.
Username: admin
Password: password
Connect PC to UG63 ETH port directly or through PoE injector to access the web GUI of
gateway. The following steps are based on Windows 10 system for your reference.
1. Go to “Control Panel” →“Network and Internet” →“Network and Sharing Center”, then
click “Ethernet” (May have different names).
2. Go to “Properties” →“Internet Protocol Version 4 (TCP/IPv4)” and select “Use the
following IP address”, then assign a static IP manually within the same subnet of the
gateway.
3. Open a Web browser on your PC (Chrome is recommended) and type in the IP address
192.168.23.150 to access the web GUI.
4. Enter the username and password, click “Login”.

10
If you enter the username or password incorrectly more than 5 times, the login page
will be locked for 10 minutes.
5. After logging in the web GUI, you can view system information and perform
configuration of the gateway. It’s suggested that you change the password for the sake of
security.

11
Chapter 3 Web Configuration
3.1 Status
3.1.1 Overview
You can view the system information of the gateway on this page.
Figure 3-1-1-1
System Information
Item
Description
Model
Show the model name of gateway.
Region
Show the LoRaWAN®frequency region of gateway.
Serial Number
Show the serial number of gateway.
Firmware Version
Show the currently firmware version of gateway.
Hardware Version
Show the currently hardware version of gateway.
Local Time
Show the currently local time of system.
Uptime
Show the information on how long the gateway has been
running.
CPU Load
Show the current CPU utilization of the gateway.
RAM (Capacity/Available)
Show the RAM capacity and the available RAM memory.
eMMC (Capacity/Available)
Show the eMMC capacity and the available eMMC memory.
Table 3-1-1-1 System Information
12
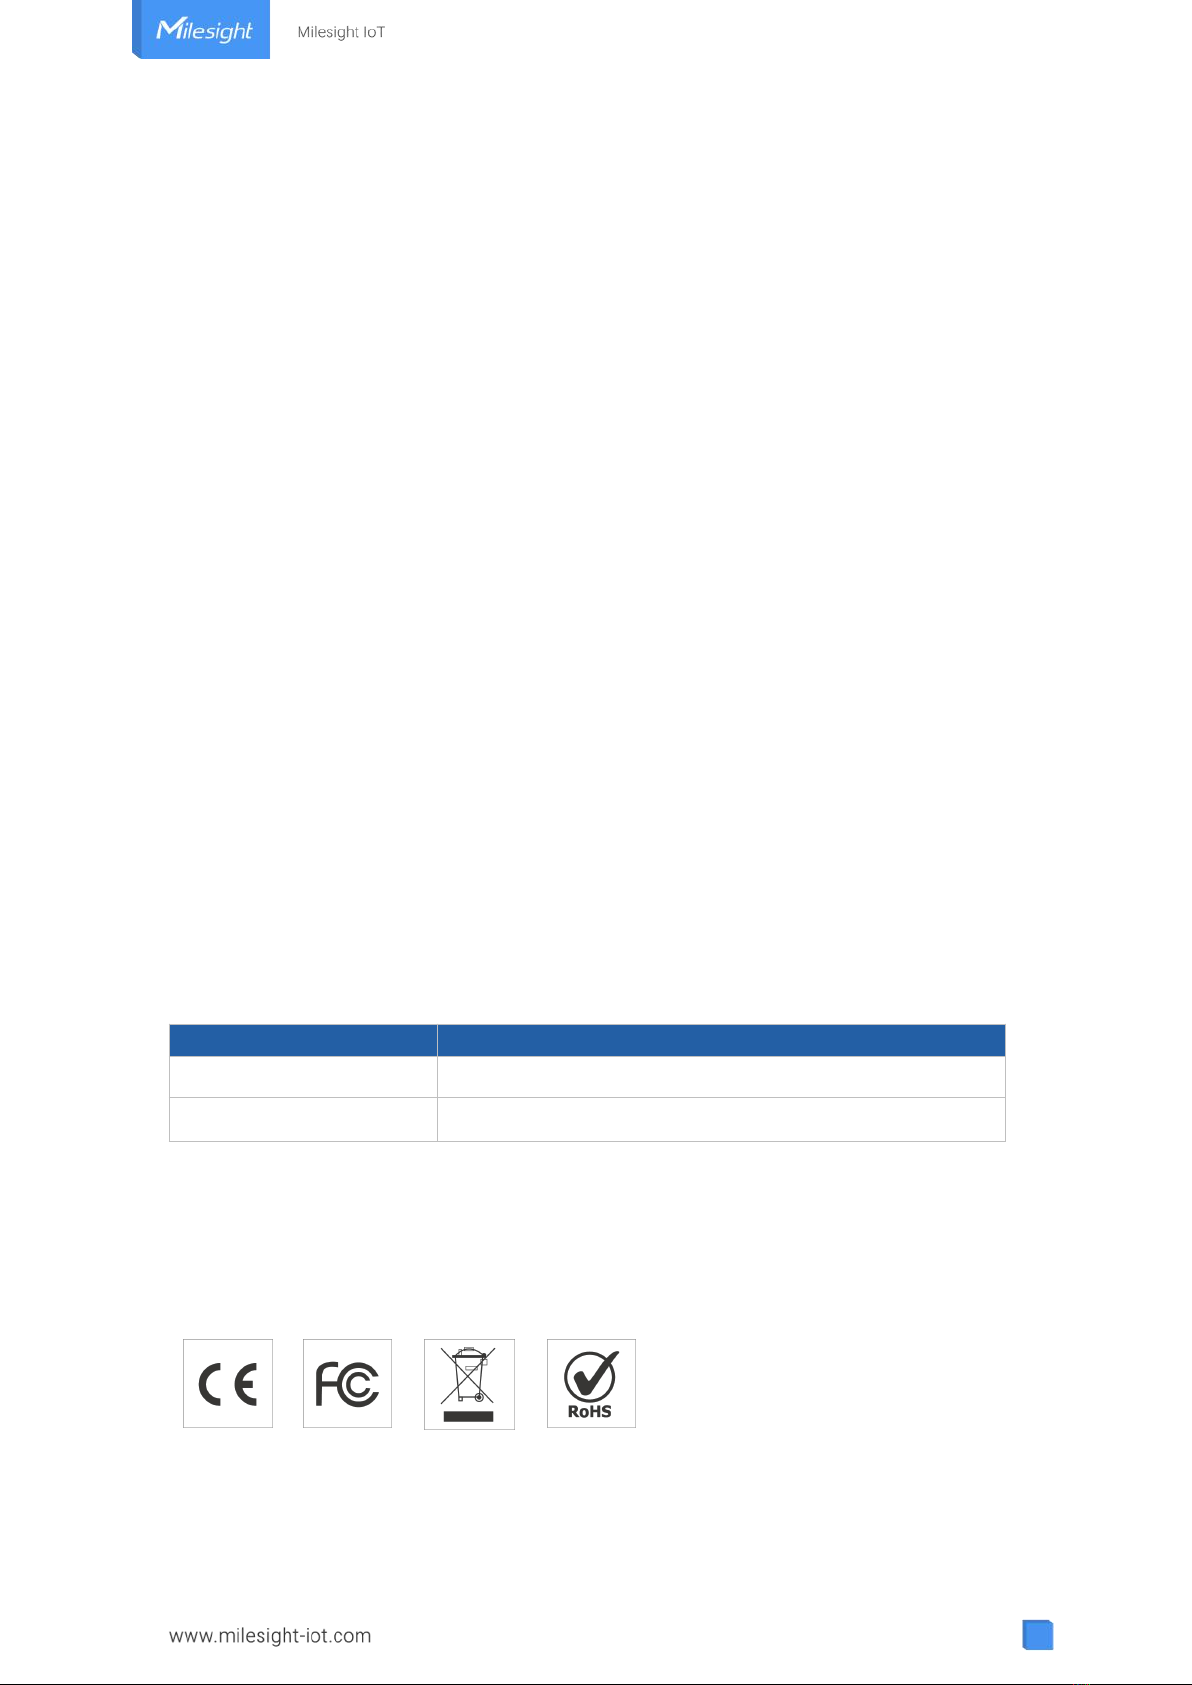
3.1.2 Network
On this page you can check the Ethernet port status of the gateway.
Figure 3-1-2-1
Network
Item
Description
Port
Show the name of the Ethernet port.
Status
Show the status of the Ethernet port. "Up" refers to a status that WAN
is enabled and Ethernet cable is connected. "Down" means Ethernet
cable is disconnected or WAN function is disabled.
Type
Show the dial-up type of the Ethernet port.
IP Address
Show the IP address of the Ethernet port.
Netmask
Show the netmask of the Ethernet port.
Gateway
Show the gateway of the Ethernet port.
DNS
Show the DNS of the Ethernet port.
Duration
Show the information about how long the Ethernet cable has been
connected to the Ethernet port when the port is enabled. Once the port
is disabled or Ethernet cable is disconnected, the duration will stop.
Table 3-1-2-1 WAN Status
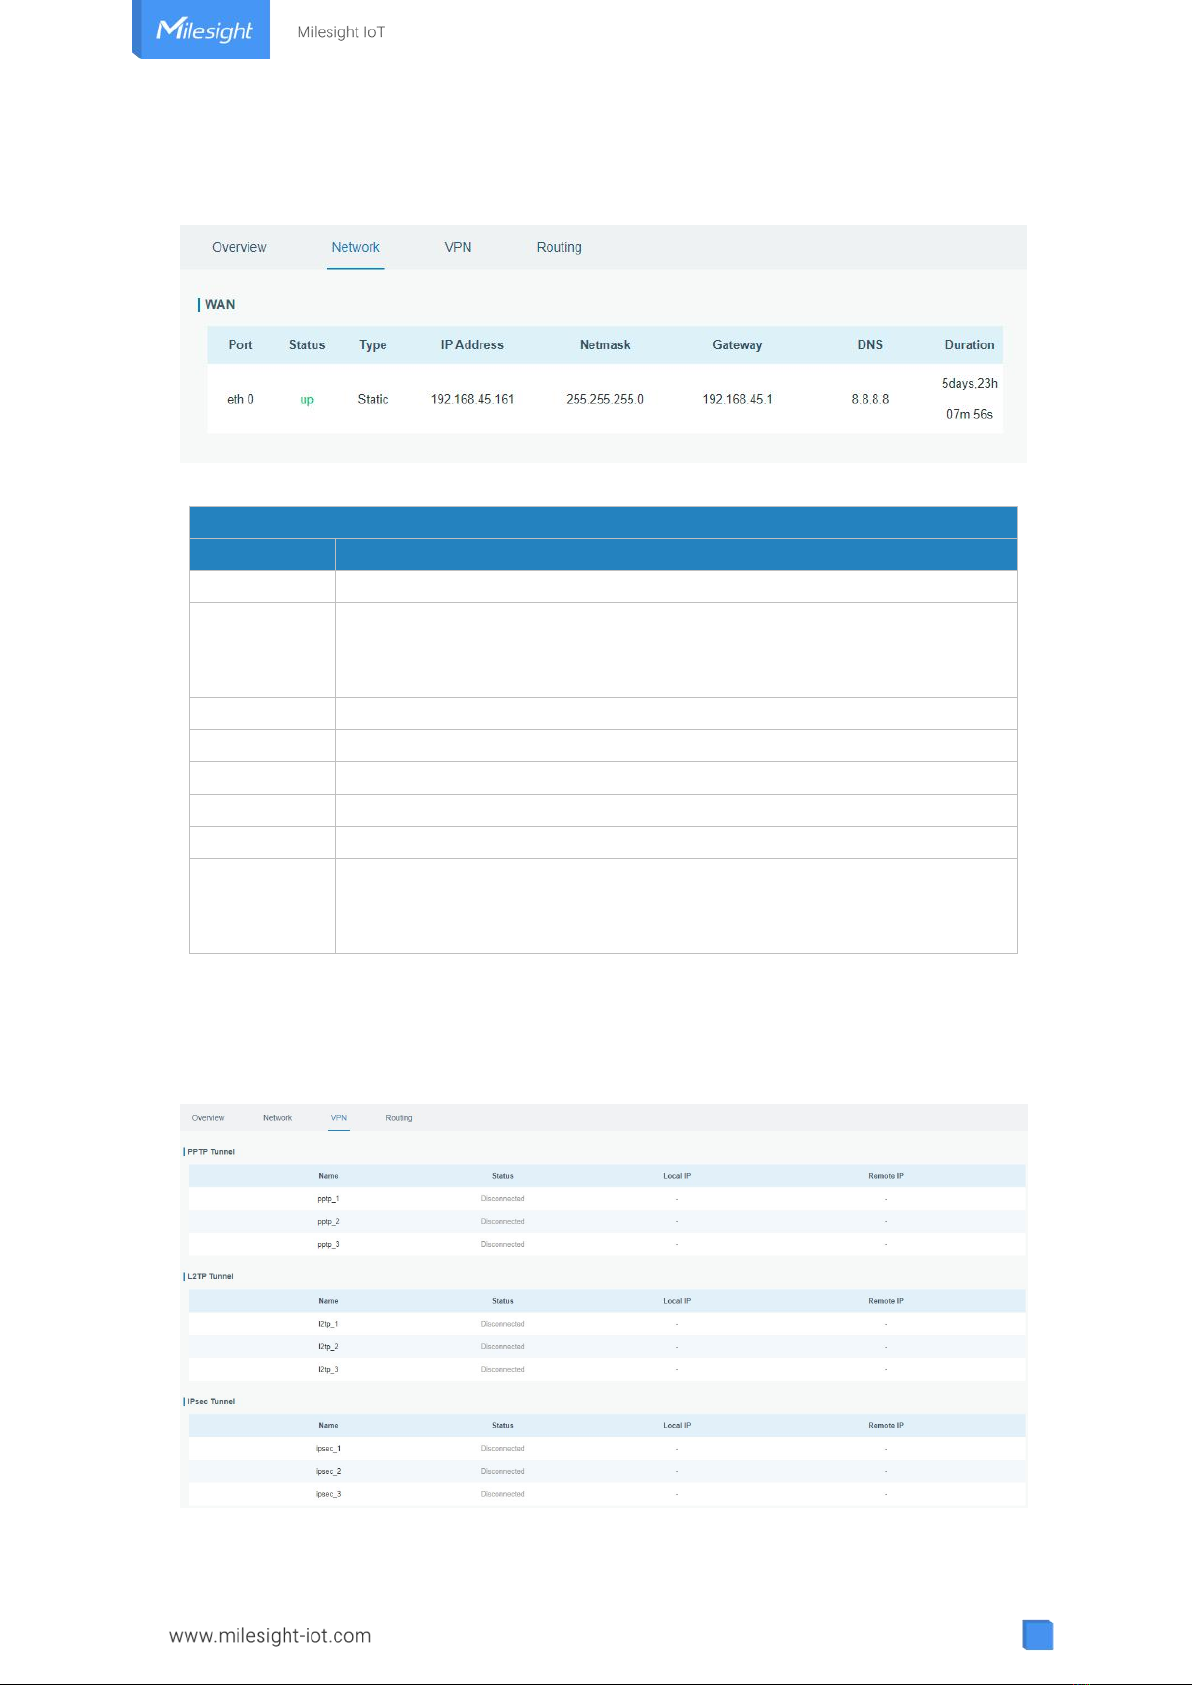
3.1.3 VPN
You can check VPN status on this page, including GRE, PPTP, L2TP, IPsec, OpenVPN and
DMVPN.
Figure 3-1-3-1
13
Figure 3-1-3-2
VPN Status
Item
Description
Name
Show the name of the VPN tunnel.
Status
Show the status of the VPN tunnel.
Local IP
Show the local tunnel IP of VPN tunnel.
Remote IP
Show the remote tunnel IP of VPN tunnel.
Table 3-1-3-1 VPN Status
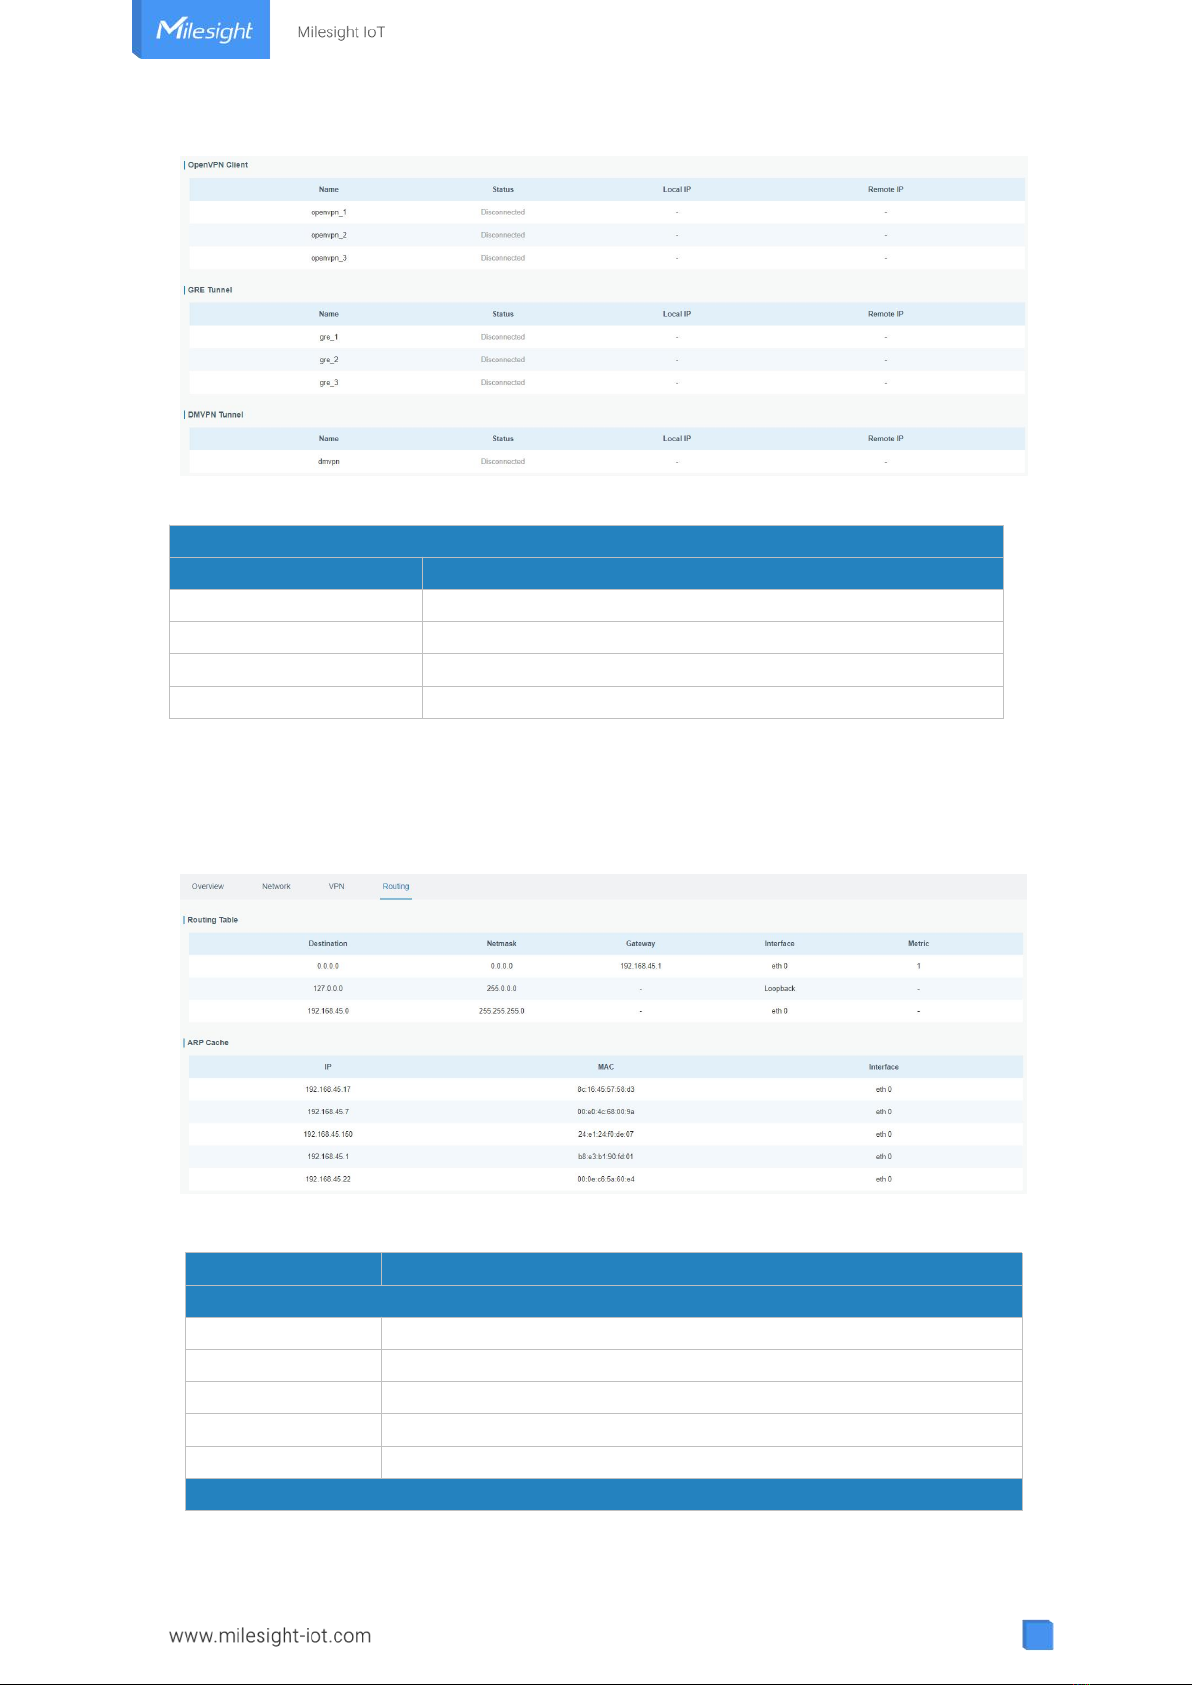
3.1.4 Routing
You can check routing status on this page, including the routing table and ARP cache.
Figure 3-1-4-1
Item
Description
Routing Table
Destination
Show the IP address of destination host or destination network.
Netmask
Show the netmask of destination host or destination network.
Gateway
Show the IP address of the gateway.
Interface
Show the outbound interface of the route.
Metric
Show the metric of the route.
ARP Cache

14
IP
Show the IP address of ARP pool.
MAC
Show the IP address's corresponding MAC address.
Interface
Show the binding interface of ARP.
Table 3-1-4-1 Routing Information
3.2 LoRaWAN
3.2.1 Packet Forwarder
3.2.1.1 General
Figure 3-2-1-1
General Settings
Item
Description
Default
Gateway EUI
Show the identifier of the gateway.
Generated from MAC
address of the
gateway and cannot
be changed.
Gateway ID
Fill in the corresponding ID which you’ve used
for register gateway on the remote network
server, such as TTN. It is usually the same as
gateway EUI and can be changed.
The same as
gateway EUI.
Frequency-Sync
Sync frequency configurations from network
server by selecting the corresponding ID.
Disabled
Multi-Destination
The gateway will forward the data to the
network server address that was created and
enabled in the list.
Local host
Connection
Status
Show the connection status of package
forwarder.
----
Table 3-2-1-1 General Setting Parameters

15
Related Configuration Example
Packet fowarder configuration
3.2.1.2 Radios
Figure 3-2-1-2
Radios-Radio Channel Setting
Item
Description
Default
Region
Choose the LoRaWAN®frequency plan used for the
upstream and downlink frequencies and datarates.
Available channel plans depend on the gateway’s
model.
Based on the
gateway’s model
Center
Frequency
Radio 0 : supports transmitting and receiving packet.
Radio 1 : only supports receiving packet from nodes.
Based on what is
specified in the
LoRaWAN®
regional
parameters
document
Table 3-2-1-2 Radio Channels Setting Parameters
Figure 3-2-1-3
Radios-Multi Channel Setting
Item
Description
Default
Enable
Click to enable this channel to transmit
packets.
Enabled
Index
Indicate the ordinal of the list.
/
Radio
Choose Radio 0 or Radio 1 as center
frequency.
Radio 0
Frequency/MHz
Enter the frequency of this channel.
Based on the

16
Range: center frequency±0.4625.
LoRaWAN®
regional document
Table 3-2-1-3 Multi Channel Setting Parameters
Figure 3-2-1-4
Radios-LoRa Channel Setting
Item
Description
Default
Enable
Click to enable this channel to transmit
packets.
Enabled
Radio
Choose Radio 0 or Radio 1 as center
frequency.
Radio 0
Frequency/MHz
Enter the frequency of this channel.
Range: center frequency±0.9.
Based on the
supported
frequency
Bandwidth/MHz
Enter the bandwidth of this channel.
Recommended value: 125KHz, 250KHz,
500KHz
500KHz
Spread Factor
Choose the selectable spreading factor. The
channel with large spreading factor
corresponds to a low rate, while the small
one corresponds to a high rate.
Based on what is
specified in the
LoRaWAN®regional
parameters
document
Table 3-2-1-4 LoRa Channel Setting Parameters
Figure 3-2-1-5
Radios-FSK Channel Setting
Item
Description
Default
Enable
Click to enable this channel to transmit
packets.
Disabled
Radio
Choose Radio 0 or Radio 1 as center
frequency.
Radio 0
Frequency/MHz
Enter the frequency of this channel.
Range: center frequency±0.9.
Based on the
supported
frequency
Bandwidth/kHz
Enter the bandwidth of this channel.
Recommended value: 125 kHz, 250 kHz, 500
kHz
Based on the
supported
frequency
Data Rate
Enter the data rate. Range:500-25000.
500

17
Table 3-2-1-5 FSK Channel Setting Parameters
3.2.1.3 Noise Analyzer
Noise analyzer is used for scanning the noise of every frequency channel and giving a
diagram for users to analyze the environment interference condition and select best
deployment. RSSI indicates the sensitivity for every channel. Lower the RSSI value, better
the signal. It’s not suggested to enable this feature when using package forwarder since it
will affect the downlink transmission.
Figure 3-2-1-6
Noise Analyzer
Item
Description
Default
Enable
Click to enable noise analyzer feature.
Disabled
Sweep Freq
Select the frequency sweeping range.
General Freq: frequencies based on the LoRaWAN®
regional parameters document
Custom: custom the frequency range
General Feq
Sweep Time
Enable the noise analyzer continuously or within a
period of time.
If Custom is selected, the noise analyzer will stop
automatically after the pre-configured time.
Note: It’s suggested to custom the time since noise
analyzer feature will affect the normal data
transmission.
Custom/24h
Table 3-2-1-6 Noise Analyzer Setting Parameters
3.2.1.4 Advanced
This section is about settings in details of beacon transmitting and validating.

18
Figure 3-2-1-7
Advanced-Beacon Setting
Item
Description
Default
Beacon Period
Interval of gateway sending beacons for Class B
device time synchronization. 0 means the gateway
will not send beacons.
0
Beacon Freq
The frequency of beacons.
Based on the
supported
frequency
Beacon
Datarate
The datarate of beacons.
Based on the
supported
frequency
Beacon Channel
Number
When selecting Custom, it allows users to custom
range from 1 to 8.
1
Beacon Freq
Step
Frequency interval of beacons. Unit: Hz
200000 Hz
Beacon
Bandwidth
The bandwidth of beacons. Unit: Hz
12500 Hz
Beacon TX
Power
The TX power of beacons.
Based on the
supported
frequency
Table 3-2-1-7 Advanced-Beacon Parameters

19
Figure 3-2-1-8
Item
Description
Default
Keep Alive
Interval
Enter the interval of keep alive packet which is sent
from gateway to network server to keep the connection
stable and alive.
Range: 1-3600.
10 s
Stat Interval
Enter the interval to update the network server with
gateway statistics. Range: 1-3600.
30 s
Push Timeout
Enter the timeout to wait for the response from server
after the gateway sends data of node. Rang: 1-1999.
100 ms
Forward CRC
Disabled
Enable to send packets received with CRC disabled to
the network server.
Disabled
Forward CRC
Error
Enable to send packets received with CRC errors to the
network server.
Disabled
Forward CRC
Valid
Enable to send packets received with CRC valid to the
network server.
Enabled
Table 3-2-1-8 Advanced Parameters
Figure 3-2-1-9
Item
Description
Default
Enable
Enable to scan occupancy of current channels before
transmission.
Note: AU915 and US915 do not support LBT feature.
Disabled
RSSI Target
Enter the criteria of an idle channel. If actual RSSI of
-80

20
a channel is less than the criteria/target, the channel
is considered as idle. Range: -120~0
Table 3-2-1-9 Advanced-LBT Parameters
3.2.1.5 Custom
Figure 3-2-1-10
When Custom Configuration mode is enabled, you can write your own packet forwarder
configuration file in the edit box to configure packet forwarder. Click “Save” to save your
custom configuration file content, and click “Apply” to take effect. You can click “Clear” to
erase all content in the edit box. If you don’t know how to write configuration file, please
click “Example” to go to reference page.
3.2.1.6 Traffic
When navigating to the traffic page, any recent traffic received by the gateway will display.
To watch live traffic, click “Refresh”.
Other manuals for UG63
2
Table of contents
Other Milesight Gateway manuals

Milesight
Milesight UG65 User manual

Milesight
Milesight Urbana GO03 User manual

Milesight
Milesight UG56 User manual

Milesight
Milesight SG50 User manual

Milesight
Milesight UG65 User manual

Milesight
Milesight UG63 User manual

Milesight
Milesight LoRaWAN UG6 Series User manual

Milesight
Milesight UG63-868M User manual

Milesight
Milesight UG63 User manual

Milesight
Milesight Urbana GI03 User manual


