Mpio FL100 User manual

Please read all instructions in this User’s Guide before using the player.
User’s Guide
FL100
English
Deutsh
Français
Español
designing your digital dream
<FL100> User's Guide
Date of Publication : Dec. 2002
Date of First edition : Dec. 2002
Publishing Company : DIGITALWAY Co., Ltd.
Address : 5F, Korea Design Center, 344-1, Yatap-dong, Bundang-gu,
Seongnam-si, 463-828, Korea
Tel : +82-31-788-7230
Fax : +82-31-788-7240
Homepage : www.mpio.com
FL-Cover-EU 12/5/96 3:24 PM Page 1

English
3
Thanks for your purchasing Digitalway MPIO. This manual
provides you with the method of operation and caution. Be
sure to read this manual before using this product.
Digitalway will always try to make better product.
What is MPIO?
This means our own brand of Digitalway including MP3
player and other potable digital audio.
1. What is MP3 Player / 4
2. Special Features / 5
3. Technical Specifications / 8
4. Computer Requirements / 9
5. Warning / 9
6. Accessories Included with your
MPIO FL100 / 11
7. MPIO FL100 Control's Overview
/ 12
8. Description of Player's LCD / 13
9. Battery Installation / 15
10. How to use Hold Slide / 16
11. How to use Joy Stick Key / 16
Contents
Designing Your Digital Dream
1. MPIO Introduction
1. Basic Function / 17
1) Power ON/OFF
2) Volume Control
3) Playback/FM Mode Switch
4) Enter to the Power Menu
2. Playback Mode / 18
1) Table of Button Behavior
2) Basic Function
3) Power Menu Setup
3. FM Mode / 25
1) Table of Button Behavior
2) Basic Function
3) Power Menu (FM) Setup
4. Record Function / 30
1) Voice Record
2) FM Record
5. How to use SD Card/MMC / 31
2. MPIO Function
1. MPIO Manager 2 Installation / 32
2. Connecting MPIO to the Computer
/ 33
3. When MPIO is not connected to the
Computer / 33
4. How to use MPIO Manager 2 / 36
1) Controls Overview
2) Menu Table of MPIO Manager2
3) Basic Function
4) Application Function for Power
User
5) How to use MPIO Audio
3. MPIO Manager 2 Program
1. MP3 File Creation(Ripping) From
Audio CD / 45
2. Macintosh iTunes Plug-In
Installation / 46
3. Trouble Shooting / 46
4. Limited Warranty / 48
4. Other Information
English
2
FL100-Eng-EU1 12/5/96 3:20 PM Page 2
1. Folder Save & Play Function
- You can store files by the unit of genre/artist/album by downloading
and maintaining the data by the folder unit in addition to by the file
unit. You can listen to music by selecting the specified folder.
2. Power Equalizer
- It provides the user mode, in which you can set the 7 Equalizer Mode
(Flat, Pop, Rock, Jazz, Classic, Vocal, Dynamic Bass) and 5 levels of
frequency range according to the music.
3. 3 Line Graphic LCD & LED Backlight
- You can check file information stored in the device and the running
status of the device with the 3 Line Graphic LCD that adopted. The
LED Backlight enables you to check the LCD information with ease at
night.
4. Multi-Format Player
- This is a Multi-Format Support Player can play WMA, ASF file in addi-
tion to the MP3 file.
2. Special Features
English
5
MP3 Player is a device plays mp3 file, known to the general public as a
digital audio format. You can listen to music by downloading mp3 files
stored on the PC to the MP3 Player.
In order to download music to the MP3 Player;
1. Install MPIO Manager 2 of the Install CD in the computer. (Refer to
the Page 32)
- MPIO Manager 2 is the Communication Window between the com-
puter and MP3 Player.
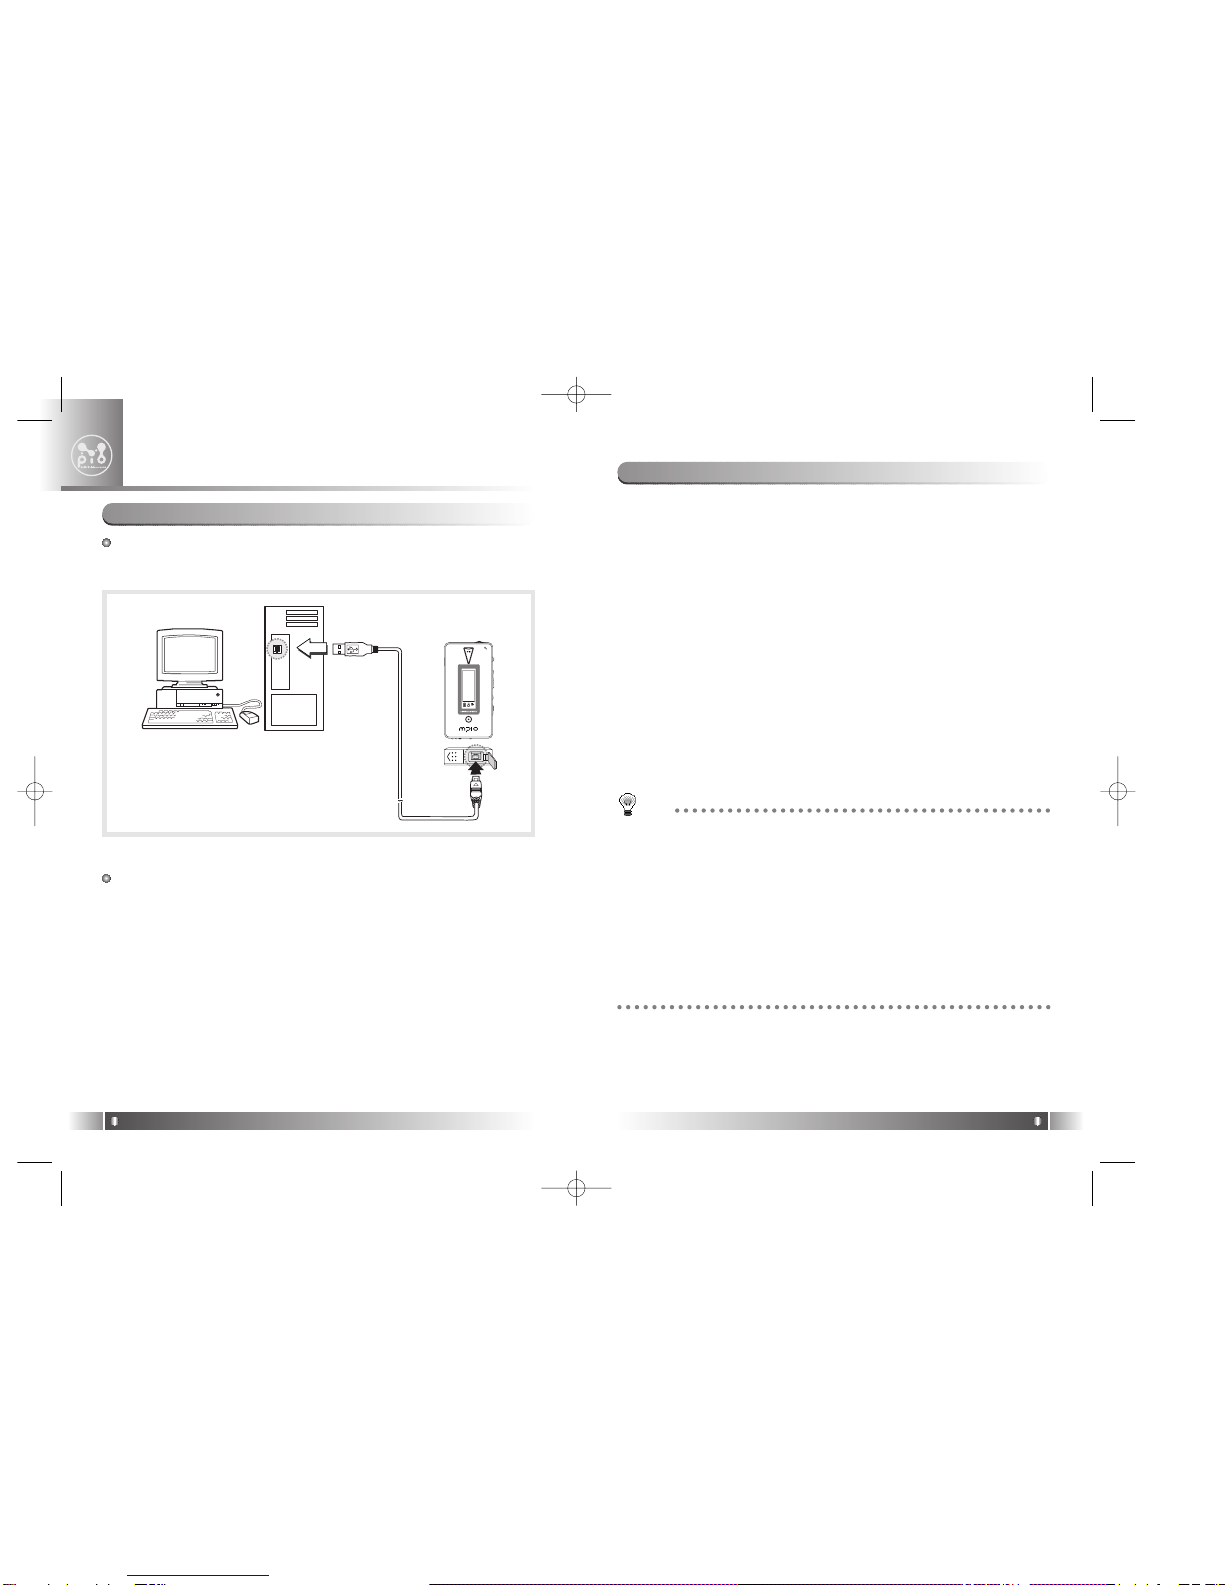
2. Connect the PC to the MP3 Player with a cable.
3. Through MPIO Manager 2, music files stored on the PC is down-
loaded to the MP3 Player. (Refer to the Page 39)
1. What is MP3 player?
MPIO Introduction
1
English
4
OPEN
5. FM Radio Function
- You can listen to the radio with the device mounted FM Receiver and
recording the received FM
TIP
[MP3]
As an abbreviation for MPEG 1 Layer 3, MP3 is an audio compression format
that enables WAV files to be compressed to about 1/12 of its original size, while
maintaining their original sound quality.
[WMA]
WMA (Windows Media Audio), Microsoft's Music File Compression Format has
the same quality of music as MP3, with half of the data compression rate (about
22 to 1) of MP3 (about 12 to 1)
[ASF]
ASF (Advanced Streaming Format) is Microsoft's Data Format for multimedia file
(MPG, AVI etc.) transfer.
FL100-Eng-EU1 12/5/96 3:20 PM Page 4

16. 4 Languages Menu Support
- The FL100 Menu Item is provided in English, Korea, Japanese and
Chinese.
17. World Language Support
- World Language Support enables you to find file names stored in
each countries' language on the LCD.
18. Windows Plug-In Support
- When you install the Windows Plug-In, you can upload or download
files to FL100 by running Windows Media Player or RealOne
Player, not MPIO Manager2.
English
7
6. Macintosh Support
- It gives consideration to the Macintosh User, supporting iTunes Plug-
In.
7. Power Menu Function
- You can setup various Menu Functions (Folder Mode, System etc.) of
the Player using Joy Stick Key.
8. SD(MMC) Expansion Slot Mounted Device
- You can use the Memory Card(SD Card, MMC).
9. USB Data Transfer
- USB cable enables you to access to the computer easily and to trans-
fer music data at a high rate of speed.
10. Data Store Function
- You can use this as the Data Storage by storing general data in
addition to music files, according to the usages.
11. Firmware Upgrade
- The product's function will be improved with the Firmware Upgrade
Support.
12. Real Networks Qualifying Software Supply
- Qualifying Software of Real Networks known for its Real Player will
be provided. You can create, manage and play digital music libraries
through with RealOne Player, a Personal Music Management
System. Besides it provides the function transforming an audio CD
to MP3 file.
13. Navigation Function
- You can search & play music while playing a music file.
14. Study Mode Support
- Speed control & Easy Finder function necessary for language study
are provided.
15. Voice Record Support
- You can record lecture & conference etc.
English
6
TIP
[Firmware]
Firmware is programming that is inserted into the hardware and operates vari-
ous functions of the hardware. If you don't have a Firmware, you can not use
the device with the un-operable hardware.
FL100-Eng-EU1 12/5/96 3:20 PM Page 6

English
9
English
8
3. Technical Specifications
Model
Decoding Format
Internal Memory
Memory Card Socket
LCD
Language Displayed
on the Menu
Language Supported
File Transfer Speed
Earphone Output
Power
S/N Ratio
THD
Frequency Range
Battery
Recording
Maximum Playing
Time
FM Frequency Range
FM Output Power
FM S/N Ratio
Dimensions/Weight
MPIO FL100
MP3(8 ~ 320kbps), WMA(5 ~ 192kbps), ASF
64/128/256MB
SD Card(MMC)
FSTN Type Graphic 3 Line LCD
(With Indigo Blue LED Backlight)
English/Korean/Japanese/Chinese
Languages of 36 countries
Maximum 4.5 Mbps
12mW( R: 6mW, L: 6mW)
85 dB
0.1%
20 Hz ~ 20 KHz
AAA Type Alkaline Battery
AAA Type Nickel Hydrogen Battery
Voice Record / FM Record
11 hrs
(MP3 file played with 128kbps)
76 ~ 108 MHz
10mW(R:5mW, L:5mW)
45 dB
40(W) x 79.5(H) x 14.2(D) mm / 41.5g (Without
Battery)
The Basic specifications of the computer to use MPIO & support-
able operating system.
•IBM PC
- Main Body: USB Interface (Rev 1.1) Standard Equipment & CD-
ROM Driver Mounted
- CPU Pentium: above 133MHz
- Memory: above 64MB
- Available Hard Disk Space: above 20MB
- Operation System Supported: Windows 98/ME/2000/XP
•Macintosh
- Main Body: USB Interface (Rev V1.1) Standard Equipment & CD-
ROM Driver Mounted
EX) Power Mac G3 (Blue&White)/G4/G4 Cube, iMac/iBook,
Powerbook, Powerbook G4
- Memory: above 64MB
- Available Hard Disk Space: above 20MB
- Operation System Supported: Mac OS Version X(iTunes3 Plug-in)
* Mac OS Version 8.62~9.2(iTunes2 Plug-in) support will be provid-
ed through the MPIO Web Site later.
Connection to the PC, using USB Hub & Extension Cord is not guar-
anteed.
4. Computer Requirements
5. Warning
You should be fully aware of the notice below, before using the
product.
The company does not take the responsibility for the defect of the
product (accessory, connecting device etc.), damage, data loss,
accident & disorder etc., occurred from not fully understanding
the notice below, so please be sure to check this notice.
1. Do not use the product for the other purpose except for the matters
described in the manual.
2. Pay attention not to hurt your hand while you touch a product box,
manual, accessory etc. Keep the manual to use at any time.
3. Pay attention not to have a severe impact on the product, might cause
a trouble or a damage.
FL100-Eng-EU1 12/5/96 3:20 PM Page 8

4. Do not insert other objects into the SD Card/MMC inserting hole,
except for SD and MMC.
5. Pay attention not to use the device or leave it alone in places with high
temperature and humidity or of high thermal difference, and by the
strong magnetic body.
6. Remember that liquid (water, beverage etc.) not leaked into the device.
7. The device that you discretionary disassembled or remodeled can not
be provided with a free service and can be excluded from the service
areas, so pay special attention to this.
8. The company does not take the responsibility for data loss cased by
the defect of the product, misoperation and other reasons, so pay
attention to this.
9. Check the polarity (+,-) of the battery when you use a battery.
10. Try not to injure you nail or not to be scratched by the edges when
you open the battery cover.
11. Remove the battery when not in use. Leakage of battery might cause
a trouble.
12. Pay attention not to use the earphone continuously for many hours
that might cause a trouble.
13. Please plug or unplug the earphone and cable by holding the plugs
not by pulling out the earphone or cable, to prevent internal line
breaking.
14. When you plug the USB cable into the computer or device, please
check again the direction of plugging it. In case the USB cable is
plugged in the wrong way, the computer or the device might suffer
trouble/damage.
15. Do not leave the USB cable plugged into the computer.
16. Do not give an impact to the connected part while the USB cable is
connected to the device.
17. Remember not to leave USB cable to be connected to the device and
the computer
18. Maintain and keep clean the USB connection of the device.
19. When the device is covered with foreign particles, please wipe off it
with soft cloth or clean towel and be careful not to use chemicals.
English
11
English
10
6. Accessories Included with your MPIO FL100
Main Body User’s GuideProduct
Installation CD
Pocket EarphoneUSB Cable
Wrist Strap Battery
FL100-Eng-EU1 12/5/96 3:20 PM Page 10
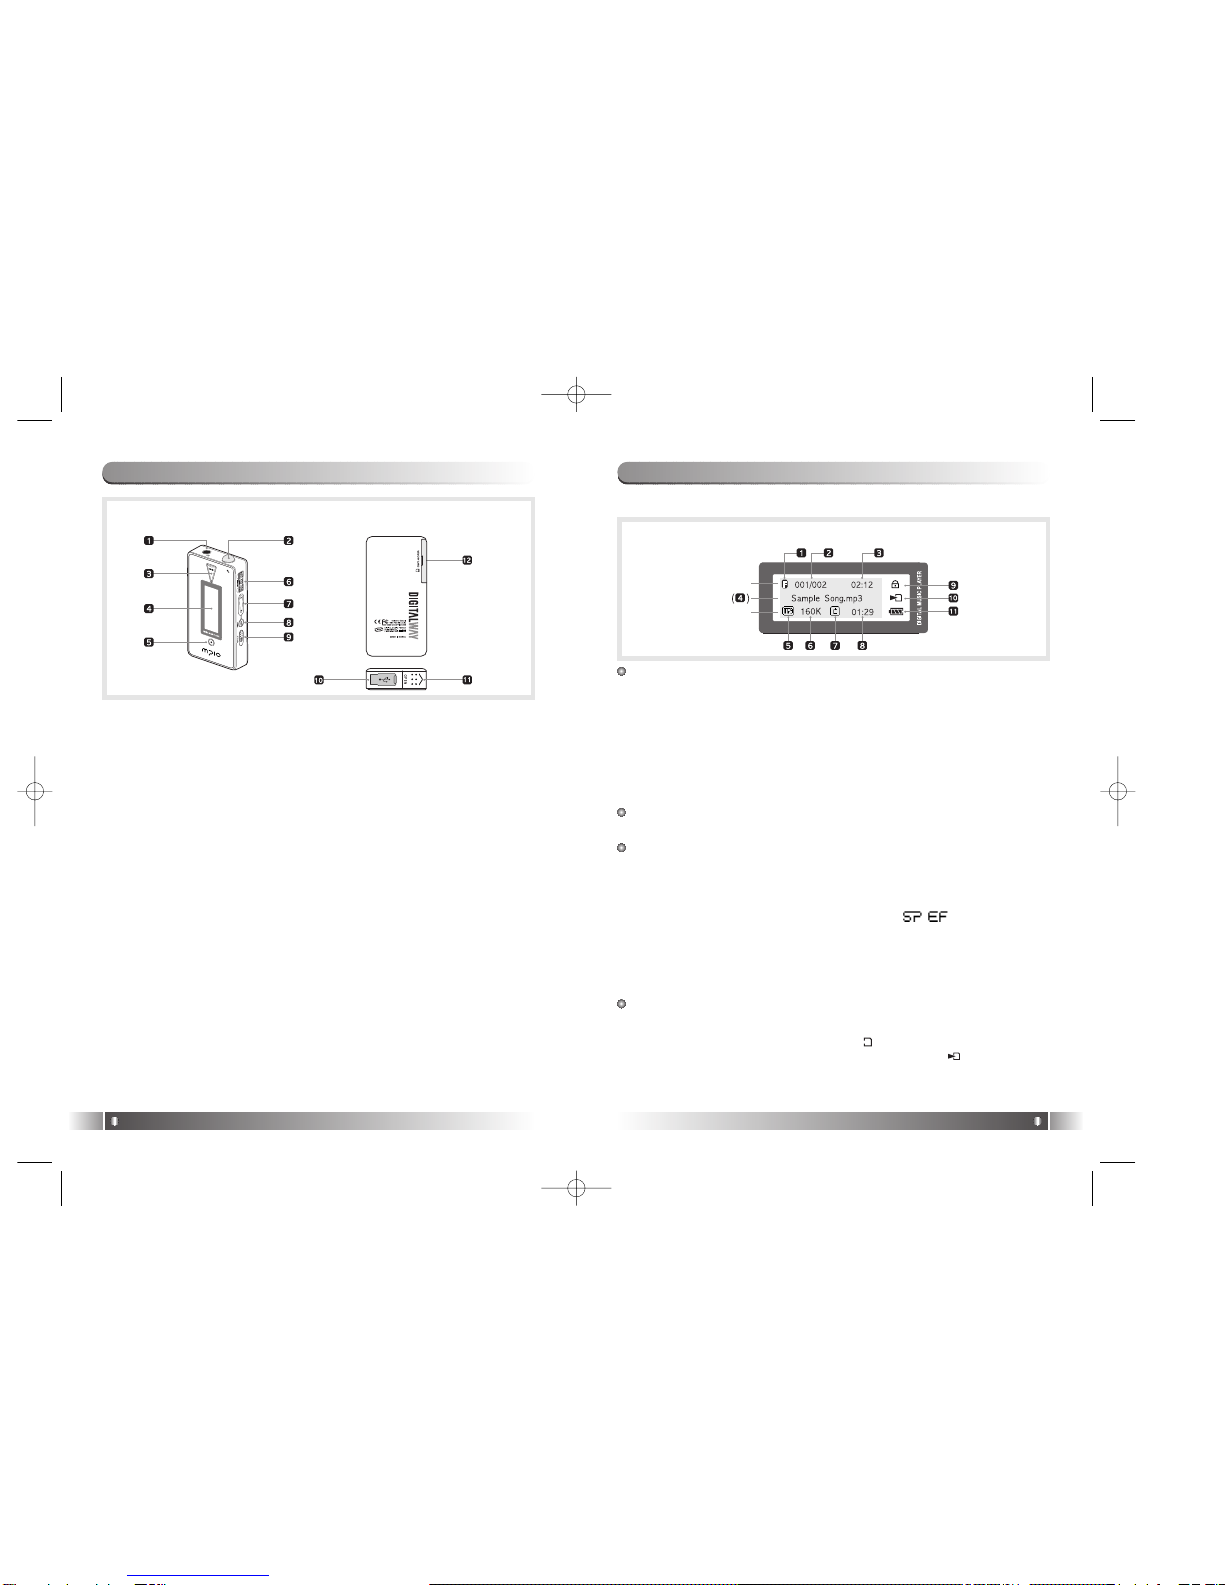
1 Line
1. Equalizer: The Setup status of Equalizer is displayed.
2. Numbers of the stored track in Memory
- In case of Folder Mode in the Menu is set as Disable:
Number of Playing Track / Numbers of stored track in memory
- In case of Folder Mode in the Menu is set as Enable:
Number of Playing Track among the ones saved in the
Folder/Numbers of saved Track in the Folder
3. Press the Menu Button during playback shortly, and it is changed into
the Visualization Mode.
2 Line
4. File Information: File Name, ID3 Tag Information etc. are displayed.
3 Line
: Press the Menu Button during playback shortly, and the mode is
changed into the Visualization Mode.
5. File Format: Extension name of the file played is displayed.
6. Bit Rate: Bit Rate of the file played is displayed.
* If you setup the Study Mode, Study Mode ( ) Icon will be dis-
played.
7. Repeat Icon: The Setup Status of Repeat Menu is displayed.
8. Elapsed Track Time: Playing time of displaying music is displayed.
* If you control the volume while playing a file, volume level is dis-
played.
Icon Collection
9. Hold Slide Icon: It is displayed when you setup locking.
10. SD Card/MMC Icon
- In case SD Card/MMC is inserted ( ) Icon is displayed.
- In case music stored in SD Card/MMC is played ( ) Icon is dis-
played.
11. Battery Icon: It displays remaining capacity of the battery by the
three levels.
8. Description of Player's LCD
English
13
[TOP]
1. Earphone Jack
2. Wrist Strap Loop
[FRONT]
3. Play/Pause Button: It has Power ON/OFF & Play/Pause functions.
4. LCD: It displays a file name and current setup status of function of the
player.
5. Record Button: Perform Record & Block Repeat Functions.
[RIGHT]
6. Joy Stick Key: You can change the status of Music Switch and setup of
each menu items.
7. +/- Button: Control the volume.
8. Menu Button: It performs functions of Playback/FM Mode Switch and
moves to the top item(Playback/FM Mode) from the
menu.
9. Hold Slide: If you push the Hold Slide to the direction of the arrow, it
will be changed into the locking status, not reacting to the
button click. It prevents misoperation of the button while
carrying the player with you.
[BOTTOM]
10. USB Port: Access to the PC by connecting the USB cable.
11. Battery Cover: Open the battery cover and insert the battery while
matching the polarity, and close the battery cover.
[LEFT]
12. SD Card/MMC Slot: Insert the SD Card/MMC.
7. MPIO FL100 Control's Overview
English
12
[FRONT] [REAR] 1) Playback Mode
1 Line
2 Line
3 Line
*The screen below is randomly made to explain LCD information.
FL100-Eng-EU1 12/5/96 3:20 PM Page 12
English
15
2) FM Mode
English
14
* The screen below is randomly made to explain LCD inforation.
1 Line
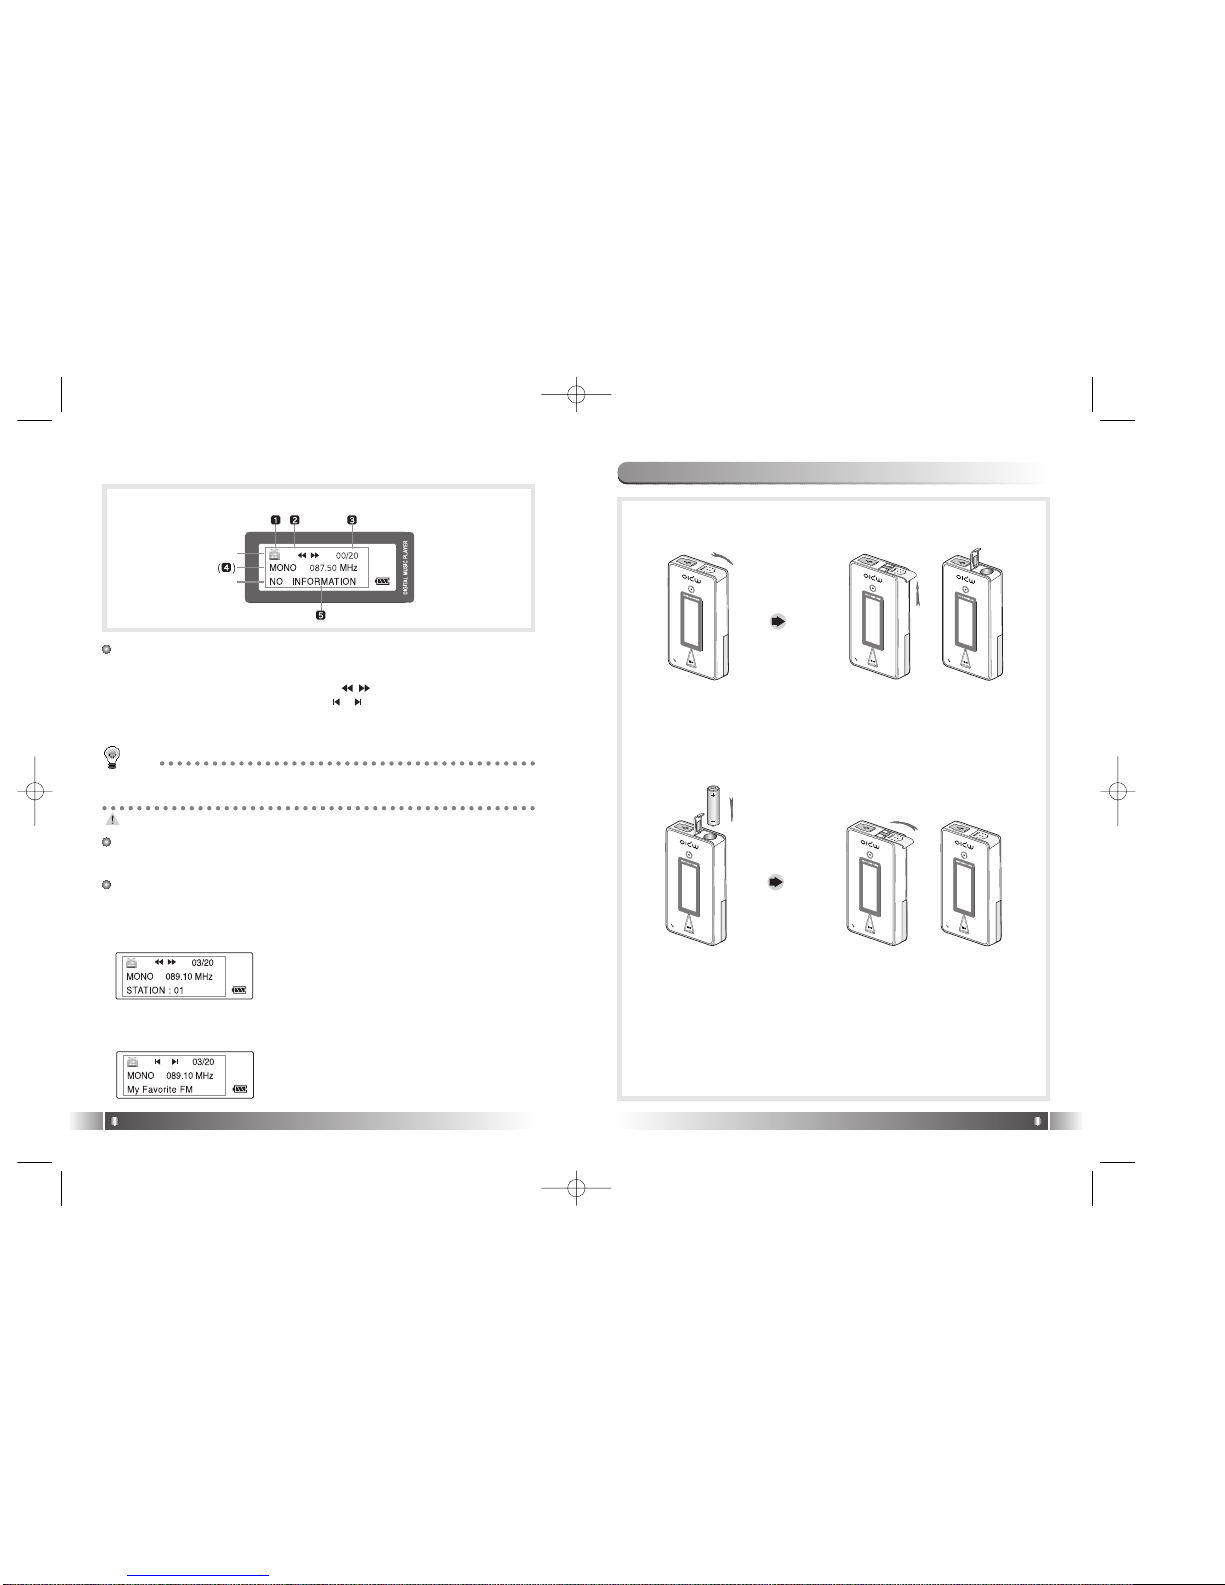
1. FM Icon: It displays the status of FM Mode.
2. Mode Icon
- In case of Channel Search Mode ( ) icon is displayed.
- In case of Station Search Mode ( ) icon is displayed.
* Number of Station receiving is displayed in the Station Mode Icon.
3. Numbers of stored station: It displays Number of Stations stored /
Number of Stations can be stored.
No station is stored, in the initial setup state.
2 Line
4. Sound Mode & Channel: It displays Sound Mode and receiving
Channel(Frequency).
3 Line
5. Detail Information
- In case the Channel receiving is stored in the Station, the Station
Number is displayed, in the Channel Search Mode.
TIP
[Station]
Station means the channel(frequency) is saved.
9. Battery Installation
1. Open the Battery Cover by pushing the button to the direction of
the arrow.
2. Insert an AAA Type
Alkaline Battery
(AAA Type Nickel
Hydrogen Battery)
while matching the
polarity.
3. After adjusting the groove,
close the battery cover by
pushing it forward.
1 Line
2 Line
3 Line
*The screen below is randomly made to explain LCD information.
01
* If the Channel receiving is not stored in the
Station, NO INFORMATION is displayed.
* See FM Stations Editor Item(Page 42) of
MPIO Manager 2 to save the detailed infor-
mation of the Station.
- In case of Station Search Mode, the detail information of Station
receiving is displayed.
* In case station information is not stored, the
next station will be displayed.
FL100-Eng-EU1 12/5/96 3:20 PM Page 14

MPIO Function
2
English
17
* If you push the Hold Slide to the direction of the arrow, it will be
changed into the locking status, not reacting to the button press. It
prevents misoperation of the button while carrying the player with
you. You can unlock the device by pushing the Hold Slide in the
opposite direction of the arrow.
* If you press a button on the device in the locking status, 'KEY HOLD'
message will appear.
10. How to use Hold Slide
English
16
* Move the Joy Stick Key up/down, the music change and FF/REW
function begin to work.
* Put the Joy Stick Key in the center and press it for a while, and the
menu setup function is activated.
11. How to use Joy Stick Key
1. Power ON/OFF
- If you press the button ( ) for long, the power is ON/OFF.
2. Volume Control
- To turn up the volume: + button
- To turn down the volume: - button
If you press the Volume button for long, the volume will rise and fall
rapidly.
3. Playback/FM Mode Switch
1) Convert the Playback Mode into FM Mode
- Press the Menu button for long in the Playback Mode.
2) Convert the FM Mode into Playback Mode.
- Press the Menu button for long in the FM Mode.
4. Enter to the Power Menu
- Put the Joy Stick Key in the center in Playback/FM Mode and press
for a while.
* Power menu includes the Return Item in each step. Select the
Return Item in the Menu, and you will move to the upper item.
* Press the Menu Button in the Menu shortly, and the Power Menu is
closed and it is changed to Playback/FM Mode. .
1. Basic Function
FL100-Eng-EU1 12/5/96 3:20 PM Page 16

3. Move to/Out of the Folder
[Move to the Folder]
- Move to a folder by shifting the Joy Stick Key up or down, and
press the Joy Stick Key.
[Move out of the Folder]
- If you press the Menu Button the folder shortly, you will move to
the upper folder.
4. Mark Replay
- If you press the Record button while a file is played, Mark Replay
function will be operated.
A. Press the Record button at the beginning of the interval which is
to be repeated. (Interval A is selected.)
B. Press the Record button at the end of the interval which is to be
repeated. (Interval B is selected.)
In order to cancel the Mark Replay function, press again the Record
button.
5. Navigation
- While you play music file, you can select the next music using the
Navigation Menu.
A. Press the Joy Stick Key for long to enter the Menu Mode.
B. Move to the NAVIGATION Menu by shifting the Joy Stick Key
and enter the NAVIGATION MENU by pressing the Joy Stick
Key
C. After selecting a music which to be played by Joy Stick Key and
press the ( ) button.
English
19
1) Table of Button Behavior
* The table below is the list of Button Behavior of FL100 in the
Playback Mode.
: It means to press the button shortly.
: It means to press the button for over one second.
English
18
Pause State Play State
Selected Music Playing Pause the Music Playing
Power OFF Power OFF
Move to the Previous Music Previous Music Playing
Search the Previous Music Continuously
Fast Rewind
Enter the Folder
Enter the Menu Enter the Menu
Move to the Next Music Playing the Next Music
Search the Next Music Continuously
Fast Forward
Voice Recording Mark Replay
Move to the upper folder Visualization Mode
Move to FM Mode Move to FM Mode
Turn Up the Volume Turn Up the Volume
Turn Up the Volume Continuously Turn Up the Volume Continuously
Turn Down the Volume Turn Down the Volume
Turn Down the Volume Continuously
Turn Down the Volume Continuously.
PLAY/PAUSE
REW
MODE
FF
RECORD
MENU
VOLUME +
VOLUME -
2) Basic Function
1. Play/Pause
- The music file will be played if you press the ( ) button in the
pause state.
- If you press the ( ) button in the play state, the file will be
paused.
2. REW/FF
- If you want to move to the previous music, Push up the Joy Stick
Key to the direction of REW.
- If you want to move to the next music, Push down the Joy Stick
Key to the direction of FF.
- Push up the Joy Stick Key for long to the direction of REW to oper-
ate Fast Rewind function.
- Push down the Joy Stick Key for long to the direction of FF to oper-
ate Fast Forward function.
2. Playback Mode
FL100-Eng-EU1 12/5/96 3:20 PM Page 18

English
21
English
20
3) Power Menu Setup
A. Power Menu
- Power menu includes the Return Item in each step. Select the
Return Item in the Menu, and you will move to the upper item.
- Press the Menu Button in the Menu shortly, and the Power Menu
is closed and it is changed to Playback/FM Mode.
Menu Lower Item Detail Information
1. FLAT Play in FLAT Mode.
2. POP Play in POP Mode.
3. ROCK Play in ROCK Mode.
4. JAZZ Play in JAZZ Mode.
5. CLASSIC Play in CLASSIC Mode.
6. VOCAL Play in VOCAL Mode.
7.
DYNAMIC BASS
Play in BASS Mode.
8. USER You can change the 5levels(100/500/2K/7K/
12KHz) of frequency to the value you wish to set.
Select the Equalizer Mode according to the genre of music.
Select the Play Order.
1. NORMAL Play sequentially
2.
REPEAT TRACK
Repeat the Track Selected.
3. REPEAT ALL Play the current music continuously.
4. RANDOM Play Randomly.
Play the whole music stored in the memory or a music stored in the
specific folder.
1. DISABLE Play the Whole Music Stored in the memory.
2. ENABLE Play the music stored specific folder.
* Set the Folder Mode Menu to Enable, and
the Folder Mode Icon is displayed in LCD.
[EQUALIZER]
[REPEAT]
[FOLDER MODE]
FOLDER MODE
1. SPEED
CONTROL Not use the Speed Control Function.
Control the playing speed of the file
in 9 levels, as 50%, 60%, 75%, 88%,
100%, 125%, 150%, 175% and
200%.
Control the Speed Control Function useful in learning foreign lan-
guages, and Easy Finder Function by which you can easily move
within the file while it is played.
2. EASY FINDER
While you play a music file, you can select next music using the NAV-
IGATION Menu.
[STUDY MODE]
[NAVIGATION]
REPEAT
ALL
REPEAT
TRACK
NORMAL
RANDOM
Play the whole music in
the memory once in con-
secutive order and stop.
Play the whole music
stored in the folder once in
consecutive order and stop.
Repeat the current
music continuously. Repeat the current
music continuously.
Repeat the whole music in
the memory continuously
in consecutive order.
Repeat the whole music
stored in the folder continu-
ously in consecutive order.
Repeat the whole music
saved in the memory con-
tinuously in random order.
Repeat the whole music stored
in the specific folder continu-
ously in random order.
DISABLE ENABLE
R
E
P
E
A
T
1. OFF
2. USER
Not use the Easy Finder Function.
When you search using the Joystick
while a file is played, it will move the
amount of about 5 sec.
1. OFF
2. 1STEP
When you search using the Joystick
while a file is played, it will move the
amount of about 10 sec.
3. 2 STEP
TIP
Speed Control function is applied only to the MP3
file at the Sampling Rate of 22.05KHz or under
below.
9. RETURN Move to the Upper Item
5. RETURN Move to the Upper Item
3. RETURN Move to the Upper Item
3. RETURN
Move to the Upper Item
* The music not stored in the folder is considered as stored in the top-
level folder (ROOT).
*
The Player plays music files as you set 'REPEAT' and 'FOLDER
MODE', the following table shows how the setting works accordingly.
4. RETURN
Move to the Upper Item
3. RETURN Move to the Upper List
FL100-Eng-EU1 12/5/96 3:20 PM Page 20
English
23
English
22
When the button is pressed, the
Backlight maintains for 3 sec.
1. BACKLIGHT
You can change the running status of FL100 from this menu.
[FILE ERASE]
[SYSTEM]
1.
DEFAULT
You can control the duration of
Backlight at the unit of 3 to 30 sec.
Not use the Backlight Function.
2. USER
3. OFF
Menu Lower Item Detail Information
[LANGUAGE]
You can delete a file stored in the Internal memory of the FL100.
1. ERASE ALL
Delete all Files Stored.
2. ERASE FILE Delete the File Selected.
1. ENGLISH
Display the Menu List in English
2. KOREAN
Display the Menu List in Korean.
3. JAPANESE
Display the Menu List in Japanese.
4. CHINESE
Display the Menu List in Chinese.
Control the duration of Backlight when the
button is pressed.
2. AUTO PLAY
After turning up the power, control the auto
play of music.
Play a file by pressing the Play
button ( ), after the power is
on.
1.
DISABLE
Play a music file right after the
power is on.
2.
ENABLE
3. PLAY
POSITION
You can select the Resume Function
remembers and plays the part played right
before the power was turned off.
When a file is played, it plays
from the beginning of the file
played at last before it was com-
pleted. (Resume Function used)
1. INITIAL
When a file is played, it remem-
bers and plays the part paused
before the power was turned off.
(Resume Function used)
2.
STOPPED
In case no button is pressed for 3
min. in the pause state, it will be
completed automatically.
4.
AUTO POWER
OFF 1.
DEFAULT
You can control time of Auto Off
at the unit of 3 to 30 minutes.
2. USER
You can set the function of Auto Power off
when no button is pressed for a certain
time in the pause state.
5. SLEEP MODE
You can power off the device at the
reserved time.
Not use Sleep Mode.
1.
OFF
You can adjust the desired time
of Auto Off to 3 to 60 minutes
while a file is played.
2.
USER
6. DISPLAY
TITLE
Select file information to be displayed on
the LCD while a file is played.
Display the ID3 Tag information
on the LCD while playing a file.
1. TAG
INFO
Display the file name on the LCD
while playing a file.
2. FILE
NAME
The set point of the Sleep Mode will be converted to OFF after the power turned off.
7. SCROL
WIDTH
Speed Control the file information displayed
on the LCD window.
File information scroll the 16
width on the LCD.
1.
DEFAULT
You can control the scroll
speed(16, 32, 48, 64, 80, 96, 112
and 128 width) of file information
on the LCD.
2. USER
8. INFORMA-
TION
Display the Firmware Version, Internal
Total/Free Memory, External Total/Free
Memory information.
Select the language to display the Menu Item of FL100
3.
RETURN
Move to the Upper List.
3. RETURN Move to the Upper Item
5. RETURN Move to the Upper Item
3.
RETURN
Move to the Upper Item
4.
RETURN
Move to the Upper Item
9. RETURN
Move to the Upper Item.
3.
RETURN
Move to the Upper Item
3.
RETURN
Move to the Upper Item.
3.
RETURN
Move to the Upper Item.
3.
RETURN
Move to the Upper Item.
[RETURN]
Move to the Upper Item.
FL100-Eng-EU1 12/5/96 3:21 PM Page 22

3. FM Mode
English
25
B. Power Menu Setup
- Enter the Power Menu by pressing the Joy Stick Key for long.
- Select a menu of which setup status to be changed by shifting the Joy
Stick Key downward and upward and press the Joy Stick Key.
- Change the setup status by shifting the Joy Stick Key upward and
downward, and save the setup status by pressing the Joy Stick Key.
- Select the Return item, and you move to the Upper List.
* Press the Menu Button in the Power Menu shortly, and the mode is
changed to the Playback Mode.
Ex) Change the Setup Status of the REPEAT Menu
English
24
1. Enter the Power Menu by pressing the Joy Stick Key for long.
2. Select the Repeat Menu by shifting the Joy Stick Key from the
Power Menu and enter the REPEAT Menu by pressing the Joy
Stick Key.
3.Move to the Repeat All using the Joy Stick Key. Save the setup
status by pressing the Joy Stick Key.
4. Move to the Playback using the Return item.
2) Basic Function
[Channel Search/High-speed Search]
- In case of shifting the Joy Stick Key to the direction of REW:
Channel decreases by 1 Step.
- In case of shifting the Joy Stick Key to the direction of FF:
Channel increases by 1 Step.
-
In case of pushing the Joy Stick Key to the direction of REW for long:
Auto Search for the Previous Frequency Band.
- In case of pushing the Joy Stick Key to the direction of FF for long:
Auto Search for the Next Frequency Band
1) Table of Button Behavior
* The table below is the list of Button Behavior of FL100 in the FM
Mode. : It means to press the button shortly.
: It means to press the button for over one second.
Channel Search Mode Status Station Search Mode Status
Power OFF Power OFF
Channel Decrease by 1 Step Pervious Station
Auto Search for the Previous Channel
Station Decrease Continuously
Enter the Menu Enter the Menu
Channel Increase by 1 Step Next Station
Auto Search for the Next Channel
Station Increase Continuously
FM Record FM Record
Switch into the Station Search Mode S
witch into the Channel Search Mode
Switch into the Playback Mode
Switch into the Playback Mode
Turn Up the Volume Turn Up the Volume
Turn Up the Volume Continuously
Turn Up the Volume Continuously
Turn Down the Volume
Turn Down the Volume
Turn Down the Volume Continuously Turn Down the Volume Continuously
PLAY/PAUSE
REW
MODE
FF
RECORD
MENU
VOLUME +
VOLUME -
The initial Setting of the FM Mode is the Channel Search Mode.
- The receive sensitivity of FM mode can vary on the area.
- Earphone output Power in FM is smaller than that in the
Playback Mode.
FL100-Eng-EU1 12/5/96 3:21 PM Page 24
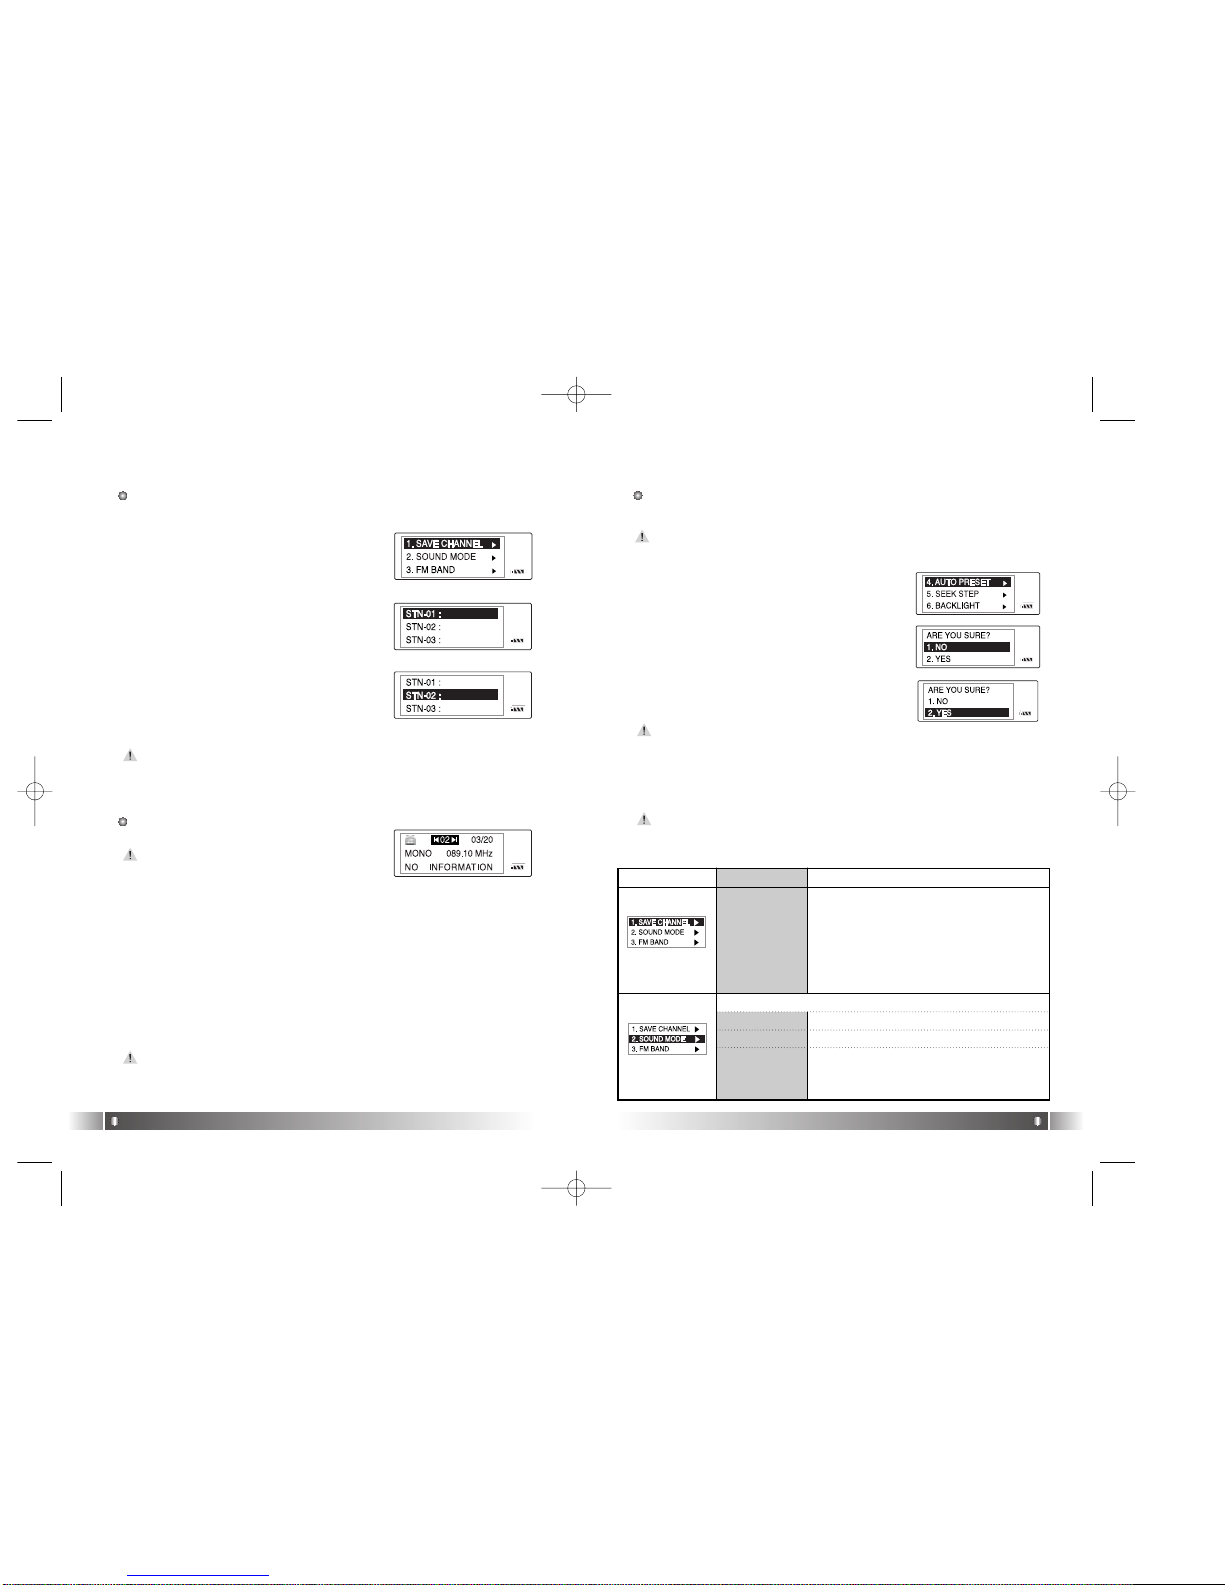
[Save Channel Setup]
Save the Channel you are receiving in the Channel Search Mode.
English
27
English
26
3. Save the Channel in the Station by
pressing the Joy Stick Key.
1. If you want to save the receiving
Channel, press the Joy Stick Key for
long to Enter the Menu(FM).
4. Move from the FM Mode by selecting the Return Item.
-
Move to the upper menu by selecting the Return Item.
-
You can save up to 20 Stations.
[Station Search]
You can move between the Stations
saved, only in the Station Search Mode.
If you move to the Station Search
Mode when no saved Station, NO STA-
TION!!! Message is displayed in LCD
and it is automatically moved to the
Channel Search Mode.
1. In case of the Channel Search Mode, convert to the Station Search
Mode by pressing the Menu Button shortly. The icon indicates the
Station Search Mode will be displayed on the LCD.
2. Move the Station by using the Joy Stick Key.
- If you shift the Joy Stick Key to the direction of REW: Move to the
Previous Station
- If you shift the Joy Stick Key to the direction of FF: Move to the
Next Station
If you press the Menu button again shortly, you will move from the
Station Search Mode and it will covert to the Channel Search
Mode.
2. Select the Save Channel Menu by using
the Joy Stick Key and assign the Station
Number by shifting the Joy Stick Key.
[Auto Preset Setup]
You can save up maximum 20 stations searched from the
Frequency Range in disregard of the existing Station.
In areas of weak FM reception, you may not perceive the frequen-
cy.
1. Enter the Menu(FM) by pressing the Joy
Stick Key.
3. If you want to execute the Auto Preset
function, select 'Yes' by using the Joy
Stick Key.
3) Power Menu (FM) Setup
[Power Menu (FM)]
- Menu(FM) includes the Return Item in each step. Select the Return Item in
the Menu(FM), and you will move to the upper item.
- Press the Menu Button in the Menu(FM) shortly, and the Menu(FM) is
closed and the mode is changed to FM Mode.
Menu Lower Item Detail Information
You can save the Channel (Frequency) while
receiving it.
Display the storing status of the Station.
(Refer to Page 26)
1. MONO
Set the Mono Mode while receiving FM.
2. STEREO
Set the Stereo Mode while receiving FM.
[SAVE CHANNEL]
[SOUND MODE]
Select the Sound Mode while receiving FM.
2. After select the Auto Preset Menu, check
the running status of Auto Preset.
3. RETURN
Move to the Upper Item
In case of executing the Auto Preset function, all Stations saved
are deleted. So pay attention to this.
FL100-Eng-EU1 12/5/96 3:21 PM Page 26
English
29
English
28
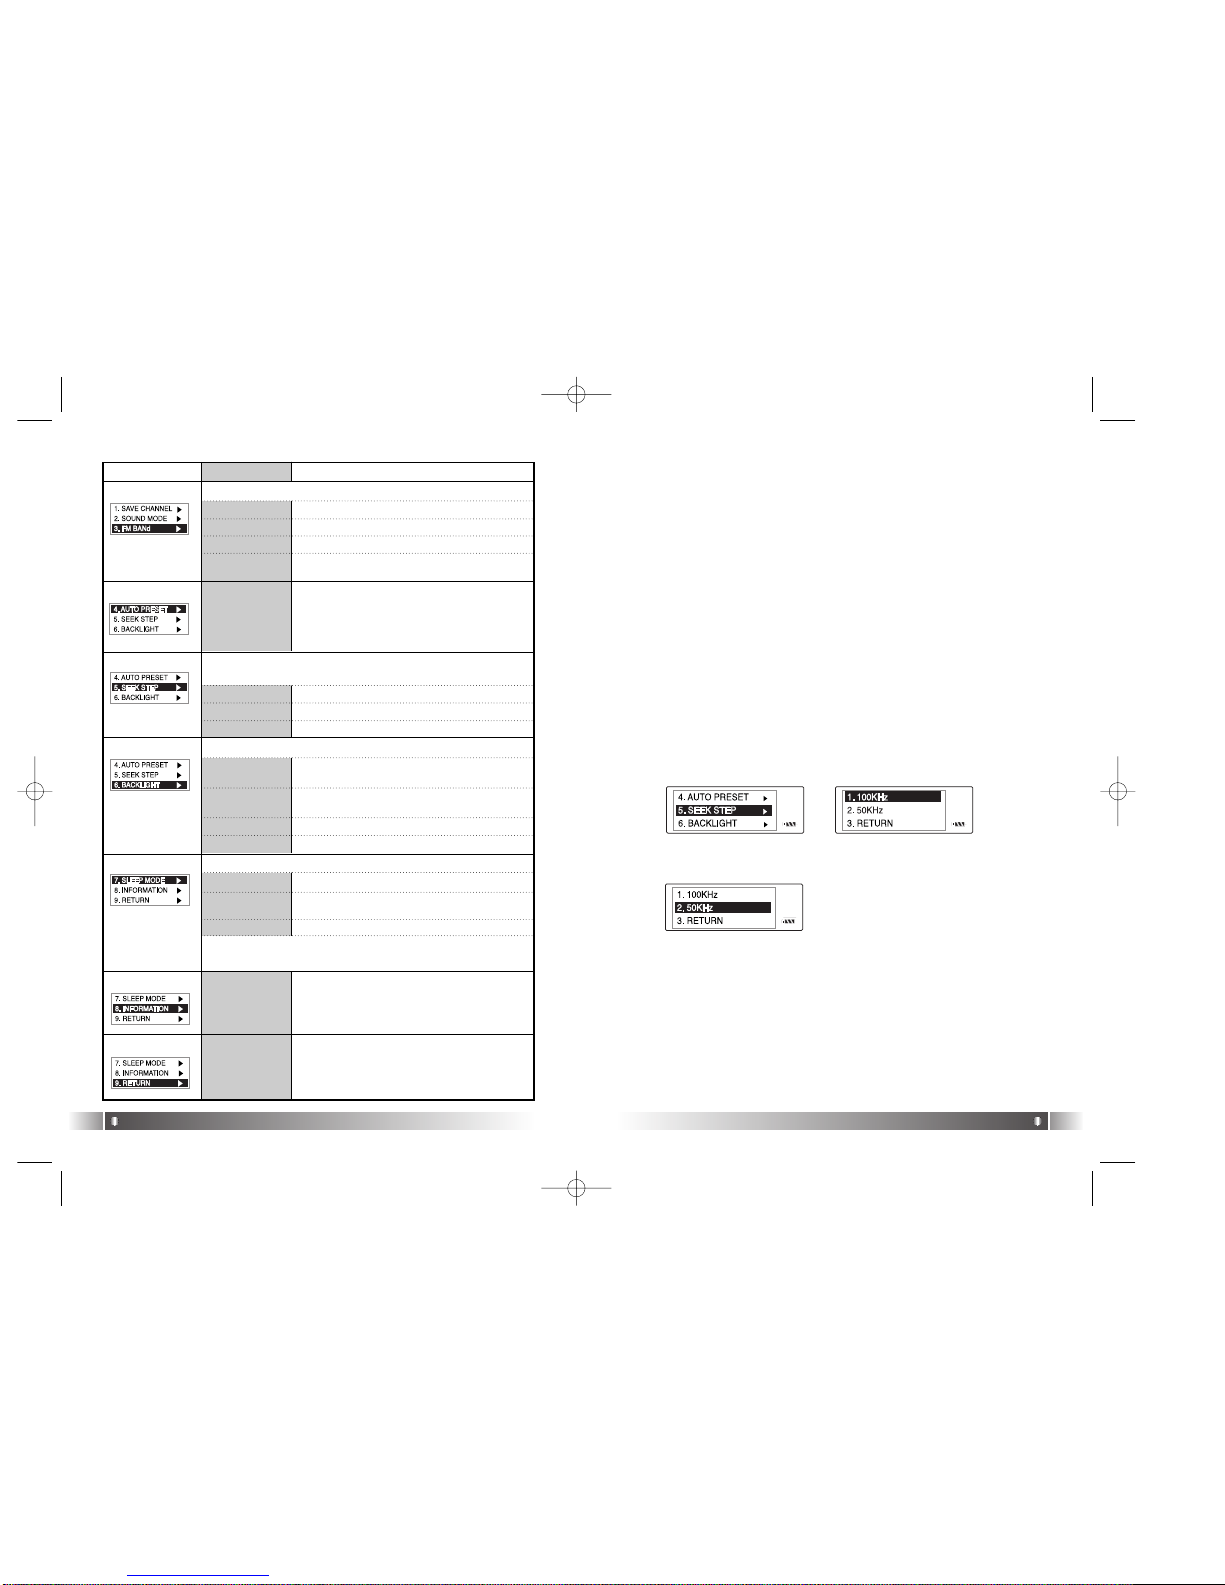
Menu Lower Item Detail Information
1. 100KHz Switch the FM Channel to the unit of 100KHz.
2. 50KHz
Switch the FM Channel to the unit of 50KHz.
You can save up maximum 20 stations
searched from the Frequency Range in dis-
regard of the existing Station
Display the Firmware Version, Internal
Total/Free Memory, External Total/Free
Memory information.
[FM BAND]
[AUTO PRESET]
[SEEK STEP]
Select the unit of frequency switch in the Channel Search
Mode using Joy Stick Key.
1. US/EU/KR/CN
Receiving Frequency Range of 87.5~108MHz.
2. JAPAN Receiving Frequency Range of 76~92MHz.
Select the FM Frequency range.
3. WORLD WIDE Receiving Frequency Range of 76~108MHz.
[BACKLIGHT]
[SLEEP MODE]
[INFORMATION]
1. DEFAULT
When the button is pressed, the Backlight
maintains for 3 sec.
2. USER
You can control the duration of Backlight at
the unit of 3 to 30 sec.
Control the duration of Backlight when the button is pressed.
1. OFF
Not use Sleep Mode.
2. USER
You can adjust the desired time of Auto Off
to 3 to 60 minutes while playing a file.
You can power off the device at the reserved time.
3. OFF
Not use the Backlight Function.
* The set point of Sleep Mode will be converted to OFF after
the power is turned off.
4. RETURN
Move to the Upper Item
3. RETURN
Move to the Upper Item
4. RETURN
Move to the Upper Item
3. RETURN
Move to the Upper Item
[RETURN]
Move to the Upper Item
[ Power Menu(FM) Setup]
1. Enter the Menu(FM) by pressing the Joy Stick Key for long.
2. Select a menu which to be changed by shifting the Joy Stick Key
right and left and press the Joy Stick Key.
3. Change the setup by shifting the Joy Stick Key (upward & downward)
and save the setup status by pressing the Joy Stick Key.
4. Move to the Upper Item by selecting the Return item.
* Press the Menu Button in the Menu(FM) shortly, and you will move
to the FM Mode.
Ex) Change the setup status of the SEEK STEP Menu
1. Enter the Menu(FM) by pressing the Joy Stick Key for long.
2. Select the SEEK STEP Menu by shifting the Joy Stick Key in the
Power Menu and enter the SEEK STEP Menu by pressing the Joy
Stick Key.
3. Move to the 50KHz Item by shifting the Joy Stick Key.
5. Move to the FM Mode by pressing the Return item.
4. Save the setup status by pressing the Joy Stick Key in the 50KHz
Item.
FL100-Eng-EU1 12/5/96 3:21 PM Page 28

4. Record Function
English
31
English
30
TIP
A file created from the record function of FL100, will be stored in the MPIO
RECORD Folder which the MPIO reserved.
* The Record File is saved as the bit rate of 33kbps.
* When the record time is less than 5 sec., the Record File is not created.
1. Voice Record
1) If you press the Record but-
ton in the pause state of
Playback Mode, it starts to
record voice.
TIP
- The MPIO RECORD folder is reserved by MPIO. Please pay attention not to
use name of MPIO RECORD Folder.
- The Record File is saved in the internal memory. Remember that the Record
File is not created in the Memory Card.
2) If you want to complete the voice
record, press the Record button
again.
3) The voice record files are stored
in the MPIO RECORD folder by
the file name of VOICE001.wav,
VOICE002.wav etc..
2. FM Record
1) In case pressing the Record
button while receiving FM, it
starts to record FM.
2) If you want to stop the FM
Record, press the Record button
again.
3) The FM record files are stored in
the MPIO RECORD folder by the
file name of FM001.wav,
FM002.wav etc..
If the external memory is needed, SD Card(Security Digital)/MMC
can be used.
When you insert or remove SD Card/MMC, make sure to turn the
power of MPIO off.
5. How to use SD Card/MMC
1. In case of inserting the SD Card/MMC:
Open the cover, push the SD Card/MMC to the end.
2. In case of ejecting the SD Card/MMC:
Open the cover, press the end point of the SD Card/MMC.
3. In case of removing the SD Card/MMC :
The SD Card/MMC will come out automatically if you press the
end point of the SD Card/MMC.
Inserting
the SD Card/MMC Ejecting
the SD Card/MMC
FL100-Eng-EU1 12/5/96 3:21 PM Page 30
English
33
4. If you agree to the stipulations,
click on the 'Yes' button. 5. Assign the Installation Path of
MPIO Manager 2. In order to
assign a different path, click
on the Browser button to
select a location of the pro-
gram installation.
6. Assign the location of MPIO
Manager 2 in the program
folder.
7. MPIO Manager 2 is installing.
If the installation is completed,
MPIO Manager 2 icon will be
produced on the desktop.
English
32
MPIO Manager2 is the Communication Window between the computer
and MP3 Player. You can download a music file (MP3/WMA/ASF)
stored in the PC to MPIO and upload a file (data file/record file etc.)
stored in MPIO to the PC.
- Due to the copyright restrictions on Music File (MP3/WMA/ASF),
you cannot upload it to the computer.
- If you install MPIO Manager 2 program on the PC while it is con-
nected to MP3 Player, the Manager Program might misoperates.
Please remove USB Cable from PC before installing MPIO Manager
2 program.
1. MPIO Manager 2 Installation
MPIO Manager 2 Program
3
1.Turn the power of the PC on
and insert the Install CD into
the CD-ROM driver.
: The Install Menu Screen will
display automatically.
- If the Install CD is not run
automatically, double-click
on [My Computer] on the
desktop.
- Select CD-ROM Driver(D:
or E: ) and run the install
CD by double-clicking it.
2. Click on the MPIO Manager 2
in install Menu.
: MPIO Manager 2 Setup
Window appears.
3. This is the MPIO Manager 2
Install Wizard. Click [NEXT], if
you agree to install.
FL100-Eng-EU2 12/5/96 3:22 PM Page 32

English
35
English
34
In case of Windows 2000/XP
1. Insert the Product Installation CD into the CD-ROM driver.
2. Select [My Computer]/[Properties]/[Hardware]/[Device Manager].
3. Double-click "Digitalways Audio player" item from the [Device
Manager].
* The Digitalway Audio Player item may be displayed as a Question
Mark(?)/ Exclamation Mark(!) item or Other Items/Unknown Device.
4. If the Properties Window of items above, click on the [Driver Update]
item.
5. If the Driver Update Wizard is run, click on the 'Complete' button.
6. Select [Install from a List or a Specific Location (Advanced)].
7. Select [Search Removable Media (floppy, CD-ROM)] from [Search
the Most Suitable Driver at this Location].
8. If the driver installation is completed, click on the 'Complete' button.
2. Connecting MPIO to the Computer
1. Connect the USB cable to the USB Port in the computer.
2. Turn the power of MPIO on and connect the USB cable to the MPIO.
3. Check the USB CONNECTED message on the MPIO LCD.
4. Run MPIO Manager 2.
After connecting the MP3 Player to the computer and running Manager2,
if the memory information parts of Manager2 not indicate memory size,
please perform as follows;
In case of Windows 98/SE/ME
1. Insert the Product Installation CD into the CD-ROM driver.
2. Move into the [Device Manager] by selecting the [Properties] of [My
Computer].
3. Search Digitalway Audio Player item in the [Device Manager].
* The Digitalway Audio Player item may be displayed as a Question
Mark (?)/ Exclamation Mark(!) item or Other Items/Unknown Device.
4. Double-click the "Digitalway Audio player" item.
5. When Properties Window of the items above appears, Select [Driver]
tab and click [Driver Update].
6. If the Driver Update Wizard is run, click on the 'Complete' button.
7. Select [Search for better driver than the one your driver is using now
(Recommended)] button.
8. Assign the location of the driver to be searched to the CD-ROM driv-
er.
9. If the driver installation is completed, click on the 'Complete' button.
3. When MPIO is not connected to the Computer
FL100-Eng-EU2 12/5/96 3:22 PM Page 34
English
37
English
36
5. PC Memory Information Part
6. Memory File (Folder) Managing Part
- Manages files(folders) in the internal memory & memory card of
MPIO.
Download
Upload
Stop
Up Level
New Folder
Refresh
Delete
Cut
Copy
Paste
Properties
DescriptionIcon Function
Download file(folder) to MPIO.
Upload file(folder) to the PC.
Stop file transfer.
Move to the upper folder
Create a new folder in the memory
Display the memory status updated.
Delete the file(folder) selected.
Cut the file(folder).
Copy the file(folder).
Paste the file(folder) copied or cut.
Display the information of track saved in MPIO and you can
check the available to speed control function.
7. Memory List Window
- It shows file list stored in the MPIO.
- You can find the lists by selecting Internal Memory/Memory Card/All
Memory.
8. Memory Information Part
9. MPIO Audio - Plays files stored on the computer
(MP3/WMA/ASF/WAV).
10. Audio List Window - shows Audio Play List.
11. Audio Information Part
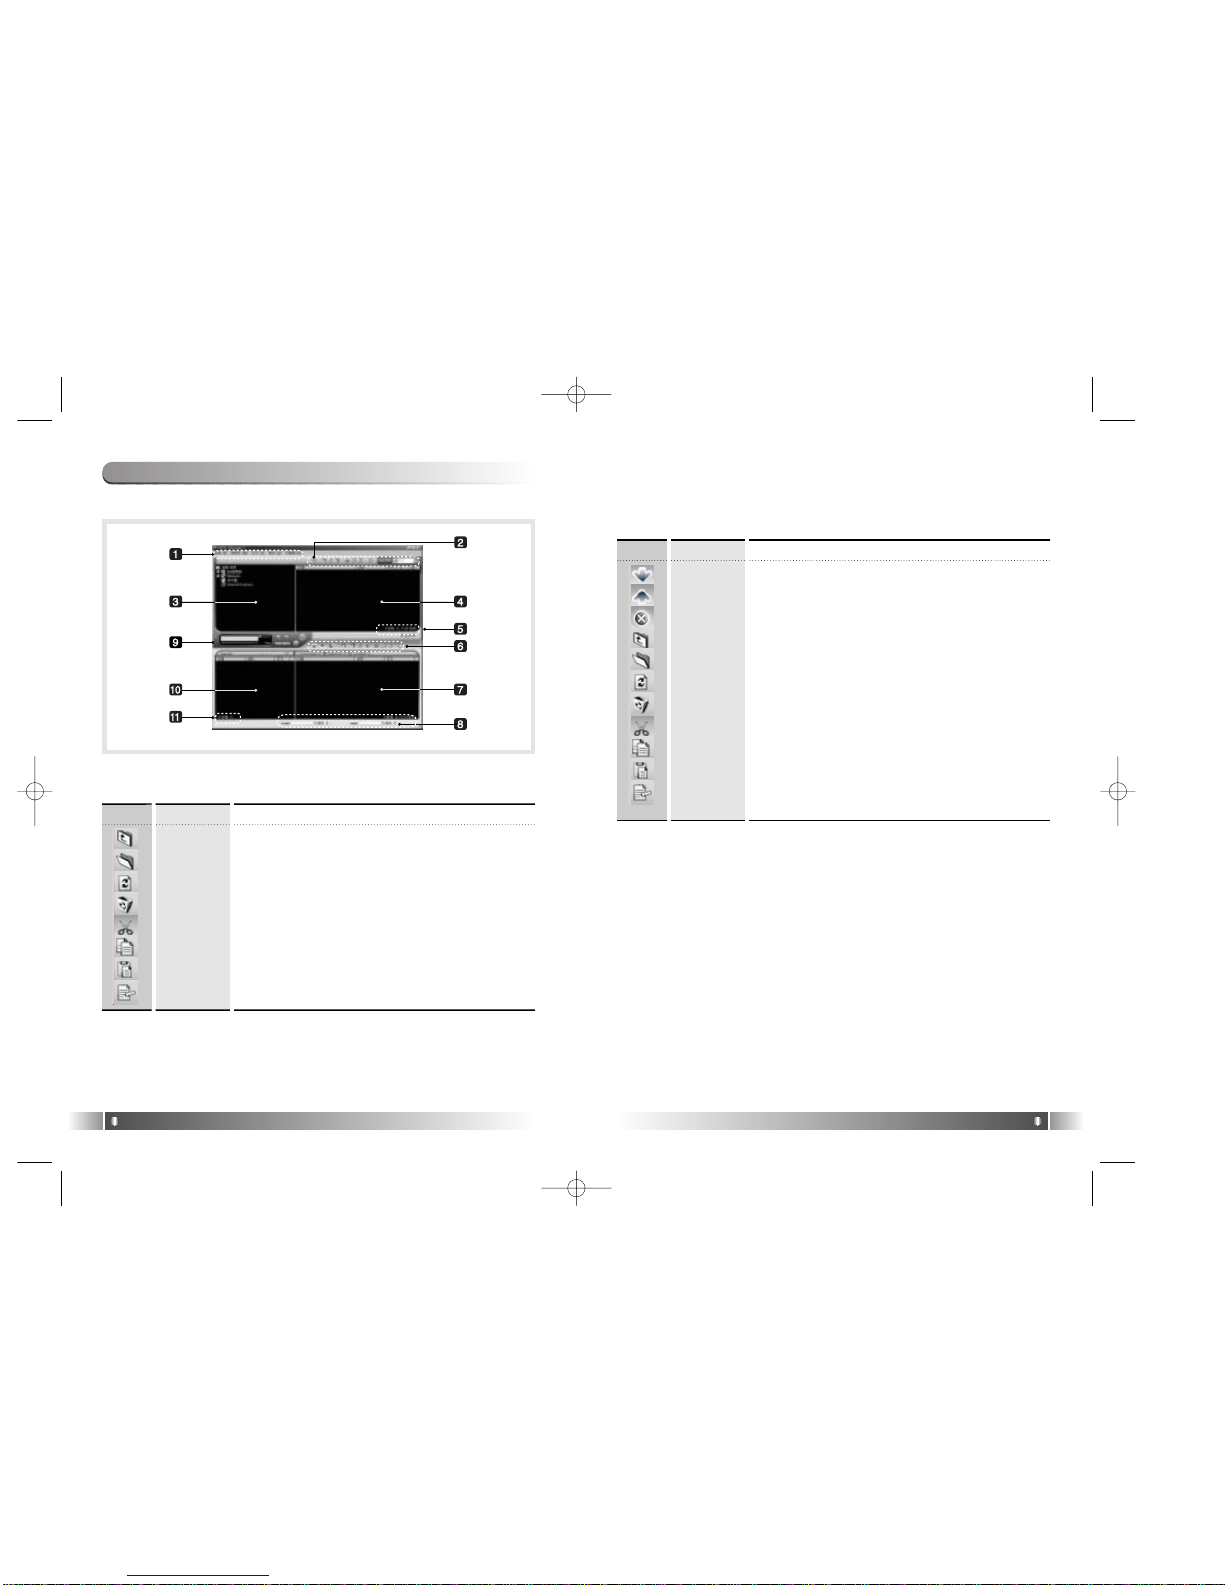
1) Control's Overview
4. How to use MPIO Manager 2
1. Menu Bar
2. PC File (Folder) Managing Part - Manages Files(Folders) on the PC.
3. PC Explorer Window - Moves to the folder in which the music files are
located through the PC Explorer Window.
4. PC List Window - Displays a File List stored in the folder selected on
the PC Explorer Window.
Up Level
New Folder
Refresh
Delete
Cut
Copy
Paste
ID3 Tag Edit
DescriptionIcon Icon Name
Move to the Upper Folder
Create a New Folder on the PC.
Displays the updated status of the PC.
Delete the Selected File (Folder).
Cut the Selected File (Folder).
Copy a File (Folder).
Paste the Copied or Cut File (Folder).
Edit ID3 Tag Information of MP3 files stored on the PC.
FL100-Eng-EU2 12/5/96 3:22 PM Page 36

English
39
English
38
3) Basic Function
A. File Download
1. Turn the power of MPIO on and connect the USB cable to the PC
and MPIO.
2. Check the "USB CONNECTED" message on the MPIO LCD.
3. Run MPIO Manager 2.
4. Check Internal Memory/ Memory card size in the Memory Information
Part.
5. By using PC Explorer Window, Move to the folder in which the music
files are located.
6. File name stored in the selected folder appears on the PC List
Window.
7. Select a file on the PC List Window and click on the 'Download' but
ton.
8. Check the condition of the file downloaded on the Memory List
Window.
If you want to download a file to the Memory Card, please select the
memory card tab and execute downloading.
B. File Upload
1. Turn the power of MPIO on and connect the USB cable to the PC
and MPIO.
2. Check the "USB CONNECTED" message on the MPIO LCD.
3. Run MPIO Manager 2.
4. Check Internal Memory/ Memory card size in the Memory Information
Part.
5. Select a folder saved to be file uploaded on the PC Explorer Window.
6. Select a file on the Memory List Window and click on the 'Upload'
button.
7. Check the condition of the file downloaded on the PC List Window.
Music File (MP3/WMA/ASF) Upload to PC is prohibited by the copy-
right.
C. Memory Format
1. Turn the power of MPIO on and connect the USB cable to the PC
and MPIO.
2. Check the message, "USB CONNECTED" on the MPIO LCD.
3. Run the MPIO Manager 2.
4. Check the Internal Memory/ Memory size card in the memory infor-
mation part.
2) Menu Table of MPIO Manager2
* Below is the Table of Operation of Each Items from the MPIO
Manager 2 Menu.
SUB ITEMS
Download a file (folder) stored in the PC to MPIO.Download File(s)
to MPIO
DESCRIPTIONMENU
File
Upload a file (folder) stored in MPIO to the PC.Upload File(s) to
PC Erase the file (folder) selected.Erase File(s)
Edit ID3 Tag information of an MP3 file saved in
the computer.
ID3 Tag Editor
Change file (folder) name.
Rename File
Complete MPIO Manager 2.Exit
Create a new folder on the PC.PC Create a new folder in the internal memory.
MPIO Internal Memory
Create a new folder in the memory card.
MPIO Memory Card
New
Folder
Format internal memory.
Format Internal Memory
Format Memory Card.
Format Memory Card
Please note that all the files (folders) stored in the memory will be deleted
after Formatting the memory and the working status of the device will be
changed to the initial setup status.
Memory
Tools
You can create a Logo File to display on the LCD.Logo Editor
Save channel and detail information of station to dis-
play on the LCD.
FM Stations
Editor
Performs Firmware Upgrade.
Firmware Upgrade
Option Select a font used in the Manager 2.
Set Window Font
You can display file names in the language of each
countries by storing the Font into the MPIO.
Download MPIO
Font Erase the Font stored in the MPIO.
Erase Font In MPIO
You can use a selected Skin of Manager 2.Skin Select a language to be used in the Manager2.Language
Select whether to apply the display tool tip.Layout
Help Move to the MPIO Web Site.Visit Digitalway's
Web Site Displays the MPIO Manager2 information, MPIO
Firmware information.
About MPIO
Manager2
FL100-Eng-EU2 12/5/96 3:22 PM Page 38
Table of contents
Other Mpio MP3 Player manuals


