MSI 661FM3-V Series User manual

i
FCC-BRadio FrequencyInterferenceStatement
Thisequipmenthasbeen tested and found tocomplywiththelimitsforaclassBdigitaldevice,pursuanttopart
15 of theFCC rules.Theselimitsaredesigned toprovide reasonableprotection against harmfulinterference
when the equipment is operated inacommercialenvironment.This equipment generates, usesand can
radiateradiofrequencyenergyand,if not installed and used inaccordancewiththe instruction manual, may
causeharmfulinterferencetoradiocommunications. Operation of this equipment inaresidentialarea is likely
tocauseharmfulinterference, inwhichcasethe userwillbe required tocorrectthe interferenceat his own
expense.
Notice1
The changesormodificationsnot expresslyapprovedbythe partyresponsibleforcompliancecouldvoidthe
user sauthoritytooperatethe equipment.
Notice2
Shielded interfacecablesand A.C.powercord,ifany,mustbeused inordertocomplywiththe emission limits.
VOIRLANOTICEDNSTALLATIONAVANTDERACCORDERAU RESEAU.
Micro-StarInternational
MS-7103
This devicecomplieswithPart 15 of the FCC Rules. Operation is subject tothe following twoconditions:
(1)this devicemaynot causeharmfulinterference, and
(2)this devicemustacceptanyinterferencereceived,including interferencethatmaycauseundesired
operation
G52-M7103X2

ii
CopyrightNotice
The materialinthisdocument is the intellectualpropertyofMICRO-STARINTERNATIONAL. Wetakeevery
careinthe preparation of this document, butno guarantee is given astothe correctness of itscontents. Our
productsareundercontinualimprovement andwereservethe right tomakechangeswithout notice.
Trademarks
All trademarksarethe propertiesof theirrespectiveowners.
AMD, Athlon™Athlon™XP,Thoroughbred™andDuron™areregistered trademarksofAMD Corporation.
Intel®and Pentium®areregistered trademarksofIntelCorporation.
PS/2and OS®2areregistered trademarksofInternationalBusiness MachinesCorporation.
Microsoft®is aregistered trademarkofMicrosoft Corporation.Windows®98/2000/NT/XPareregistered
trademarksofMicrosoft Corporation.
NVIDIA,the NVIDIAlogo, DualNet, and nForceareregistered trademarksortrademarksof NVIDIA
Corporation inthe United Statesand/orothercountries.
Netware®is aregistered trademarkof Novell,Inc.
Award®is aregistered trademarkof PhoenixTechnologiesLtd.
AMI®is aregistered trademarkofAmerican MegatrendsInc.
Kensington andMicroSaverareregistered trademarksof the KensingtonTechnologyGroup.
PCMCIAandCardBusareregistered trademarksof the PersonalComputerMemoryCardInternational
Association.
Revision History
Revision Revision HistoryDate
V1.0First released of Multi-language version forPCB1.xDecember2004
withchipsetsSiS ®661FX/648FX/648 &SiS ®964/964L
V1.1Add onechipset SiS ®661GXMay2005

iii
SafetyInstructions
1.Alwaysread thesafetyinstructionscarefully.
2.Keep this UserManualforfuturereference.
3.Keep this equipment awayfromhumidity.
4.Laythis equipment on areliableflat surfacebeforesetting it up.
5.The openingsontheenclosureareforairconvection henceprotectsthe equipmentfromoverheating.Do
not covertheopenings.
6.Makesurethe voltage of the powersourceand adjust properly110/220Vbeforeconnecting the equipment
tothe powerinlet.
7.Placethe powercordsuchawaythat peoplecan not step on it. Donot placeanything overthepower
cord.
8.AlwaysUnplug thePowerCordbeforeinserting anyadd-on cardormodule.
9.All cautionsand warningson the equipment shouldbe noted.
10.Neverpouranyliquidintothe opening that coulddamage orcauseelectricalshock.
11.Ifanyof the following situationsarises, get the equipment checkedbyaservicepersonnel:
-The powercordorplug is damaged.
-Liquidhaspenetrated intothe equipment.
-The equipment hasbeen exposed tomoisture.
-The equipment doesnot workwell oryou can not get it workaccording toUserManual.
-The equipment hasdropped and damaged.
-The equipment hasobvioussign of breakage.
12.Donot leavethis equipment inan environment unconditioned, storagetemperatureabove60°C (140°F),
it maydamage the equipment.
CAUTION:Dangerofexplosionifbatteryisincorrectlyreplaced. Replace only
withthesameorequivalenttyperecommendedbythemanufacturer.

iv
TableofContent
English.....................................................................1
Deutsch....................................................................15
Fran ais...................................................................31
体中文 ...................................................................47
體中文 ...................................................................61
日本語.......................................................................75

1
Introduction
Thankyouforchoosingthe661FM3-V/661GM3-V/648M3-V/648FM3-V Series(MS-7103v1.X)
microATXmainboard.The661FM3-V/661GM3-V/648M3-V/648FM3-VSeriesisbasedon SiS
661FX/GX/648FX/648&SiS 964/964L chipsetsforoptimal systemefficiency. Designed tofit
theadvanced Intel Pentium 4/CeleronDprocessorsin 775pinpackage, the661FM3-V/
661GM3-V/648M3-V/648FM3-VSeriesdeliversahighperformanceand professional desktop
platformsolution.
Layout
D
D
R
2
D
D
R
1
T: mouse
B: keyboard
T: Line-Out
B:Mic
Line-In
M:
JAUD1
JCI1
CD_IN1
Codec
B
A
T
T
+
Winbond
W83687THF
SiS
964/964L
Chipset
SiS
661FX/661GX/
648FX/648
Chipset
IDE1
IDE2
FDD1
PCI Slot 1
AGPSlot
PCI Slot 2
CPUFAN1
CHSFAN1
JFP2
JPW1
ATX
PowerSupply
JBAT1
JCOM2
JUSB1JUSB2
SATA2
SATA1
BIOS
JFP1

2
Specifications
CPU
lSupportsIntel Pentium4/CeleronDprocessorinthe775-landpackage
lSupports533MHz, 800MHzFSB
lSupports4pinsCPUFanPin-HeaderwithFanSpeedControl
(Forthelatest information aboutCPU,pleasevisit
http://www.msi.com.tw/program/products/mainboard/mbd/pro_mbd_cpu_support.php )
Chipset
lSiS 648FX/648/661GX/FXChipset
-Integratedgraphiccontroller(661FX/661GXonly)
-Support DDR333/400SDRAM
lSiS 964/964LChipset
-HighDefinitionAudiointerface
-8USB2.0/1.1ports
-2channel UltraATA66/100/133BusMasterIDEcontroller
-2serial ATAHost Controllers(964only)
Main Memory
lSupports64-bitwideDDR
lAvailablebandwidthupto3.2GB/s(DDR 400)
lSupports128Mb,256Mbor512MbDDR technologies
(Fortheupdatedsupportingmemorymodules,pleasevisit
http://www.msi.com.tw/program/products/mainboard/mbd/pro_mbd_trp_list.php )
Slots
lOneAGPSlot
lTwoPCI Slots(32-bitv2.3MasterPCIbus, supports3.3/5vPCIbusinterface)
On-Board IDE
lAnIDEcontrolleron the964/964L chipsetprovidesIDEHDD/CD-ROMwithPIO,BusMaster
andUltraDMA66/100/133operation modes.
lSupport2Serial ATA150ports. (964only)

3
On-BoardPeripherals
lOn-BoardPeripheralsinclude:
-1floppyportsupports1FDD with360K,720K,1.2M,1.44Mand 2.88Mbytes.
-2serialports, Com1on RearIO,JCOM2viapin header(IObracketisoptional)
-1parallel portsupportsSPP/EPP/ECPmode.
-8USB2.0/1.1ports(Rear*4/Front*4).
-1audio(Line-In/Line-Out/Mic)port.
-1RJ45LANjack.(Optional)
-1VGAport.(661FX/GXonly)
-2IDEportssupport 4IDEdevices.
-1chassisintrusion switchconnector
Audio
lHighDefinition linkcontrollerintegrated in 964/964L
l6channels(HDA) audiocodec
-MeetPC2001audioperformancerequirement
LAN (Optional)
lRealtekR8201CL
-Integrated FastEthernetPHY.
-Supports10Mb/s,100Mb/s.
-CompliancewithPCI2.2.
-SupportsACPIPowerManagement.
BIOS
l4Mb
lProvidesDMI2.0,WfM2.0, WOL,WOR, chassisintrusion,andSMBusforsystem
management
Dimension
lMicro-ATXFormFactor19.5cmx24.4cm
Mounting
l6mountingholes.

4
Rear Panel
The backpanelprovidesthefollowing connectors:
Keyboar
d
U
S
B
P
o
r
t
s
Mouse
COMportVGAport
ParallelPort
L
i
n
e
I
n
L
i
n
e
O
u
t
M
i
c
I
n
L
A
N
U
S
B
P
o
r
t
s
(Optional, for661FX/GXonly)
(Optional)
HardwareSetup
ThischaptertellsyouhowtoinstalltheCPU,memorymodules,andexpansioncards,aswellas
howtosetupthejumperson themainboard.It alsoprovidestheinstructionson connectingthe
peripheral devices, suchasthemouse,keyboard,etc.Whiledoingtheinstallation,becarefulin
holdingthecomponentsandfollowtheinstallation procedures.
Central ProcessingUnit: CPU
The mainboardsupportsIntel Pentium4/ Celeron DTM(LGA775)processor.Themainboard
usesaCPUsocketcalled LGA775.When youareinstallingtheCPU,makesuretoinstallthe
heat sink/coolertopreventoverheating. If youdonothavetheCPU, contactyourdealerto
purchaseandinstall thembeforeturningon thecomputer. Forthelatestinformation aboutCPU,
pleasevisit
http://www.msi.com.tw/program/products/mainboard/mbd/pro_mbd_cpu_support.php.
ExampleofCPUCore Speed Derivation Procedure
IfCPUClock=133MHz
Core/Busratio =23
thenCPUcorespeed=Host ClockxCore/Busratio
=133MHzx23
=3.06 GHz

5
Memory Speed/CPUFSBSupportMatrix
Memory
FSB DDR 200 DDR 266
400MHz OK OK
533MHz OK OK
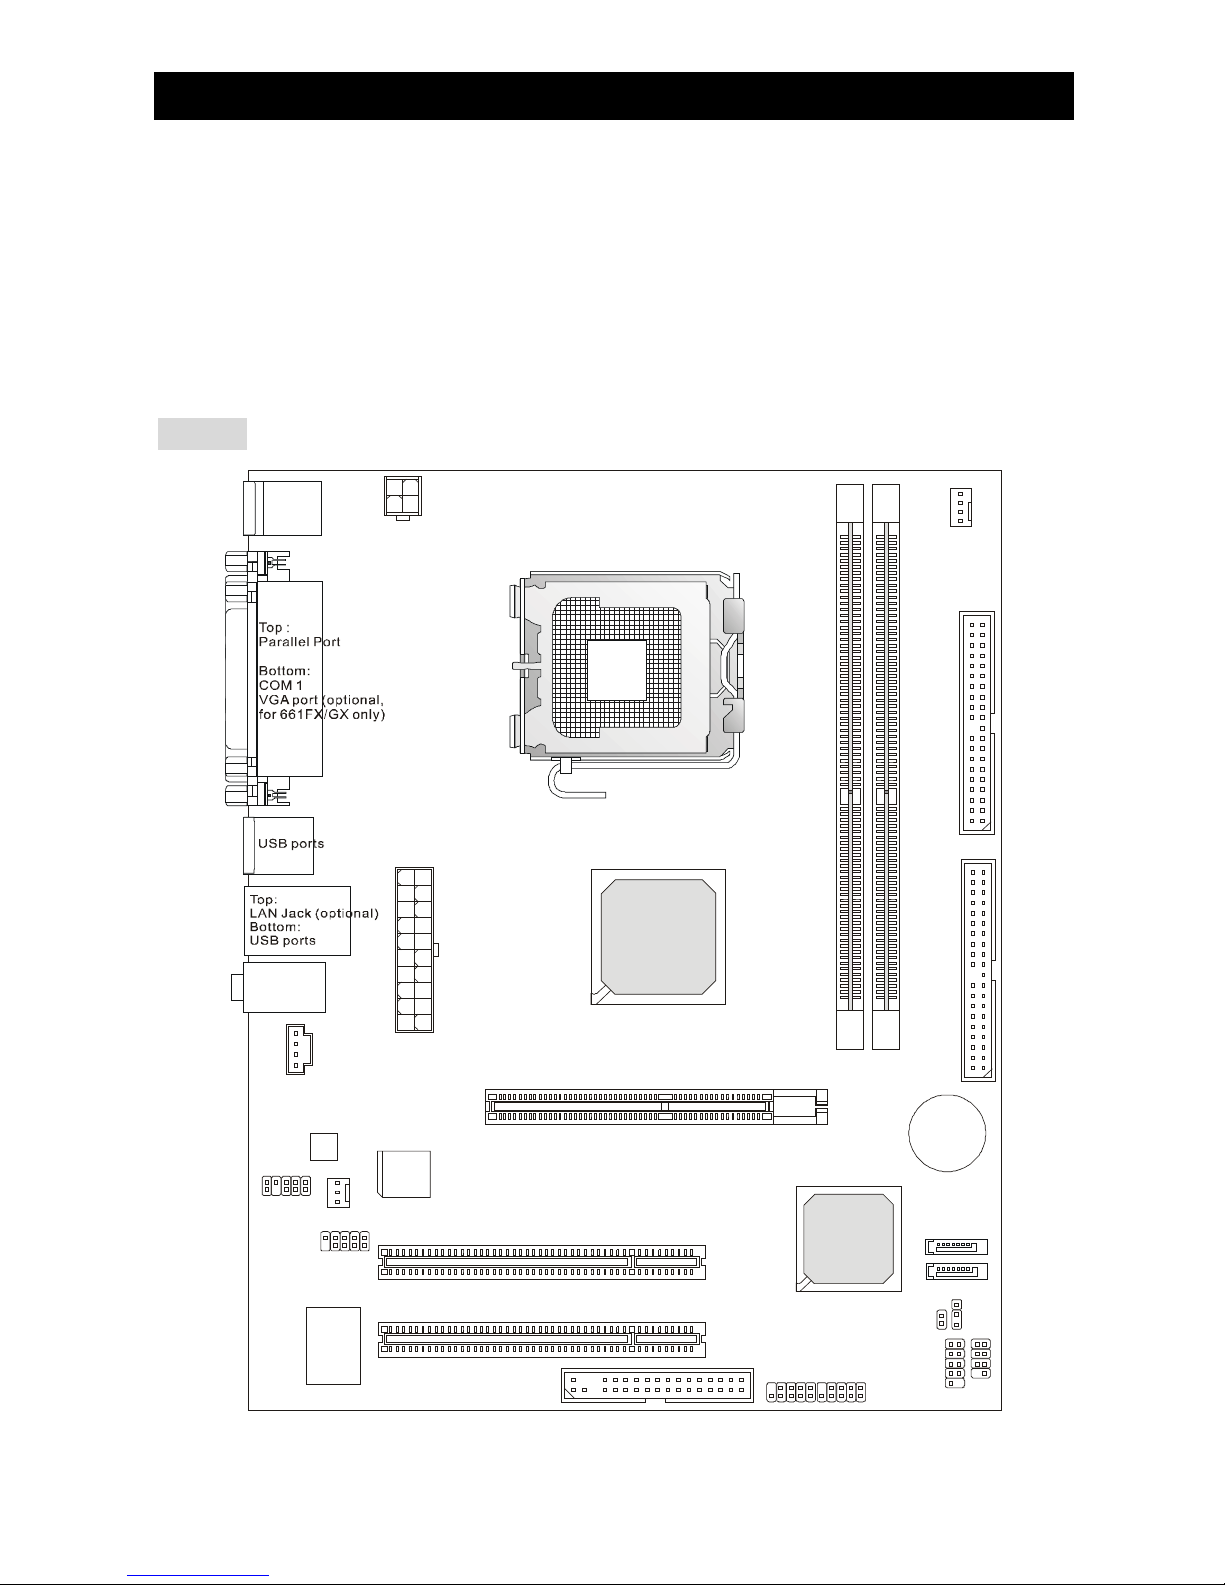
LGA775 CPUandCooler Installation (CPUclipisoptional)
WhenyouareinstallingtheCPU, makesuretheCPUhasacoolerattached onthetop toprevent
overheating.If you donothavethecooler, contactyourdealertopurchaseandinstallthem
beforeturningon thecomputer.Meanwhile,donot forgettoapplysomesilicon heattransfer
compoundon CPUbeforeinstallingthecoolerforbetterheatdispersion.
FollowthestepsbelowtoinstalltheCPU&coolercorrectly.Wronginstallation willcausethe
damagetoyourCPU&mainboard.
1.The CPUhasaland sidecoveron thebottomtoprotect theCPUcontactfromdamage.
Rotateit tomakethepin1indicator(yellowtriangle)intheleft-bottom
corner.Theavailabilityof itdependsontheCPUpacking.
2.TakeouttheaccompanyingCPUClip(shownintheright)and rotateit
forthesamedirectionastheCPU(Pin1indicatorisin theleft-bottom
corner).
3.Use2handstoremovethelandsidecover(if any). Pleasenotenot totouchthepins.
4.Align thetwopin 1indicators(thetriangleson theCPU&theCPUClip),and usetheCPU
CliptocliptheCPUup, pressingtheclipson bothsidestothecenter, asthearrows
shown.
5.The CPUhasaplasticcap on it toprotectthecontact fromdamage.Beforeyou have
installed theCPU, alwayscoverittoprotectthesocketpin.
6.Removethecap fromleverhingeside.Thepinsofsocket reveal.
7.Lift theloadleverupandopen theloadplate.
8.Correctlyalignthetriangleof CPUClipwiththeCPUchamfer, and
thesquareon theCPUCliptothehookofthesocket.
9.Useyourthumband themiddlefingerstopushtheclipstorelease
theCPU,thenpress downtheCPUwithyourindexfingertoallow
thewholemoduletobeinstalled ontotheCPUsocket.
10.The CPUisinstalledwell ontheCPUsocket.
11.VisuallyinspectiftheCPUisseated wellintothesocket, then
removetheCPUClipwith2fingers.Then covertheload plateonto

6
thepackage.
12.Press downtheloadleverlightlyontotheloadplate,andthen securetheleverwiththe
hookunderretention tab.
13.Align theholeson themainboardwiththecooler. Pushdownthecooleruntil itsfourclips
get wedgedintotheholesofthemainboard.
14.Press thefourhooksdowntofastenthecooler.Thenrotatethelockingswitch(refertothe
correctdirection markedon it)tolock thehooks.
15.Turnoverthemainboardtoconfirmthattheclip-endsarecorrectly
inserted.
Note:IfyouwanttouninstalltheCPU,alignthe4points(see Point8for
details)againandpushthecliptolift uptheCPU.
Memory
The mainboardprovidestwo184-pinunbuffered DDR333/DDR400 DDR SDRAM,andsupports
thememorysizeupto2GB.Tooperateproperly,at least oneDIMMmodulemustbeinstalled.
(Fortheupdatedsupportingmemorymodules,pleasevisit
http://www.msi.com.tw/program/products/mainboard/mbd/pro_mbd_trp_list.php )
Installat least oneDIMMmoduleon theslots.Memorymodulescan beinstalled ontheslotsin
anyorder.You can install eithersingle-ordouble-sided modulestomeet yourownneeds.
Installing DDRModules
1.The DDRDIMMhasonlyonenotchon thecenterofmodule.Themodulewillonlyfit inthe
rightorientation.
2.InserttheDIMMmemorymoduleverticallyintotheDIMMslot.Then pushitinuntilthe
golden fingeron thememorymoduleisdeeplyinsertedinthesocket.
3.The plasticclipat eachsideoftheDIMMslot willautomaticallyclose.
Notch
Volt

7
Power Supply
The mainboardsupportsATXpowersupplyforthepowersystem.Beforeinsertingthepower
supplyconnector, alwaysmakesurethatallcomponentsareinstalledproperlytoensurethatno
damagewill becaused.A300Worabovepowersupplyissuggested.
ATX20-PinPower Connector:CONN1
Thisconnectorallowsyoutoconnecttoan ATXpower
supply.Toconnect totheATXpowersupply,makesure
theplugofthepowersupplyisinserted in theproper
orientation andthepinsarealigned.Then pushdown
thepowersupplyfirmlyintotheconnector.
ATX12VPower Connector:JPW1
This12Vpowerconnectorisused toprovidepowertotheCPU.
FloppyDisk DriveConnector:FDD1
The mainboardprovidesastandardfloppydisk
driveconnectorthat supports360K, 720K,1.2M,
1.44Mand2.88Mfloppydisktypes.
ChassisIntrusionSwitch Connector:JCI1
Thisconnectorisconnected to2-pinconnectorchassisswitch. Ifthe
Chassisisopen, theswitchwill beshort.Thesystemwill recordthisstatus.Toclearthewarning,
youmustentertheBIOSsettingandclearthestatus.
CD-In Connector:CD_IN1
The connectorisforCD-ROMaudioconnector.
3.3V
-12V
GND
GND
PW_OK -5V
5V_SB 5V
12V
PS_ON
10
20
11
1
GND
GND
5V
GND
GND
GND
5V
5V
3.3V
3.3V
1
2
3
4
GND
12V
GND
12V
2
1GND
CINTRO
GND
L
R

8
FanPower Connectors:CPUFAN1/CHSFAN1
The CPUFAN1(processorfan)andCHSFAN1(systemfan)
support systemcoolingfanwith+12V.Theysupport
three-pin/four-pinhead connector.When connectingthewire
totheconnectors,alwaystakenotethat thered wireisthe
positiveandshouldbeconnected tothe+12V, theblack wire
isGroundandshouldbeconnected toGND.
MSIRemindsYou...
Always consultthevendorsforproperCPUcoolingfan.
IDEConnectors:IDE1&IDE2
The mainboardhasa32-bit Enhanced PCI IDEandUltraDMA33/66/100/133
controllerthatprovidesPIOmode0~4, BusMaster,andUltraDMA33/66/100/133
function.You can connectup tofourharddisk drives, CD-ROM,120MBFloppyand
otherdevices.
The first harddriveshouldalwaysbeconnectedtoIDE1.IDE1canconnect aMaster
andaSlavedrive. Youmust configuresecondharddrivetoSlavemodebysetting
thejumperaccordingly.IDE2canalsoconnectaMasterandaSlavedrive.
MSIRemindsYou...
If youinstall twoharddisks on cable,youmust configuretheseconddrivetoSlavemodeby
setting itsjumper. Refertotheharddisk documentation suppliedbyharddisk vendorsforjumper
setting instructions.
GND
+12V
SENSOR
CONTROL
CPUFAN1
+12V
GND
SENSOR
CHSFAN1

9
FrontPanel Connectors:JFP1&JFP2
The mainboardprovidestwofrontpanel
connectorsforelectrical connectiontothe
front panel switchesandLEDs. JFP1is
compliantwithIntelFrontPanel I/O
ConnectivityDesignGuide.
JFP1JFP2
FrontPanelAudio Connector:JAUDIO1
The frontpanel audioconnectorallowsyoutoconnecttothe
front panel audioandiscompliantwithIntel Front Panel I/O
ConnectivityDesignGuide.
MSIRemindsYou...
If you donot wanttoconnect tothefront audioheader, pins5&6, 9&10 havetobejumperedin
ordertohavesignaloutputdirectedtotherearaudio ports.Otherwise,theLine-Outconnectoron
theback panelwill notfunction.
1
2
9
10
FrontUSBConnector:JUSB1/2
The mainboardprovidestwostandardUSB 2.0pinheaderJUSB1&JUSB2.
USB 2.0technologyincreasesdatatransferrateuptoamaximum
throughput of480Mbps,whichis40timesfasterthanUSB 1.1,andisideal
forconnectinghigh-speedUSBinterfaceperipheralssuchasUSBHDD,
digital cameras,MP3players, printers,modemsand thelike.
MSI RemindsYou...
Pleasenotethat thepinsof VCC&GNDmustbe connected correctly, oritmaycausesome
damage.
1
2
9
10
GND
NC
KEY
GND
VCC
VCC
USB0-
USB1-
USB0+
USB1+
Power
LED
Speaker
12
78
HDD
LED Power
LED
Reset
Switch Power
Switch
1
9
2
10
1
2
9
10
AUD_MIC
AUD_MIC_BIAS
AUD_GND
AUD_VCC
AUD_FPOUT_R
AUD_RET_L
AUD_FPOUT_L
AUD_RET_R
NC
KEY

10
Serial PortConnector:JCOM2
The mainboardoffersanotherserialport JCOM2. Itis16550A
highspeed communicationportthat sends/receives16bytes
FIFOs.TheMSIJCOM2cableisoptional.
PIN SIGNALDESCRIPTION PIN
SIGNALDESCRIPTION
1
3
5
7
9
DCD
SOUT
GND
RTS
RI
DataCarryDetect
ReceiveDataTransmit
Data
RequestToSend Ring
Indicate
2
4
6
8
10
SIN
DTR
DSR
CTS
X
Serialinorreceivedata
Serialout ortransmit data
DataSet Ready
ClearToSend
X
SerialATAHDD Connectors:SATA1&SATA2
The mainboardprovidesdual high-speedSerialATAinterfaceports.The ports
support1stgenerationSerialATAdataratesof150MB/sandarefullycompliant
withSerial ATA1.0specifications.EachSerial ATAconnectorcan connectto1
harddiskdrive.
PIN SIGNALPIN
SIGNAL
1
3
5
7
GND
TXN
RXN
GND
2
4
6
TXP
GND
RXP
MSIRemindsYou...
Pleasedo not fold theserialATAcable in a90-degree angle, whichwill causetheloss of data
duringthe transmission.
Clear CMOSJumper:JBAT1
ThereisaCMOSRAMon boardthathasapowersupplyfrom
external batterytokeepthesystemconfiguration data.Withthe
CMOSRAM,thesystemcan automaticallybootOSeverytimeitisturned on.Ifyouwanttoclear
thesystemconfiguration data,usetheJBAT1(ClearCMOSJumper)tocleardata.Followthe
instructionsbelowtoclearthedata:
1
9
210
7 1
SATA1
SATA2
1
1
3
KeepData
ClearData
1
3

11
MSIRemindsYou...
Youcan clearCMOSbyshorting 1-2pinwhilethe systemisoff.Thenreturnto2-3pinposition.
Avoid clearingtheCMOSwhilethesystemison;it willdamagethemainboard.
AGP(Accelerated Graphics Port) Slot
The AGPslotallowsyoutoinserttheAGPgraphics card.AGPisan interfacespecification
designedforthethroughput demandsof 3Dgraphics. It introducesa66MHz,32-bitchannelfor
thegraphics controllertodirectlyaccess mainmemory.Themainboardsupports4xAGPcard.
PCI (PeripheralComponentInterconnect) Slots
The PCIslotsallowyoutoinsert theexpansion cardstomeetyourneeds. Whenaddingor
removing expansion cards,makesurethatyouunplugthepowersupplyfirst. Meanwhile, read
thedocumentation fortheexpansion cardtomakeanynecessaryhardwareorsoftwaresettings
fortheexpansion card, suchasjumpers, switchesorBIOSconfiguration.
PCI InterruptRequestRouting
The IRQ,abbreviation of interrupt requestlineandpronouncedI-R-Q,arehardwarelinesover
whichdevicescansendinterrupt signalstothemicroprocessor.ThePCI IRQpinsaretypically
connected tothePCIbusINTA#~INT D#pinsasfollows:
Order1 Order2 Order3 Order4
PCISlot 1 INTB# INTC# INTD# INTA#
PCISlot 2 INTC# INTD# INTA# INTB#

12
BIOSSetup
Poweron thecomputerandthesystemwillstart POST (PowerOnSelfTest)process.When the
messagebelowappearson thescreen,press <DEL>keytoenterSetup.
Ifthemessagedisappearsbeforeyourespondand you stillwishtoenterSetup, restartthe
systembyturning it OFF andOnorpressingtheRESETbutton.You mayalsorestart thesystem
bysimultaneouslypressing<Ctrl>,<Alt>, and <Delete> keys.
MainPage
Standard CMOSFeatures
Usethismenuforbasicsystemconfigurations, suchastime, dateetc.
Advanced BIOSFeatures
UsethismenutosetuptheitemsofAwardspecial enhancedfeatures.
AdvancedChipsetFeatures
Usethismenutochangethevaluesin thechipset registersandoptimizeyoursystem
performance.
IntegratedPeripherals
Usethismenutospecifyyoursettingsforintegrated peripherals.
PowerManagementSetup
Usethismenutospecifyyoursettingsforpowermanagement.
PNP/PCIConfigurations
Thisentryappearsif yoursystemsupportsPnP/PCI.
H/W Monitor
Thisentryshowsthestatusof yourCPU,fan,warning foroverallsystemstatus.
Frequency/VoltageControl
Usethismenutospecifyyoursettingsforfrequency/voltagecontrol.

13
LoadOptimizedDefaults
Usethismenutoloadthedefault valuesset bythemainboardmanufacturerspecificallyfor
optimalperformanceofthemainboard.
BIOSSettingPassword
Usethismenutoset BIOSsetting Password.
Save&ExitSetup
SavechangestoCMOSandexit setup.
ExitWithoutSaving
Abandonall changesand exitsetup.
Frequency/VoltageControl
CurrentCPUClock
It showsthecurrent clockofCPU. Read-only.
AdjustDDRMemoryFrequency
Whenitissetto[Manual]inHigh PerformanceMode,usercan placeanartificial memoryclock
limitonthesystem.Pleasenotethatmemoryisprevented fromrunning fasterthan this
frequency.Setting options:[DDR266], [DDR333], [Auto].
AdjustCPUFSBFrequency
Thisitemallowsyou toselecttheCPUFront SideBusclockfrequency(inMHz)andoverclock
theprocessorbyadjusting theFSBclocktoahigherfrequency.133MHz,137MHz,140MHz,
200MHz, 206MHz,210MHz(ROMTable)forselectable.
AdjustCPURatio
ThisitemletsyoutoadjusttheCPUratio. Settingto[Startup]enablestheCPUrunningat the
fastest speedwhichisdetected bysystem. Settingoptionsare:[x10]~[x24].
MemoryVoltage
Adjusting theDDR voltagecanincreasetheDDR speed.Anychangesmadetothissetting
maycauseastabilityissue, sochanging theDDRvoltageforlong-termpurposeisNOT

14
recommended.
AGPVoltage
AGPvoltageisadjustableinthefield,allowing you toincreasetheperformanceof yourAGP
displaycardwhen overclocking,butthestabilitymaybeaffected.Settingoptions:1.5Vto1.8Vat
0.1Vincrement.
AutoDisableDIMM/PCI Clock
Thisitemisused toautodetectthePCI slots.When settoEnabled, thesystemwill remove(turn
off)clocksfromemptyPCI slotstominimizetheelectromagneticinterference(EMI).
SpreadSpectrum
Whenthemotherboard’sclockgeneratorpulses, theextremevalues(spikes)ofthepulses
createsEMI (ElectromagneticInterference).TheSpreadSpectrumfunction reducestheEMI
generatedbymodulatingthepulsessothatthespikesofthepulsesarereduced toflattercurves.
Ifyoudonot haveanyEMI problem,leavethesettingatDisabledforoptimalsystemstabilityand
performance.But if youareplagued byEMI, set toEnabledforEMI reduction.Rememberto
disableSpreadSpectrumif you areoverclockingbecauseevenaslight jittercan introducea
temporaryboost inclockspeedwhichmayjust causeyouroverclocked processortolock up.

15
Einleitung
Danke, dass Siedas661FM3-V/661GM3-V/648M3-V/648FM3-VSeries(MS-7103v1.X)Mikro
ATXMainboardgew hlthaben.Das661FM3-V/661GM3-V/648M3-V/648FM3-VSeriesbasiert
aufden SiS ®661FX/GX/648FX/648und SiS ®964/964LChips tzen undermöglichtsoein
optimalesund effizientesSystem. Entworfenumdiefortschrittlichen Intel ®Pentium ®4/Celeron
DProzessorenim775Pin Packageaufzunehmen, stelltdas661FM3-V/661GM3-V/648M3-V/
648FM3-VSeriesdieidealeLösungzumAufbau einesprofessionellen
Hochleistungsdesktopsystemsdar.
Layout
D
D
R
2
D
D
R
1
T:mouse
B:keyboard
T: Line-Out
B:Mic
Line-In
M:
JAUD1
JCI1
CD_IN1
Codec
B
A
T
T
+
Winbond
W83687THF
SiS
964/964L
Chipset
SiS
661FX/661GX/
648FX/648
Chipset
IDE1
IDE2
FDD1
PCISlot1
AGPSlot
PCISlot2
CPUFAN1
CHSFAN1
JFP2
JPW1
ATX
PowerSupply
JBAT1
JCOM2
JUSB1JUSB2
SATA2
SATA1
BIOS
JFP1

16
Spezifikationen
CPU
lUnterst tztIntel ®Pentium4/Celeron DProzessorenimPackage775
lUnterstützt533MHz,800MHzFSB
lUnterstützt CPUKühlermitvierpoligemAnschluss undaktiverLüftersteuerung
(Umdieneuesten Informationen zuunterstütztenProzessoren zuerhalten, besuchenSiebitte
http://www.msi.com.tw/program/products/mainboard/mbd/pro_mbd_cpu_support.php )
Chipsatz
lSiS ®648FX/648/661FX/661GXChipsatz
-IntegrierterGrafikkontroller(nur661FX/661GX)
-UnterstütztDDR333/400SDRAM
lSiS ®964/964LChipsatz
-HighDefinitionAudioSchnittstelle
-8USB2.0/1.1Anschlüsse
-2KanalUltraATA66/100/133 BusMasterIDEKontroller
-2SerialATAHost Kontroller(nur964)
Hauptspeicher
lUnterstützt64-BitDDR
lVerfügbareBandbreitebiszu3.2GB/s(DDR400)
lUnterstützt128Mb, 256Mboder512MBDDR Bauweise
(Umden letztenStandbezüglichderunterstützten Speichermodulezuerhalten,besuchenSie
bitte http://www.msi.com.tw/program/products/mainboard/mbd/pro_mbd_trp_list.php )
Schnittstellen
lEinAGPSockel
lZweiPCISockel(32-Bit V2.3MasterPCI, 3,3V/5VPCI Busunterstützt).
On-Board IDE
lDerim964/964LChipsatzenthalteneIDEKontrollerbietet fürden Festplatten-und
CD-ROM-ZugriffPIO, BusMastering undBetrieb mit UltraDMA66/100/133.
lUnterstützt2SerialATA150Anschlüsse. (nur964)
This manual suits for next models
4
Table of contents
Languages:
Other MSI Motherboard manuals

MSI
MSI Z87M-G43 Series User manual

MSI
MSI MS-6330 Manual

MSI
MSI MEG X570S ACE MAX User manual

MSI
MSI K7 Master MS-6341 User manual

MSI
MSI B85M-E45 User manual

MSI
MSI MEG Z690 GODLIKE User manual

MSI
MSI MS-98I8 User manual

MSI
MSI MS-6187 User manual

MSI
MSI MAG B660M MORTAR WIFI DDR4 User manual

MSI
MSI B450M-A PRO MAX User manual

MSI
MSI 645E Max-C User manual

MSI
MSI MPG Z490 GAMING EDGE WIFI User manual

MSI
MSI X470 GAMING PRO User manual

MSI
MSI B350M BAZOOKA User manual

MSI
MSI B450M MORTAR MAX User manual

MSI
MSI PRO B550M-P GEN3 User manual

MSI
MSI Z370-A User manual

MSI
MSI MS-6114 User manual

MSI
MSI MAG B760M MORTAR MAX WIFI User manual

MSI
MSI MS-7522 User manual