Mues-Tec innovativTV User manual

SMART / TOUCHSCREEN
USER MANUAL / BENUTZERHANDBUCH
© innovativTV by Mues-Tec. Alle Rechte vorbehalten.
innovativTV
www.mues-tec.de
+49 (0)6648 - 9178880
Mues-Tec GmbH & Co. KG, Hauptstrasse 16, 36137 Grossenlueder, Germany

ENGLISH
SAFETY INSTRUCTIONS ......................................................................................................... 1
LIMITATION OF LIABIILITY...................................................................................................... 2
PORTS AND CONNECTIONS...................................................................................................3
INSTALLATION & ACCESORIES
1. SMART MIRROR WITH MOUNTING BRACKET ....................................................... 3
2. SMART MIRROR WITHOUT MOUNTING BRACKET ............................................... 4
3. KITCHEN SMART ............................................................................................................ 5
QUICK GUIDE CONNECTION TO THE INTERNET ........................................................... 6
MAIN SETTINGS ....................................................................................................................... 6
INTERFACE INTRODUCTION................................................................................................. 8
ACCOUNT MANAGEMENT ................................................................................................... 9
TROUBLE SHOOTING ............................................................................................................ 12
WARRANTY CARD ................................................................................................................. 13
GERMAN
SICHERHEITSHINWEISE..........................................................................................................15
HAFTUNGSAUSSCHLUSS ......................................................................................................16
ANSCHLÜSSE UND VERBINDUNGEN?............................................................................... 17
INSTALLATION & LIEFERUMFANG
1. SMART SPIEGEL MIT HALTERUNG.............................................................................17
2. SMART SPIEGEL OHNE HALTERUNG.......................................................................18
3. KÜCHEN SMART.............................................................................................................19
INTERNETANSCHLUSS ..........................................................................................................20
HAUPTEINSTELLUNGEN ......................................................................................................20
INTERFACE EINFÜHRUNG ................................................................................................... 22
KONTO-MANAGEMENT ........................................................................................................ 23
FRAGEN & ANTWORTEN...................................................................................................... 26
GARANTIEKARTE.................................................................................................................... 27
More info and tutorials on our website www.mues-tec.de
INDEX
I.
II.
III.
IV.
V.
VI.
VII.
VIII.
IX.
X.
I.
II.
III.
IV.
V.
VI.
VII.
VIII.
IX.
X.

41
I. SAFETY INSTRUCTIONS
Mues-Tec products are developed and produced according to international safety
standards. For your own safety, please follow these safety precautions and follow the
warning signs on product and packaging.
Make sure the cables and connections to the device are in perfect working condition.
Install power cords in a manner that they are not being stepped on or squeezed. Protect
the power-supply from moisture.
Before connecting the power cord to the outlet, ensure that the voltage of your power-
supply confers with your local electrical provider.
Should the product not operate normally, disconnect from power immediately and contact
your authorized dealer or service center.
Only authorized service centers may open and/or repair this product. All product warranty
will cease to exist if not adhered to.
Only use original accessories or recommendations of Mues-Tec.
WARNING! Do not drop or impact shock this product. Use a cushioned surface when laying
down the Device.
Do not use scratchpads or abrasive cleaning solutions.
Install the device on a stable surface to prevent personal injury and to avoid damage to the
device.
For prevention and protection of the device, disconnect the power supply during sever
weather.
Protect the unit from open fire!
The handling of electrical appliances of any kind carries potential dangers. Always take
extreme caution.
•
•
•
•
•
•
•
•
•
•
•
•

52
Cleaning and Care:
Ensure unit is in the OFF position!
Clean with nonabrasive detergent and a soft cloth
Light circular motion is recommended to avoid streaking.
II. LIMITATION OF LIABIILITY
Mues-Tec is not liable for losses and / or damage to the product, which is due to the following
facts:
In addition, Mues-Tec shall not be liable for damage or consequential damage caused by
improper use.
The symbol with the crossed - out garbage can indicates that this product is separated from
the normal household waste and must be properly collected and disposed of.
Built-in batteries and rechargeable batteries can be disposed of together with the product.
They are then separated in the recycling centers. The black bar indicates that the product was
launched on the market after 13 August 2005. By supporting the separate
Collection of devices and batteries helps you with the proper disposal and contribute to this to
avoid possible adverse effects on the environment and health.
For more information about collection and recycling in your country, please contact us, local
authorities or the dealer where you bought the product.
The symbol with the crossed-out waste bin indicates that batteries and / or batteries are not
collected and disposed of by normal household waste.
If the battery or battery is more than the one indicated in the Battery Directive (2006/6 /
EC) Amounts of lead (Pb), mercury (Hg) and / or cadmium (Cd) are added chemical symbols
for lead (Pb), mercury (Hg) and / or cadmium (Cd) under the symbol with the crossed-out
garbage can. More detailed information about the collection and Recycling in your country,
please contact the local authorities or the dealer, at which you bought the product.
Disposal of this product (Waste Electrical & Electronic Equipment)
(Applicable in countries with separate collection systems)
Disposal of batteries in this product
(Applicable in countries with separate collection systems)
Fire
Earthquake
Unintentional and / or intended damage
Improper use and / or handling of the product
Damage and / or loss of the product while it was owned by third parties
Damages and / or losses resulting from malpractice or failure to comply with the
instructions in the Manual
Damages and / or losses resulting from the use of additional equipment
a.
b.
c.
d.
e.
f.
g.

63
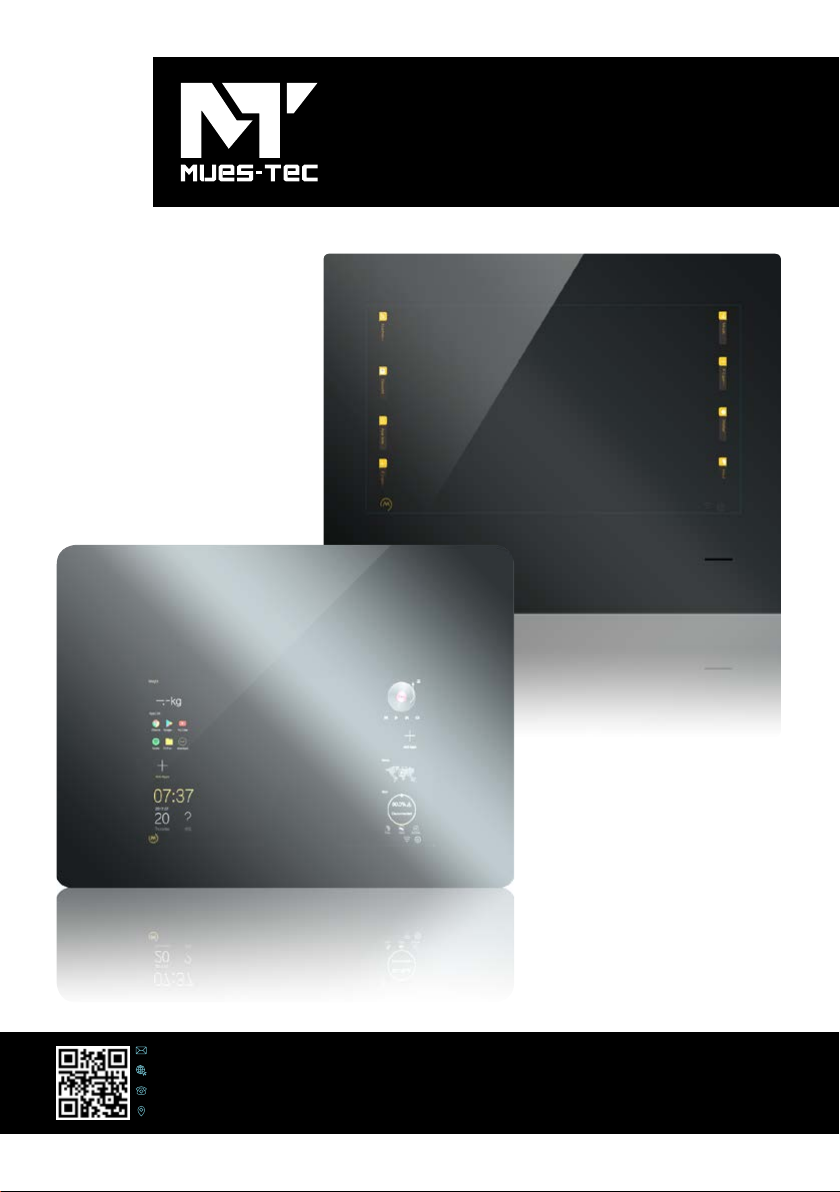
III. PORTS AND CONNECTIONS
Device Ports and Connections
IV. INSTALLATION
1. Smart Mirror with mounting bracket
Installation should be performed by professional and technical person to ensure
proper installation. Please install following the installation method step by step.
Smart Mirror Power Supply Skin Tester(optional) Weight Scale(optional)
Smart Mirror is very heavy and must be installed correctly
to avoid damage and injury!
A minimum of 2 people is required for installation!
1. Attach Optional Mounting bracket to back of Smart
Mirror.
Wall needs to be prepared to hold weight of Smart Mirror!
Installation must be performed by skilled installer!
Select wall screws to fit your wall type and product weight!
2. Attach mounting bracket to wall.
3. Attach Smart Mirror to wall bracket on wall.
Camera ON/OFF Switch
LAN
DC-12V
USB
Power ON/OFF Switch
4. Now connect the Smart Mirror to the power. Follow
the instructions on the menu with touch screen .
For detailed operating information, please visit our
website or Youtube Channel @ Mues-Tec GmbH &
Co. KG - YouTube
Camera ON/OFF
LAN USB
DC12V
Power ON/OFF

74
3. Attach Smart Mirror to wall.
Camera ON/OFF Switch
LAN
DC-12V
USB
Power ON/OFF Switch
4. Now connect the Smart Mirror to the power. Follow
the instructions on the menu with touch screen .
For detailed operating information, please visit our
website or Youtube Channel @ Mues-Tec GmbH &
Co. KG - YouTube
2. Smart Mirror without mounting bracket
Smart Mirror is very heavy and must be installed correctly to
avoid damage and injury!
A minimum of 2 people is required for installation!
Wall needs to be prepared to hold weight of Smart Mirror!
Installation must be performed by skilled installer!
Select wall screws to fit your wall type and product weight!
1. Measure mounting holes center to center 2. Attach screws to wall.
Smart Mirror Power Supply Skin Tester(optional) Weight Scale(optional)
Position
A
Position
B

5
3. Kitchen Smart
Kitchen Smart Power Supply Spring-loaded Lever Push to open pin Manual
1. Install the spring-loaded levers. Installation must
be performed by a skilled installer to avoid
damage and injury!
Risk of injury by spring-loaded lever assembly! Do not push
lever assembly down without unit attached.
Risk of damage to spring-loaded lever assembly! Do not push
lever assembly down without unit attached. To retract hinges
the Unit must be attached.
Click
Click
2. Ensure the Kitchen Smart is not connected to
power. Attach Kitchen Smart to the Spring-
loaded Levers.
3. Now, install the mounting clip for the push to
open pin. Recommended to install on the bottom
right or left of the cabinet.
4. Attach push to open pin to the mounting clip and
adjust.
CLICK!
1
2
5. Now, connect power to the Unit. Follow the
instructions on the menu with touch screen. For
detailed operating information, please read the
manual.
6. Enjoy your new Kitchen Smart from Mues-Tec.
We thank you for your trust and sincerely hope
you are pleased with your purchase. MUES-TEC
is always the right choice!
Our team is at all times available for feedback or
questions.
Camera ON/OFF Switch
LAN
DC-12V
USB
Power ON/OFF Switch

6
VI. MAIN SETTINGS
6.1 Wi-Fi
Wi-Fi
6.2 Bluetooth
Bluetooth
Settings:
Turn on the WI-FI function. Connect to the network.
Turn on the Bluetooth function. Select Device to connect / Pair.
V. CONNECTION TO THE INTERNET
Wi-Fi: Open settings and ensure Wi-Fi is turned on. Then select your network and enter password if
applicable.
LAN: Connect Ethernet cable to unit and connect to internet.
Select time zone in Advanced Settings.
Open App List Icon/Tab. Select Google app. At first time use, system will prompt you through the steps,
connecting your Google account. Please note, it is important to connect to a Google account to access all
features such as the Play store.
Settings: Volume down
Volume down
Return
Return
Volume up
Volume up
Setting
Settings
Recents
Recents
WiFi
WiFi
Home page
Home page
Wi-Fi
Bluetooth
Account
Language
Advanced
Setting
About
6.4 Language
Language
6.3 Account
Account
Select Language.
Click the Add account to create user accounts.
Fill in the user name, age, height, click add account.

7
6.5 Sleep Mode
Advanced
Setting
6.6 Factory data reset
Advanced
Setting
6.7 Reboot system
Advanced
Setting
6.8 Theme color
Advanced
Setting
6.9 About About
Select desired time.
To wake up unit double click the main screen.
To wake up using Motion Detection the camera on/off switch must be in the on position.
Delete all data and resets to original factory setting. After Factory data reset turn off/on device.
Unit will reboot.
The account user, can choose the theme color as they like.
About selection provides details and update information about your device.

8
7.2 Location of icon / tabs
7.3 Icons / tab management
Press and hold to drag / move the icon / tab.
Click on the icon / tab to open.
Press and hold icon / tab to move, add or uninstall.
Attention: some app are permanently installed.
7.1 Standby Mode
Double click the blank area of main screen. The screen will turn off. Double click again the screen turns
on.
VII. INTERFACE INTERODUCTION
Account
Music Date & Weather
News
Weight Management
(Smart Mirror only)
APP Lists
Add APP Skin Detector
(Smart Mirror only)
Account Wi & Setting

9
VIII. ACCOUNT MANAGEMENT
Account Click to switch between users.
In the settings menu press User name to edit/delete.
Click the to take a photo or select a picture for the user account.
*8.1 STANDBY MODE
8.2 Home Screen
Unit will go in Standby mode when no activity and no motion is detected over a selected period of time.
The time may be adjusted in the settings menu/ sleep mode.
The device reserves custom fields, you can add an app that has been downloaded in the app list.
8.3 App List
Click the App list icon/tab to open. Here you can find Google, app store, downloaded apps, file and
device manager and the home screen widget.
Wi-Fi Account Info
Input Account
Name
Input Age
Choose Avatar
Input Height(CM)
Input Password
Add Account
Bluetooth
Account
Language
Advanced
Setting
About
Sure Password
OK
Brightness
Volume

10
8.4 ADD app to Home screen
8.5 News
The device reserves custom fields, where you can add an app to the home screen that has been
downloaded in app list.
Enable Add App in home screen widget. Click on Add App on home screen to select a previously
Downloaded App from App list.
New App will be displayed on the home screen.
Select your favorite downloaded news app.
To set your daily news app, download your preferred news app in the app store. Then, click on world
map icon and select the app. App is now saved for future use.
To change News App: press and hold Icon of world map. Then click move app OK. Click icon of world
map to select your new news app.
8.6 Date and weather
First time set-up: Open the Weather app on the home screen. Click on below the question mark. Select
city, or enter your city. Allow device a moment to find your city. Current weather will now be displayed.
Calendar Weather
<
<

Music List
11
8.7 Weight management (Smart Mirror only)
To manage and record your weight management, be sure to select your user account before stepping
on the Bluetooth scale.
Ensure, Bluetooth is turned on in settings. Click Weight App on home screen. Step on Bluetooth scale to
connect to the device. Your current weight information will appear and record in history.
8.8 Music player
8.9 Skin detector (Smart Mirror only)
8.10 Close open apps
8.11 Device & System Settings
Click the Music tab to open. Play downloaded music.
To manage and record your Skin moisture, be sure to select your user account before using the Skin
tester. Ensure Bluetooth is turned on in settings. . Press the Skin tester on/off button to connect
via Bluetooth. Open the Skin tester Icon/app. Select the parts to be tested. Press skin tester on the
corresponding parts for about 5 seconds your current skin moisture will appear and record in history.
To close open apps, click settings, then Recents, then swipe the individual windows to close.
To access device and system settings, swipe down notification bar when in any web browser and click
on setting icon.
00.0%
PCT
Disconnected
Skin
Face Hand Eyehole
00.0%
PCT
Connected
Skin
Face Hand Eyehole
Hand Historical Data
60
40
20
0
05/09
20% 30% 38% 60%
Week Month Year
05/10 05/1205/11 05/13 05/14
Oh, you have not tested the skin data
Dry MoistNormal
Previous
Cycle
Play/ Pause Next
Weight Historical data
100
80
60
40
20
0
05/08
Week MonthY ear
05/09 05/10 05/11 05/120 5/13
Weight
Oh, you have not tested the weight data

12
9.1 Device cannot boot
9.2 Device or App is frozen
9.3 Cannot connect to
the Internet
9.4 Camera not working
9.5 No sound
9.6 Cannot see display
screen
9.8 Can’t sign into play
store / Google chrome
9.9 Can’t connect
Bluetooth device
9.7 Verify new device
with Google
IX. TROUBLE SHOOTING
User Videos @ Mues-Tec GmbH & Co KG – YouTube
Ensure power button on device is in on position and device is
connected properly. Check indication light on power supply.
If it still does not boot up, disconnect device from power for
at least 30 seconds. Reconnect to power.
Contact your local dealer if it still does not boot up.
Remove device from power. Allow at least 30 seconds to
reset, Then connect to power. Allow device to load fully.
Delete browsing history and close running app.
Wi-Fi: Make sure Wi-Fi is enabled in settings and the Wi-Fi
signal is Strong and the password is correct.
LAN: Make sure Ethernet cable is connected properly and
receives signal.
Set time and Zone in Advanced settings.
Make sure camera On/Off switch is in the ON position.
Check volume settings in settings.
Check display brightness in settings.
As a security measurement, Google may send you a
notification to verify this device is authorized to display and
use your Google account. Please pay close attention to
these notifications, as a negative response will prevent you
from using your Google account on this device.
Swipe down notification bar, click setting icon, click Apps, in
Chrome, Google Play services and Google Play Store make
sure Permissions are on.
Sign in to Google play store and Update all apps, device
will run slow while Updating Please allow time for device to
update apps.
Make sure Bluetooth is enabled in settings. Swipe down
notification bar and check for pairing request notifications.

13
X. WARRANTY CARD
Dear Customer,
our Mues-Tec products are subject to strict quality control. If this device still does not function
properly, we regret this and ask you to contact your dealer or our service hotline. The
following applies to the assertion of warranty claims without restricting your statutory rights.
1. Warranty claims may only be lodged within a period of a maximum of 2 years from the date
of purchase. Our warranty is limited to the repair of material and manufacturing errors or the
replacement of the device. Traces of daily use, e.g. Scratches do not constitute a guarantee.
Mues-Tec assumes no liability for possible data or settings stored on the product by the
buyer.
2. For warranty claims, please contact your dealer or our service to determine how to proceed.
If the defect is within the scope of our warranty, the device will be repaired or replaced free
of charge. For this you need the purchase proof in the form of a receipt or an invoice. No
new warranty period begins by repairing or replacing the unit. The warranty period remains
effective from the date of purchase. Regardless of whether a chargeable repair is required
within or outside the warranty period, you will be informed in advance.
Please note that our warranty will be void in the event of misuse or improper handling, non-
observance of the safety precautions for the appliance, or in the case of use of force or
actions that has not been authorized by the service address authorized by us. Defects which
have not been detected (or no longer) on the device or damages which have extinguished the
warranty will be remedied for a fee.
IMPORTANT!
Keep this warranty card for your records. Do not send them to Mues-Tec or your dealer.
Only if you claim a warranty claim, please send this card with your proof of purchase and the
device.
First name and surname of the buyer: _____________________________________________
______
Purchaser's phone number: ______________________________________________________
Product: ______________________________ Date of purchase: ____________________
Bill number: ________________________________________________
Dealer name and telephone number: _____________________________________________
The product has been proved all functions are working correctly before leaving the original
factory. Please make sure you have followed all the safety instructions mentioned in the manual
when you take this product for repairing.
This product is carrying the CE-Mark in accordance with the related European Directives.
Responsible for CE-Marking is MUES-TEC GmbH & Co. KG, Hauptstrasse 16, 36137 Grossenlueder,
Germany. This product is labeled with the CE Mark in accordance with the related European
Directives, notably.
Low Voltage Directive 2014/35/EU, Electromagnetic Compatibility Directive 2014/30/EU and
RoHS
Directive 2011/65/EU.

15
I. SICHERHEITSHINWEISE
Mues-Tec Geräte werden nach internationalen Sicherheitsstandards entwickelt und
produziert. Zu Ihrer eigenen Sicherheit beachten Sie bitte unbedingt folgende Hinweise,
sowie die Warnungshinweise auf dem Gerät und im Display.
Verwenden Sie nur Original-Zubehör oder beachten Sie die Empfehlungen von Mues-Tec.
Vergewissern Sie sich, dass die Kabel und Anschlüsse zum Gerät im einwandfreien Zustand
sind.
Das Netzgerät muss so installiert werden, dass nicht auf das Kabel getreten werden kann
und es nicht gequetscht wird. Das Netzteil ist generell vor Feuchtigkeit zu schützen.
Achten Sie besonders sorgsam auf die Anschlüsse des Gerätes, die korrekte Verbindung
zwischen Stecker und Steckdose und eventuelle Verlängerungskabel.
Vergewissern Sie sich, dass die Nennspannung des Netzteils der Ihrer örtlichen
Stromversorgung entspricht.
Das Gerät darf nur von autorisiertem Fachpersonal geöffnet werden, sonst erlischt jegliche
Gewährleistung / Garantie.
Sollte das Gerät nicht einwandfrei funktionieren oder ungewöhnliche Geräusche von sich
geben, trennen Sie es unverzüglich von der Stromversorgung und kontaktieren Sie Ihren
Händler oder den Mues-Tec Kundendienst.
VORSICHT! Lassen Sie das Gerät nicht fallen und setzen Sie es keinen Erschütterungen aus.
Verwenden Sie eine gepolsterte Oberfläche, wenn Sie das Gerät ablegen.
Benutzen Sie bei der Säuberung keine kratzigen Schwämme und keine
lösungsmittelhaltigen Reinigungsmittel.
Installieren Sie das Gerät ausschließlich an stabilen Wandflächen um Verletzungen an
Personen und Schäden am Gerät zu vermeiden.
Zur Vorbeugung und zum Schutz des Gerätes, trennen Sie den Netzstecker während
eines Gewitters von der Stromversorgung. Gleiches empfiehlt sich auch bei längerem
Nichtbenutzen.
Batterien sind ordnungsgemäß zu entsorgen. Nicht ins Feuer werfen!
Bei unsachgemäßem Einsatz und Auswechseln von Batterien besteht schlimmstenfalls die
Gefahr einer Explosion. Benutzen Sie immer nur empfohlene oder gleichwertige Batterien.
Schützen Sie das Gerät unbedingt vor offenem Feuer!
Der Umgang mit Elektrogeräten jeglicher Art birgt potentielle Gefahren. Handeln Sie stets
mit äußerster Vorsicht.
•
•
•
•
•
•
•
•
•
•
•
•
•
•
•
•

16
II. HAFTUNGSAUSSCHLUSS
Mues-Tec ist nicht haftbar für Verluste und/oder Schäden am Produkt, welche durch folgende
Faktoren verursacht werden:
Darüber hinaus haftet Mues-Tec nicht für Beschädigungen oder Folgeschäden durch
unsachgemäße Handhabung.
Das Symbol mit der durchgestrichenen Mülltonne zeigt an, dass dieses Produkt getrennt vom
normalen Haushaltsmüll gesammelt und entsorgt werden muss.
Eingebaute Batterien und Akkus können gemeinsam mit dem Produkt entsorgt werden.
Sie werden dann in den Recyclingzentren getrennt. Der schwarze Balken zeigt an, dass das
Produkt nach dem 13. August 2005 auf den Markt gebracht wurde. Durch Unterstützung der
separaten Sammlung von Geräten und Batterien helfen Sie bei der richtigen Entsorgung und
tragen damit dazu bei, mögliche schädliche Auswirkungen auf Umwelt und Gesundheit zu
vermeiden.
Für detaillierten Informationen zur Sammlung und Wiederverwertung in Ihrem Land wenden
Sie sich bitte an die örtlichen Behörden oder an den Händler, bei dem Sie das Produkt gekauft
haben.
Das Symbol mit der durchgestrichenen Mülltonne zeigt an, dass Batterien und/oder Akkus
getrennt vom normalen Haushaltsmüll gesammelt und entsorgt werden müssen.
Wenn die Batterie oder der Akku mehr als die in der Batterierichtlinie (2006/6/EC)
angegebenen Mengen an Blei (Pb), Quecksilber (Hg) und/oder Cadmium (Cd) enthalten,
werden die chemischen Symbole für Blei (Pb), Quecksilber (Hg) und/oder Cadmium (Cd)
unter dem Symbol mit der durchgestrichenen Mülltonne angegeben. Genauere Informationen
zur Sammlung und Wiederverwertung in Ihrem Land wenden Sie sich bitte an die örtlichen
Behörden oder an den Händler, bei dem Sie das Produkt gekauft haben.
Ordnungsgemäße Entsorgung des Produkts und von Elektro- & Elektronik-
Altgeräten. (Anwendbar in Ländern mit Systemen zur getrennten Sammlung von
Wertstoffen)
Ordnungsgemäße Entsorgung der Batterien dieses Produkts
(Anwendbar in Ländern mit Systemen zur getrennten Sammlung von Wertstoffen)
Feuer
Erdbeben
Unbeabsichtigte und/oder beabsichtigte Beschädigung
Unsachgemäße Verwendung und/oder Handhabung des Produkts
Schäden und/oder Verluste des Produkts während es im Besitz Dritter war
Schäden und/oder Verluste die aus Fehlverhalten oder der Missachtung der
Anweisungen im Handbuch erfolgen
Schäden und/oder Verluste die durch Verwendung von Zusatzgeräten verursacht
werden
a.
b.
c.
d.
e.
f.
g.

17
III. ANSCHLÜSSE UND VERBINDUNGEN
Gerät Anschlüsse und Verbindungen
IV. INSTALLATION
1. Smart Spiegel, mit Befestigungswinkeln
Die Installation sollte von einer Fachkraft und, oder einer technisch versierten Person
durchgeführt werden, um eine ordnungsgemäße Installation zu gewährleisten. Bitte
gehen Sie bei der Installation, gemäß der Anleitung, Schritt für Schritt vor.
TV-Einheit Netzteil Hauttester (Optional) Körperwaage (Optional)
2. Montieren Sie die TV-Halterung an der Wand.
3. Verbinden Sie jetzt vorsichtig die Montagehalterung
des Smart-Spiegels mit den Befestigungswinkeln an
der Wand.
Kamera: AN/AUS
LAN
DC-12V
USB
AN/AUS Schalter
4. Abschließend stellen Sie mittels des Netzteils die
Stromversorgung Ihres Smart- Spiegels her.
Nun folgen Sie bitte den Anweisungen des Menüs
auf dem Touch-Screen.
Achtung! Der Smart-Spiegel ist relativ schwer. Um
Beschädigungen und Verletzungen zu vermeiden, sind
für die fachgerechte Montage mindestens zwei Personen
erforderlich.
1. Befestigen Sie die Montagehalterung an der Rückseite
des Smart-Spiegels..
Achtung! Die Tragfähigkeit Ihrer Wand, die Auswahl der
entsprechenden Schrauben und die korrekte Befestigung
des Gerätes, sollte von einem Fachmann überprüft, bzw.
durchgeführt werden.
Kamera: AN/AUS
LAN USB
DC12V
AN/AUS Schalter

18
TV-Einheit Netzteil Hauttester (Optional) Körperwaage (Optional)
3. Hängen Sie nun den Smart-Spiegel vorsichtig in
die Befestigungsschrauben ein.
Kamera: AN/AUS
LAN
DC-12V
USB
AN/AUS Schalter
4. Abschließend stellen Sie mittels des Netzteils die
Stromversorgung Ihres Smart- Spiegels her. Nun
folgen Sie bitte den Anweisungen des Menüs auf
dem Touch-Screen.
2. Smart Spiegel, ohne Befestigungswinkel
Achtung! Der Smart-Spiegel ist relativ schwer. Um
Beschädigungen und Verletzungen zu vermeiden, sind
für die fachgerechte Montage mindestens zwei Personen
erforderlich.
Achtung! Die Tragfähigkeit Ihrer Wand, die Auswahl der
entsprechenden Schrauben und die korrekte Befestigung
des Gerätes, sollte von einem Fachmann überprüft, bzw.
durchgeführt werden.
1. Befestigen Sie Montagehalterung an der
Rückseite des Smart-Spiegels.
2. Befestigen Sie die entsprechenden Schrauben
gemäß der korrekten Abmessungund Ausrichtung
an Ihrer Wand.
Position
A
Position
B

19
3. Küchen Smart
Küchen Smart Netzteil Hochklappscharnier Drucktüröffner Manual
1. Installation des Scharniers nach den individuellen
Maßen Ihres Schrankes.
ACHTUNG! Verletzungsgefahr bei der Montage der TV-
Einheit. Die mechanische Federung steht unter Druck.
Beschädigungsrisiko des Federhebels bei der Montage!
Betätigen Sie die Hebel erst, wenn das Gerät an den
Scharnieren angebracht ist. Nur wenn die Scharniere
am Gerät angebracht sind, lassen sich die Hebel wieder
einfahren.
Click
Click
2. Befestigung des Küchen Smart am Federscharnier.
Das Gerät darf bei diesem Installationsvorgang
noch nicht mit der Stromversorgung verbunden sein.
3. Montieren Sie nun den Befestigungsclip für den
Drucktüröffner. Wir empfehlen die Montage
beider Befestigungsclips übereinander.
4. Verbinden Sie jetzt den Drucktüröffner mit den
Befestigungsclips und justieren Sie ihn ggf. nach.
CLICK!
1
2
5. Schließen Sie jetzt das Netzteil an und schalten
Sie das Gerät ein. Befolgen Sie bitte die
Anweisungen auf dem Touchscreen, oder lesen
Sie im Handbuch nach.
6. Genießen Sie Ihren neuen Küchen-Smart von
Mues-Tec. Unser Team steht Ihnen jederzeit für
Feedback oder Fragen zur Verfügung.
Kamera: AN/AUS
LAN
DC-12V
USB
AN/AUS Schalter
Table of contents
Languages:
Popular Touchscreen manuals by other brands

Allo RemoteControl
Allo RemoteControl NICE Era TOUCH HSTS2FR instructions

AXIOMTEK
AXIOMTEK GOT5100T-832 user manual

Uctronics
Uctronics U6103 quick start guide

Elo TouchSystems
Elo TouchSystems 3200L user manual

Elo TouchSystems
Elo TouchSystems 3200L user manual

LEGRAND
LEGRAND 7" Video Touch Screen user guide