manuals.online logo
Brands
  1. Home
  2. •
  3. Brands
  4. •
  5. MULTISPAN
  6. •
  7. Timer
  8. •
  9. MULTISPAN UTR 1044 User manual

MULTISPAN UTR 1044 User manual

UTR 2044
R
32 4
234
TIME
SET TIME
SET
ENT RESET
www.multispanindia.com
Page - 1
UTR-1044,2044,444
Technical Specification
Connection Diagram
OPERATING MANUAL
UNIVERSAL TIMER
UTR-1044,2044,444
Output
Power Supply
Protection Level
Operating
Relative
(As per request)
Temperature
Humidity
1 relay, 2 C/O contact, 230V AC, 5A
100 to 270V AC, 50 / 60 Hz, Approx 4VA
IP-65(Front side) AS per IS/IEC 60529:2001
0°C To 55°C
Up to 95% RH Non Condensing
Model
Display
Size(HXWXD)
Panel Cutout
Input
UTR 1044
96 X 96 X 50 mm
68 X 68 mm
92 X 92 mm
72 X 72 X 85 mm
UPPER:- 4 Digit 7 seg 0.70”,red LED Display
LOWER:- 4 Digit 7 seg 0.50”,green LED Display
UTR 2044 UTR 444
NPN/PNP Proximity & Micro Switch
1). For safely purpose, key function are designed in such a way that operator will not go into
detailed parameter setting (Previously Set) function. In this situation, in Password parameter,
YES has to be selected. If previously set parameters are to be changed, then any operator
has to select NO.
2). POWER ON : Timer starts counting as soon as it gets power supply.
3). By default Cycle ON Mode is provided. Please refer programming guide to change to Cycle OFF
Delay ON/ Delay OFF Mode.
UTR 1044
TIME
SET TIME
32 4
234
SET
ENT RESET
11
1
1
!
!
~
50/60 HZ
4VA
100
270V AC
N0
N0
+12V
I/P
NPN
I/P
PNP
GND
NC
NC
C
C
L
N
1
2
3
4
5
6
7
8
9
10
11
12
13
14
RESET
RELAY
RELAY
MICRO SWITCH:- M/S Connection 4 & 6
LN
12
1314 11
1617181920 15
RESET
GNDPNP
I/P
+12V NPN
I/P
17 8 9 10
23456
NC NCC CNO NO
Relay Relay
MICRO SWITCH:- M/S Connection 15 & 13
~
50/60 HZ
4VA
100
270V AC
R1
R2
UTR444
SET
ENT
SET TIME
TIME
RESET
UPPER:- 4 Digit 7 seg 0.56”,red LED Display
LOWER:- 4 Digit 7 seg 0.33”,green LED Display
45 X 45 mm
48 X 48 X 95 mm
100
270V AC
~
50/60 HZ
4VA
1
2
3
4
5
L
N
7
6
8
9
10
11
12
NC
RELAY
RESET
NC
C
NO
NO
M/S PROXI NPN
I/P
+12V
GND
Note
www.multispanindia.com
17 8 9
12
1314
10
11
1617181920 15
23456
NC CNO
TC
+
-
+
-
RELAY
100
270V AC
~
50/60 Hz
4VA
!
LN
O/P
S.S.R RTD
T/C
+
RTD
-
!
L
N
1
2
3
4
5
6
7
-
+
O/P
S.S.R
RELAY1
100
270V AC
~
50/60 Hz
4VA
NC
NO
C
8
9
10
11
12
13
14
Made in India
www.multispanindia.com
1
2
3
4
5
NC
C
R1
NO
L
N
!
Control
Action
T.P.
ON-OFF
AUTO PID
100
270V AC
~
50/60 Hz
4VA
UTC 421-RG
Made in India
Made in India
www.multispanindia.com
Made in India
www.multispanindia.com www.multispanindia.com
Made in India
!
Delay time (time-1)
Cycle OFF time (time-2)
press key to
set cycle Delay time
If Delayed ON/ Delayed OFF is selected
If Cycling Mode is selected
No. OF
Repeat Cycle
Cycle ON time (time-1)
press key to
set cycle ON time
press key to
set cycle OFF time
Press key
Press key
Press key
Press key
Press key
Press key
Press key
Press key
Press key
Press key
Press key
Press key
Press key
Press key
Press key to save & exit
Press key for 5 to 7 sec
Time
Set Time
1
234
1234
TIM1
1234
TIM1
1234
CYON
0000
seC
seC
seC
seC
seC
up
YES
PwOn trI enbL
nO
seC
MIN
MIN
MIN
MIN
MIN
DN
MIN
Hr
Hr
Hr
Hr
Hr
Hr
PASS
func func func func
CyCL
unt1
unt1
unt2
RN 1
tIme
MEMO
PuLs PuLs PuLs
MEMO
RN 2
RN 2
unt1
unt1
unt2
RN 1
TIME
RN 2
RN 2
unt1
unt1
unt2
Rn 1
Rn 2
Rn 2
CYOF dLON dLOf
25
TIM2
1234
Press key
Press key
Press key
Press key for mode selection
Press key for range selection
/
/
/
/
/
/
/
//
/
/
/
/
/
/
/
/
//
9.999 SEC
9.999 SEC
99.99 SEC
99.59 min.SEC
99.59 min.SEC
99.59 min.SEC
99.59 hr.min
99.59 hr.min
99.59 hr.min
999.9 min
999.9 min
999.9 min
999.9 hr
999.9 hr
999.9 hr
9999 hr
9999 hr
9999 hr
999.9 SEC
999.9 SEC
999.9 SEC
9999 SEC
9999 SEC
9999 SEC
99.99 SEC
99.99 SEC
9.999 SEC
9999 MIN
9999 MIN
9999 MIN
M I N
M I N
M I N
H R
H R
H R
S E C
S E C
S E C
Parameter Menu
www.multispanindia.com
Page - 2UTR-1044,2044,444
Page - 3 www.multispanindia.com
DESCRIPTION
Time - 1
Delayed OFF
No. of cycle to repeat
Password “25”
Unit - 2 for Time - 2
Cycling time
Start from relay on
Minute set for Time - 1 or 2
Up counting
Memory Retain : Yes / No
Enable/ Trigger/ Power ON
DISPLAY
SR.
1
7
8
9
11
3
5
13
16
Time - 2
Unit - 1 for Time - 1
Delayed function
Seconds set for Time - 1 or 2
Direction of time counting
Delayed ON
Start from relay off
Hour set for Time - 1 or 2
Down counting
2
4
12
15
10
6
14
17
18
19
20
T I M 1
T I M 2
F U N C
C Y L E
C Y O N
D L O N
C Y O F
D L O F
C Y C L
U N T 1
U N T 2
S E C
M I n
H R
T I M E
U P
m E M O
P U L S
D N
P A S S
UTR-1044,2044,444
1). Turn ON instrument. SET time according to your requirement.
2). In running mode, upper display indicates current TIME value and lower display shows SET
time value. Relay ON or OFF controls depends on set time.
3). Relay operation is according to selection of Delay ON or Delay OFF in programming menu.
4). In cycling mode, relay will turn on for ON time (time-1) & relay will turn off for OFF time
(time-2) and this ON-OFF process will continue.
5). To reset the time, press Reset Key.
Working
Display Message And Their Meaning
R1
R2
UTR444
SET
ENT
SET TIME
TIME
RESET
Product improvement and upgrade is a constant procedure. So for more updated operating information and support,
Please contact our helpline : +91-9978991474/76/82 or Email at [email protected] Ver: 2009
All safety related codifications, symbols and instructions that appear in this operating manual
or on the equipment must be strictly followed to ensure the safety of the operating personnel as
well as the instrument.
If all the equipment is not handled in a manner specified by the manufacturer, it might impair the
protection provided by the equipment .
=> Read complete instructions prior to installation and operation of the unit.
WARNING : Risk of electric shock.
3) Cable used for connection to power source, must have a cross section of 1mm or greater. These wires
should have insulations capacity made of at least 1.5kV.
2) To reduce electro magnetic interference, use wire with adequate rating and twists of the same of equal size shall
be made with shortest connection.
1) To prevent the risk of electric shock power supply to the equipment must be kept OFF while doing the wiring
arrangement. Do not touch the terminals while power is being supplied.
4) A better anti-noise effect can be expected by using standard power supply cable for the instrument.
1) This equipment, being built-in-type, normally becomes a part of main control panel and such in case the
terminals do not remain accessible to the end user after installation and internal wiring.
2) Do not allow pieces of metal, wire clippings, or fine metallic fillings from installation to enter the product
or else it may lead to a safety hazard that may in turn endanger life or cause electrical shock to the operator.
3) Circuit breaker or mains switch must be installed between power source and supply terminal to
facilitate power ‘ON’ or ‘OFF’ function. However this mains switch or circuit breaker must be
installed at convenient place normally accessible to the operator.
4) Use and store the instrument within the specified ambient temperature and humidity ranges as
mentioned in this manual.
Warning Guidelines
Safety Precautions
Installation Guidelines
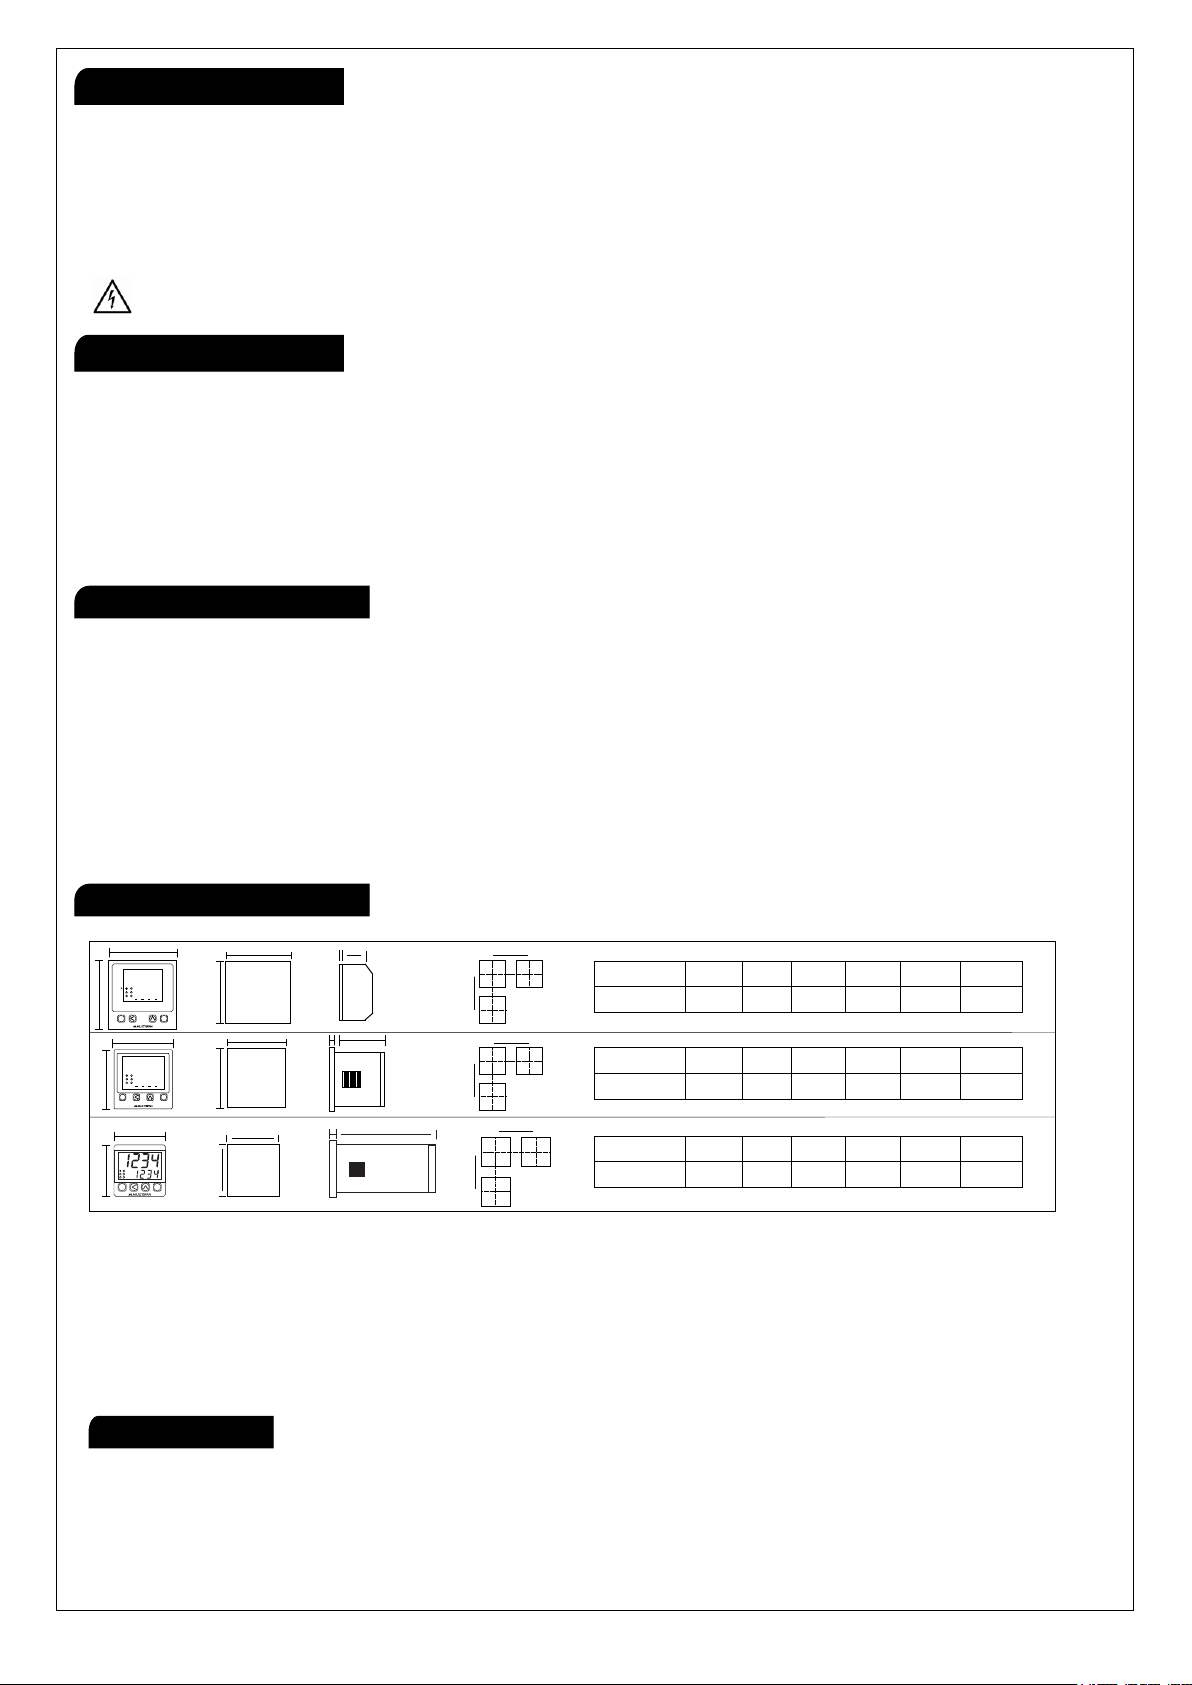
Mechanical Installation
Maintenance
1) Prepare the panel cutout with proper dimensions as show above.
2) Fit the unit into the panel with the help of clamp given.
3) The equipment in its installed state must not come in close proximity to any heating source,
caustic vapors, oils steam, or other unwanted process by products.
4) Use the specified size of crimp terminal (M3.5 screws) to wire the terminal block. Tightening the
screws on the terminal block using the tightening torque of the range of 1.2 N.m.
5) Do not connect anything to unused terminals.
1) The equipment should be cleaned regularly to avoid blockage of ventilating parts.
2) Clean the equipment with a clean soft cloth. Do not use isopropyl alcohol or any other cleaning agent.
3) Fusible resistor must not be replaced by operator.
2
95mm - 3.75 inches
85mm - 3.34 inches
136mm - 5.35 inches
120mm - 4.72 inches
B
B
A
A
F
E
MODEL A
96mm 96mm 92mm 92mm 3mm 50mm
BC
D E
F
DIMENSIONS
MODEL
MODEL
A
A
72mm
48mm
72mm
48mm
68mm
45mm
68mm
45mm
3mm
3mm
85mm
95mm
B
B
C
C
D
D
E
E
F
F
DIMENSIONS
DIMENSIONS
C
C
D
D
E
F
UTR 1044
TIME
SET TIME
32 4
234
SET
ENT RESET
1
1
UTR 2044
R
32 4
234
TIME
SET TIME
SET
ENT RESET
1
1
Page - 4 www.multispanindia.com
UTR-1044,2044,444
B
AC
D
68mm - 2.68 inches
60mm - 2.36 inches
EF

This manual suits for next models

2

Other MULTISPAN Timer manuals

MULTISPAN SDX 22-02 User manual

MULTISPAN

MULTISPAN SDX 22-02 User manual

MULTISPAN UTR-1044 User manual

MULTISPAN

MULTISPAN UTR-1044 User manual

MULTISPAN FRT 22 User manual

MULTISPAN

MULTISPAN FRT 22 User manual

MULTISPAN UTR-413 User manual

MULTISPAN

MULTISPAN UTR-413 User manual

MULTISPAN UTR-2244 User manual

MULTISPAN

MULTISPAN UTR-2244 User manual

MULTISPAN UTR-2244 User manual

MULTISPAN

MULTISPAN UTR-2244 User manual

MULTISPAN UTR-433 User manual

MULTISPAN

MULTISPAN UTR-433 User manual

MULTISPAN UTR-4244 User manual

MULTISPAN

MULTISPAN UTR-4244 User manual

MULTISPAN UTR-1033 User manual

MULTISPAN

MULTISPAN UTR-1033 User manual

MULTISPAN DI-22U User manual

MULTISPAN

MULTISPAN DI-22U User manual

MULTISPAN MDT-4310 User manual

MULTISPAN

MULTISPAN MDT-4310 User manual

MULTISPAN CYL-22 Instruction sheet

MULTISPAN

MULTISPAN CYL-22 Instruction sheet

MULTISPAN CYL-22U User manual

MULTISPAN

MULTISPAN CYL-22U User manual

MULTISPAN UTR - 1044 User manual

MULTISPAN

MULTISPAN UTR - 1044 User manual

MULTISPAN DIN-63 User manual

MULTISPAN

MULTISPAN DIN-63 User manual

MULTISPAN SQT-1044 User manual

MULTISPAN

MULTISPAN SQT-1044 User manual

MULTISPAN MDT-4310N User manual

MULTISPAN

MULTISPAN MDT-4310N User manual

MULTISPAN SQT 1044 User manual

MULTISPAN

MULTISPAN SQT 1044 User manual

MULTISPAN DIN-63C User manual

MULTISPAN

MULTISPAN DIN-63C User manual

MULTISPAN UTR-1244 User manual

MULTISPAN

MULTISPAN UTR-1244 User manual

MULTISPAN DT 10S User manual

MULTISPAN

MULTISPAN DT 10S User manual

MULTISPAN UTR-2033 User manual

MULTISPAN

MULTISPAN UTR-2033 User manual

Popular Timer manuals by other brands

Wholesale Chess 0487 user manual

Wholesale Chess

Wholesale Chess 0487 user manual

digicon SBT-2020 operating manual

digicon

digicon SBT-2020 operating manual

BEKA BA377E-SS manual

BEKA

BEKA BA377E-SS manual

XT Racing GPX Pro user manual

XT Racing

XT Racing GPX Pro user manual

DIG BO92A instruction manual

DIG

DIG BO92A instruction manual

Smeg KIT TIMER manual

Smeg

Smeg KIT TIMER manual

claber Aqua-Home 4-6-8 user manual

claber

claber Aqua-Home 4-6-8 user manual

AppyGarden Edge 2 Plus Setup manual

AppyGarden

AppyGarden Edge 2 Plus Setup manual

Clas Ohlson 15UKD/3A instruction manual

Clas Ohlson

Clas Ohlson 15UKD/3A instruction manual

Oase FishGuard operating instructions

Oase

Oase FishGuard operating instructions

NSI NORK E Series installation instructions

NSI

NSI NORK E Series installation instructions

Omron H3FA - datasheet

Omron

Omron H3FA - datasheet

Timeguard ETU17N Installation & operating instructions

Timeguard

Timeguard ETU17N Installation & operating instructions

HANYOUNG NUX MA4N instruction manual

HANYOUNG NUX

HANYOUNG NUX MA4N instruction manual

HANYOUNG NUX LF4N instruction manual

HANYOUNG NUX

HANYOUNG NUX LF4N instruction manual

Skytech E-Stop Series manual

Skytech

Skytech E-Stop Series manual

Smartswitch HNS220TD owner's manual

Smartswitch

Smartswitch HNS220TD owner's manual

GardenMate Easy Program manual

GardenMate

GardenMate Easy Program manual

manuals.online logo
manuals.online logoBrands
  • About & Mission
  • Contact us
  • Privacy Policy
  • Terms and Conditions

Copyright 2025 Manuals.Online. All Rights Reserved.