Musicom Lab EFX-LE User manual

EFX -LE
Audio Controller
OWNER'S MANUAL
Version 1.4x

Table of Contents
1. Introduction ---------------------------------------------------------------------- 3
1.1 Main Features ---------------------------------------------------------------------- 3
1.2 Specifications ---------------------------------------------------------------------- 4
1.3 Block Diagram ---------------------------------------------------------------------- 4
1.4 Front Panel ------------------------------------------------------------------------ 5
1.5 Rear Panel ------------------------------------------------------------------------ 6
2. Basic Operation --------------------------------------------------------------------- 7
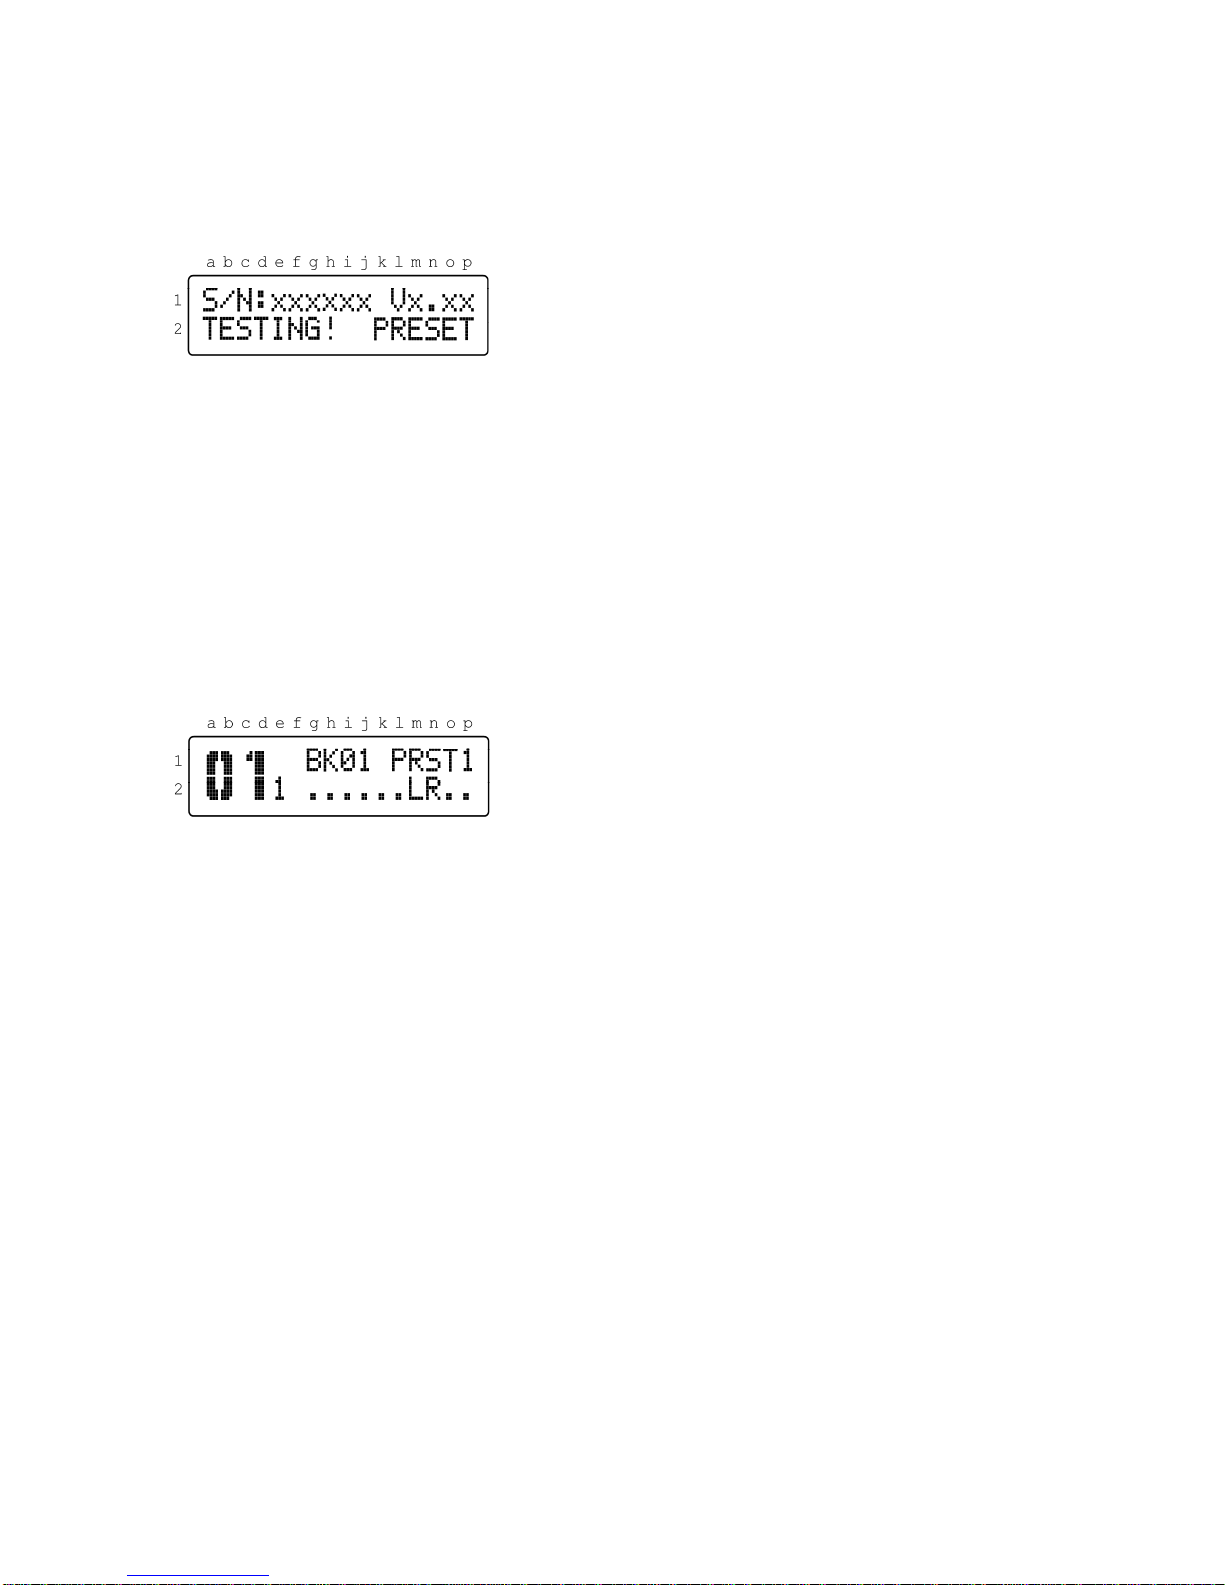
2.1 Initial Power Up ------------------------------------------------------------------ 7
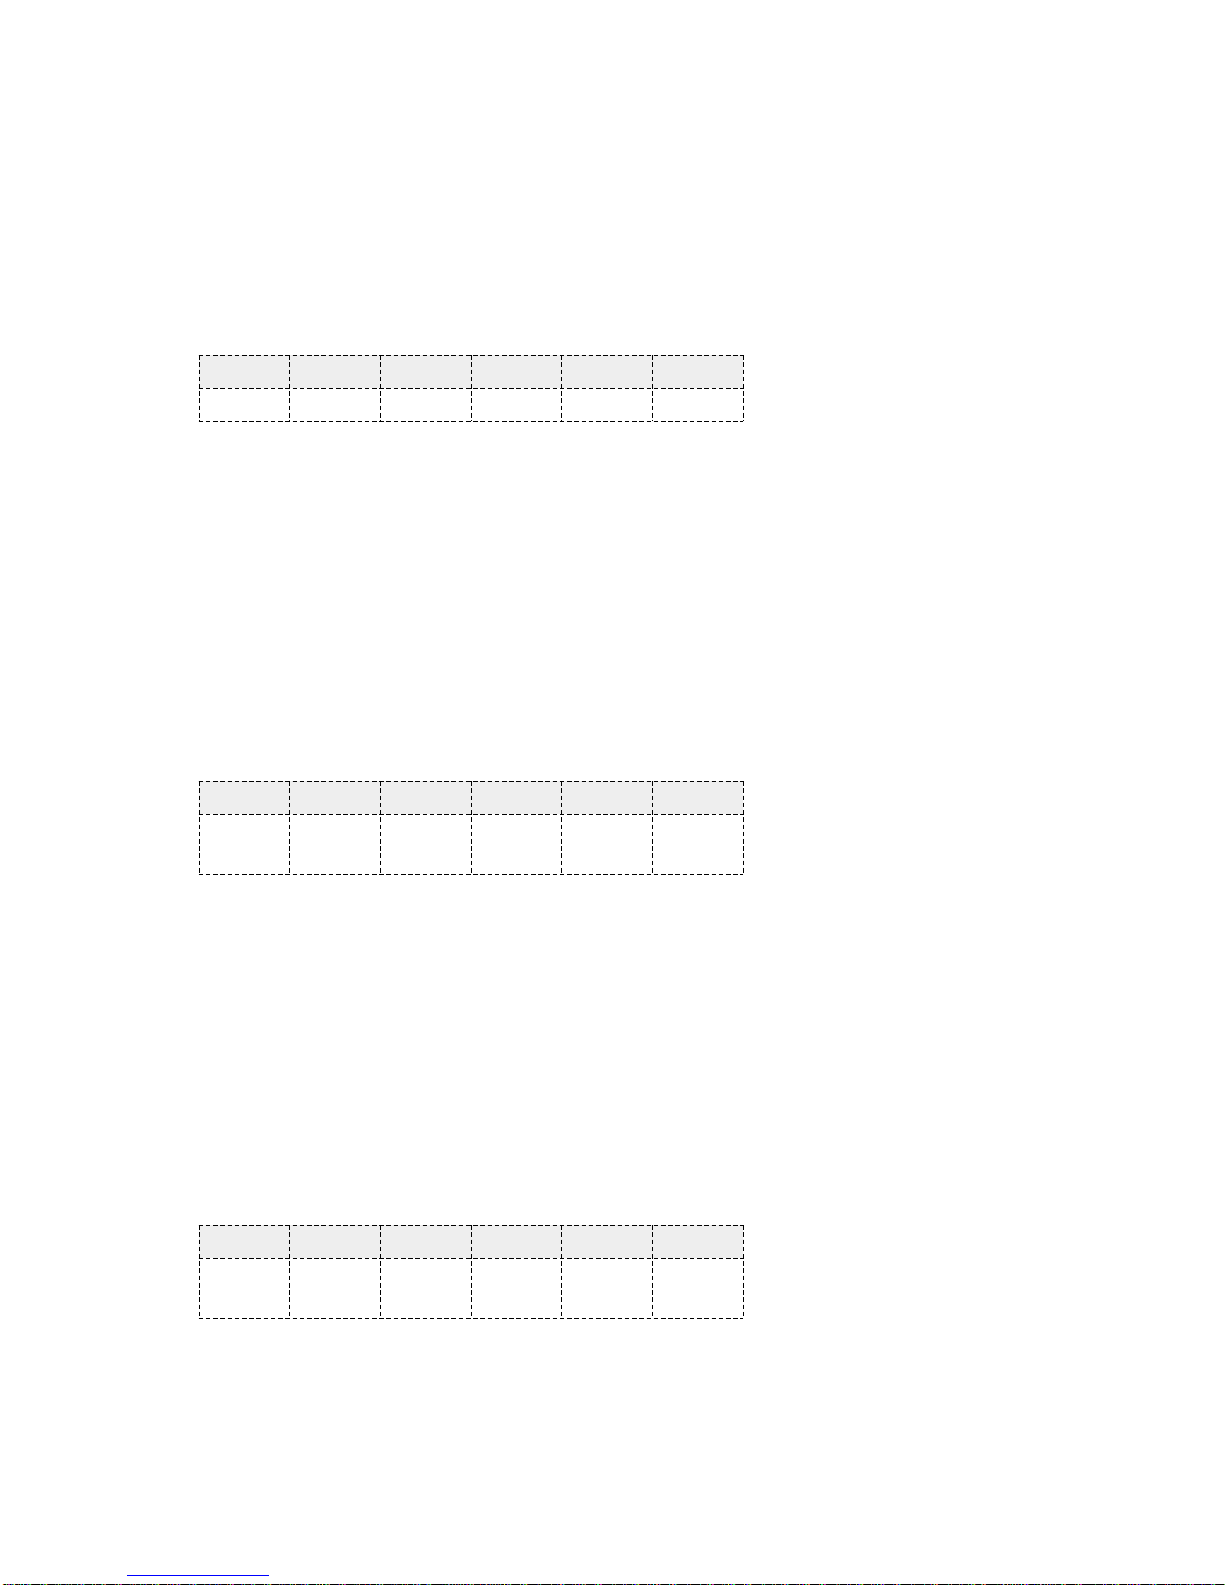
2.2 Preset Mode --------------------------------------------------------------------- 7
2.3 Instant Access (IA) Mode ------------------------------------------------------------ 8
2.3.1 IA1 Mode ------------------------------------------------------------------- 8
2.3.2 IA2 Mode ------------------------------------------------------------------- 8
2.3.3 IA3 Mode ------------------------------------------------------------------- 8
2.4 Mute ---------------------------------------------------------------------------- 9
2.5 Activate/Deactivate TAP Switch ----------------------------------------------------- 9
3. Song/Set Mode -------------------------------------------------------------------- 9
3.1 Song Mode ----------------------------------------------------------------------- 9
3.2 Set Mode ----------------------------------------------------------------------- 10
4. Setup Mode ------------------------------------------------------------------------- 11
4.1 ORDER Menu ----------------------------------------------------------------------- 11
4.1.1 Changing the Effect Loop Connection Order ------------------------------------ 12
4.1.2 Making a Parallel Connection --------------------------------------------------- 13
4.1.3 Specify Spill Over ------------------------------------------------------------- 13
4.2 MIDI menu ------------------------------------------------------------------------- 14
4.2.1 Preset MIDI ----------------------------------------------------------------- 14
4.2.2 Global MIDI ----------------------------------------------------------------- 17
4.3 COPY Menu ---------------------------------------------------------------------- 19
4.3.1 Preset Copy ------------------------------------------------------------------ 19
4.3.2 Bank Copy ------------------------------------------------------------------ 19
4.3.3 Song Copy ------------------------------------------------------------------ 20
4.3.4 Set Copy -------------------------------------------------------------------- 20
4.4 TITLES Menu -------------------------------------------------------------------- 21
4.4.1 Preset Titles ------------------------------------------------------------------ 21
4.4.2 Song Titles ------------------------------------------------------------------ 22
4.5 SONG/SET Menu ------------------------------------------------------------------ 23
4.5.1 Song Edit ------------------------------------------------------------------ 23
4.5.2 Set Edit -------------------------------------------------------------------- 24
4.6 UTILITY Menu -------------------------------------------------------------------- 25
4.6.1 Operation Mode --------------------------------------------------------------- 26
4.6.2 Click-Less ------------------------------------------------------------------- 26
4.6.3 Hold “BANK DOWN” ----------------------------------------------------------- 26
4.6.4 Mute Position --------------------------------------------------------------- 27
4.6.5 Max Bank Number ----------------------------------------------------------- 27
4.6.6 Duplicated PC --------------------------------------------------------------- 27
4.6.7 Tempo Sync With ------------------------------------------------------------ 28
4.6.8 Tempo Sync Time ------------------------------------------------------------ 28
4.6.9 XPDL Rate ------------------------------------------------------------------- 28
4.6.10 Func. Switch 1/2 ------------------------------------------------------------- 29
4.6.11 ISO-OUT Source ----------------------------------------------------------- 29
4.6.12 LP 5/6 Return ----------------------------------------------------------- 29
4.6.13 LP 6 Send.R Split -------------------------------------------------------- 30
4.6.14 Global Preset --------------------------------------------------------------- 30
4.6.15 Mute -> Loop On ------------------------------------------------------------ 30
4.6.16 BPM Display ----------------------------------------------------------------- 31
4.6.17 Group Select ----------------------------------------------------------------- 31
4.6.18 MIDI SysEx Data ----------------------------------------------------------- 32
4.6.19 Factory Reset ------------------------------------------------------------- 32
5. Cables ----------------------------------------------------------------------------- 33
5.1 XPDL ---------------------------------------------------------------------------- 33
5.2 Function Switches ---------------------------------------------------------------- 33
6. MIDI IN Specification ---------------------------------------------------------------- 34
6.1 Preset Changes -------------------------------------------------------------------- 34
6.2 Individual Loop Controls ----------------------------------------------------------- 34
7. Connection Examples ---------------------------------------------------------------- 35

EFX-LE Audio Controller Owner's Manual
3
1. Introduction
Thank you for purchasing the Musicom Lab EFX-LE Audio Controller.
The EFX-LE Audio Controller is the ultimate floor-based switching system.
It is a compact, easy to use, has 7 fully programmable loops, 2 function switches and a MIDI foot controller.
The EFX-LE Audio Controller has 360 memory locations, configured as 72 banks of 5 presets, plus a global preset. It
can transmit 8 MIDI Program and Control Change and messages on 8 MIDI channels and 18 MIDI Control Change
messages on an appointed MIDI channel.
Also one continuous controller port(XPDL) is included and can be programmed with a designated MIDI channel and
controller number.
The EFX-LE Audio Controller has two outputs, OUT L and OUT R, can be used as stereo outputs, or as an A/B/Y
switch for a mono guitar signal.
The EFX-LE Audio Controller has two low-noise, high quality buffers to prevent the loss of guitar signal. Each buffer
can be bypassed/engaged per each preset.
1.1 Main Features
• 7 audio loops. 4 mono loops, 2 stereo loops and 1 volume loop.
Volume Loop can be engaged/bypassed by IA switch or as parts of a preset.
• 2 stereo loops are stereo capable using TRS jacks.
• Changeable loop order per each preset.
• 2 buffers. Input buffer and Movable buffer.
Movable buffer can be placed anywhere in your signal path.
Each buffer can be enabled/disabled by IA switch or as parts of a preset.
• 2 internal unity mixers. each mixer has 2 input(2 Effects or 1 Effect + Dry signal).
Mixers also are used for spillover between presets, even with your analog delay or reverb.
• 2 function switches via one TRS jack. You can control the switching functions of your amp.
• 360 presets (72 banks x 5 presets) and 1 global preset.
• Create up to 99 songs
• Organize the 99 Songs into 40 sets of 40 songs
• Click-Less(Mute) function for reducing popping noise
• ISO OUT that prevent to occur ground hum noise and phase issue.
• Transmits 8 MIDI Program Change and 8 MIDI Control Change messages.
Each MIDI message can be stored differently in each preset.
• Transmits 18 MIDI Control Change message by assigned IA switches.
• Transmits MIDI Timing Clock and synchronizes with Function Switch1.
Tap tempo for both MIDI-compatible pedals and any pedals that have external tap input jacks.
BPM can be stored in each bank preset and song preset.
• Easily copy presets, banks, songs and sets
• 2 Lines x 16 Characters LCD display that can display preset/song titles and other status.

EFX-LE Audio Controller Owner's Manual
4
1.2 Specifications
• Buffer Input Impedance ........................
• Buffer Output Impedance .......................
• Nominal Audio Signal Level ...................
• Maximum Audio Signal Level ................
• Current Draw ..........................................
• Dimensions ..............................................
• Weight .....................................................
2.2 MΩ
100 Ω
-10 dBu
+18 dBu
250 mA (DC12V Center Negative)
320 mm(W) x 96 mm(D) x 68 mm(H)
12.6 inches(W) x 3.8 inches(D) x 2.7 inches(H)
1,130 g / 2.5 lbs
1.3 Block Diagram

EFX-LE Audio Controller Owner's Manual
5
1.4 Front Panel
1 through 4 switches
When in Preset mode these switches are used to recall the corresponding preset. When in IA1, IA2 or IA3 mode
pressing these switch turn on/off the corresponding effect loop, function switches, ouputs and buffers.
5/TAP switch
This Switch can have two functions based upon your needs. By default, this button is set up to access
the Preset 5, You can also program this switch to TAP TEMPO. Refer to the Activate/Deactivate TAP Switch on the
page 9 of the manual.
MODE switch
Pressing this switch puts the EFX-LE into the IA1 mode, where you can turn individual loops on and off, and store
their settings to presets. For the other side, pressing this switch for 2 seconds puts the EFX-LE into the SETUP mode.
BANK▲switch
The 360 presets in the EFX-LE are arranged in banks of 5, and these buttons allow you to select which bank of 5
you’d like to access. Pressing this switch in Preset mode increments the bank number.
MUTE/BANK▼switch
This Switch can have two functions(MUTE and BANK DOWN).
Pressing and holding this switch in Preset mode decrements the bank number.
For the other side, pressing this switch will execute the MUTE function.
LCD Display
Line 1 and 2 - a to d indicate a bank or song number
Line 1 - e to p indicate a Preset or Song Title.
Line 2 - e indicates a preset number within the bank or song.
Line 2 - g to l indicate which of the 6 audio loops are currently active.
Line 2 - m and n indicate which of the two audio outputs are active.
Line 2 - o and p indicate which of the 2 function switches are currently active.

EFX-LE Audio Controller Owner's Manual
6
1.5 Rear Panel
IN Jack
This is the main input jack where your guitar plugs in.
SND 1-4, RTN 1-4 Jacks
These jacks provide mono-send mono-return effect loops. SND 1
–
4send signals to effect pedals. RTN 1
–
4receive
signals from effect pedals. Connect the SND 1
–
4jacks to the INPUT jack of each effect pedal, and connect the
OUTPUT jack of each effect pedal to the RTN 1
–
4jacks.
SND 5, RTN 5S Jacks
These jacks provide a mono-send stereo-return effect loop. RTN 5S jack is stereo capable using TRS connectors. If the
last stage of the chain is the stereo-send effect loop or the output, the signal is output in stereo. If the last effect loop
in the chain is the mono-send effect loop, only the signal received at the tip conductor of the RTN 5S jack is output.
SND 6S, RTN 6S Jacks
These jacks provide a stereo-send stereo-return effect loop. These jacks are stereo capable using TRS connectors. If the
last stage of the chain is the stereo-send effect loop or the output, the signal is output in stereo. If the last effect loop
in the chain is the mono-send effect loop, only the signal received at the tip conductor of the RTN 6S jack is output.
SND VL, RTN VL Jacks
These jacks are for connecting a volume pedal. You can also use these jacks as send/return for a preamp.
OUT L, OUT R Jacks
These are the output jacks. OUT-L and OUT-R can be turned on/off independently. If the last stage of the chain is the
mono output, the OUT-L signal is split up in to the OUT-R.
TUNER Jack
This jack is for connecting an external tuner.
F1/F2 Jack
Latch or momentary function switch jack for amplifier channel switching or on/off controlling of reverb.
TRS plug’s Tip : F1 TRS plug’s Ring : F2 TRS plug’s Sleeve : Common ground for F1/F2
XPDL Jack
An expression pedals can be connected to this jack using a 1/4” TRS cable. Also an external Tap-Tempo switch and
LED to this jack using a 1/4” TRS cable. The TRS cable must be connected before supplying power to the EFX MK-V.
Refer to the 5.1 XPDL on the page 33 of the manual for cabling.
ISO OUT Jack and ISO PHASE Switch
There is an isolation transformer before the ISO OUT jack. The isolation transformer may help reduce hum that can
occur when using two amps or 4CM. If the ISO OUT are used, ISO OUT can also be inverted the phase by pressing
the ISO OUT PHASE switch. Refer to the ISO-OUT SOURCE on the page 29 of the manual.
MIDI IN, MIDI OUT/THRU Connector
MIDI IN connector receives MIDI signals from an external MIDI device. MIDI OUT/THRU connector is used to feed
MIDI signals to external MIDI devices. When the operation mode of MIDI OUT/THRU has been set to 'THRU', MIDI
signals received at MIDI IN pass through the EFX-LE without any changes.
DC12V Power Connector
This is the main power input for the EFX-LE. The EFX-LE requires a DC12V supply. The current draw is
approximately 250mA at DC12V (Center Negative).

EFX-LE Audio Controller Owner's Manual
7
2. Basic Operation
2.1 Initial Power Up
• Line 1 - e to j indicate the serial number of your unit.
• Line 1 - m to p indicate the firmware version of your unit.
• Line 2 - a to h indicate the power test results.
TEST OK : Input Voltage is 11V~13V.
Too Low : Input Voltage is under 11V.
Too High : Input Voltage is over 13V.
• Line 2 - k to p indicate the operating mode (PRESET, SONG or SET01 to SET40).
The EFX-LE requires a DC12V power supply.
When you power up the EFX-LE, the LCD display will show the serial number, firmware, power test results and
operating Mode. And then the first preset of Bank 01(or Song 01) is selected.
2.2 Preset Mode
• Line 1 and 2 - a to d indicate a bank number.
• Line 1 - e to p indicate a preset title.
• Line 2 - e indicates a preset number(1 to 5) within the bank.
• Line 2 - g to p indicate the on/off status of loops, outputs and function switches.
The EFX-LE has 360 presets and 1 global preset that you can choose from, and they’re arranged in banks of four or
five. When the EFX-LE powers up, it selects Bank 1 and Preset 1.
Press/hold MUTE/BANK
▼
or BANK
▲
switch to shift other banks, pressing one of the four or five switches (1
–
4or
5) selects a preset in the new bank.
① Press/hold the MUTE/BANK
▼
or BANK
▲
switch to scroll through the 72 available banks.
② The LEDs above 1 - 5 switches will blink in blue.
③ The preset is selected via pressing any switches from 1through 5.
④ The LEDs above 1 - 5 switches will stop blinking and the LED above the switch will be turned on in blue.
For example: to select the second preset of bank 3, press the MUTE/BANK
▼
or BANK
▲
switch until the bank number
03is shown on the display. And then press the 2switch.
The GLOBAL PRESET is a preset with all the capabilities of preset 1 through 5, but is the same for all banks.
Pressing the switch of a preset that is already on selects the global preset and will cause the LED above the switch to
be turned off. To enable/disable the Global Preset, refer to the GLOBAL PRESET on the page 30 of the manual.

EFX-LE Audio Controller Owner's Manual
8
2.3 IA (Instant Access) Mode
2.3.1 IA1 Mode (L1-L6)
This mode allows you to turn each of the audio loops on or off individually. In the PRESET, SONG or SET mode,
pressing the MODE switch brings you to the IA1 mode. To left bottom of the each switch, there is a label reading L1
through L6. The following is the assignment of each switch in the IA1 Mode.
12345/TAP BANK
▲
Loop 1 Loop 2 Loop 3 Loop 4 Loop 5 Loop 6
Pressing & holding the MODE switch for 1 second will store the edit and return to the Preset mode.
For the other side, pressing the MODE switch will move to the IA2 Mode.
Pressing the MUTE/
▼
switch will return to the Preset mode without storing the edit.
2.3.2 IA2 Mode (OL-BM)
This mode allows you to control 2 function switches, outputs and buffers individually.
To first right bottom of the each switch, there is a label what the switch does in the IA2 mode.
The following is the assignment of each switch in the IA2 Mode.
12345/TAP BANK
▲
Output
Left Output
Right Function
Switch 1 Function
Switch 2 Buffer 1
(Input) Buffer 2
(Movable)
Pressing & holding the MODE switch for 1 second will store the edit and return to the Preset mode.
For the other side, pressing the MODE switch will move to the IA3 Mode.
Pressing the MUTE/
▼
switch will return to the Preset mode without storing the edit.
2.3.3 IA3 Mode (C1-VL)
This Mode allows you to control the volume loop and 5 MIDI Control Change messages individually.
To second right bottom of the each switch, there is a label what the switch does in the IA3 mode.
The following is the assignment of each switch in the IA3 Mode.
12345/TAP BANK
▲
C1
(MIDI CC) C2
(MIDI CC) C3
(MIDI CC) C4
(MIDI CC) C5
(MIDI CC) Volume
Loop
Pressing & holding the MODE switch for 1 second will store the edit and return to the Preset mode.
For the other side, pressing the MODE switch will move to the IA1 Mode.
Pressing the MUTE/
▼
switch will return to the Preset mode without storing the edit.

EFX-LE Audio Controller Owner's Manual
9
2.3 Mute
In the PRESET mode, pressing(& holding) MUTE/
▼
switch will mute the guitar signal. When muted, the MUTE LED
turns on in purple. Pressing the MUTE/
▼
or any switches from 1through 5switch will cancel the MUTE function.
NOTE
• The EFX-LE executes Bank Down or MUTE function, by Press & holding the MUTE/
▼
switch for 1 second in the
Preset mode. Refer to the Hold “BANK DOWN” on the page 26.
• The mute function is not available in the IA mode.
• The mute position (VOL.LOOP, OUTPUT or NO ASSIGN) to be linked with this switch can be selected
in UTILITY menu. Refer to the Block Diagram on the page 4 and the Mute Position on the page 27 of
the manual.
2.4 Activate/Deactivate TAP Switch
The 5/TAP switch can have two functions based upon your needs. By default, this switch is set up to access the Preset
5. You can change this switch to tap tempo function. The TAP switch function can be activated/deactivated by pressing
the MODE and MUTE/
▼
switches simultaneously.
TAP can be synchronized with MIDI Time Clock(MTC) or Function Switch 1(F1). The F1 supports for devices that
only have an analog tap tempo input. Also you can select whether to send the MTC/F1 for 1 bar, 2 bars or
continuously. When TAP switch function is selected, tapping the 5/TAP switch will change the MTC or F1 rate to the
tempo of your taps. At this time, the Global BPM will be changed to the tempo of your taps. When the EFX-LE
powers up, the Global BPM is 120.
Refer to the TAP SYNC WITH and TAP SYNC TIME on the page 28 of the manual.
3. Song / Set Mode
The Song operating mode allows access to the EFX-LE's 99 songs. A Song is a group of 5 presets that are selected for
use in a particular song. Each preset in a song can be chosen from any of the 360 presets. The Set operating mode
allows up to 40 songs of the EFX-LE's 99 songs to be arranged in any order to create a set. The EFX-LE can support
40 different sets.
When You are in the Song and Set mode, the MUTE/BANK
▼
or BANK
▲
Switches move from song to song instead of
moving from bank to bank.
Refer to the OPERATING MODE on the page 26 of the manual.
3.1 Song Mode
• Line 1 and 2 - a to d indicate a song number.
• Line 1 - e to p indicate a song title.
• Line 2 - e indicates a preset number(1 to 5) within the song.
• Line 2 - g to p indicate the on/off status of loops, outputs and function switches.

EFX-LE Audio Controller Owner's Manual
10
① Press/hold the MUTE/BANK
▼
or BANK
▲
switch to scroll through the 99 available songs.
② The LEDs above 1 - 5 switches will blink in blue and the LCD display will show the song title.
③ The preset is selected via pressing any switches from 1through 5.
④ The LEDs above 1- 5switches will stop blinking, the LED above the switch will be turned on in blue.
The LCD display will show the preset title for 2 seconds and then show the song title.
For example: to select the second preset of song 3, press the MUTE/BANK
▼
or BANK
▲
switch until the song number
03 is shown on the display. And then press the 2switch.
The GLOBAL PRESET is a preset with all the capabilities of preset 1 through 5, but is the same for all songs.
Pressing the switch of a preset that is already on selects the global preset and will cause the LED above the switch to
be turned off. To enable/disable the Global Preset, refer to the GLOBAL PRESET on the page 30 of the manual.
3.2 Set Mode
• Line 1 and 2 - a to d indicate a song number.
• Line 1 - e to p indicate a song title.
• Line 2 - e indicates a preset number(1 to 5) within the song.
• Line 2 - g to p indicate the on/off status of loops, outputs and function switches.
① Press/hold the MUTE/BANK
▼
or BANK
▲
switch to scroll through the 40 available songs.
② The LEDs above 1 - 5 switches will blink in blue and the LCD display will show the song title.
③ The preset is selected via pressing any switches from 1through 5.
④ The LEDs above 1 - 5 switches will stop blinking, the LED above the switch will be turned on in blue.
The LCD display will show the preset title for 2 seconds and then show the song title.
For example: to select the second preset of song 3, press the MUTE/BANK
▼
or BANK
▲
switch until the song number
03 is shown on the display. And then press the 2switch.
The GLOBAL PRESET is a preset with all the capabilities of preset 1 through 5, but is the same for all songs.
Pressing the switch of a preset that is already on selects the global preset and will cause the LED above the switch to
be turned off. To enable/disable the Global Preset, refer to the GLOBAL PRESET on the page 30 of the manual.

EFX-LE Audio Controller Owner's Manual
11
-Loop Number
Volume Loop
Movable Buffer (BM)
-A loop for which
Spill Over is specified
Mono connection
Stereo connection
4. SETUP Mode
To enter the SETUP Mode, press and hold the MODE switch for 2 seconds. The display will show the following
picture.
• Press the ORDER (1) switch to enter the ORDER menu.
• Press the MIDI (2) switch to enter the MIDI menu.
• Press the COPY (3) switch to enter the COPY menu.
• Press the TITLES (4) switch to enter the TITLES menu.
• Press the SONG/SET (5/TAP) switch to enter the SONGSET menu.
• Press the UTILITY (BANK
▲
)switch to enter the UTILITY menu.
• Press the MUTE/
▼
switch to exit the SETUP mode.
4.1 ORDER Menu
The ORDER menu allows changing loop structure you can make the following settings.
• Change the connection order of effect loops
• Create a parallel connection
• Specify Spill Over
The EFX-LE has two internal mixers. By using these internal mixers, you can connect loops in parallel and use the
Spill Over function.
NOTE
• The same mixers are used for parallel connections and for Spill Over functions.
• The Movable Buffer and Volume Loop CAN NOT be used for Parallel connection or Spill Over function.
• For the mono/stereo returns of effect loops 5 and 6, Refer to the LP5/6 RETURN and LP6 SEND6.R SPLIT on
the page 29 and 30 of the manual.
• The Spill Over function allows the return signal of a currently selected preset to 'Spill' into the next selected preset.
• Line 1 – a to f indicate the bank number and preset that you want to edit.
• Line 2 - a to p indicate the loop structure of the preset.

EFX-LE Audio Controller Owner's Manual
12
1 & 2 Press to move cursor.
3 & 4 When the cursor is at tthe Line 1 - f : Decreasing/increasing a preset number.
When the cursor is at the other positions : Moving the loops number.
5/TAP When the cursor is at the Line 1 - f : Decreasing a bank number.
When the cursor is at the other positions : Activating/deactivating the Spill Over function.
BANK
▲
When the cursor is at the Line 1 - f : Increasing a bank number.
When the cursor is at the other positions : Activating/deactivating the Mixer function.
STORE (MODE) Storing any changes made while in this menu.
EXIT (MUTE/
▼
)Returning to the SETUP menu.
4.1.1 Changing the Effect Loop Connection Order
Example : Change the order of effect loops 3 and 4.
Before the change
① Use the 1or 2switch to move the cursor to loop 3. ② Press 4switch to move the loop 3.
③ Press the MODE switch to store this edit.
You can change other connection orders in the same way.

EFX-LE Audio Controller Owner's Manual
13
① Use the 1or 2switch to move the cursor to loop 6. ② Press BANK
▲
switch to specify the parallel connection.
③ Use the 1switch to move the cursor to loop 5. ④ Press 4switch to move the loop 3 into the parallel
connection.
⑤ Press the MODE switch to store this edit.
You can change other connections in the same way.
① Use the 1or 2switch to move the cursor to loop 6. ② Press the 5/TAP switch to specify the Spill Over.
4.1.2 Making a Parallel Connection
Example : Connect effect loops 5 and 6 in parallel.
Before the change
4.1.3 Specify Spill Over
Example : You can specify Spill Over for effect loop 6.
Before the change
③ Press the MODE switch to store this edit.
You can change other Spill Over in the same way.

EFX-LE Audio Controller Owner's Manual
14
4.2 MIDI Menu
The MIDI menu allows accessing to the MIDI features of the EFX-LE.
• Press the 1switch to edit the PRESET MIDI setting.
• Press the 2switch to edit the GLOBAL MIDI setting.
• Press the MUTE/
▼
switch to exit the MIDI menu.
4.2.1 PRESET MIDI
The PRESET MIDI menu allows assigning 8 MIDI Program Change and 8 MIDI Control Change and determining how
the expression port will function when used function in the preset.
PRESET
PC.1
↕
PC.8
CH (Channel) 01 to 16
↕
PC# (Number) 000 to 127 or OFF
↕
MSB 000 to 127 or OFF
↕
LSB 001 to 128 or OFF
↕
CC.1
↕
CC.8
CH (Channel) 01 to 16
↕
CC# (Number) 000 to 127 or OFF
↕
VAL (Value) 000 to 127
↕
SEL (Select) GLB (Global) or PST (Preset)
↕
CH (Channel) 01 to 16
↕
CC# (Number) 000 to 127 or OFF
XPDL VB (Value Begin) 000 to 127,PDL or OFF
↕
VM (Value Max.) 000 to 127
↕
Vm (Value Min.) 000 to 127
↕
BPM SEL (Select) GLB (Global) or PST (Preset)
↕
BPM 40 to 209 or OFF

EFX-LE Audio Controller Owner's Manual
15
MIDI Program Change
• Line 1 - b and c indicate the bank number (01 to 72) that the preset is
located in.
• Line 1 - f indicates the preset number(1to 5or 0for the Global Preset)
that is going to be created/modified.
• Line 1 - m to p indicate the MIDI Program Change (PC.1 to PC.8).
• Line 2 - d and e indicate the MIDI Program Change Channel (01-16).
• Line 2 - k to m indicate the MIDI Program Change Number (001-128 or
OFF).
• Line 2 - f to h indicate the MIDI Program Change MSB. (000-127 or OFF)
• Line 2 - n to p indicate the MIDI Program Change LSB. (000-127 or OFF)
1 & 2 Press to move cursor.
3 & 4 When the cursor is at the Line 1 - f : Decreasing/increasing a preset number.
When the cursor is at the Line 1 - p : Scrolling PC.1 to BPM.
When the cursor is at the other positions : Decreasing/increasing a value.
5/TAP & BANK
▲
When the cursor is at the Line 1 - f : Decreasing/increasing a bank number.
When the cursor is at the Line 1 - p : Scrolling PC.1 to BPM by 5.
When the cursor is at the other positions : Decreasing/increasing a value by 10.
STORE (MODE) Storing any changes made while in this menu.
EXIT (MUTE/
▼
)Returning to the MIDI menu.
MIDI Control Change
• Line 1 - b and c indicate the bank number (01 to 72) that the preset is
located in.
• Line 1 - f indicates the preset number(1to 5or 0for the Global Preset)
that is going to be created/modified.
• Line 1 - m to p indicate the MIDI Control Change (CC.1 to CC.8).
• Line 2 - d and e indicate the MIDI Control Change Channel (01-16).
• Line 2 - k to m indicate the MIDI Control Change Number (001-128 or
OFF).
• Line 2 - f to h indicate the MIDI Contol Change Value. (000-127)
1 & 2 Press to move cursor.
3 & 4 When the cursor is at the Line 1 - f : Decreasing/increasing a preset number.
When the cursor is at the Line 1 - p : Scrolling PC.1 to BPM.
When the cursor is at the other positions : Decreasing/increasing a value.
5/TAP & BANK
▲
When the cursor is at the Line 1 - f : Decreasing/increasing a bank number.
When the cursor is at the Line 1 - p : Scrolling PC.1 to BPM by 5.
When the cursor is at the other positions : Decreasing/increasing a value by 10.
STORE (MODE) Storing any changes made while in this menu.
EXIT (MUTE/
▼
)Returning to the MIDI menu.

EFX-LE Audio Controller Owner's Manual
16
XPDL in PRESET.MIDI
• Line 1 - b and c indicate the bank number (01 to 72) that the preset is
located in.
• Line 1 - f indicates the preset number(1to 5or 0for the Global Preset)
that is going to be created/modified.
• Line 1 - m to p indicate that you are in the XPDL.
• Line 2 - e to g indicate whether the XPDL is configured as Preset(PST) or
Global (GLB).
• Line 2 - l and m indicate the MIDI Control Change Channel (01-16).
• Line 2 - f to h indicate the MIDI Control Change Number (001-128 or
OFF).
• Line 2 - m to o indicate the initial XPDL value that the expression pedal
port will transmit
when the preset is selected.
• Line 2 - e to g indicate the highest XPDL value that the expression pedal
port can transmit when its pedal is moved.
• Line 2 - l to m indicate the lowest XPDL value that the expression pedal
port can transmit when its pedal is moved.
1 & 2 Press to move cursor.
3 & 4 When the cursor is at the Line 1 - f : Decreasing/increasing a preset number.
When the cursor is at the Line 1 - p : Scrolling PC.1 to BPM.
When the cursor is at the other positions : Decreasing/increasing a value.
5/TAP & BANK
▲
When the cursor is at the Line 1 - f : Decreasing/increasing a bank number.
When the cursor is at the Line 1 - p : Scrolling PC.1 to BPM by 5.
When the cursor is at the other positions : Decreasing/increasing a value by 10.
STORE (MODE) Storing any changes made while in this menu.
EXIT (MUTE/
▼
)Returning to the MIDI menu.
BPM in PRESET.MIDI
• Line 1 - b and c indicate the bank number (01 to 72) that the preset is
located in.
• Line 1 - f indicates the preset number(1to 5or 0for the Global Preset)
that is going to be created/modified.
• Line 1 - n to p indicate that you are in the BPM.
• Line 2 - e to g indicate whether the XPDL is configured as Preset(PST) or
Global (GLB).
• Line 2 - k to m indicate the BPM of current preset.
1 & 2 Press to move cursor.
3 & 4 When the cursor is at the Line 1 - f : Decreasing/increasing a preset number.
When the cursor is at the Line 1 - p : Scrolling PC.1 to BPM.
When the cursor is at the other positions : Decreasing/increasing a value.
5/TAP & BANK
▲
When the cursor is at the Line 1 - f : Decreasing/increasing a bank number.
When the cursor is at the Line 1 - p : Scrolling PC.1 to BPM by 5.
When the cursor is at the other positions : Decreasing/increasing a value by 10.
STORE (MODE) Storing any changes made while in this menu.
EXIT (MUTE/
▼
)Returning to the MIDI menu.

EFX-LE Audio Controller Owner's Manual
17
4.2.2 GLOBAL.MIDI
The GLOBAL MIDI Menu allows defining global parameters such as ; the MIDI channel that the EFX-LE will respond
to incoming MIDI messages on, the MIDI Control Change messages that are assigned the IA Switches, expression pedal
port(XPDL) MIDI Control Change Message...
CC.L1
↕
CC.MT
CH (Channel) 1to 16
↕
CC# (Number) 000 to 127 or OFF
↕
VN (Value On) 000 to 127 or OFF
↕
VF (Value Off) 000 to 127 or OFF
↕
XPDL
CH (Channel) 1to 16
↕
CC# (Number) 000 to 127 or OFF
↕
VM (Value Max) 000 to 127
↕
Vm (Value Min) 000 to 127
↕
IN/OUT RCH (RECEIVE CHANNEL) 01 to 16 or --
↕
MIDI OUT or THRU
MIDI Control Change
• Line 1 - l to p indicate the you are in the CC.L1 to CC.MT.
• Line 2 - d and e indicate the MIDI Control Change Channel (01-16).
• Line 2 - k to m indicate the MIDI Control Change Number
(001-128 or OFF).
•
Line 2 - e to g indicate the MIDI Control Change Value when a
instant access switch will be 'ON'.
•
Line 2 - l to n indicate the MIDI Control Change Value when a
instant access switch will be 'OFF'.
1 & 2 Press to move cursor.
3 & 4 When the cursor is at the Line 1 - p : Scrolling CC.L1 to IN/OUT.
When the cursor is at the other positions : Decreasing/increasing a value.
5/TAP & BANK
▲
When the cursor is at the Line 1 - p : Scrolling CC.L1 to IN/OUT by 5.
When the cursor is at the other positions : Decreasing/increasing a value by 10.
STORE (MODE) Storing any changes made while in this menu.
EXIT (MUTE/
▼
)Returning to the MIDI menu.
Note :
1. If CC #(numbers) of CC.L1 to CC.L6 are not OFF, the assigned audio loops are always bypassed.
2. The CC.MT is the MIDI CC message is sent when the mute function is On/Off.

EFX-LE Audio Controller Owner's Manual
18
XPDL in GLOBAL.MIDI
• Line 1 - m to p indicate the you are in the GLOBAL XPDL.
• Line 2 - d and e indicate the MIDI Control Change Channel (01-16).
• Line 2 - k to m indicate the MIDI Control Change Number (001-128 or
OFF).
• Line 2 - e to g indicate the highest XPDL value that the expression pedal
port can transmit when its pedal is moved.
• Line 2 - l to m indicate the lowest XPDL value that the expression pedal
port can transmit when its pedal is moved.
1 & 2 Press to move cursor.
3 & 4 When the cursor is at the Line 1 - p : Scrolling CC.L1 to IN/OUT.
When the cursor is at the other positions : Decreasing/increasing a value.
5/TAP & BANK
▲
When the cursor is at the Line 1 - p : Scrolling CC.L1 to IN/OUT by 5.
When the cursor is at the other positions : Decreasing/increasing a value by 10.
STORE (MODE) Storing any changes made while in this menu.
EXIT (MUTE/
▼
)Returning to the MIDI menu.
IN/OUT (RECEIVE CHANNEL & MIDI OUT/THRU)
• Line 1 - k to p indicate the you are in the IN/OUT.
• Line 2 - e and f indicate the MIDI Channel that the EFX-LE will receive.
• Line 2 - m to p indicate the MIDI OUT or MIDI THRU.
1 & 2 Press to move cursor.
3 & 4 When the cursor is at the Line 1 - p : Scrolling CC.L1 to IN/OUT.
When the cursor is at the other positions : Decreasing/increasing a value.
5/TAP & BANK
▲
When the cursor is at the Line 1 - p : Scrolling CC.L1 to IN/OUT by 5.
When the cursor is at the other positions : Decreasing/increasing a value by 10.
STORE (MODE) Storing any changes made while in this menu.
EXIT (MUTE/
▼
)Returning to the MIDI menu.

EFX-LE Audio Controller Owner's Manual
19
4.3 COPY Menu
The COPY Menu allows copying presets, banks, songs and sets from one location to another.
• Press the 1switch to Copy PRESET.
• Press the 2switch to Copy BANK.
• Press the 3switch to Copy SONG.
• Press the 4switch to Copy SET.
• Press the MUTE/
▼
switch to exit the COPY menu.
4.3.1 PRESET COPY
The sub-menu allows a single preset to be copied from on preset location to another.
• Line 2 – a to f indicate the preset that is going to be copied.
• Line 2 – k to p indicate the destination preset location to copy to.
1 & 2 Press to move cursor.
3 & 4 Decreasing/increasing a preset.
5/TAP & BANK
▲
Decreasing/increasing a bank.
STORE (MODE) Storing any changes made while in this menu.
EXIT (MUTE/
▼
)Returning to the COPY menu.
4.3.2 BANK COPY
The sub-menu allows an entire bank of five presets to be copied from one bank location to another.
• Line 2 – a to f indicate the bank that is going to be copied.
• Line 2 – k to p indicate the destination bank location to copy to.
1 & 2 Press to move cursor.
3 & 4 Decreasing/increasing a bank.
5/TAP & BANK
▲
Decreasing/increasing a bank by 10.
STORE (MODE) Storing any changes made while in this menu.
EXIT (MUTE/
▼
)Returning to the COPY menu.

EFX-LE Audio Controller Owner's Manual
20
4.3.3 SONG COPY
The sub-menu allows a song to be copied from one song location to another. This sub-menu copies the presets and
locations associated with the song to be copied.
• Line 2 – a to f indicate the song that is going to be copied.
• Line 2 – k to p indicate the destination song location to copy to.
1 & 2 Press to move cursor.
3 & 4 Decreasing/increasing a song.
5/TAP & BANK
▲
Decreasing/increasing a song by 10.
STORE (MODE) Storing any changes made while in this menu.
EXIT (MUTE/
▼
)Returning to the COPY menu.
4.3.4 SET COPY
The sub-menu allows an entire set to be copied from one set location to another. This sub-menu copies all of the songs
and their order of an entire set (40 songs).
• Line 2 – b to f indicate the set that is going to be copied.
• Line 2 – k to o indicate the destination set location to copy to.
1 & 2 Press to move cursor.
3 & 4 Decreasing/increasing a set.
5/TAP & BANK
▲
Decreasing/increasing a set by 10.
STORE (MODE) Storing any changes made while in this menu.
EXIT (MUTE/
▼
)Returning to the COPY menu.
Other manuals for EFX-LE
1
Table of contents
Other Musicom Lab Recording Equipment manuals

Musicom Lab
Musicom Lab EFX MK-V User manual

Musicom Lab
Musicom Lab EFX-ME User manual

Musicom Lab
Musicom Lab EFX MkIII User manual

Musicom Lab
Musicom Lab MTX-5 User manual

Musicom Lab
Musicom Lab MVC User manual

Musicom Lab
Musicom Lab POWER STATION II User manual

Musicom Lab
Musicom Lab EFX-LE User manual

Musicom Lab
Musicom Lab EFX MK-VI User manual

Musicom Lab
Musicom Lab EFX MkIII+ User manual

Musicom Lab
Musicom Lab EFX MKII User manual