MW TOOLS PH400 User manual

M1.1.PH400-PH400R.NLFREN
TOOLS
HANDLEIDING - MODE D’EMPLOI - MANUAL
PH400 (758611035)
PH400-R (758611038)
Elektrische takel
Treuil électrique
Electric hoist
P.02 Gelieve te lezen en voor later gebruik bewaren
P.09 Veuillez lire et conserver pour consultation ultérieure
P.16 Please read and keep for future reference
FR
EN
NL
copyrighted document - all rights reserved by FBC

M1.1.PH400-PH400R.NLFREN
2
NL
TOOLS
1 Veiligheid
AANDACHT!
Lees deze instructies et bewaar deze in een veilige plaats voor verdere raadpleging.
We aanvaarden geen aansprakelijkheid in geval van schade als gevolg van het niet-naleven van
deze instructies.
Dit toestel is voor een privé gebruik, niet voor commercieel of professioneel gebruik.
Gebruik het toestel nooit om mensen of dieren te transporteren.
Ga nooit onder een hangende last.
• Houd uw werkruimte net.
• Zorg voor een voldoende verlichting van de werkruimte. Gebruik het toestel niet in een omgeving met een potentieel
brandgevaar, of in een explosiegevaarlijke omgeving, of in de aanwezigheid van brandbare vloeistoffen. Stel het toestel
niet aan regen, damp, zon, stof of kou bloot.
• Vermijd het contact met de geaarde oppervlakken.
• Houd kinderen en onbevoegde personen buiten de werkruimte.
• Overschrijd de maximale draagcapaciteit van de takel niet.
• Gebruik geen 2 of meerdere takels om een voorwerp te tillen.
• Draag nauwsluitende kleren. Draag geen accessoires (juwelen, ...), die door de bewegende delen ingetrokken kunnen
worden.
• Draag de nodige persoonlijke beschermingen (handschoenen, antislip schoenen, oog- en gehoorbeschermingen).
• Houd de voedingskabel ver van hitte, olie en scherpe kanten.
• Controleer de goede toestand van de voedingskabel voor elk gebruik.
• Zorg altijd voor een stabiele lichaamspositie en een goed evenwicht.
• Ontkoppel het toestel van de stroomtoevoer wanneer niet in gebruik en voor onderhoudswerken.
• De takel is voor een binnenshuis gebruik geschikt, gebruik deze niet buitenshuis.
• Controleer de takel voor elk gebruik. Als een onderdeel beschadigd is, moet het onmiddellijk door een professioneel
gerepareerd of vervangen worden.
• Gebruik enkel accessoires, die door de fabrikant aanbevolen zijn.
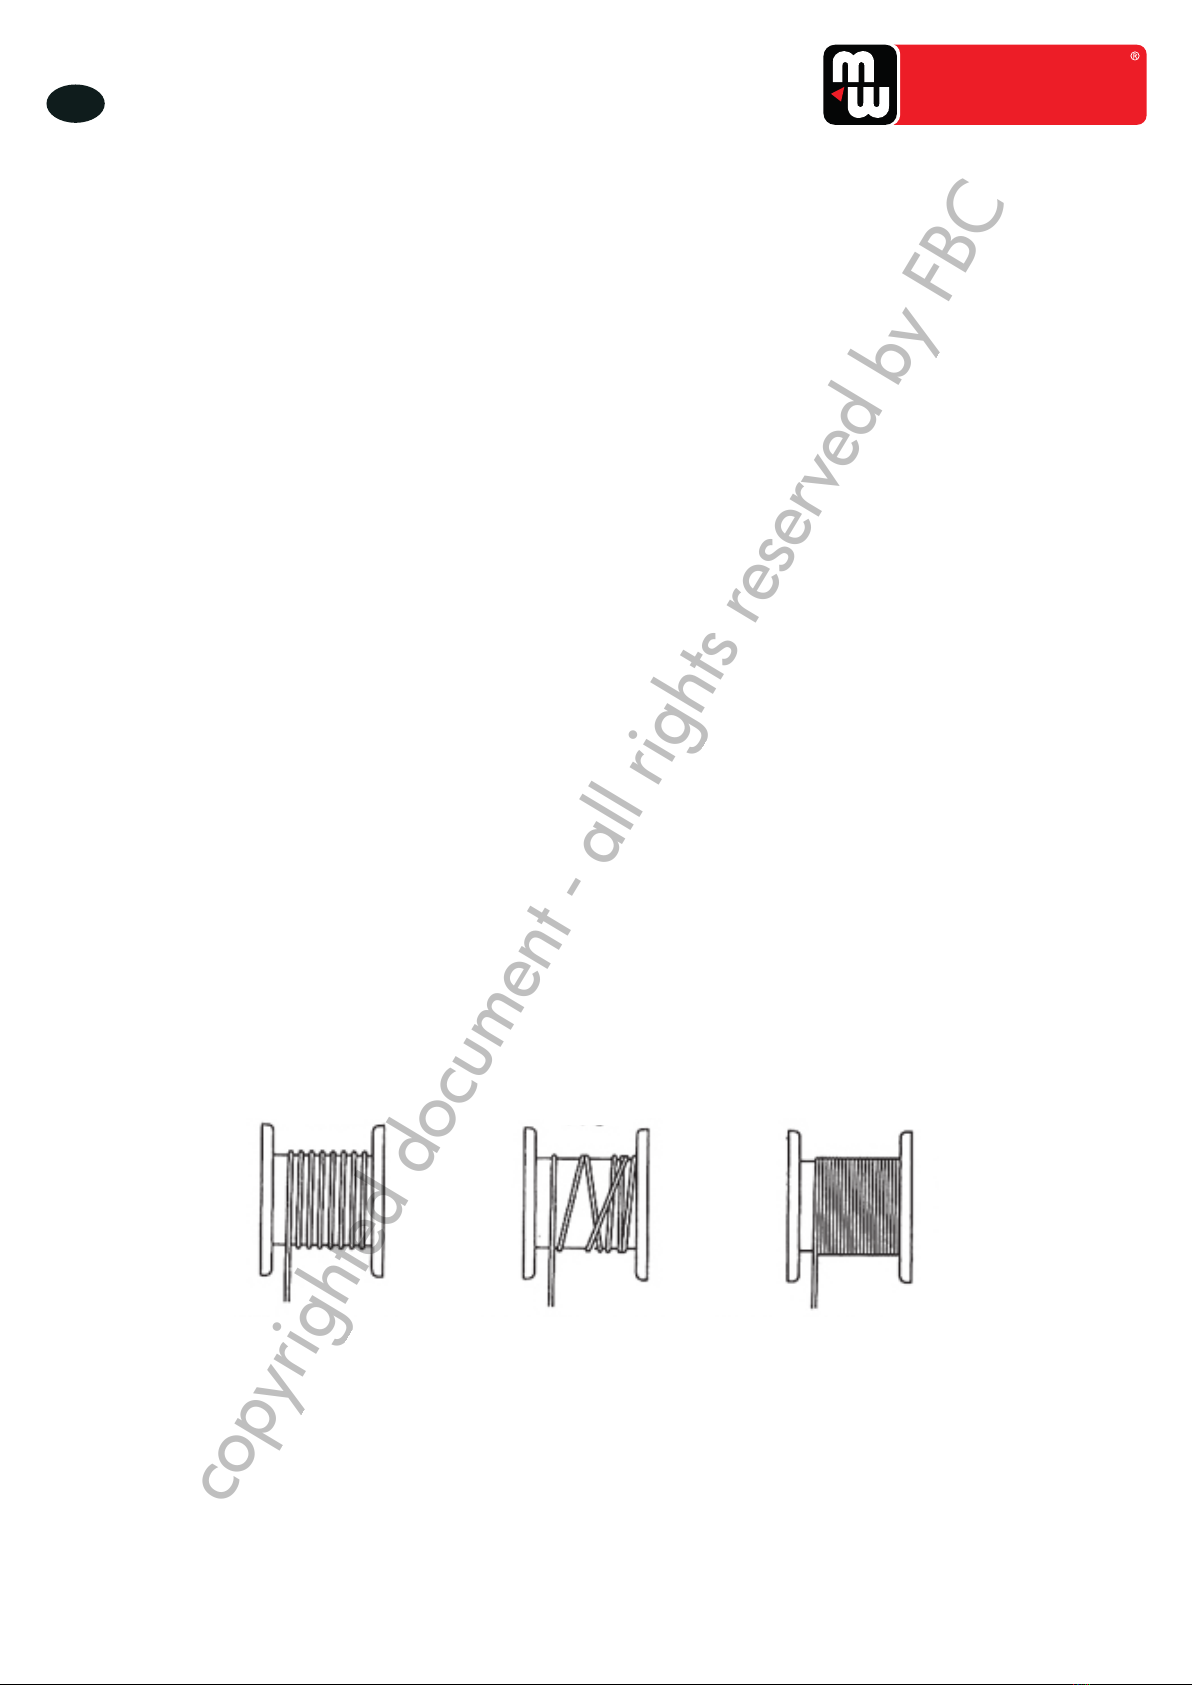
• Til de lasten op de kleinst mogelijke snelheid vanaf de grond. De kabel moet gespannen zijn, maar niet ontrold wanneer u
begint de last te tillen.
• Als de remmen niet meer werken en de last snel daalt, druk onmiddellijk op de noodstop knop. Neem dan de last weg van
de takel, en laat deze door een professioneel repareren.
• Het is verboden de takel te wijzigen of demonteren.
• Na 20 uren gebruik, en tenminste eenmaal per jaar, moet de takel door een erkende technische dienst grondig onderhoud
worden.
• Bij het gebruik van de draadloze afstandbediening, werk steeds op een zichtbare afstand.
• Gebruik de draadloze afstandbediening niet in een omgeving met een sterk magnetische veld.
• Als het controlelampje aan de onderkant van de sturingsdoos oplicht, vervang de batterij.
• Als het toestel voor een lange periode niet gebruikt wordt, neem de batterij uit de sturingsdoos.
Inhoud
1 Veiligheid.............................................................................................................................................................. 2
2 Technische specicaties........................................................................................................................................... 3
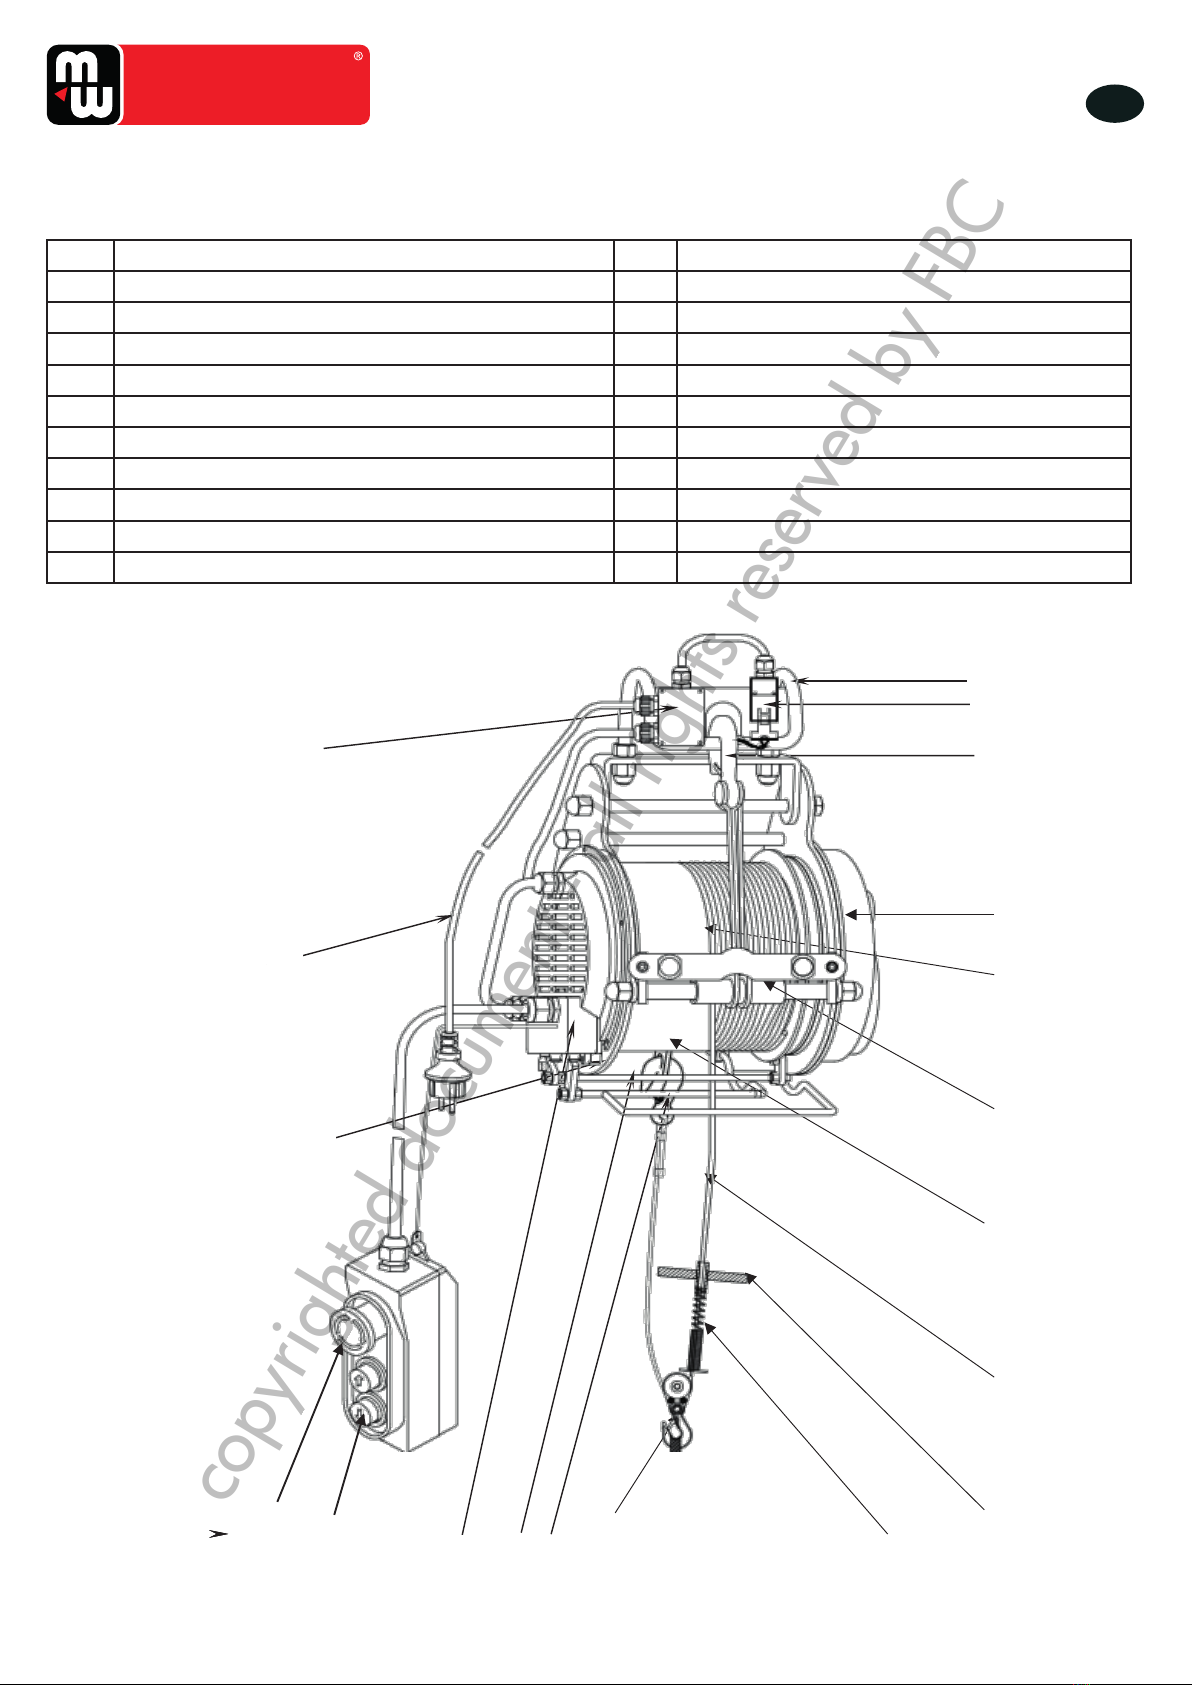
3 Omschrijving ......................................................................................................................................................... 4
4 Toepassingsgebied................................................................................................................................................. 5
5 Voorbereiding........................................................................................................................................................ 5
6 Installatie............................................................................................................................................................... 5
7 Gebruik ................................................................................................................................................................ 6
8 Onderhoud en reiniging.......................................................................................................................................... 7
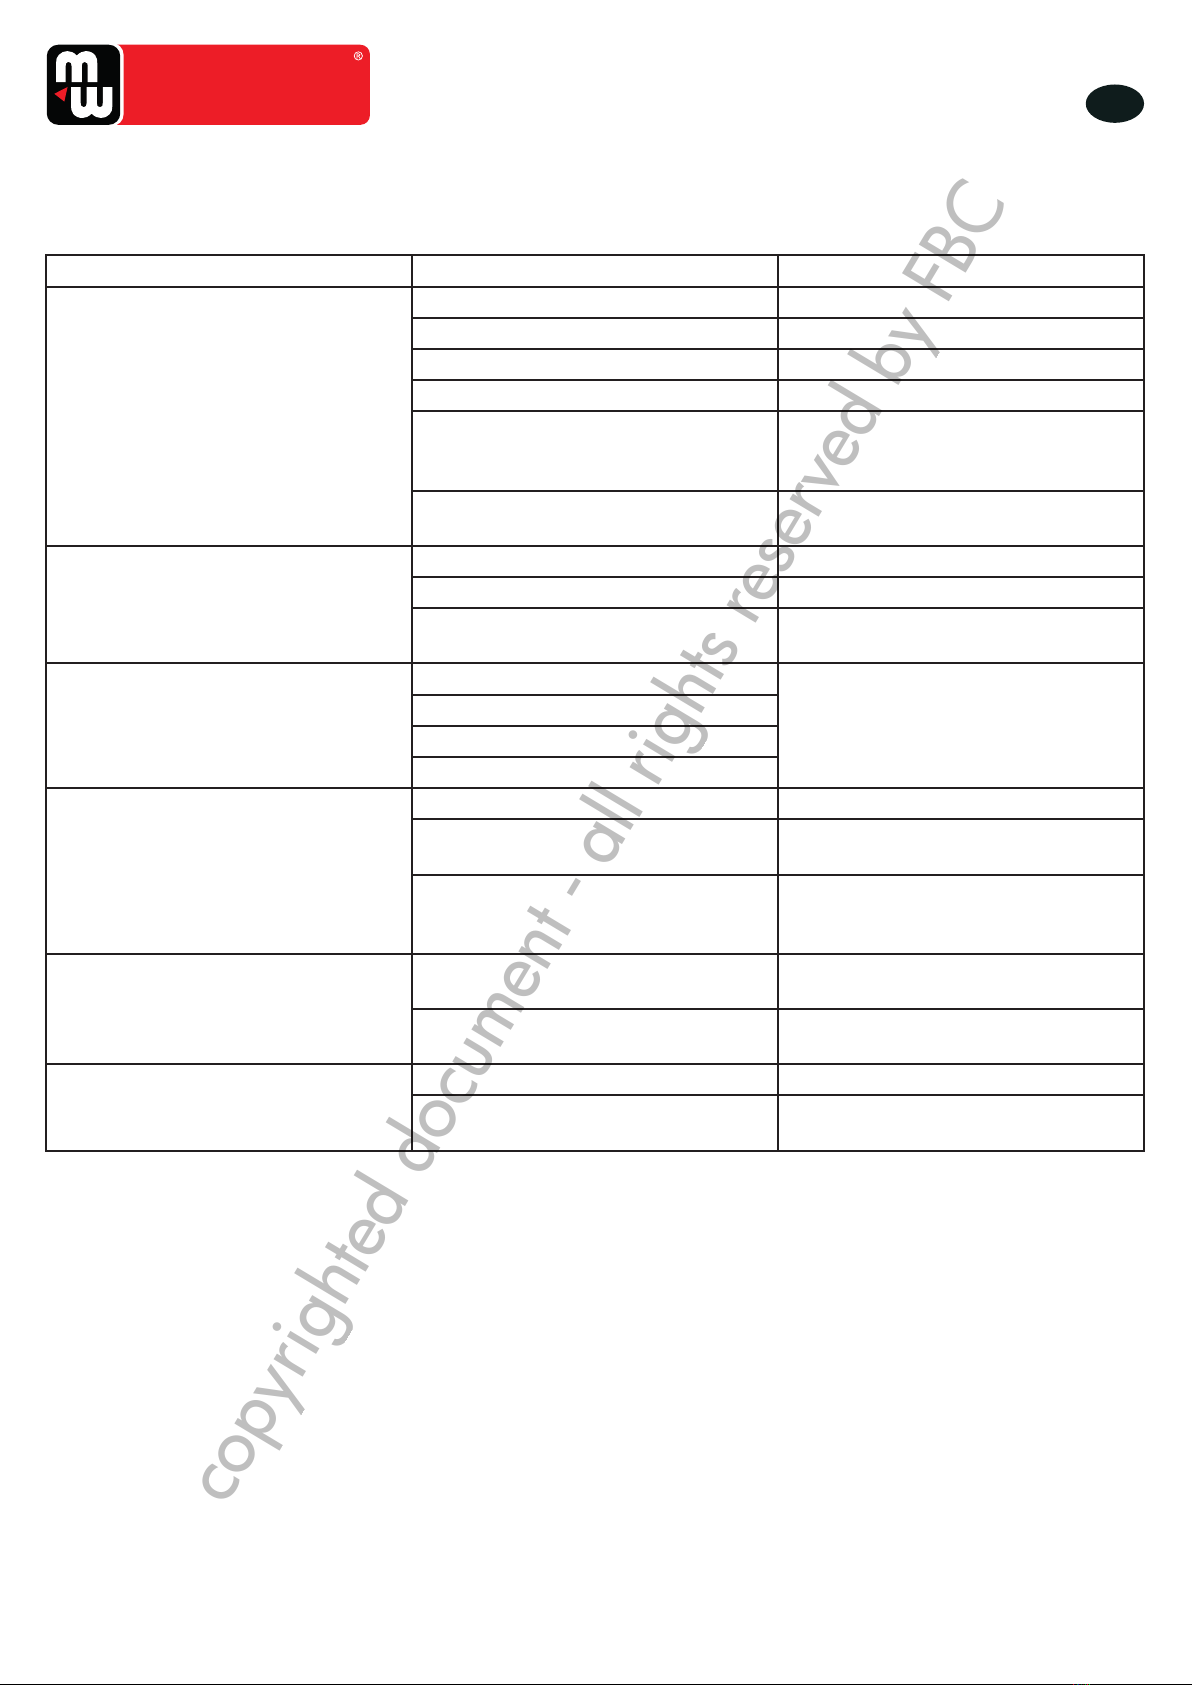
9 Storingen .............................................................................................................................................................. 8
10 Onderdelen....................................................................................................................................................... 23
11 EG conformiteitsverklaring - PH400....................................................................................................................... 26
12 EG conformiteitsverklaring - Afstandsbediening voor PH400-R.................................................................................. 27
copyrighted document - all rights reserved by FBC

M1.1.PH400-PH400R.NLFREN
3
NL TOOLS
2 Technische specicaties
Model PH400 / PH400-R
Nominale spanning 230 V
Nominale frequentie 50 Hz
Nominaal vermogen 1300 W
Nominale stroom 5,6 A
Max. draagkracht voor eenvoudige kabel 400 kg
Max. draagkracht voor dubbele kabel 800 kg
Kabelsnelheid voor eenvoudige kabel 8 m/min
Kabelsnelheid voor dubbele kabel 4 m/min
Hefhoogte voor eenvoudige kabel 32 m
Hefhoogte voor dubbele kabel 16 m
Kabeldiameter 5,0 mm
Treksterkte 1870 N/mm²
Beschermingsklasse IP54
Motor categorie M1
Inschakelduur S3 20% - 10 min
Beschermingsgraad I
Gewicht 35 kg
Afmetingen (l x b x h) 510 x 410 x 455 mm
Geluidsniveau (LWA) 71 dB(A)
De hier vermelde LWA waarde geldt alleen voor dit toestel. Of de bediener verplicht is om een gehoorbescherming te dragen
kan hier niet worden vastgesteld. Dit is afhankelijk van de geluiden die het oor van de bediener bereiken, en dus van de
werkomstandigheden, zoals andere geluidsbronnen in de omgeving. Hoewel het niet expliciet kan worden vereist, is het in uw
eigen belang om altijd een gehoorbescherming te dragen bij het bedienen van dit toestel.
2.1 Draadloze afstandsbediening voor PH400-R
Werking frequentie FM419m (20CH)
Emissieafstand < 100 m
Stroomvoeding ontvanger 36 V - 48 V - 220 V - 380 V
Output interface Relais
Ontvangstrichting 360° unidirectioneel
Vermogen zender < 10 MW
Werktemperatuur -20 °C ~ +65 °C
Relatieve vochtigheid < 85 %
Beschermingsklasse zender IP54
Beschermingsklasse ontvanger IP65
copyrighted document - all rights reserved by FBC

M1.1.PH400-PH400R.NLFREN
4
NL
TOOLS
3
12
Overview
1. Switch box 11. Spring buffer unit
2. Plug with power cord 12. Limit weight
3. Down limit pole for limit stop 13. Steel cable line
4. Handle connection cable 14. Double line hook hanging device
5. Emergency-Off switch 15. Automatic rope rolling device
6. Controlling handle with Operating switch
Up/Down
16. Steel rope drum assembly
7. Junction box 17. Gear box
8. Uplimit assembly for limit stop 18. Additional Protection hook
9. Load hook 19. Safety switch
1
2
19
3
13
14
15
16
18
17
20
5
67910
11
8
3 Omschrijving
No Omschrijving No Omschrijving
1 Schakelkast 11 Dempende veer
2 Stekker met voedingskabel 12 Gewicht van de aanslag
3 Onderste stop voor de aanslag 13 Stalen kabel
4 Verbindingskabel afstandsbediening 14 Hangsysteem met een haak en een dubbele lijn
5 Noodstopknop 15 Automatische kabelgeleiding
6 Afstandsbediening met knop Op/Neer 16 16. Trommel voor de stalen kabel
7 Aansluitdoos 17 Tandwielkast
8 Bovenste stop voor de aanslag 18 Extra veiligheidshaak
9 Lasthaak 19 Veiligheidsschakelaar
10 Riemschijf haak 20 Ophangrek met haak
copyrighted document - all rights reserved by FBC

M1.1.PH400-PH400R.NLFREN
5
NL TOOLS
4 Toepassingsgebied
• Deze takel is geschikt voor het optillen en neerlaten van lasten.
• Het is verboden mensen of dieren op te tillen.
• De lasten moeten altijd verticaal opgetild worden.
• Elk ander gebruik is verboden.
• Als het vermogen te laag is om een last op te tillen, controleer of de netspanning 230 V bedraagt. De takel werkt optimaal
met een 230 V spanning. Als de spanning lager is, verminder de belasting.
5 Voorbereiding
Voor het begin van het werk, moeten sommige voorbereidingsoperaties uitgevoerd worden:
• Maak zeker dat de kenmerken van het stroomnet met deze van het toestel overeenstemmen, en dat het toester met een
stekker is uitgerust.
• Maak een test zonder last, en controleer de volgende punten:
a. De exibiliteit van de “Op/Neer knop (up/down), voor een goede controle van de beweging van de lasthaak,
b. De werking van de bovenste stop, die de stroomtoevoer onderbreekt,
c. De werking van de onderste stop, die de stroomtoevoer onderbreekt als de kabel bijna ontrold is,
d. Abnormale geluiden tijdens de werking,
e. Als de stalen kabel beschadigd is (gerafeld of gebogen), of als hij 20 werkuren heeft bereikt, vervang deze.
• Controleer het remschijf alle 20 werkuren. Als de last niet goed gehouden is, of als de rem niet soepel werkt, vervang de
beschadigde onderdelen onmiddellijk.
• Controleer de haak voor gebruik, en vervang deze als beschadigd of vervormd.
• Het toestel is met een reststroom beveiliging uitgerust (rode noodstop knop), die extra bescherming biedt in geval van
gevaar en in noodsituaties. Nadat de noodstop werd geactiveerd, draai de knop in de richting van de pijl, om deze te
ontgrendelen nadat het gevaar verwijderd is.
• Zorg voor een voldoende smering van de onderdelen. Smeer de haak, de kabeltrommel, de vertragingsdoos en de lagers
alle zes maanden.
• Smeer de houder van de as van de trommel wanneer u de stalen kabel vervangt. Vervang de kabel onmiddellijk als deze
beschadigd is.
• Ontkoppel de takel van de stroomtoevoer voor het onderhoud of reparatiewerken.
• Voor de ingebruikname, controleer de takel op transportschade. Als er een probleem is neem onmiddellijk contact op met
uw verdeler.
5.1 Correct oprollen van de kabel
6 Installatie
De elektrische takel is gemakkelijk te installeren via het ophangrek met haakje. Hij kan direct geïnstalleerd worden op
een dwarsbalk met een externe diameter van 50 mm. De dwarsbalk wordt vastgemaakt aan een staande pijler, die in de
werkplaats gemonteerd is volgens de vereisten van de gebruiker. Zorg ervoor dat de pijler stevig genoeg gemonteerd is om
voor een langere tijd lasten te kunnen dragen.
Zorg ervoor dat de veiligheidshaak zich in de juiste positie bevindt en plaats de veiligheidssleutel correct in de
veiligheidsschakelaar.
13
Clean the device using adamp cloth and some liquid soap. Never use cleaning agents or
solvents, these could damage the device's plastic parts.
Regularly inspect the total length of the steel cable for damages as well as the functionality of
the limit bracket (2) (Wind cable winch until the limit weight (5) activates the limit bracket of the
limit switch).
If the steel cable is damaged (split or bent,see below),aprofessional must replace it using
original replacement parts.
During assembly of the cable,it is imperative to remember the limit weight (5) in order to ensure
a secure limit stop.
Inspect the free movement of all mechanical components after the power plug has been
disconnected.
Replace lost parts only with original parts.
Return the device to your seller to ensure professional recycling.
The machine should be repaired totally after continuously 20hours working time according to
operation frequency, usually make a repair annually. And the machine should be abandoned
reaching to 100hours working time.
Correct winding of steel rope
Problem-Solving
Common Malfunction Cause Solution
Correct
Niet correct Niet correct
copyrighted document - all rights reserved by FBC

M1.1.PH400-PH400R.NLFREN
6
NL
TOOLS
7 Gebruik
1. De takel wordt vanaf de sturingsdoos bediend (afb. 1, 10). Als de knop naar boven wordt gedrukt, wordt de last opgetild.
Als de knop naar beneden wordt gedrukt, wordt de last neergelaten. Schakel nooit direct van de ene positie naar de
andere. Stop altijd de takel alvorens van richting te veranderen.
2. In noodgeval, of om een herstarten te voorkomen, druk op de noodstop knop (afb. 1, 9), om de takel onmiddellijk
te stoppen. Om de takel opnieuw te kunnen gebruiken, draai de noodstop knop naar rechts, om de rode sleutel te
ontgrendelen.
3. De takel is met twee aanslagen voorzien. Als de lasthaak tot de hoogste positie komt, raakt het gewicht de bovenste
aanslag. De microschakelaar van de bovenste aanslag onderbreekt de stroomtoevoer en stopt de motor, om de veiligheid
te garanderen. Als de lasthaak naar beneden gaat, en de kabel bijna ontrold is, wordt de stroomtoevoer door de
microschakelaar onderbroken, om de motor te stoppen.
AANDACHT!
Als de kabel zo ontrold is, dat de rode markering zichtbaar is, moet de takel gestopt worden. In
geen ieder geval mag de kabel verder ontrold worden.
4. Als de takel de last niet onmiddellijk kan hijsen, stop deze onmiddellijk, om een ongeval te voorkomen.
5. Maak zeker dat de last stevig aan de haak bevestigd is. Houd de grootst mogelijke afstand tussen de last en de kabel
tijdens het optillen.
6. Wanneer u de last doet zakken, vergeet nooit dat de kabel nog van een paar centimeter kan ontrollen na het stoppen.
7. Maak zeker dat de kabel nooit meer dan 15° kan hellen.
8. De takel kan gebruikt worden met een eenvoudige of een dubbele kabel. Het draagvermogen is dan verschillend.
Raadpleeg de technische specicaties.
9. Na het uitpakken van de takel, controleer dat er geen ontbrekend of beschadigd onderdeel is. Controleer ook dat de
kabelaansluitingen in goede staat zijn, en dat de motor geen waterschade vertoont.
10. De elektrische riemschijf werkt op een eenfasige stroomvoeding. De nominale spanning bedraagt 230 V + 20%, de
nominale frequentie bedraagt 50 Hz + 1%. De motor moet geaard worden. Een bescherming tegen overspanning moet op
de stroomvoeding geïnstalleerd worden.
11. Na de elektrische aansluiting van de takel, mag de riemschrijf in Jog modus opgehesen en verlaagd worden. Maak eerst
een test zonder last. Als u vaststelt dat de beweging stabiel is, en dat de rem goed werkt, maak een test met een last.
12. De kamertemperatuur moet tussen 5 en 40 °C bedragen. De hoogte boven de zeespiegel moet lager dan 1000 m
bedragen.
De luchtvochtigheid moet tussen 30 en 95% bedragen.
De opslag- en transporttemperatuur moet tussen 5 en 55 °C bedragen.
Intermitterende werking
Dit toestel is ontworpen voor een werking type S3 20% - 10 min (periodieke intermitterende werking). De relatieve
inschakelduur is 20%. Dit betekent, dat het toestel 2 minuten mag werken tijdens een cyclus van 10 minuten, en dan 8 minuten
uitgeschakeld moet worden, om af te koelen. Het toestel mag dus voor een duur van 20% van de totale werkcyclus van 10
minuten bij nominale belasting gebruikt worden.
Overbelasting
• De takel is niet geschikt voor een continu gebruik. De motor wordt tegen overbelasting en oververhitting door een
thermische schakelaar beschermd.
• Als de toegelaten werkingsduur overschreden is, gaat de temperatuur van de motor stijgen, en de thermische schakelaar de
takel uitschakelen. De thermische schakelaar zal automatisch gedeactiveerd worden na de motor afgekoeld is.
• Als de takel voor een minder zware last gebruikt wordt, zal de werkingsduur langer zijn, et de koeltijd korter.
AANDACHT!
Als de takel aan de zon blootgesteld is, zal de temperatuur van de behuizing hoger zijn, en de
toelaatbare werkingsduur aanzienlijk korter zijn. De thermische schakelaar kan dan vroeger
geactiveerd worden. Wacht tot de motor afgekoeld is.
copyrighted document - all rights reserved by FBC

M1.1.PH400-PH400R.NLFREN
7
NL TOOLS
Gebruik met dubbele kabel
Draai de 3 schroeven van de extra lasthaak, en verwijder de deksel aan de zijkant. Plaats de stalen kabel om de afwijkende
as, en sluit de deksel en draai de schroeven opnieuw vast. Zorg ervoor, dat de lasthaak en de afwijkende as goed
geïnstalleerd zijn, en dat de schroeven goed vastgedraaid zijn.
Steek de lasthaak in de houder op de montagebeugel.
12
l) After connecting the power supply, the pulley can then be raised and lowered in Jog-mode.
One can raise and lower start-up during a dry-run. First when the up and down movement is
stable and the brakes work flawlessly, once can test the pulley with a dummy load.
m) The surrounding area temperature should be between 50-40℃. The height about sea
level needs to be under 1000m. The area dampness should be at 30-95%.
The temperature for the storage and transport should be about -25℃up to 55℃.
Intermittent rating
This machine is designed for operating type S320% -10 min (periodic intermittent operation).
The relative duty cycle is 20%, which means that the device can be operated at rated load for
2.0 minutes during each operating cycle and must then be switched off for 8. 0minutes to cool
off. The device can therefore be continuously used for aduration of 20% of the total operating
cycle of 10 minutes at rated load.
Overload
a) The cable winch is not suitable for continuous operation. The motor is protected from
overload and overheating by a temperature switch.
b) If the permissible operating time is exceeded, the motor temperature will increase and the
temperature switch will shut the cable winch off. The temperature switch will automatically
switch back on after a cooling phase.
c)In case of a strain on the cable hoist with a lesser load,the operating time will increase and
the cooling time will decrease.
d) Attention! In case of direct exposure to sunlight, the temperature of the casing will increase
significantly, which will also decrease the permissible operating time. It is therefore possible
that the temperature switch will switch off after a short time period and the cable winch will shut
down. Please wait until the device is cooled off.
Operation with double cable line
Loosen the nuts of the 3 screws located on the additional load hook and remove the cover plate
located on the side. Place the steel cable around the deviating shaft and reattach the cover
plate and nuts. Please be sure that the load hook /deviating shaft is installed properly and that
the nuts are securely tightened.
Please insert the load hook attached to the cable into the hook bracket of the mounting casing.
Maintenance and Cleaning
Disconnect the power plug
prior to performing any work on the device.
12
temperature switch will shut the cable winch off. The temperature switch will automatically switch
back on after a cooling phase.
c)In case of a strain on the cable hoist with a lesser load,the operating time will increase and
the cooling time will decrease.
d) Attention! In case of direct exposure to sunlight, the temperature of the casing will increase
significantly, which will also decrease the permissible operating time. It is therefore possible that
the temperature switch will switch off after a short time period and the cable winch will shut down.
Please wait until the device is cooled off.
Operation with double cable
Loosen the nuts of the 3 screws located on the additional load hook (dia. 1, item 4) and remove the
cover plate located on the side. Place the steel cable around the deviating shaft and reattach the
cover plate and nuts. Please be sure that the load hook /deviating shaft is installed properly and
that the nuts are securely tightened.
Please insert the load hook (3) attached to the cable into the hook bracket of the mounting casing
(7).
Maintenance and Cleaning
Disconnect the power plug prior to performing any work on the device.
Clean the device using adamp cloth and some liquid soap. Never use cleaning agents or solvents,
these could damage the device's plastic parts.
Regularly inspect the total length of the steel cable for damages as well as the functionality of the
limit bracket (2) (Wind cable winch until the limit weight (5) activates the limit bracket of the limit
switch).
If the steel cable is damaged (split or bent,see dia. below),aprofessional must replace it using
original replacement parts.
During assembly of the cable,it is imperative to remember the limit weight (5) in order to ensure a
secure limit stop.
Inspect the free movement of all mechanical components after the power plug has been
disconnected.
Gerafelde kabel Gebogen kabel
8 Onderhoud en reiniging
• Trek de stekker voor het onderhoud of de reiniging van de takel.
• Maak de takel schoon met een vochtig doek met vloeibare zeep. Gebruik geen oplosmiddel, dat de kunststof onderdelen
kan beschadigen.
• Controleer de stalen kabel regelmatig, en ook de werking van de veiligheidsschakelaar. (Rol de kabel op, tot het gewicht
van de aanslag de veiligheidsschakelaar activeert).
• Als de stalen kabel beschadigd is (gerafeld of gebogen, zie afb. 5 hieronder), laat deze door een professioneel
vervangen. Gebruik steeds originele onderdelen.
• Bij de montage van de kabel, vergeet het gewicht van de aanslag niet, dat onmisbaar is voor het activeren van de
veiligheidsschakelaar.
• Controleer de beweging van alle mechanische delen, nadat de takel van de stroomtoevoer ontkoppeld werd.
• Vervang de beschadigde onderdelen door originele onderdelen.
• Breng het gebruikte toestel naar uw verdeler terug, voor een professionele recyclage.
• De machine moet na iedere 20 werkuren nagekeken worden, dit is doorgaans jaarlijks, afhankelijk van hoe intensief de
machine gebruikt wordt. Na 100 werkuren mag de machine niet meer gebruikt worden.
copyrighted document - all rights reserved by FBC

M1.1.PH400-PH400R.NLFREN
8
NL
TOOLS
9 Storingen
Storingen Oorzaken Oplossingen
De On/Off schakelaar wordt bediend,
maar de motor start niet op Het toestel is niet aangesloten Sluit het toestel aan
De elektrische kabels zijn beschadigd Controleer en sluit de kabels aan
Schakelaar defect Repareer of vervang de schakelaar
De condensator is doorgebrand Vervang de condensator
De veiligheidsschakelaar werd
niet gereset, of fout van de
veiligheidsschakelaar
Controleer de veiligheidsschakelaar en
vervang deze indien nodig
De thermische schakelaar werd
ingeschakeld of is defect Wacht tot het toestel afgekoeld is, of
vervang de thermische schakelaar
De richtingsschakelaar werd bediend.
De motor maakt veel lawaai, maar de
last kan niet opgetild worden
De netspanning is te laag Pas het werk aan de netspanning aan
De condensator is beschadigd Vervang de stroomtoevoer
De rem is niet volledig los Laat door een gekwaliceerde technicus
repareren
Na een stroomuitval, houden de
remmen de last niet, of de last glijdt Te veel lucht tussen de remmen Laat door een gekwaliceerde technicus
repareren
De remveer is gescheurd
De remschijf zit vast
De remschijf is vuil
Het toestel begint veel lawaai te doen Onvoldoende smering Smeer het toestel
Na een lange werkingsduur, zijn het
tandwiel en de lagers beschadigd Vervang het tandwiel of de lagers
Het toestel is niet correct geïnstalleerd Controleer de installatie, of laat deze
door een gekwaliceerde elektricien
controleren
Te hoge spanning Foute aarding Controleer de draden en sluit deze
correct aan
De interne aansluitingen zijn in contact
met de behuizing Controleer alle interne aansluitingen
De veiligheidsschakelaar werkt niet Veiligheidsschakelaar defect Vervang de veiligheidsschakelaar
Veiligheidsschakelaar geblokkeerd Controleer, repareer of vervang de
veiligheidsschakelaar
copyrighted document - all rights reserved by FBC

9
M1.1.PH400-PH400R.NLFREN
FR TOOLS
1 Sécurité
ATTENTION!
Lisez ces instruction et conservez-les soigneusement, an de pouvoir les consulter à tout moment.
Nous déclinons toute responsabilité en cas d’accident dû au non-respect de ces instructions.
Cet appareil est destiné à un usage privé, et non à un usage commercial ou professionnel.
N’utilisez jamais l’appareil pour soulever des personnes ou des animaux.
Ne restez jamais sous une charge en suspension.
• Gardez votre espace de travail propre et rangé.
• Veillez à un éclairage sufsant de l’espace de travail. N’utilisez pas l’appareil dans un endroit avec un risque potentiel
d’incendie, en présence de liquides facilement inammables, ou dans un environnement explosif. N’exposez pas l’appareil
à la pluie, à la vapeur, au soleil, à la poussière ou au froid.
• Évitez tout contact avec les surfaces mises à la terre.
• Tenez les enfants et autres personnes non autorisées en dehors de l’espace de travail.
• Ne dépassez pas la capacité de charge maximale.
• N’utilisez pas 2 ou plusieurs appareils pour soulever un objet.
• Portez des vêtements près du corps. Ne portez pas d’accessoires (bijoux, ...) qui pourraient être entraînés par les pièces
mobiles de l’appareil.
• Portez toujours des équipements de sécurité (gants, chaussures antidérapantes, protection oculaires et auditives).
• Tenez le câble d’alimentation loin de la chaleur, de l’huile et des bords tranchants.
• Contrôlez le bon état du câble d’alimentation avant chaque utilisation.
• Veillez toujours à avoir une position bien stable et un bon équilibre.
• Débranchez l’appareil quand il n’est pas en service et pour les travaux d’entretien.
• Le treuil est destiné à une utilisation intérieure uniquement, ne l’utilisez pas à l’extérieur.
• Inspectez le treuil avant chaque utilisation. Toute pièce endommagée doit être immédiatement réparée ou remplacée par
un professionnel.
• Utilisez uniquement les accessoires recommandés par le fabricant.
• Hissez les charges à la vitesse la plus faible depuis le sol. Le câble doit être tendu, mais pas déroulé quand vous
commencez à hisser la charge.
• Si les freins ne fonctionnent plus et que la charge descend rapidement, pressez immédiatement le bouton d’arrêt d’urgence.
Après avoir enlevé la charge, faites réparer le treuil par un professionnel.
• Il est interdit de modier le treuil ou de le démonter.
• Après 20 heures d’utilisation, et au moins une fois par an, le treuil doit subir un entretien approfondi par un service
technique agréé.
• Lors de l’utilisation de la commande à distance sans l, travaillez toujours à une distance visible.
• N’utilisez pas la commande à distance sans l dans un environnement à fort champ magnétique.
• Si le témoin lumineux rouge s’allume dans le bas du boîtier de commande remplacez la pile.
• Si l’appareil n’est pas utilisé pendant une longue période, retirez la pile du boîtier de commande.
Table des matières
1 Sécurité.................................................................................................................................................................9
2 Spécications techniques.......................................................................................................................................10
3 Description .......................................................................................................................................................... 11
4 Champs d’application...........................................................................................................................................12
5 Préparation ......................................................................................................................................................... 12
6 Installation...........................................................................................................................................................12
7 Utilisation............................................................................................................................................................13
8 Entretien et nettoyage............................................................................................................................................ 14
9 Résolution de problèmes........................................................................................................................................15
10 Pièces détachées................................................................................................................................................ 23
11 Déclaration de conformité CE - PH400.................................................................................................................. 26
12 Déclaration de conformité CE - Télécommande pour PH400-R.................................................................................. 27
copyrighted document - all rights reserved by FBC

10
M1.1.PH400-PH400R.NLFREN
FR
TOOLS
2 Spécications techniques
Modèle PH400 / PH400-R
Tension nominale 230 V
Fréquence nominale 50 Hz
Puissance nominale 1300 W
Courant nominal 5,6 A
Capacité de charge max. câble simple 400 kg
Capacité de charge max. câble double 800 kg
Vitesse du câble pour câble simple 8 m/min
Vitesse du câble pour câble double 4 m/min
Hauteur de levage pour câble simple 32 m
Hauteur de levage pour câble double 16 m
Diamètre du câble 5,0 mm
Résistance à la traction 1870 N/mm²
Classe de protection IP54
Catégorie du moteur M1
Cycle de travail S3 20% - 10 min
Indice de protection I
Poids 35 kg
Dimensions (L x l x h) 510 x 410 x 455 mm
Niveau sonore (LWA) 71 dB(A)
La valeur LWA indiquée concerne uniquement le niveau sonore émis par l’appareil. Le fait que l’utilisateur doive porter une
protection auditive ne peut être déterminé ici. Cela dépend du niveau sonore atteignant l’oreille de l’utilisateur, et donc des
conditions de travail existantes, telles que d’autres sources de bruit à proximité. Même si ce n’est pas explicitement requis, il est
toujours conseillé de porter une protection auditive lors de l’utilisation de l’appareil.
2.1 Télécommande sans l pour PH400-R
Fréquence de fonctionnement FM419m (20CH)
Distance d’émission < 100 m
Alimentation du récepteur 36 V - 48 V - 220 V - 380 V
Interface de sortie Relais
Direction de réception 360° unidirectionnel
Puissance de l’émetteur < 10 MW
Température de service -20 °C ~ +65 °C
Humidité relative < 85 %
Classe de protection émetteur IP54
Classe de protection récepteur IP65
copyrighted document - all rights reserved by FBC

11
M1.1.PH400-PH400R.NLFREN
FR TOOLS
3
12
Overview
1. Switch box 11. Spring buffer unit
2. Plug with power cord 12. Limit weight
3. Down limit pole for limit stop 13. Steel cable line
4. Handle connection cable 14. Double line hook hanging device
5. Emergency-Off switch 15. Automatic rope rolling device
6. Controlling handle with Operating switch
Up/Down
16. Steel rope drum assembly
7. Junction box 17. Gear box
8. Uplimit assembly for limit stop 18. Additional Protection hook
9. Load hook 19. Safety switch
1
2
19
3
13
14
15
16
18
17
20
5
67910
11
8
3 Description
No Description No Description
1 Boîtier électrique 11 Amortisseur à ressort
2 Fiche avec câble d’alimentation 12 Poids de la butée
3 Limite inférieure de la butée 13 Câble en acier
4 Câble de branchement de la poignée 14 Système de suspension avec crochet et
câble double
5 Bouton d’arrêt d’urgence 15 Système d’enroulement automatique
6 Manette de commande avec fonction montée/descente 16 Tambour pour l’enroulement du câble
7 Boîtier de connexion 17 Boîte de vitesse
8 Limite supérieure de la butée 18 Crochet de protection additionnel
9 Crochet pour la charge 19 Interrupteur de sécurité
10 Crochet de la poulie 20 Crochet de suspension
copyrighted document - all rights reserved by FBC

12
M1.1.PH400-PH400R.NLFREN
FR
TOOLS
4 Champs d’application
• Ce treuil est conçu pour lever et abaisser des charges.
• Il est interdit de soulever des personnes ou des animaux.
• Les charges doivent toujours être soulevées verticalement.
• Toute autre utilisation est interdite.
• Si la puissance est trop faible pour soulever une charge, vériez si la tension du réseau est bien de 230 V. Le treuil
fonctionne de manière optimale sur du 230 V. Si la tension est inférieure, diminuez la charge.
5 Préparation
Avant le début du travail, vous devez effectuez certaines opérations de préparation :
• Assurez-vous que les caractéristiques du réseau électriques correspondent à celles de l’appareil, et que l’appareil est
équipé d’une che électrique.
• Effectuez un test sans charge, et vériez les points suivants :
a. La souplesse du bouton de montée et de descente (up/down) pour assurer le contrôle du mouvement du crochet de
charge,
b. Le fonctionnement de l’arrêt supérieur, qui assure la coupure du circuit,
c. Le fonctionnement de l’arrêt inférieur, qui assure la coupure du circuit quand le câble est presque déroulé,
d. Tout bruit anormal pendant le fonctionnement,
e. Si le câble d’acier est endommagé (efloché ou croqué), ou a atteint 20 heures de fonctionnement, remplacez-le.
• Contrôlez le disque de frein toutes les 20 heures de fonctionnement. Si la charge n’est pas bien maintenue, ou que le frein
maque de souplesse, remplacez immédiatement les pièces défectueuses.
• Contrôlez le crochet avant utilisation, et remplacez-le s’il est endommagé ou déformé.
• L’appareil est muni d’un dispositif de protection à courant résiduel (bouton d’arrêt d’urgence rouge), qui offre une
protection supplémentaire en cas de danger. Quand l’arrêt d’urgence a été enclenché, tournez-le dans le sens de la èche
pour le déverrouiller lorsque tout danger a été éliminé.
• Veillez à une lubrication sufsante des pièces. Graissez le crochet, l’axe du tambour du câble, la boîte de ralentissement
et les roulements tous les six mois.
• Graissez le logement de l’axe du tambour lorsque vous remplacez le câble d’acier. Remplacez immédiatement le câble s’il
est endommagé.
• Débranchez le treuil avant l’entretien ou une réparation.
• Avant la mise en service, vériez si le treuil n’a pas subit de dommages pendant le transport. En cas de problème, prenez
contact immédiatement avec votre revendeur.
5.1 Enroulement correct du câble en acier
6 Installation
Le treuil électrique est facile à installer grâce à la suspension avec crochet. Vous pouvez l’installer directement sur une traverse
ayant un diamètre externe de 50 mm. La traverse est xée sur une colonne, qui est placée dans l’atelier selon les exigences
de l’utilisateur. Faites attention de monter la colonne assez solidement, an qu’elle puisse porter des charges pour de longues
périodes.
Positionnez le crochet de protection correctement et placez la clé de sécurité correctement dans l’interrupteur de sécurité.
13
Clean the device using adamp cloth and some liquid soap. Never use cleaning agents or
solvents, these could damage the device's plastic parts.
Regularly inspect the total length of the steel cable for damages as well as the functionality of
the limit bracket (2) (Wind cable winch until the limit weight (5) activates the limit bracket of the
limit switch).
If the steel cable is damaged (split or bent,see below),aprofessional must replace it using
original replacement parts.
During assembly of the cable,it is imperative to remember the limit weight (5) in order to ensure
a secure limit stop.
Inspect the free movement of all mechanical components after the power plug has been
disconnected.
Replace lost parts only with original parts.
Return the device to your seller to ensure professional recycling.
The machine should be repaired totally after continuously 20hours working time according to
operation frequency, usually make a repair annually. And the machine should be abandoned
reaching to 100hours working time.
Correct winding of steel rope
Problem-Solving
Common Malfunction Cause Solution
Incorrect Incorrect Correct
copyrighted document - all rights reserved by FBC

13
M1.1.PH400-PH400R.NLFREN
FR TOOLS
7 Utilisation
1. Le treuil est commandé à partir du boîtier de commande (g. 1, 10). Si le bouton est poussé vers le haut, la charge est
soulevée. Si le bouton est poussé vers le bas, la charge est abaissée. Ne passez jamais directement d’une position à
l’autre. Arrêtez toujours le treuil avant de changer de direction.
2. En cas d’urgence, ou pour empêcher un redémarrage, appuyez sur le bouton d’arrêt d’urgence (g. 1, 9) pour stopper
immédiatement le treuil. Pour que le treuil soit à nouveau opérationnel, tournez le bouton d’arrêt d’urgence vers la droite,
ce qui va déverrouiller la clé rouge.
3. Le treuil est équipé de deux butées d’arrêt. Quand le crochet de charge arrive en haut, le poids de la butée touche l’arrêt,
le microrupteur de la butée supérieure coupe l’arrivée de courant, et donc stoppe le moteur, pour assurer la sécurité.
Quand le crochet de charge arrive en bas, et que le câble est presque entièrement déroulé, le microrupteur de la butée
inférieure coupe l’arrivée de courant, et donc stoppe le moteur.
ATTENTION !
Si le câble est déroulé de sorte que la marque rouge soit visible, le treuil doit être stoppé. En
aucun cas, le câble ne peut être déroulé au-delà de ce point.
4. Si le treuil ne peut pas soulever une charge immédiatement, arrêtez-le immédiatement, pour éviter tout accident.
5. Assurez-vous que la charge est bien xée au crochet. Maintenez le plus de distance possible entre la charge et le câble en
acier pendant le travail.
6. Quand vous abaissez la charge, n’oubliez jamais que le câble peut encore se dérouler de quelques centimètre après avoir
été stoppé. Pour cette raison, stoppez-le toujours bien à temps.
7. Assurez-vous que le câble ne peut jamais pencher à plus de 15°.
8. Le treuil peut être actionné avec un câble simple ou double. La charge nominale est alors différente. Consultez le tableau
des spécications techniques.
9. Après déballage du treuil, vériez qu’il ne manque aucune pièce, et qu’elles sont en parfait état, que les connexions du
câble ne présentent aucun défaut, et que le moteur ne montre aucun signe de dégâts dus à de l’eau.
10. La poulie électrique fonctionne sur une alimentation électrique monophasée. La tension nominale est de 230 V + 20%,
la fréquence nominale est de 50 Hz + 1%. Le moteur doit être mis à la terre. Un protection contre la surtension doit être
installée sur l’alimentation électrique.
11. Après le branchement électrique du treuil, la poulie peut être levée et abaissée en mode Jog. Faites d’abord un test de
fonctionnement sans charge. Quand vous constatez que le mouvement est stable et que le frein fonctionne, faites un test
avec une charge ctive.
12. La température ambiante doit être comprise entre 5 et 40 °C. Le niveau au-dessus de la mer doit être inférieur à 1000 m.
L’humidité ambiante doit se situer entre 30 et 95 %.
La température de stockage et de transport doit être comprise entre 5 et 55 °C.
Fonctionnement intermittent
Cet appareil est conçu pour un fonctionnement de type S3 20% - 10 min (fonctionnement intermittent périodique). Le cycle de
travail relatif est de 20%, ce qui signie que l’appareil peut fonctionner 2 minutes pendant un cycle de 10 minutes, et doit être
ensuite arrêté pendant 8 minutes pour se refroidir. L’appareil peut donc être utilisé pendant une durée de 20% du cycle de
fonctionnement total de 10 minutes à la charge nominale.
Surcharge
• Le treuil n’est pas conçu pour une utilisation en continu. Le moteur est protégé contre la surcharge et la surchauffe par un
interrupteur thermique.
• Si le temps de fonctionnement admissible est dépassé, la température du moteur va s’élever et l’interrupteur thermique va
arrêter le treuil. L’interrupteur thermique va se débloquer automatiquement quand le moteur aura refroidi.
• Si le treuil est utilisé pour une charge moins lourde, le temps de fonctionnement va augmenter et le temps de refroidissement
va diminuer.
ATTENTION !
Si le treuil est exposé au soleil, la température sera plus élevée et le temps de fonctionnement
admissible diminuera sensiblement. Il est donc possible que l’interrupteur thermique se déclenche
plus tôt. Attendez alors que l’appareil ait refroidi.
copyrighted document - all rights reserved by FBC

14
M1.1.PH400-PH400R.NLFREN
FR
TOOLS
Utilisation avec un câble double
Desserrez les 3 vis du crochet de charge supplémentaire et enlevez le couvercle situé sur le côté. Placez le câble d’acier autour
de l’axe de déviation, et remettez le couvercle et les vis. Assurez-vous que le crochet de charge et l’axe de déviation sont bien
installé et les vis bien serrées.
Insérez le crochet de charge attaché au câble dans la xation du crochet sur le support de montage.
8 Entretien et nettoyage
• Débranchez le câble d’alimentation avant de travailler sur le treuil.
• Nettoyez le treuil avec un chiffon humide imprégné de savon liquide. N’utilisez pas de solvant, qui pourrait endommager
les parties en plastique.
• Inspectez régulièrement le câble d’acier, ainsi que le bon fonctionnement de l’interrupteur de sécurité. (Enroulez le câble
jusqu’à ce que le poids de la butée déclenche l’interrupteur de sécurité).
• Si le câble d’acier est endommagé (efloché ou plié, voir ci-dessous), faites-le remplacer par un professionnel. Utilisez
toujours des pièces de rechange originales.
12
l) After connecting the power supply, the pulley can then be raised and lowered in Jog-mode.
One can raise and lower start-up during a dry-run. First when the up and down movement is
stable and the brakes work flawlessly, once can test the pulley with a dummy load.
m) The surrounding area temperature should be between 50-40℃. The height about sea
level needs to be under 1000m. The area dampness should be at 30-95%.
The temperature for the storage and transport should be about -25℃up to 55℃.
Intermittent rating
This machine is designed for operating type S320% -10 min (periodic intermittent operation).
The relative duty cycle is 20%, which means that the device can be operated at rated load for
2.0 minutes during each operating cycle and must then be switched off for 8. 0minutes to cool
off. The device can therefore be continuously used for aduration of 20% of the total operating
cycle of 10 minutes at rated load.
Overload
a) The cable winch is not suitable for continuous operation. The motor is protected from
overload and overheating by a temperature switch.
b) If the permissible operating time is exceeded, the motor temperature will increase and the
temperature switch will shut the cable winch off. The temperature switch will automatically
switch back on after a cooling phase.
c)In case of a strain on the cable hoist with a lesser load,the operating time will increase and
the cooling time will decrease.
d) Attention! In case of direct exposure to sunlight, the temperature of the casing will increase
significantly, which will also decrease the permissible operating time. It is therefore possible
that the temperature switch will switch off after a short time period and the cable winch will shut
down. Please wait until the device is cooled off.
Operation with double cable line
Loosen the nuts of the 3 screws located on the additional load hook and remove the cover plate
located on the side. Place the steel cable around the deviating shaft and reattach the cover
plate and nuts. Please be sure that the load hook /deviating shaft is installed properly and that
the nuts are securely tightened.
Please insert the load hook attached to the cable into the hook bracket of the mounting casing.
Maintenance and Cleaning
Disconnect the power plug
prior to performing any work on the device.
12
temperature switch will shut the cable winch off. The temperature switch will automatically switch
back on after a cooling phase.
c)In case of a strain on the cable hoist with a lesser load,the operating time will increase and
the cooling time will decrease.
d) Attention! In case of direct exposure to sunlight, the temperature of the casing will increase
significantly, which will also decrease the permissible operating time. It is therefore possible that
the temperature switch will switch off after a short time period and the cable winch will shut down.
Please wait until the device is cooled off.
Operation with double cable
Loosen the nuts of the 3 screws located on the additional load hook (dia. 1, item 4) and remove the
cover plate located on the side. Place the steel cable around the deviating shaft and reattach the
cover plate and nuts. Please be sure that the load hook /deviating shaft is installed properly and
that the nuts are securely tightened.
Please insert the load hook (3) attached to the cable into the hook bracket of the mounting casing
(7).
Maintenance and Cleaning
Disconnect the power plug prior to performing any work on the device.
Clean the device using adamp cloth and some liquid soap. Never use cleaning agents or solvents,
these could damage the device's plastic parts.
Regularly inspect the total length of the steel cable for damages as well as the functionality of the
limit bracket (2) (Wind cable winch until the limit weight (5) activates the limit bracket of the limit
switch).
If the steel cable is damaged (split or bent,see dia. below),aprofessional must replace it using
original replacement parts.
During assembly of the cable,it is imperative to remember the limit weight (5) in order to ensure a
secure limit stop.
Inspect the free movement of all mechanical components after the power plug has been
disconnected.
• Pendant le montage du câble, n’oubliez pas le poids de la butée, indispensable pour le déclenchement de l’interrupteur de
sécurité.
• Vériez le mouvement de toutes les pièces mécaniques après avoir débranché l’appareil.
• Remplacez les pièces endommagées par des pièces détachées originales.
• Retournez l’appareil usagé chez votre revendeur pour un recyclage professionnel.
• Le treuil doit être contrôlé après chaque cycle de 20 heures de fonctionnement ininterrompu, et en fonction de la fréquence
d’utilisation, généralement une fois par an. Il doit être mis hors service après 100 heures de fonctionnement.
Câble efloché Câble plié
copyrighted document - all rights reserved by FBC

15
M1.1.PH400-PH400R.NLFREN
FR TOOLS
9 Résolution de problèmes
Pannes Causes Solutions
L’interrupteur On/Off est actionné mais
le moteur de démarre pas L’appareil n’est pas branché Branchez l’appareil
Les câbles électriques sont endommagés Vériez les câbles et rebranchez-les
Interrupteur défectueux Réparez ou remplacez l’interrupteur
Le condensateur est grillé Remplacez le condensateur
L’interrupteur de sécurité n’a pas été
réinitialisé ou erreur de l’interrupteur de
sécurité
Vériez l’interrupteur de sécurité, et
remplacez-le si nécessaire
L’interrupteur thermique s’est déclenché
ou est défectueux Attendez que l’appareil refroidisse, ou
remplacez l’interrupteur thermique
L’interrupteur de direction a été
actionné. Le moteur est très bruyant,
mais le treuil ne peut pas soulever la
charge
La tension du réseau est trop basse Adaptez votre travail à la tension du
réseau
Le condensateur est endommagé Changez l’alimentation électrique
Le frein n’est pas complètement desserré Faites réparer l’appareil par un
technicien qualié
Après une coupure de courant, les freins
ne tiennent pas ou la charge glisse vers
le bas
Trop d’air entre les freins Faites réparer l’appareil par un
technicien qualié
Le ressort des freins est cassé
Le disque de frein est bloqué
Le disque de frein est sale
Le bruit de l’appareil commence à être
plus fort Lubrication insufsante Graissez l’appareil
Après une longue utilisation, la
roue dentée et les roulements sont
endommagés
Remplacez la roue dentée ou les
roulements
L’appareil est mal installé Vériez l’installation ou faites-le faire
par un technicien qualié
Tension trop élevée Erreur de mise à la terre Vériez les ls de terre et connectez-les
correctement
Les connections internes sont en contact
avec le boîtier Vériez toutes les connexions internes
L’interrupteur de sécurité ne fonctionne
pas Interrupteur défectueux Remplacez l’interrupteur
Interrupteur bloqué Vériez, réparez ou remplacez
l’interrupteur
copyrighted document - all rights reserved by FBC

16
M1.1.PH400-PH400R.NLFREN
EN
TOOLS
1 Safety
Please read these instructions and keep them in a safe place, so as to have them at hand at any
time.
We are not liable for any accidents or damages caused by non-compliance of these instructions!
Only for private use! Not for commercial or professional applications!
Never use the machine to transport persons or animals!
Never stand or work under a hoisted load.
• Keep the immediate working environment clean.
• Ensure good illumination for your workspace. Do not use the device in potential re hazard, easily ammable uids or
explosive surroundings, do not expose it to unnecessary weather inuences, such as rain, damp, sun exposure, dust or cold.
• Avoid physical contact with grounded surfaces
• Be sure that children and other persons keep sufcient distance to the work space.
• Do not exceed the maximum load capacity.
• Do not use 2 or more machines to load same object.
• Never wear loose clothing or jewellery, this could be caught by movable parts of the machine.
• Always wear safety equipment (such as rubber gloves, nonslip footwear, hearing and hair protection etc.).
• Keep the power cord away from heat, oil and sharp edges.
• Check the power cable before every use for damages.
• Ensure a safe position and always maintain your balance.
• Always disconnect the power plug from the power outlet if the device is not in use and prior to performing any
maintenance.
• This cable winch can’t be used out-doors, it is suitable for using indoors.
• Prior to operating, please inspect the hoist for possible damaged components. Damaged components, in particular
damaged safety equipment, must be repaired or replaced by a professional.
• Use only the manufacturer recommended accessories.
• Be sure to hoist the loads with lowest speed from the ground. And the cable should be tense but not unwound when start
loading from the ground.
• If the brakes stop functioning and the load lowers quickly, one should press the off-switch immediately and then the On-
switch. After unloading, please send the machine in for repairs to a qualied professional.
• It is prohibited to change any part of the pulley or to disassemble it.
• Depending on the frequency of use, after 20 hours of continuous operation, the machine must be taken in for a thorough
maintenance (at least once a year).
• While using the wireless remote control, the user should operate at a visible distance.
• Do not use the wireless remote control in a strong magnetic interference environment.
• While the red light on in the bottom of control handset, please change the battery in time.
• If you don’t use the hoist for a long time, please take off the battery in the handset.
Contents
1 Safety.................................................................................................................................................................16
2 Technical specications.........................................................................................................................................17
3 Description ..........................................................................................................................................................18
4 Area of application ..............................................................................................................................................19
5 Preparation .........................................................................................................................................................19
6 Installation...........................................................................................................................................................19
7 Operation ...........................................................................................................................................................20
8 Maintenance and cleaning....................................................................................................................................21
9 Troubleshooting....................................................................................................................................................22
10 Spare parts .......................................................................................................................................................23
11 EC declaration of conformity - PH400 ...................................................................................................................26
12 EC declaration of conformity - Remote control for PH400-R ......................................................................................27
copyrighted document - all rights reserved by FBC

17
M1.1.PH400-PH400R.NLFREN
EN TOOLS
2 Technical specications
Model PH400 / PH400-R
Rated voltage 230 V
Rated frequency 50 Hz
Power rating 1300 W
Rated current 5.6 A
Max. loading capacity for single cable 400 kg
Max. loading capacity for double cable 800 kg
Cable speed for single cable 8 m/min
Cable speed for double cable 4 m/min
Hoisting height for single cable 32 m
Hoisting height for double cable 16 m
Cable diameter 5.0 mm
Tensile strength 1870 N/mm²
Protection rating IP54
Motor category M1
Work duty S3 20% - 10 min
Protection rating I
Weight 35 kg
Dimensions (l x w x h) 510 x 410 x 455 mm
Sound pressure level (LWA) 71 dB(A)
The LWA values stated here only indicate the loudness emitted by this machine. Whether the operator is required to wear
hearing protection can’t be determined here. This depends on how much noise reaches the ear of the operator. And this,
among other things, depends on the existing ambient conditions (such as other sources of noise nearby). Even though it may
not be explicitly required, it is in your own interest to always wear hearing protection when operating this machine.
2.1 Wireless remote control for PH400-R
Work frequency FM419m (20CH)
Emission distance < 100 m
Receiver work power supply 36 V - 48 V - 220 V - 380 V
Output interface Relay
Receiving direction 360° unidirectional
Remote control emitter power < 10 MW
Working temperature -20 °C ~ +65 °C
Relative humidity <85 %
Protection class emitter IP54
Protection class receiver IP65
copyrighted document - all rights reserved by FBC

18
M1.1.PH400-PH400R.NLFREN
EN
TOOLS
3
12
Overview
1. Switch box 11. Spring buffer unit
2. Plug with power cord 12. Limit weight
3. Down limit pole for limit stop 13. Steel cable line
4. Handle connection cable 14. Double line hook hanging device
5. Emergency-Off switch 15. Automatic rope rolling device
6. Controlling handle with Operating switch
Up/Down
16. Steel rope drum assembly
7. Junction box 17. Gear box
8. Uplimit assembly for limit stop 18. Additional Protection hook
9. Load hook 19. Safety switch
1
2
19
3
13
14
15
16
18
17
20
5
67910
11
8
3 Description
No Description No Description
1 Switch box 11 Spring buffer unit
2 Plug with power cord 12 Limit weight
3 Down limit pole for limit stop 13 Steel cable line
4 Handle connection cable 14 Double line hook hanging device
5 Emergency off switch 15 Automatic rope rolling device
6 Controlling handle with operating switch up/down 16 Steel rope drum assembly
7 Junction box 17 Gear box
8 Up limit assembly for limit stop 18 Additional protection hook
9 Load hook 19 Safety switch
10 Pulley hook 20 Hanging hook rack
copyrighted document - all rights reserved by FBC

19
M1.1.PH400-PH400R.NLFREN
EN TOOLS
4 Area of application
• This cable winch is used to hoist and lower loads.
• The transportation of persons or animals is not permitted.
• Loads can only be hoisted and lowered vertically.
• Other applications are excluded.
• While lifting a load if the raising power is so low that the load can’t be raised, check if the voltage on-site is 230 V. The
machine works efciently with a voltage of 230 V, if the voltage does not meet the requirements, one must reduce the load.
5 Preparation
Prior to start-up operation, please be sure to make some preparations:
• Make sure the voltage of your power network complies with the voltage listed on the data plate and that the device is
equipped with the correct power plug.
• Please make no-loading test before start-up operation at rst, and please check:
a. The exibility of up/down operating switch to insure the controlling of the hoisting and lowering of load hook.
b. The exibility of up limit bracket to make sure the cut-off of circuit.
c. The exibility of down limit bracket to make sure the cut-off circuit when the steel cable is nearly used up.
d. Any abnormal sounds when start-up operation.
e. The steel rope is possible damaged (split or bent), or reach 20 hours after using, change the rope immediately.
• Please inspect the brake disc before operating at every 20 hours after load. If the load is downslide or the brake is not
exible, replace the relevant components in time.
• Please inspect the hook before operation is possible damaged or distortional, replace it in time.
• Operation using a residual current protective device (Red Emergency Stop Switch) offers additional protection under danger
and in emergency circumstances, then screw the switch head as the arrow direction to recover operation after remove the
danger.
• Please be sure to the enough lubricant on parts. Daub the lubricant on the load hook, cable drum shaft, slow down box,
and bearing every half a year.
Please daub the lubricant on the nesting of cable drum shaft when replace the steel cable every time. Immediately replace
the cable if damaged.
• Please perform any rework and maintenance tasks only if the power plug is disconnected.
• Please inspect the device for transportation damages. Immediately report any possible damages to your seller.
5.1 Correct winding of steel rope
6 Installation
The new electric hoist is easy to install with hanging hook rack. It can directly install on the crossbeam which external diameter
is suggested Φ 50 mm. The crossbeam is xed in the stand pillar, which is mounted in the work site as user’s requirements. Pay
attention to mount the stand pillar rmly enough to loading weight long period.
Please make sure of the protection hook on proper position, and put the safety key onto the safety switch properly.
13
Clean the device using adamp cloth and some liquid soap. Never use cleaning agents or
solvents, these could damage the device's plastic parts.
Regularly inspect the total length of the steel cable for damages as well as the functionality of
the limit bracket (2) (Wind cable winch until the limit weight (5) activates the limit bracket of the
limit switch).
If the steel cable is damaged (split or bent,see below),aprofessional must replace it using
original replacement parts.
During assembly of the cable,it is imperative to remember the limit weight (5) in order to ensure
a secure limit stop.
Inspect the free movement of all mechanical components after the power plug has been
disconnected.
Replace lost parts only with original parts.
Return the device to your seller to ensure professional recycling.
The machine should be repaired totally after continuously 20hours working time according to
operation frequency, usually make a repair annually. And the machine should be abandoned
reaching to 100hours working time.
Correct winding of steel rope
Problem-Solving
Common Malfunction Cause Solution
copyrighted document - all rights reserved by FBC

20
M1.1.PH400-PH400R.NLFREN
EN
TOOLS
7 Operation
1. The electric hoist is operated using the operating handle. When operating the upper position of the switch, the load is
hoisted up. When operating the lower position, the load is lowered. Never switch directly from hoisting to lowering or vice
versa. Always stop the cable winch prior to changing directions.
2. Operate the emergency-off switch to immediately stop the cable winch in case of an emergency and to secure against
restart. To reset the device to operational status, rst turn the emergency-off switch clockwise, which will unlock the red key.
The cable winch is now operational.
3. The electric hoist is designed with limit conguration to limit stop. When load hook is hoisting up to topmost position, the
limit weight touches the up limit bracket, the microswitch of up limit bracket can cut off the circuit and make the motor stop
to insure the safety of operations. When load hook is lowering down nearly to use up the cable, the microswitch of down
limit bracket starts work and cut off the circuit and make the motor stop.
ATTENTION!
If the cable has been unwound to the point where the red indicator mark is visible, the cable
winch must be stopped. Under no circumstances should the cable be unwound past this point.
4. If the cable winch cannot hoist a load immediately, switch it off immediately to prevent damages and accidents.
5. Please be sure that the load is securely fastened to the load hook. Maintain the largest possible distance to the load and
steel cable during operation.
6. Upon lowering a load, please remember that the cable hoist may still unwind a few more centimetres after it was stopped.
Therefore, please stop in sufcient time.
7. Please be sure that the steel cable cannot be moved more than 15° to the side.
8. The cable winch can be operated with a single or double cables, therefore the permissible rated load, see Technical
Specications, can vary.
9. After unpacking the items, check to make sure that all pieces and accessories correspond with the directions. Check to see
if the rope winch has any dents or damage, if the cable connections have any defects and if the motor shows any signs of
rain or water damage.
10. The electric pulley uses a single-phase energy power supply. The nominal voltage is 230 V + 20%, the nominal frequency
is 50 Hz + 1%. The motor must be safely grounded. In the circuitry of the power supply an over-current protection must be
installed.
11. After connecting the power supply, the pulley can then be raised and lowered in Jog-mode. One can raise and lower
start-up during a dry-run. First when the up and down movement is stable and the brakes work awlessly, once can test the
pulley with a dummy load.
12. The surrounding area temperature should be between 5 - 40 °C. The height about sea level needs to be under 1000 m.
The area dampness should be at 30-95%.
The temperature for the storage and transport should be about 5 up to 55 °C.
Intermittent rating
This machine is designed for operating type S3 20% - 10 min (periodic intermittent operation). The relative duty cycle is
20%, which means that the device can be operated at rated load for 2.0 minutes during each operating cycle and must then
be switched off for 8.0 minutes to cool off. The device can therefore be continuously used for a duration of 20% of the total
operating cycle of 10 minutes at rated load.
Overload
• The cable winch is not suitable for continuous operation. The motor is protected from overload and overheating by a
temperature switch.
• If the permissible operating time is exceeded, the motor temperature will increase and the temperature switch will shut the
cable winch off. The temperature switch will automatically switch back on after a cooling phase.
• In case of a strain on the cable hoist with a lesser load, the operating time will increase and the cooling time will decrease.
ATTENTION!
In case of direct exposure to sunlight, the temperature of the casing will increase signicantly,
which will also decrease the permissible operating time. It is therefore possible that the
temperature switch will switch off after a short time period and the cable winch will shut down.
Please wait until the device is cooled off.
copyrighted document - all rights reserved by FBC
This manual suits for next models
3
Table of contents
Languages:
Other MW TOOLS Chain Hoist manuals
Popular Chain Hoist manuals by other brands

CRYSTEEL
CRYSTEEL LO-BOY manual

OZ Lifting Products
OZ Lifting Products STAINLESS Series Operator's manual

KITO
KITO ED Series Owner's manual and safety instructions

Steinberg
Steinberg SBS-EH-600/18 user manual

Yale
Yale CPA Series Translation of original operating instructions

CM
CM 5623A Operating, Maintenance & Parts Manual

Tractel
Tractel supertirfor TU16A Operating and maintenance instruction

Sealey
Sealey CB500.V3 instructions

Dolezych
Dolezych DoNova PowerLash Original operating instructions

LK
LK LT Series User instruction

Atex
Atex Yalelift 360 Operating and maintenance instruction

Ingersoll-Rand
Ingersoll-Rand KM Series Product Maintenance Information