5
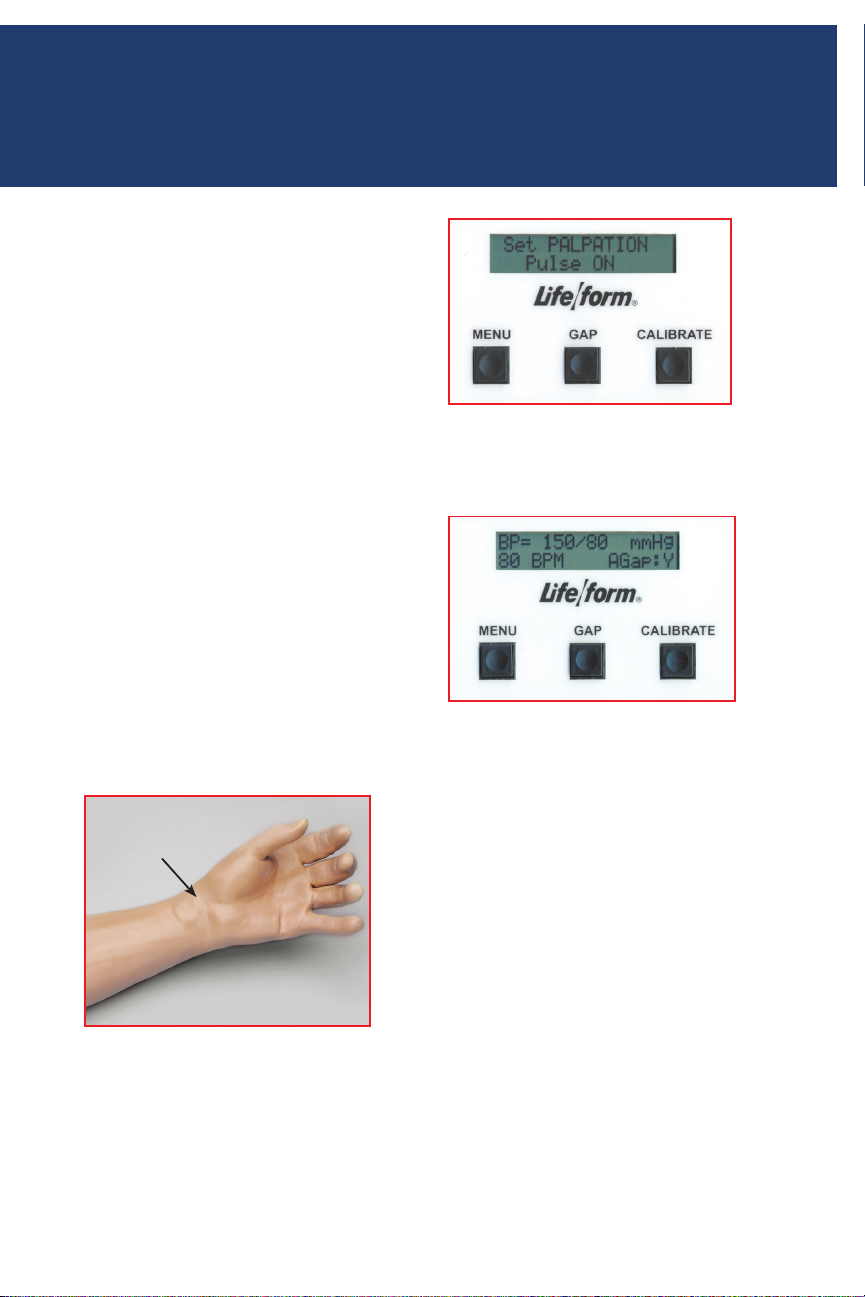
Pressure Simulator also incorpo-
rates a palpable pulse at the radial
location. (See figure 9.) Palpations
can be felt upon start-up of the
unit or after blood pressure set-
tings have been made. Press the
Menu key repeatedly until “Set
PALPATION” menu appears. “Pulse
ON” is defaulted and enables the
palpation feature. The pulse in the
wrist will begin when the elec-
tronic box is turned on. During the
actual blood pressure reading, the
palpable pulse will turn off when
the cuff is inflated and surpasses
the systolic set point. It will
turn on again when the cuff is
deflated 20 mmHg BELOW the
diastolic set point.
Note: The pulse feature is
turned off during this time to
allow students to clearly hear
the Korotkoff sounds through
the stethoscope without inter-
ference from the background
noise of the pulse feature in
the wrist. The palpable
pulse is delicate and should be
palpated lightly, as you would
with a real patient. Pressing
too hard can damage the pulse
feature.
Make sure the cable from the
blood pressure arm is properly
connected to the electronic
box and the palpation feature
is in the “PULSE ON” mode. A
pulseless condition can be sim-
ulated by switching your unit
to the “pulseless” mode. Press
the Menu key repeatedly until
“Set PALPATION” menu appears.
By pressing the down arrow at
this point, palpations can be
disabled, causing the simulator
to be pulseless. When in the
“pulseless” mode, all settings
are automatically reset to 0 and
all blood pressure sounds are
disabled.
The pulseless setting will also
turn off the sounds in the arm.
The pulse will always be on
unless the pulseless feature is
activated or if the systolic or
heart rate levels are set to zero.
To do this, press the Menu key
four times.
The down arrow key will set
the pulse to pulseless. Press the
arrow up key to turn the pulse
back on. (See figure 10.)
Figure 7 Figure 7
Figure 8 Figure 8
Palpable Pulse Feature
The
Nasco
Life/form®
Blood Pressure
Simulator also incorporates a palpa-
ble pulse at the radial
location. (See
figure 9.) Palpations can
be felt upon
start-up of the unit or after blood
pressure settings have been made.
Press the Menu key repeatedly until
“Set PALPATION” menu appears.
“Pulse ON” is defaulted and enables
the palpation feature.
The pulse in the wrist will begin when the electronic box is turned on. During
the actual blood pressure reading, the palpable pulse will turn off when the
cuff is inflated and surpasses the systolic set point. It will turn on again when
the cuff is deflated 20 mmHg BELOW the diastolic set point.
Note: The pulse feature is turned off during this time to allow students to
clearly hear the Korotkoff sounds through the stethoscope without interfer-
ence from the background noise of the pulse feature in the wrist. The pal-
pable pulse is delicate and should be palpated lightly, as you would
with a real patient. Pressing too hard can damage the pulse feature.
Make sure the cable from the blood pressure arm is properly connected to
the electronic box and the palpation feature is in the “PULSE ON” mode.
A pulseless condition can be simulated
by switching your unit to the “pulse-
less” mode. Press the Menu key repeatedly until “Set PALPATION” menu
appears. By pressing the down arrow at this point, palpations can be dis-
abled, causing the simulator to be pulseless. When in the “pulseless” mode,
all settings are automatically reset to 0 and all blood pressure sounds are
disabled.
The pulseless setting will also turn off the sounds in the arm. The pulse will
always be on unless the pulseless feature is activated or if the systolic or
heart rate levels are set to zero. To do this, press the Menu key four times.
Pulse Location
Figure 9
Figure 9
5 5
NP074_91_.indd 5 11/7/17 3:12 PM
Located to the right of the Menu
key is the auscultatory Gap key.
(See figure 11.)
This key is included to simu-
late the auscultatory gap that
is sometimes present between
phase 1 and phase 2 sounds in
which no audible sound is noted
during this portion of auscul-
tation. This control function is
included so that the trainee can
become familiar with this phe-
nomenon. Pressing the Gap key
simply turns the gap function off
or on. When the key is pressed, a
message will briefly appear that
the auscultatory gap is enabled
or disabled. Also the main display
will show (at the bottom right of
the display) either AGap:Y (for on)
or AGap:N (for off).
The arrow up and down keys
also control the volume of the
Figure 10
Figure 10Figure 11 Figure 11
The down arrow key will set the pulse to pulseless. Press the arrow up key to
turn the pulse back on. (See figure 10.) Located to the right of the Menu key is
the auscultatory Gap key. (See figure 11.) This key is included to simulate the
auscultatory gap that is sometimes present between phase
1 and phase 2
sounds in which no audible sound is noted during this portion
of
auscultation.
This control function is included
so that the trainee can become familiar with
this phenomenon. Pressing the Gap key simply turns the gap function off or
on. When the key is pressed, a message will briefly appear that the ausculta-
tory gap is enabled or disabled. Also the main display will show (at the bot-
tom right of the display) either AGap:Y (for on) or AGap:N (for off).
The arrow up and down keys also control the volume of the sounds that are
present in the arm. From the main menu, press the up arrow key to increase the
volume, press the down arrow key to decrease the volume. The volume levels
can be adjusted from level 1 (the lowest volume) to level 7 (the highest volume).
Using the Nasco Life/form® Blood Pressure Simulator
First, verify that the pressure line tubing from the sphygmomanometer
and the audio line coming from the simulated arm assembly are properly
connected to the blood pressure simulator unit, as previously described in
the set up procedures. Apply the sphygmomanometer cuff and gauge to
the simulated arm assembly in the usual manner. Apply the stethoscope to
the simulated arm, also in the usual manner. Set the systolic and diastolic
controls to the desired levels. Select the auscultatory gap if desired. Finally,
adjust
the pulse rate control to the desired setting.
To proceed with the simulated blood pressure measurement, first close the
valve on the sphygmomanometer bulb tightly and begin pumping air into
the cuff until the gauge reads higher than the preset systolic level chosen.
Once this point is reached, loosen the valve on the bulb slightly to allow
the gauge pressure reading to decrease slowly. While monitoring the arm
assembly with the stethoscope, note the point on the sphygmomanometer
gauge when the first Korotkoff sound is heard. This will be the systolic blood
pressure. Allow the pressure in the cuff to continue to decrease until the
point at which the last pulse is heard, noting the reading on the gauge. This
is the diastolic blood pressure.
Compare the results of reading the systolic and diastolic blood pressures
on the gauge with the respective settings on the simulator. If the readings
were accurate, they should compare favorably with the preset values. If the
auscultatory gap had been selected, then an absence of an audible pulse
would have been noticed during what would have been the phase 2
Korotkoff sound. It is this lack of an audible pulse that is considered an aus-
cultatory gap. Note that in reality the auscultatory gap can be present in
6 6
NP074_91_.indd 6 11/7/17 3:12 PM
Figure 11
Figure 11
The down arrow key will set the pulse to pulseless. Press the arrow up key to
turn the pulse back on. (See figure 10.) Located to the right of the Menu key is
the auscultatory Gap key. (See figure 11.) This key is included to simulate the
auscultatory gap that is sometimes present between phase
1 and phase 2
sounds in which no audible sound is noted during this portion
of
auscultation.
This control function is included
so that the trainee can become familiar with
this phenomenon. Pressing the Gap key simply turns the gap function off or
on. When the key is pressed, a message will briefly appear that the ausculta-
tory gap is enabled or disabled. Also the main display will show (at the bot-
tom right of the display) either AGap:Y (for on) or AGap:N (for off).
The arrow up and down keys also control the volume of the sounds that are
present in the arm. From the main menu, press the up arrow key to increase the
volume, press the down arrow key to decrease the volume. The volume levels
can be adjusted from level 1 (the lowest volume) to level 7 (the highest volume).
Using the Nasco Life/form® Blood Pressure Simulator
First, verify that the pressure line tubing from the sphygmomanometer
and the audio line coming from the simulated arm assembly are properly
connected to the blood pressure simulator unit, as previously described in
the set up procedures. Apply the sphygmomanometer cuff and gauge to
the simulated arm assembly in the usual manner. Apply the stethoscope to
the simulated arm, also in the usual manner. Set the systolic and diastolic
controls to the desired levels. Select the auscultatory gap if desired. Finally,
adjust
the pulse rate control to the desired setting.
To proceed with the simulated blood pressure measurement, first close the
valve on the sphygmomanometer bulb tightly and begin pumping air into
the cuff until the gauge reads higher than the preset systolic level chosen.
Once this point is reached, loosen the valve on the bulb slightly to allow
the gauge pressure reading to decrease slowly. While monitoring the arm
assembly with the stethoscope, note the point on the sphygmomanometer
gauge when the first Korotkoff sound is heard. This will be the systolic blood
pressure. Allow the pressure in the cuff to continue to decrease until the
point at which the last pulse is heard, noting the reading on the gauge. This
is the diastolic blood pressure.
Compare the results of reading the systolic and diastolic blood pressures
on the gauge with the respective settings on the simulator. If the readings
were accurate, they should compare favorably with the preset values. If the
auscultatory gap had been selected, then an absence of an audible pulse
would have been noticed during what would have been the phase 2
Korotkoff sound. It is this lack of an audible pulse that is considered an aus-
cultatory gap. Note that in reality the auscultatory gap can be present in
6 6
NP074_91_.indd 6 11/7/17 3:12 PM
Use of the Simulator