NEC MobilePro 250e User manual

POCKET PC 2003
REFERENCE GUIDE

3URSULHWDU\1RWLFHDQG/LDELOLW\'LVFODLPHU
The information disclosed in this document, including all designs and related materials, is
the valuable property of NEC Computers International BV and/or its licensers. NEC
Computers International B.V. and/or its licensers, as appropriate, reserve all patent,
copyright and other proprietary rights to this document, including all design, manufacturing,
reproduction, use, and sales rights thereto, except to the extent said rights are expressly
granted to others.
The NEC Computers International B.V. product(s) discussed in this document are
warranted in accordance with the terms of the Warranty Statement accompanying each
product. However, actual performance of each such product is dependent upon factors such
as system configuration, customer data, and operator control. Since implementation by
customers of each product may vary, the suitability of specific product configurations and
applications must be determined by the customer and is not warranted by NEC Computers
International B.V.
To allow for design and specification improvements, the information in this document is
subject to change at any time, without notice. Reproduction of this document or portions
thereof without prior written approval of NEC Computers International B.V. is prohibited.
NEC and MobilePro are registered trademark of NEC Corp. used under license by NEC
Computers International B.V.
Pocket PC is a registered trademark of Microsoft Corporation.
Microsoft, MS, MSN, Pocket PC, Pocket Word, Pocket Excel, ActiveSync, Outlook, Media
Player, Passport, Hotmail, Windows, and the Windows logo are either registered
trademarks or trademarks of Microsoft Corporation in the United States and/or other
countries. Microsoft products are licensed to OEMs by Microsoft Licensing, Inc., a wholly
owned subsidiary of Microsoft Corporation.
All other product, brand, or trade names used in this publication are the trademarks or
registered trademarks of their respective trademark owners.
Copyright 2003 NEC Computers International B.V.
5HJXODWRU\,QIRUPDWLRQ
(XURSHDQ1RWLFH
Products with the CE marking comply with both the Electromagnetic Compatibility
Directive (89/336/EEC) and the Low Voltage Directive (73/23/EEC) – as amended by
Directive 93/68/ECC - issued by the Commission of the European Community.
Compliance with these directives implies conformity to the following European Standards:
(15DGLRGLVWXUEDQFHFKDUDFWHULVWLFV
(1 ,PPXQLW\FKDUDFWHULVWLFV
(1/LPLWVIRUKDUPRQLFFXUUHQWHPLVVLRQV
(1/LPLWDWLRQRIYROWDJHIOXFWXDWLRQDQGIOLFNHULQORZYROWDJHVXSSO\V\VWHP
(13URGXFW6DIHW\
0RGLILFDWLRQVWRWKH3URGXFW
&(0DUNLQJ
NEC Computers International B.V. cannot be held responsible for modifications made by
the User and the consequences thereof, which may alter the conformity of the product
with the CE Marking.
5DGLR)UHTXHQF\,QWHUIHUHQFH
The manufacturer is not responsible for any radio or TV interference caused by
unauthorised modifications to this equipment.
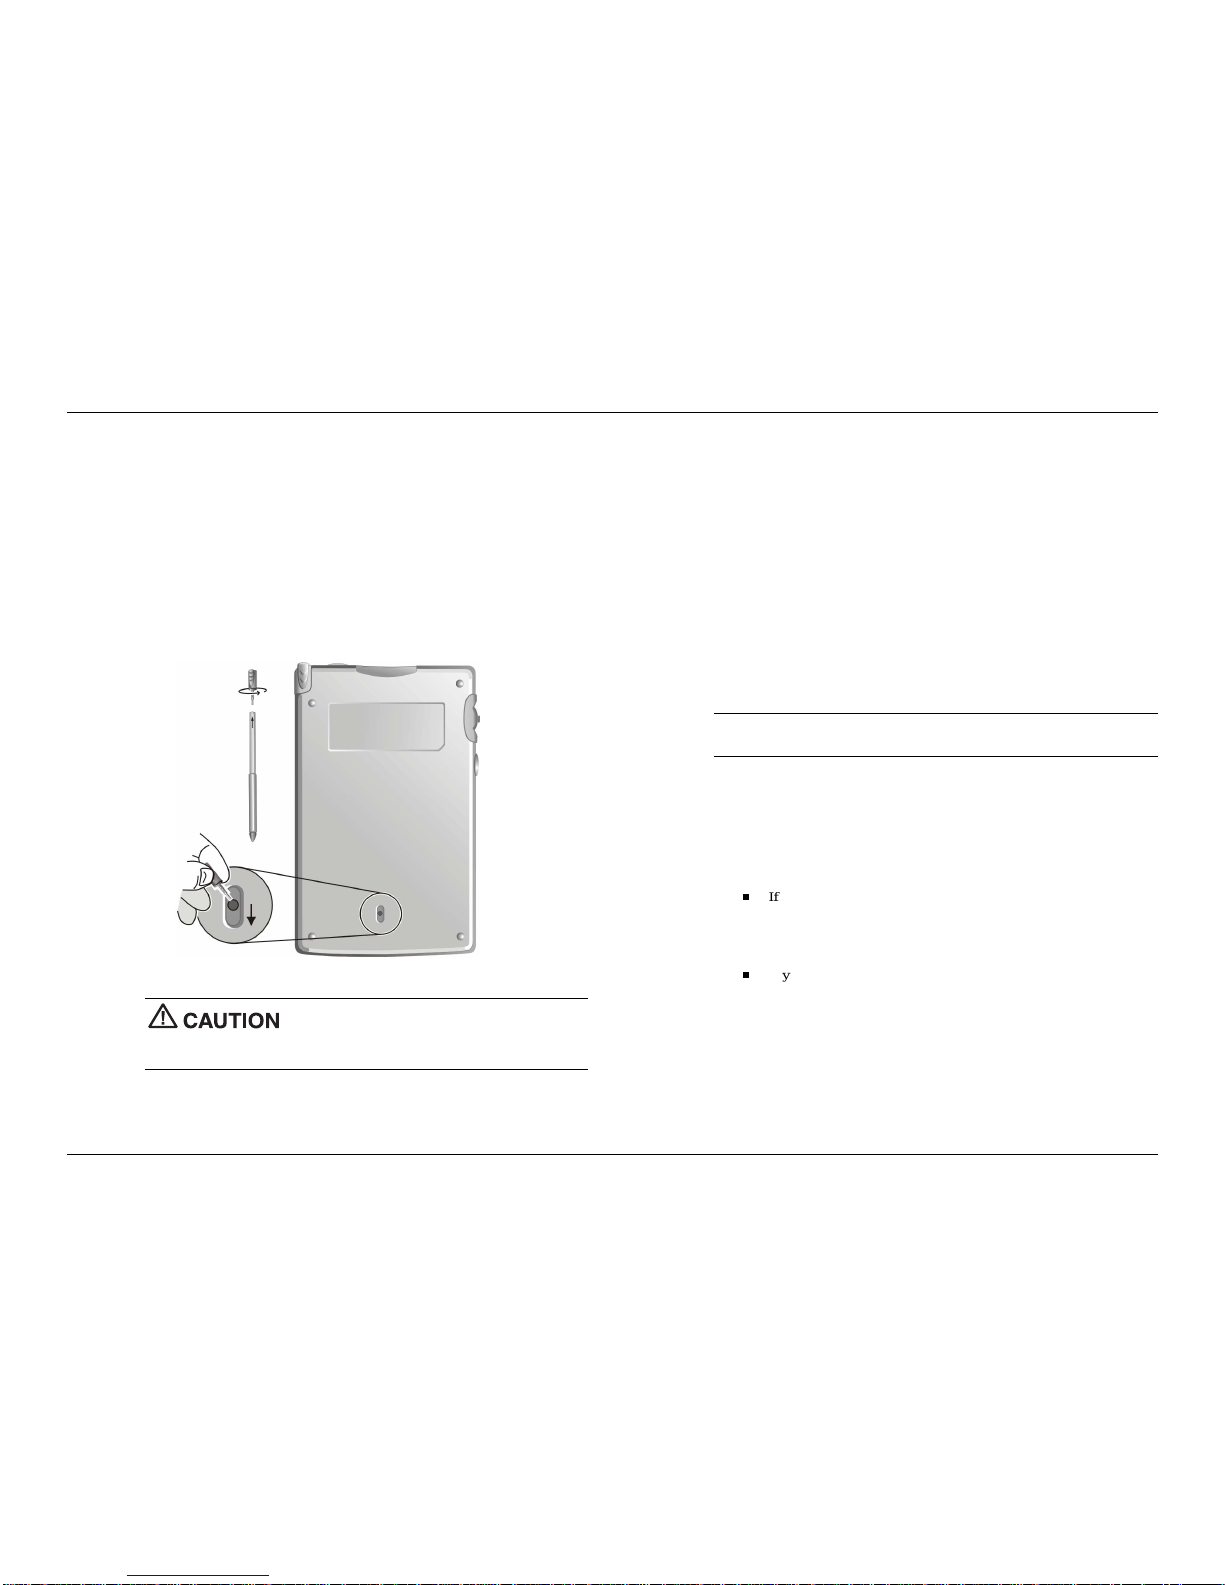
%DWWHU\5HSODFHPHQW
A Lithium Ion battery in this computer maintains system configuration information. In the
event that the battery fails to maintain system configuration information, we recommend
that you call your local dealer. The battery is not user replaceable.
:$51,1* This unit contains a non-replaceable internal Lithium Ion battery. To reduce the
risk of fire or burns, do not disassemble, crush, puncture, or dispose of in fire or water.
Contact your local waste management officials for other information regarding the
environmentally sound collection, recycling, and disposal of used batteries.
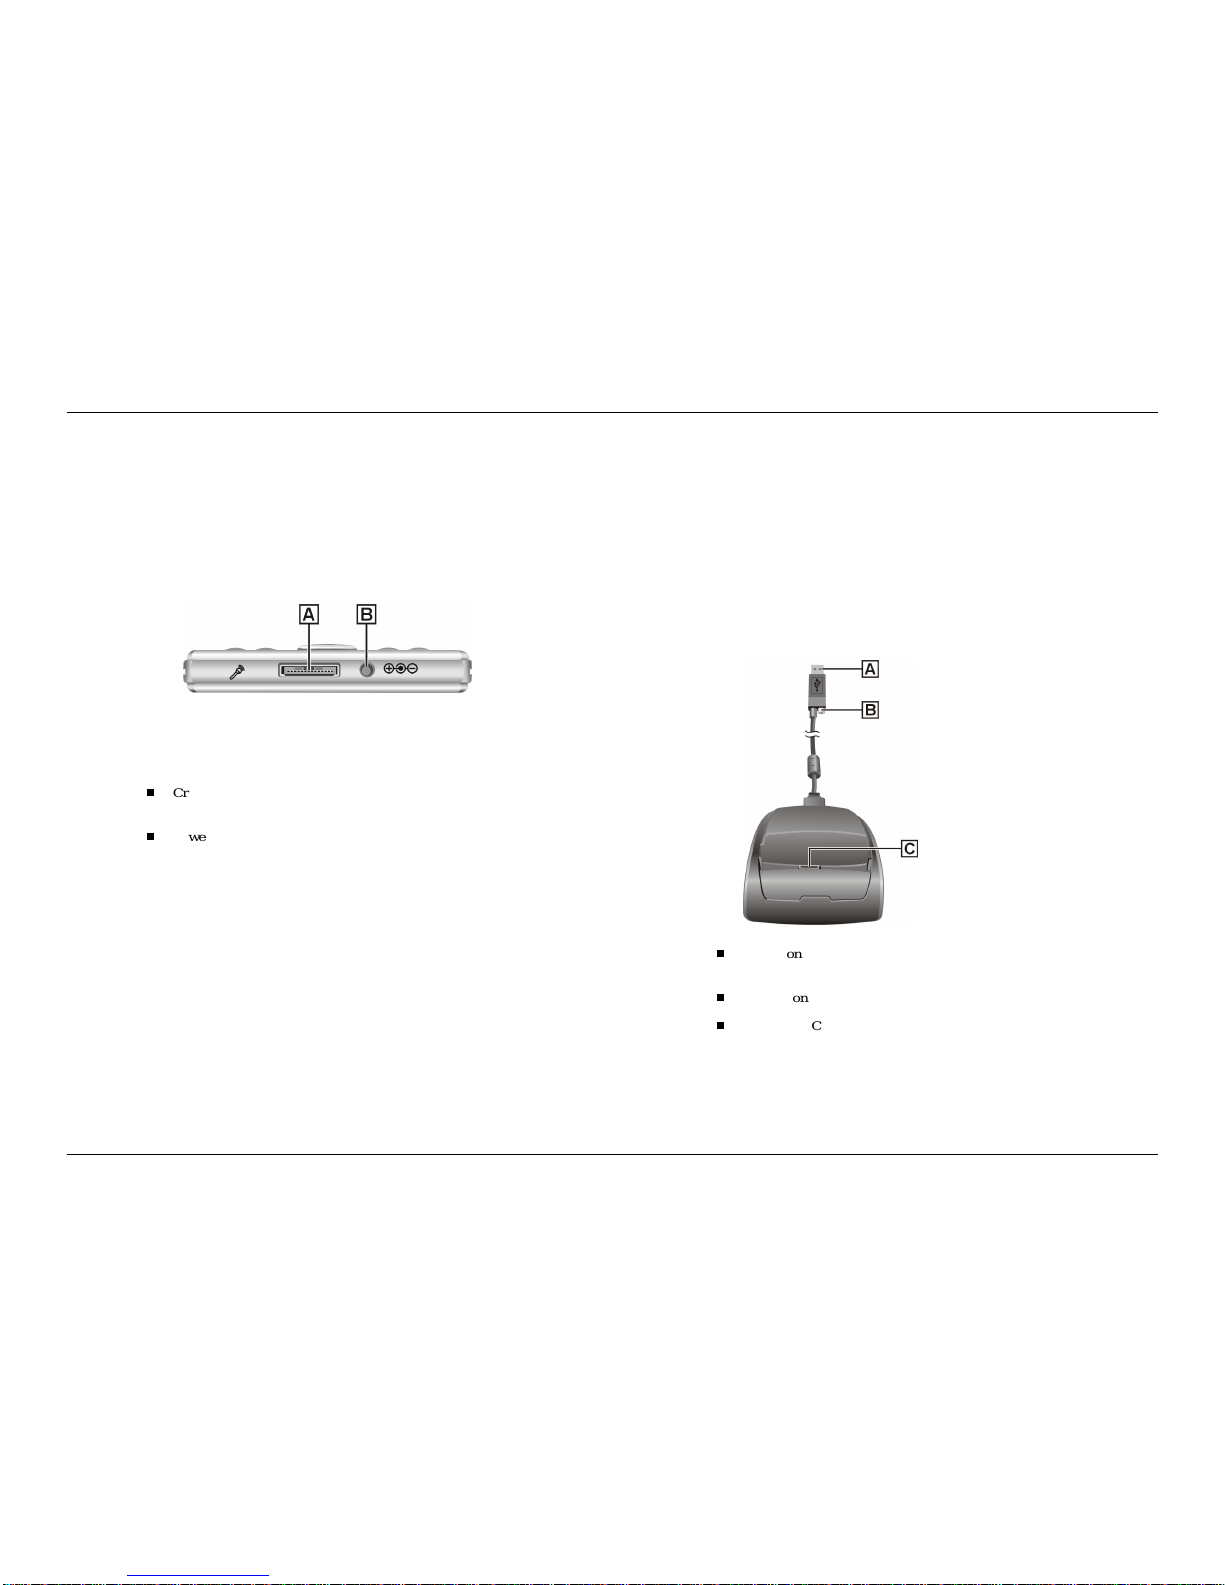
$&$GDSWHU
Use only the AC adapter supplied with your Pocket PC. Use of another type of AC
adapter will result in malfunction and/or danger.
This product is intended to be supplied by a Listed Power Unit marked “LPS” and output
rated +5 V dc / 900mA minimum.

3UHIDFH
3UHIDFH
This reference guide contains detailed information on the use of the NEC
Pocket PC powered with the Microsoft®Windows®Powered Pocket PC 2003.
The guide is organised as follows:
&KDSWHU ² *HW 6WDUWHG, provides procedures for unpacking, charging
the battery, calibrating and installing Microsoft ActiveSync®.
&KDSWHU ² /HDUQ WKH %DVLFV,includes information on using pop-up
menus, notifications, entering information and customising your Pocket PC.
&KDSWHU²8VH0LFURVRIW3RFNHW2XWORRN, provides procedures for using
Microsoft Pocket Outlook Calendar, Contacts, Tasks, Notes and Inbox.
&KDSWHU — 8VH WKH &R SDQLRQ 3URJUD V, includes information on
using Pocket Word, Pocket Excel, MSN Messenger, Windows Media™
Player for Pocket PC, Microsoft Reader and Pictures.
&KDSWHU ² 8VH 3RFNHW ,QWHUQHW ([SORUHU, provides information and
procedures for using Pocket Internet Explorer, Mobile Favourites folder
and AvantGo interactive service.
&KDSWHU ² *HW &RQQHFWHG, includes procedures for connecting to the
Internet and private network and for transferring data using infrared.
&KDSWHU ² ,I <RX +DYH 3UREOH V, includes information on solving
problems that you might have in using the Pocket PC.
&KDSWHU²6SHFLILFDWLRQVincludes specifications for the Pocket PC and
its accessories.

*HW6WDUWHG
Unpack Your Pocket PC
Get to Know Your Pocket PC
Before You Start
Charge the Battery
Calibrate and Activate the Pocket PC
Learn the Basics
Install ActiveSync
Using a Secure Data Card
Access Pocket PC Functions
Get Help
Pocket PC Care

*HW6WDUWHG
8QSDFN<RXU3RFNHW3&
Your Pocket PC ships with a number of accessories. When you unpack the
Pocket PC, verify that you have all of the items listed here and that they are
in good condition. If anything is missing or damaged, contact the dealer
that sold you the Pocket PC.
1RWHBefore you use your Pocket PC for the first time, you need to set
the hard reset switch and charge the battery (see “Charge the Battery” later
in this chapter).
Pocket PC (includes a stylus in a storage compartment)
Pocket PC AC Adapter with European or UK Converter
Pocket PC Universal Serial Bus (USB) Cradle
Companion CD (contains the Microsoft ActiveSync software and your
documentation)
Pocket PC Getting Started Guide
Pocket PC Reference Guide (this document, included on the
Companion CD)
Pocket PC Release Notes (optional)
Service & Warranty booklet
*HWWR.QRZ<RXU3RFNHW3&
Your Pocket PC is a multifunction handheld device designed for ease of
use in the office, on the road, at home or wherever you are.
The Pocket PC is powered by the Microsoft®Windows®Powered Pocket
PC 2003 operating system. Data synchronising between the Pocket PC and
a computer is provided by Microsoft ActiveSync®.
Standard features include a 300-MHz Intel®PXA255 processor, 64-MB
synchronous dynamic random access memory (SDRAM), reflective LCD
panel with 65K colour, touch screen with automatic backlighting, internal
speaker, microphone and a rechargeable Lithium Ion battery. Touch screen
backlighting levels are adjustable.
The Pocket PC includes an infrared (IR) port and Secure Digital
(SD)/MultiMediaCard (MMC) card slot. You can use the IR port to
transfer data between other handheld devices with IR capabilities or your
computer. The SD/MMC card slot can be used to expand memory, add
applications and more.
Also included with the Pocket PC is a cradle for holding the Pocket PC.
Use the cradle to synchronise with your computer.
Your Pocket PC comes with a stylus, a pen-like device that allows you to
touch, tap or double tap objects on the Pocket PC touch screen. The touch,
tap and double tap act just like a point, click and double click of a mouse.
The external features of the Pocket PC and USB cradle are shown and
described in the following sections.

*HW6WDUWHG
)URQW)HDWXUHV
The front features of the Pocket PC are shown in the following figure.
Brief descriptions follow the figure.
3RFNHW3&)URQW)HDWXUHV
$– Touch Screen )– Calendar Button
%– Notes Button *– Speaker
&– Microphone +– Tasks Button
'– Contacts Button ,– Battery Charging LED
(– Navigation Button (4) -– Notification LED
Touch Screen — enter, read, send, receive and modify data by tapping
the touch screen with the stylus. Backlighting is automatic with
automatic dimming after a preset time. Tap the touch screen to restore
full lighting.
Program Buttons — press or tap the1RWHV,&DOHQGDU, &RQWDFWV or
7DVNV button for quick access to tasks or programs. The buttons are
customisable.
Microphone — records your notes.
Navigation Buttons — use the four buttons as arrow keys, the same as
you would for a keyboard’s up, down, left and right arrow keys.
Speaker — sounds alarms and plays back sound recordings.
Battery Charging LED — lights amber while the battery is charging.
The light goes off when the battery is charged.
Notification LED — blinks red to indicate an alarm or reminder.

*HW6WDUWHG
%DFN)HDWXUHV
The back features of the Pocket PC are shown in the following figure.
Brief descriptions follow the figure.
3RFNHW3&%DFN)HDWXUHV
$– Hard Reset Switch
Always leave the switch in the ON (down) position
unless you need to perform a hard reset. A hard reset will cause the
memory of your Pocket PC to be cleared.
Hard Reset Switch — restores your Pocket PC to factory settings (see
“Hard Reset” in Chapter 7).
5L KW6LGH)HDWXUHV
The right side features of the Pocket PC are shown in the following figure.
Brief descriptions follow the figure.
3RFNHW3&5LJKW6LGH)HDWXUHV
$– Headset Jack
Headset Jack — Use this standard 3.5 mm port to connect an optional
headset.

*HW6WDUWHG
/HIW6LGH)HDWXUHV
The left side features of the Pocket PC are shown in the following figure.
Brief descriptions follow the figure.
3RFNHW3&/HIW6LGH)HDWXUHV
$– Scroll Dial &– Reset Button
%– Recording Button
Scroll Dial — use to scroll through a menu and to select a program.
Recording Button — records sound in a program where you can
include a recording (see “Record a Message” in Chapter 2).
Reset Button — performs a soft reset of the operating system in case
of malfunction (see “Soft Reset” in Chapter 7). Your data is preserved
if it was saved.
7RS)HDWXUHV
The top features are shown in the following figure. Brief descriptions
follow the figure.
3RFNHW3&7RS)HDWXUHV
$– IR Port&– Power Button
%– SD/MMC Card Slot '– Stylus
IR Port — exchange data with another handheld or your computer
(both must have IR capabilities).
Secure Digital (SD)/MultiMediaCard (MMC) Card Slot — holds an
SD or MMC card. Insert an optional SD/MMC card in this slot to add
memory to your Pocket PC or expand the capabilities of your Pocket
PC.
Power Button — turns power on and off. Turn the backlight off by
pressing and holding.
Stylus — use to tap or write on the screen. Slide the stylus out of its
storage compartment on your Pocket PC.
Always use the stylus for tapping the touch
screen. Never use hard-pointed or sharp objects. These objects can
damage the touch screen.

*HW6WDUWHG
%RWWRP)HDWXUHV
The bottom features are shown in the following figure. Brief descriptions
follow the figure.
3RFNHW3&%RWWRP)HDWXUHV
$– Cradle Connector %– Power Connector
Cradle Connector — connect the USB cradle to this connector. Use
the cradle to synchronise the Pocket PC with your computer.
Power Connector — connect the AC adapter to this connector.
&UDGOH)HDWXUHV
Use the cradle to hold the Pocket PC when charging the battery,
synchronising data with your computer or when you keep your Pocket PC
on for long periods.
The cradle features are shown in the following figure. Brief descriptions
follow the figure.
3RFNHW3&&UDGOH)HDWXUHV
$– USB Connector
%– Power Connector
&– Pocket PC Connector
USB Connector — connect to the USB port on your computer for
synchronising data.
Power Connector — connect the AC adapter to this connector.
Pocket PC Connector — connect your Pocket PC to this connector.
Use the cradle to charge the battery and to synchronise the Pocket PC
with your computer.

*HW6WDUWHG
%HIRUH<RX6WDUW
The hard reset switch on the back of your Pocket PC should be switched to
the ON (down) position before you can use your Pocket PC. If this is not
the case, please set it to the ON position.
Make sure that your Pocket PC is switched off.
Unscrew the cap of your stylus. Use the pointed end of the cap to slide
the hard reset switch to the ON (down) position.
Always leave the switch in the ON position unless
you need to perform a hard reset. A hard reset will cause the memory of
your Pocket PC to be cleared.
&KDU HWKH%DWWHU\
Your Pocket PC contains a rechargeable Lithium Ion battery. The battery
must be charged before you use the Pocket PC the first time. You can
periodically recharge thereafter.
Battery power is monitored by your Pocket PC. Warning messages and
battery low icons are displayed when battery power becomes low. If you
receive a “battery low” warning message, you should save your data and
recharge the battery as soon as possible to avoid data loss.
You can also monitor battery power activity through the “power
remaining” indicator on your Pocket PC. Tap 6WDUW, 6HWWLQJV, the 6\VWH
tab and 3RZHU to see the indicator.
1RWHBefore using your Pocket PC for the first time, you need to charge
and calibrate the battery.
Charge the battery as follows:
You may need to connect the appropriate converter to the AC
adapter’s plug according to your country.
Connect your Pocket PC to an AC power source.
If you are using the cradle for charging, install the Pocket PC in
the cradle, plug the appropriate end of the AC adapter into the
power connector on the USB cable and plug the other end into a
grounded AC outlet.
If you are not using the cradle, plug the appropriate end of the AC
adapter directly into the power connector on the bottom of the
Pocket PC and plug the other end into a grounded AC outlet.

*HW6WDUWHG
&KDUJLQJWKH%DWWHU\
$– Battery Charging LED '– Power Connector
%– Pocket PC (– AC Adapter
&– Cradle
Wait till the battery is fully charged. This may require a couple of
hours.
The battery-charging LED lights amber, indicating that the battery
is charging.
You can also check the “power remaining” indicator.
When the battery is fully charged, the following occurs.
The battery-charging LED is off.
The “power remaining” indicator indicates 100%.
You can leave the Pocket PC in the cradle and the AC adapter
connected to keep your battery charged.
1RWH Whenever possible, keep your Pocket PC connected to the AC
adapter and a power source. This keeps the battery charged.
1RWH If you want to unplug the AC adapter after the battery has been
fully charged, wait at least 5 seconds. This length of time is necessary for
the battery calibration to complete and thus ensure the best performance of
the battery. Should your Pocket PC indicate a low battery level just after it
has been fully charged, please repeat the battery calibration procedure.
Now calibrate and activate your Pocket PC (see “Calibrate and Activate
the Pocket PC” in the following section). Calibration must be done to
ensure proper operation of your Pocket PC.

*HW6WDUWHG
&DOLEUDWHDQG$FWLYDWHWKH3RFNHW3&
It is essential that you calibrate and activate your Pocket PC before you use
it. This ensures accurate positioning when entering text and selecting
menus. Calibrate and activate the Pocket PC as follows.
Press the power button to switch on the Pocket PC.
Tap the touch screen with the stylus to start the calibration and
activation.
When prompted to align the screen, tap the centre of the cross
wherever the travelling cross stops on the screen. You might have to
do this several times to properly calibrate.
On completion of the screen calibration, follow the screen prompts to
complete the activation.
In the “Stylus” screen, tap 1H[W to continue.
In the “pop-up menus” screens, perform the indicated operations.
In the “Congratulations” screen, tap QH[W to continue.
In the “location” screen, select your time zone and tap 1H[W to
continue.
In the “completion” screen, tap the screen to continue.
The “Today” screen displays.
Your Pocket PC is now ready to use. The following sections describe the
Pocket PC’s two basic screens and how to use them for performing
functions. Also included is information for installing ActiveSync on your
computer.
/HDUQWKH%DVLFV
There are two basic screens you need to know about to get started. These
are the “Today” screen and the “Navigation Bar” screen.
The first screen that you normally see on startup is the “Today” screen.
This screen displays your important events (for example, current date and
time, your name, upcoming appointments, unread messages, tasks).
Tapping or tapping 6WDUW on the “Today” screen with the stylus takes
you to the “Navigation Bar” screen. In the Navigation Bar, you can select
and access the programs available on your Pocket PC. Tap 6WDUW to go back
to the “Today” screen.
Your actions in these basic screens are controlled with the stylus. The
stylus is used as follows.
Tap — touch the screen once with the stylus to open programs and
select options.
Drag — hold the stylus on the screen and drag across the screen to
select text and images. Drag in a list to select multiple items.
Tap and Hold — tap and hold the stylus on an item to see a list of
actions available for that item. In the displayed pop-up menu, tap the
action that you want to perform.
For more information on using the “Today” screen, Navigation Bar and
stylus, please refer to the following sections.

*HW6WDUWHG
7RGD\6FUHHQ
The “Today” screen normally appears whenever you power on the Pocket
PC. On the “Today” screen, you can see at a glance your important
information for the day. The following figure shows a typical “Today”
screen and what you can do from it.
7\SLFDO7RGD\6FUHHQ
At the top of the screen is the “Start” bar. The bar displays the current time
and any active program. The bar also allows you to switch to programs and
close screens.
From the “Today” screen, you can select any of the listed activities by
tapping on your selection with the stylus. For example, if you just activated
your Pocket PC, you might want to enter your name as the owner. Do this
as follows.
In the “Today” screen, tap 7DSKHUHWRVHWRZQHULQIRU DWLRQ.
In the “Owner Information” screen, tap the triangle at the lower right
corner of the screen.
In the “Options” screen, tap .H\ERDUG. A soft keyboard displays.
Tap once in the “Name” field. A blinking cursor appears, indicating
that you can enter data.
Use the keyboard to tap in your name, just as you would with your
computer keyboard.
If you make a mistake and need to remove a letter(s) or remove a
word(s), you can:
correct minor mistakes by placing the cursor after the letter or
letters to be deleted and pressing the backspace arrow on the
keyboard to delete the letter or letters.
highlight a whole word(s) with the stylus and pressing and
holding the stylus on the word(s). A pop-up menu gives options to
Undo, Cut, Copy, Paste, Clear or Select All.
When done, click on . Your changes are saved and the “Today”
screen displays with your name as the owner.
At the bottom of the “Today” screen is the Command Bar. Tapping 1HZ
on the bar lists several tasks that you can tap to open. Use this as a short
cut to open any of the listed tasks.

*HW6WDUWHG
By using the stylus and several control buttons, you can open tasks from
the “Today” screen and Navigation Bar and enter or read data at selected
screens.
1DYL DWLRQ%DU6FUHHQ
To switch to the “Navigation Bar” screen, tap or tap 6WDUW at the top of
the “Today” screen. The Navigation Bar displays in the “Today” screen.
From the Navigation Bar, you can select any one of the listed activities by
tapping on your selection with the stylus. You can also use the navigation
buttons on the front or the scroll dial on the side of the Pocket PC to scroll
up or down, then open the highlighted program by pressing the dial.
7\SLFDO1DYLJDWLRQ%DU6FUHHQ
The “Start” bar at the top of the screen displays the time and one or more
status icons. The bar also displays the icon which you can tap to return
to the “Today” screen. A Command Bar appears at the bottom of the
screen. Tap 1HZ in the bar to return to the “Today” screen.
To select a program from the Navigation Bar (for example, Contacts), tap
or tap &RQWDFWV. You can also tap the &RQWDFWV button on the front of
the Pocket PC. Please note the Contacts command bar at the bottom of the
screen.
The Contacts command bar has a 1HZ button for creating a new contact, a
9LHZ button for selecting the type of contact, a 7RROV button for
performing various tasks and an input panel button. Tapping the input
panel button displays a soft keyboard which you can use to create or edit a
contact.
You can also input information by writing data on the screen. Tap the
triangle in the lower right corner of the screen and tap %ORFN 5HFRJQL]HU,
/HWWHU 5HFRJQL]HU or 7UDQVFULEHU. For information on using each input
device, tap +HOS to open a help screen.
Close the open activity window by tapping in the upper right corner of
the screen. If you revised or added anything, tap to save any changes.
Many of the programs available on your Pocket PC are selected and used
in a manner similar to that described for Contacts.

*HW6WDUWHG
The following table lists the activities on your Navigation Bar. To see the list
on your Pocket PC, tap 6WDUW to open the “Navigation Bar” screen. Tap
3URJUD Vto see more activities. Look on the Companion CD for additional
programs that you might want to install.
$FWLYLWLHV
,FRQ 3URJUD 'HVFULSWLRQ
ActiveSync Synchronise information between your Pocket
PC and computer.
Calendar Keep track of your appointments and create
meeting requests.
Contacts Keep track of your colleagues and friends.
Inbox Send and receive e-mail messages.
Internet
Explorer
View Web pages downloaded from your
computer or connect to the Internet to browse the
Web.
Notes Create hand-written or typed notes, drawings and
recordings.
Tasks Keep track of your tasks.
Windows
Media Play audio or video files.
Programs Tap 3URJUD V to see a list of the various
programs available to you.
Settings Tap 6HWWLQJV to see the various areas that you
can access for changing/reviewing settings.
Find Tap )LQG to find data in your Pocket PC.
Help Tap +HOS to see the Help Contents.
For further information on accessing and using the activities, tap +HOS on
the Navigation Bar.
,QVWDOO$FWLYH6\QF
A key component of your Pocket PC is the Microsoft ActiveSync program.
With Microsoft ActiveSync, you can synchronise the information on your
computer and/or a Microsoft Exchange Server with the information on
your Pocket PC and update both with the most recent information.
1RWH You can synchronise information directly with a Microsoft
Exchange Server if your company is running Microsoft Mobile Information
Server 2002 or later.
For example:
Keep Microsoft Pocket Outlook®data up-to-date by synchronising
your Pocket PC with Microsoft Outlook data on your computer.
Synchronise Microsoft Word and Microsoft Excel files between your
Pocket PC and computer. Your files are automatically converted to the
correct format.
1RWH By default, ActiveSync does not automatically synchronise all
types of information. Use ActiveSync options to turn synchronisation on and
off for specific information types.
With ActiveSync, you can also:
Back up and restore your Pocket PC data.
Copy (rather than synchronise) files between your Pocket PC and
computer.
Control when synchronisation occurs by selecting a synchronisation
mode. For example, you can synchronise continually while connected
to your computer or only when you choose the synchronise command.
Select which information types are synchronised and control how
much data is synchronised. For example, you can choose how many
weeks of past appointments you want synchronised.

*HW6WDUWHG
Your Pocket PC comes with ActiveSync already installed. However, to
synchronise information with your computer, you must also install
ActiveSync on your computer.
Install ActiveSync on your computer from the Companion CD as follows:
1RWH Before starting the ActiveSync installation, ensure that you have
Microsoft Outlook 2002 or later installed on your computer. If you do not
have Outlook, you can install Outlook 2002 from the Companion CD.
1RWH Do not connect your Pocket PC to the computer until ActiveSync
is installed.
Power on your computer.
Insert the Companion CD into the CD-ROM drive of your computer.
The CD starts automatically and displays the “Getting Started with
Your Pocket PC” screen.
In the “Getting Started with Your Pocket PC” screen, click on 6WDUW
+HUH.
If you have not installed Outlook, install it now. Click on ,QVWDOO
2XWORRN in the “Start Here” screen and follow the prompts.
Return to the “Start Here” menu when done.
In the “Start Here” screen, click on,QVWDOO$FWLYH6\QF.
In the “Install ActiveSync 3.7” screen, click on ,QVWDOO.
In the “File Download” screen, click on 2SHQ if your operating
system is Windows XP or click 5XQ WKLV SURJUD IUR LWV FXUUHQW
ORFDWLRQ if your operating system is Windows 2000/Me/98.
Follow the prompts to install ActiveSync on your computer. When
prompted, connect your Pocket PC to your computer.
Install the Pocket PC in the cradle.
Connect the AC adapter to the power connector of the USB cable.
Connect the USB connector of the USB cable to your computer.
6\QFKURQLVLQJ6HWXS
$– Pocket PC '– AC Adapter
%– Cradle (– USB Connector
&– USB Cable )– Computer
Follow the prompts to complete the synchronisation and establish a
partnership between your Pocket PC and your computer.
Your first synchronisation begins when the installation is completed. This
takes time, as the process is copying information to the Pocket PC.

*HW6WDUWHG
Press the power button on the Pocket PC and check your Calendar (tap the
&DOHQGDU program button or tap and tap &DOHQGDU). Please note that
your calendar information in Microsoft Outlook on your computer was
copied to your Pocket PC. Also look at Contacts and Tasks. If you have
Contacts and Tasks information on your computer, you should see that
information copied to your Pocket PC.
When done, tap the button at the top right of the screen to exit the
program.
For further information on using Pocket PC ActiveSync, tap in the
“Today” screen and tap +HOS in the “Navigation Bar” screen. In the
“Help” screen, tap &RQQHFWLRQV and tap 6HW8S5H RWH6\QFKURQLVDWLRQ
ortap6WDUWDQG6WRS6\QFKURQLVDWLRQ.
For information about using ActiveSync on your computer, start
ActiveSync on your computer and click on $FWLYH6\QF+HOS.
$FFHVVLQJ$FWLYH6\QF HOSRQ\RXUFRPSXWHU
Once you have installed ActiveSync on your computer and performed your
first synchronisation, synchronisation occurs whenever the ActiveSync
components on the Pocket PC and on your computer are activated.
Use the USB cradle for automatic synchronisation. You can also use
infrared for synchronisation. To set the synchronisation type, tap 7RROVon
the “ActiveSync” screen, &RQQHFW YLD,5 or 2SWLRQV then 86% 6\QF.

*HW6WDUWHG
8VLQ DQ6'RU00&&DUG
An optional SD or MMC card can be used to add memory to your Pocket
PC or expand the capabilities of your Pocket PC.
To use an SD or MMC card, insert it into the SD/MMC slot on the top of
your Pocket PC until it clicks into place. Please refer to the document
supplied with the card for further instructions.
1RWH You can use an SD IO card that is compliant with the bsquare
solution.
$FFHVV3RFNHW3&)XQFWLRQV
The following table is a guide to many of the functions and settings for the
Pocket PC. Included in the table is the tapping path for accessing the
function from the Navigation Bar. Please note that not all functions are
listed and some settings and selections may differ from that on your Pocket
PC.
$FFHVVLQ 3RFNHW3&)XQFWLRQV
,FRQ )XQFWLRQ $FFHVV
About Pocket
PC Tap 6WDUW, 6HWWLQJV, tap the 6\VWH tab and
tap $ERXW to see Pocket PC version and
processor type.
$FFHVVLQ 3RFNHW3&)XQFWLRQV
,FRQ )XQFWLRQ $FFHVV
ActiveSync Tap 6WDUW, $FWLYH6\QF and tap 6\QFor
7RROV.
Align Screen Tap 6WDUW, 6HWWLQJV, tap the 6\VWH tab
and tap 6FUHHQ.
Backlight
Settings Tap 6WDUW, 6HWWLQJV, tap the 6\VWH tab
and tap %DFNOLJKW.
Battery Status Tap 6WDUW, 6HWWLQJV, tap the 6\VWH tab
and tap 3RZHU.
Buttons, Front Tap 6WDUW, 6HWWLQJV and %XWWRQV.
Calendar Press the &DOHQGDU program button on the
front or tap 6WDUW and &DOHQGDU.
Clock Tap 6WDUW, 6HWWLQJV, tap the 6\VWH tab
and tap &ORFN.
Contacts Press the &RQWDFWV program button on the
front or tap 6WDUW and &RQWDFWV.
eBackup Utility Tap 6WDUW, 3URJUD V and H%DFNXS.
eMenu Utility Tap 6WDUW, 3URJUD V and H0HQX.
File Explorer Tap 6WDUW, 3URJUD V and )LOH([SORUHU.
Find Tap 6WDUW and )LQG.
Help Tap 6WDUW, +HOS and select a topic.
Inbox Tap 6WDUW and ,QER[.
Input Panel Tap 6WDUW, 6HWWLQJV, ,QSXW and select input
method.

*HW6WDUWHG
$FFHVVLQ 3RFNHW3&)XQFWLRQV
,FRQ )XQFWLRQ $FFHVV
Internet
Explorer Tap 6WDUW, ,QWHUQHW([SORUHU
UHTXLUHV
RSWLRQDOPRGHPRU3RFNHW3&V\QFKHGWR
FRPSXWHU
Memory
Settings Tap 6WDUW, 6HWWLQJV, tap the 6\VWH tab
and tap 0H RU\.
MSN
Messenger Tap 6WDUW, 3URJUD V and 061
0HVVHQJHU.
Notes Tap 6WDUW and 1RWHV.
Owner
information Tap 6WDUW, 6HWWLQJV, 2ZQHU,QIRU DWLRQ
and enter information.
Password Tap 6WDUW, 6HWWLQJV and 3DVVZRUG.
Pocket Excel Tap 6WDUW, 3URJUD V and 3RFNHW([FHO.
Pocket PC
Basics Tap 6WDUW, +HOS and 3RFNHW3&%DVLFV.
Pocket Word Tap 6WDUW, 3URJUD V and 3RFNHW:RUG.
Programs Tap 6WDUW, 3URJUD Vand select a program.
Regional
Settings Tap 6WDUW, 6HWWLQJV, tap the 6\VWH tab
and tap 5HJLRQDO6HWWLQJV.
Settings,
Connections Tap 6WDUW, 6HWWLQJV and tap the
&RQQHFWLRQV tab. Select Beam or
Connections.
Settings,
Personal Tap 6WDUW, 6HWWLQJV and tap the 3HUVRQDO
tab. Select Buttons, Input, Menus, Owner
Information, Password, Sounds &
Notifications or Today.
$FFHVVLQ 3RFNHW3&)XQFWLRQV
,FRQ )XQFWLRQ $FFHVV
Settings,
System Tap 6WDUW, 6HWWLQJV and tap the 6\VWH tab.
Select About, Backlight, Certificates, Clock,
Memory, Power, Regional Settings, Remove
Programs or Screen.
Sound Volume Tap 6WDUW, 6HWWLQJV, 6RXQGV
1RWLILFDWLRQV
Start Menu Tap 6WDUW, 6HWWLQJV, 0HQXV and select
programs to appear on Start menu.
Tasks
Windows
Media
Tap the 7DVNV button on the front or tap
6WDUW and 7DVNV.
Tap 6WDUW and :LQGRZV0HGLD.

*HW6WDUWHG
*HW+HOS
The following table provides a comprehensive list of where you can get
help and information on your Pocket PC, the software, connections,
accessories and support.
+HOS5HVRXUFHV
,WH 5HVRXUFH
Pocket PC Operation Pocket PC Getting Started Guide
Pocket PC Reference Guide (this document,
on Companion CD)
Windows Pocket PC :LQGRZV3RFNHW3&+HOS
Help file included with Windows Pocket PC.
Tap 6WDUW in the “Today” screen, tap +HOS
and tap an item in the “Help Contents”
screen.
:LQGRZV3RFNHW3&ZHEVLWH
http://www.pocketpc.com
ActiveSync $FWLYH6\QF+HOSRQ\RXUFR SXWHU
After installing ActiveSync on your computer,
click on 6WDUW!$OO3URJUD V!$FWLYH6\QF
to open the ActiveSync window. Select +HOS
from the menu bar and click on 0LFURVRIW
$FWLYH6\QF+HOS.
$FWLYH6\QF+HOSRQ\RXU3RFNHW3&
Tap in the “Today” screen and tap +HOS
on the Navigation Bar. In the “Help
Contents” screen, tap &RQQHFWLRQV. Select
a topic for help.
$FWLYH6\QF+HOS on the Web
http://www.pocketpc.com and type in
“ActivcSync” in the search box.
+HOS5HVRXUFHV
,WH 5HVRXUFH
Pocket Word, Excel,
Reader, Outlook (Inbox,
Calendar, Contacts,
Tasks, Notes), Windows
Media Player, Internet
Explorer
0LFURVRIW3RFNHW3&)HDWXUHV
http://www.pocketpc.com and choose
“Pocket PC” in the menu.
Software and Hardware
Resources 3RFNHW3&0DJD]LQH
http://www.ppcmag.com
3RFNHW3&&DUH
Your Pocket PC is a durable, dependable unit built for extensive use and
travel. Follow these guidelines to maintain the condition and performance
of the Pocket PC.
Clean your Pocket PC with a soft, clean, slightly damp, almost dry
cloth. Use only water to dampen the cloth. Do not use any type of
cleaning products or soap or you might damage the touch screen and
discolour the case finish.
Do not spray liquids on the touch screen and case or allow liquids to
drip into the Pocket PC.
Do not put anything on top of the touch screen.
Always use the stylus to prevent scratching the touch screen.
Do not expose your Pocket PC to moisture and temperature extremes.
Avoid dropping or bumping the Pocket PC or the AC adapter.
Do not use the Pocket PC in humid or dusty environments.
Avoid leaving the Pocket PC and its components in direct sunlight or
near heat sources.
Other NEC Handheld manuals

NEC
NEC MOBILEPRO 900C User manual

NEC
NEC MOBILEPRO 900 User manual

NEC
NEC MOBILEPRO 750C - VERSION 1999 User manual

NEC
NEC MOBILEPRO 800 - User manual

NEC
NEC MOBILEPRO 780 - User manual

NEC
NEC MOBILEPRO HPC User manual

NEC
NEC MOBILEPRO 900 Instruction Manual

NEC
NEC MobilePro 790 Instruction Manual

NEC
NEC MOBILEPRO 800 - Operating manual

NEC
NEC 700 User manual

NEC
NEC S1596-01 User manual

NEC
NEC MOBILEPRO 800 - User manual

NEC
NEC Barracuda User manual

NEC
NEC SuperScript 750C User manual

NEC
NEC MOBILEPRO 800 - User manual

NEC
NEC MOBILEPRO 750C H User manual

NEC
NEC MOBILEPRO P300 - 2001 User manual

NEC
NEC MOBILEPRO P300 User manual

NEC
NEC MOBILEPRO 900C Instruction Manual

NEC
NEC MOBILEPRO 900C User manual