Necchi K121A User manual


Important safety instructions
When using an electrical appliance, basic safety should always be followed,
including the following:
Read all instructions before using this sewing machine.
DANGER - To reduce the risk of electric shock:
1. An appliance should never be left unattended when plugged in.
2. Always unplug this appliance from the electric outlet immediately after using
and before cleaning.
WARNING - To reduce the risk of burns, re, electric shock,
or injury to persons:
1. Read the instruction carefully before you use the machine
2. Keep the instructions at a suitable place close to the machine and hand it
over if you give the machine to a third party.
3. Use the machine only in dry locations.
4. Never leave the machine unattended with children or elderly people due to
they may not be able to estimate the risk.
5. This appliance can be used by children aged from 8 years and above and
persons with reduced physical, sensory or mental capabilities or lack of
experience and knowledge if they have been given supervision or instruction
concerning use of the appliance in a safe way and understand the hazards
involved.
6. Children shall not play with the appliance.
7. Cleaning and user maintenance shall not be made by children without
supervision.
8. Always switch off the machine if you carry out preparation for work (change
the needle, feed the yarn through the machine, change the footer, etc.).
9. Always unplug the machine if you leave it unattended, to avoid injury by
expediently switch on the machine.
10. Always unplug the machine if you changing the lamp or carry out
maintenance (oiling, cleaning).
11. Don't use the machine if it’s wet or in humid environment.
12. Never pull at the cord, always unplug the machine by gripping the plug.
13. If the LED lamp is damaged or broken, it must be replaced by the
manufacturer or its service agent or a similarly qualied person, in order to
avoid a hazard.
III

14. Never place anything on the pedal.
15. Never use the machine if the air vents are blocked, keep the air vents of the
machine and the foot pedal free from dust, fusel and leftovers.
16. The machine must only be used with designated foot controller, in order
to avoid a hazard. If the foot controller is damaged or broken, it must be
replaced by the manufacturer or its service agent or a similarly qualied
person.
17. The power cord of the foot controller can not be replaced. If the power cord is
damaged the foot controller must be disposed
18. The sound pressure level at normal operation is smaller than 75dB(A).
19. Do not dispose of electrical appliances as unsorted municipal waste, use
separate collection facilities.
20. Contact your local government for information regarding the collection
systems available.
21. If electrical appliances are disposed of in landlls or dumps, hazardous
substances can leak into the groundwater and get into the food chain,
damaging your health and well-being.
22. When replacing old appliances with new ones, the retailer is legally obligated
to take back your old appliance for disposal at least for free of charge.
23. The appliance is not to be used by persons (including children) with reduced
physical, sensory or mental capabilities, or lack of experience and knowledge,
unless they have been given supervision or instruction. (For outside Europe)
24. Children being supervised not to play with the appliance. (For outside
Europe)
SAVE THESE INSTRUCTIONS
This sewing machine is intended for household use only.
Be sure to use the sewing machine in the temperature range from 5ºC to 40ºC.
If the temperature is excessively low, the machine can fail to operate normally.
IV

Contents
Machine Introduction 1
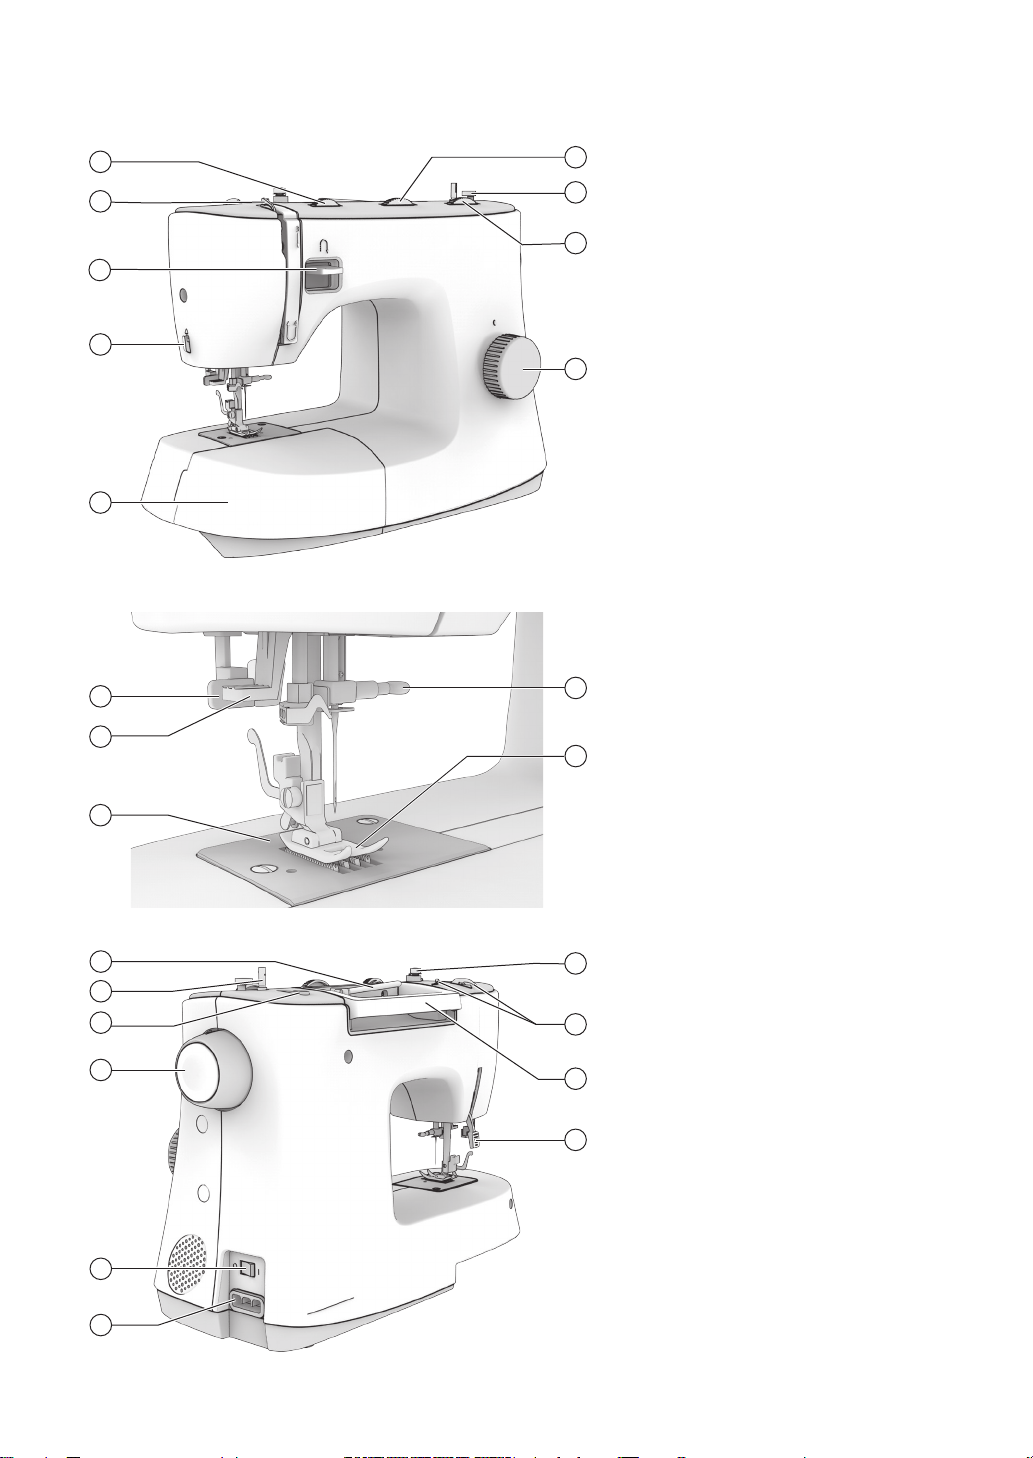
Principal parts of the machine ............................................................................................... 2
Accessories.............................................................................................................................. 3
Standard................................................................................................................................................. 3
Optional.................................................................................................................................................. 3
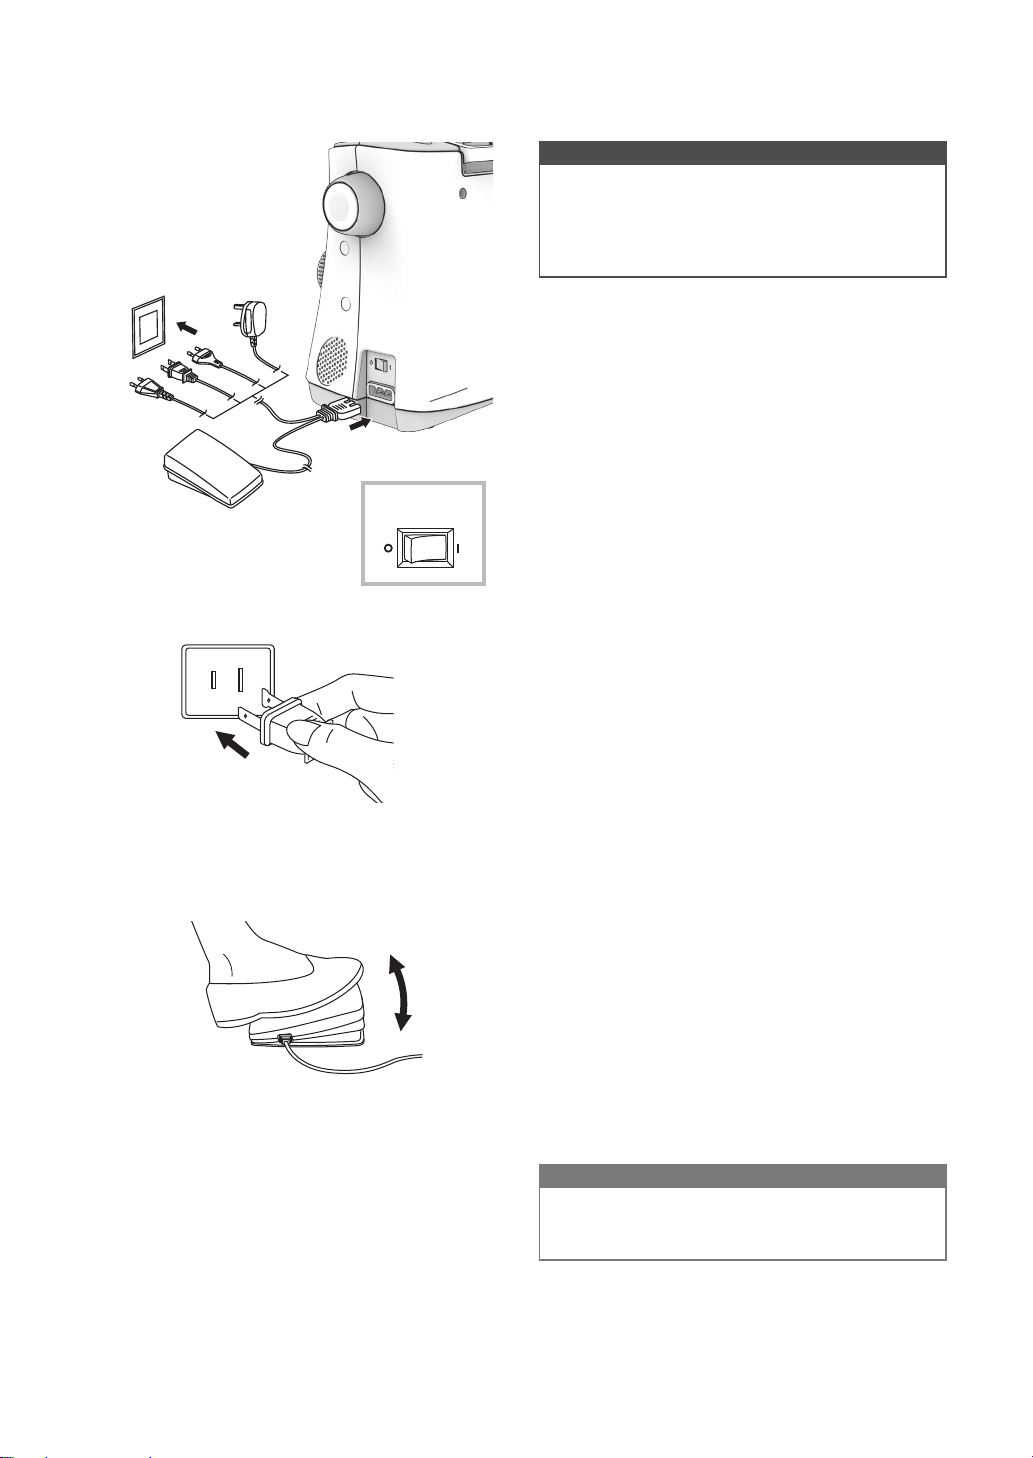
Connecting machine to power source................................................................................... 4
Polarized plug information ..................................................................................................................... 4
Foot control ............................................................................................................................................ 4
Machine Setup 5
Sewing table ............................................................................................................................. 6
Free arm................................................................................................................................................. 6
Two-step presser foot lifter .................................................................................................... 7
Winding the bobbin ................................................................................................................. 8
Inserting the bobbin .............................................................................................................. 10
Threading the upper thread .................................................................................................. 11
Using the needle threader (depends on models) .............................................................. 13
Bringing up the bobbin thread ............................................................................................. 14
Replacing the needle ............................................................................................................. 15
Matching needle/fabric/thread ............................................................................................. 16
Changing the presser foot .................................................................................................... 17
Remove the presser foot...................................................................................................................... 17
Attach the presser foot......................................................................................................................... 17
Remove and insert the presser foot holder.......................................................................................... 17
Insert the edge/quilting guide............................................................................................................... 17
Thread tension ....................................................................................................................... 18
Sewing Basics 19
How to choose your pattern ................................................................................................. 20
Straight stitch......................................................................................................................... 21
Changing the needle position .............................................................................................................. 21
Zigzag stitch ........................................................................................................................... 22
Adjusting the stitch width ..................................................................................................................... 22
Adjusting the stitch length .................................................................................................................... 22
Starting to sew ....................................................................................................................... 23
Useful skills ............................................................................................................................ 25
Reverse sewing.................................................................................................................................... 25
Sewing curves...................................................................................................................................... 25
Sewing corners .................................................................................................................................... 26
Sewing stretch fabrics.......................................................................................................................... 26
Sewing thin fabrics............................................................................................................................... 26
Sewing heavy fabric............................................................................................................................. 26
Utility Stitches 27
Stretch stitch .......................................................................................................................... 28
Straight stretch stitch ........................................................................................................................... 28
Zigzag stretch stitch ............................................................................................................................. 28
Sewing stretch fabrics and elastic tape .............................................................................. 29
Overcasting stitch.................................................................................................................. 30
V

Blind Hem ............................................................................................................................... 31
1-Step Buttonhole stitch ....................................................................................................... 32
Making a buttonhole on stretch fabrics................................................................................................ 34
Button sewing ........................................................................................................................ 35
Zipper insertion...................................................................................................................... 36
Inserting a centered zipper .................................................................................................................. 36
Inserting a side zipper.......................................................................................................................... 37
Gathering ................................................................................................................................ 38
Smocking ................................................................................................................................ 39
Free motion darning, embroidery and monogramming .................................................... 40
Preparation for embroidering and monogramming.............................................................................. 40
Darning..................................................................................................................................................41
Embroidery............................................................................................................................................41
Monogramming .....................................................................................................................................41
Quilting ................................................................................................................................... 42
Using the edge/quilting guide............................................................................................................... 42
Joining the pieces of the fabric ............................................................................................................ 42
Patchwork stitching .............................................................................................................................. 43
Applique..................................................................................................................................44
Fagoting .................................................................................................................................. 44
Scallop stitch.......................................................................................................................... 45
Scallop edging...................................................................................................................................... 45
Shell tuck stitching ............................................................................................................................... 45
Maintenance and Trouble shooting 46
Maintenance ........................................................................................................................... 47
Clean the machine surface .................................................................................................................. 47
Remove the needle plate ..................................................................................................................... 47
Clean the feed dog............................................................................................................................... 47
Clean and lubricate the hook ............................................................................................................... 48
Trouble shooting guide ......................................................................................................... 49
VI

Machine Introduction

2
1. Tension dial (page 18)
2. Take-up lever
3. Reverse sewing lever (page 25)
4. Thread cutter (page 24)
5. Sewing table and accessory box
(page 6)
6. Stitch width dial
(depends on models) (page 20)
7. Bobbin winder stopper (page 8)
8. Stitch lenght dial (page 20)
9. Pattern selector dial (page 20)
10. Buttonhole lever
11. Needle threader
(depends on models) (page 13)
12. Needle plate (page 47)
13. Needle clamp screw (page 15)
14. Presser foot (page 17)
15. Horizontal spool pin (page 11)
16. Bobbin winder spindle (page 8)
17. Second spool pin hole
18. Handwheel
19. Power switch (page 4)
20. Power cord (page 4)
21. Bobbin thread guide (page 8)
22. Upper thread guide
23. Handle
24. Presser foot lifter (page 7)
Principal parts of the machine
8
7
2
1
3
5
4
6
9
12
11
14
13
10
17
16
15
19
18 23
20
24
22
21

3
Accessories
9
8
5 6 7
10 11
1 2 34
12
13 14
15 16 17 18
19 20 21 22
23
Accessories are stored inside the
accessory box.
vStandard
1. All purpose foot
(already installed)
2. Zipper foot
3. Buttonhole foot
4. Button sewing foot
5. Seam ripper/brush
6. Edge/quilting guide
7. Pack of Needle:
3x single needles (90/14)
8. Spool holder
9. Bobbin (4x) (1x already installed)
10. L-screwdriver
11. Spool pin felt
12. Second spool pin
13. Darning plate
14. Oil bottle
vOptional
15. Satin stitch foot
16. Overcasting foot
17. Hemmer foot
18. Cording foot
19. Blind hem foot
20. Darning/embroidery foot
21. Gathering foot
22. Quilting foot
23. Walking foot
Note
To purchase optional accessories,
please consult your local dealer
for further information.

4
Connecting machine to power source
2
ON
OFF
1
nAttention
Always make sure that the machine is
unplugged from power source and the main
switch is off ("O"), when the machine is not
in use and before inserting or removing
parts.
Before connecting the power supply, make
sure that the voltage shown on the rating
plate is conforming with your main power.
Put the machine on a stable table.
1. Connect the machine to a power source
as illustrated.
2. Turn the power switch to on ("I").
The sewing lamp will light up when the switch
is turned on.
vPolarized plug information
This appliance has a polarized plug (one
blade is wider than the other), to reduce the
risk of electrical shock; this plug will t in a
polarized outlet only one way. If the plug does
not t fully in the outlet, reverse the plug. If it
still does not t, contact a qualied electrician
to install the proper outlet. Do not modify the
plug in any way.
vFoot control
When the machine is off, insert the foot
control plug into its connector on the machine.
Turn on the machine, and then slowly press
down the foot control to start sewing. Release
the foot control to stop the machine.
User can quickly kick one step on the foot
control to change the needle position and set
the stop position at the same time.
Note
Consult a qualied electrician if in doubt
as to connect the machine to the power
source.

Machine Setup

6
Sewing table
Hold the sewing table horizontally, then pull
toward the left to remove it from the machine.
Attach the sewing table, and then push it to
the right.
The inside space of the sewing table is used
as an accessory box.
vFree arm
Free-arm sewing is convenient for sewing
tubular areas such as pant hems and cuffs.

7
Two-step presser foot lifter
The presser foot lifter is to raise or lower your
presser foot.
When sewing multi-layers or thick fabrics, the
presser foot can be further raised up manually
to allow enough space for your sewing work.
Note
The needle must always be at the highest
position.

8
Winding the bobbin
1. Place the thread and spool holder onto
the spool pin. For better sewing quality,
choose a proper size of the spool holder
for the thread and attach it next to the
spool.
1
Large spool holder
2
Small spool holder
2. Draw the thread from the spool and place
the thread in between the upper thread
guide.
3. Wind the thread clockwise around the
tension discs.
4. Place the thread end through one of
the inner holes as illustrated and place
the empty bobbin on the bobbin winder
spindle. Then align the notch with bobbin
winder spindle spring.
1
Notch
2
Bobbin winder spindle spring
5. Push the bobbin to the right.
Please following the number order and see the corresponding illustrations below.
12
2
1
4-9
1
2
3

9
6. Hold the thread tail securely in one hand.
7. Step on the foot control to start winding
the bobbin.
8. After the bobbin has wound a few rounds,
stop the machine and cut the thread near
the hole of the bobbin. Continue lling
the bobbin until it is full. Once the bobbin
is full, it rotates slowly. Release the foot
control to stop the machine, then push the
bobbin winder spindle to the left.
9. Cut the thread and then remove the
bobbin.
Note
When the bobbin winder spindle is pushed
to the right position, it’s in "bobbin winding"
mode and the machine is not allowed to
sew and the handwheel will not be able
to turn. To start sewing, push the bobbin
winder spindle back to the left.
Note
Use a bobbin that has been correctly
wound with thread, otherwise the needle
may break or the thread tension will be
incorrect.

10
Inserting the bobbin
nAttention
Turn the power switch to off ("O").
When inserting or removing the bobbin,
the needle must be fully raised.
Remove the sewing table, then open the
hinged cover.
1
Hinged cover
1
3
2
1
4
Pull the bobbin case by the hinged latch.
Remove the bobbin of the bobbin case.
1
Hinged latch
Hold the bobbin case with one hand. Insert
the bobbin so that the thread runs in a
clockwise direction (arrow).
Pull the thread from the slot under the tension
spring and through the opening. Leave a
10cm tail of thread.
1
Slot
2
Tension spring
3
Opening
4
10cm
Hold the bobbin case by the hinged latch.
Make sure the bobbin case nger ts into
the notch at the top of the race as shown in.
Close the hinged cover.
1
Hinged latch
2
Bobbin case nger
3
Notch
Note
If the bobbin case is not properly placed
back into the machine, it will fall out form
the shuttle immediately after starting to
sew.
1
3
2
1

11
Threading the upper thread
nAttention
Turn the power switch to off ("O").
1. Raise the presser foot lifter.
2. Turn the handwheel towards you to bring
the needle and take-up lever to highest
position.
3. Place the thread and spool holder onto
the spool pin. For better sewing quality,
choose a proper size of the spool holder
for the thread and attach it next to to the
thread.
1
Large spool holder
2
Small spool holder
12
Please follow the number order and see the corresponding illustrations below. It is
important to carry out the threading correctly to get sewing quality. Otherwise several
problems will occur.
ON
OFF
2
3
4
5
8
8
6
6
7
7
9
9
1

12
4. Draw the thread from the spool and place
the thread in between the upper thread
guide.
5. Guide the thread ahead and pull the
thread through the pre-tension spring as
illustrated.
6. Continue to guide the thread into the silver
discs to keep the thread in proper tension.
7. Pass the thread under the take-up spring
then pull it upwards as arrow marks
illustrated.
8. Pull the thread to the top then pass the
thread through the slotted eye of the
take-up lever. Guide the thread down
afterwards.
9. Pass the thread behind the at, horizontal
thread guide.
Pull the end of the thread through the
needle from front to rear and pull out
about 10 cm of thread.

13
Using the needle threader (depends on models)
nAttention
Turn the power switch to off ("O").
Lower the presser foot lifter. Raise the
needle to its hightest position by turning the
handwheel toward you until the mark matched
with the line on the machine.
1
Mark
2
Line on the machine
1
2
Press down the needle threader as far as it
goes.
The needle threader turns automatically to the
threading position and the hook pin passes
through the needle eye.
1
Hook pin
2
Needle
Take the thread in front of the needle and
make sure it is under the hook pin.
1
Hook pin
Hold the thread loosely and release the lever
slowly. The hook turns and passes the thread
through the needle eye forming a loop.
Pull the thread through the needle eye.
Press down the needle threader for a certain
distance and cross the thread over the thread
guide.
1
Thread guide
1
1
2
1
1

14
Bringing up the bobbin thread
Hold the upper thread with your left hand.
Turn the handwheel towards you (counter-
clockwise) to lower the needle down below
the needle plate then raise it to bring the
bobbin thread up.
Gently pull on the upper thread to bring the
bobbin thread up through the needle plate
hole. The bobbin thread will come up in a
loop.
Pull both threads to the back under the
presser foot.
Note
Your machine is threaded and ready for
sewing, follow the instructions on "Starting
to sew" (Page 23) chapter to start sewing.
This manual suits for next models
4
Table of contents
Other Necchi Sewing Machine manuals

Necchi
Necchi Vigorelli S1 User manual

Necchi
Necchi NC-102D User manual

Necchi
Necchi Automatic Supernova Ultra Mark 2 User manual

Necchi
Necchi L234A User manual

Necchi
Necchi NC-204D User manual

Necchi
Necchi Creator User manual

Necchi
Necchi NL11C User manual

Necchi
Necchi 681C User manual

Necchi
Necchi FA16 User manual

Necchi
Necchi EX60 User manual

Necchi
Necchi NC-103D User manual

Necchi
Necchi 590 User manual

Necchi
Necchi 270 User manual

Necchi
Necchi NC-59QD User manual

Necchi
Necchi HD22 User manual

Necchi
Necchi Q421A User manual

Necchi
Necchi Q132A User manual

Necchi
Necchi Lock 181 User manual

Necchi
Necchi K408A User manual

Necchi
Necchi EX30 User manual