Necchi FA16 User manual

Instruction Manual

IMPORTANT SAFETY INSTRUCTIONS
When using an electrical appliance, basic safety precautions should always be followed, including the
following:
This sewing machine is designed and manufactured for household use only.
Read all instructions before using this sewing machine.
DANGER— To reduce the risk of electric shock:
1.
An appliance should never be left unattended when plugged in. Always unplug this
sewing machine from the electric outlet immediately after using and before cleaning.
WARNING—To reduce the risk of burns, fire, electric shock, or injury to persons:
1. Do not allow to be used as a toy. Close attention is necessary when this sewing machine is used
by or near children.
2. Use this appliance only for its intended use as described in this owner’s manual.
Use only attachments recommended by the manufacturer as contained in this owner’s manual.
3. Never operate this sewing machine if it has a damaged cord or plug, if it is not working properly, if
it has been dropped or damaged, or dropped into water.
Return this sewing machine to the nearest authorized dealer or service center for examination,
repair, electrical or mechanical adjustment.
4. Never operate the appliance with any air opening blocked. Keep ventilation openings of this
sewing machine and foot controller free from accumulation of lint, dust and loose cloth.
5. Never drop or insert any object into any opening.
6. Do not use outdoors.
7. Do not operate where aerosol (spray) products are being used or where oxygen is being
administered.
8. To disconnect, turn all controls to the off (“O”) position, then remove plug from outlet.
9. Do not unplug by pulling on cord. To unplug, grasp the plug, not the cord.
10. Keep fingers away from all moving parts. Special care is required around the sewing machine
needle and/or cutting blade.
11. Always use the proper needle plate. The wrong plate can cause the needle to break.
12. Do not use bent needles.
13. Do not pull or push fabric while stitching. It may deflect the needle causing it to break.
14. Switch this sewing machine off (“O”) when making any adjustment in the needle area, such as
threading the needle, changing the needle, threading the bobbin or changing the presser foot, and
the like.
15. Always unplug this sewing machine from the electrical outlet when removing covers, lubricating, or
when making any other adjustments mentioned in this owner’s manual.
SAVE THESE INSTRUCTIONS
Please note that on disposal, this product must be safely recycled in accordance with relevant National
legislation relating to electrical/electronic products. If in doubt please contact your retailer for guidance.
(European Union only)
For Europe only:
This appliance can be used by children aged from 8 years and above and persons with reduced
physical, sensory or mental capabilities or lack of experience and knowledge if they have been given
supervision or instruction concerning use of the appliance in a safe way and understand the hazards
involved. Children shall not play with the appliance. Cleaning and user maintenance shall not be made
by children without supervision.
For outside Europe (except U.S.A and Canada):
This appliance is not intended for use by persons (including children) with reduced physical, sensory or
mental capabilities, or lack of experience and knowledge, unless they have been given supervision or
instruction concerning use of the appliance by a person responsible for their safety.
Children should be supervised to ensure that they do not play with this appliance.

SECTION 1. KNOW YOUR MACIHNE
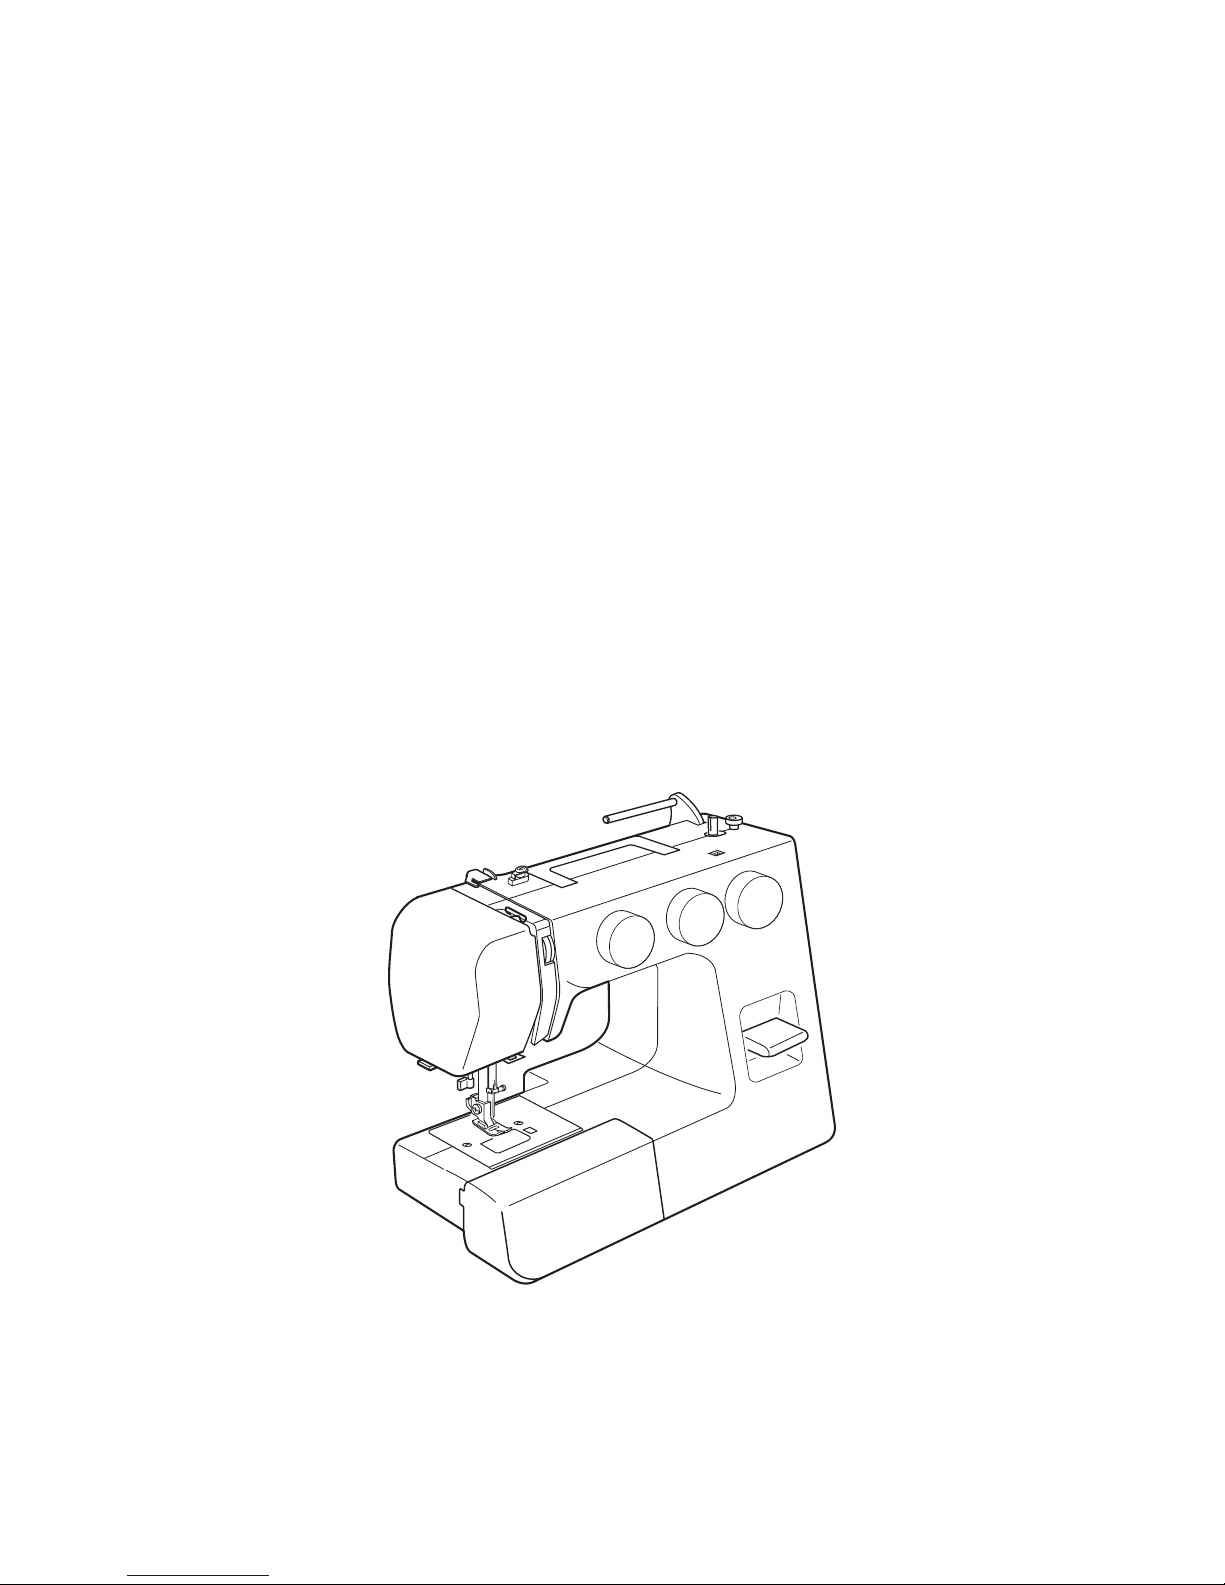
Names of Parts...............................................................2
Setting the Spool Pin......................................................2
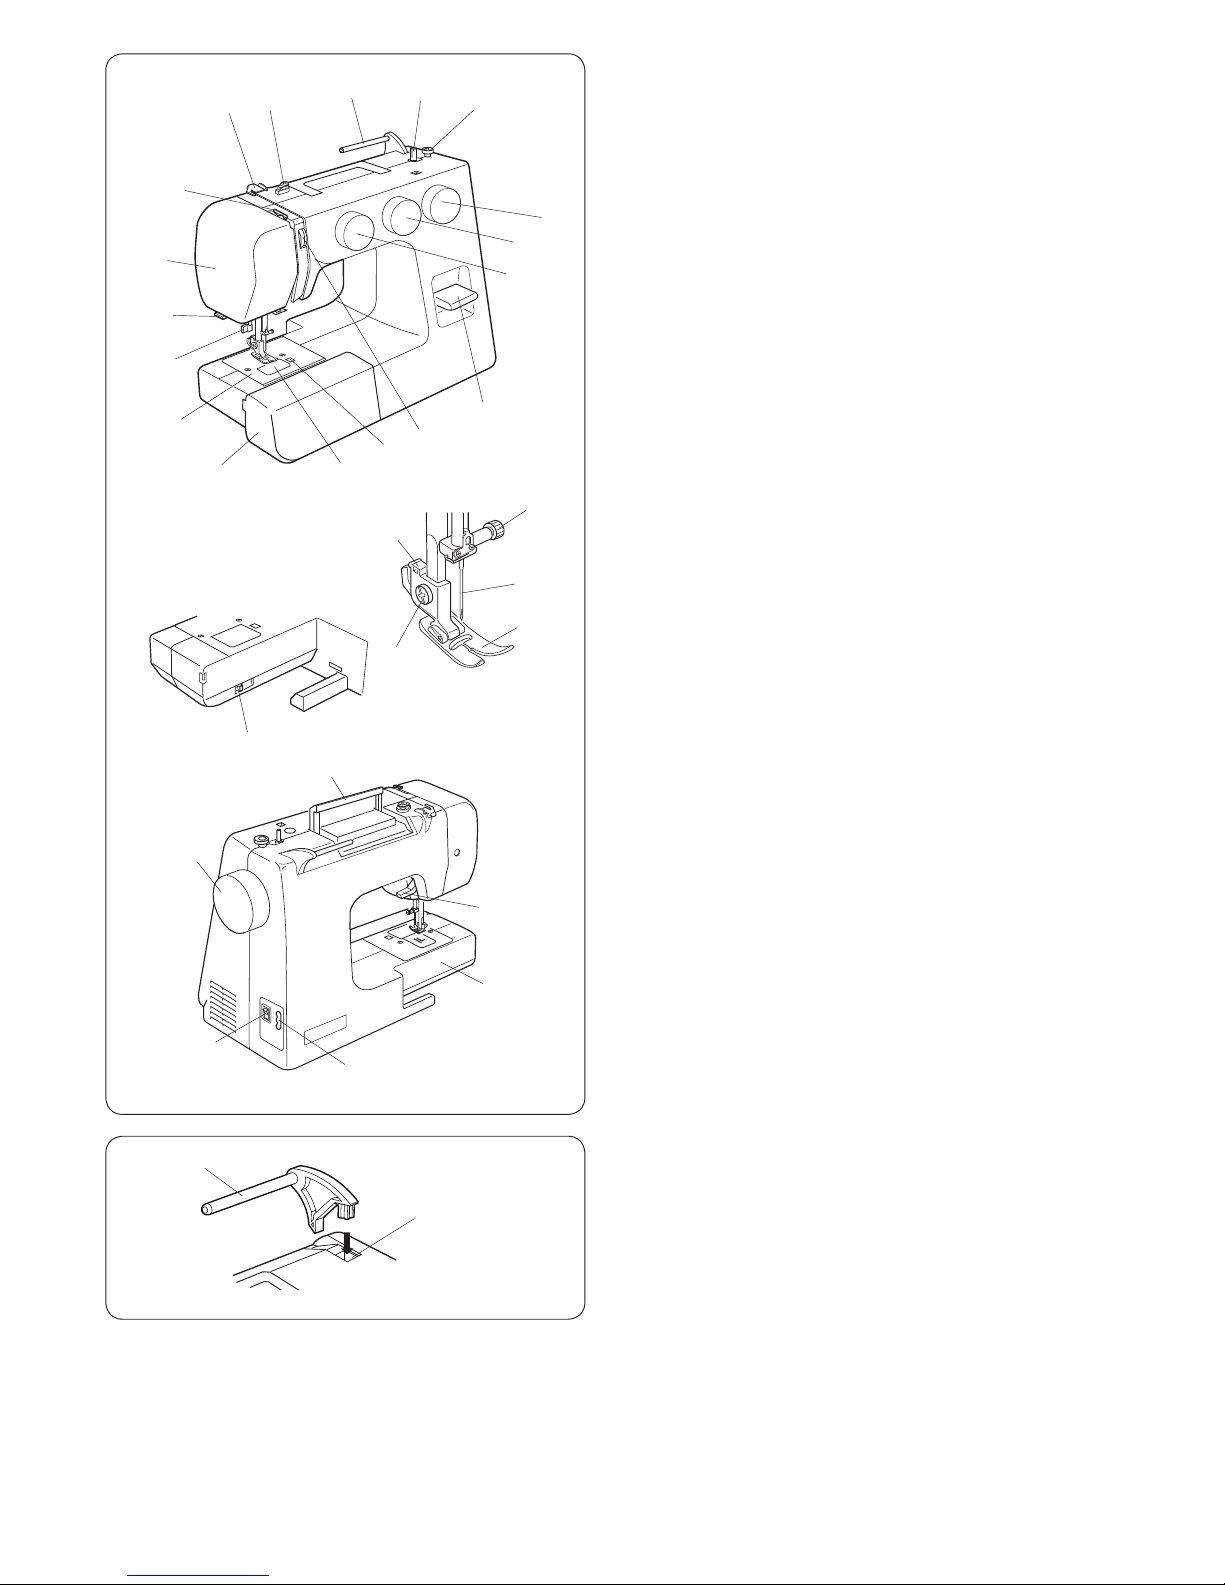
Standard Accessories.....................................................3
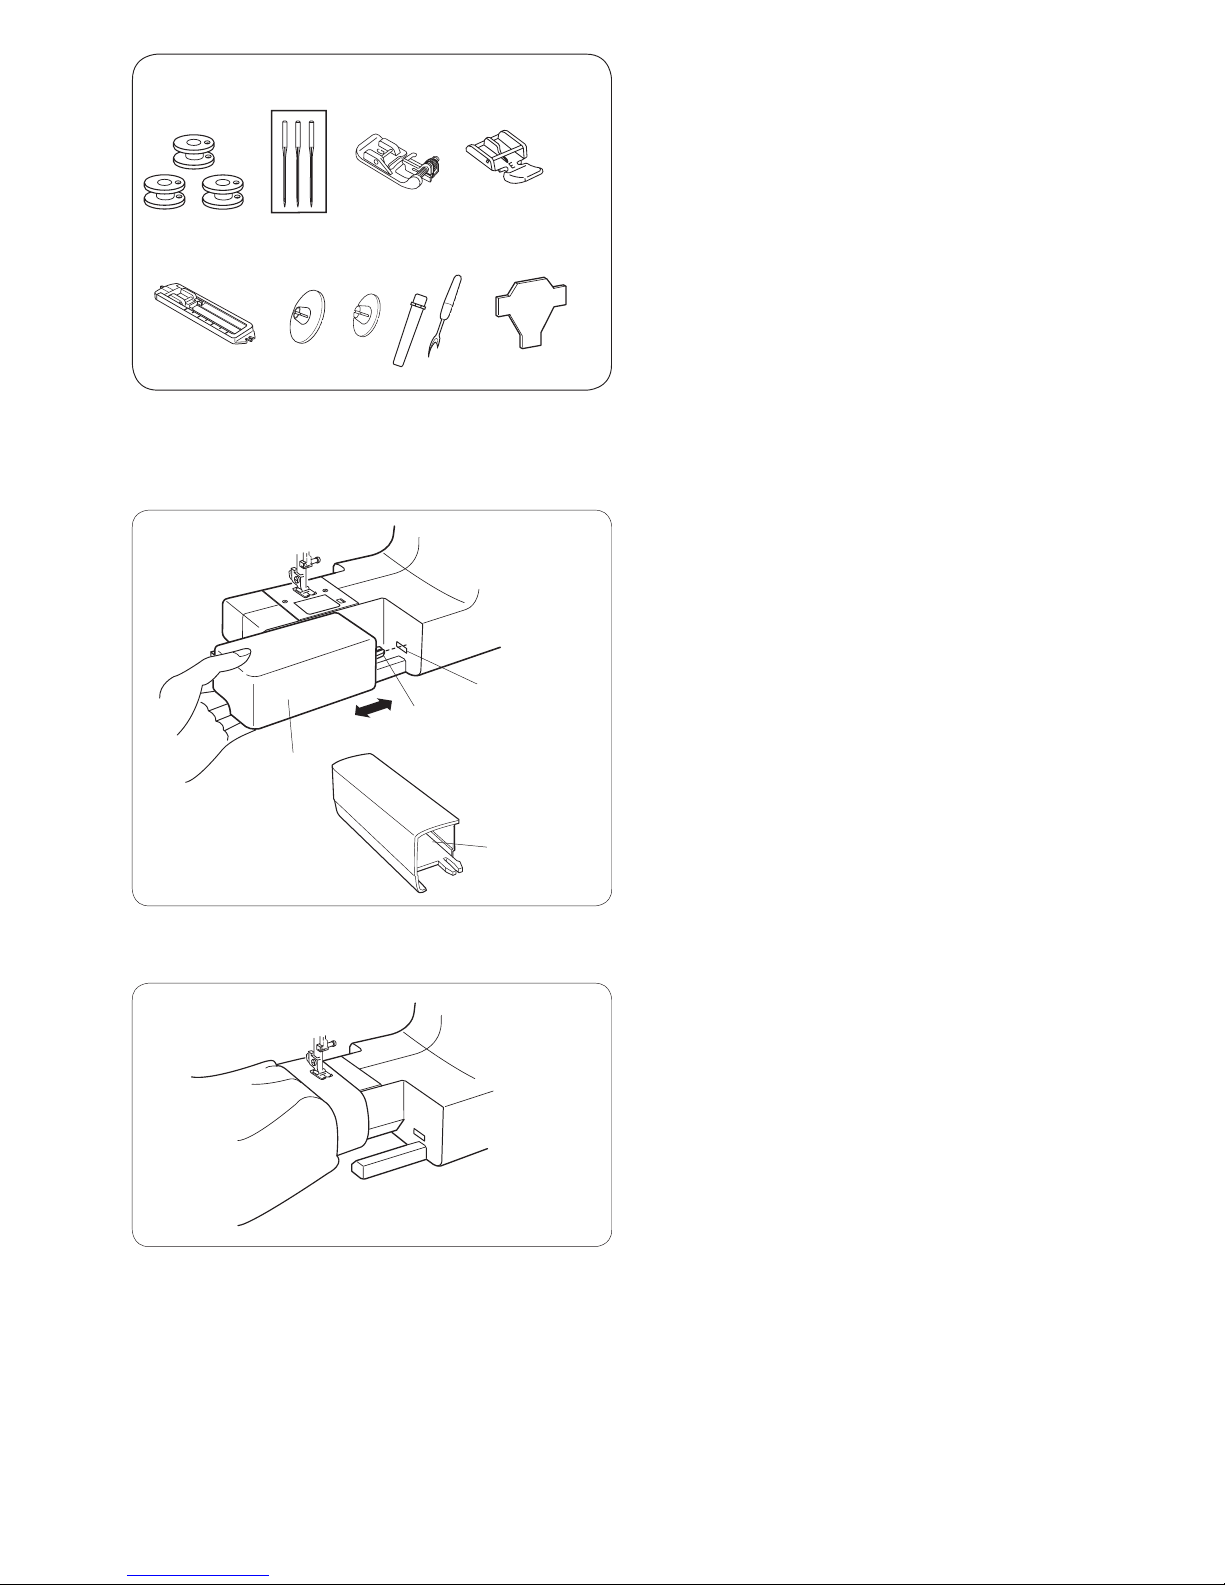
Extension Table ..............................................................3
SECTION 2. GETTING READY TO SEW
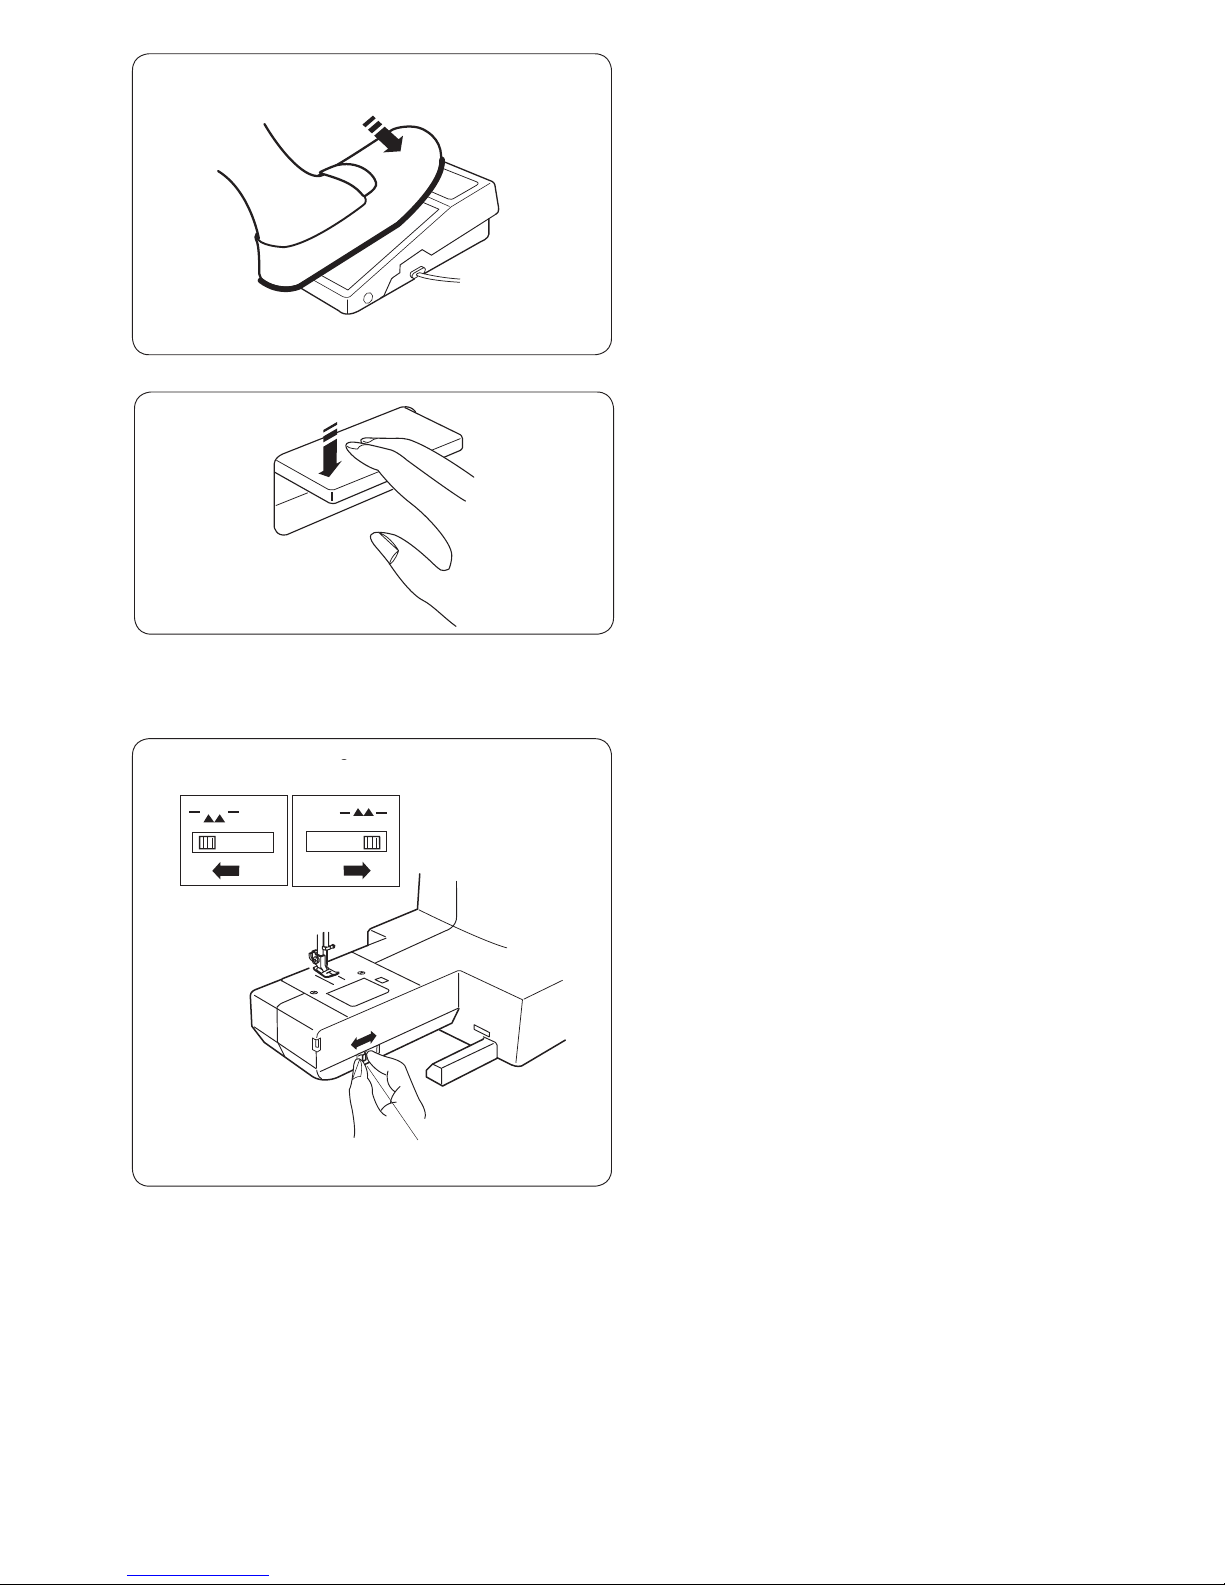
Connecting the Power Supply ........................................4
Controlling the Sewing Speed ........................................5
Reverse Stitch Lever.......................................................5
Dropping the Feed Dog ..................................................5
Raising and Lowering the Presser Foot..........................6
Changing the Presser Foot.............................................6
Removing and Attaching the Foot Holder ......................6
Changing Needles..........................................................7
Fabric and Needle Chart ................................................7
Winding the Bobbin ........................................................8
Removing the Bobbin .....................................................8
Winding the Bobbin ........................................................9
Inserting the Bobbin .....................................................10
Threading the Machine.................................................11
Needle Threader ..........................................................12
Drawing up the Bobbin Thread .....................................12
Selecting the Stitch Pattern ..........................................13
Stitch Length Dial .........................................................13
Stitch Width Dial ...........................................................13
Balancing Needle Thread Tension ................................14
SECTION 3. BASIC SEWING
Straight Stitch Sewing ..................................................15
Changing the Sewing Direction ....................................15
Use the Seam Guide ....................................................16
Turning a Square Corner ..............................................16
Variable Needle Position...............................................16
SECTION 4. UTILITY STITCHES
Basic Zigzag.................................................................17
Overcasting ..................................................................17
Tricot Stitch (Multiple Zigzag Stitch) .............................18
Knit Stitch .....................................................................18
Straight Stretch Stitch...................................................19
Zigzag Stretch Stitch ....................................................19
Button Sewing ..............................................................20
4-Step Buttonhole.........................................................21
Corded Buttonhole........................................................22
Zipper Application....................................................23-25
Blind Hemming ............................................................26
SECTION 5. DECORATIVE STITCHES
Shell Tuck .....................................................................27
Smocking......................................................................27
Applique........................................................................28
Pin Tucking ...................................................................28
Satin Stitches................................................................29
Decorative Stretch Stitches ..........................................29
SECTION 6. CARE AND MAINTENANCE
Cleaning the Hook Race and Feed Dog.......................30
Replacing the Bobbin Holder........................................31
Troubleshooting ............................................................32
TABLE OF COTENTS

2
SECTION 1. KNOW YOUR MACIHNE
Names of Parts
Bobbin winder stopper
Bobbin winder spindle
Spool pin
Bobbin winder thread guide
Thread guide
Thread take-up lever
Face plate
Thread cutter
Needle threader
Needle plate
Extension table (Accessory storage)
Hook cover plate
Hook cover plate release button
Thread tension dial
Reverse stitch lever
Stitch width dial
Stitch length dial
Pattern selector dial
Presser foot
Needle
Needle clamp screw
Foot holder
Setscrew
Carrying handle
Handwheel
Power switch
Machine socket
Drop feed lever
Free-arm
Presser foot lifter
q
w
e
r
t
y
u
i
o
!0
!1
!2
!3
!4
!5
!6
!7
!8
!9
@0
@1
@2
@3
@4
@5
@6
@7
@8
@9
#0
q
w
e
r
t
y
u
i
o
!0
#0
@9
@8
@7
@6
@5
@4
@3
@2
@1
@0
!9
!8
!7
!6
!5
!4
!3
!2
!1
Setting the Spool Pin
Insert the spool pin into the hole as shown.
qSpool pin
wHole
q
w

3
30
3
1
2
3
4
5
1
2
4
5
ÐÀÇÄÅË 6. ÓÕÎÄ ÇÀ ÌÀØÈÍÎÉ
×èñòêà øïóëüíîãî îòñåêà è íèæíåãî
òðàíñïîðòåðà
ÂÍÈÌÀÍÈÅ!
Îòêëþ÷èòå ïèòàíèå è âûòàùèòå âèëêó èç
ðîçåòêè.
Íå ðàçáèðàéòå ìàøèíó èíà÷å, ÷åì îïèñàíî â
ýòîé èíñòðóêöèè.
ÏÐÅÄÓÏÐÅÆÄÅÍÈÅ:
Íå õðàíèòå ìàøèíó â ïîìåùåíèÿõ ñ
ïîâûøåííîé âëàæíîñòüþ, à òàêæå ðÿäîì ñ
ðàäèàòîðàìè èëè íà ïðÿìîì ñîëíå÷íîì ñâåòå.
ÏÐÈÌÅ×ÀÍÈÅ:
Ïðîòèðàéòå êîðïóñ ìàøèíû ìÿãêîé òêàíåâîé
ñàëôåòêîé è íåéòðàëüíûì ìûëîì.
Ïîñëå ÷èñòêè ìàøèíû ïðîâåðüòå, óñòàíîâëåíû
ëè èãëà è ïðèæèìíàÿ ëàïêà.
Îòêëþ÷èòå ïèòàíèå ìàøèíû, âûòàùèòå âèëêó èç
ðîçåòêè.
Ïîäíèìèòå èãëó â íàèâûñøóþ ïîçèöèþ Ñíèìèòå
ïëàñòèíó ÷åëíî÷íîãî îòñåêà, îòîäâèíóâ êíîïêó
âïðàâî. Âûòàùèòå øïóëüêó. Âû÷èñòèòå ïûëü è
îáðåçêè òêàíè ùåòî÷êîé.
1. Ñíèìèòå óñòàíîâî÷íûé âèíò ñ ëåâîé è
ïðàâîé ñòîðîíû èãîëüíîé ïëàñòèíû ïðè ïîìîùè
îòâåðòêè , ïðèëàãàåìîé ê ìàøèíå. Ñíèìèòå
èãîëüíóþ ïëàñòèíó.
1 Óñòàíîâî÷íûé âèíò
2. Ïîäíèìèòå øïóëåäåðæàòåëü è âûòàùèòå åãî.
2 Øïóëåäåðæàòåëü
3. Ïðî÷èñòèòå øïóëåäåðæàòåëü ùåòî÷êîé è
ìÿãêîé òêàíüþ.
4. Ïðî÷èñòèòå òêàíåíàïðàâèòåëè è ÷åëíî÷íûé
ìåõàíèçì ìÿãêîé ùåòî÷êîé.
3 Ùåòî÷êà îò ïûëè
4 Òêàíåíàïðàâèòåëü (ðåéêà)
5. Ïðîòðèòå öåíòð ÷åëíî÷íîãî ìåõàíèçìà ñóõîé
ìÿãêîé òêàíüþ.
5 Öåíòð ÷åëíî÷íîãî ìåõàíèçìà
ÏÐÈÌÅ×ÀÍÈÅ:
Ìîæíî âîñïîëüçîâàòüñÿ ïûëåñîñîì.
3
12
3
456
789
1
2
3
4
Ñòàíäàðòíûå àêñåññóàðû
1 Øïóëüêè
2 Íàáîð èãë
3 Ëàïêà äëÿ ïîòàéíîãî øâà G
4 Ëàïêà äëÿ ìîëíèè E
5 Ëàïêà äëÿ ïåòëè J
6 Äåðæàòåëü êàòóøêè áîëüøîé
7 Äåðæàòåëü êàòóøêè ìàëûé
8 Âñïàðûâàòåëü
9 Îòâåðòêà
Äîïîëíèòåëüíûé ñòîëèê
Äîïîëíèòåëüíûé ñòîëèê îáåñïå÷èâàåò
äîïîëíèòåëüíóþ ðàáî÷óþ ïîâåðõíîñòü.
Óäàëåíèå ñòîëèêà
Ïîòÿíèòå ñòîëèê îò ìàøèíû, êàê ïîêàçàíî íà
ðèñóíêå.
Êðåïëåíèå ñòîëèêà
Ñîåäèíèòå âûñòóï ñ ïàçîì íà ìàøèíå è ñëåãêà
íàäàâèòå íà ñòîëèê.
1 Äîïîëíèòåëüíûé ñòîëèê
2 Âûñòóï
3 Ïàç
4 Ñòàíäàðòíûå àêñåññóàðû ìîæíî õðàíèòü â
îòñåêå â äîïîëíèòåëüíîì ñòîëèêå
- ïðîøèâàíèÿ ðóêàâîâ, ïîÿñîâ, áðþê èëè ëþáûõ
êðóãëûõ äåòàëåé îäåæäû.
- øòîïêè íîñêîâ èëè íàëîæåíèÿ çàïëàò íà
îáëàñòü êîëåí, ëîêòåé èëè íà äåòñêóþ îäåæäó.
Ðóêàâíàÿ ïëàòôîðìà íóæíà äëÿ:
Standard Accessories
qBobbins
wNeedle set
eBlind hemming foot G
rZipper foot E
tSliding buttonhole foot J
ySpool holder (large)
uSpool holder (small)
iSeam ripper (buttonhole opener)
oScrewdriver
Extension Table
The extension table provides an extended sewing
area and can be easily removed for free arm sewing.
The accessories can be stored in the table.
Detaching the table:
Pull the table away from the machine, as illustrated.
Attaching the table:
Push the extension table, inserting the tab into the slot
until the table snaps into the machine.
qExtension table
wTab
eSlot
rAccessory storage
Free-arm sewing
Free-arm sewing is used for stitching sleeves,
waistbands, pant legs or any other tubular garments.
It is also useful for darning socks or mending knees or
elbows.
qwe r
t y u i o
q
w
e
r

4
SECTION 2. GETTING READY TO SEW
Connecting the Power Supply
zTurn the power switch off.
xInsert the machine plug into the machine socket.
cInsert the power supply plug into the wall outlet.
vTurn the power switch on.
qPower switch
wMachine plug
eMachine socket
rPower supply plug
tWall outlet
NOTE:
Before connecting to the power supply, make sure the
voltage shown on the machine conforms to your
electrical power.
WARNING:
While in operation, always keep your eyes on the
sewing area, and do not touch any moving parts such
as the thread take-up lever, handwheel or needle.
Always turn off the power switch and unplug from the
power supply:
- when leaving the machine unattended.
- when attaching or removing parts.
- when cleaning the machine.
Do not place anything on the foot control, otherwise the
machine will run intermittently.
Operating Instructions:
The symbol “O” of a switch indicates the “off” position of
a switch.
For an appliance with a polarized plug (one blade wider
than the other):
To reduce the risk of electrical shock, this plug is
intended to fit in a polarized outlet only one way.
If it does not fit fully in the outlet, reverse the plug. If it still
does not fit, contact a qualified electrician to install the
proper outlet. Do not modify the plug in any way.
The foot controller Model YC-482J-EC or TJC-150 is used
with this sewing machine (USA market only).
q
w
e
r
t

5
28
1
23
4
1Ñáîðêè
Óñòàíîâêà ìàøèíû
1 Âûáîð ñòðî÷êè: D
2 Äëèíà ñòåæêà: S.S
3 Íàòÿæåíèå âåðõíåé íèòè: 1 - 4
4 Ïðèæèìíàÿ ëàïêà: ëàïêà äëÿ çèã-çàãà À
ÏÐÈÌÅ×ÀÍÈÅ:
Îñëàáüòå íàòÿæåíèå âåðõíåé íèòè äëÿ
îáëåã÷åíèÿ ñîçäàíèÿ ñáîðîê.
1. Ñáîðêè – óòîí÷åííàÿ äåêîðàòèâíàÿ îòäåëêà
íà äåòñêîé îäåæäå èëè æåíñêèõ áëóçêàõ.
Âûáåðèòå ìÿãêóþ è ëåãêóþ òêàíü òàêóþ êàê
áàòèñò èëè øàëè. Îòðåæüòå òêàíü â òðè ðàçà
äëèííåå äëèíû ïðåäïîëàãàåìîãî ïðîåêòà.
Óñòàíîâèòå äëèíó ñòåæêà íà «4» è ïðîøåéòå
ðÿäû ïðÿìûõ ñòåæêîâ, ïðèáëèçèòåëüíî íà 1 ñì
äðóã îò äðóãà äëÿ ñîçäàíèÿ ñáîðîê.
1 Ðàññòîÿíèå ìåæäó ðÿäàìè
2. Çàâÿæèòå íèòè ñ îäíîé ñòîðîíû . Ñ äðóãîé
ñòîðîíû ïîòÿíèòå çà øïóëüíóþ (íèæíþþ) íèòü è
ðîâíî ðàñïðåäåëèòå ñêëàäêè .
Ïðîøåéòå äåêîðàòèâíûå ñòðî÷êè ìåæäó ðÿäàìè
ïðÿìûõ ñòåæêîâ. Âûòÿíèòå íèòè ïðÿìûõ
ñòåæêîâ.
5
1
3
Êíîïêà ðåâåðñà
Ïîêà âû íàæèìàåòå íà êíîïêó ðåâåðñà,
áóäåò øèòü â îáðàòíîì íàïðàâëåíèè.
ìàøèíà
Êîíòðîëü ñêîðîñòè øèòüÿ
Íîæíàÿ ïåäàëü
Ñêîðîñòü øèòüÿ ìîæíî èçìåíÿòü ïðè ïîìîùè
ïåäàëè. ×åì ñèëüíåå äàâèòü íà ïåäàëü, òåì
âûøå ñêîðîñòü øèòüÿ.
Òðàíñïîðòåð ïîäà÷è òêàíè
Ïðè ïðèøèâàíèè ïóãîâèö è ò.ä. îòêëþ÷èòå
òðàíñïîðòåð.
Îòêëþ÷åíèå òðàíñïîðòåðà ïîäà÷è òêàíè
Äëÿ îòêëþ÷åíèÿ òðàíñïîðòåðà òêàíè
ïåðåäâèíüòå ðû÷àã îòêëþ÷åíèÿ òðàíñïîðòåðà
âëåâî.
Ïîäêëþ÷åíèå òðàíñïîðòåðà ïîäà÷è òêàíè
×òîáû ïîäíÿòü òðàíñïîðòåð òêàíè, ïåðåäâèíüòå
ðû÷àã âïðàâî.
1 Ðû÷àã îòêëþ÷åíèÿ òðàíñïîðòåðà òêàíè
2 Îòêëþ÷åí
3 Ïîäêëþ÷åí
ÏÐÈÌÅ×ÀÍÈß:
Äëÿ îáû÷íîãî øèòüÿ òðàíñïîðòåð òêàíè äîëæåí
áûòü âêëþ÷åí. Ïîâåðíèòå ìàõîâîå êîëåñî è
ïðîâåðüòå, ïîäíèìåòñÿ ëè òðàíñïîðòåð òêàíè
ïðè ïåðåêëþ÷åíèè ðû÷àãà âïðàâî.
2
1
3
2
Controlling the Sewing Speed
Foot control
Sewing speed can be varied by the foot control.
The harder you depress the foot control, the faster the
machine runs.
Reverse Stitch Lever
Push the reverse stitch lever down to sew in reverse.
The machine will sew in reverse while the lever is pushed.
Dropping the Feed Dog
The drop feed lever is located underneath the free-arm
bed on the front side of the machine.
To drop the feed dog, push the lever in the direction of the
arrow, as illustrated.
To raise the feed dog, push the lever in the direction of
the arrow, as illustrated, and turn the handwheel toward
you.
The feed dog must be up for regular sewing.
qDrop feed lever
wRaised position
eLowered position
we
q

6
1
2
3
3
2
6
1
2
3
3
2
1
2
4
1
23
3
Ïîäúåì è îïóñêàíèå ïðèæèìíîé ëàïêè
Ðû÷àã ïîäúåìà ïðèæèìíîé ëàïêè ïîäíèìàåò è
îïóñêàåò ïðèæèìíóþ ëàïêó.
Âû ìîæåòå ïîäíÿòü ëàïêó íà 0,6 ñì âûøå
îáû÷íîãî ïîëîæåíèÿ äëÿ áûñòðîé ñìåíû
ïðèæèìíîé ëàïêè èëè äëÿ áåñïðåïÿòñòâåííîãî
ðàçìåùåíèè îáúåìíûõ ìàòåðèàëîâ ïîä ëàïêîé.
1 Îïóùåííîå ïîëîæåíèå
2 Îáû÷íîå ïîäíÿòîå ïîëîæåíèå
3 Íàèâûñøåå ïîëîæåíèå
Ñìåíà ïðèæèìíîé ëàïêè
ÂÍÈÌÀÍÈÅ!
Ïåðåä ñìåíîé ïðèæèìíîé ëàïêè îòêëþ÷èòå
ïèòàíèå.
Âñåãäà èñïîëüçóéòå òîëüêî ïîäõîäÿùóþ ëàïêó
äëÿ âûáðàííîãî îáðàçöà. Èç-çà íåïðàâèëüíîé
ëàïêè ìîæåò ñëîìàòüñÿ èãëà.
Êàê ñíÿòü ïðèæèìíóþ ëàïêó
Ïîâåðíèòå ìàõîâîå êîëåñî ïðîòèâ ÷àñîâîé
ñòðåëêè è ïîäíèìèòå èãëó â âåðõíåå ïîëîæåíèå.
Ïîäíèìèòå ïðèæèìíóþ ëàïêó è íàæìèòå íà
ðû÷àã ïîçàäè äåðæàòåëÿ ëàïêè.
1 Ðû÷àã
Êàê ïðèñòåãíóòü ïðèæèìíóþ ëàïêó
Ðàñïîëîæèòå âûáðàííóþ ïðèæèìíóþ ëàïêó òàê,
÷òîáû ñòåðæåíü íàõîäèëñÿ ïðÿìî ïîä âûåìêîé
äåðæàòåëÿ.
Îïóñòèòå äåðæàòåëü ëàïêè è ïðèñòåãíèòå ëàïêó.
2 Âûåìêà äåðæàòåëÿ
3 Ñòåðæåíü ëàïêè
Êàê ñíÿòü è óñòàíîâèòü äåðæàòåëü ëàïêè
ÂÍÈÌÀÍÈÅ!
Ïåðåä ñìåíîé äåðæàòåëÿ ïðèæèìíîé ëàïêè
îòêëþ÷èòå ïèòàíèå.
×òîáû ñíÿòü:
Ïåðåâåäèòå èãëó â âåðõíþþ ïîçèöèþ.
Ïîâåðíèòå îòâåðòêîé âèíò ïðîòèâ ÷àñîâîé
ñòðåëêè è ñíèìèòå åãî.
×òîáû óñòàíîâèòü:
Ñîïîñòàâüòå îòâåðñòèÿ â äåðæàòåëå ëàïêè ñ
îòâåðñòèåì íà ïðèæèìíîì ñòåðæíå . Âñòàâüòå
âèíò â îòâåðñòèå. Îòâåðòêîé çàòÿíèòå âèíò ïî
÷àñîâîé ñòðåëêå.
1 Óñòàíîâî÷íûé âèíò
2 Äåðæàòåëü ëàïêè
3 Îòâåðñòèÿ â äåðæàòåëå ëàïêè
4 Îòâåðñòèå â ïðèæèìíîì ñòåðæíå
Raising and Lowering the Presser Foot
The presser foot lifter raises and lowers the presser foot.
You can raise the foot about 1/4˝ (0.6 cm) higher than the
normal up position for easy removal of the presser foot,
or to help you place heavy fabric under the foot.
qLowered position
wNormal up position
eExtra up position
Changing the Presser Foot
To remove:
Raise the needle to its highest position by turning the
handwheel counterclockwise. Raise the presser foot, and
press the lever on the back of the foot holder.
qLever
CAUTION:
Turn OFF the power switch before changing the foot.
Always use the proper foot for the selected pattern. The
wrong foot can cause the needle to break. Do not push
the lever down to prevent it from being broken.
To attach:
Place the desired presser foot, so that the pin on the foot
lies just under the groove on the foot holder. Lower the
presser foot lifter to lock the foot in place.
wGroove
ePin
Removing and Attaching the Foot Holder
WARNING:
Turn OFF the power switch before detaching or
attaching the foot holder.
To remove:
Remove the setscrew by turning it counterclockwise with
a screwdriver and remove the foot holder.
To attach:
Match the hole in the foot holder with the threaded hole
in the presser bar. Fit the setscrew into the hole. Tighten
the screw by turning it clockwise with a screwdriver.
qSetscrew
wFoot holder
eHole
rThreaded hole
q
w
w
e
e
we
q
w
e
r
q

7
26
1
2
34
8
1
2
1
2
3
4
23
4
1Ïîòàéíàÿ ñòðî÷êà
Óñòàíîâêà ìàøèíû
1 Âûáîð ñòðî÷êè: E èëè F
2 Äëèíà ñòåæêà: 2 - 3
3 Íàòÿæåíèå âåðõíåé íèòè: 1 - 4
4 Ïðèæèìíàÿ ëàïêà: ëàïêà äëÿ ïîòàéíîé
ñòðî÷êè G
1. Óñòàíîâêà ëàïêè äëÿ ïîòàéíîé ñòðî÷êè.
Èäåàëüíûé ïîòàéíîé ñòåæîê âîçìîæåí òîëüêî
íà òîëñòûõ òêàíÿõ.
Ïðèêðåïèòå ëàïêó äëÿ ïîòàéíîé ñòðî÷êè êàê íà
ðèñóíêå. Ñëîæèòå òîëñòóþ òêàíü ïî ñõåìå
îñòàâèâ îòîãíóòûé êðàé îò 0.4 äî 0.7 ñì
1 Îáîðîòíàÿ ñòîðîíà òêàíè
2îò 0.4 äî 0.7 ñì
3 Òîëñòûå òêàíè
4 Òîíêèå è ñðåäíèå òêàíè
2. Îòðåãóëèðóéòå ïîëîæåíèå èãëû ïðè
íåîáõîäèìîñòè òàê, ÷òîáû èãëà òîëüêî
ïðèõâàòûâàëà êðàé ñ ëåâîé ñòîðîíû.
3. Îñëàáüòå âèíò è ñîïîñòàâüòå íàïðàâèòåëü íà
ëàïêå ñî ñêëàäêîé íà òêàíè. Èãëà äîëæíà òîëüêî
ïðèõâàòûâàòü ñêëàäêó. Åñëè èãëà óõîäèò
ñëèøêîì äàëåêî âëåâî, ïåðåäâèíüòå íåìíîãî
íàïðàâèòåëü âëåâî. Åñëè èãëà íå çàõâàòûâàåò
ñêëàëó, ïåðåäâèíüòå íàïðàâèòåëü âïðàâî.
Øåéòå, íàïðàâëÿÿ ñëîæåííûé êðàé âäîëü
íàïðàâèòåëÿ.
5 Âèíò
6 Ñêëàäêà
7 Íàïðàâèòåëü
4. Ïî îêîí÷àíèè ðàñêðîéòå òêàíü ëèöåâîé
ñòîðîíîé íàâåðõ.
ÏÐÈÌÅ×ÀÍÈÅ:
Åñëè ñòåæêè áóäóò ëîæèòüñÿ ñëèøêîì äàëåêî
âëåâî, îíè áóäóò âèäíåòüñÿ íà ëèöåâîé ñòîðîíå
òêàíè.
5
6
7
7
1
2
3
4
1
Ñìåíà èãë
ÂÍÈÌÀÍÈÅ!
Ïåðåä çàìåíîé èãë îòêëþ÷àéòå ïèòàíèå
ìàøèíû.
1.Ïîâåðíèòå ìàõîâîå êîëåñî ïðîòèâ ÷àñîâîé
ñòðåëêè è ïîäíèìèòå èãëó â âåðõíåå ïîëîæåíèå.
Îïóñòèòå ïðèæèìíóþ ëàïêó.
Îñëàáüòå âèíò èãîëüíîãî ñòåðæíÿ, ïîâåðíóâ åãî
ïðîòèâ ÷àñîâîé ñòðåëêè.
Âûòàùèòå èãëó èç çàæèìà
1 Âèíò çàæèìà èãëû
2.Âñòàâüòå íîâóþ èãëó â çàæèì ïëîñêîé
ñòîðîíîé îò ñåáÿ.
Âñòàâëÿÿ èãëó â çàæèì, ïîäòîëêíèòå åå êàê
ìîæíî âûøå è çàòÿíèòå âèíò, ïîâåðíóâ åãî ïî
÷àñîâîé ñòðåëêå.
2 Ñòîïîð
3 Ïëîñêàÿ ñòîðîíà
×òîáû ïðîâåðèòü êà÷åñòâî èãëû, ïîëîæèòå åå
ïëîñêîé ñòîðîíîé íà ðîâíóþ ïîâåðõíîñòü
(èãîëüíóþ ïëàñòèíó, ñòåêëî è ò.ä.). Çàçîð ìåæäó
èãëîé è ïëîñêîé ïîâåðõíîñòüþ äîëæåí áûòü
îäèíàêîâûì. Íèêîãäà íå èñïîëüçóéòå ãíóòûå
èëè òóïûå èãëû. Ïîâðåæäåííûå èãëû ìîãóò
ðâàòü è çàòÿãèâàòü òðèêîòàæ, òîíêèé øåëê è
ëåãêèå òêàíè.
4 Çàçîð
12
Òàáëèöà ïîäáîðà íèòè è èãëû.
Òêàíü Íèòêè Ðàçìåð èãëû
Ëåãêèå
òêàíè
Áàòèñò
Æîðæåò
Òðèêî
Øåðñòü
Ïîëèýñòåð
Øåëê ¹80–100
Õëîïîê ¹80–100
Ñèíòåòè÷åñêàÿ
íèòü ¹80–100
¹9/65–11/75
Ñðåäíèå
òêàíè
Õëîïîê
Ïîëèýñòåð
Òîíêèé
òðèêîòàæ
Øåðñòü
Øåëê ¹50
Õëîïîê ¹60–80
Ñèíòåòèêà ¹50–80
Õëîïîê ¹50
¹11/75-¹14/90
¹14/90
Òÿæåëûå
òêàíè
Äæèíñà
Äæåðñè
Ïàëüòîâàÿ
Äðàïèðîâî÷íàÿ
Øåëê ¹50
Õëîïîê ¹40-50
Ñèíòåòèêà ¹40-50
Øåëê ¹30
Õëîïîê ¹50
¹14/90–16/100
¹16/100
Ïðè îáû÷íîì øèòüå èñïîëüçóþòñÿ èãëû ¹11/75 èëè ¹14/90. Òîíêèå íèòè è èãëû èñïîëüçóþòñÿ ïðè
ðàáîòå ñ òîíêèìè òêàíÿìè, ÷òîáû òêàíü íå ìîðùèëàñü; òîëñòûå òêàíè òðåáóþò òîëñòûõ èãë,
ñïîñîáíûõ ïðîéòè ñêâîçü òêàíü, íå èñïîðòèâ âîëîêíà. Ïåðåä íà÷àëîì ðàáîòû âñåãäà ïðîáóéòå èãëó è
íèòü íà îòäåëüíîì êóñî÷êå òêàíè. Âåðõíÿÿ è íèæíÿÿ íèòè äîëæíû áûòü îäèíàêîâûìè. Ïðè ðàáîòå ñ
î÷åíü òîíêèìè, ñèíòåòè÷åñêèìè è ðàñòÿãèâàþùèìèñÿ òêàíÿìè èñïîëüçóéòå èãëû BLUE TIPPED ñ
Ãîëóáûì Íàêîíå÷íèêîì. Èãëà ñ ãîëóáûì íàêîíå÷íèêîì ïðåäîòâðàùàåò ïðîïóñêè ñòåæêîâ.
Changing Needles
CAUTION:
Always make sure to turn the power switch off and
disconnect the machine from power supply before
changing the needle.
Raise the needle by turning the handwheel and lower the
presser foot.
Turn off the power switch.
zLoosen the needle clamp screw by turning it
counterclockwise.
Remove the needle from the clamp.
qNeedle clamp screw
xInsert a new needle into the needle clamp with
the flat side of the needle to the rear.
When inserting the needle into the needle clamp,
push it up against the stopper pin and tighten the
needle clamp screw firmly.
wStopper pin
eFlat side
To check needle straightness, place the flat side of the
needle onto something flat (glass, etc.)
The gap between the needle and the flat surface should
be consistent.
Never use a blunt needle.
rGap
Fabric and Needle Chart
•Forgeneralsewing,useneedlesize11/75or14/90.
•Anethreadandneedleshouldbeusedforsewing
lightweight fabrics, so the fabric will not be marred.
•Heavyfabricsrequireaneedlelargeenoughtopierce
the fabric without fraying the needle thread.
•Alwaystestthethreadandneedlesizeonasmallscrap
of the fabric that will be used for actual sewing.
•Ingeneral,usethesamethreadfortheneedleand
bobbin.
NOTE:
When sewing stretch fabrics, very fine fabrics and
synthetics,useabluetipneedle(PartNo.990311000,
sold separately). The blue tip needle effectively
prevents skipped stitches.
Fine
Medium
Silk #80-100
Cotton #80-100
Synthetic #80-100
Heavy
weight
Denim
Tweed
Coating
Quilting
Lawn
Georgette
Tricot
Organza
Crepe
Sheeting
Jersey
Broadcloth
Fleece
#9/65-11/75
Thread Needle
Silk #50
Cotton #50-80
Synthetic #50-80
#11/75-14/90
Silk #30-50
Cotton #40-50
Synthetic #40-50
#14/90-16/100
Fabric
NOTE:
3x#14/90needlesareincludedintheenvelop.
q
z
q
x
w
e
r

8
8
1
2
1
2
3
(A)
(B)
1
2
Óñòàíîâêà êàòóøêè íà êàòóøêîäåðæàòåëü
ÀÓñòàíîâèòå íà ñòåðæåíü êàòóøêó, ðàçìàòûâàÿ
íèòêó ïî íàïðàâëåíèþ, ïîêàçàííîì íà ðèñóíêå.
Ñâåðõó íàäåíüòå áîëüøîé äåðæàòåëü è ïëîòíî
çàôèêñèðóéòå íà êàòóøêå.
1 Äåðæàòåëü êàòóøêè áîëüøîé
 Ìàëûé äåðæàòåëü èñïîëüçóåòñÿ äëÿ
ìàëåíüêèõ èëè óçêèõ êàòóøåê.
2 Äåðæàòåëü êàòóøêè ìàëûé
Èçâëå÷åíèå øïóëüêè
1.Îòîäâèíüòå êíîïêó êðûøêè ÷åëíî÷íîãî
îòñåêà âïðàâî
1 Êíîïêà ñíÿòèÿ êðûøêè ÷åëíî÷íîãî îòñåêà
2 Êðûøêà ÷åëíî÷íîãî îòñåêà
2.Âûòàùèòå øïóëüêó.
3 Øïóëüêà.
25
13
14
5
6
5. Îòñòåãíèòå ëàïêó è ïðèñòåãíèòå åå íà ëåâóþ
ñòîðîíó ïåðåêëàäèíû. Ñäåëàéòå ñòðî÷êó
ïîïåðåê êîíöà ðàñêðûòèÿ íà 1 ñì îò íåãî.
Ïîâåðíèòå òêàíü íà 90 ãðàäóñîâ è ïðèñòðî÷èòå
ëåíòó ìîëíèè ê èçäåëèþ. Îñòàíîâèòå ìàøèíó çà
5 ñì ïåðåä òåì, êàê ëàïêà äîñòèãíåò çàìêà
ìîëíèè. Îïóñòèòå èãëó â òêàíü è ïîäíèìèòå
ëàïêó. Óäàëèòå ñòåæêè íàìåòêè.
13 Ñòåæêè íàìåòêè íà îáðàòíîé ñòîðîíå
14 1 ñì
6. Îòêðîéòå ìîëíèþ, îïóñòèòå ëàïêó è
ïðîøåéòå îñòàòîê øâà. Çàêðåïèòå øîâ
îáðàòíûìè ñòåæêàìè.
Ïî îêîí÷àíèè óäàëèòå âñå ñòåæêè íàìåòêè.
1
2
3
1
2
Winding the Bobbin
Setting the spool
Place a spool of thread on the spool pin with the thread
coming off the spool as illustrated.
A: Press the large spool holder firmly against the spool of
thread.
qLarge spool holder
B: For a small spool, use the small spool holder.
wSmall spool holder
Removing the Bobbin
z Push the hook cover plate release button to the right
and remove the cover plate.
qHook cover plate release button
wHook cover plate
xLift out the bobbin.
eBobbin
q
w
q
w
z
x
e

9
24
1
23
4
5
6
7
8
11
12
3
5
9
1
2
3
4
Êàê øèòü
1. Çàëîæèòå íàâåðõ âåðõíèå ïðèïóñêè.
Îòâåðíèòå íàçàä íèæíèé ïðèïóñê è
ñôîðìèðóéòå ñêëàäêó â 0,3 ñì.
Ðàñïîëîæèòå çóáöû ìîëíèè ðÿäîì ñ ýòîé
ñêëàäêîé è ïðèêîëèòå áóëàâêîé.
1 Íèæíÿÿ òêàíü
2 Êîíåö ðàñêðûòèÿ
3 Çóáöû ìîëíèè
4 0.3 ñì
5 Èçíàíêà âåðõíåé òêàíè
6 Ðàçìåð ðàñêðûòèÿ
7 Ñêëàäêà
8 Ñòåæêè íàìåòêè
2. Ïðèñòåãíèòå ëàïêó äëÿ ìîëíèè íà ïðàâóþ
ñòîðîíó.
Ïðîøåéòå âñå ñëîè îò êîíöà ðàñêðûòèÿ ìîëíèè,
íàïðàâëÿÿ çóáöû ìîëíèè âäîëü êðàÿ ëàïêè.
3. Îñòàíîâèòå ìàøèíó çà 5 ñì ïåðåä òåì, êàê
ëàïêà äîñòèãíåò çàìêà ìîëíèè.
Îïóñòèòå èãëó â òêàíü, ïîäíèìèòå ëàïêó.
Îòêðîéòå ìîëíèþ, çàòåì îïóñòèòå ëàïêó,
ïðîøåéòå îñòàòîê øâà.
9 Çàìîê
10 5 ñì
4. Çàêðîéòå ìîëíèþ è ðàñïðàâüòå âåðõíþþ
òêàíü íàä ìîëíèåé. Ïðèìåòàéòå âåðõíþþ òêàíü
ê ëåíòå ìîëíèè.
11 Ñòåæêè íàìåòêè
12 Ëåíòà ìîëíèè
9
10
9
1
1
2
4
2
3
3
5
Íàìîòêà øïóëüêè
1. Âûòÿíèòå íèòü ñ êàòóøêè. Íàïðàâüòå íèòü çà
íèòåíàïðàâèòåëü âåðõíåé íèòè. Ïðîòÿíèòå íèòü
÷åðåç íàïðàâèòåëü øïóëüíîé íèòè.
1 Íèòåíàïðàâèòåëü âåðõíåé íèòè
2 Íàïðàâèòåëü øïóëüíîé íèòè
2. Ïðîïóñòèòå íèòü ñêâîçü îòâåðñòèå â øïóëüêå
èçíóòðè íàðóæó. Óñòàíîâèòå øïóëüêó íà
øïèíäåëü ìîòàëêè.
3 Øïèíäåëü ìîòàëêè
3.Ïîäòîëêíèòå øïóëüêó âïðàâî.
4.Óäåðæèâàÿ ñâîáîäíûé êîíåö íèòè â ðóêå,
íàäàâèòå íà ïåäàëü. Îñòàíîâèòå ìàøèíó ïîñëå
íåñêîëüêèõ îáîðîòîâ è îáðåæüòå ñâîáîäíûé
êîíåö íèòè áëèçêî ê øïóëüêå.
5.Ñíîâà íàæìèòå íà ïåäàëü. Êîãäà øïóëüêà
áóäåò ïîëíîñòüþ íàìîòàíà, ìàøèíà
îñòàíîâèòñÿ àâòîìàòè÷åñêè. Âåðíèòå øïóëüêó â
ïåðâîíà÷àëüíîå ïîëîæåíèå, îòîäâèíóâ
øïèíäåëü âëåâî, è îáðåæüòå íèòü êàê ïîêàçàíî
íà ðèñóíêå.
ÏÐÈÌÅ×ÀÍÈÅ:
Ïîëîæåíèå ñòîïîðà íàìîòêè øïóëüêè ìîæíî
ðåãóëèðîâàòü â çàâèñèìîñòè îò òðåáóåìîãî
êîëè÷åñòâå íèòêè íà øïóëüêå (íàïðèìåð,
íàïîëîâèíó íàìîòàíà èëè ïîëíîñòüþ
íàìîòàíà). Ïðè ïîìîùè îòâåðòêè îñëàáüòå âèíò
íà îäèí îáîðîò èëè ìåíüøå òàê, ÷òîáû
îòðåãóëèðîâàòü ïîëîæåíèå ñòîïîðà íàìîòêè. Íå
îòâîðà÷èâàéòå âèíò ïîëíîñòüþ. Ñíîâà çàòÿíèòå
âèíò è çàôèêñèðóéòå ïîëîæåíèå ñòîïîðà
íàìîòêè.
Winding the Bobbin
z Hold the thread with both hands and pass the thread
under the thread guide.
Guide the thread around the bobbin winding thread
guide.
qThread guide
wBobbin winding thread guide
xPass the thread through the hole in the bobbin from
the inside to the outside.
Put the bobbin on the bobbin winder spindle.
eBobbin winder spindle
cPush the bobbin winder spindle to the right.
vHold the free end of the thread in your hand and start
the machine.
Stop the machine when the bobbin has been wound a
few layers, and cut the thread close to the bobbin.
bStart the machine again. When the bobbin is fully
wound, it will stop automatically.
Stop the machine and return the bobbin winder spindle
to its original position by moving it to the left, and cut
the thread with a pair of scissors. Remove the bobbin
from the bobbin winder spindle.
NOTE:
The machine will not sew until the spindle has been
returned to the left.
z
x
c
v
b
q
w
e

10
10
1
2
3
4
1
2
3
4
1. Ïîìåñòèòå øïóëüêó â äåðæàòåëü, îòìàòûâàÿ
íèòü ïðîòèâ ÷àñîâîé ñòðåëêè.
1 Êîíåö íèòè
2. Ïðîïóñòèòå íèòü â ïåðâûé ïàç â ïåðåäíåé
÷àñòè øïóëåäåðæàòåëÿ. Îòâåäèòå íèòü âëåâî è
ïðîïóñòèòå åå ìåæäó ïðóæèíàìè íàòÿæåíèÿ.
2 Ïàç
3 Ïðóæèíû íàòÿæåíèÿ
3. Ïðîäîëæàéòå îñòîðîæíî âûòÿãèâàòü íèòü,
ïîêà îíà íå ñîñêîëüçíåò â ïàç.
4 Ïàç
4. Âûòÿíèòå íàçàä îêîëî 15 ñì íèòè.
Óñòàíîâèòå ïëàñòèíó ÷åëíî÷íîãî îòñåêà.
Ïðîâåðüòå, ïðàâèëüíî ëè Âû âäåëè íèòü,
ñðàâíèâàÿ ñ ïîäñêàçêîé íà êðûøêå ÷åëíî÷íîãî
îòñåêà .
5 Íèòü
6 Êðûøêà ÷åëíî÷íîãî îòñåêà
Óñòàíîâêà øïóëüêè
5
6
23
34
5
6
7
8
9
12
(A) (B)
1
2
11
12
13
14
10
23
4
1Ïðèøèâàíèå ìîëíèè
Óñòàíîâêà ìàøèíû
1 Âûáîð ñòðî÷êè: À
2 Äëèíà ñòåæêà: 1,5 - 4
3 Íàòÿæåíèå âåðõíåé íèòè: 3 - 6
4 Ïðèæèìíàÿ ëàïêà: ëàïêà äëÿ ïðèøèâàíèÿ
ìîëíèè Å
Óñòàíîâêà ëàïêè äëÿ ìîëíèè
Ñîïîñòàâüòå ïåðåêëàäèíó íà ëàïêå ñ âûåìêîé
íà äåðæàòåëå ëàïêè.
×òîáû ïðèøèòü ëåâóþ ñòîðîíó ìîëíèè,
ïðèñòåãíèòå ëàïêó äëÿ ìîëíèè íà ïðàâûé êðàé
ïåðåêëàäèíû.
×òîáû ïðèøèòü ïðàâóþ ñòîðîíó ìîëíèè,
ïðèñòåãíèòå ëàïêó äëÿ ìîëíèè íà ëåâûé êðàé
ïåðåêëàäèíû.
1 Âûåìêà
2 Ïåðåêëàäèíà
À. Êîãäà ïðîøèâàåòñÿ ëåâàÿ ñòîðîíà
Â. Êîãäà ïðîøèâàåòñÿ ïðàâàÿ ñòîðîíà
Ïîäãîòîâêà òêàíè
1. Äîáàâüòå 1 ñì ê ðàçìåðó ìîëíèè. Ýòî îáùèé
ðàçìåð ðàñêðûòèÿ.
1 Ëèöåâàÿ ñòîðîíà òêàíè
2 1 ñì
3 Ðàçìåð ðàñêðûòèÿ
4 Äëèíà ìîëíèè
5 Çàìîê
6 Çóáöû ìîëíèè
7 Ëåíòà ìîëíèè
8 Èçíàíî÷íàÿ ñòîðîíà òêàíè
9 Êîíåö ðàñêðûòèÿ
2. Ñëîæèòå ëèöåâûå ñòîðîíû òêàíè âìåñòå è
ïðîøåéòå äî êîíöà ðàñêðûòèÿ ìîëíèè, îñòàâèâ
2 ñì íà ïðèïóñê.
Çàêðåïèòå ñòåæêè ðåâåðñîì. Íàìåòàéòå
ðàñêðûòèå ìîëíèè ñ äëèíîé ñòåæêà â 4.5.
10 2 ñì
11 Ðàñêðûòèå ìîëíèè
12 Ñòåæîê ðåâåðñ
13 Êîíåö ðàñêðûòèÿ
14 Øîâ
ÏÐÈÌÅ×ÀÍÈÅ:
Îñëàáüòå íàòÿæåíèå íèòè äî 1 äëÿ ñòåæêîâ
íàìåòêè.
1
2
5
6
4
Inserting the Bobbin
zPlace the bobbin in the bobbin holder with the thread
running off as illustrated.
qThread
xGuide the thread into the front notch on the front side
of the bobbin holder. Draw the thread to the left,
sliding it between the tension spring blades.
wFront notch
eTension spring blade
cContinue to draw the thread lightly until the thread
slips into the side notch.
rSide notch
vPull out about 4˝ (10 cm) of thread. Attach the hook
cover plate. Check the threading by referring to the
chart shown on the hook cover plate.
tThread
yHook cover plate
w
q
z
x
c
v
e
r
t
y

11
Threading the Machine
To set the needle thread:
Raise the presser foot.
Turn the hand wheel to raise the thread take-up lever to
its highest position.
zDraw the thread from the spool and pass it under the
thread guide.
qThread guide
xDraw the thread down along the right channel and pull
it up around the bottom of the thread guide plate.
Pull the thread up along the left channel.
wRight channel
eThread guide plate
rLeft channel
cFirmly draw the thread from right to left over the
thread take-up lever and down into the take-up lever
eye.
tThread take-up lever
vDraw the thread down along the left channel and slip
the thread behind the needle bar thread guide from
the left.
yNeedle bar thread guide
bPass the thread through the needle eye from the front.
w
q
z
x
c
v
b
e
r
t
y

12
1
1
3
2
21
Drawing up the Bobbin Thread
zRaise the presser foot and hold the needle thread
lightly with your left hand.
qNeedle thread
xTurn the handwheel slowly toward you one complete
turn. Bring the bobbin thread up by pulling the needle
thread as illustrated.
cPull 4˝ (10 cm) of both threads back and under
the presser foot.
qNeedle thread
wBobbin thread
Needle Threader
zRaise the needle to its highest position.
Pull down the needle threader knob as far as it will go.
xTurn the knob in the direction of the arrow in the
illustration, then insert hook into the needle eye.
Lead the thread around guide and under hook.
cTurn the knob in the direction of the arrow in the
illustration, drawing the thread loop through the
needle.
Pull the thread through the needle eye.
* The needle threader can be used with a #11 to #16
needle or a Janome Blue tipped needle. Thread size 50
to90shouldalsoworkwell.
x
z
c
x
z
c
w
q
q

13
20
23
4
5
2
3
1Ïðèøèâàíèå ïóãîâèö
Óñòàíîâêà ìàøèíû
1 Âûáîð ñòðî÷êè: Ñ
2 Äëèíà ñòåæêà: ëþáàÿ
3 Íàòÿæåíèå íèòè: 3- 7
4 Ïðèæèìíàÿ ëàïêà: ëàïêà äëÿ çèã-çàãà À
5 Òðàíñïîðòåð òêàíè îòêëþ÷åí
Óäàëèòå íèòü èç èãëû. Èçìåíèòå øèðèíó çèãçàãà
òàê, ÷òîáû èãëà ïðîõîäèëà ñêâîçü ïðîðåçü íà
ëàïêå ïîïàäàëà â îòâåðñòèå ïóãîâèöû.
Ïîâåðíèòå ìàõîâîå êîëåñî è ïðîâåðüòå , âõîäèò
ëè èãëà â îòâåðñòèå ïóãîâèöû.
Îïóñòèòå ïðèæèìíóþ ëàïêó, ÷òîáû çàêðåïèòü
ïóãîâèöó íà ìåñòå.
Îòâåðñòèÿ â ïóãîâèöå äîëæíû ñîâïàäàòü ñ
ïðîðåçüþ íà ëàïêå.
Ñâåðõó íà ëàïêó ïîëîæèòå áóëàâêó, ÷òîáû
ñôîðìèðîâàòü íîæêó.
Ïðîâåðüòå, ÷òîáû èãëà ñìîãëà ïðîéòè ñêâîçü
îáà îòâåðñòèÿ â ïóãîâèöå.
1 Áóëàâêà
Çàïðàâüòå íèòü â èãëó è ïðîøåéòå 10 ñòåæêîâ.
Îáðåæüòå îáå íèòè â íà÷àëå.
Ïîäíèìèòå ëàïêó è ñíèìèòå òêàíü.
Îáðåæüòå èãîëüíóþ è øïóëüíóþ íèòè, îñòàâëÿÿ
õâîñòèêè ïî 20 ñì.
Âûâåäèòå èãîëüíóþ íèòü ìåæäó ïóãîâèöåé è
òêàíüþ ÷åðåç îòâåðñòèå â ïóãîâèöå.
Ïîòÿíèòå çà èãîëüíóþ íèòü è ïîäõâàòèòå
øïóëüíóþ, âûâåäèòå èõ íà ëèöåâóþ ñòîðîíó
òêàíè.
Çàìîòàéòå íèòè âîêðóã íîæêè è çàâÿæèòå èõ
âìåñòå.
2 Èãîëüíàÿ íèòü
3 Øïóëüíàÿ íèòü
ÏÐÈÌÅ×ÀÍÈÅ:
Ïî îêîí÷àíèè ïðèøèâàíèÿ ïóãîâèö ïîäêëþ÷èòå
òðàíñïîðòåð òêàíè.
1
“+”
“–”
13
1
2
4
5
3
Ïåðåêëþ÷åíèå âûáîðà ñòðî÷åê
ÂÍÈÌÀÍÈÅ!
Ïîäíèìèòå èãëó íàä òêàíüþ êîãäà âûáèðàåòå
ñòðî÷êó.
Ïåðåêëþ÷àòåëü âûáîðà ñòðî÷åê
Äëÿ âûáîðà íóæíîé Âàì îïåðàöèè ïîâåðíèòå
ïåðåêëþ÷àòåëü âûáîðà ñòðî÷åê òàê, ÷òîáû áóêâà
ñ èçîáðàæåíèåì íóæíîé îïåðàöèè ñîâïàëî ñ
èíäèêàöèîííîé ìåòêîé.
1 Ïåðåêëþ÷àòåëü âûáîðà ñòðî÷åê
2 Èíäèêàöèîííàÿ ìåòêà
ÂÍÈÌÀÍÈÅ!
Íå ïîâîðà÷èâàéòå ïåðåêëþ÷àòåëü âûáîðà
ñòðî÷åê, åñëè èãëà íàõîäèòñÿ â òêàíè. Èãëà
ìîæåò ñëîìàòüñÿ èëè ïîãíóòüñÿ.
Äëÿ âûáîðà ñòåæêîâ ñòðå÷, óñòàíîâèòå ðó÷êó
äëèíû ñòåæêà íà «S.S»
3 Âèäû ñòðåé÷ ñòåæêà
Èçìåíåíèå äëèíû ñòåæêà
Ïîâåðíèòå ðó÷êó èçìåíåíèÿ äëèíû ñòåæêà è
óñòàíîâèòå íóæíóþ öèôðó äëèíû ñòåæêà ó
êîíòðîëüíîé îòìåòêè. ×åì áîëüøå öèôðà, òåì
äëèííåå ñòåæîê. Ñèìâîë « » îçíà÷àåò ðÿä
èçìåíåíèé ïðè âûïîëíåíèè ïåòëè.
4 Èíäèêàöèîííàÿ ìåòêà
5 Ðó÷êà èçìåíåíèÿ äëèíû ñòåæêà
Ðåãóëèðîâêà áàëàíñà ñòðåé÷ ñòåæêîâ
Äëÿ âûáîðà ñòåæêîâ ñòðåé÷, óñòàíîâèòå ðó÷êó
äëèíû ñòåæêà íà S.S.
Åñëè ñòðåé÷ ñòðî÷êà íå ðîâíàÿ, òî ïîâåðíèòå
ðó÷êó èçìåíåíèÿ äëèíû ñòåæêà:
« - », ÷òîáû ñæàòü
« + » ÷òîáû ðàñøèðèòü
ABCDEFGH J
4
2
Selecting the Stitch Pattern
Raise the needle to its highest position.
Pattern selector dial
Turn the pattern selector dial to set the symbol of the
desired stitch pattern at the setting mark.
qPattern selector dial
wSetting mark
CAUTION:
Do not turn the pattern selector dial while the needle is
in the fabric, otherwise the needle may bend or break.
To select the stretch stitch patterns, set the stitch length
dial at S.S.
eStretch stitch patterns
Stitch Length Dial
Turn the stitch length dial to set the desired stitch length
number at the setting mark.
The higher the number, the longer the stitch.
The “ ” mark shows the adjustment range when
sewing the buttonhole.
rStitch length dial
tSetting mark
Adjusting stretch stitch balance
If the stretch stitch patterns are uneven when you sew
on a particular fabric, correct them by turning the stitch
length dial.
If the patterns are drawn out, correct them by setting the
dial to the “–” side.
If the patterns are compressed, correct them by setting
the dial to the “+” side.
Stitch Width Dial
Turn the stitch width dial to set the desired stitch width at
the setting mark .
The higher the number, the wider the stitch width.
yPattern selector dial
uSetting mark
NOTE:
Raise the needle above the fabric, when you turn the
stitch width dial.
w
q
e
r
y
t
u

14
14
1
2
3
4
5
2
Íàñòðîéêà íàòÿæåíèÿ âåðõíåé íèòè
Äëÿ ïðÿìîé ñòðî÷êè:
Íàòÿæåíèå íèòè ïðè øèòüå óñòàíàâëèâàåòñÿ â
çàâèñèìîñòè îò îáðàáàòûâàåìîé òêàíè,
êîëè÷åñòâà ñëîåâ è äðóãèõ ðàçëè÷íûõ óñëîâèé.
Äëÿ èçìåíåíèÿ íàòÿæåíèÿ íèòè ïîâåðíèòå äèñê
íàòÿæåíèÿ íèòè.
1 Äèñê íàòÿæåíèÿ íèòè
Ñáàëàíñèðîâàííîå íàòÿæåíèå
Èäåàëüíàÿ ïðÿìàÿ ñòðî÷êà áóäåò â òîì ñëó÷àå,
åñëè èãîëüíàÿ è íèæíÿÿ íèòêè ñöåïëÿþòñÿ â
öåíòðå äâóõ ñëîåâ òêàíè.
Äëÿ çèãçàãîîáðàçíîé ñòðî÷êè:
Ïðè ïðàâèëüíîé ñòðî÷êå çèãçàãà øïóëå÷íàÿ
íèòü íå äîëæíà ïîêàçûâàòüñÿ íà âåðõíåé
ñòîðîíå òêàíè. Íàòÿæåíèå âåðõíåé íèòè
ñëåäóåò ïðèíÿòü ñëàáåå ïî ñðàâíåíèþ ñ ïðÿìîé
ñòðî÷êîé. Âåðõíÿÿ íèòêà äîëæíà ñëåãêà
ïîÿâëÿòüñÿ íà îáðàòíîé ñòîðîíå òêàíè.
2 Èãîëüíàÿ íèòü
3 Øïóëüíàÿ íèòü
4 Ëèöåâàÿ ( âåðõíÿÿ ) ñòîðîíà èçäåëèÿ
5 Èçíàíî÷íàÿ ( íèæíÿÿ ) ñòîðîíà èçäåëèÿ
*Íàòÿæåíèå íèòè ñëèøêîì áîëüøîå
Íèæíÿÿ íèòü âèäíà íà âåðõíåé ñòîðîíå òêàíè.
Äëÿ îñëàáëåíèÿ íàòÿæåíèÿ âåðõíåé íèòè
ïîâåðíóòü äèñê â ñòîðîíó ìåíüøèõ íîìåðîâ.
*Íàòÿæåíèå íèòè ñëèøêîì ìàëåíüêîå
Èãîëüíàÿ íèòü âèäíà íà íèæíåé ñòîðîíå òêàíè.
Äëÿ óâåëè÷åíèÿ íàòÿæåíèÿ âåðõíåé íèòêè
ïîâåðíóòü äèñê â ñòîðîíó áîëüøèõ íîìåðîâ.
19
23
4
1
B
23
4
1
Ïðÿìàÿ ñòðî÷êà ñòðåé÷
Óñòàíîâêà ìàøèíû
1 Âûáîð ñòðî÷êè: À èëè Â
2 Äëèíà ñòåæêà: SS
3 Íàòÿæåíèå íèòè: 2- 5
4 Ïðèæèìíàÿ ëàïêà: ëàïêà äëÿ çèã-çàãà À
Ýòà ñòðî÷êà ôîðìèðóåòñÿ èç äâóõ ñòåæêîâ
âïåðåä è îäíîãî íàçàä. Òàêîé øîâ íåëåãêî
ðàçîðâàòü.
Èñïîëüçóéòå åãî â îáëàñòè ïðîéìû è
âòà÷èâàíèÿ ðóêàâîâ.
Ìîæíî òàêæå èñïîëüçîâàòü ïðè øèòüå ðþêçàêîâ.
Ñëåãêà íàïðàâëÿéòå òêàíü âî âðåìÿ ðàáîòû, ò.ê.
îíà ïîñòîÿííî äâèãàåòñÿ âïåðåä-íàçàä.
Ñòðî÷êà ñòðåé÷ çèã-çàã
Óñòàíîâêà ìàøèíû
1 Âûáîð ñòðî÷êè: Ñ
2 Äëèíà ñòåæêà: SS
3 Íàòÿæåíèå íèòè: 2- 5
4 Ïðèæèìíàÿ ëàïêà: ëàïêà äëÿ çèã-çàãà À
Ýòà ñòðî÷êà ôîðìèðóåòñÿ èç äâóõ ñòåæêîâ
âïåðåä è îäíîãî íàçàä. Òàêîé øîâ íåëåãêî
ðàçîðâàòü. Èñïîëüçóåòñÿ êàê äåêîðàòèâíûé.
Balancing Needle Thread Tension
The thread tension should be adjusted depending on the
sewing materials, layers of fabric and sewing method.
To adjust the thread tension, turn the tension dial.
qThread tension dial
Balanced tension:
The ideal straight stitch has threads locked between two
layers of fabric, as illustrated.
For an ideal zigzag stitch, the bobbin thread does not
show on the right side (top side) of the fabric, and the
needle thread shows slightly on the wrong side (bottom
side) of the fabric.
wNeedle thread (Top thread)
eBobbin thread (Bottom thread)
rRight side (Top side) of fabric
tWrong side (Bottom side) of fabric
Needle thread tension is too tight:
The bobbin thread (bottom thread) will appear on the
right side (top side) of the fabric.
Loosen the needle thread tension by moving the dial to a
lower number.
Needle thread tension is too loose:
The needle thread (top thread) will form loops on the
wrong side (bottom side) of the fabric.
Tighten the needle thread tension by moving the dial to a
higher number.
w
e
r
w
q
t

15
1
SECTION 3. BASIC SEWING
Straight Stitch Sewing
Machine setting
qStitch pattern: A or B
wPresser foot: Zigzag foot A
eThread tension: 2 - 6
rStitch length: 1.5 - 4
tStitch width: 0 or 5
Starting to sew
Raise the presser foot and place the fabric under the foot.
Lower the needle into the fabric.
Lower the presser foot and smooth the threads toward
the back. Depress the foot control.
NOTE:
Draw the threads to the left when sewing with the
buttonhole foot.
To fasten the beginning of the seam, first sew several
stitches in reverse then sew forward.
Changing the Sewing Direction
Stop the machine and turn the handwheel toward you to
bring the needle down into the fabric.
Raise the presser foot.
Pivot the fabric around the needle to change sewing
direction as desired. Lower the presser foot and continue
sewing in the new direction.
Finishing sewing
Press the reverse stitch lever and sew several stitches in
reverse at the end of the seam.
Raise the presser foot and remove the fabric, drawing the
threads to the back.
Draw the threads up and into the thread cutter.
The threads are cut the proper length for starting the next
seam.
qThread cutter
q

16
Numbers on
the needle
plate
10 15 30 40 3/8 1/2 5/8 1 1 1/2
Distance in
centimeters 1.0 1.5 3.0 4.0 — — — — —
Distance in
inches — — — — 3/8 1/2 5/8 1 1 1/2
Use the Seam Guide
The seam guides on the needle plate help you to
measure seam width.
The numbers indicate the distance between the center
needle position and the guide line.
qSeam guides
Turning a Square Corner
The cornering guide helps you maintain a 5/8˝ (1.6 cm)
seam allowance when sewing a corner.
When the fabric edge facing you lines up with the
cornering guide as illustrated, stop stitching and lower the
needle into the fabric by turning the handwheel toward
you.
Raise the presser foot and pivot the fabric so the edge of
the fabric will align with the 5/8˝ (1.6 cm) seam guide.
Lower the presser foot and start stitching in the new
direction.
wCornering guide
Variable Needle Position
When the straight stitch (pattern A) is selected, you can
move the needle between center and left needle position
by turning the stitch width dial.
q
w

17
SECTION 4. UTILITY STITCHES
Basic Zigzag
Machine setting
qStitch pattern: C
wPresser foot: Zigzag foot A
eThread tension: 2 - 5
rStitch length: 0.5 - 3
tStitch width: 1 - 5
Simple zigzag stitching is widely used for overcasting,
sewing on buttons etc.
Adjust the stitch length to suit your sewing needs.
Overcasting
Machine setting
qStitch pattern: C
wPresser foot: Zigzag foot A
eThread tension: 1 - 4
rStitch length: 1 - 2
tStitch width: 5
The zigzag stitch is used on the seam allowance to
prevent fabric from fraying at raw edges.

18
Tricot Stitch (Multiple Zigzag Stitch)
Machine setting
qStitch pattern: D
wPresser foot: Zigzag foot A
eThread tension: 1 - 4
rStitch length: 0.5 - 1.5
tStitch width: 5
This stitch is used to finish the seam allowance on
synthetics and other fabrics that tend to pucker.
Place your fabric to allow a 1.6 cm (5/8˝) seam.
Trim the seam allowance after sewing.
It is also handy for darning and mending tears.
Knit Stitch
Machine setting
qStitch pattern: J
wPresser foot: Zigzag foot A
eThread tension: 1 - 4
rStitch length: S.S.
tStitch width: 5
This stitch is ideal for 1/4˝ (0.6 cm) seams on knits or on
medium to heavy weight woven fabrics where you want
a narrow seam. It is also great for sewing spandex swim
wear. Place the fabric to leave a 5/8˝ (1.6 cm) allowance.
Trim the extra allowance after sewing.
Table of contents
Other Necchi Sewing Machine manuals

Necchi
Necchi 270 User manual

Necchi
Necchi Q421A User manual

Necchi
Necchi NL11C User manual

Necchi
Necchi Creator User manual

Necchi
Necchi 534 FB User manual

Necchi
Necchi K121A User manual

Necchi
Necchi L234A User manual

Necchi
Necchi Q132A User manual

Necchi
Necchi EX60 User manual

Necchi
Necchi Automatic Supernova Ultra Mark 2 User manual

Necchi
Necchi EX30 User manual

Necchi
Necchi Vigorelli S1 User manual

Necchi
Necchi Supernova User manual

Necchi
Necchi NC-204D User manual

Necchi
Necchi NC-103D User manual

Necchi
Necchi Lock 181 User manual

Necchi
Necchi 590 User manual

Necchi
Necchi K408A User manual

Necchi
Necchi EX100 User manual

Necchi
Necchi HD22 User manual