Neptune R450 MC Product manual

E-Cod
E-Cod
R450™ MINI COLLECTOR INSTALLATION AND MAINTENANCE GUIDE
R450™ Mini Collector Installation and Maintenance Guide


R450™ Mini Collector Installation and Maintenance Guide

Copyright
This manual is an unpublished work and contains the trade secrets and confidential information of
Neptune Technology Group Inc., which are not to be divulged to third parties and may not be
reproduced or transmitted in whole or part, in any form or by any means, electronic or mechanical
for any purpose, without the express written permission of Neptune Technology Group Inc. All rights
to designs or inventions disclosed herein, including the right to manufacture, are reserved to
Neptune Technology Group Inc.
Neptune engages in ongoing research and development to improve and enhance its products. Therefore,
Neptune reserves the right to change product or system specifications without notice.
Trademarks Used in this Manual
R450 System and R450 are trademarks of Neptune Technology Group Inc. N_SIGHT R450 is a trademark of
Neptune Technology Group Inc. Other brands or product names are the trademarks or registered trademarks
of their respective holders.
FCC Notice
Thisdevice complies withPart15oftheFCCRules.Operation is subjecttothefollowingtwoconditions: (1) this
devicemaynotcauseharmful interference,and(2)thisdevice must accept any interferencereceived, including
interference that may cause undesired operation.
NOTE: This equipment has been tested and found to comply with the limits for a Class A digital device,
pursuant to Part 15 of the FCC Rules. These limits are designed to provide reasonable protection against
harmful interference in a residential installation. This equipment generates, uses, and can radiate radio
frequency energy and, if not installed and used in accordance with the instructions, may cause harmful
interference to radio communications. However, there is no guarantee that interference will not occur in a
particular installation. If this equipment does cause harmful interference to radio or television reception, which
canbe determined byturningtheequipment off and on,the user isencouraged to trytocorrect the interference
by one or more of the following measures:
• Reorient or relocate the receiving antenna.
• Increase the separation between the equipment and receiver.
• Connect the equipment into an outlet on a circuit different from that to which the receiver is connected.
• Consult the dealer or an experienced radio/TV technician for help.
RF Exposure Information
This equipment complies with the FCC RF radiation requirements for uncontrolled environments. To maintain
compliance with these requirements, the antenna and any radiating elements should be installed to ensure that
a minimum separation distance of 46cm is maintained from the general population.
CAUTION:
The antenna used for this transmitter must not beco-located or operating in conjunction with any
other antenna or transmitter. This device is approved with emissions having a source-based time-
averaging duty factor not exceeding 50%.
Changes or modifications not expressly approved by the party responsible for compliance could
void the user's authority to operate the equipment.

Professional Installation
In accordance with Section 15.203 of the FCC rules and regulations, the R450 Mini Collector must be
professionally installed by trained installers. Changes or modifications not expressly approved by the party
responsible for compliance could void the user's authority to operate the equipment.
Industry Canada
This Class A digital apparatus meets all requirements of the Canadian Interference Causing Equipment
Regulations. Operation is subject to the following two conditions: (1) this device may not cause harmful
interference, and (2) this device must accept any interference received, including interference that may cause
undesired operation.
Cet appareillage numérique de la classe A répond à toutes les exigences de l'interférence canadienne causant
des règlements d'équipement. L'opération est sujette aux deux conditions suivantes: (1) ce dispositif peut ne
pas causer l'interférence nocive, et (2) ce dispositif doit accepter n'importe quelle interférence reçue, y compris
l'interférence qui peut causer l'opération peu désirée.
Important Safety Precautions
Review the following precautionary measures prior to installation.
• Review the following precautionary measures prior to installation. Connections to the AC mains must be
performed by a licensed electrician. No user-installable parts inside.
• Installation must be done in accordance with the instructions contained in this manual.
• Installation must be done in accordance with the National Electrical Code (NEC), NFPA 70 or Canadian
Electrical Code (CEC.), CSA C22.2, No. 1.
• In particular, installation must be done in accordance with NEC Article 810 or CEC Section 54.
• This unit is not intended to be powered directly from the Mains Distribution System.
Refer installation and service to qualified service personnel only.
Risk of explosion if battery is replaced by an incorrect type.
Dispose of used batteries according to the manufacturer’s instructions.
R450 Mini Collector Installation and
Maintenance Guide
Literature No. IM R450 Mini Collector 05.14
Part No. 13025-001
Neptune Technology Group Inc.
1600 Alabama Highway 229
Tallassee, AL 36078
Tel: (334) 283-6555
Fax: (334) 263-7293
Copyright © 2011-2014
Neptune Technology Group Inc.
All Rights Reserved


Contents
R450 Mini Collector Installation and Maintenance Guide v
1Product Description
General Product Overview . . . . . . . . .. . . . . . . . . . . . . . . .. . . . . . . . . . . . . . . .. . . . . . . . . . . . . .. . . . . . . . 1
Types of R450 MC Installations . . . . . . . . . . . . . . . . . . . . . . . . . . . . . . . . . . . . . . . . . . . . . . . . . . . . . . . . . . . 2
Determining How to Install the R450 MC . . . . . . . . . .. . . . . . . . . . . . . . . . . .. . . . . . . . . . . . . . . .. . . . 3
Mounting Configurations . . . . . . . . .. . . . . . . . . . . . . . . . . . . . . . . . . . . . . . . . . . . . . . . . . . . . . . . . . . . . 4
Street Light Pole Installation . . . . . . . . . . . . . . . . . . . . . . . . . . . . . . . . . . . . . . . . . . . . . . . . . . . . . . . 4
Tower Mount . . . . . . . . . .. . . . . . . . . . . . . . . .. . . . . . . . . . . . . . . .. . . . . . . . . . . . . . .. . . . . . . . . 5
Rooftop Installation . . . . . . . . . . . . . . . . . . . . . . . . . . . . . . . . . . . . . . . . . . . . . . . . . . . . . . . . . . . . . . 5
Wall Mount Installation . . . . . . . . . . . . . . . . . . . . . . . . . . . . . . . . . . . . . . . . . . . . . . . . . . . . . . . . . . . 6
Performance Considerations with the R450 System . . . . . . . . . . . . . . . . . .. . . . . . . . . . . . . .. . . . . . . . 7
Optimizing the Performance of a New System . . . . . . . . .. . . . . . . . . . . . . . . . . .. . . . . . . . . . . . . . 7
Maintaining the Performance of the R450 System . . . . . . . .. . . . . . . . . . . . . . . .. . . . . . . . . . . . . . 8
R450 MC Kits . . . . . . .. . . . . . . . . . . . . . . .. . . . . . . . . . . . . . . .. . . . . . . . . . . . . . . .. . . . . . . . . .. . . . . . . . 9
Cellular Modem . . . . . . . . . .. . . . . . . . . . . . . . . .. . . . . . . . . . . . . . . .. . . . . . . . . . . . . .. . . . . . . . . . . . 9
Ethernet . . . . . . . . . . . . . . . . . . . . . . . . . . . . . . . . . . . . . . . . . . . . . . . . . . . . . . . . . . . . . . . . . . . . . . . . . . 9
2General Installation Guidelines
R450 MC Specifications . . . . . . . . . . . . . . . . . . . . . . . . . . . . . . . . . . . . . . . . . . . . . . . . . . . . . . . . . . . . . . . . 10
Electrical Specifications . . . . . . . . . .. . . . . . . . . . . . . . . .. . . . . . . . . . . . . . . . . .. . . . . . . . . . . . . 10
Environmental Conditions . . .. . . . . . . . . . . . . . . .. . . . . . . . . . . . . . . .. . . . . . . . . . . . . .. . . . . . . 10
Mechanical Specifications . . . .. . . . . . . . . . . . . . . . . .. . . . . . . . . . . . . . . .. . . . . . . . . . . . . . . . . 10
R450 MC Footprint . . . . . . . . . . . . . . . . . . . . . . . . . . . . . . . . . . . . . . . . . . . . . . . . . . . . . . . . . . . . . 10
Storage . . . . . . . . . . . .. . . . . . . . . . . . . . . .. . . . . . . . . . . . . . . .. . . . . . . . . . . . . . . .. . . . . . . . . . . . . . . . . 11
Unpacking . . . . . . . . . . . . . . . . . . . . . . . . . . . . . . . . . . . . . . . . . . . . . . . . . . . . . . . . . . . . . . . . . . . . . . . . . . . 11
R450 MC Installation Kits . . . . . . . . . . . . . . . . . . . . . . . . . . . . . . . . . . . . . . . . . . . . . . . . . . . . . . . . . . . . . . . 12
Tools and Materials . . . . . . . . . . . .. . . . . . . . . . . . . . . .. . . . . . . . . . . . . . . .. . . . . . . . . . . . . . . . . . . . . . . 12
R450 MIU and Magnet . . . . . . . . . . . . . . . . . . . . . . . . . . . . . . . . . . . . . . . . . . . . . . . . . . . . . . . . . . . . . 13
3Installation of the R450 MC
Mounting RF Antenna to Pole or Stand . . . . . . . . .. . . . . . . . . . . . . . . .. . . . . . . . . . . . . .. . . . . . . . . . . . . 14
Mounting the R450 MC – Solar Configuration . .. . . . . . . . . . . . . . . .. . . . . . . . . . . . . . . .. . . . . . . . . . . . . 16
Mounting the Battery Box . . . . . . . . . . . . . . . . . . . . . . . . . . . . . . . . . . . . . . . . . . . . . . . . . . . . . . . . . . . 16
Attaching the Solar Panel . . . . . . . . . . . . . . . . . . . . . . . . . . . . . . . . . . . . . . . . . . . . . . . . . . . . . . . . . . . 17
Mounting the R450 MC . . . . . . . . . . . . . . . . . .. . . . . . . . . . . . . . . .. . . . . . . . . . . . . . . .. . . . . . . . . . . 18

Contents
vi R450 Mini Collector Installation and Maintenance Guide
Wiring the Solar Panel . . . . . . . . . . . . . . . . . . . . . . . . . . . . . . . . . . . . . . . . . . . . . . . . . . . . . . . . . . . . . 19
Wiring the Battery Box . . . . . . . . .. . . . . . . . . . . . . . . . . . . . . . . . . . . . . . . . . . . . . . . . . . . . . . . . . . . . 20
Solar-Powered System . . .. . . . . . . . . . . . . . . .. . . . . . . . . . . . . . . .. . . . . . . . . . . . . . . .. . . . . . 20
Wiring the R450 MC . . . . . . . . . . . . . . . . . . . . . . . . . . . . . . . . . . . . . . . . . . . . . . . . . . . . . . . . . . . . . . . 21
Applying the Ballast to the Stand . . . . . . . . . . . . . . . . .. . . . . . . . . . . . . . . .. . . . . . . . . . . . . . . . 21
Activating the R450 MC System . . . . . . . . .. . . . . . . . . . . . . . . .. . . . . . . . . . . . . . . .. . . . . . . . . . . . 22
Activating the Solar Power System . . . . . . . . . . . . . . . . . . . . . . . . . . . . . . . . . . . . . . . . . . . . . . . . 22
Installing a Large Pole Mount System . . . . . . . . .. . . . . . . . . . . . . . . .. . . . . . . . . . . . . . . .. . . . . . . . . . . . 23
Mounting the RF Antenna to a Large Pole . . . . . . . . . . . . . .. . . . . . . . . . . . . . . .. . . . . . . . . . . . . . . . 23
Mounting the R450 MC to a Large Pole . . . . . . . . . . . .. . . . . . . . . . . . . . . .. . . . . . . . . . . . . .. . . . . . 24
Mounting the Battery Box to a Large Pole . . . . . . . . . . . . . . . . . . . . . . . . . . . . . . . . . . . . . . . . . . . 25
Mounting the Solar Panel to a Large Pole . . . . . . . . . . . . . . . . . . . . . . . . . . . . . . . . . . . . . . . . . . . 26
Mounting the R450 MC to a Large Pole . . . . . . . . . . . .. . . . . . . . . . . . . . . .. . . . . . . . . . . . . . . . 26
Attaching Cables for the R450 MC . . . . . . . . . . . . . . . . . . . . . . . . . . . . . . . . . . . . . . . . . . . . . . . . . . . . 27
Attaching the RF Antenna Cable . . . . . . . . . . . . . . . .. . . . . . . . . . . . . . . .. . . . . . . . . . . . . . . .. . 27
Weatherizing the RF Antenna Connection . . . . . . . . . . . . . . . .. . . . . . . . . . . . . .. . . . . . . . . . . . 28
Connecting the Ground Wire . . . . . . . . . . . . . . . . . . . . . . . . . . . . . . . . . . . . . . . . . . . . . . . . . . . . . 29
Configuring the R450 MC . . . . . . . . . . . . . . . . .. . . . . . . . . . . . . . . .. . . . . . . . . . . . . . . . . .. . . . 29
Connecting Power to the R450 MC . . . . . . .. . . . . . . . . . . . . . . .. . . . . . . . . . . . . . . .. . . . . . . . . . . . 30
Checking Cellular Modem Connectivity . . . . . . . . . . . . . . . . . . . . . . . . . . . . . . . . . . . . . . . . . . . . . . . . 30
Swiping the MIU . . . .. . . . . . . . . . . . . . . .. . . . . . . . . . . . . . . .. . . . . . . . . . . . . . . .. . . . . . . . . . 32
If No Email is Received . . .. . . . . . . . . . . . . . . .. . . . . . . . . . . . . . . .. . . . . . . . . . . . . . . . .. . . . . 32
Installing a Wall Mount System . . . . . . . .. . . . . . . . . . . . . . . .. . . . . . . . . . . . . . . . . .. . . . . . . . . . . . . .. . 33
Mounting the R450 MC to a Wall . . . . . . . . . . .. . . . . . . . . . . . . . . . . . . . . . . . . . . . . . . . . . . . . . . . . . 33
Connecting the Cables to the R450 MC . . . . . . . . . . . . . . . . . . . . . . . . . . . . . . . . . . . . . . . . . . . . 34
Mounting the RF Antenna and Antenna Mast . . . . . . . . . . .. . . . . . . . . . . . . . . . . .. . . . . . . . . . . . . . 35
Mounting the Antenna Mast . . . . . . . . . . . . . . . . . . . . . . . . . . . . . . . . . . . . . . . . . . . . . . . . . . . . . . . . . 35
Mounting the Antenna Mast to the Building . . . . . .. . . . . . . . . . . . . . . .. . . . . . . . . . . . . . . .. . . . 35
Mounting RF Antenna to Antenna Mast . . . . . . . . . .. . . . . . . . . . . . . . . .. . . . . . . . . . . . . .. . . . 36
4Troubleshooting
Equipment Required . . . . . . . .. . . . . . . . . . . . . . . .. . . . . . . . . . . . . .. . . . . . . . . . . . . . . .. . . . . . . . . . . . 38
R450 MC Troubleshooting . . . . . . . . . . . . . . . . . . . . . . . . . . . . . . . . . . . . . . . . . . . . . . . . . . . . . . . . . . . . . 39
Multiple R450 MCs Not Syncing with Host Database . . . . . . . . . . . . . . . . . . . . . . . . . . . . . . . . . . . . . 39
One R450 MC Not Syncing withthe Host Database . . . . . . . . . . . . . . . .. . . . . . . . . . . . . . . .. . . . . . 39
First Steps . . . . . . . . . . . . . . . . . . . . . . . . . . . . . . . . . . . . . . . . . . . . . . . . . . . . . . . . . . . . . . . . . . . 39
Initial Site Activities . .. . . . . . . . . . . . . . . .. . . . . . . . . . . . . . . .. . . . . . . . . . . . . . . . .. . . . . . . . . 39

Contents
R450 Mini Collector Installation and Maintenance Guide vii
Checking the General Health of the R450 MC . . . . . . . . . . . . . . . . . . . . . . . . . . . . . . . . . . . . . . . . 40
Additional Detail Checks . . . . . . . . . . . . . . . . . . . . . . . . . . . . . . . . . . . . . . . . . . . . . . . . . . . . . . . . . . . . 40
Verifying Main Power . . . .. . . . . . . . . . . . . . . .. . . . . . . . . . . . . . . .. . . . . . . . . . . . . . . .. . . . . . . 41
Verifying Radio ModulePower . . . . . . .. . . . . . . . . . . . . . . .. . . . . . . . . . . . . .. . . . . . . . . . . . . . . 41
Cellular Modem Overview . . . . . . . . . . . . . . . . . . . . . . . . . . . . . . . . . . . . . . . . . . . . . . . . . . . . . . . . . . . . . . 42
Configuring the Cellular Modem . . . . . . . . . . . . . . . . . . . . . . . . . . . . . . . . . . . . . . . . . . . . . . . . . . . . . . . . . . 43
Equipment Required . . . . . . . .. . . . . . . . . . . . . . . .. . . . . . . . . . . . . .. . . . . . . . . . . . . . . .. . . . . . . . . 43
Configuring the Modem . . . . . . . . . . . . . . . .. . . . . . . . . . . . . . . .. . . . . . . . . . . . . . . .. . . . . . . . . . . . . 44
Provisioning the Vanguard 3000 for GSM . . . . . . . . . . . . . . . . . . . . . . . . . . . . . . . . . . . . . . . . . . . 45
R450 MC is Syncing but Not Supplying MIU Data . . . . . . . . . . . . . . . . . . . . . . . . . . . . . . . . . . . . . . . . 45
Initial Observations . . . .. . . . . . . . . . . . . . . .. . . . . . . . . . . . . . . .. . . . . . . . . . . . . . . . .. . . . . . . . 45
Transmitter Transmits but No MIU Readings . . . . . . . . . . . . . . . . . .. . . . . . . . . . . . . . . .. . . . . . . 46
Taking the Reading andCalculating VSWR . . . . . . . .. . . . . . . . . . . . . . . .. . . . . . . . . . . . . . . .. . . . . 46
The Radio Module Never Transmits . . . . . . . . . . . . . . . . . . . . . . . . . . . . . . . . . . . . . . . . . . . . . . . . 47
R450 MC Not Collecting as Much Data as Before but Still Collecting Some MIU Data . . . . . . . . . . . . 47
Diagnostic Ports . . . . . . . . .. . . . . . . . . . . . . . . . . .. . . . . . . . . . . . . . . .. . . . . . . . . . . . . . . . . . . . . . . 47
MSD Port . . . . . . . . . . . . .. . . . . . . . . . . . . . . .. . . . . . . . . . . . . . . .. . . . . . . . . . . . . . . . . . . . . . . 48
FST Port . . . . . . . . . . . . . . . . . . . . . . . . . . . . . . . . . . . . . . . . . . . . . . . . . . . . . . . . . . . . . . . . . . . . . 48
Starting FST Diagnostics . . . . . . . . . . . . . . . . . . .. . . . . . . . . . . .. . . . . . . . . . . . . . . .. . . . . . . . . . . . . 48
CPU Boot-Up Status LED . . . . . . . . . . . . . . . .. . . . . . . . . . . . . .. . . . . . . . . . . . . . . .. . . . . . . . . . . . . 50
Reset Switch . . . . . . . . . . . . . . . . . .. . . . . . . . . . . . . . . .. . . . . . . . . . . . . .. . . . . . . . . . . . . . . . . 51
Contacting Customer Support . . . . . . . . . .. . . . . . . . . . . . . . . .. . . . . . . . . . . . . . . .. . . . . . . . . . . . . . . . . 52
ARF Antenna Installation
RF Antenna Overview . . . . . . . . . .. . . . . . . . . . . . . . . .. . . . . . . . . . . . . . . .. . . . . . . . . . . . . . . . . . . . . . . 53
Mounting the Antennas . . . . . . . . . .. . . . . . . . . . . . . . . . . . . . . . . . . . . . . . . . . . . . . . . . . . . . . . . . . . . 53
Site Recommendations . . . . . . . . . . . . . . . . . . . . . . . . . . . . . . . . . . . . . . . . . . . . . . . . . . . . . . . . . . . . . 53
Feed Line and Antenna Recommendations . . . . . . . . . . . . . . . . . . . . . . . . . . . . . . . . . . . . . . . . . . . . . . . . . 54
Feed Line . . . . . . . . . .. . . . . . . . . . . . . . . .. . . . . . . . . . . . . . . .. . . . . . . . . . . . . . . .. . . . . . . . . . . .. 54
Feed Line Requirements .. . . . . . . . . . . . . . . . . .. . . . . . . . . . . . . . . . . . . . . . . . . . . . . . . . . . . . . 55
Neptune Part Numbers . . . . . . . . . . . . . . . . . . . . . . . . . . . . . . . . . . . . . . . . . . . . . . . . . . . . . . . . . . 56
Antenna . . . . . . . . . . . . . .. . . . . . . . . . . . . . . .. . . . . . . . . . . . . . . .. . . . . . . . . . . . . . . . . . . . . . . . . . . 57
Requirements . . . . . . . . . . . . . . . . . . . . . . . . . . . . . . . . . . . . . . . . . . . . . . . . . . . . . . . . . . . . . . . . . 58
System Certification .. . . . . . . . . . . . . . . .. . . . . . . . . . . . . . . .. . . . . . . . . . . . . . . .. . . . . . . . . . . 58
Power Measurement . . . . . . . . . . . . . . . . . . . . . . . . . . . . . . . . . . . . . . . . . . . . . . . . . . . . . . . . . . . . . . . . . . 59

Contents
viii R450 Mini Collector Installation and Maintenance Guide
Coax Cable Loss . . . . . . . . . . . . . . . . . . . . . . . . . . . . . . . . . . . . . . . . . . . . . . . . . . . . . . . . . . . . . . . . . . . . . 60
VSWR Calculation . . . . . . . . . . . .. . . . . . . . . . . . . . . .. . . . . . . . . . . . . . . .. . . . . . . . . . . . . . . . . . . . . . . . 61
Using a Wattmeter and a Handheld 450MHz Radio . . . . . . . . . . . . . .. . . . . . . . . . . . . . . .. . . . . . . . 61
Using the AEA 140-525 Antenna Analyzer . . . . . . . . . . . . . . . . . . . . . . . . . . . . . . . . . . . . . . . . . . . . . 62
Taking the Reading andCalculating VSWR . . . . . . . . . .. . . . . . . . . . . . . . . .. . . . . . . . . . . . . . . .. . 62
General Installation Guidelines . . . . . . . . . . . . . . . . . . . . . . . . . . . . . . . .. . . . . . . . . . . . . . . .. . . . . . . . . . 63
Unpacking . . . . . . . . . . . . . .. . . . . . . . . . . . . . . .. . . . . . . . . . . . . . . .. . . . . . . . . . . . . .. . . . . . . . . . 63
RF Antenna Installation Kit . . . . . . . . . . . . . . . .. . . . . . . . . . . . . . . .. . . . . . . . . . . . . . . .. . . . . . . . . . 63
Tools and Materials . . . . . . . . . . . . . . . . . . . . . . . . . . . . . . . . . . . . . . . . . . . . . . . . . . . . . . . . . . . . . . . . . . . 64
Installation of the RF Antenna . . . . . . . . . . .. . . . . . . . . . . . . . . . . .. . . . . . . . . . . . . . . .. . . . . . . . . . . . . . 65
Locating the Site . . . . . . . . .. . . . . . . . . . . . . . . .. . . . . . . . . . . . . . . .. . . . . . . . . . . . . . . . . . . . . . . . 65
Mounting the RF Antenna . . . . . . . . . . . . . . . .. . . . . . . . . . . . . . . . . . . . . . . . . . . . . . . . . . . . . . . . . . 66
Attaching the RF Antenna Cable . . . . . . . . . . . . . . . .. . . . . . . . . . . . . . . .. . . . . . . . . . . . . . . .. . 66
Weatherizing the Cable Connections . . . . . . . . . .. . . . . . . . . . . . . . . .. . . . . . . . . . . . . . . .. . . . . . . . 67
BR450 MC Stand
Using the R450 MC Stand . . . . . . . . . . . . . . . .. . . . . . . . . . . . . . . .. . . . . . . . . . . . . . . . . .. . . . . . . . . . . . 69
Ballast Requirements vs. Wind Speed . . . . . . . . . . . . . . . . . . . . . . . . . . . . . . . . . . . . . . . . . . . . . . . . . 69
Ballast Considerations . . . . . . . . . . . . . . . . . . . . . . . . . . . . . . . . . . . . . . . . . . . . . . . . . . . . . . . . . . . . . 69
Applying the Ballast to the Stand . . . . . . . . . . . . . . . . .. . . . . . . . . . . . . . . .. . . . . . . . . . . . . . . . 69
Rohn Industries Stand – Part # JRM23855 . . . . . . . . . . . . . . . . . . . . . . . . . . . . . . . . . . . . . . . . . . . . . 70
CSolar Power Information
Magnetic Declination . . . . . . . . . . . . . . . . . .. . . . . . . . . . . . . . . .. . . . . . . . . . . . . . . . . .. . . . . . . . . . . . . . 71
Correction for Magnetic Declination and Array Tilt . . . . . . . . . . . . . . . .. . . . . . . . . . . . . .. . . . . . . . . . 71
Facing True South . . . . . . . . .. . . . . . . . . . . . . . . .. . . . . . . . . . . . . . . .. . . . . . . . . . . . . .. . . . . . 71
Specific Tilt Angle . . . . . . . . . . .. . . . . . . . . .. . . . . . . . . .. . . . . . . . . . . . . . . . . .. . . . . . . . . . . . 72
Selecting the Correct Solar Power System . . . . . . . . . . . . . . .. . . . . . . . . . . . . . . .. . . . . . . . . . . . . . . .. . 73
Troubleshooting the Solar Power System . . . . . . . . . . . .. . . . . . . . . . . . . . . .. . . . . . . . . . . . . . . .. . . . . . 75
Troubleshooting the Solar Panel’s Load/Controller . . . . . . . . . . . . . . . . . . . . . . . . . . . . . . . . . . . . . . . 76
Troubleshooting the Solar Panel’s Battery . . . . . . . . . . . . . .. . . . . . . . . . . . . . . . . .. . . . . . . . . . . . . . 76
PV Array (Solar Panel) Troubleshooting . . . . . . . . . . . . . . . . . . . . . . . . . . . . . . . . . . . . . . . . . . . . . . . 79
Glossary
Index

R450 Mini Collector Installation and Maintenance Guide ix
Figures
Figure Title Page
1 R450 MC . . . . . . . . . . . . . . . . . . . . . . . . . . . . . . . . . . . . . . . . . . . . . . . . . . . . . . . . . . . . . . . . . . . . . . . . . . . . . . . . . . . . 1
2 Mounting Options . . . . . . . . . . . . . . . . . . . . . . . . . . . . . . . . . . . . . . . . . . . . . . . . . . . . . . . . . . . . . . . . . . . . . . . . . . . . 3
3 Pole Installation . . . . . . . . . . . . . . . . . . . . . . . . . . . . . . . . . . . . . . . . . . . . . . . . . . . . . . . . . . . . . . . . . . . . . . . . . . . . . . 4
4 Tower Mount Installation . . . . . . . . . . . . . . . . . . . . . . . . . . . . . . . . . . . . . . . . . . . . . . . . . . . . . . . . . . . . . . . . . . . . . . 5
5 Stand Installation . . . . . . . . . . . . . . . . . . . . . . . . . . . . . . . . . . . . . . . . . . . . . . . . . . . . . . . . . . . . . . . . . . . . . . . . . . . . . 5
6 Wall Mount Installation . . . . . . . . . . . . . . . . . . . . . . . . . . . . . . . . . . . . . . . . . . . . . . . . . . . . . . . . . . . . . . . . . . . . . . . . 6
7 R450 MC . . . . . . . . . . . . . . . . . . . . . . . . . . . . . . . . . . . . . . . . . . . . . . . . . . . . . . . . . . . . . . . . . . . . . . . . . . . . . . . . . . . 12
8 RF Antenna . . . . . . . . . . . . . . . . . . . . . . . . . . . . . . . . . . . . . . . . . . . . . . . . . . . . . . . . . . . . . . . . . . . . . . . . . . . . . . . . . 12
9 Antenna Mounting Brackets . . . . . . . . . . . . . . . . . . . . . . . . . . . . . . . . . . . . . . . . . . . . . . . . . . . . . . . . . . . . . . . . 14
10 Attaching Coax Cable . . . . . . . . . . . . . . . . . . . . . . . . . . . . . . . . . . . . . . . . . . . . . . . . . . . . . . . . . . . . . . . . . . . . . . 15
11 Weatherizing RF Antenna . . . . . . . . . . . . . . . . . . . . . . . . . . . . . . . . . . . . . . . . . . . . . . . . . . . . . . . . . . . . . . . . . . 15
12 Using Mounting Brackets . . . . . . . . . . . . . . . . . . . . . . . . . . . . . . . . . . . . . . . . . . . . . . . . . . . . . . . . . . . . . . . . . . . 15
13 Installing Pole Brackets . . . . . . . . . . . . . . . . . . . . . . . . . . . . . . . . . . . . . . . . . . . . . . . . . . . . . . . . . . . . . . . . . . . . 16
14 Battery Box Installed . . . . . . . . . . . . . . . . . . . . . . . . . . . . . . . . . . . . . . . . . . . . . . . . . . . . . . . . . . . . . . . . . . . . . . . 16
15 Battery and Wiring . . . . . . . . . . . . . . . . . . . . . . . . . . . . . . . . . . . . . . . . . . . . . . . . . . . . . . . . . . . . . . . . . . . . . . . . . 17
16 R450 MC Solar Panel . . . . . . . . . . . . . . . . . . . . . . . . . . . . . . . . . . . . . . . . . . . . . . . . . . . . . . . . . . . . . . . . . . . . . . 17
17 Solar Panel Attached . . . . . . . . . . . . . . . . . . . . . . . . . . . . . . . . . . . . . . . . . . . . . . . . . . . . . . . . . . . . . . . . . . . . . . 17
18 Solar Panel Tilt Angle . . . . . . . . . . . . . . . . . . . . . . . . . . . . . . . . . . . . . . . . . . . . . . . . . . . . . . . . . . . . . . . . . . . . . . 18
19 Mounting Bracket for the R450 MC . . . . . . . . . . . . . . . . . . . . . . . . . . . . . . . . . . . . . . . . . . . . . . . . . . . . . . . . . 18
20 Positioning the R450 MC . . . . . . . . . . . . . . . . . . . . . . . . . . . . . . . . . . . . . . . . . . . . . . . . . . . . . . . . . . . . . . . . . . . 19
21 Back of Battery Box . . . . . . . . . . . . . . . . . . . . . . . . . . . . . . . . . . . . . . . . . . . . . . . . . . . . . . . . . . . . . . . . . . . . . . . . 19
22 Feeding Conductor Wire . . . . . . . . . . . . . . . . . . . . . . . . . . . . . . . . . . . . . . . . . . . . . . . . . . . . . . . . . . . . . . . . . . . 20
23 Tightening Connector Hub . . . . . . . . . . . . . . . . . . . . . . . . . . . . . . . . . . . . . . . . . . . . . . . . . . . . . . . . . . . . . . . . . 20
24 Battery Box Wires . . . . . . . . . . . . . . . . . . . . . . . . . . . . . . . . . . . . . . . . . . . . . . . . . . . . . . . . . . . . . . . . . . . . . . . . . . 21
25 R450 MC Wiring . . . . . . . . . . . . . . . . . . . . . . . . . . . . . . . . . . . . . . . . . . . . . . . . . . . . . . . . . . . . . . . . . . . . . . . . . . . 21
26 Stand with Concrete Block Ballast . . . . . . . . . . . . . . . . . . . . . . . . . . . . . . . . . . . . . . . . . . . . . . . . . . . . . . . . . . 21
27 Activating the Solar System . . . . . . . . . . . . . . . . . . . . . . . . . . . . . . . . . . . . . . . . . . . . . . . . . . . . . . . . . . . . . . . . 22
28 Security Torx Screws . . . . . . . . . . . . . . . . . . . . . . . . . . . . . . . . . . . . . . . . . . . . . . . . . . . . . . . . . . . . . . . . . . . . . . 22
29 RF Antenna for a Pole . . . . . . . . . . . . . . . . . . . . . . . . . . . . . . . . . . . . . . . . . . . . . . . . . . . . . . . . . . . . . . . . . . . . . 23
30 Pole Hardware for the R450 MC . . . . . . . . . . . . . . . . . . . . . . . . . . . . . . . . . . . . . . . . . . . . . . . . . . . . . . . . . . . . 24
31 Slots on Mounting Bracket . . . . . . . . . . . . . . . . . . . . . . . . . . . . . . . . . . . . . . . . . . . . . . . . . . . . . . . . . . . . . . . . . 24
32 Battery Box Clamps . . . . . . . . . . . . . . . . . . . . . . . . . . . . . . . . . . . . . . . . . . . . . . . . . . . . . . . . . . . . . . . . . . . . . . . . 25
33 Pole Hardware . . . . . . . . . . . . . . . . . . . . . . . . . . . . . . . . . . . . . . . . . . . . . . . . . . . . . . . . . . . . . . . . . . . . . . . . . . . . . 25
34 Battery Box Mounted to a Large Pole . . . . . . . . . . . . . . . . . . . . . . . . . . . . . . . . . . . . . . . . . . . . . . . . . . . . . . . 25
35 Solar Panel Mounted to a Large Pole . . . . . . . . . . . . . . . . . . . . . . . . . . . . . . . . . . . . . . . . . . . . . . . . . . . . . . . 26
36 Solar Panel Tilt Angle . . . . . . . . . . . . . . . . . . . . . . . . . . . . . . . . . . . . . . . . . . . . . . . . . . . . . . . . . . . . . . . . . . . . . . 26
37 Snaplock Clamps . . . . . . . . . . . . . . . . . . . . . . . . . . . . . . . . . . . . . . . . . . . . . . . . . . . . . . . . . . . . . . . . . . . . . . . . . . 26
38 Mounted to a Pole . . . . . . . . . . . . . . . . . . . . . . . . . . . . . . . . . . . . . . . . . . . . . . . . . . . . . . . . . . . . . . . . . . . . . . . . . 27
39 Attaching the RF Antenna Cable . . . . . . . . . . . . . . . . . . . . . . . . . . . . . . . . . . . . . . . . . . . . . . . . . . . . . . . . . . . 27
40 Weatherizing the RF Antenna Connection . . . . . . . . . . . . . . . . . . . . . . . . . . . . . . . . . . . . . . . . . . . . . . . . . . . 28
41 Weatherized RF Port . . . . . . . . . . . . . . . . . . . . . . . . . . . . . . . . . . . . . . . . . . . . . . . . . . . . . . . . . . . . . . . . . . . . . . . 28
42 Power Cable Attached to the R450 MC . . . . . . . . . . . . . . . . . . . . . . . . . . . . . . . . . . . . . . . . . . . . . . . . . . . . . 28
43 Ground Wire . . . . . . . . . . . . . . . . . . . . . . . . . . . . . . . . . . . . . . . . . . . . . . . . . . . . . . . . . . . . . . . . . . . . . . . . . . . . . . . 29

Figures
x R450 Mini Collector Installation and Maintenance Guide
Figure Title Page
44 Configuring the R450 MC . . . . . . . . . . . . . . . . . . . . . . . . . . . . . . . . . . . . . . . . . . . . . . . . . . . . . . . . . . . . . . . . . . 29
45 Cellular Modem Front View . . . . . . . . . . . . . . . . . . . . . . . . . . . . . . . . . . . . . . . . . . . . . . . . . . . . . . . . . . . . . . . . . . . 31
46 Cellular Modem Back View . . . . . . . . . . . . . . . . . . . . . . . . . . . . . . . . . . . . . . . . . . . . . . . . . . . . . . . . . . . . . . . . . . . 31
47 Swiping the MIU . . . . . . . . . . . . . . . . . . . . . . . . . . . . . . . . . . . . . . . . . . . . . . . . . . . . . . . . . . . . . . . . . . . . . . . . . . . 32
48 Email Sent from R450 MC . . . . . . . . . . . . . . . . . . . . . . . . . . . . . . . . . . . . . . . . . . . . . . . . . . . . . . . . . . . . . . . . . 32
49 R450 MC Mounted on Wall . . . . . . . . . . . . . . . . . . . . . . . . . . . . . . . . . . . . . . . . . . . . . . . . . . . . . . . . . . . . . . . . 33
50 Adding Cables to the R450 MC . . . . . . . . . . . . . . . . . . . . . . . . . . . . . . . . . . . . . . . . . . . . . . . . . . . . . . . . . . . . 34
51 Weatherizing RF Antenna Connection . . . . . . . . . . . . . . . . . . . . . . . . . . . . . . . . . . . . . . . . . . . . . . . . . . . . . . 34
52 Attaching Circular Power Connector . . . . . . . . . . . . . . . . . . . . . . . . . . . . . . . . . . . . . . . . . . . . . . . . . . . . . . . . 34
53 Completed Wall Installation . . . . . . . . . . . . . . . . . . . . . . . . . . . . . . . . . . . . . . . . . . . . . . . . . . . . . . . . . . . . . . . . 34
54 Securing Pole Bracket . . . . . . . . . . . . . . . . . . . . . . . . . . . . . . . . . . . . . . . . . . . . . . . . . . . . . . . . . . . . . . . . . . . . . 35
55 Lining up Second Pole Bracket . . . . . . . . . . . . . . . . . . . . . . . . . . . . . . . . . . . . . . . . . . . . . . . . . . . . . . . . . . . . . 36
56 RF Antenna Mounting Brackets . . . . . . . . . . . . . . . . . . . . . . . . . . . . . . . . . . . . . . . . . . . . . . . . . . . . . . . . . . . . 36
57 Attaching Coax Cable to RF Antenna . . . . . . . . . . . . . . . . . . . . . . . . . . . . . . . . . . . . . . . . . . . . . . . . . . . . . . . 36
58 Weatherizing RF Antenna Connection . . . . . . . . . . . . . . . . . . . . . . . . . . . . . . . . . . . . . . . . . . . . . . . . . . . . . . 37
59 Mounting RF Antenna to Mast . . . . . . . . . . . . . . . . . . . . . . . . . . . . . . . . . . . . . . . . . . . . . . . . . . . . . . . . . . . . . . 37
60 Securing the Coax Cable . . . . . . . . . . . . . . . . . . . . . . . . . . . . . . . . . . . . . . . . . . . . . . . . . . . . . . . . . . . . . . . . . . 37
61 Radio Module LEDs . . . . . . . . . . . . . . . . . . . . . . . . . . . . . . . . . . . . . . . . . . . . . . . . . . . . . . . . . . . . . . . . . . . . . . . 40
62 AC Power Plug Disconnected . . . . . . . . . . . . . . . . . . . . . . . . . . . . . . . . . . . . . . . . . . . . . . . . . . . . . . . . . . . . . . 41
63 Radio Module Power . . . . . . . . . . . . . . . . . . . . . . . . . . . . . . . . . . . . . . . . . . . . . . . . . . . . . . . . . . . . . . . . . . . . . . 42
65 Null Modem Serial Cable Connected to FST Port . . . . . . . . . . . . . . . . . . . . . . . . . . . . . . . . . . . . . . . . . . . . . . . . 48
66 HyperTerminal Window . . . . . . . . . . . . . . . . . . . . . . . . . . . . . . . . . . . . . . . . . . . . . . . . . . . . . . . . . . . . . . . . . . . . . . 49
67 Port Settings . . . . . . . . . . . . . . . . . . . . . . . . . . . . . . . . . . . . . . . . . . . . . . . . . . . . . . . . . . . . . . . . . . . . . . . . . . . . . . . 49
68 Serial Data Output . . . . . . . . . . . . . . . . . . . . . . . . . . . . . . . . . . . . . . . . . . . . . . . . . . . . . . . . . . . . . . . . . . . . . . . . . . 50
69 Reset Switch and CPU Boot-Up Status LED . . . . . . . . . . . . . . . . . . . . . . . . . . . . . . . . . . . . . . . . . . . . . . . . . . . . 51
70 Support Options . . . . . . . . . . . . . . . . . . . . . . . . . . . . . . . . . . . . . . . . . . . . . . . . . . . . . . . . . . . . . . . . . . . . . . . . . . . . 52
71 AEA Antenna Analyzer . . . . . . . . . . . . . . . . . . . . . . . . . . . . . . . . . . . . . . . . . . . . . . . . . . . . . . . . . . . . . . . . . . . . 62
72 RF Antenna . . . . . . . . . . . . . . . . . . . . . . . . . . . . . . . . . . . . . . . . . . . . . . . . . . . . . . . . . . . . . . . . . . . . . . . . . . . . . . . 63
73 RF Antenna Cable and Trench . . . . . . . . . . . . . . . . . . . . . . . . . . . . . . . . . . . . . . . . . . . . . . . . . . . . . . . . . . . . . 65
74 RF Antenna to be Mounted . . . . . . . . . . . . . . . . . . . . . . . . . . . . . . . . . . . . . . . . . . . . . . . . . . . . . . . . . . . . . . . . 66
75 Antenna Connections . . . . . . . . . . . . . . . . . . . . . . . . . . . . . . . . . . . . . . . . . . . . . . . . . . . . . . . . . . . . . . . . . . . . . . 66
76 Weatherizing the RF Antenna Connection . . . . . . . . . . . . . . . . . . . . . . . . . . . . . . . . . . . . . . . . . . . . . . . . . . 67
77 Stand with Concrete Block Ballast . . . . . . . . . . . . . . . . . . . . . . . . . . . . . . . . . . . . . . . . . . . . . . . . . . . . . . . . . . . . . 69
78 Rohn Industries Stand . . . . . . . . . . . . . . . . . . . . . . . . . . . . . . . . . . . . . . . . . . . . . . . . . . . . . . . . . . . . . . . . . . . . . . . 70
79 Magnetic Declination U.S. . . . . . . . . . . . . . . . . . . . . . . . . . . . . . . . . . . . . . . . . . . . . . . . . . . . . . . . . . . . . . . . . . 73
80 Solar Power Zones . . . . . . . . . . . . . . . . . . . . . . . . . . . . . . . . . . . . . . . . . . . . . . . . . . . . . . . . . . . . . . . . . . . . . . . . 74

R450 Mini Collector Installation and Maintenance Guide xi
Tables
Table Title Page
1 Cellular Modem Parts List . . . . . . . . . . . . . . . . . . . . . . . . . . . . . . . . . . . . . . . . . . . . . . . . . . . . . . . . . . . . . . . . . 9
2 Ethernet Parts List . . . . . . . . . . . . . . . . . . . . . . . . . . . . . . . . . . . . . . . . . . . . . . . . . . . . . . . . . . . . . . . . . . . . . . . . 9
3 Recommended Tools and Materials . . . . . . . . . . . . . . . . . . . . . . . . . . . . . . . . . . . . . . . . . . . . . . . . . . . . . . 13
4 Installing the R450 MCLarge Pole Mount System . . . . . . . . . . . . . . . . . . . . . . . . . . . . . . . . . . . . . . . . 23
5 Vanguard 3000 LED Functions . . . . . . . . . . . . . . . . . . . . . . . . . . . . . . . . . . . . . . . . . . . . . . . . . . . . . . . . . . . 31
6 Installing a Wall Mount System . . . . . . . . . . . . . . . . . . . . . . . . . . . . . . . . . . . . . . . . . . . . . . . . . . . . . . . . . . 33
7 CDMA Bands and Speeds Supported by Vanguard 3000 . . . . . . . . . . . . . . . . . . . . . . . . . . . . . . . . . . 42
8 GSM Bands and Speeds Supported by Vanguard 3000 . . . . . . . . . . . . . . . . . . . . . . . . . . . . . . . . . . . 43
9 Certifying Carriers by Nation . . . . . . . . . . . . . . . . . . . . . . . . . . . . . . . . . . . . . . . . . . . . . . . . . . . . . . . . . . . . . 43
10 Neptune Part Numbers for Cable and Connectors . . . . . . . . . . . . . . . . . . . . . . . . . . . . . . . . . . . . . . . . . 56
11 Connectors and Accessories . . . . . . . . . . . . . . . . . . . . . . . . . . . . . . . . . . . . . . . . . . . . . . . . . . . . . . . . . . . . . 56
12 Power Measurement toReturn Loss and VSWR Conversion Table . . . . . . . . . . . . . . . . . . . . . . . . 59
13 Coax Cable Loss Table . . . . . . . . . . . . . . . . . . . . . . . . . . . . . . . . . . . . . . . . . . . . . . . . . . . . . . . . . . . . . . . . . . 60
14 Recommended Tools and Materials for RF Antenna Installations . . . . . . . . . . . . . . . . . . . . . . . . . . . 64
15 Rohn Industries Stand Concrete Block Requirements . . . . . . . . . . . . . . . . . . . . . . . . . . . . . . . . . . . . . 70
17 Solar Power System Selection . . . . . . . . . . . . . . . . . . . . . . . . . . . . . . . . . . . . . . . . . . . . . . . . . . . . . . . . . . . 74
18 Solar Power System Troubleshooting . . . . . . . . . . . . . . . . . . . . . . . . . . . . . . . . . . . . . . . . . . . . . . . . . . . . . 75
19 Battery Load Voltage by DOD . . . . . . . . . . . . . . . . . . . . . . . . . . . . . . . . . . . . . . . . . . . . . . . . . . . . . . . . . . . . 77
20 Voltages for SoC at 25°C . . . . . . . . . . . . . . . . . . . . . . . . . . . . . . . . . . . . . . . . . . . . . . . . . . . . . . . . . . . . . . . . 78
21 Sunlight by Time of Day in the Winter . . . . . . . . . . . . . . . . . . . . . . . . . . . . . . . . . . . . . . . . . . . . . . . . . . . . . 79
22 Sunlight by Time of Day in the Summer . . . . . . . . . . . . . . . . . . . . . . . . . . . . . . . . . . . . . . . . . . . . . . . . . . . 79

xii R450 Mini Collector Installation and Maintenance Guide
Notes:
Tables
R450 Mini Collector Installation and Maintenance Guide 1
1 Product Description
General Product Overview
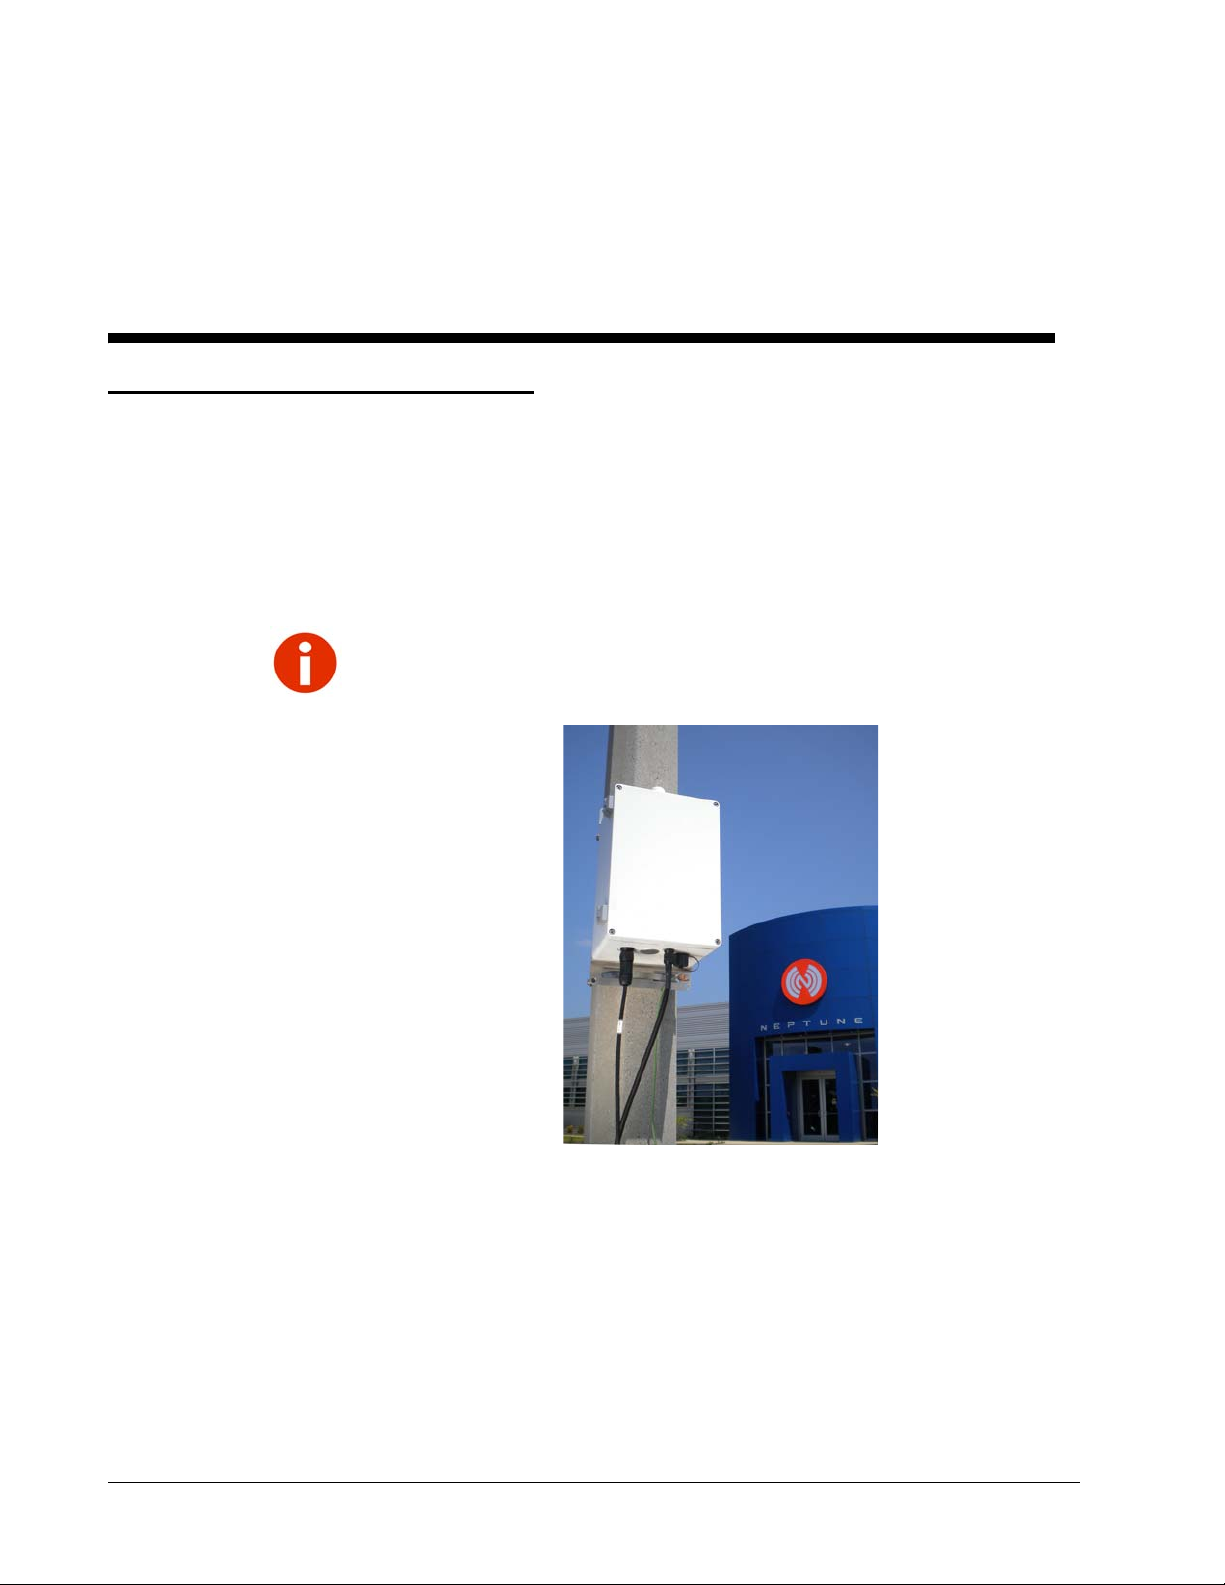
This section provides a general description of the R450™ Mini Collector (R450 MC).
The R450 MC receives, stores, and communicates meter reading data to the
N_SIGHT™ R450 host software (version 1.6 or later) in the host computer. The
R450 MC collects meter reading data from Neptune’s R450 meter interface unit (MIU)
interfacing with Neptune’s absolute encoder register. This data can later be uploaded to the
Customer Information System (CIS) and sent to the utility billing system for processing.
Figure 1 R450 MC
This chapter is designed to provide you with an introduction to the installation process. It
explains the focus of the guide, the pre-installation personnel responsibilities, and general
information on customer support.
Before you begin to install the R450 MC, it is important to become familiar with the unit
and its components. This guide is intended for use by installers and is designed to help in
the installation process. This guide contains information on the components and
specifications, the site selection, and the actual installation of the unit.
TheR450MC utilizesfrequenciesinthe450-470MHzlicensed band.AnFCClicenseisrequired
prior to installation of the system.

Product Description
2 R450 Mini Collector Installation and Maintenance Guide
Types of R450 MC Installations
There are three R450 MC variants depending upon the mounting option,
power supply option, and backhaul communications required. Each type
is powered by either 12VAC or 12VDC.
Neptune provides an installation kit for each type of installation. The
standard configuration of the R450 MC backhaul is Ethernet or a
cellular modem. Other available backhaul options include using an
Ethernet connection.
Mounting Options
Supports:
• Existing light poles
• Towers
• Wall mount
• Rooftop mount
The R450 MC can be mounted on a wall, a pole, or a stand as shown in
the illustrations on the following pages.
Power Supply Options
•ACtransformer
•UPS
•Solar
Backhaul Communications Options
• Ethernet
• Cellular modem
Product Description
R450 Mini Collector Installation and Maintenance Guide 3
Determining How to Install the R450 MC
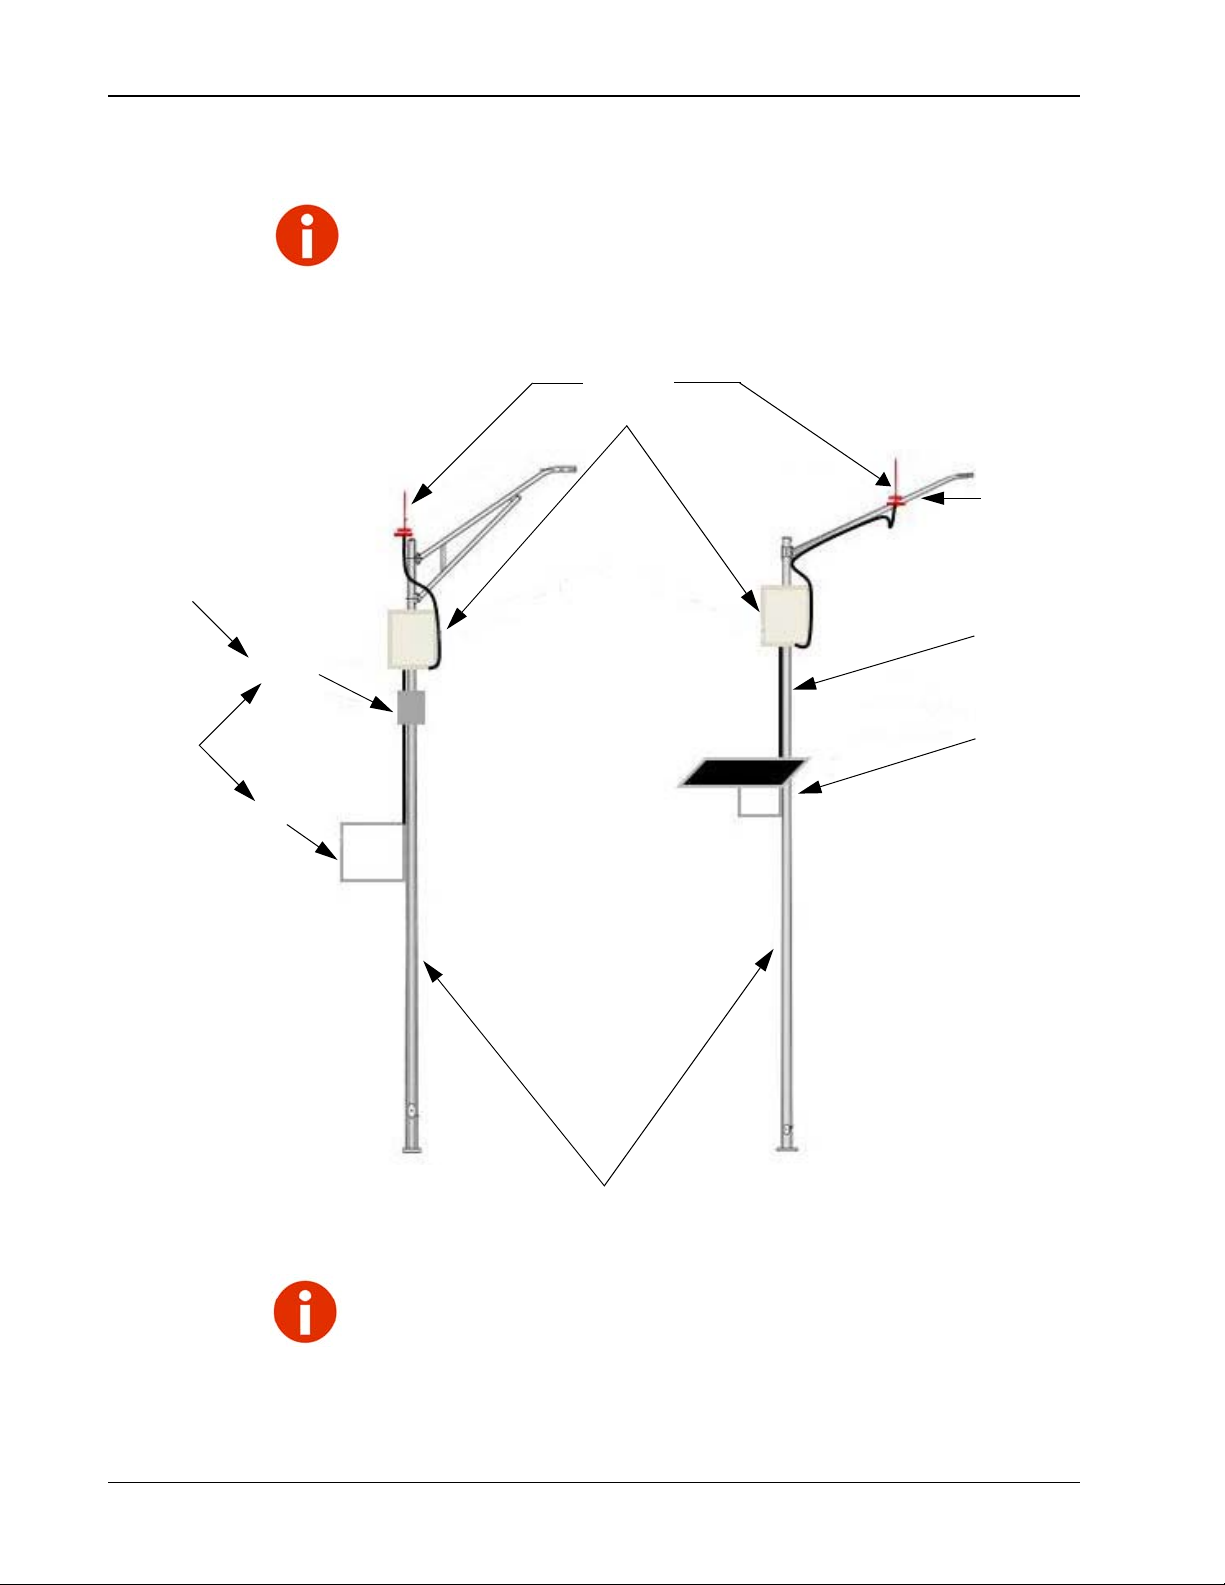
The following figure illustrates how the R450 MC can be installed.
Figure 2 Mounting Options
Forbestperformance of your R450 MC, mounttheRFantennaat a minimum of 30 feet high,but
no more than 75 feet high.
RF antenna
One or the other
Street light)
AC/DC power supply
R450 Mini Collector
Transformer
Solar collector
1 to 4 feet
UPS
Either
or
Depending upon the availability of communications, cellular or Ethernet modems can be used.
Use site selection checklist before installing the R450 MC.

Product Description
4 R450 Mini Collector Installation and Maintenance Guide
Mounting Configurations
Street Light Pole Installation
The pole installation is used for an outdoor free-standing pole. Refer to
Figure 3 for how you can install the R450 MC on a pole.
Figure 3 Pole Installation
RF antenna
R450 Mini Collector
UPS
Solar collector
Depending upon the availability of communications, a cellular modem or
Ethernet can be used.
Product Description
R450 Mini Collector Installation and Maintenance Guide 5
Tower Mount
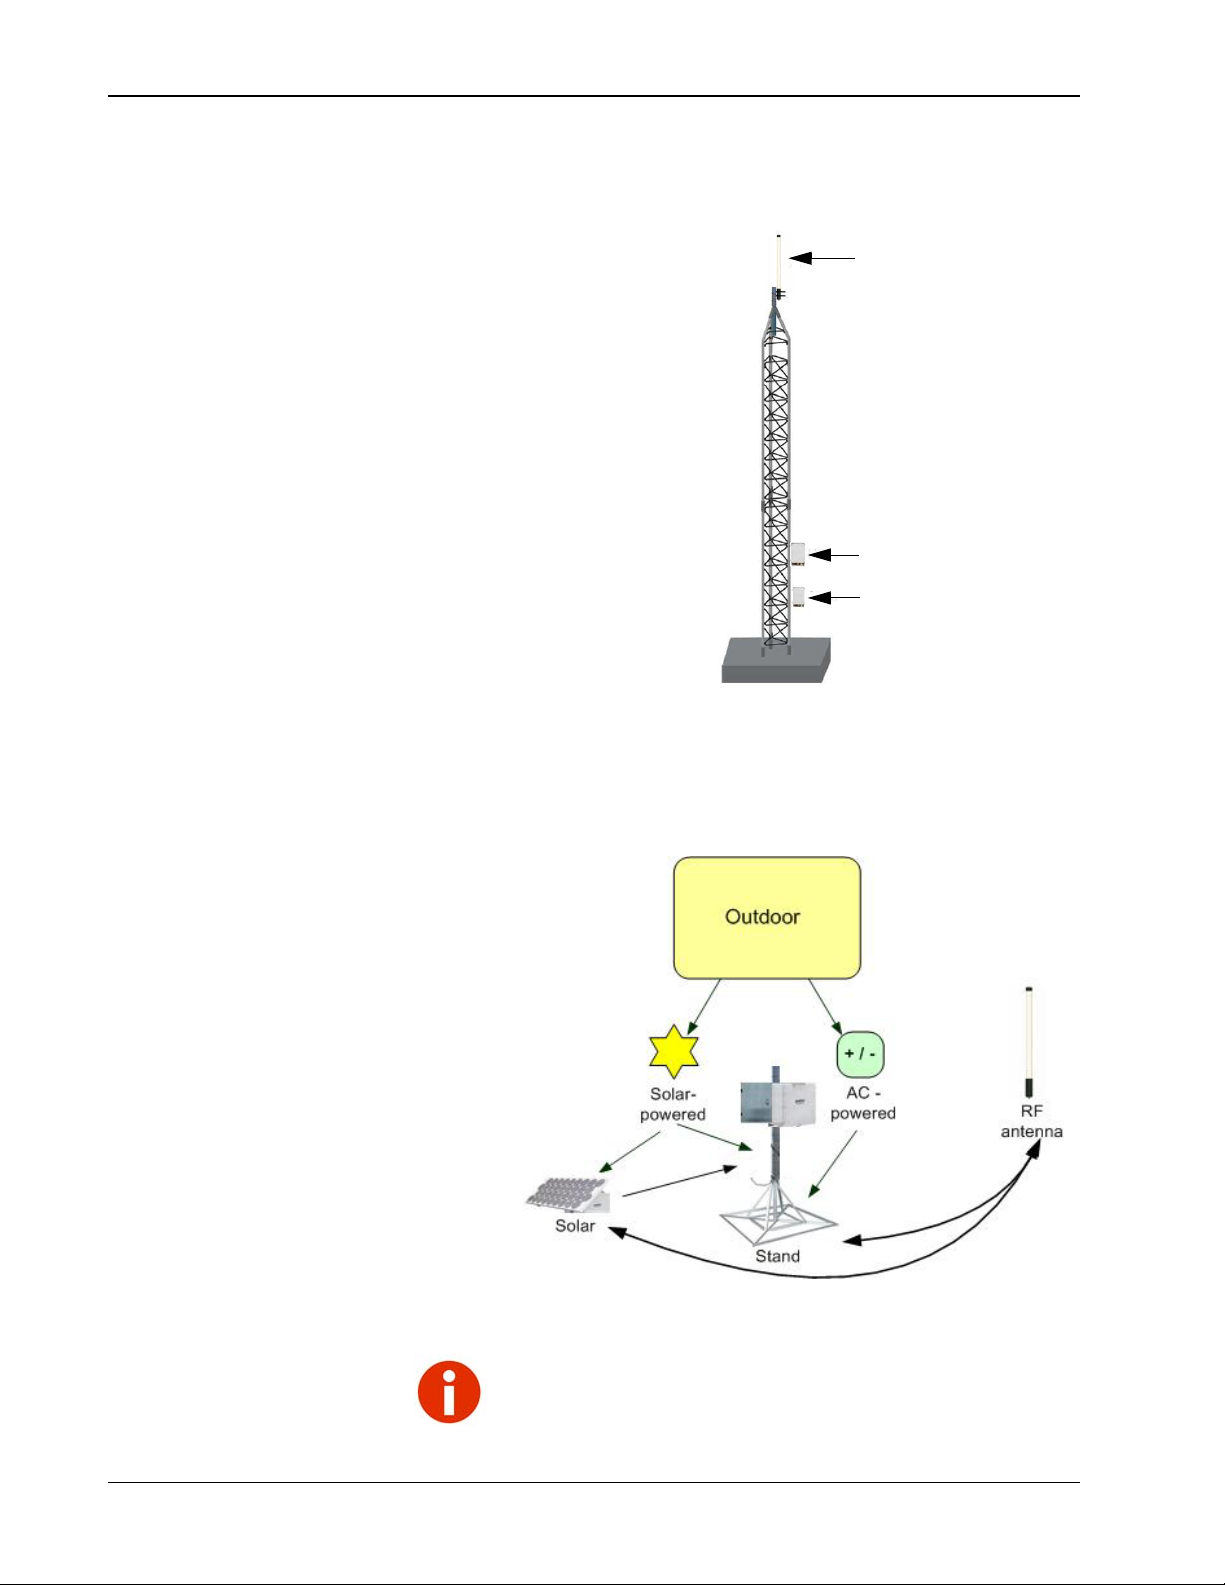
The tower mount installation is used for an outdoor tower. Refer to
Figure 4 for how to install the R450 MC on a tower.
Figure 4 Tower Mount Installation
Rooftop Installation
The rooftop installation is used when the R450 MC is mounted in a high
location, such as on a rooftop. Refer to Figure 5.
Figure 5 Stand Installation
RF antenna
R450 Mini Collector
Transformer
Depending upon the availability of communications, a cellular modem or
Ethernet can be used.

Product Description
6 R450 Mini Collector Installation and Maintenance Guide
Wall Mount Installation
The wall-mounted installation can be installed outdoors. Refer to Figure
6 for how to mount the R450 MC to a wall.
Figure 6 Wall Mount Installation
Depending upon the availability of communications, Ethernet or cellular
modems can be used.
Do not mount the R450 MC, antenna mast, or antenna to a pole
or similar structure carrying open electric light, power wires, or
trolley wires over 250 volts. See NEC, Article 810.
Always mount the R450 MC at least three feet above ground level.
Table of contents
Other Neptune Data Logger manuals


