manuals.online logo
Brands
  1. Home
  2. •
  3. Brands
  4. •
  5. NeuLog
  6. •
  7. Accessories
  8. •
  9. NeuLog NUL-211 User manual

NeuLog NUL-211 User manual

NEULOG FORCE SENSOR GUIDE
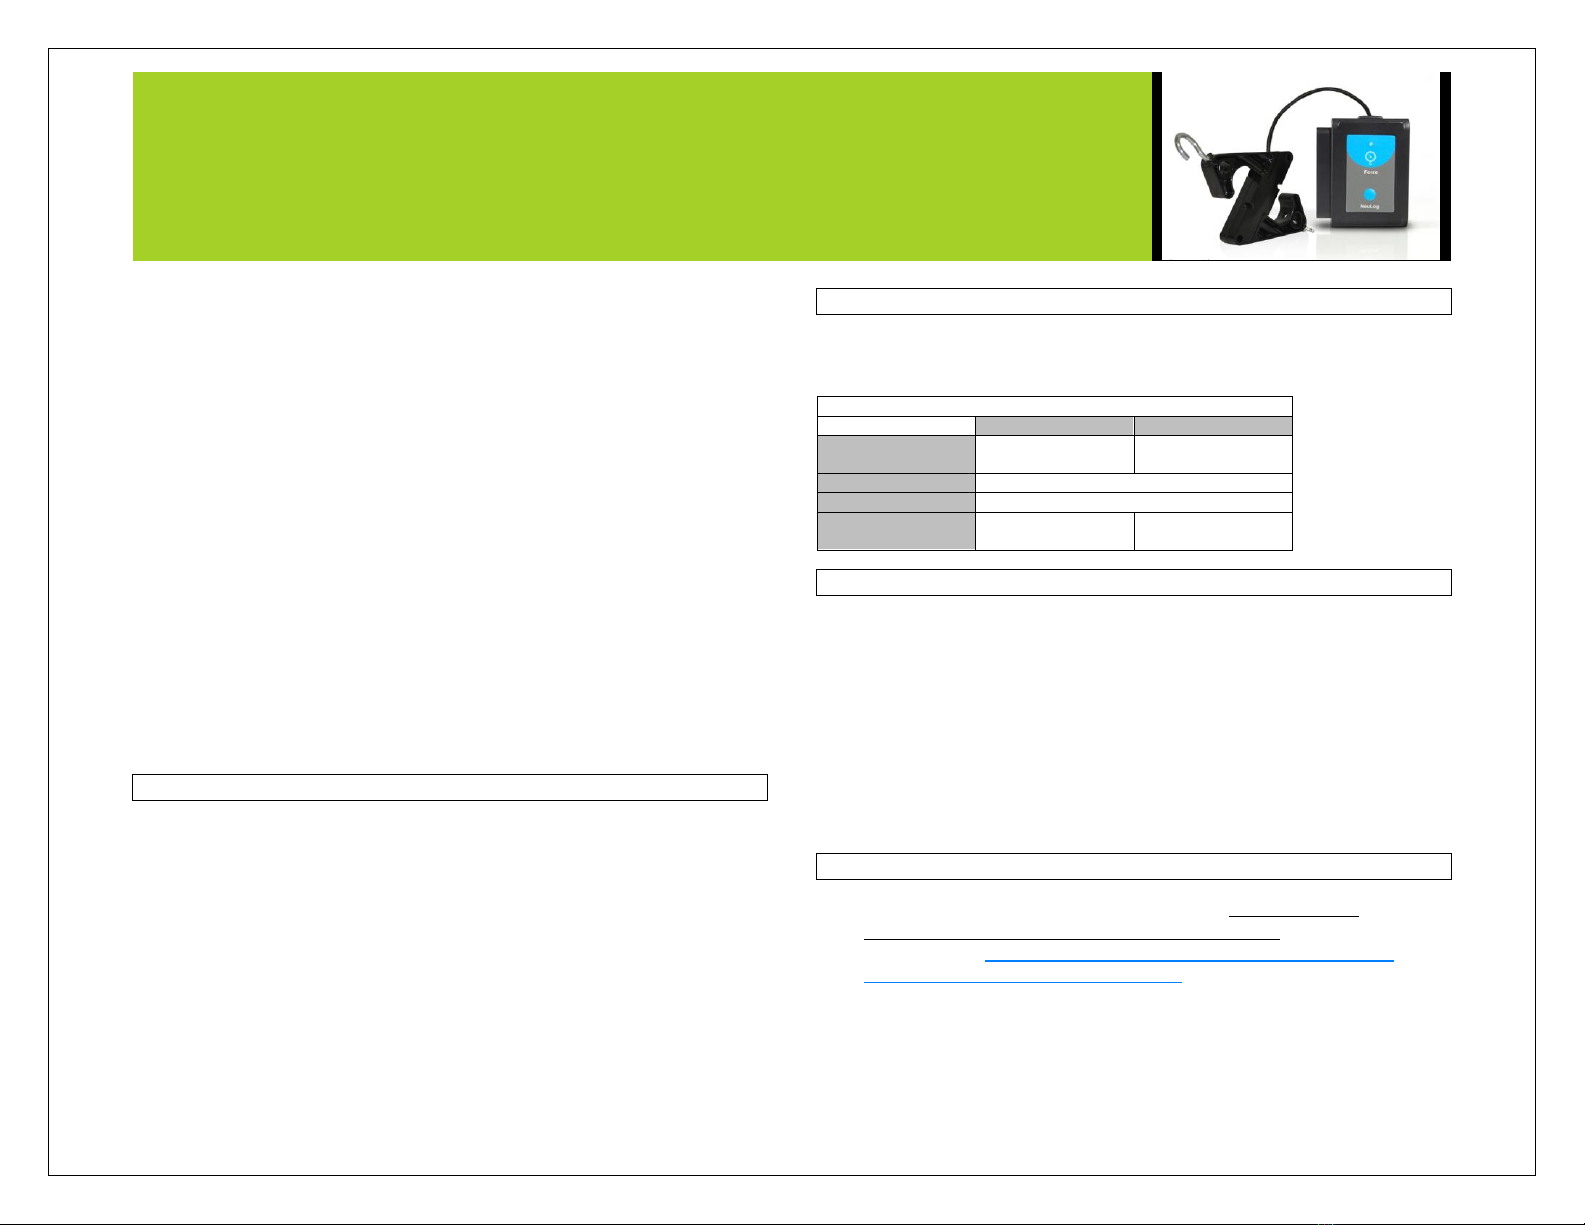
NeuLog force logger sensor
NUL-211
The NeuLog force sensor can be used for any science experiment or activity which
involves both constant and changing forces such as in the fields of Physics,
Physiology, Mechanics, Biomechanics, Biology, etc.
With the ability to hang the sensor using a stand and rod, an attached hook to hang
weights, as well as two directional measurement capabilities the NeuLog force sensor
can easily be set up to your specific requirements to give quick, easy, accurate, and
reliable data.
The sensor comes pre-calibrated so you can start experimentation right out of the box
using any of the following guides. The sensor can easily be recalibrated if you want to
change your experiment parameters following the recalibration guide in this document.
Just a few of the thousands of possible experimental subjects that can be done with
the NUL-211 sensors are: Applied forces and energy, friction, Newton’s Laws of
Motion, physiological concepts, collisions, harmonic motion, and many more.
This sensor measures force in both the push and pull directions.
The unit of measurement that the force sensor collects data in is the newton:
Newton (N): The SI unit of force.
1 N = 1 kg · m/s2
Recalibration:
The force sensor comes pre-calibrated however after use you may find that the sensor
is slightly off or you may want to run an experiment that requires you to zero the
sensor with a constant applied force on it.
To zero the sensor:
1. Connect the NUL-211 force sensor to a computer/tablet/smart device
following one of the guides below.
2. Open the NeuLog software.
3. When your sensor has been detected click on the force sensor icon (on the
left side of your screen)
4. Remove all force from the sensor and click reset to zero your force sensor.
5. Your force sensor is now recalibrated.
Note: You can zero the scale with a constant force being applied to it to set that
value as your new “zero”
Quick start procedure:
PC or Mac Computer
Materials needed:
NUL-211 Force Sensor
USB-200 USB Module
A USB to mini USB cable (which comes with the USB-200)
Your force sensor needs to be connected to a USB-200 module. The USB-200
module then connects to a computer via a USB to mini-USB cable. Please note that
you cannot plug the force sensor directly into the computer.
Resident PC software and browser based software can be downloaded for free at
www.NeuLog.com/dowload as well as a full software user guide. Note: Make sure not
to download and install both types of software they will conflict on the computer.
Procedure:
1. Install the NeuLog software
2. Connect the USB-200 module to the PC or Mac
3. Connect the force sensor to the USB-200 module (they directly plug
together).
4. Open the NeuLog software.
5. Once a force sensor logo appears on the left side of the screen the probe
has been automatically identified and you can begin experimentation.
6. If the force sensor is not automatically identified then click the “Search for
sensors” icon to find the sensor.
7. Select the “On-line experiment” button; this will open a graph below.
8. Click on the “Module setup” button located on the force sensor icon in the
module window to change the sensor settings if need be.
NEULOG FORCE SENSOR GUIDE
9. Click on the experiment set up button to change the experiment settings if
need be (experiment duration for example).
10. The force sensor will give a live reading in the box to the left of the screen
while plugged in.
11. To run an experiment and collect data click “Run experiment”.
12. To end data collection early, click “Stop experiment”.
Tablet, smart phone device
Materials needed:
NUL-211 Force Sensor
WIFI-201 WIFI module
BAT-200 Battery
Your force sensor needs to be connected to a WIFI-201 module. The WIFI-201
module will create a closed NeuLog wifi network which will stream the NeuLog data to
a device of your choosing. Once your device is wirelessly connected to the NeuLog
network you can run experiments and collect data through a browser of your choosing.
Procedure:
1. Connect the force sensor directly to the left side of a WIFI-201 module (no
wires required).
2. Connect a BAT-200 module to the right side of the WIFI-201 module.
3. Although not required, we recommend plugging the BAT-200 to an outlet
using a USB to micro USB charger (such as a typical cell phone charger).
The WIFI-201 module will run for 15-75 minutes (depending on the sensor)
without being plugged in.
4. For further WIFI-201 instructions or the WIFI-201 quick start guide please
visit www.NeuLog.com/download.
5. The WIFI-201 indicator lights will flash; take no action until the LED to the
far left turns blue.
6. Take your tablet or smart phone and go to the Wi-Fi settings and select the
NeuLog network which matches the WIFI module ID found on the back of
the WIFI-201 device. (NeuLogXXXX for example)
7. Give your device 1-2 minutes to connect to the WIFI-201 network.
8. Once the device is connected go to your browser and type in the website
wifi201.com into the URL bar, then wait for 30-60 seconds.
9. You will see a “Control mode” icon in the browser, click on this icon.
10. The browser will then load a new screen and begin to auto detect the
sensors, this can take a few minutes.
11. If the browser does not auto detect, select “Search for sensors”
12. Once the sensor is found you will see an icon on the left side of the screen
for the force sensor. The icon will display data in real time.
13. To set the force sensor’s settings click on “Module setup” button located on
the force sensor icon on the left side of your screen.
14. To change the experimental settings click the “Experiment setup” button
(experiment duration for example).
15. To run an experiment and collect data click “Run experiment”.
Operation with NeuLog viewer
Materials needed:
NUL-211 Force Sensor
VIEW-101 Viewing Module
BAT-200 Battery
Procedure:
1. Connect the force sensor to the left side of the viewer.
2. Connect the BAT-200 module to the right side of the viewer.
3. The VIEW-101 will auto detect the sensor and you will see it appear on the
left side of the screen.
4. Once the sensor appears it will be monitoring data in real time.
5. To run an experiment and collect data click the run button (little green
person).
Off-line experiments
(Off-line experiments are for when you do not have a sensor connected directly to a
computer, tablet, smartphone, or NeuLog viewer).
Materials needed:
NUL-211 Force Sensor
BAT-200 Battery
NEULOG FORCE SENSOR GUIDE
Materials needed to configure your offline experiment:
USB-200 USB Module or WIFI-201 WIFI module or VIEW-101 Viewing Module
A USB to mini USB cable (which comes with the USB-200)
Procedure:
1. Connect the force sensor directly to the left side of a charged BAT-200
module.
2. When ready to collect data press the “Start/Stop” button on the force
sensor, a red light will turn on for the duration of the experiment.
3. To change the experiment settings first connect to your chosen device (PC,
Mac, tablet, smart device) and select the “Module setup” button. (For more
information on how to change the experiment settings view quick start
procedure section for your chosen device in this document.)
4. After the experiment has concluded (when the “Start/Stop” button is pressed
again or the data collection period ends) connect the sensor to your chosen
device. (full instructions in each device’s quick start procedure section)
5. Open NeuLog software.
6. Click the “Off-line experiment” button.
7. Click the “Load data from sensors” button.
8. Select which experimental data to upload. (5 experimental runs can be
stored at one time on the NUL-211 force sensor)
Restoring sensor’s factory default settings:
Procedure:
1. Connect the USB-200 to a PC, Mac, tablet, or smart device.
2. Connect the force sensor to a USB-200 module (they directly plug together).
3. Open the NeuLog software.
4. Click the “Tools” icon.
5. Click “Restore sensor’s factory defaults” icon.
6. If prompted to clear the graph, click either the “Off-line experiment” or “On-
line experiment” (whichever you are using).
7. Click “Clear experiment results”.
8. Resume from step 4.
Included with sensor:
NeuLog NUL-211 force sensor guide (this document).
Utility probe with hook attached to the sensor by a durable rubber-coated wire.
Sensor specifications
10 N range
50 N range
Range and
operation modes
± 10 N
± 50 N
ADC resolution
14 bit
Resolution
0.01 N
Max sample rate
(S/sec)
100 slow
3000 fast
Sensor features:
Fully digital data.
Rugged plastic ergonomic case.
Push button switch for Start/Stop experiments in off line mode.
LED indicator of experiment status (blinks while collecting data).
Pre-calibrated sensing equipment.
Strong plastic force utility sensor with hook attached to the sensor’s plastic body
by a durable rubber-coated wire.
The force takes measurements in two directions for both pushing and pulling
experiments.
Note: NeuLog products are intended for educational use.
Videos and experiment examples:
Videos, literature and other probes can be found at www.NeuLog.com
http://www.NeuLog.com/Products/force loggerSensor.aspx
Friction Force - http://www.neulog.com/Portals/3/Users/Experiment%20P-
6%20Friction%20Force%20Ver%203.4.3.pdf
NEULOG FORCE SENSOR GUIDE
Technical background:
The philosophy behind NeuLog’s plug and play technology is based on each sensor’s
ability to store its own data due to an internal flash memory chip and micro-controller
in each plastic NeuLog body. This technology allows the sensor to collect and then
store the digital data in the correct scientific units (oC, oF, Lux, %, ppm, for example).
The sensor is pre-calibrated at the factory. The built-in software in the logger can be
upgraded for free at any time using the provided firmware update.
When a force is applied to the sensor, internal strain gauges measure the bending of a
thin metal rod. This is the basis for how the force sensor accurately and quickly
measures applied forces. Multiple strain gauges inside of the force sensor’s body take
readings and are compared to one another to give a total force measurement.
Maintenance and storage:
Never submerge the NeuLog plastic body in any liquid.
Do not allow liquid into the force sensor’s body.
After use, gently wipe away any foreign material from the force sensor.
Store in a box at room temperature out of direct sunlight.
Avoid storing with weight applied directly to the sensor.
Warranty:
We promise to deliver our sensor free of defects in materials and workmanship for a
period of 3 years from the date of purchase. Our warranty does not cover damage of
the product caused by improper use, abuse, or incorrect storage. Sensors with a shelf
life such as ion selective proves have a warranty of 1 year. Should you need to act
upon the warranty please contact your distributor. Your sensor will be repaired or
replaced.
Thank you for using NeuLog!
Flexible, simple, fast, forward thinking.
W: www.neulog.com
E: info@neulog.com
A: 850 St Paul Street, Suite 15, Rochester, NY 14605
P: 1.866.553.8536
V04302013

Other NeuLog Accessories manuals

NeuLog NUL-246 User manual

NeuLog

NeuLog NUL-246 User manual

NeuLog UL-202 User manual

NeuLog

NeuLog UL-202 User manual

NeuLog NUL-216 User manual

NeuLog

NeuLog NUL-216 User manual

NeuLog NUL-209 User manual

NeuLog

NeuLog NUL-209 User manual

NeuLog NUL-235 User manual

NeuLog

NeuLog NUL-235 User manual

NeuLog NUL-214 User manual

NeuLog

NeuLog NUL-214 User manual

NeuLog NUL-203 User manual

NeuLog

NeuLog NUL-203 User manual

NeuLog NUL-213 User manual

NeuLog

NeuLog NUL-213 User manual

NeuLog NUL-219 User manual

NeuLog

NeuLog NUL-219 User manual

NeuLog NUL-209 User manual

NeuLog

NeuLog NUL-209 User manual

NeuLog NUL-207 User manual

NeuLog

NeuLog NUL-207 User manual

NeuLog NUL-226 User manual

NeuLog

NeuLog NUL-226 User manual

NeuLog NUL-237 User manual

NeuLog

NeuLog NUL-237 User manual

NeuLog NUL-231 User manual

NeuLog

NeuLog NUL-231 User manual

NeuLog NUL-243 User manual

NeuLog

NeuLog NUL-243 User manual

NeuLog NUL-227 User manual

NeuLog

NeuLog NUL-227 User manual

NeuLog NUL-209 User manual

NeuLog

NeuLog NUL-209 User manual

NeuLog NUL-223 User manual

NeuLog

NeuLog NUL-223 User manual

NeuLog NUL-245 User manual

NeuLog

NeuLog NUL-245 User manual

NeuLog NUL-208 User manual

NeuLog

NeuLog NUL-208 User manual

NeuLog NUL-230 User manual

NeuLog

NeuLog NUL-230 User manual

NeuLog NUL-201 User manual

NeuLog

NeuLog NUL-201 User manual

NeuLog NUL-204 User manual

NeuLog

NeuLog NUL-204 User manual

NeuLog NUL-202 User manual

NeuLog

NeuLog NUL-202 User manual

Popular Accessories manuals by other brands

Hydreon RG-9 manual

Hydreon

Hydreon RG-9 manual

Panasonic HFQ EE26 specification

Panasonic

Panasonic HFQ EE26 specification

SKY PARAGLIDERS Gii 5 user manual

SKY PARAGLIDERS

SKY PARAGLIDERS Gii 5 user manual

Panasonic HL-C235BE instruction manual

Panasonic

Panasonic HL-C235BE instruction manual

Honeywell Home DW915 Series manual

Honeywell Home

Honeywell Home DW915 Series manual

Clearaudio Unify Series user manual

Clearaudio

Clearaudio Unify Series user manual

SBIG SG-4 Application note

SBIG

SBIG SG-4 Application note

Vaisala WAC151 user guide

Vaisala

Vaisala WAC151 user guide

Novanta ATI Axia90 F manual

Novanta

Novanta ATI Axia90 F manual

Goldair GHCR200 operating instructions

Goldair

Goldair GHCR200 operating instructions

SICK LMS1104C-111031S01 quick start

SICK

SICK LMS1104C-111031S01 quick start

Philio PHI PST02-1B quick start

Philio

Philio PHI PST02-1B quick start

FSR PTB Series installation manual

FSR

FSR PTB Series installation manual

nekos NRS1 instruction manual

nekos

nekos NRS1 instruction manual

bora USTF Assembly & instruction manual

bora

bora USTF Assembly & instruction manual

MTS Systems Temposonics III Programming guide

MTS Systems

MTS Systems Temposonics III Programming guide

4B ADBT2 Operation manual

4B

4B ADBT2 Operation manual

Gleason Reel Electric Cable Reel P14 Replacement parts

Gleason Reel

Gleason Reel Electric Cable Reel P14 Replacement parts

manuals.online logo
manuals.online logoBrands
  • About & Mission
  • Contact us
  • Privacy Policy
  • Terms and Conditions

Copyright 2025 Manuals.Online. All Rights Reserved.