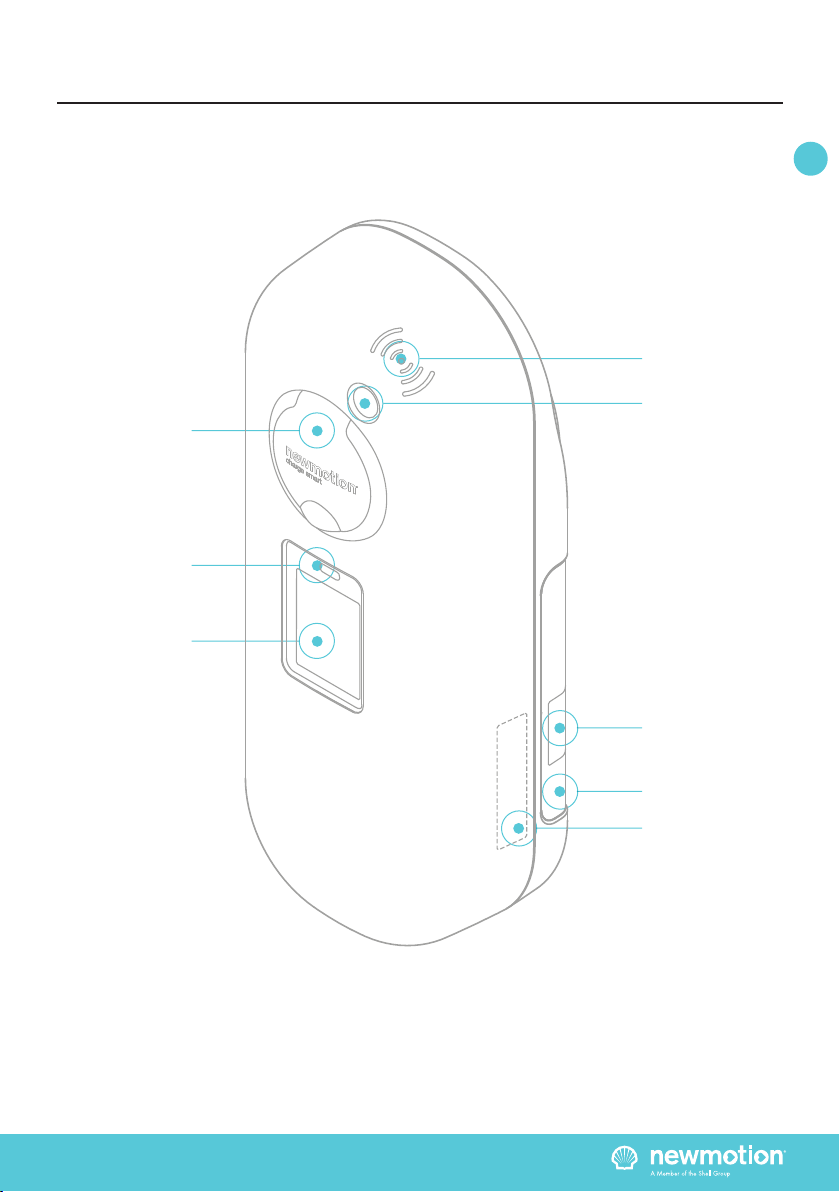
newmotion Business Lite View Installation instructions

USER MANUAL – EN | BEDIENUNGSANLEITUNG ENDKUNDE – DE
Business Lite & Pro View
Home Advanced View
VERSION 0512NM02INT01 2019
sensor


Table of contents / Inhaltsverzeichnis
DE: +49 (0)30 215 028 48
User instruction (EN)
Pages 4 - 14
Bedienungsanleitung Endkunde (DE)
Seiten 15 - 25
NewMotion
View charge points

EN NLDE
USER MANUAL – P4 0512NM02INT01
This NewMotion View product user manual belongs to
the following 3 types of charger which can be delivered
to the following charge point models that are compliant
for Mess & Eichrecht:
Home Advanced View
Serial Number Range: 0750.0000 to 0759.9999
Business Lite View
Serial Number Range: 0850.0000 to 0859.9999
Business Pro View
Serial Number Range: 0950.0000 to 0959.9999
When a charger is M&E-compliant, a Secured Mess &
Eichrecht Device (SMED) is build upon the existing (MID
compliant) energy meter inside the charger. All legally
relevant data from each transaction is stored inside this
SMED device. It’s possible to read and access current
(live) and historical (stored) transaction/session data for a
unique identier (UID) on the LCD display screen.
For installation of the View charge points, please refer to
the dedicated installation manuals which are available.
1. ABOUT

INSTALLATIEHANDLEIDING – P5 VERSION 0129NM02INT01USER MANUAL – P5
EN DE
0512NM02INT01
2. PRODUCT OVERVIEW
Type 2 EV plug
socket & cover lid
or dummy socket
SMED proximity
sensor set
SMED LCD display
RFID reader
Identication label
with serial number
Product details
LED status indicator
SMED sticker
sensor

INSTALLATIEHANDLEIDING – P6 VERSION 0129NM02INT01USER MANUAL – P6
EN DE
0512NM02INT01
3.1. LED STATUS INDICATOR
The LED status indicator can give the user various
indications as shown below;
Full or waiting to charge
Plug in or identify
Charging
Not accepted
Error
3.2. SMED | PROXIMITY SENSOR SET
It’s possible to activate the screen by waving in front of
the sensor at a distance of about 1-5 centimeters.
Other ways to activate the screen include;
• Swipe an RfID-card (charge card or key fob) to start a
transaction or to request historical data;
• Plug in a cable;
• Remote request through your app;
3.3 SMED | LCD DISPLAY SCREEN
The View Charge Point features a high resolution full
color display to show the legally relevant data to the
user(s) and help guide the user(s) to successfully charge
their vehicle(s).
Initial start screen
Activate the screen (see previous step) to display the
initial start screen like shown below.
DATA/INFO SHOWN ON INITIAL START SCREEN
Serial : 07501234
This is the serial number of the charge point that this
SMED is built into.
FW-version : 1.1.11
This is the rmware version of the SMED, also mentioned
on the PtB certicate of this charge point.
Actual values | 000570.00 kWh
This is the total amount of kWh which is consumed on
this SMED*
*A new charge point with SMED will never show completely 0
kWh as it has gone through a Factory Acceptance Test after
assembly.
3. PRODUCT INTERFACES

EN NLDE
USER MANUAL – P7 0512NM02INT01
Actual values | 18:03:52
This is the actual time
Actual values | 23.05.2018
This is the actual date
Scan QR code or charge card to start charging
There are 2 ways to start and/or stop a transaction on
this View charge point:
1. Scan the QR code with your smartphone and follow
the steps online, alternatively you can type the address
as shown below the QR code into the browser of your
device;
2. Swipe your charge card at the card reader on top of
the charge point;
Hold charge card for history review
You can hold your charge card at the cardreader on
top of the charge point for ~15 seconds to display the
historic sessions for this charge card stored on this
charge point*;
*In case there are no stored historic sessions on this charge point
for this card the charge point will prompt that on the screen;
3.4. RFID CARD READER
The RFID card reader is the part where you present your
RFID card (charge card or key fob), and can be used for
either;
1. Swipe short (~1 sec) for transaction/sessions start or
stop request;
2. Swipe longer (~15 sec) for displaying historic
transactions/session of your charge card/key fob stored
on this Charge point;
3.5. SMED STICKER
Each View charge point has a SMED sticker on the side
like indicated which shows the following information;
1. Unique SMED serial-number;
2. Unique public key which can verify it’s private key
signature;
3. CE mark;
4. Reference to PTB Baumunsterprufbescheinigung;
5. Reference to MID compliance and accuracy class;
3. PRODUCT INTERFACES

INSTALLATIEHANDLEIDING – P8 VERSION 0129NM02INT01USER MANUAL – P8
EN DE
0512NM02INT01
4.1 STARTING A TRANSACTION/
SESSION;
Step 1: plug in your Electric Vehicle with corresponding
cable & connector
Step 2: request start transaction/session from the initial
start screen;
There are 2 ways to start and/or stop a transaction on
this View charge point*
1. Scan the QR code with your smartphone and follow
the steps in the online webpage. You can also type the
address as shown below the QR code into the internet
browser of your smartphone to end up on the same
online webpage;
2. Swipe your charge card at the card reader on top of
the charge point
*Contact NewMotion for assistance if you are experiencing
trouble starting a transaction
It’s possible to start a transaction/session with charge
card and stop it with a QR scan and vice versa, the only
requirement is that the end-user is the same (UID - the
unique identier - has to match);
4. USER INSTRUCTIONS

EN NLDE
USER MANUAL – P9 0512NM02INT01
Step 3: when a transaction/session is initialised to start,
the following screens will appear*;
*Except when a transaction/session request is refused, see error
screens below
Charge request screen
The charging sessions is requested and the charger is
waiting if the session is authorized.
The last 4 characters of the requesters unique identier
(UID) are visible on the screen.
The start values are not xed yet, but already displayed.
Start charging screen
When the transaction/session request is authorized, a
transaction ID (L-TX-ID) is received and displayed on this
screen, above the UID.
4. USER INSTRUCTIONS

INSTALLATIEHANDLEIDING – P10 VERSION 0129NM02INT01USER MANUAL – P10
EN DE
0512NM02INT01
Charging in progress screens (1 of 3)
When the charging transaction/session is in progress,
this rst screen of three screens will be shown for the
rst 2 minutes (including the UID).
After the rst 2 minutes of the transaction/session,
the UID will disappear (it will reappear again when the
transaction/session is ended), and thus show as the
second of the three screens.
Charging in progress screens (2 of 3)
After the rst 2 minutes of the transaction/session,
the UID will disappear (it will reappear again when the
transaction/session is ended), and thus show as the
second of the three screen.
During the remainder of the transaction/session the
second of the three screens will be shown. However
every two minutes that pass screen three will be shown
for 20 seconds to enable users to stop the transaction/
session via the QR-code online portal if they so desire.
Charging in progress screens (3 of 3)
During the remainder of the transaction/session the
second of the three screens will be shown. However
every 15 seconds that pass during the transaction/
session screen three of three will be shown for 4
seconds to enable users to stop the transaction/session
via the QR-code online portal if they so desire.
4. USER INSTRUCTIONS

INSTALLATIEHANDLEIDING – P11 VERSION 0129NM02INT01USER MANUAL – P11
EN DE
0512NM02INT01
4. USER INSTRUCTIONS
4.2. STOPPING A TRANSACTION/
SESSION;
A transaction in progress can only be stopped by the
same UID which started the transaction. When this stop
commando is given to the charger, the session will be
stopped and the UID will be displayed again.
It’s possible to stop a transaction/session with an RFID
card or with a QR scan, the only requirement is that
the end-user is the same (UID has to match) of the
transaction/session that is in progress;
Step 1; Stop the transaction/session by either swiping
the RFID card or via the QR code online portal, the
following screens will appear;
The display will rst show the ‘charging stopped’ screen
like shown here.
The UID will again show up in the bottom of the screen.
Then a prompt will show an instruction that it is
recommended to take a picture of the end screen which
will show a summary of all the legally relevant data of the
transaction/session.
After that the end screen which will show a summary of
all the legally relevant data of the transaction/session will
be displayed.
It is recommended to take a picture of this screen as a
‘receipt’ so you can verify it against your bill/invoice at a
later time if you wish.

EN NLDE
USER MANUAL – P12 0512NM02INT01
4. USER INSTRUCTIONS
4.3. REQUESTING TO DISPLAY
STORED HISTORIC TRANSACTION(S)/
SESSION(S);
All the transactions/sessions that have been made on
the charge point will be stored on a secure internal
storage inside the View charge point SMED.
At any time as a user, for example after receiving your
bill, you can come back to the charge point and check
the historic stored transaction/session details afliated to
your RFID card (UID) in the following way:
Step 1; Hold the RFID card in front of the reader and
keep it there. After ~5 sec the following screens appear
(keep holding the RFID in front of the reader);
After this, all historic stored transactions/sessions for
this UID stored in this charge point are automatically
shown on the display screens.
You can now verify the legally relevant (stored)
transaction data against for example your bill/invoice.
For ease of use it’s recommended to take a picture of
the screen(s).
The stored sessions will be shown in backwards order,
this means most recent transactions/sessions are
shown rst and will show in chronological order.
In the bottom of the screen you can see the number of
stored transactions/sessions for this UID on this charge
point and which one is being displayed. In this example
1/12 mean that the most recent transaction/session is
shown of the 12 stored transactions/sessions for this
UID on this charge point.
Each transaction/sessions screen will be shown for ~5
seconds.
Keep holding the RFID card in
front of the reader and keep it there
until the screen is completely blue
(~15 seconds in total)

INSTALLATIEHANDLEIDING – P13 VERSION 0129NM02INT01USER MANUAL – P13
EN DE
0512NM02INT01
4. USER INSTRUCTIONS
It’s possible to interrupt/abort the automatic scrolling
through the stored historic data by swiping a (any) RFID
card shortly at the reader. The charger point will then
return to the initial start screen and is ready for use.
In case no historic transactions/sessions are stored on
this change point for this UID the following screen will
be shown;
This means this UID has not been used for transactions/
sessions (yet) at this charge point.
4.4 ERROR SCREENS AND
INSTRUCTIONS
It is possible the following screens are displayed, it’s
recommended to take the following actions.
When requesting a transaction/session start, this screen
can be shown, indicated the start is refused.
This can have various reasons, and it is therefore
recommended to contact NewMotion and/or the charge
card supplier (if other than NewMotion) to come with a
solution.
Alternatively it’s always possible to use the QR code
online web portal to start a session with a direct
payment of Credit Card.

EN NLDE
USER MANUAL – P14 0512NM02INT01
4. USER INSTRUCTIONS
This screen indicates there is a technical issue with this
charge point, please contact NewMotion and don’t use
before this screen is gone and the initial start screen is
shown again.
4.5 ADDITIONAL INSTRUCTION FOR
CHANGED/REMOVED/REPLACED
SMED
It can occur that you have charged at a NewMotion
charge point and later when you would like to verify the
stored historic transaction/session data, the View charge
point with SMED storage is no longer available to do so.
This can happen when:
• The charge point owner has decided to remove it as
publically available;
• The charge point owner has decided to relocate,
remove or replace the charge point;
• The charge point had a technical issue and has been
replaced by a new chargepoint or the SMED has been
replaced;
In any of these cases do the following:
Contact NewMotion customer care for an update on
how to check your historic sessions details, by calling
DE: +49 (0)30 215 028 48

EN DE
BEDIENUNGSANLEITUNG ENDKUNDE – P15 0512NM02INT01
Diese NewMotion View Bedienungsanleitung gehört
zu den folgenden 3 Arten von Ladegeräten, die
für die folgenden Mess- & Eichrecht-konformen
Ladestationsmodelle geliefert werden können:=
Home Advanced View
Seriennummernbereich: 0750.0000 to 0759.9999
Business Lite View
Seriennummernbereich: 0850.0000 to 0859.9999
Business Pro View
Seriennummernbereich: 0950.0000 to 0959.9999
In ein M&E-konformes Ladegerät wird ein „Secured
Mess & Eichrecht Device“ (SMED) in den vorhandenen
(MID-konformen) Elektrizitätszähler im Ladegerät
eingebaut. Alle rechtlich relevanten Daten jeder
Transaktion werden in diesem SMED-Gerät
gespeichert. Die aktuellen (Live) und die (gespeicherten)
Verlaufsdaten für die Transaktion/Session (Ladevorgang)
für einen einzigartigen Identikator (UID) können am
LCD-Display abgelesen werden und hier erfolgt auch
der Zugriff auf diese Daten.
Informationen zur Installation der View-Ladestationen
entnehmen Sie bitte den entsprechenden, verfügbaren
Installationshandbüchern.
1. ÜBER UNS

EN DE
0512NM02INT01BEDIENUNGSANLEITUNG ENDKUNDE – P16
2. PRODUKTÜBERSICHT
Typ 2 EV-Steckdose
(oder Blindstecker-
buchse für festanges-
chlossenes Kabel
SMED Näherungs-
sensor-Set
SMED LCD display
RFID reader
Etikett mit Serien-
und Produktnummer
Produktinformationen
LED-Statusanzeige
SMED sticker
sensor

EN DE
BEDIENUNGSANLEITUNG ENDKUNDE – P17 0512NM02INT01
3.1. LED-STATUSANZEIGE
An der LED-Statusanzeige können dem Benutzer
verschiedene (nachfolgend dargestellten) Informationen
angezeigt werden:
Voll oder auf Ladung wartend
Verbinden oder identizieren
Ladevorgang
Nicht akzeptiert
Fehler
Grün blinkende oder mehrfarbige LED: Start des
Vorgangs oder Software-Update für die Ladestation.
3.2. SMED | NÄHERUNGSSENSOR-SET
Der Bildschirm kann durch Winken vor dem Sensor in
einer Distanz von circa 1 bis 5 cm aktiviert werden.
Weitere Möglichkeiten zur Aktivierung des Bildschirms:
• Um eine Transaktion zu beginnen oder um historische
Daten abzurufen, streifen Sie eine RfID-Karte (Ladekarte
oder Schlüsselanhänger) über den Bildschirm.
• Stecken Sie ein Kabel ein.
• Remote-Anforderung über Ihre App.
3.3 SMED | LCD-DISPLAY
Die View-Ladestation ist mit einem hochauösenden
Vollfarb-Display ausgestattet, an dem den Benutzern die
rechtlich relevanten Daten sowie die Anleitungen für das
erfolgreiche Laden ihrer Fahrzeuge angezeigt werden.
Auf dem Startbildschirm angezeigte Daten/
Informationen
Seriennummer: 07501234
Dies ist die Seriennummer der Ladestation, in die dieses
SMED eingebaut ist.
FW-Version: 1.1.11
Dies ist die Firmware-Version des SMED, die auch auf der
PtB-Bescheinigung dieser Ladestation angegeben ist.
Istwerte | 000570,00 kWh
Dies ist die Gesamtsumme der kWh, die auf diesem
SMED verbraucht wurden*. *Eine neue Ladestation mit
einem SMED zeigt niemals nur 0 kWh an, weil das Gerät nach der
Montage einem Werkabnahmetest unterzogen wurde.
3. PRODUKTSCHNITTSTELLEN

EN DE
0512NM02INT01BEDIENUNGSANLEITUNG ENDKUNDE – P18
Istwerte | 18:03:52
Dies ist die tatsächliche Zeit
Istwerte | 23.05.2018
Dies ist das aktuelle Datum
QR Code scannen oder Ladekarte nutzen, um den
Ladevorgang zu starten.
Es gibt zwei Möglichkeiten, um eine Transaktion an
dieser View-Ladestation zu starten und/oder zu stoppen.
1. Scannen Sie den QR-Code mit Ihrem Smartphone
und befolgen Sie die Schritte online. Sie können jedoch
auch die Adresse, wie unter dem QR-Code abgebildet,
in den Browser Ihres Gerätes eingeben.
Ziehen Sie Ihre Ladekarte über das Kartenlesegerät
oben auf der Ladestation.
Ladekarte zur Verlaufsprüfung vormerken
Sie können Ihre Ladekarte circa 15 Sekunden an das
Kartenlesegerät oben auf der Ladestation halten, um
den Verlauf der Ladevorgänge aufzurufen, der für diese
Ladekarte an dieser Ladestation gespeichert ist*.
*Falls auf der Ladestation kein Verlauf für diese Karte gespeichert
sein sollte, wird das am Bildschirm der Ladestation angezeigt.
3.4. RFID-KARTENLESEGERÄT
Das RFID-Kartenlesegerät ist das Teil, in dem Sie
Ihre RFID-Karte (Ladekarte oder Schlüsselanhänger)
vorzeigen, und es kann für beide verwendet werden.
1. Streifen Sie für die Start- oder Stoppanforderung einer
Transaktion/eines Ladevorgangs kurz (ca. 1 Sek.) darüber.
2. Streifen Sie länger darüber (ca. 15 Sek.), um den
Verlauf der für Ihre Ladekarte/Ihren Schlüsselanhänger
an dieser Ladestation gespeicherten Transaktionen/
Sessions anzuzeigen.
3.5. SMED-AUFKLEBER
Jede View-Ladestation hat einen auf der Seite
angebrachten Aufkleber (wie den abgebildeten), der die
folgenden Informationen enthält:
1. Eindeutige SMED-Seriennummer.
2. Eindeutiger öffentlicher Schlüssel, mit dem die
Signatur des privaten Schlüssels veriziert werden kann.
3. CE-Zeichen.
4. Verweis auf PTB-Baumusterprüfbescheinigung.
5. Verweis auf MID-Konformität und Genauigkeitsklasse.
3. PRODUKTSCHNITTSTELLEN

EN DE
BEDIENUNGSANLEITUNG ENDKUNDE – P19 0512NM02INT01
4.1STARTEN EINER TRANSAKTION/
SESSION
Schritt 1: Schließen Sie Ihr Elektrofahrzeug mit dem
entsprechenden Kabel und Stecker an.
Schritt 2: Fordern Sie am Startbildschirm eine
Transaktion/Session an.
Es gibt zwei Möglichkeiten, um an dieser View-Ladestation
eine Transaktion zu starten und/oder zu stoppen*
1. Scannen Sie den QR-Code mit Ihrem Smartphone
und befolgen Sie die Schritte auf der Online-Webseite.
Sie können die Adresse auch, wie unter dem QR-Code
angezeigt, in den Internet-Browser Ihres Smartphones
eingeben, um auf die Online-Website zuzugreifen.
2. Ziehen Sie Ihre Ladekarte über das Kartenlesegerät
oben auf der Ladestation
*Falls Sie Probleme haben sollten, eine Transaktion zu starten,
wenden Sie sich bitte an NewMotion.
Eine Transaktion/Session kann mit der Ladekarte
gestartet und mit einem QR-Scan gestoppt werden
(und umgekehrt). Die einzige Anforderung ist, dass ein
Benutzer dafür dieselbe UID (einzigartiger Identikator,
der identisch sein muss) benutzt.
4. BEDIENUNGSANLEITUNG

EN DE
0512NM02INT01BEDIENUNGSANLEITUNG ENDKUNDE – P20
Schritt 3: Wenn der Start einer Transaktion/Session
initialisiert wird, werden die folgenden Bildschirme
angezeigt*:
*Außer, wenn die Anforderung für eine Transaktion/einen
Ladevorgang abgelehnt wird; siehe die nachstehenden
Fehlerbildschirme.
Bildschirm „Ladeanforderung Initiierung“
Die Ladesessions werden angefordert, und das
Ladegerät wartet auf die Autorisierung der Session.
Die letzten vier Zeichen des einzigartigen Identikators
(UID) der anfordernden Person werden auf dem
Bildschirm angezeigt.
Die Startwerte sind noch nicht festgelegt, werden
jedoch bereits angezeigt.
Ladebildschirm starten
Wenn die Anforderung für die Transaktion/Session
autorisiert ist, wird eine Transaktions-ID (L-TX-ID)
empfangen und auf diesem Bildschirm über der UID
angezeigt.
4. BEDIENUNGSANLEITUNG
Other manuals for Business Lite View
4
This manual suits for next models
2
Table of contents
Languages:
Other newmotion Batteries Charger manuals

newmotion
newmotion Business Pro 2.2 User manual

newmotion
newmotion Business Lite View User manual

newmotion
newmotion Home Standard User manual

newmotion
newmotion Home Standard 2.1 User manual

newmotion
newmotion Home Advanced Edition 7 User manual

newmotion
newmotion Home Advanced Edition 7 User manual

newmotion
newmotion Home Advanced RenaultEdition User manual