manuals.online logo
Brands
  1. Home
  2. •
  3. Brands
  4. •
  5. Nexa
  6. •
  7. Accessories
  8. •
  9. Nexa MLR-1105 User manual

Nexa MLR-1105 User manual

FEATURE:
• Self learning wireless (radio) system with 67 million
codes. Does not disturb neighbours/Neighbours do
not disturb you.
• 5 ringtones / 4 sound volume selections (High-Medi-
um-Low-Mute).
• 4 programmable memories.
• LED indicator for hearing impaired person.
• The doorbell/receiver is compatible with self learning
code transmitter, for example push button unit LMLT-
711 or motion detector LMDT-609 and magnetic
sensor LMST-606 as alarm system.
• Each transmitter can learn with the door chime via
different ringtone as door bell sound or alert sound.
• Operating distance 150 meter (in open field).
• Battery life 2 years.
INSTALLATION:
LMLT-711 Transmitter (Bell push unit)
• The push button unit can be attached to a flat wall
surface using either the double-sided adhesive tape
or the screws supplied.
• To match IP44 standard, LMLT-711 Transmitter must
be affixed with LED on top, push button on bottom.
• Or horizontal placed.
Self Adhesive strips:
• Ensure the surface is free from dirt and grease.
• Attach the self adhesive tab to the back cover of the
push button unit. Remove the protective film from the
double sided tape and press hard against the wall.
Mounting the push button unit using the screws:
• Unclip the cover from the bell push unit and using the
2 holes on the back of the bell as a template,
• Mark and drill the mounting holes and then attach the
push button unit using the screws supplied.
• Close back the front cover to complete the whole
push button bell transmitter.
MLR-1105 Receiver (chime)
Stand type door chime can be placed wherever the su-
itable place for sound clearly hearing or LED indicator
clearly visually.
LED indicator
Learning button
Button for selecting volume
Button for selecting ring tone
MLR-1105
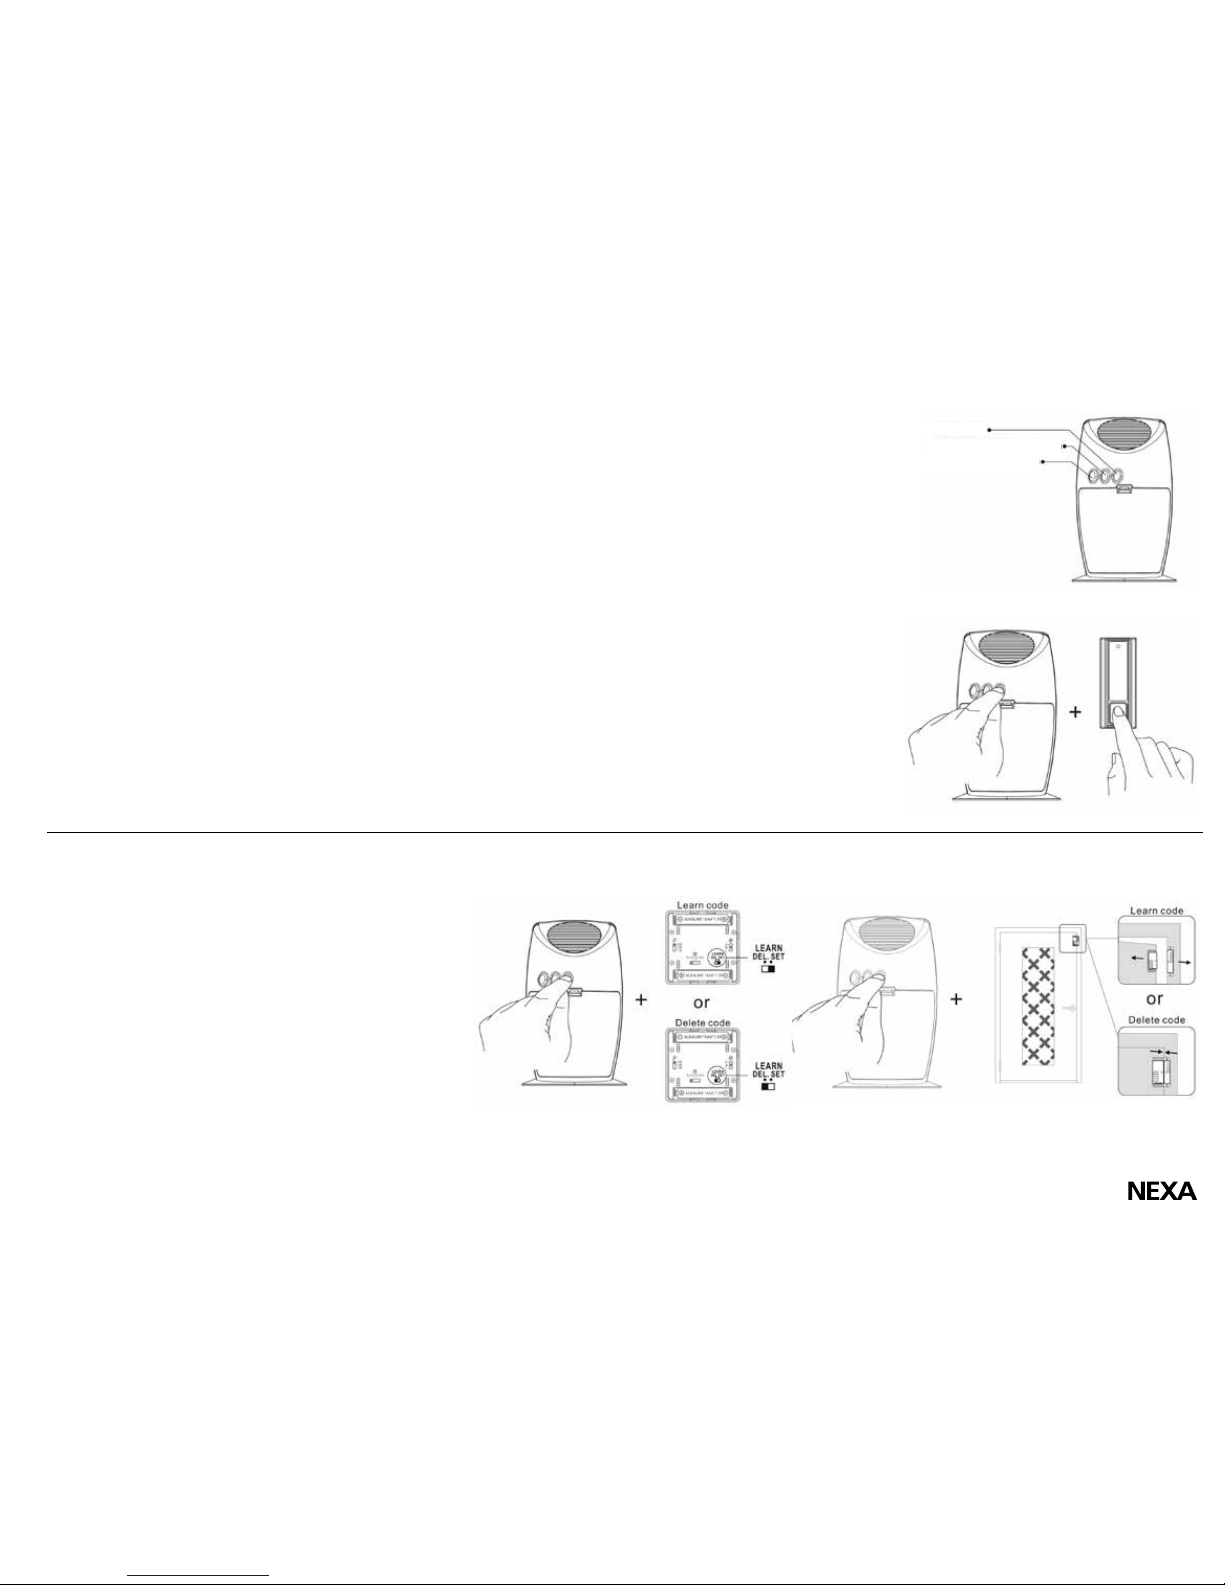
HOW TO SET CODES: Learning function
• Start by programming the transmitter (push button unit) with
the receiver (doorbell).
• First select the ring tone on the unit (button for ring tone).
• Press once on the learn button on the receiver (doorbell), A
beep is heard and the LED flashes slowly.
• The push the button on LMLT-711 (or slide the button to
”SET” on LMDT-609 or separate the parts of LMST-606 for
code learning) to send a signal to the receiver.
• Regardless of the set volume (or if the sound is muted) a
”beep beep” is heard from the receiver to confirm that setting
is complete. The LED stops flashing. Even if code leaning is
performed with the sound muted, the selected ring tone is
heard as one of the sound levels H, M or L is selected.
• Selected ringtone and the transmitter are programmed in one
of the memory of MLR-1105 at the same time.
• If the connection of the transmitter and receiver is not com-
pleted within 15 seconds of the learn button being pushed,
learning mode is cancelled automatically.
• Repeat procedure with different ringtone for different trans-
mitter setting.
• When 4 memories are fully programmed, receiver will make
”Du-Du-Du-Du” sound.
HOW TO DELETE CODES: Delete individual setting
• Press once on the learn button on the receiver (doorbell), A
beep is heard and the LED flashes slowly.
• Then push the button on LMLT-711 (or slide the button to
”DEL” on LMDT-609 or ”join” the parts on LMST-606 for code
learning to delete the code) to send a signal to the receiver.
• Regardless of the set volume (or if the sound is muted) a
”beep beep” is heard from the receiver to confirm that de-
letion is complete. The LED stops flashing. Repeat steps to
delete single memory from transmitters.
Delete all memory settings at the same time:
• Push the learn button on the receiver (doorbell) until a ”beep”
is heard. Then hold the button in for about 6 seconds until
another ”beep” is heard and the LED flashes.
• Release the learn button and quickly push it again. Regard-
less of the set volume (or if the sound is muted) a ”beep
beep” is heard from the receiver to confirm that deletion is
complete. The LED stops flashing.
• All memories are deleted once at the same time.
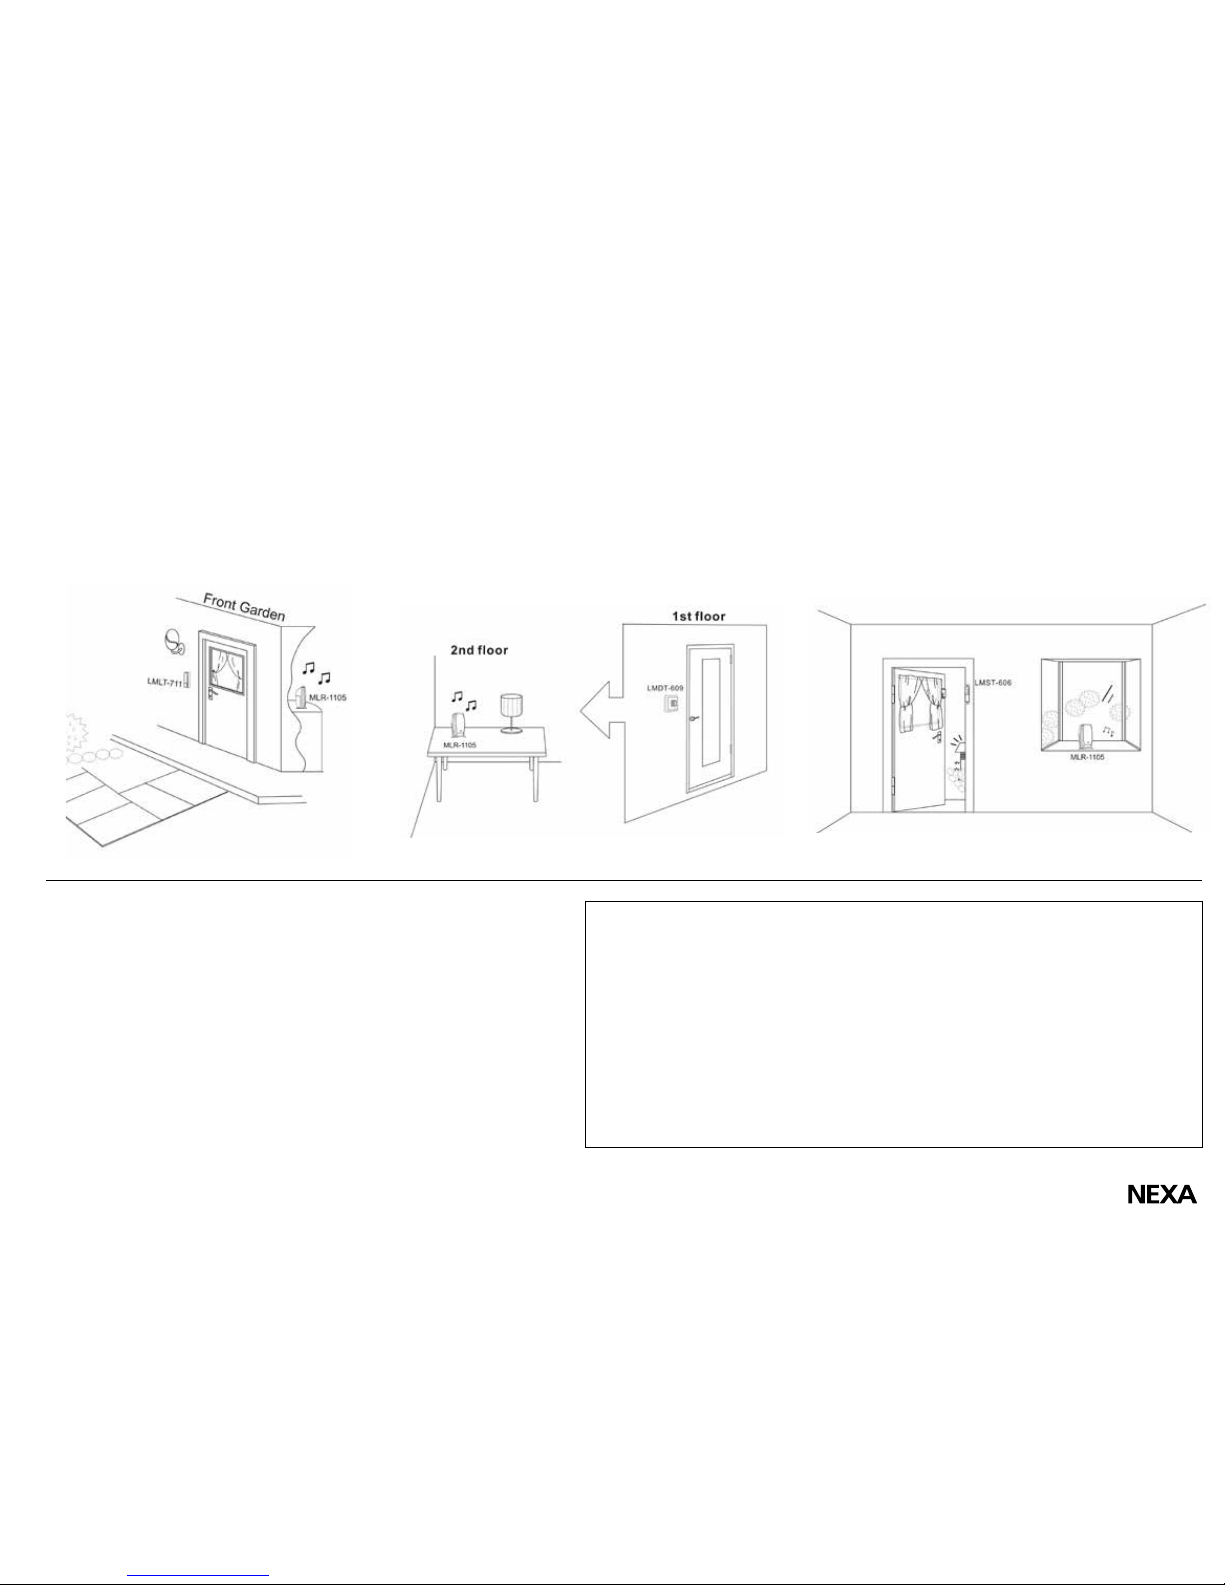
OPERATING TRANSMITTERS (such like LMLT-711, LMDT-
609 and LMST-606) and receiver chime unit:
• If the volume is set to ”High”, ”Medium” or ”Low” when the
doorbell receives a signal from any of the connected tran-
smitters, it gives a signal and the LED flashes continuously
for about 12 seconds. If the doorbell receives a signal from
another transmitter, during the first sound, it switches it off
and the new transmitter sound is heard, but the LED conti-
nues to flash.
• If the sound volume is setup at ”Mute”, when chime catches
a signal from the paired transmitter, the LED light starts
to flash for about 12 seconds. When the receiver catches
another signal from transmitter within the 12 seconds, LED
light flashing will stop for about 1 second and continue to
flash.
• When pairing the transmitter with MLR-1105, no matter the
sound volume is High, Medium, Low or Mute, it still can be
manually adjusted to any sound volume with last ringtone
when normal operation.
eller
eller
LED indicator
Learning button
Button for selecting volume
Button for selecting ring tone
APPLICATION IN BELOW EXAMPLE:
With transmitter:
LMLT-711 (push button/transmitter for doorbell)
• Setup with ringtone 1.
• Fix LMLT-711 on the outside wall.
• When people push the unit button, the signal tran-
smits to MLR-1105 to make ringtone 1 sounded as
door bell.
LMDT-609 (motion detector transmitter)
• Setup with ringtone 2.
• Fix LMDT-609 on the wall outside of the room or at
the entrance of the door.
• Position MLR-1105 on the top floor.
• When people walk inside the house passing through
LMDT-609, it detects body movement and sends
signal to MLR-1105 to make ringtone 2 sounded as
an alert.
LMST-606 (magnetic sensor transmitter)
• Fix LMST-606 on the door (or on the window).
• Put MLR-1105 by the window or any places where
can clearly hear the sound or see the LED flash indi-
cation.
• When people open or break in the door (or window),
detach parts of LMST-606 sending signal to MLR-
1105 making ringtone 3 sounded as an alert.
CHANGE BATTERY:
Transmitter
Unclip the front cover from the transmitter (push button unit)
using a small screwdriver.
Remove the battery and replace with a new ”CR2032”battery.
Ensure that it is inserted the right way up.
Replace the front cover making sure the clips are correctly alig-
ned and firmly push the case together.
Receiver
Take off the battery compartment cover.
Take out the batteries and replace with new fresh AA * 3 bat-
teries. Replace battery ready and correct, ”Du-Du” sound is
heard to confirm.
Close the battery compartment cover back to the
chime receiver completely.
SPECIFICATION
Receiver:
Frequency: 433.92MHz
Battery operated: 4.5 VDC (3 x AA)
Battery life: 2 years (dependent on battery
quality)
Ringtone: 5 kinds of sound
Volume: High - Medium - Low - Mute
Memories: 4 codes
Receiving distance: 150 meters (in open
field) while both receiver and transmitter are
will full or enough battery power.
Transmitter (LMLT-711):
IP-44 weatherproof approved.
Battery: CR2032 (included)
FAULT FINDING
No activation: Check the battery level and
polarity, replace the battery if necessary.
New codes cannot be learnt once all four
memories are full.
Extreme cold (-15 degrees and lower) can
affect the service life of the battery in the
transmitter.

Other Nexa Accessories manuals

Nexa LBST-604 User manual

Nexa

Nexa LBST-604 User manual

Nexa MLR-1923 User manual

Nexa

Nexa MLR-1923 User manual

Nexa MYCR-3500 User manual

Nexa

Nexa MYCR-3500 User manual

Nexa LMLR-710 User manual

Nexa

Nexa LMLR-710 User manual

Nexa PROLUX G 36W A User manual

Nexa

Nexa PROLUX G 36W A User manual

Nexa MYRC-2 User manual

Nexa

Nexa MYRC-2 User manual

Nexa CMA-968/10Y User manual

Nexa

Nexa CMA-968/10Y User manual

Popular Accessories manuals by other brands

Robus RCD1080-04 quick start guide

Robus

Robus RCD1080-04 quick start guide

Tekscan FlexiForce user manual

Tekscan

Tekscan FlexiForce user manual

Baumer FVDK 10N66ZR manual

Baumer

Baumer FVDK 10N66ZR manual

LeeBoy 8515D Operation, service & parts manual

LeeBoy

LeeBoy 8515D Operation, service & parts manual

Pluggit APFF Operating and installation instructions

Pluggit

Pluggit APFF Operating and installation instructions

Axis F2105-RE installation guide

Axis

Axis F2105-RE installation guide

P3 International Wicked Colors Q1048 user guide

P3 International

P3 International Wicked Colors Q1048 user guide

Pepperl+Fuchs IPT FP Series manual

Pepperl+Fuchs

Pepperl+Fuchs IPT FP Series manual

Banner Q3XTBLD150-Q8 instruction manual

Banner

Banner Q3XTBLD150-Q8 instruction manual

KIT PWRP6BKNK user manual

KIT

KIT PWRP6BKNK user manual

TP-Link HS105 quick start guide

TP-Link

TP-Link HS105 quick start guide

Raymarine 4000 mk2 Wheel Drive install guide

Raymarine

Raymarine 4000 mk2 Wheel Drive install guide

Bimar AP04 Instruction book

Bimar

Bimar AP04 Instruction book

Tridonic LCAI 2x038/0500 K013 one4all product manual

Tridonic

Tridonic LCAI 2x038/0500 K013 one4all product manual

Lamson & Sessions Libra Instructions for use

Lamson & Sessions

Lamson & Sessions Libra Instructions for use

Linea Domo DO9234EM Instruction booklet

Linea

Linea Domo DO9234EM Instruction booklet

Acconeer A111 user guide

Acconeer

Acconeer A111 user guide

SOL paragliders CXC manual

SOL paragliders

SOL paragliders CXC manual

manuals.online logo
manuals.online logoBrands
  • About & Mission
  • Contact us
  • Privacy Policy
  • Terms and Conditions

Copyright 2025 Manuals.Online. All Rights Reserved.