Nexxtender HOME User manual

User Manual
A Nexxtender Solution
HOME
ENT1

Contents
Introduction.............................................................................................................................................1
Details about the device, its function and its purpose
Definition of symbols............................................................................................................................. 1
Safety instructions.................................................................................................................................. 1
Limitation of liability............................................................................................................................... 2
Copyright..................................................................................................................................................2
Device description.............................................................................................................................3
Description of the device, with parts, technical data, and available options
Product overview.................................................................................................................................... 3
Box content...................................................................................................................................... 5
Main device parts.............................................................................................................................6
Technical data..........................................................................................................................................7
Certificates........................................................................................................................................ 8
Mechanical data............................................................................................................................... 8
Smart charging options................................................................................................................ 11
LED light codes..............................................................................................................................13
How to start..........................................................................................................................................15
Learn how to start using the device in a few simple steps
Set up the app.......................................................................................................................................15
Download........................................................................................................................................ 15
Sign up and register......................................................................................................................15
Sign in............................................................................................................................................. 16
Pair to a smartphone............................................................................................................................16
Daily use................................................................................................................................................. 18
Learn how to charge and change the settings of the device
Configure................................................................................................................................................18
Basic settings.................................................................................................................................18
Badges.............................................................................................................................................19
Charge.................................................................................................................................................... 19
Start a charge in open mode........................................................................................................19
i

Start a charge with the app.......................................................................................................... 20
Start a charge with a badge......................................................................................................... 20
Stop a charge................................................................................................................................. 21
Switch charging speed during charging.....................................................................................21
Live data visualisation.................................................................................................................. 21
Synchronise the data............................................................................................................................21
Update the software..............................................................................................................................22
App..........................................................................................................................................................22
Log out............................................................................................................................................ 22
Maintenance, cleaning and disposal..................................................................................23
Information about maintaining the device and end of lifetime care
Powerdale product limited factory warranty................................................................ 24
General information about the warranty and the return process
Warrantor................................................................................................................................................24
Warranty Eligibility................................................................................................................................ 24
Warranty Period.....................................................................................................................................24
Geographic Scope of Application....................................................................................................... 25
Warranty Coverage................................................................................................................................25
Warranty Exclusions.............................................................................................................................27
Impact of Warranty Coverage on the (Remaining) Warranty Period............................................... 28
Procedure to Exercise Rights under this Powerdale Limited Factory Warranty............................ 28
Final Validity.......................................................................................................................................... 29
Applicable Law and Place of Jurisdiction..........................................................................................29
Troubleshooting Home................................................................................................................. 30
Registration solutions.......................................................................................................................... 30
I cannot register the device..........................................................................................................30
Bluetooth Pairing solutions................................................................................................................. 30
I cannot pair through Bluetooth...................................................................................................30
Charging solutions................................................................................................................................32
Charging does not start................................................................................................................32
I cannot charge with my badge................................................................................................... 33
I cannot charge with the app....................................................................................................... 33
ii

My electrical protections activate when I plug in the charging cable......................................33
The current transformer is disconnected................................................................................... 34
The regulation does not work properly.......................................................................................35
The power supply cable is too loose.......................................................................................... 35
Charging is interrupted (LED turns off)...................................................................................... 36
Charging is interrupted (LED turns red)..................................................................................... 36
Unexpected behaviour during charging......................................................................................37
Synchronisation solutions................................................................................................................... 37
I don't see the live data as a driver.............................................................................................38
Reimbursement solutions.................................................................................................................... 38
Why do I need to provide my IBAN?...........................................................................................38
The reimbursement service is activated, but I don't receive money........................................38
Other solutions......................................................................................................................................39
I forgot my Nexxtmove password................................................................................................39
iii

Introducon
version: 20201216
Denion of symbols
Hazard statements
!
Notice: Indicates a potential situation which, if not avoided, might result in property damage or in
an undesirable result or state.
!
Caution: Indicates a potentially hazardous situation which, if not avoided, might result in minor or
moderate injury.
!
Warning: Indicates a potentially hazardous situation which, if not avoided, could result in death or
serious injury.
!
Danger: Indicates an imminently hazardous situation which, if not avoided, will result in death or
serious injury.
Others
i
Tip: Indicates a shortcut or any other useful indication.
i
Important: Indicates an important element to be borne in mind.
!
Attention: Indicates an element which requires extra attention, not necessarily a hazard.
Safety instrucons
!
Attention:
- The following safety instructions are intended to prevent hazardous situations and/or equipment
damage. Failure to follow the warnings and instructions may result in electric shock, fire and/or
serious injury.
- Please read this document carefully before using or interacting with the device. Keep this
document for future reference. If you have any further questions, please contact your supplier.
!
Notice:
- Do not remove any labels from the device.
!
Caution:
- Before installation, check for exterior damage. If any part of the device is damaged, do not install
it and contact your supplier.
- Never use the product with humid or wet hands or tools.
- Do not lean on, stack anything on top of, or hang anything from the holder or from the cables
leading to the Home holder.
- Avoid too much traction on the cables.
- Do not step on, fold or knot the cables. Never use the cables as a rope.
1

- Never use the product or the cable near a heating source.
- Never use the product or the cable in the vicinity of flammable substances.
!
Warning:
- In case of danger or accident, ask a qualified person to turn off the power.
- The Home environment must only be used for charging an electric vehicle.
- This product must only be installed, repaired and maintained by qualified personnel. A qualified
person is someone who is familiar with the installation, configuration, operation or maintenance
of the equipment and the hazards involved. If commissioning and start-up of the charging device
is necessary, the person must have knowledge of electric vehicles, including the ISO 61851-1
standard.
- The product is not intended for use by young children or any person not capable of assessing
the risks. Do not allow children to play on or with this device.
- Do not apply force when reattaching the charging connector to the Home holder.
Limitaon of liability
!
Attention:
- Powerdale waives all liability for any possible damage resulting from inspection flaws or lack of
maintenance, shock, humidity, corrosion, contamination, heat or resulting from the fact that the
products were used for purposes other than those for which they were originally intended.
- Powerdale will not in any instance be liable for loss of profits or halting of activities, for loss of
data (including but not limited to any costs whatsoever for data recovery and restoration), loss of
contracts, loss of activity, loss of good will, financial costs, loss of financial interest or any indirect
or consequential damage, whatever the cause of action or the legal basis on which this claim is
based.
- The cumulative liability of Powerdale with respect to the scope of application of the present
conditions, for both contractual and extra-contractual damages, will in any case be limited to EUR
250,000(two hundred fifty thousand euros) or to the selling price if this is lower.
Copyright
No part of this document, either extracts of in full, may be distributed to any other party without the written
consent of Powerdale NV/SA.
Subject to change without notice. Find the latest version of this manual on www.powerdale.com/
documentation.
2

Device descripon
Product overview
The Home is a charging solution to easily and safely charge an electric vehicle at home, while optimising
charging speed and available power.
Home set-up
Home Type 1
3
One device for any kind of house and any kind of vehicle
The Home can be installed in any house and can be used in any grid connection type, providing full
compatibility in any electrical configuration:
- Single-phase
- Three-phase
- Three-phase with neutral
In addition, the device is compatible with all car manufacturers and all types of vehicle:
Plug-in hybrid Full EV
Type 1 connector
Type 2 connector
Adapts to the user's behaviour for increased safety
The Home will automatically adapt to behaviour of the users to give you peace of mind. You do not need
to take the charging process into account when switching on other household appliances. The device
will take all sources of electricity consumption into consideration and adapt to keep charging the vehicle,
while always keeping household appliances running.
Smart grid ready and economical
By using a power optimisation algorithm, the Home avoids injecting power on the grid. Local electricity
production is self-consumed to optimise charging costs. Choose from two charging modes:
- Max Mode maximises charging speed by:
- Combining maximum available grid power with local production.
- Dynamically adapting charging power by taking the physical limits of the electrical installation
into account at all times for maximum security.
- Eco Mode optimises electricity consumption economically by:
- Making maximum use of night and weekend tariffs.
- Optimising self-consumption of local production.
Connected
The Home is connected through Bluetooth Low Energy (BLE 4.2) and managed through Nexxtmove. The
app is used for:
- Synchronising data with cloud storage.
- Updating software & protocols.
- Adding improved and/or new features.
4

The device is also Wi-Fi ready. A future remote update will activate the built-in Wi-Fi module and provide
an additional connectivity method, with the following advantages:
- A permanent connection between the device and cloud storage for continuous synchronisation.
- Easier software and protocol updates: direct connection to the internet instead of through the
Bluetooth connection on a smartphone.
- Activation of new services, such as the possibility to enable external tokens to let other users use
the charger.
Flexible and easy access
Choose or combine different access modes for more convenience:
Access mode Description
Open access mode No identification or authentication: Charging starts when the connector is
plugged in to the vehicle.
Nexxtmove(app)
1. App as key: The device detects the smartphone and automatically starts
charging when the connector is plugged in.
2. Start button on the app: Choice between Eco or Max charging mode.
Badge Simply swipe a badge to start charging(1)
when the connector is plugged in.
Box content
The Home box contains the following:
The Type 1 Home package contains:
1. The Home device.
2. The Type 1 holder for the connector, to insert the connector when the device is not in use.
3. Universal Spit Pro Fixings:
- Four screws and four wall plugs (8x40mm) to secure the device.
- Four screws and four wall plugs (6x30mm) to secure the holder.
4. The charging cable with Type 1 connector.
(1) The badge must be added and configured through the app before use, for example to always enable Max Mode (see: Configure (on page 18) ).
5
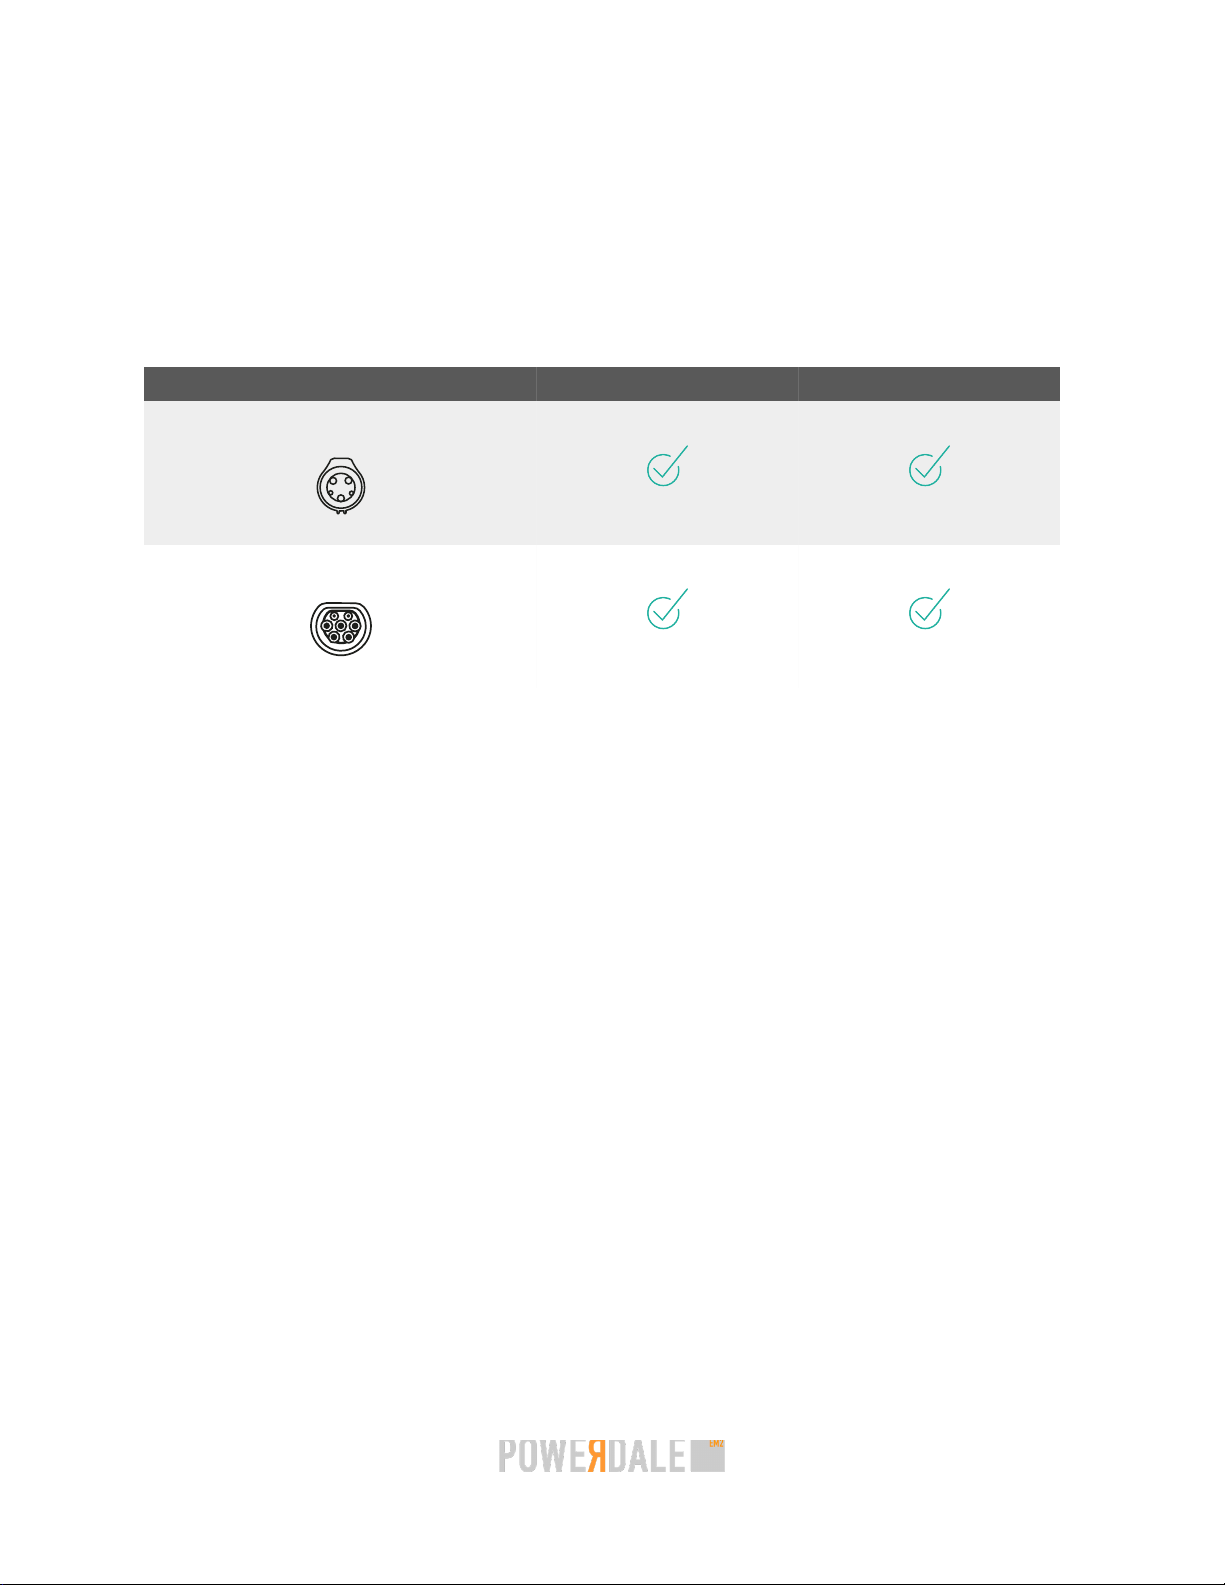
5. Three current transformers (CT) + RJ45 connector(2):
- Used for building energy measurement and connected to the adaptor.
- The adaptor provides a RJ45 interface that connects to the Home.
6. Two RFID badges, ready to be configured and suitable to be attached to a key chain.
Also in the box (not pictured above)
- Documentation:
- A quick guide to help the driver start using the device.
- A QR code is available inside the box which links to a quick guide that guides the installer
through the installation process.
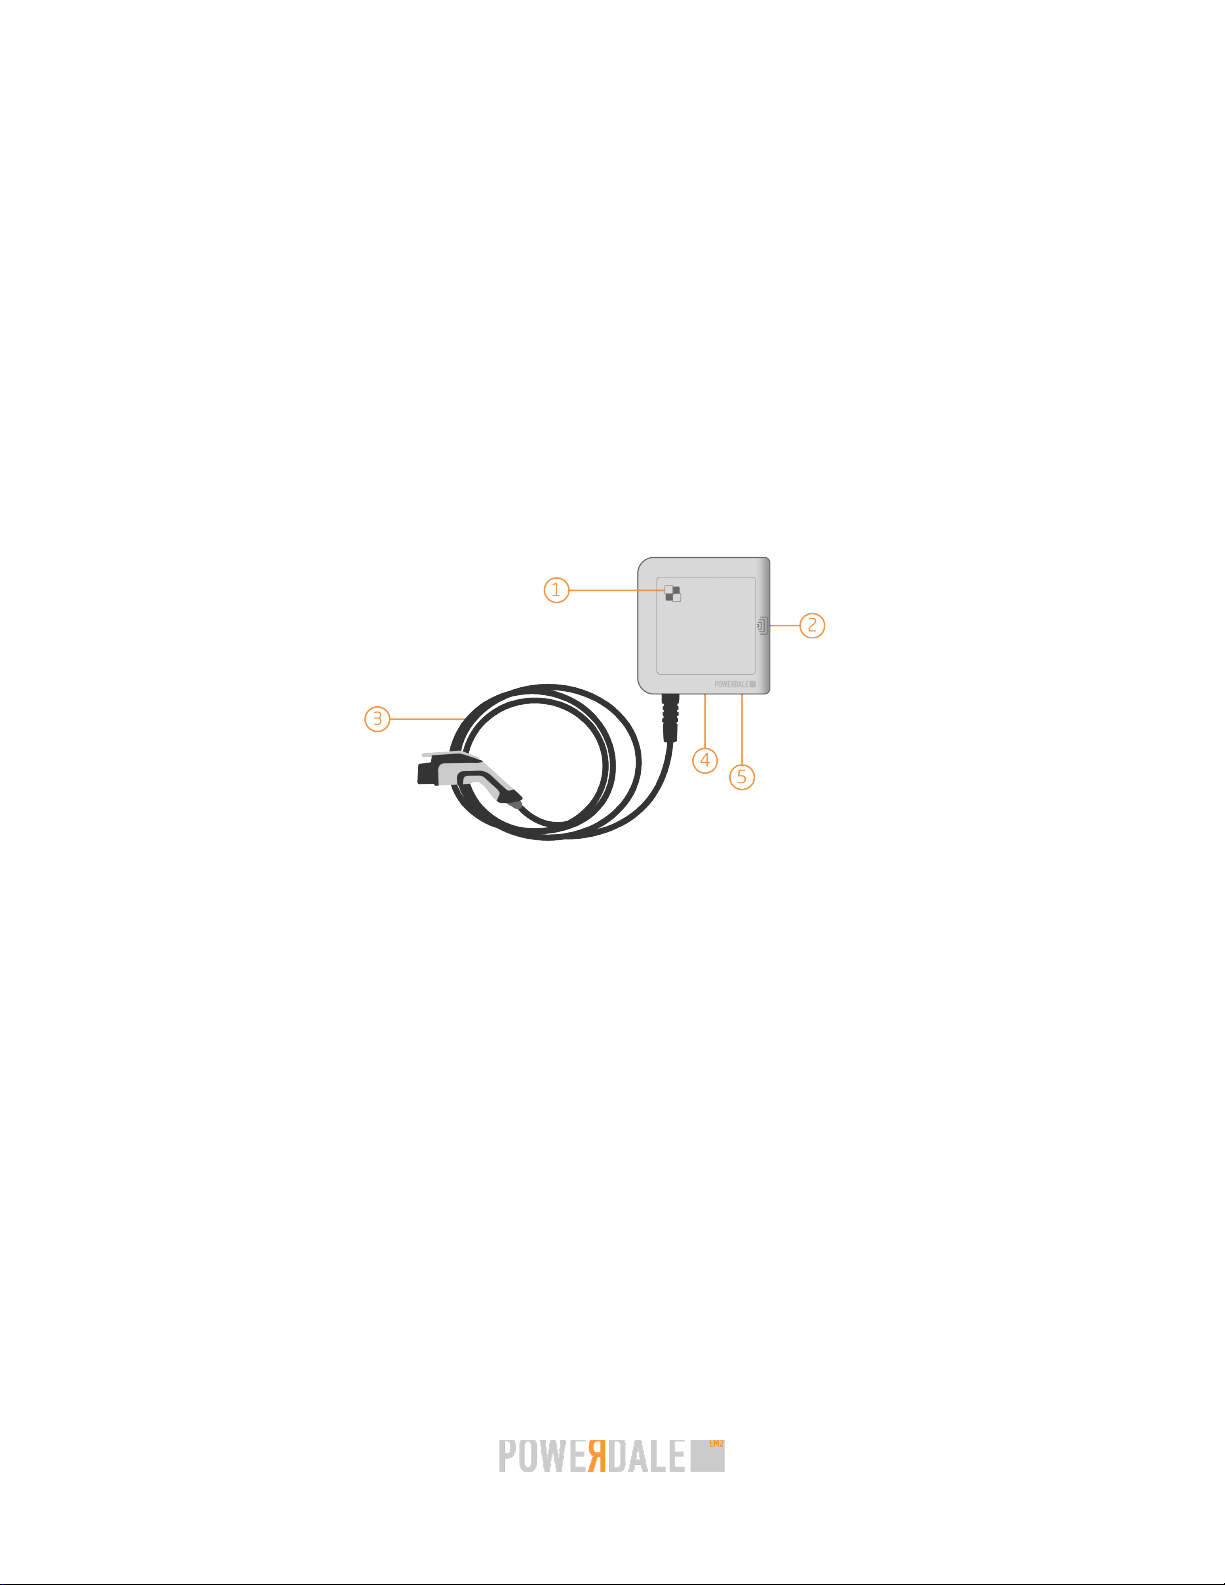
Main device parts
1. Status LED indicating the current mode of the device (see LED light codes (on page 13))
2. RFID reader enabling the user to identify and start charging by swiping with a configured RFID
badge
3. Charging cable with a Type 1 connector linking the Home to the vehicle
4. Power cable entry connecting the Home to the buildings electricity supply
5. Ethernet cable entry (RJ45) connecting to the external meter connector (+ Input for load shedding
signal(3))
(2) The RJ45 cable itself is not included.
(3) For example Smarty smart electricity meter (applicable in Luxembourg).
6

Technical data
FEATURES
Charging points 1
Access mode RFID reader or via the Nexxtmove
Nexxtmove app (compatible with Android 5.0 and higher & iOS 8 and
higher)
Memory Data back-up based on an average of one charging session/day: Up
to one month of charging sessions and up to one week of measure
ments and events
Metering Integrated Class 1
Class 1-Up to 80 A provided with the device for main supply mea
surement
Smart charging Two modes:
- Max: Maximise charging speed
- Eco: Optimise consumption of local production & make use of night/
weekend tariff (when applicable)
User interface Status LED indicator
ELECTRICAL
Charging connector type Type 1 connector on integrated cable
Cable Length 4 m or 6,5 m (option)
Charging output current 32 A single phase
Input voltage 3 x 400 V AC + N and 1 x 230 V AC
Grid Frequency 50 Hz
Charging output power From 1,4 to 7,4 kW
Can be limited to 11 kW to comply with local regulations
Standby consumption 5 W
Charging mode Mode 3 per IEC 61851-1:2017
Electrical safety Residual Current Monitoring per IEC 62752:2016 (AC 30 mA - DC
6 mA)
COMMUNICATION
Connectivity Bluetooth Low Energy (BLE 4.2)
!
Attention: Bluetooth connectivity can vary from phone to
phone. Consult the FAQ page on the Powerdale website for more
information.
Wi-Fi ready. A future remote update will activate the built-in Wi-Fi
module and provide an additional connectivity method
7

MECHANICAL
Material ABS-PC & PC
Weight Type 1 with:
- 4 m cable: X kg
- 6,5 m cable: X kg
Dimensions (HxWxD) 25 x 25 x 6 cm
Ingress protection IP 55
ENVIRONMENTAL
Operating Temperature -25° C to + 40° C
Operating Humidity Up to 95% non-condensing
MAINTENANCE
Remote Update Software update can be done remotely via the Nexxtmove
The technical characteristics are subject to change without further notice.
Cercates
The Home is certified:
- IEC 62196-1, Plugs, socket-outlets, vehicle connectors and vehicle inlets – Conductive charging
of electric vehicles – Part 1: General requirements
- IEC 62196-2, Plugs, socket-outlets, vehicle connectors and vehicle inlets – Conductive charging
of electric vehicles – Part 2: Dimensional compatibility and interchangeability requirements for a.c.
pin and contact-tube accessories
- IEC 61851-1:2010, Electric vehicle conductive charging system – Part 1: General requirements
- IEC 61851-1:2017, Electric vehicle conductive charging system – Part 1: General requirements
- IEC 60364-7-722, Low-voltage electrical installations – Part 7-722: Requirements for special
installations or locations – Supplies for electric vehicles
- IEC 62335: 2008, Circuit breakers – Switched protective earth portable residual current devices
for class I and battery powered vehicle applications
- IEC 60309-1:1999, Plugs, socket-outlets and couplers for industrial purposes – Part 1: General
requirements
Mechanical data
The mechanical dimensions and cover placement of the Home.
8

9
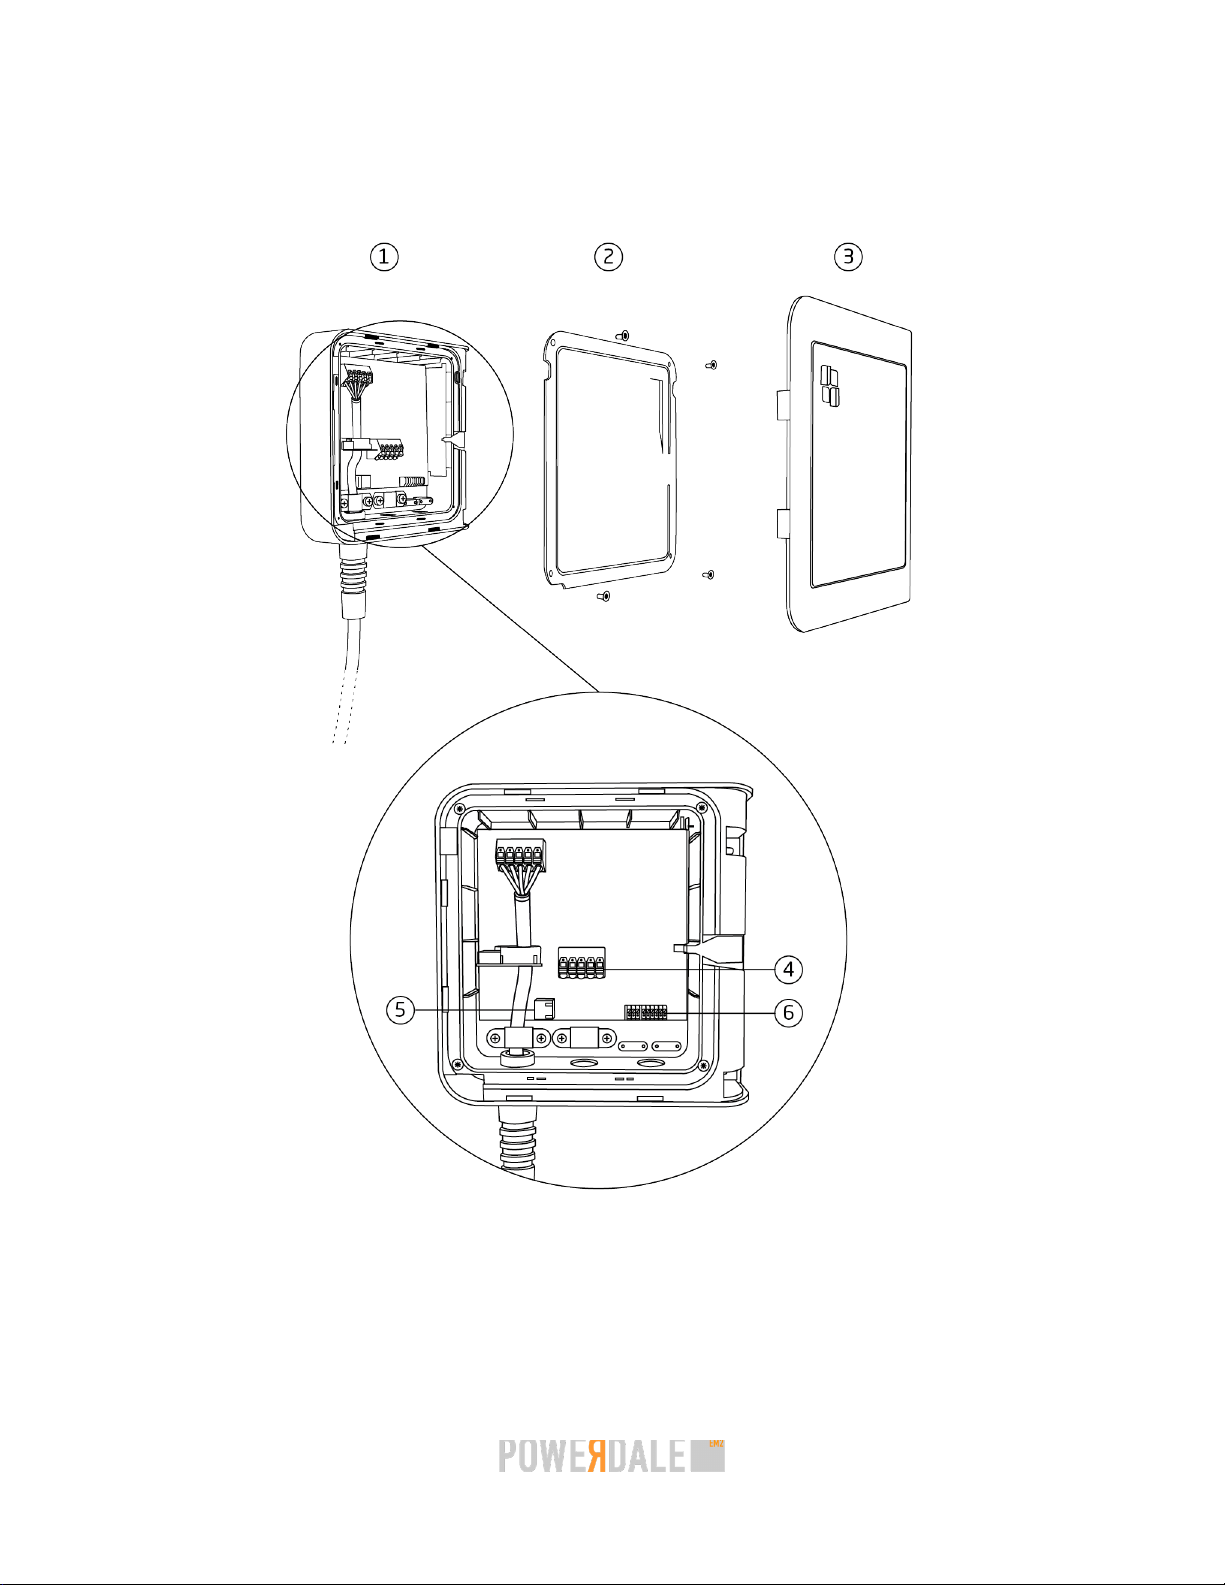
Figure 13: Exploded view
1. Housing
2. Internal cover (translucent)
3. External cover
4. Terminal block
5. Ethernet port (external meter connector)
6. Digital input for load management
10

Smart charging opons
Max Mode
This is the fastest charging mode, that at the same time guarantees a secure supply to all household
appliances.
In Max Mode, the Home dynamically charges any electric vehicle with power from the grid plus local
production(4), minus what is already consumed by the building (microwave, dishwasher, oven, washing
machine...).
Use case examples of charging in Max Mode:
Day Evening & Night
Situation: An electric vehicle is charging, and
there is less consumption by household appli
ances. The sun is shining and there is plenty of
local production (for example from solar panels).
Result: the vehicle is charged by local generation
plus all the available grid power not consumed by
the building.
Situation: An electric vehicle is charging, and mul
tiple residents are home cooking, watching TV,
using computers. The sun is down, there is no/
less local production.
Result: the vehicle is charged by all the grid power
(on night tariff) not consumed by the building.
Figure 14: Visual representaon of Max charging mode
(4) If applicable: Local production of electricity requires solar panels, wind or hydropower installations or cogeneration. The external meter connection must
be far enough upstream in order to integrate the local production and the household consumption.
11

Icon Description
Night time (uses cheaper night tariff(5))
Day time (more local production)
Amount of charging power available to the car
Amount of power consumed by the house
Surplus local production available to the car
Power
Time
Local production through time
Eco Mode
This is the most economical charging mode using either the surplus of local production (during daytime),
or the cheaper night/weekend tariff.
In Eco Mode, the Home charges the electrical vehicle with power from the grid (when the cheaper
night/weekend tariff applies) plus local production minus what is already consumed by the building. This
charging option is optimised ecologically and economically.
Use case examples of charging in Eco Mode:
Day Evening & Night
Situation: An electric vehicle is charging and there
is less power consumption by household appli
ances. The sun is shining and there is plenty of
local production (for example from solar panels).
Result: Charging is kept to a minimum and the ve
hicle is charged only by local generation(6).
Situation: An electric vehicle is charging and mul
tiple residents are home cooking, watching TV,
using computers. The sun is down, there is no/
less local production.
Result: The vehicle is charged by all the grid pow
er (on night tariff) not consumed by the building.
(5) Applies 24/24 during the weekend
(6) A minimum of 6 A is always provided to avoid interruption of the charging session by the battery management system of the car.
12

Figure 15: Visual representaon of Eco charging mode
No day/night meter?
There are two options if you cannot take advantage of night/weekend tariff:
- Do not configure Eco Mode: charge at regulated maximum speed without Eco Mode.
- Configure Eco Mode with specific time slots for fast charging.
LED light codes
The LED lights on the external cover provide you with information on the current state of the Home.
LED State
Glowing slow
Glowing fast
Charging - Slow
Charging – Fast (Max Mode or Eco Mode during the night)
Blinking End of charge
Blue
Solid blue Plugged but not charging
Solid green Available
Green Blinking Charging session authorized (Bluetooth detected, badge
swiped, …)
Solid red Error (all types except if described elsewhere in this table)
Red Blinking Error (RCM(7)
triggered)
(7) Residual Current Monitor
13


How to start
Set up the app
Download
1. For iOS users:
a. Go to the Apple App store.
b. Search for Nexxtmove.
c. Tap Download.
Result: Downloading will start.
2. For Android users:
a. Go to the Google Play store.
b. Search for Nexxtmove.
c. Tap Download.
Result: Downloading will start.
Sign up and register
Context:
To create a new user account and register the Home:
1. Open the Nexxtmove app.
2. Tap New user.
3. Choose the language of choice and tap Next..
4. Read the Terms and Conditions & Privacy Policy and select the checkbox next to 'I have read and
agree to the terms of service'.
5. Tap Next.
6. Fill in the required personal information:
a. Required: Username, Password and Confirm password
b. Required: Contact information
c. Optional: Address
7. Select Home from the list of devices and tap Next.
8. Enter the serial number of the Home and tap Next.
i
Tip: You can find the serial number (SN) on the sticker on the right side of the bottom of
the device.
15

Figure 16: Example of serial number
i
Tip: You can also scan the QR code on the right side of the sticker.
9. Optional: Enter a bank account number (IBAN).(9)
10. Tap Save to finish the registration process after checking the summary.
Sign in
Context: If you have already used the app or previously created an account on the cloud platform, you
can immediately sign in with username and password and register the device.
1. Open the Nexxtmove app.
2. Enter the sign in details.
i
Tip:
- If you forgot it, you can request a new password (see: I forgot my Nexxtmove
password (on page 39)).
- Logins and passwords are case-sensitive.
3. Tap Sign in.
4. Complete the registration procedure as described in Sign up and register (on page 15).
Pair to a smartphone
Context:
To pair a device to a smartphone, it must be Registered to an existing account. You can register a new
device directly from the app in the Registered devices page.
1. In the My devices panel, select a device.
2. Below the status line, tap Pair my device.
3. Read the Important safety instructions, and confirm that you have understood them.
4. Tap Pair my device.
i
Important: If you are using an Android phone, skip step 5.
5. When requested, enter the PIN code in the pop-up window.
(9) This step will only appear when creating a new user and if the device has the optional reimbursement service.
16
Table of contents


