NGM STORM User manual

Seng up
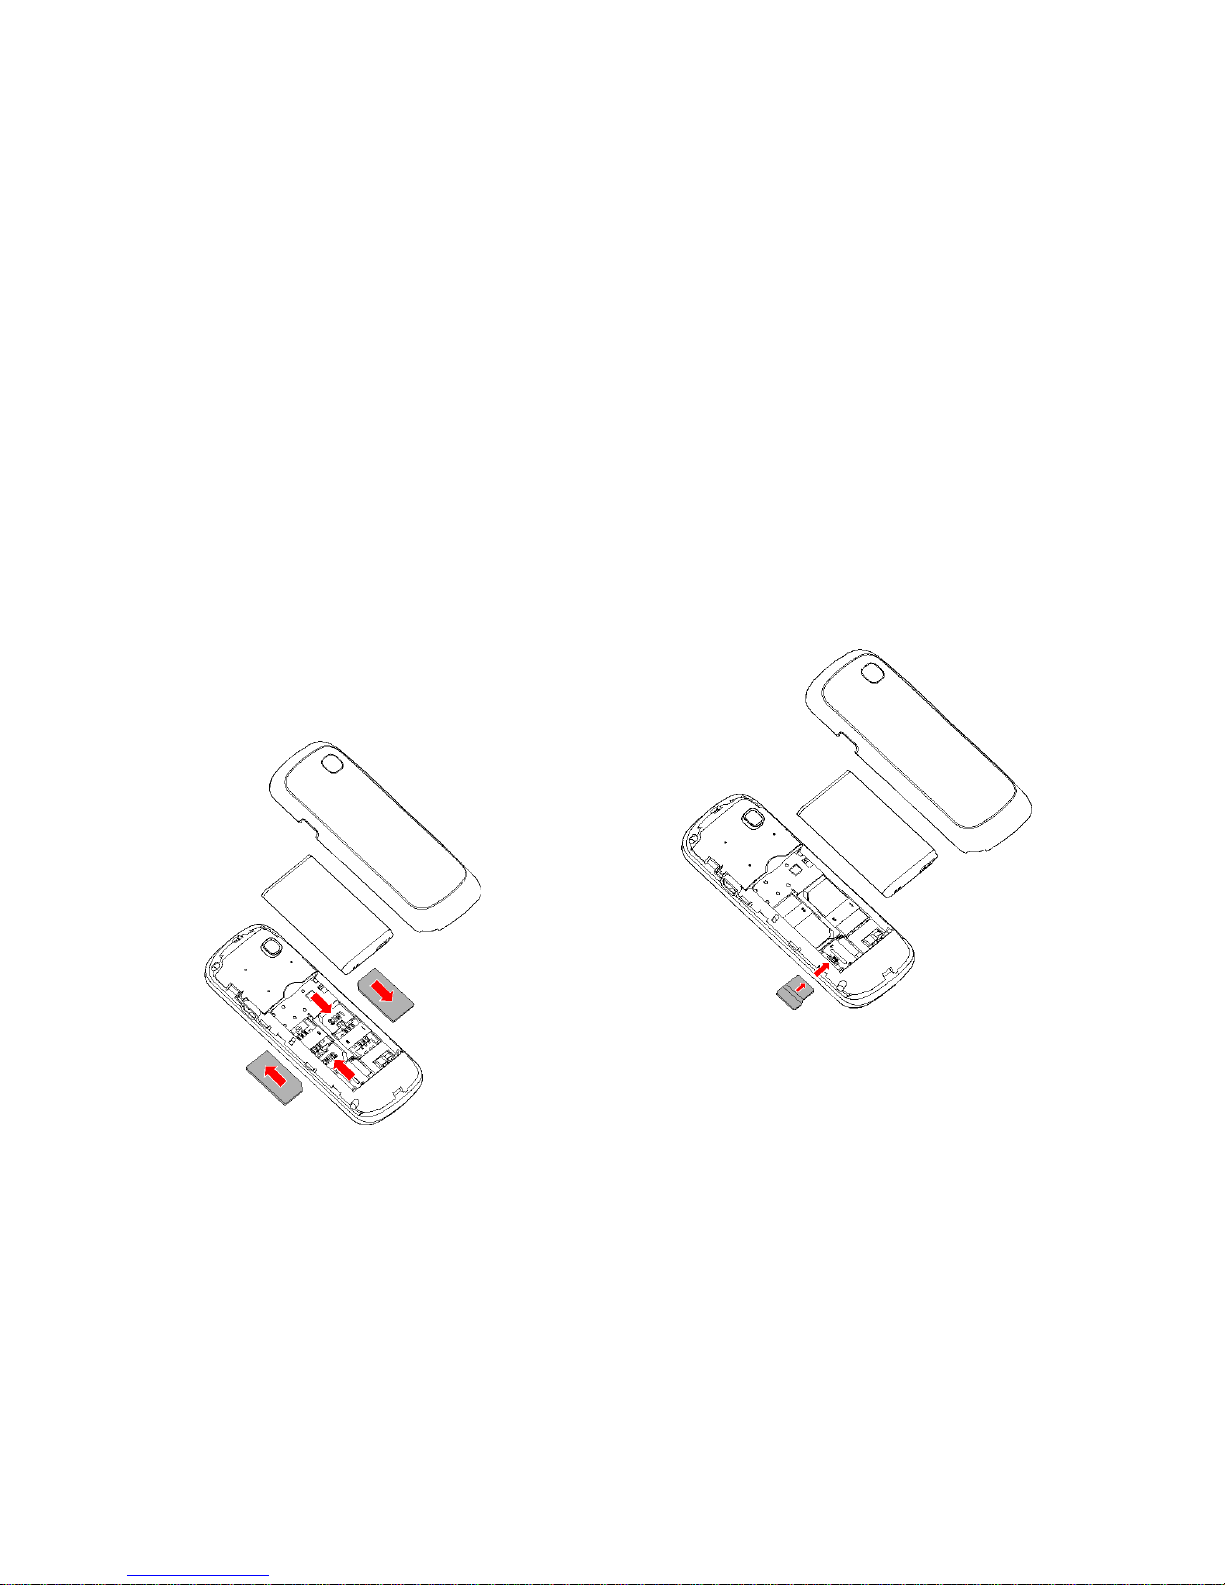
Installing the SIM card
The SIM card stores informaons as your personal phone
number, PIN code, carrier services numbers, contacts and other
important details.
Both SIM cards must be inserted in the slots placed on the back
side of the phone. In order to access this area, the phone must
be powered off and the baery removed.
SIM cards must be inserted with the gold contacts facing down
and the notched corner facing outwards. See the diagram
below:
Installing the Memory card
MicroSD card must be inserted, as for the SIM cards, in the
back side of the phone, aer powering off the phone and
removing the baery. A dedicated slot for the memory card
is placed beside the SIM cards. Slide the memory card into its
slot, with the gold contacts facing down.
See the diagram below:
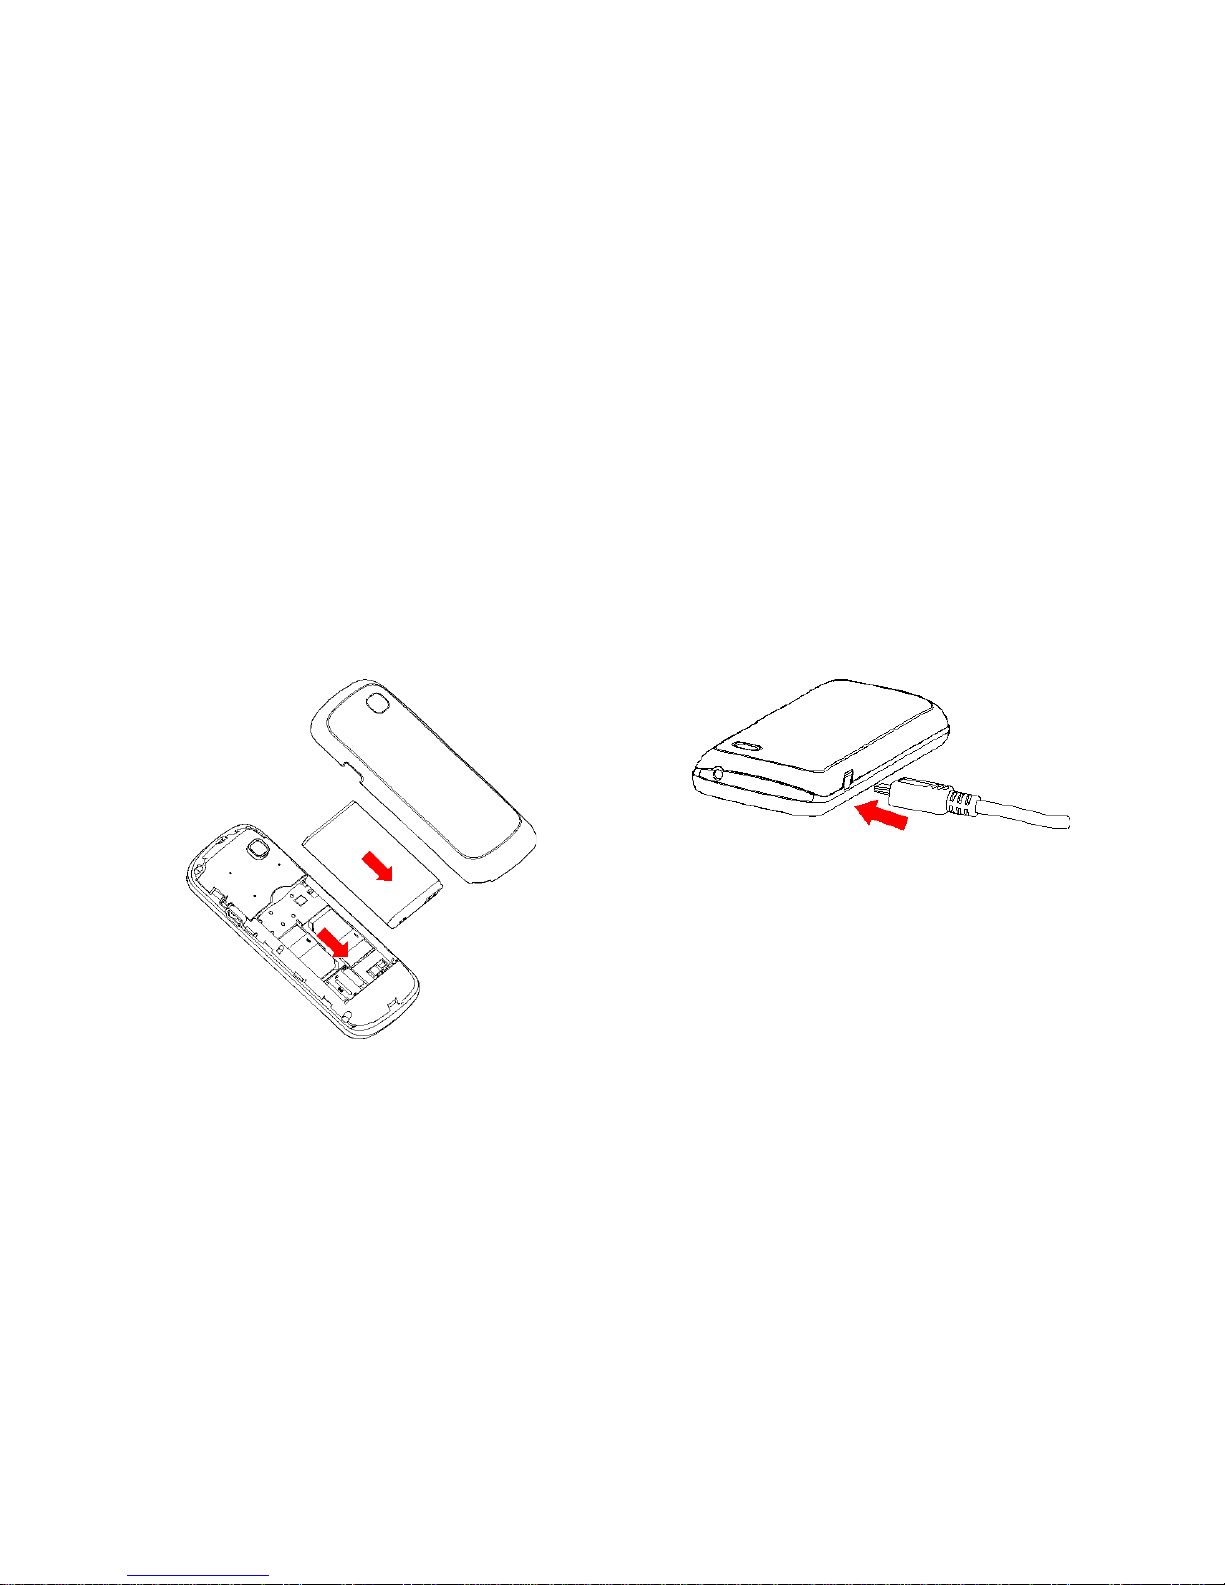
Inserng the baery
Your device is provided with a lithium-ion baery and is
designed to be used exclusively with original NGM baeries
and chargers. The baery must be inserted from the backside
of the phone. Align the baery contacts with the phone
connector inside the dedicated slot, and let it slide down in
posion.
See the diagram below:
Once the baery is inserted, close the rear cover by gently
pushing it in posion.
Charging the baery
Please charge completely the baery before starng to use the
device. Use the USB cable provided, and connect it one end to
the USB connector placed on the right side of the phone, and
the other end to the wall socket adaptor provided.
See the diagram below:
When baery is charging, an animated icon on screen will show
the charging progress. Once the progress bar is completed
phone can be disconnected from the grid.
Note: use only the provided USB cable for recharging the
device. Charge the baery indoors in a dry and favourable
environment. It’s normal for the baery to get slightly warm
during the charging process. The baery will not reach the full
capacity unl cycled several mes.

CAMERA
EARPIECE
LCD
Main funcons
END KEY
(POWER
ON/OFF)
SIM1
CALL KEY
BACK KEY
NAVIGATION
KEYS
MAIN KEY
(OK)
SIM2
CALL KEY
STANDARD KEYPAD
USB CHARGING
PORT
LED FLASHLIGHT

Main screen
What you nd on main screen
NOTIFICATIONS BATTERY LEVELSIGNAL STRENGHT
CALL LIST
SIM1/SIM2
OPERATORS
MAIN MENU PHONEBOOK
Main menu
What you nd on main menu
SCREEN 1
SCREEN 2
MESSAGING PHONEBOOK
CALL HISTORY SETTINGS
MULTIMEDIA
GAMES
ORGANIZER
FILE MANAGER

Making a call
Making a voice call
1. From the main screen, digit the phone number to call using
the telephone keypad.
2. Select the SIM card you want to use, by pressing the SIM1/
SIM2 call keys.
3. To end the call, press the End key.
Managing contacts
Adding new contacts
1. From the main screen, press the BACK buon (RIGHT
FUNCTION KEY) to open the Phone book.
2. Click Add contact and select the locaon where you want to
save the new contact (Phone or SIM1/SIM2).
3. Enter name and contact number, and any other details
(when saving to phone).
4. Conrm saving.
Adding new contacts from Call List
1. From Main screen, select Menu.
2. Select CALL LOGS > Call History > SIM1 or SIM2, then
choose the contact number you want to save (scrolling the list
including Missed calls, Dialled calls and Received call.
3. Click Opons, then Save to Phonebook > Add contact.
4. Conrm saving.
Seng ringtones
Select a ringtone
1. From Main screen, select Menu.
2. Select USER PROFILES > General, then select Opons >
Customize > Tone setup > Incoming Call (SIM1 or SIM2).
3. Select the desired ringtone from the list, then click OK.
4. It is possible to add a customized ringtone. From Incoming
call menu (SIM1 or SIM2), select an empty slot at the boom
of the ringtones list, then click Add and choose one .mid le
from folders in the phone memory or memory card.
Note: It is possible to use only les in .mid format. The
same procedure is of course applicable also to other proles
contained in User Proles menu.

Keypad lock and Shortcuts
Locking the keypad
1. From main screen, press and hold the main key (OK) for 3
seconds
2. This will lock immediately the keyboard.
3. To unlock, briefy press OK key.
4. You will then be prompted to press ”*” key, and this will
unlock the keyboard.
Last call redial
1. From main screen press SIM1 or SIM2 call key to access the
Dialled Calls list for both SIM cards.
2. Select a contact or number from the list, then press the SIM1
or SIM2 key to make the call.
How to enable or disable vibraon
1. From main screen, press and hold the # key to quickly turn
on Vibrate mode and to turn off the ringer .
2. By pressing and holding the same key again, the previous
user prole will be restored.
Listening to FM radio
Funcon keys for FM radio
1. In MULTIMEDIA > Radio mode, press OK key to turn on/off
the FM radio.
2. Use the “up/down” navigaon keys to set the volume;
the “le/right” navigaon keys allow to manually tune the
channels (each push will go forward/backward through staons
0.1 MHz steps).
3. From the Opons,you can also launch the Auto channel
search funcon.
Select a language
Language and Input mode
Italian is the language by default and as input mode. For
different areas, there are 4 languages available (English,
French, Spanish, German) with the corresponding input
modes.
How to change the menu language: from Main menu select
Sengs > Phone sengs > Language > [select a language].
How to change the input language: from Main menu select
Messages > Write message > Opons > Wring language >
[select a language].

Sending and reading messages
Sending SMS
1. From Main Menu screen, select MESSAGING > Write
Message for quick access to text entry screen.
2. Enter text using the standard keyboard.
3. Once the message is ready, press OK to choose whether
to insert recipient’s number directly or retrieve it from the
phone book.
4. Select which SIM to use to send out your SMS.
Taking pictures
Take a picture, then view it
1. From MULTIMEDIA > Camera, press OK key to take a picture.
2. Use Opons to access the Camera sengs and Image
sengs submenus, and change shoong sengs and image
size and quality.
3. When the picture has been acquired, use MULTIMEDIA >
Images funcon to view the photo.
4. From Camera sengs you can change the locaon where
les are saved (phone or memory card).
How to organize your day
Tools and applicaons in ORGANIZER
Alarm uses a format similar to a digital clock. There are three
different opons for the alarm, and they can be acvated
either individually or globally according to your own needs.
When the me is reached, the mobile phone will give out alert
tone and icker the current me on the screen. Press Stop to
stop alarm clock; press Snooze, then the mobile phone will
pause ringing and connue aer a given me period.
If alarm me is reached but the mobile phone is switched off,
then the mobile phone will be switch on automacally and
ring. If Stop is pressed, then the mobile phone will ask you
whether to switch on the mobile phone.
Calculator allows you to use the navigaon keys to select the
desired arithmec operator ( “+” up, “-“ down, “x” le and “:”
right) and make simple calculaons. Press the Back key to clear
the latest inputs or results digit by digit; press the Back key
longer to clear all content or result. Press “OK” key to obtain
the result.

Seng up and customizing
Contents of SETTINGS Menu
SETTINGS menu grants access to various customizaons:
• User proles - to freely change the User proles (see also
“Seng ringtones”): General, Meeng, Outdoor, Indoor, or
Headset.
• Time and date - to set date and me, change the display
format, enable auto update of date and me.
• Display - to customize wallpaper, LCD backlight and
brightness.
• Phone sengs - to modify various phone sengs as
language, shortcuts, auto keypad lock, input method.
• Network sengs - to choose between automac or manual
network selecon and to create a list of preferred networks.
• Security - to enable/disable the phone lock and change its
password.
• Restore factory sengs - to reset your device to the original
sengs. The password required to perform this operaon is
“1122”.
Using the ashlight
The LED ashlight
The phone comes equipped with a LED ashlight (see the
images showing the phone in full).
In idle mode, press the navigaon key “down” (characterized
by the symbol) to turn on the ashlight.
The ashlight will stay lit unl the next press of the key.
SIM cards conguraon
Disabling one of the two SIM cards
1. Aer turning the phone on, with two SIM cards inserted,
you can choose to enable either (or both of) SIM1 or SIM2.
2. Select Only SIM1 open or Only SIM2 open and conrm.
Note: if only one SIM card is currently inserted in the phone, the
dialog box won’t appear on start-up.

S.A.R. (Specic Absorpon Rate)
SAR certification information (Specific Absorption
Rate)
This phone meets European Union (EU) requirements concerning
exposure to radio waves coming from telecommunicaon and
radio devices. The exposure standard for
mobile phones employs a unit of measurement known as SAR
(Specic Absorpon Rate).
The SAR limit recommended by the EU Council is 2.0 W/kg
averaged over ten grams of body ssue.
Cercaons
Declaraon of Conformity (R&TTE)
We, NGM Italia
declare under our sole responsibility that the product idened as
GSM Mobile Phone: Storm
conforms to the following standards and specicaons:
Health EN 50360, EN 62209-1
Safety EN 60950-1+A11
EMC EN 301 489-1/-7/-17
Radio EN 301 511
EN 300 328
We declare that [all the series of fundamental radio test have
been conducted and that] the aforesaid product meets all the
essenal requirements of the Direcve 1999/5/EC.
The conformity assessment procedure referred to in Arcle 10
and detailed in Annex IV of Direcve 1999/5/EC has been followed
with the involvement of the following noed bodies:
PHOENIX TESTLAB GmbH
Königswinkel 10, D-32825 Blomberg, Germany
All technical documents conserved at
NGM Italia S.r.l.
Available on request.
(UE Authorized Representave)
NGM Italia S.r.l.
Via L. Da Vinci, 7 – Poncelli
56020 Santa Maria a Monte (Pi)

The highest SAR value for this model phone when tested for use
at the ear was 0.815 wa /kg. Although the SAR is determined
at the highest cered power level, the actual SAR of the phone
while operang can be well below the maximum value. This is
because the phone is designed to operate at mulple power levels
so as to use only the power required to reach the network. In
general, the closer you are to a base staon, the lower the power
output of the phone. The Declaraon of Conformity here above
proves that the designated product is in compliance with the
essenal requirements and other relevant provisions of the R&TTE
- Direcve (European Radio & Terminal Telecommunicaons
Equipment)1999/5/EC.
Table of contents
Other NGM Cell Phone manuals


