6.
7.
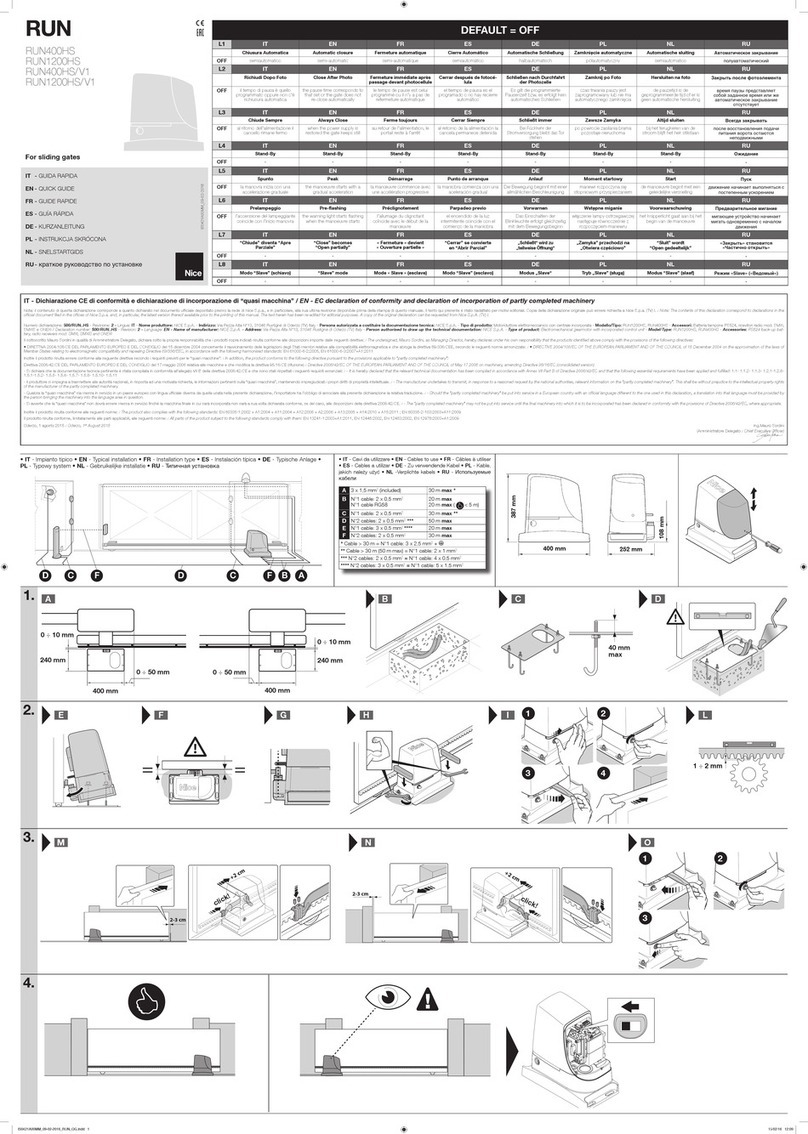
• IT -LEGENDA • EN -KEY • FR - LÉGENDE • ES - LEYENDA • DE - LEGENDE • PL - LEGENDA • NL - LEGENDA • RU -
УСЛОВНЫЕ ОБОЗНАЧЕНИЯ
• IT - dare alimentazione elettrica di rete • EN
- supply mains power • FR - activer l’alimen-
tation électrique du réseau • ES - conectar la
alimentación eléctrica de red • DE - mit dem
Stromnetz verbinden • PL - włączyć zasilanie
elektryczne • NL - netvoeding inschakelen • RU
- включить питание
• IT - mantenere premuto il tasto del trasmettitore •
EN - press and hold the transmitter key • FR - main-
tenir appuyée la touche de l’émetteur • ES - mante-
ner pulsada la tecla del transmisor • DE - Eine Taste
des Senders gedrückt halten • PL - przytrzymać
wciśnięty przycisk nadajnika • NL - houd de toets
van de zender ingedrukt • RU - держать нажатой
кнопку передатчика
• IT - togliere alimentazione elettrica di rete • EN -
shut off mains power • FR - couper l’alimentation
électrique du réseau • ES - desconectar la ali-
mentación eléctrica de red • DE - Die Netzstrom-
versorgung ausschalten • PL - odłączyć zasilanie
elektryczne • NL - Netvoeding uitschakelen • RU
- отключите сетевое электропитание
• IT - rilasciare il tasto del trasmettitore • EN - re-
lease the transmitter key • FR - relâcher la touche
de l’émetteur • ES - soltar la tecla del transmisor •
DE - Die Taste des Senders loslassen • PL - zwolnić
przycisk nadajnika • NL - laat de toets van de zender
los • RU - отпустить кнопку передатчика
• IT - Corretto • EN - Correct • FR - Correct •
ES - Correcto • DE - Richtig • PL - Prawidłowo
• NL - Correct • RU - Правильно
• IT - premere e rilasciare il tasto radio su scheda •
EN - press and release the radio key on the board •
FR - enfoncer et relâcher la touche radio sur la carte
• ES - pulsar y soltar el botón radio en la tarjeta • DE
- Die Funktaste auf der Karte drücken und loslassen •
PL - nacisnąć i zwolnić przycisk radiowy na płycie • NL
- de radiotoets op de kaart indrukken en weer loslaten •
RU - нажмите и отпустите кнопку радио на плате
• IT - Non corretto • EN - Incorrect • FR - In-
correct • ES - No correcto • DE - Nicht richtig
• PL - Nieprawidłowo • NL - Niet correct • RU
- Неправильно
• IT - lampeggio led • EN - ashing LED • FR -
clignotement de la led • ES - led intermitente •
DE - Blinken der LED • PL - miganie diody led •
NL - led knippert • RU - мигание светодиода
• IT - fase di acquisizione quote • EN - level acquisi-
tion phase • FR - phase d’acquisition des dispositifs
• ES - fase de adquisición de las distancias • DE -
Erfassung der Höhenmaße • PL - faza wyszukiwania
położeń • NL - acquisitiefase hoogten • RU - этап
приема отметок
• IT - lampeggio veloce led • EN - LED fast
ashing • FR - clignotement rapide de la led •
ES - parpadeo rápido del led • DE - Schnelles
Blinken der LED • PL - szybkie miganie diody
led • NL - led knippert snel • RU - частое
мигание индикатора
• IT - fase di acquisizione dispositivi • EN - device
acquisition phase • FR - phase d’acquisition des va-
leurs • ES - fase de adquisición de los dispositivos
• DE - Erfassung der Geräte • PL - faza wczytywa-
nia urządzeń • NL - acquisitiefase apparaten • RU
- этап приема устройств
• IT - led acceso • EN - led on • FR - led allumée
• ES - led encendido • DE - Dauerleuchten der
LED • PL - dioda led zapalona • NL - led brandt
• RU - индикатор горит
=
• IT - a ne procedura il Led si spegne • EN - the
LED turns off at the end of the procedure • FR - la
Led s’éteint à la n de la procédure • ES - al nal del
procedimiento el Led se apaga • DE - Nach dem
Vorgang verlöscht die LED • PL - po zakończeniu
procedury dioda led gaśnie • NL - aan het einde van
de procedure gaat de led uit • RU - по завершении
процедуры СИД гаснет
• IT - led spento • EN - led off • FR - led éteinte
• ES - led apagado • DE - led Aus • PL - dio-
da led zgaszona • NL - Led is uit • RU - СИД
выключен
• IT - attendere • EN - wait • FR - attendre •
ES - esperar • DE - Warten • PL - zaczekać •
NL - wachten • RU - ожидайте
Open Close
• IT - mantenere premuto il tasto OPEN / CLOSE •
EN - press and hold OPEN / CLOSE • FR - maintenir
la touche OPEN / CLOSE enfoncée • ES - mante-
ner pulsada la tecla OPEN / CLOSE • DE - die Tas-
te OPEN / CLOSE gedrückt halten • PL - przytrzy-
maćwciśnięty przycisk OPEN / CLOSE • NL - Houd
de toets OPEN / CLOSE gedurende • RU - нажмите
и удерживайте нажатой кнопку OPEN / CLOSE
• IT - apertura • EN - opening • FR - ouverture
• ES - apertura • DE - Öffnen • PL - otwieranie
• NL - opening • RU - открытие
• IT - chiusura • EN - closing • FR - fermeture •
ES - cierre • DE - Schließen • PL - zamykanie •
NL - sluiting • RU - закрытие
Open Close
• IT - rilasciare il tasto OPEN / CLOSE • EN - relea-
se the OPEN / CLOSE key • FR - relâcher la touche
OPEN / CLOSE • ES - soltar la tecla OPEN / CLOSE •
DE - die Taste OPEN / CLOSE loslassen • PL - zwolnić
przycisk OPEN / CLOSE • NL - laat de toets OPEN /
CLOSE • RU - отпустите кнопку OPEN / CLOSE
5.
8.
• IT - Procedura per quick set up • EN - Procedure for Quick set-up • FR - Procédure de conguration rapide • ES - Procedimiento de Quick set up • DE - Verfahren zum Quick Setup • PL - Procedura Szybkiej konguracji • NL - Procedure voor Quick set up •
RU - Процедура быстрой настройки
01. 02. 03. 04. 05. 06. 07.
L4(R) L1L2L3
Close
Open
Stop/Set
Flash
Photo
PhotoTest
Stop
GND
SbS
24V
Aerial
L4(R) L1L2L3
Close
Open
Stop/Set
Flash
Photo
PhotoTest
Stop
GND
SbS
24V
Aerial
L4(R) L1L2L3
Close
Open
Stop/Set
Flash
Photo
PhotoTest
Stop
GND
SbS
24V
Aerial
L4(R) L1L2L3
Close
Open
Stop/Set
Flash
Photo
PhotoTest
Stop
GND
SbS
24V
Aerial
9.
16,484
mm
• IT - Cancellazione totale della memoria • EN - Full deletion of the memory • FR - Élimination totale de la mémoire
• ES - Borrado total de la memoria • DE - Vollständiges Löschen des Speichers • PL - Całkowite kasowanie pamięci
• NL - Het geheugen volledig wissen • RU - Полная очистка памяти
01. 02. 03.
3 s
Open Close L1, L2 e L3 Open Close L1, L2 e L3
10.
16,484 m
• IT - Procedura memorizzazione trasmettitore in Modo 2 • EN - Mode 2 transmitter memorisation procedure • FR -
Procédure de mémorisation de l’émetteur en Mode 2 • ES - Procedimiento de memorización del transmisor en Modo 2 •
DE - Speicherverfahren des Senders in Modus 2 • PL - Procedura wczytywania nadajnika w Trybie 2 • NL - Procedure voor
opslag van zender in Modus 2 • RU - Процедура сохранения в памяти передатчика в Режиме 2
01. 02. 03. 04. 05.
08. 09.
L4(R)
÷ 5 s 10 s
=
08. 09.
10 s
=
Complete manual: www.niceforyou.com SERIAL NUMBER: ..................................................................... DATE: .............................................
• IT - Da consegnare all’utilizzatore • EN - To be given to the user • FR - À remettre à l’utilisateur • ES - Para entregar al usuario • DE - Dem Endnutzer zu übergeben • PL - Do przekazania użytkownikowi • NL - Te overhandigen aan de gebruiker • RU - Передается конечному пользователю
IT
Questo manuale è una sintesi delle fasi d’installazione e della messa in funzione con i valori di default: il manuale istruzio-
ni completo (installazione, collegamenti, programmazioni parametri, diagnostica, ecc.) è scaricabile dal sito www.niceforyou.com
EN This manual is a summary of the installation and commissioning instructions, using the default values: the complete
user manual (installation, connections, programming, diagnostics, etc.) is available for download from www.niceforyou.com
FR Ce manuel est un résumé des phases d’installation et de mise en service avec les valeurs par défaut: le mode d’emploi
complet (installation, raccordements, programmation des paramètres, diagnostic, etc.) peut être téléchargé sur le site Internet
www.niceforyou.com
ES Este manual es una síntesis de las fases de instalación y de la puesta en funcionamiento con los valores
predeterminados: el manual de instrucciones completo (instalación, conexiones, programación de parámetros, diagnóstico,
etc.) se puede descargar del sitio www.niceforyou.com
DE Diese Anleitung gibt einen Überblick über die Einrichtungs- und Inbetriebnahmephasen mit den Standardeinstellungen:
Die vollständige Anleitung (zu Einrichtung, Anschlüssen, Programmierung der Parameter, Diagnose, usw.) kann auf der Webseite
www.niceforyou.com heruntergeladen werden
PL Niniejsza instrukcja jest streszczeniem etapów instalacji i uruchomienia z zastosowaniem wartości domyślnych: pełną
instrukcję obsługi (instalacja, podłączenia, programowanie parametrów, diagnostyka, itd.) można pobrać ze strony internetowej
www.niceforyou.com
NL Deze handleiding is een samenvatting van de stadia van installatie en inbedrfstelling met de standaard waarden: de
complete handleiding (installatie, bedrading, het programmeren van parameters, diagnostiek etc.) kan worden gedownload van
de website www.niceforyou.com
RU
Данное руководство являет собой синтез фаз монтажа и пуска в работу согласно стандартно заданным
значениям: полное руководство с инструкциями (монтаж, подключения, программирование параметров, диа-
гностика и пр.) может быть загружена с веб-сайта www.niceforyou.ru
ON
FLASH
OFF
2
Flash
8 7 6 5 4 3 2 1
Photo Test
Photo
GND
Stop
SbS
L1
L2
L3
24 V
Aerial
OpenStop/SetClose
=
IT controllare: collegamenti elettrici, allineamenti fotocellule e fusibili.
EN check: electrical connections, alignment of photocells, and fuses.
FR contrôler: raccordements électriques, alignements des photocellules et fusibles.
ES controlar: conexiones eléctricas, alineación fotocélulas y fusibles.
DE Überprüfen Sie Folgendes: elektrische Anschlüsse, Ausrichtung von Photozellen und Sicherungen.
PL sprawdzić: połączenia elektryczne, ustawienie fotokomórek i bezpieczniki.
NL controleren: elektrische aansluitingen, uitlning fotocellen en zekeringen.
RU проверить: электрические подключения, юстировку фотоэлементов и плавкие предохранители.
• IT - Sblocco dell’automazione • EN - Releasing the automation • FR - Déblocage de l’automatisme • ES - Desbloqueo de la automatización • DE -
Automatikbetrieb entriegeln • PL - Odblokowanie automatu • NL - Deblokkering van de automatisering • RU - Разблокировка привода
• IT - Blocco dell’automazione • EN - Locking the automation • FR - Blocage de l’automatisme • ES - Bloqueo de la automatización • DE - Automatik-
betrieb sperren • PL - Zablokowanie automatu • NL - Blokkering van de automatisering • RU - Блокирование привода
OFF
L1L2L3
Close
Open
Stop/Set
Flash
Photo
Photo Test
Stop
GND
SbS
24 V
Aerial
NO
FLASH
2
Flash
87 65 43 21
Photo Test
Photo
GND
Stop
SbS
L1L2L3
L4(R)
24 V
Aerial
TX
112345 2
RX
OpenStop/SetClose
OFF
L4(R)L1L2L3
Close
Open
Stop/Set
Flash
Photo
PhotoTest
Stop
GND
SbS
24V
Aerial
NC
8k2
NO
IBT4N
C
A B
IT FR ES DE
KEYS TASTI PROGRAMMAZIONE E
COMANDO TOUCHES DE PROGRAMMATION
ET COMMANDE TECLAS DE PROGRAMACIÓN Y
MANDO PROGRAMMIER- UND
BEFEHLSTASTEN
FLASH LAMPEGGIANTE CLIGNOTANT INTERMITENTE BLINKLEUCHTE
TX - RX FOTOCELLULE PHOTOCELLULES FOTOCÉLULAS FOTOZELLEN
NO - NC - 8k2
INGRESSO BORDO SENSIBILE FR ES DE
FUSE FUSIBILE FUSIBLE FUSIBLE SICHERUNG
AERIAL ANTENNA ANTENNE ANTENA ANTENNE
LED LED FUNZIONI LED DE FONCTIONS LED FUNCIONES FUNKTIONSANZEIGE-LED
PL NL RU
KEYS PRZYCISKI PROGRAMUJĄCE I
STEROWNICZE PROGRAMMERINGS- EN
BEDIENINGSTOETSEN КЛАВИШИ ПРОГРАММИРОВАНИЯ
И УПРАВЛЕНИЯ
FLASH LAMPA OSTRZEGAWCZA KNIPPERLICHT ПРОБЛЕСКОВАЯ ЛАМПА
TX - RX FOTOKOMÓRKI FOTOCELLEN ФОТОЭЛЕМЕНТЫ
NO - NC - 8k2
PL NL RU
FUSE BEZPIECZNIK ZEKERING ПРЕДОХРАНИТЕЛЬ
AERIAL ANTENA ANTENNE АНТЕННА
LED DIODY LED FUNKCJI FUNCTIELEDS СВЕТОДИОДЫ ФУНКЦИЙ
PerSbloccare - Pour débrayer - Tounblock
Umzu entriegeln - Para desbloquear
Odblokowanie- Om te deblokkeren - Отпереть
1 2 3
PerSbloccare - Pour débrayer - Tounblock
Umzu entriegeln - Para desbloquear
Odblokowanie- Om te deblokkeren - Отпереть
1 2 3
PerSbloccare - Pour débrayer - Tounblock
Umzu entriegeln - Para desbloquear
Odblokowanie- Om te deblokkeren - Отпереть
1 2 3
PerSbloccare - Pour débrayer - Tounblock
Umzu entriegeln - Para desbloquear
Odblokowanie- Om te deblokkeren - Отпереть
1 2 3
PerSbloccare - Pour débrayer - Tounblock
Umzu entriegeln - Para desbloquear
Odblokowanie- Om te deblokkeren - Отпереть
1 2 3
PerSbloccare - Pour débrayer - Tounblock
Umzu entriegeln - Para desbloquear
Odblokowanie- Om te deblokkeren - Отпереть
1 2 3
PerSbloccare - Pour débrayer - Tounblock
Umzu entriegeln - Para desbloquear
Odblokowanie- Om te deblokkeren - Отпереть
1 2 3
PerSbloccare - Pour débrayer - Tounblock
Umzu entriegeln - Para desbloquear
Odblokowanie- Om te deblokkeren - Отпереть
1 2 3
PerSbloccare - Pour débrayer - Tounblock
Umzu entriegeln - Para desbloquear
Odblokowanie- Om te deblokkeren - Отпереть
1 2 3
PerSbloccare - Pour débrayer - Tounblock
Umzu entriegeln - Para desbloquear
Odblokowanie- Om te deblokkeren - Отпереть
1 2 3
PerSbloccare - Pour débrayer - Tounblock
Umzu entriegeln - Para desbloquear
Odblokowanie- Om te deblokkeren - Отпереть
1 2 3
PerSbloccare - Pour débrayer - Tounblock
Umzu entriegeln - Para desbloquear
Odblokowanie- Om te deblokkeren - Отпереть
1 2 3
PerSbloccare - Pour débrayer - Tounblock
Umzu entriegeln - Para desbloquear
Odblokowanie- Om te deblokkeren - Отпереть
1 2 3
PerSbloccare - Pour débrayer - Tounblock
Umzu entriegeln - Para desbloquear
Odblokowanie- Om te deblokkeren - Отпереть
1 2 3
PerSbloccare - Pour débrayer - Tounblock
Umzu entriegeln - Para desbloquear
Odblokowanie- Om te deblokkeren - Отпереть
1 2 3
PerSbloccare - Pour débrayer - Tounblock
Umzu entriegeln - Para desbloquear
Odblokowanie- Om te deblokkeren - Отпереть
1 2 3
PerSbloccare - Pour débrayer - Tounblock
Umzu entriegeln - Para desbloquear
Odblokowanie- Om te deblokkeren - Отпереть
1 2 3
PerSbloccare - Pour débrayer - Tounblock
Umzu entriegeln - Para desbloquear
Odblokowanie- Om te deblokkeren - Отпереть
1 2 3
PerSbloccare - Pour débrayer - Tounblock
Umzu entriegeln - Para desbloquear
Odblokowanie- Om te deblokkeren - Отпереть
1 2 3
PerSbloccare - Pour débrayer - Tounblock
Umzu entriegeln - Para desbloquear
Odblokowanie- Om te deblokkeren - Отпереть
1 2 3
PerSbloccare - Pour débrayer - Tounblock
Umzu entriegeln - Para desbloquear
Odblokowanie- Om te deblokkeren - Отпереть
1 2 3
PerSbloccare - Pour débrayer - Tounblock
Umzu entriegeln - Para desbloquear
Odblokowanie- Om te deblokkeren - Отпереть
1 2 3
PerSbloccare - Pour débrayer - Tounblock
Umzu entriegeln - Para desbloquear
Odblokowanie- Om te deblokkeren - Отпереть
1 2 3
PerSbloccare - Pour débrayer - Tounblock
Umzu entriegeln - Para desbloquear
Odblokowanie- Om te deblokkeren - Отпереть
1 2 3
PerSbloccare - Pour débrayer - Tounblock
Umzu entriegeln - Para desbloquear
Odblokowanie- Om te deblokkeren - Отпереть
1 2 3
PerSbloccare - Pour débrayer - Tounblock
Umzu entriegeln - Para desbloquear
Odblokowanie- Om te deblokkeren - Отпереть
1 2 3
PerSbloccare - Pour débrayer - Tounblock
Umzu entriegeln - Para desbloquear
Odblokowanie- Om te deblokkeren - Отпереть
1 2 3
PerSbloccare - Pour débrayer - Tounblock
Umzu entriegeln - Para desbloquear
Odblokowanie- Om te deblokkeren - Отпереть
1 2 3
PerSbloccare - Pour débrayer - Tounblock
Umzu entriegeln - Para desbloquear
Odblokowanie- Om te deblokkeren - Отпереть
1 2 3
PerSbloccare - Pour débrayer - Tounblock
Umzu entriegeln - Para desbloquear
Odblokowanie- Om te deblokkeren - Отпереть
1 2 3
PerSbloccare - Pour débrayer - Tounblock
Umzu entriegeln - Para desbloquear
Odblokowanie- Om te deblokkeren - Отпереть
1 2 3
PerSbloccare - Pour débrayer - Tounblock
Umzu entriegeln - Para desbloquear
Odblokowanie- Om te deblokkeren - Отпереть
1 2 3
PerSbloccare - Pour débrayer - Tounblock
Umzu entriegeln - Para desbloquear
Odblokowanie- Om te deblokkeren - Отпереть
1 2 3
PerSbloccare - Pour débrayer - Tounblock
Umzu entriegeln - Para desbloquear
Odblokowanie- Om te deblokkeren - Отпереть
1 2 3
PerSbloccare - Pour débrayer - Tounblock
Umzu entriegeln - Para desbloquear
Odblokowanie- Om te deblokkeren - Отпереть
1 2 3
PerSbloccare - Pour débrayer - Tounblock
Umzu entriegeln - Para desbloquear
Odblokowanie- Om te deblokkeren - Отпереть
1 2 3
LED KEYS
