Nichiryo Nichipet HB User manual

●Thank you for your purchase of our Nichipet HB
●For safe and proper use of the Nichipet HB, please be sure to carefully read this manual.
The sampling and dilution expert
BE ORIGINATIVE
User’s Manual
Hybrid Pipette

1
Features
●Inclusion of both motorized and manually operated modes makes detailed operations pos-
sible.
●Wide range of operation modes makes various operations possible.
●10 key keypad allows easy mode selection and setup.The keypad’s open/close cover
prevents input errors during operation.
●Liquid Crystal display provides at a glance confirmation of operation and settings.
●Three-stage battery charge display allows easy confirmation of remaining battery power.
●The lightweight, easy to grip design allows the unit to be used for long periods of time
without operator-fatigue.
Additionally, the design allows the unit to be operated by left or
right-handed persons.
●Two different HB200/HB1000 models provide a sampling range of 20 µl to 1000 µl.
●As plunger drive stroke speed is controlled by the microprocessor during motor drive mode,
reproducibility
is constant and not influenced by the individual operator.
●Batteries can be easily replaced.
TIP eject function makes replacement of tip possible without having to touch it.
●MANUAL Mode
For manually operated simple pipetting.
●PIPET Mode
For motor driven simple pipetting. Pipetting number can also be calculated using the
counter.
●MULTI PIPETE Mode
For motor driven consecutive multi pipetting of equal amounts. Automatic consecutive
multi pipetting or consecutive multi pipetting at arbitrarily set intervals can be carried out.
●DIFFER MULTI PIPET Mode
For motor driven consecutive pipetting in a set order of different discharge amounts.
●DILUTION Mode
For motor driven pickup and dilution of two types of liquid.
●MIXING Mode
For motor driven mixing. Because mixing is stopped at the last pickup, the mixed liquid
can be moved to the next receiving vessel.
Hybrid Pipette

2
Features (Cont.)
●DIGITAL MANUAL Mode
In this mode, pickup is carried out only while the START switch is being pressed and
discharge can be carried out by pressing and holding the switch again.The counter can
also be used to calculate the pipetting number.
●MANUAL CALIBRATION Mode
For calibration of the Mode at one location.
●MOTOR DRIVE CALIBRATION Mode
For calibration of the PIPET Mode, MULTI PIPET Mode, DIFFER MULTI
PIPET Mode, DILUTION Mode, MIXING Mode and DIGITAL MANUAL Mode at one
location.
Note: Separate calibration of each mode is not possible.
●SPEED Mode
Speed of pickup and dispensing is variable between 5 different speed settings.
●DATE Mode
For display of date and time.The date and time can also be adjusted using this mode.
●SOUND Mode
This mode allows the keys to be set to give off a beeping sound when pressed to
indicate operation.The beeping sound can also be turned off with this mode.
●Auto power OFF function
When the switch or operation keys are not used for a certain amount of time, the unit is
automatically turned off to conserve battery power.
●Mode settings storage function
Because the settings for each mode are automatically stored in memory, resetting the
modes is not necessary the next time you wish to use the same settings.
●Power OFF dispense function
When there is still liquid remaining in the tip when power is turned off manually or
automatically during the PIPET Mode, MULTI PIPET Mode, DIFFER MULTI PIPET Mode,
DILUTION Mode, MIXING Mode, DIGITAL MANUAL Mode or MOTOR DRIVE CALI-
BRATION Mode, power is turned off after the liquid is first dispensed.
Note:Be careful of liquid spillage when liquid is being dispensed during
power off.
Note: The Power OFF dispense function will not operate when the MANUAL
Mode or MANUAL CALIBRATION Mode is engaged.

3
Standard accessories
●AC adapter.......................................... 1
●Battery ................................................ 1
●Tip....................................................... 3
●Operator’s manual .............................. 1
●Filter.................................................... 3 (HB1000 only)
●Filter replacement tool ........................ 1 (HB1000 only)
Please check to make sure that none of the above accessories are missing before using this
unit.
Safety precautions
●To ensure safe and proper use of the Nichipet HB, please carefully read the “Safety
Precautions” in this section and “Cautions” on the following page before using the
product.
●The contents of “CAUTIONS” are matters that require the user’s attention, not only for
using the Nichipet HB properly, but for preventing accidents or injury to the user.
●After reading this manual please store it in a convenient place for quick reference.

4
Please observe the following cautions to ensure the safe use of this product
CAUTIONS
Be sure to observe the following instructions for using your Nichipet HB properly and
safely.
If the user operates the Nichipet HB in the wrong way, disregarding the following instruc-
tions, this may result in injury to the user or/and other persons or physical damage to this
instrument or/and other equipment.
1. Do not use for any other purpose than handling liquid.
2. Never modify this instrument, as this may cause accident.
3. Do not use for handling of liquids that will be directly injected into the body.
4. As certain types of liquids are harmful to the body, never discharge any sample
liquid while pointing the instrument at a person.
5. Do not eject the tip while the unit is pointed at a person.
6. Do not eject the tip when there is liquid inside.
7. The sharp protruding tip is dangerous. Please use care when handling.
8. Please make sure that the tip is securely attached to the nozzle. Scattering of liquid
will occur if tips fall off the nozzle.
9. If liquid that is harmful to the body has splashed onto the unit, treat it properly before
using it.
10. When using liquid that is harmful to the body, never touch a tip that has been used.
11. Do not use this unit to mix liquid etc.This will cause the tip to loosen, fall off, or result
in liquid splashing on the unit.
12. Although this product is designed to resist chemicals, it may be damaged by some
kinds of chemicals such as N-methyl-pyrrolidinone, etc. Please contact the manu-
facturer before using special chemicals.
13. Use only the battery and adapter (including charging devices) specified by the manu-
facturer.Use of unspecified products may cause the battery to leak fluid, overheat,
rupture or catch fire.
14. Do not store the unit in locations prone to excessive humidity, dust or locations that
reach high temperatures.This may damage the instrument.
15. Do not disassemble or modify any part other than specified.This may cause injury
or electric shock.
16. Do not get the body (the blue colored part) of the unit wet.This may cause overheat-
ing, electric shock or breakdown.

5
Please observe the following cautions to ensure the safe use of this product
CAUTIONS
Be sure to observe the following instructions for using your Nichipet HB properly and
safely.
If the user operates the Nichipet HB in the wrong way, disregarding the following instruc-
tions, this may result in injury to the user or/and other persons or physical damage to this
instrument or/and other equipment.
Cautions regarding the AC Adapter
A-1. Never use any adapter other an AC100V AC adapter.
A-2. Use caution to avoid shorting the connection terminal when the adapter is con-
nected to the power outlet.Shorting may cause electric shock, fire or breakdown.
A-3. Never disassemble or modify the AC adapter.This may cause electric shock, fire or
breakdown.
A-4.Never get the AC adapter wet.This may cause overheating, electric shock, or break-
down.
A-5. Never use the AC adapter in a location subject to excessive humidity.This may
cause electric shock.
A-6. Never touch the AC adapter, power cord or power outlet with wet hands.This may
cause electric shock.

6
Please observe the following cautions to ensure the safe use of this product
CAUTIONS
Be sure to observe the following instructions for using your Nichipet HB properly and
safely.
If the user operates the Nichipet HB in the wrong way, disregarding the following instruc-
tions, this may result in injury to the user or/and other persons or physical damage to this
instrument or/and other equipment.
Battery cautions
B-1. Never drop the battery in a fire.This may cause the battery to catch fire or rupture.
B-2. Never short the battery terminal. This may cause the battery to leak battery fluid,
overheat, rupture or catch fire.
B-3. Battery liquid in your eye may cause loss of sight. In the event that your eye is
exposed to battery fluid, immediately flush your eye thoroughly with clean water, Do
not rub your eye. After cleansing, consult a doctor immediately.
B-4. Battery liquid on your skin may cause bodily harm. If battery liquid gets on your skin
or clothing, immediately wash with clean water.
B-5. Never use or place the Nichipet HB in a location subject to high temperature such
as near a fire or stove.This may cause the battery to leak battery fluid, overheat, or
catch fire.
B-6. Never disassemble or modify the battery.This may cause the battery to leak battery
fluid, overheat, rupture or catch fire.
B-7. If you notice any abnormality such as strange odor, overheating, color change or
shape during battery usage, recharging or storage, immediately remove the battery
and discontinue its usage.Continuing to use the battery may cause the battery to
leak battery fluid, overheat, rupture or catch fire.
B-8. Never get the battery wet.This may cause the battery to overheat, emit smoke, or
rust.

7
Matters that require strict observance
Users are required to strictly observe the following points in order for the instrument
to keep its excellent precision, reproducibility and original performance for a long time.
1. Avoid exposing this unit to direct sunlight for 2 hours before operation as well as dur-
ing operation.Exposure to sunlight may result in loss of accuracy.
2. Avoid touching the tip and nozzle sections as much as possible just before operating.
Warming of these parts may result in loss of accuracy.
3. Please use the forward method when sampling (the operation method used in this
manual). Using a different method may result in loss of accuracy.
4. When releasing the push button, gently.If released too quickly, liquid will be pulled into
the inside of the unit, which may result in loss of accuracy. Liquid inside the unit may
also result in performance loss.
5. Please discard tips after use.Repeated use may result in loss of accuracy.There is
also danger of contamination (*) caused by mixing liquids.
* Liquid remaining in a tip may be mixed with new liquids causing an undesired result.
6. Do not turn the unit on its side or upside down when there is liquid in the tip.Liquid will
get inside the unit, which may result in performance loss.
7. Do not set liquid volume to a setting that exceeds the specified sample volume limit.
Doing so may result in instrument damage or product quality degradation.
8. Do not operate when the liquid amount is less than the set volume. Doing so may
cause the liquid to scatter on the main body resulting in product quality degradation.

8
Contents
●Features ......................................................................................................................... 1
●Standard accessories..................................................................................................... 3
●Safety precautions.......................................................................................................... 3
●Matters that require strict observance ............................................................................ 7
●Main Unit
•Part names and functions ......................................................................................... 10
•Keypad ...................................................................................................................... 11
•Liquid crystal display ................................................................................................. 11
●Recharging the battery ................................................................................................. 12
●Basic Operation ............................................................................................................ 13
●Mode setup and operation
•Safety precautions for each mode ............................................................................ 14
•MANUAL Mode ......................................mode number: 1 ....................................... 15
•PIPET Mode...........................................mode number: 2 ....................................... 17
•MULTI PIPET Mode ...............................mode number: 3 ....................................... 19
•DIFFER MULTI PIPET Mode .................mode number: 4 ....................................... 23
•DILUTION Mode ....................................mode number: 5 ....................................... 26
•MIXING Mode ........................................mode number: 6 ....................................... 29
•DIGITAL MANUAL Mode........................mode number: 7 ....................................... 32
•MANUAL CALIBRATION Mode..............mode number: 8 ....................................... 34
•MOTOR DRIVE CALIBRATION Mode ...mode number: 9 ....................................... 36
•SPEED Mode.........................................mode number: 10 ..................................... 38
•DATE Mode ............................................mode number: 11 ..................................... 39
•SOUND Mode ........................................mode number: 12 ..................................... 40

9
Contents (continued)
●Disassembly and assembly
•Battery installation and removal ................................................................................ 41
•Disassembly and assembly of the airtight unit.......................................................... 42
•Filter replacement ..................................................................................................... 45
●Volume accuracy and reproducibility ............................................................................ 46
●Troubleshooting ............................................................................................................ 47
●Tips............................................................................................................................... 49
●Replacement parts list.................................................................................................. 49
●Specifications ............................................................................................................... 50

10
Main unit
Part names and functions
Push button
Used for manual pipetting.
Tip eject button
Used for ejecting the tip.
START switch
Used for digital pipetting.
Battery charge
indication LED
Indicates battery charge.
LCD display
Diplays present modes
and settings.
Keypad
Used for input of mode settings.
Open/Close cover
(Normally use in closed position)
Nozzel
Tip ejector
Battery case
11
Main unit (continued)
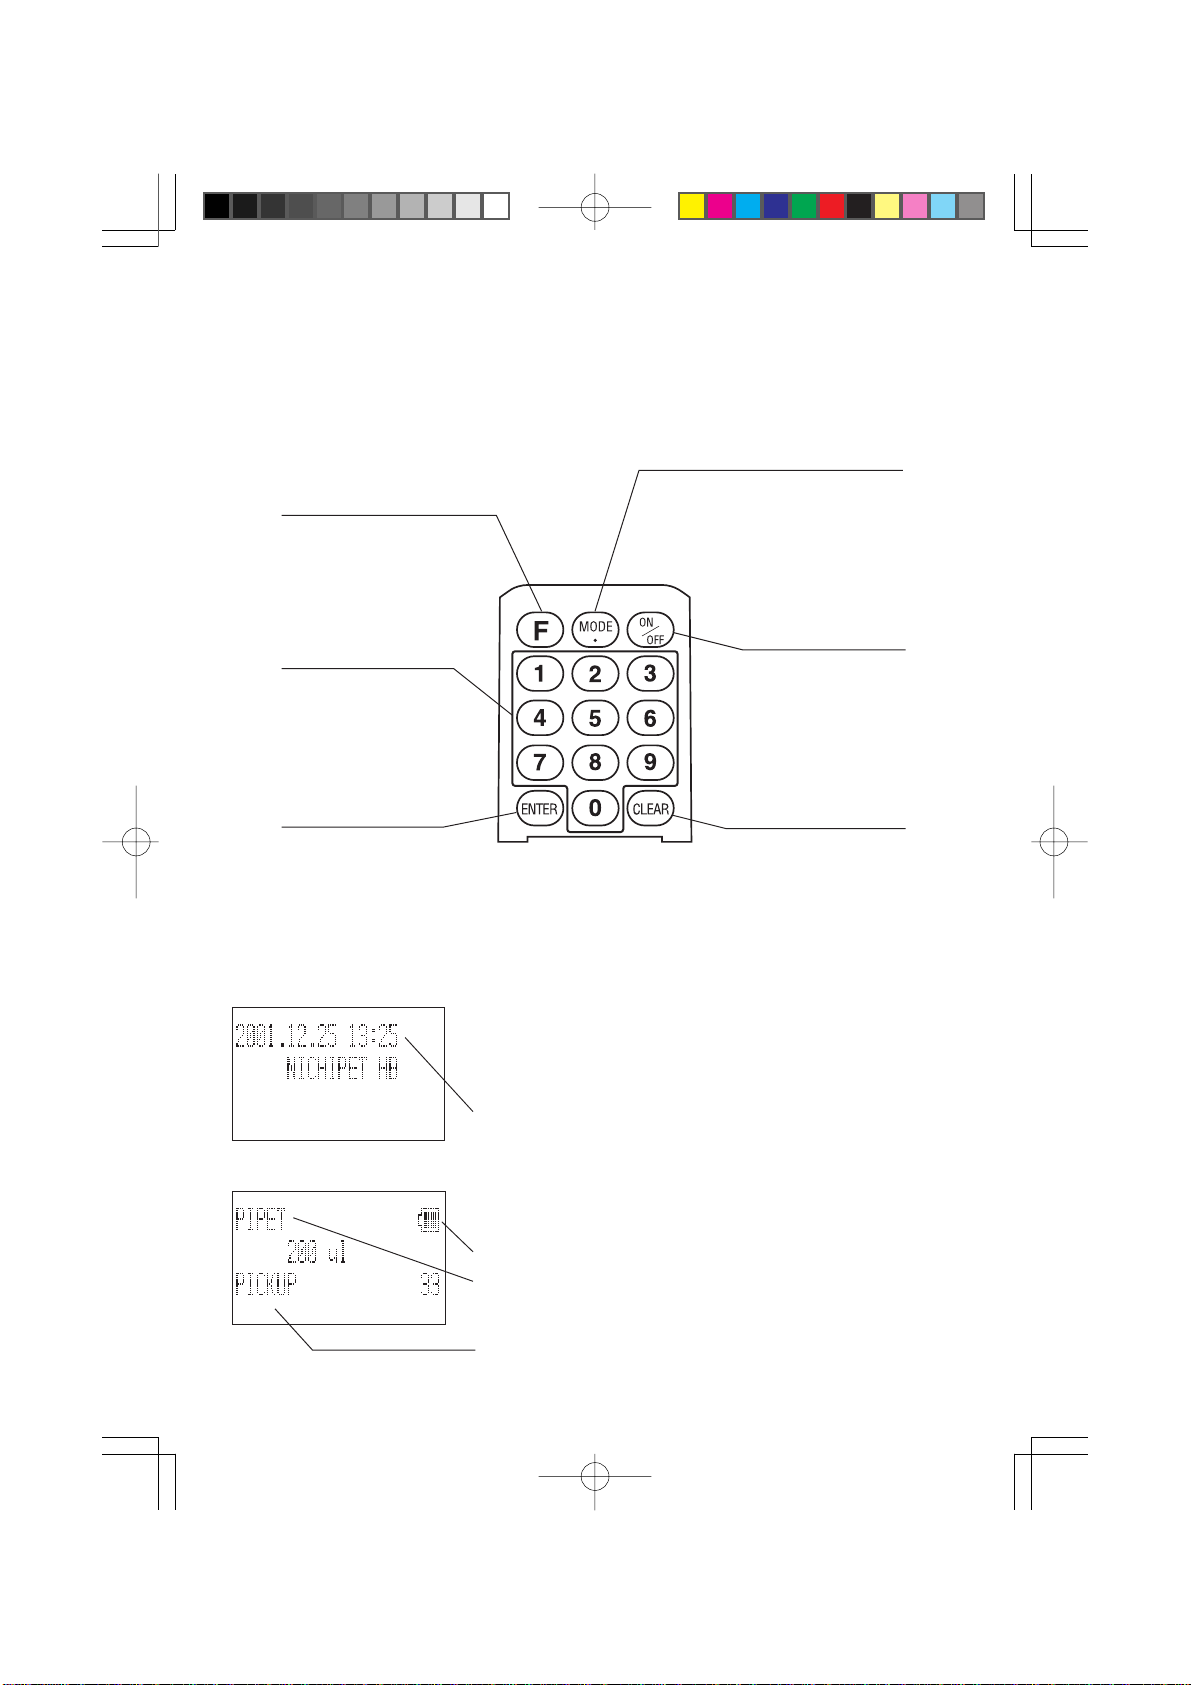
Keypad
This display appears when the power is turned on or mode
input is cleared.
The current date and time is displayed.
This display appears when the various modes are selected.
(For details, please refer to the various mode explanations).
Current battery capacity is displayed.
Current mode.
Next operation display (PICKUP/DISPENSE)
LCD display
Function key
Used when function
input is necessary
during setting of modes.
Number keys
Used for input
of number data.
ENTER key
Used to enter
input data.
MODE key
Used to change the mode.
Also used for decimal [.] input
in the MANUAL CALIBRATION
and MOTOR DRIVE CALI-
BRATION Modes.
CLEAR key
Used to cancel mode
settings before they
are entered.
ON/OFF key
Used to turn the
power on or off.

12
Recharging the battery
●The AC adapter can be connected directly to the unit for recharging of the battery while
the unit is being operated.
●By using the optional exclusive charging stand, the battery can be charged simply by
placing it in the stand (for details, please refer to the charging stand’s operator’s manual).
●Even with the power turned off, the battery power will be consumed little by little.When the
unit has been stored for a few days with the power turned off, we recommend that you
recharge the battery before using.
Battery charge display
●Battery charge is indicated on the LCD by the following three level displays.
: Remaining battery charge is sufficient.
: Remaining battery charge is low.
: Battery charge is almost completely depleted. Recharging is recommended.
Recharging the AC adapter
1) Connect the AC adapter to the unit.
2) Plug the AC adapter into the power outlet.
3) Confirm that the charging LED is red.
4) The charging LED will turn green when charging is finished. At this time, disconnect
the AC adapter from the main unit and then unplug it from the AC power outlet.
Note: Never use any AC adapter except the one specified by the manufac-
turer.
Charging time (approximate guide)
●With the power off, and the unit is being charged from a depleted state, charging will take
approximately 7 hours.
Number of pipettes possible when the unit is fully charged
(approximate guide).
●When the unit is fully charged, the number of pipettes possible in the PIPET Mode is
approximately 2000 or more.
Note: This number may vary depending on the way the unit is recharged
and the operation environment.

13
Operation
1) Press the buttonfor over1.5 secondstoturn
the power on.The Fig. 1 display appears.
2) Press the button to select the mode.The
Fig.2 display appears.
3) From the Fig.2 display, enter the mode number
(ex:press , then ) to display the desired
mode screen (for details please refer to the vari-
ous mode explanations. Fig. 8 for example).
Input can be cancelled by pressing the but-
ton before pressing the button.The display
will return to the Fig. 1 display and data can be
re-input.
4) Please refer to mode setup/operation instructions
for setup and operation of modes.
5) Modes can be changed by pressing the MODE
button during any mode. The Fig. 2 display will
be returned to for input of a different mode.
Note: Keypad input is not possible when
“DISPENSE” is displayed as the next
operation. Please carry out data in-
put when “PICKUP” is displayed.
Note:The mode cannot be changed during
input of MANUAL CALIBRATION or
MOTOR DRIVE CALIBRATION number
data.
6) Press the buttonforover1.5seconds to turn
the power off.
Fig. 1
Fig. 2

14
Mode setup/operation
Mode safety precautions
Note: Keypad input is not possible when the “DISPENSE” mode is dis
played as the next operation mode.Please carry out data input when
“PICKUP” is displayed.
Note: When a liquid amount that exceeds the specified liquid volume limit
is input, the display will not change to “PICKUP” when input is com-
pleted. Re-input of data is necessary in this case.
Note: If is pressed during input, data input until that point will be
cancelled. Re-input of data is necessary in this case.
Note: When input is begun, if the correct data is not input and is not
pressed, “PICKUP” will not be displayed. To cancel input, start again
after first changing the mode.
Note: Do not set the first dispense volume under 100 µl on the HB1000 or
20µl on the HB200, as this may cause degradation of accuracy and
reproducibility.
Note: When calibration is carried out in the MANUAL CALIBRATION Mode,
settings of the MANUAL Mode stored in memory will be returned to
the default settings.
Note: When calibration is carried out in the MOTOR DRIVE CALIBRATION
Mode,all digital mode settings stored in memory will be returned to
the default settings.

15
Mode setup and operation (continued)
MANUAL Mode Mode number:1
Press and to select the MANU mode
display (Fig.1).
Changing the volume setting (Ex: changing the
setting to 100 µl)
1) With the Fig.3 display selected, press
.The Fig. 4 display appears.
2) From the Fig.4 display, press to enter the
data. [µl] is displayed (Fig. 5). Volume setting
change is now complete.
Volume setting range
●HB1000: 2 - 1000µl1µl step
●HB200: 2 - 1200µl1µl step
Note:Be careful not to set volume under
100 µl on the HB1000 or 20 µl on the
HB200, as the accuracy and repro-
ducibility will not be covered by the
warranty.
Operation
1) Attach the disposable tip to the nozzle.
2) Press the push button down from the “a” to “b” position. (Fig. 6)
3) With the push button pressed down, insert the top of the tip to a point suitable for
suction of the desired volume. (Fig. 7-1)
4) Return the push button gently to the “a”position.The liquid will be pulled into the tip.At
this time pause for 1 second to wait for complete suction of the liquid. (Fig. 7-2)
Note: Do not carry out suction from the “c” position shown in Fig. 6.
(liquid to be pulled into the nozzle if done from this position).
Note: Operate the push button gently. Releasing quickly will cause liq-
uid to be pulled into the inside of the unit causing possible loss
of accuracy.
5) Withdraw the tip slowly from the liquid.By doing this gently, hardly any of the liquid will
remain on the outside surface of the tip.If liquid does remain, remove it with paper or
something similar, being careful not to touch the tip’s point.
6) Touch the top of the tip to the inside of the receiving vessel.(Fig. 7-3)
Fig. 3
Fig. 4
Fig. 5
Set volume

16
Mode setup and operation (continued)
MANUAL Mode (continued)
Operation (continued)
7) Gently depress the push button from “a” to “b”.Wait about 1 second, then depress to
the c position.The liquid is now discharged. (Fig. 7-4,5)
8) Press the eject button to remove the used tip. (Fig. 7-6)
Fig. 6
Fig. 7
a
b
c
① ② ③ ④ ⑤ ⑥

17
Mode setup and operation (continued)
PIPET Mode Mode number:2
Press to select the PIPET mode
display (Fig. 8).
Changing the volume setting (Ex: changing the
setting to 100µl)
1) With the Fig. 8 display selected, press
.The Fig.9 display appears.
2) From the Fig.9 display, press to enter the
data.[ µl ] is displayed (Fig.10).Volume setting
change is now complete.
Volume setting range
●HB1000: 2 ~1000µl1µl step
●HB200: 2 ~ 200µl1µl step
Note: Do not set the first dispense volume
under 100 µl on the HB1000 or 20 µl
on the HB200, as this may cause
degradation of accuracy and
reproducibility.
Resetting the counter
Press to reset the counter to the “0” setting.
Turning the counter ON/OFF
Press to turn the counter OFF (no counter display) from the ON mode
or ON (counter display) from the OFF mode.
Operation
1) Attach the disposable tip to the nozzle.
2) Insert the top of the tip to a point suitable for suction of the desired volume. (Fig. 11-
1).
3) Confirm that the next operation mode display shows “PICKUP” and press the START
switch.The liquid will be pulled into the tip.(Fig. 11-2).
4) Withdraw the tip slowly from the liquid.By doing this gently, hardly any of the liquid will
remain on the outside surface of the tip.If liquid does remain, remove it with paper or
something similar, being careful not to touch the tip’s point.
Fig. 8 Counter display
Fig. 9
Fig. 10
Set volume

18
Mode setup and operation (continued)
PIPET Mode (continued)
Operation (continued)
5) Touch the top of the tip to the inside of the receiving vessel. (Fig. 11-3)
6) Confirm that the next operation mode display shows “DISPENSE”and press and hold
the START switch to dispense the liquid. (Fig. 11-4). After the liquid is dispensed,
releasing the START switch will change the mode to the pickup mode and“PICKUP”
will appear on the next operation mode display.(If the START switch is released imme-
diately after pressing, after liquid dispenses, there will be a 3 second pause before the
mode changes to the pickup mode and “PICKUP” appears on the next operation dis-
play.)
7) Press the eject button to remove the used tip. (Fig. 11-5)
Fig. 11
① ② ③ ④ ⑤

19
Mode setup and operation (continued)
MULTI PIPET Mode Mode number:3
Press to select the M-PIPET mode
display (Fig. 12)
Changing number of dispenses and dispense volume
(ex:changing the setting to 6 times x 22 µl)
1) With the Fig.12 display selected, press .
The Fig.13 display appears.
2) From the Fig. 13 display, press to enter
number of dispense times.The Fig.14 display
appears.
3) From the Fig.14 display, press .
The Fig.15 display appears.
4) From the Fig. 15 display, press to enter
the data.“µl”and “PICKUP” are displayed (Fig.
16). Dispense number and volume change is
now complete.
Note:Please set number of dispenses
and dispense volume according to
the restrictions below.
Number of dispenses x dispense
volume
=100% volume – (pre-dispense
surplus + post-dispense sur-
plus )
Please note that because this unit
carries out complicated internal
calibration, input may be cancelled
even when the above restrictions
are observed.
Dispense number setting range
●HB1000: 1 ~ 450 times 1 time step
●HB200: 1 ~ 180 times 1 time step
Range of set dispense volume for 1 time
●HB1000: 2 ~ 900 µl1µl step
●HB200: 2 ~ 180 µl1µl step
Note: Do not set the first dispense volume under 100 µl on the HB1000 or
20 µl on the HB200, as this may cause degradation of accuracy and
reproducibility.
Fig. 12
Fig. 13
Fig. 14
Fig. 15
Fig. 16
Number of
dispenses
1 time dispense
volume
Dispense interval time
Table of contents
Other Nichiryo Laboratory Equipment manuals


Popular Laboratory Equipment manuals by other brands


Scientifica
Scientifica MTP Manual Adjustment

Endress+Hauser
Endress+Hauser Analytik Jena UVP Transilluminator instruction manual

HIRAYAMA
HIRAYAMA HV-25 Operation manual

Fritsch
Fritsch PULVERISETTE 7 operating instructions

Tektronix
Tektronix 7B71 instruction manual

Agilent Technologies
Agilent Technologies 100 Operator's manual

Beckman Coulter
Beckman Coulter COULTER EPICS XL Getting started

BD
BD FACSAria II Quick reference guide

Cole Parmer
Cole Parmer StableTemp 03405-00 Operation manual and parts list

Precisionary
Precisionary Compresstome VF-210-0Z user manual

Granite River Labs
Granite River Labs GRL-PCIE-TX Quick start user guide

Cole Parmer
Cole Parmer HP-400 Series instruction manual