Manufactured by Bayco Products, Inc. • 640 South Sanden Blvd. • Wylie, TX 75098
1-800-233-2155 • 1-469-326-9400 • www.nightstick.com
INS-TCM-10-GL-LG-22
Manufactured by Bayco Products, Inc. • 640 South Sanden Blvd. • Wylie, TX 75098
1-800-233-2155 • 1-469-326-9400 • www.nightstick.com
INS-TCM-10-GL-LG-22
Mode d’emploi
TCM-10-GL
SÉCURITÉ DES ARMES
LA NON-CONFORMITÉ AUX INSTRUCTIONS
DE SÉCURITÉ ET D’UTILISATION LORS DE LA
MANIPULATION DES ARMES À FEU OU DU NIGHTSTICK
TCM LORSQU’ILS SONT MONTÉS SUR DES ARMES À
FEU EST DANGEREUSE ET PEUT ENTRAÎNER DES
BLESSURES GRAVES, DES DOMMAGES MATÉRIELS
OU LA MORT.
yL’usage d’une arme à feu est, en toute circonstance,
essentiellement dangereux. DES BLESSURES GRAVES
OU MÊME LA MORT peuvent subvenir sans formation
adéquatesurlamanipulationentoutesécuritédesarmesà
feu.Uneformationpertinentedevraitêtreobtenueàpartir
d’unprogrammereconnusurlasécuritédesarmesàfeu
dirigéeparuninstructeurqualié.
yLire, comprendre et suivre toutes les directives de
sécurité qui viennent avec votre arme à feu avant
l’assemblagedevotrenouvellelampeTCM.
yToujoursprésumerquechaquearmeàfeusoitchargée
ettraitercettearmeàfeucommetelle.
yNejamaisdirigerunearmeàfeusurunobjetdontvous
nevoulezpasdétruire.
yNe jamais réparer votre arme à feu ou votre lampe
TCMlorsqu’elleestmontéesurl’armesanspremièrement
activerlasûreté(s’ilyalieu), enleverlechargeur,ouvrir
l’armeetvériervisuellementetmanuellementpourvous
assurerqu’iln’yaucunemunitiondansl’armeàfeu.
SÉCURITÉ POUR LAMPE TORCHE
MONTÉE SUR ARME
yNightstick recommande que la lampe TCM soit
uniquement activée avec la main qui n’est pas sur la
détente(maind’appui)enutilisantunepriseàdeuxmains
et avec le doigt utilisé pour la détente complètement à
l’extérieurdupontets’ilyalieu.
yPratiquer rigoureusement (en utilisant des conditions
d’entraînement sécuritaires) avec la lampe TCM et une
armeàfeudéchargéeavantl’utilisationdel’arme.
AVANT D’ATTACHER, INSPECTER OU
ENTRETENIR LA LAMPE TCM
yEnclencherlasécuritédel’armeàfeu(s’ilyalieu).
yEnleverlechargeurdel’armeàfeu(s’ilyalieu).
yOuvrirl’armeetvériervisuellementetmanuellementla
chambrepourvousassurerqu’ellesoitvide.
yGarderlecanondel’armepointédansunedirectionsûre
en tout temps et ne jamais placer votre main devant la
bouchedel’arme.
AVERTISSEMENT: IL EST IMPORTANT QUE DES
MESURES DE SÉCURITÉ SOIENT PRISES EN TOUT
TEMPS LORS DE LA MANIPULATION D’UNE ARME À FEU.
SCANNER POUR LA VIDÉO
D’INSTRUCTION DE MONTAGE
https://youtu.be/wrAOY9tZVrM
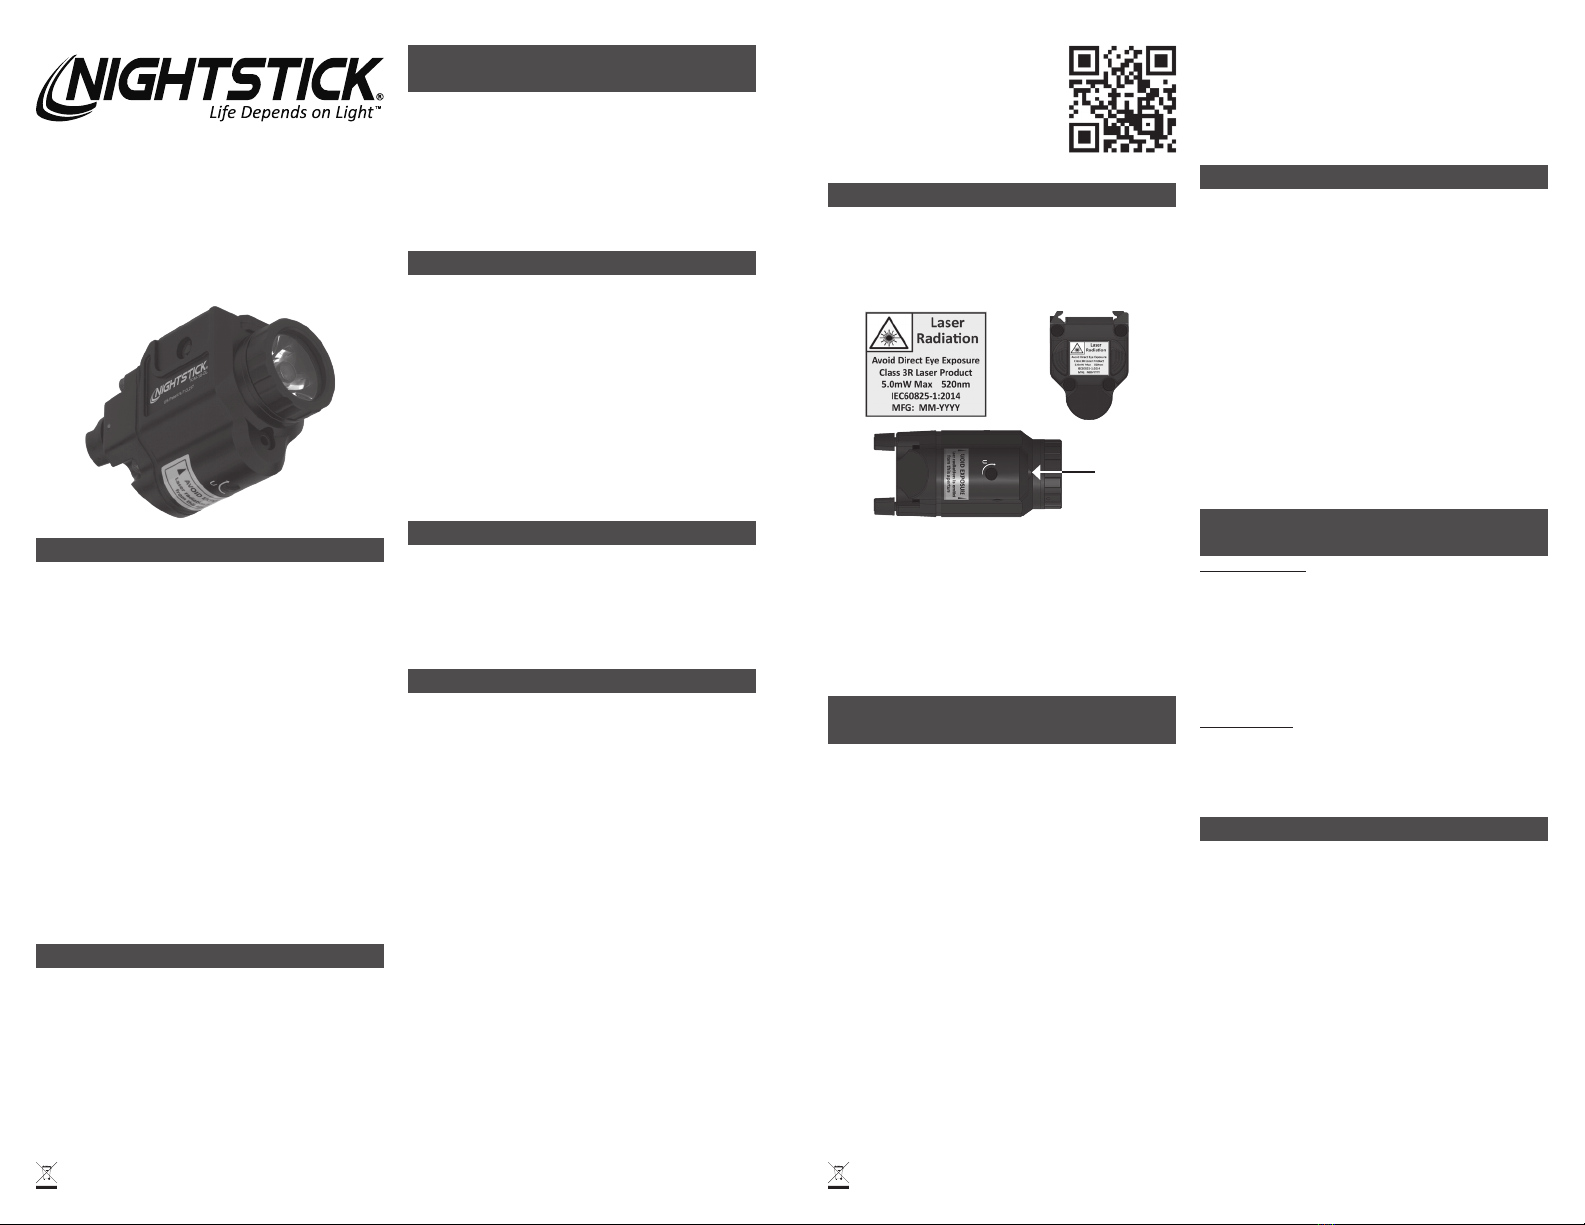
RAYONNEMENT LASER
ATTENTION : L’utilisation de commandes ou de
réglages ou l’exécution de procédures autres que ceux/
celles spéciées dans le présent document peut entraîner
uneexpositionàdesrayonnementsdangereux.
AVERTISSEMENT : Puissance maximale de
rayonnement laser mesurée à 5.0 MW. Éviter l’exposition
directedesyeux.Nepasxerlefaisceau.Nepasallumerla
lumièreenregardantdirectementdanslalunette.
Lesétiquettesd’avertissementd’ouvertureetdelaserde
classe 3R sont situées au bas et à l’arrière de la lumière,
commeillustréci-dessus.
Conforme à 21 CFR 1040.10 et 1040.11 sauf pour la
conformité avec IEC 60825-1 Ed. 3., tel que décrit dans
l’avislasern°56,datédu8mai2019.FabriquéparLuxgend
ElectronicsCo.Ltd.,n°7,JiaHuaRoad,QianLoong,villede
SanXiang,ZhongShan,Guangdong,Chine528437.
LeTCM-10-GLn’estpasdestinéàêtreréparé.Veuillez
contacterleserviceàlaclientèledeBaycosileproduitne
fonctionne pas correctement. Voir la section « Garantie »
pourplusd’informations.
PROGRAMMER LES PARAMÈTRES
SÉLECTIONNABLES PAR L’UTILISATEUR
Pourprogrammerlemodestroboscopiqueousansbatterie,
les deux commutateurs sont enfoncés en même temps.
Programmezlalumièredepuislapositionmarcheouarrêt.
Lesmodes de sécuritéstroboscopique et batteriesont
désactivéslorsqueleproduitarrivedel’usine.
MODES LUMIÈRE ET LASER
En maintenant enfoncé l’interrupteur latéral gauche ou
droit,appuyeretrelâcherl’interrupteuropposépourparcourir
les modes : 1) lumière blanche uniquement, 2) laser vert
uniquementou3)lumièreblancheetlaservert.
yParcourir chaque mode en maintenant enfoncé un
interrupteurtoutenappuyantetenrelâchantl’interrupteur
latéralopposé.
yLorsque le mode souhaité est sélectionné, relâcher
l’interrupteuretlalumièreresteradanslemodesélectionné
lorsdufonctionnementnormal.
REMARQUE: Le mode d’éclairage sélectionné par
l’utilisateur est conservé en mémoire lorsque les piles
sont retirées ou complètement déchargées.
MODE STROBOSCOPIQUE
Appuyez rapidement 5 fois (moins d’une seconde
entre les pressions) pour activer ou désactiver le mode
stroboscopique.
Après cinq pressions, la lumière clignotera 2 fois pour
conrmerunchangementdemodestroboscopique.
REMARQUE:Lemodestroboscopiquesélectionnépar
l’utilisateurestconservé enmémoirelorsquelespiles sont
retiréesoucomplètementdéchargées.
MODE SANS ÉCHEC DE LA BATTERIE
Appuyezetmaintenezenfoncépendant3secondespour
activeroudésactiverlemodesanséchecdelabatterie.
Après trois secondes, le voyant clignotera 1 fois pour
conrmerunchangementdanslemodedesécuritédelabatterie.
REMARQUE: Le mode sans échec de la batterie
redevient désactivé lorsque les batteries sont retirées ou
complètementdéchargées.
FONCTIONNEMENT
Lescommutateurslatérauxgaucheetdroitfonctionnent
demanièreindépendante.L’activationdel’unoul’autredes
interrupteursallumeralalumière.
yActiver/désactiver:Appuyezetrelâchez.
yMomentané allumé: maintenez la touche enfoncée
pendant0,5secondeouplus.Relâchez-lapourl’éteindre.
ySilemodestroboscopiqueestactif,appuyezrapidement
surl’undescommutateurs2foisetmaintenezladeuxième
pression pour allumer le stroboscope. (Moins de 0,5
secondeentrelespressions.)Lestroboscoperesteallumé
jusqu’àcequel’interrupteursoitrelâché.
AVERTISSEMENT STROBOSCOPIQUE (XLS Modèles)
L’exposition à des lumières stroboscopiques peut
causer des étourdissements, une désorientation et des
nausées. Un très faible pourcentage de personnes
souffrent d’épilepsie photosensible et peuvent avoir des
convulsions ou des évanouissements déclenchés par des
lumières stroboscopiques. Pour plus d’informations sur la
photosensibilitéetlessaisiesdelaFONDATIONEPILEPSY,
rendez-vous sur www.epilepsy.com. Toute personne qui a
eudessymptômesliésàcetteconditiondevraitconsulterun
médecinavantd’utiliserceproduit.
AJUSTEZ LA DÉRIVE ET L’ÉLÉVATION
DU LASER
Ajustementbrut
yDéterminez la distance à laquelle vous souhaitez
quele laseret laballe secroisent (distancezéro). Nous
recommandonsde5à20mètres.
yTenez l’arme de poing et alignez correctement les
viseursavantetarrièresurcettedistance.
yUtilisezlacléAlleninclusepourtournerlesvisdedérive
(latérale) et d’élévation (inférieure) pour régler le laser
jusqu’àcequ’ilsoitalignéaveclehautduviseuravant.
Réglageprécis
yAu champ de tir, afnez le point de visée pour qu’il
correspondeaupointd’impactàladistancesouhaitée.
yUtilisezlacléAllenincluseetlesèchesdirectionnelles
pourafnerdavantageladériveetl’élévationendéplaçant
lepointd’impact.
GARANTIE
GARANTIE À VIE LIMITÉE
BaycoProducts,Inc.garantitqueceproduitestexempt
dedéfautsdematériauxetdefabricationàl’acheteuroriginal
duranttoutesavie.LagarantieàvielimitéeinclutlesDEL,
les boîtiers et les lentilles. Les batteries rechargeables,
les chargeurs, les interrupteurs, les électroniques et les
accessoires compris sont garantis pour une période de
deux ans avec une preuve d’achat. L’usure normal et
les défaillances qui sont causés par des accidents, une
mauvaiseutilisation,unabus,uneinstallationdéfectueuseet
unsystèmed’éclairageendommagésontexclus.
Ceproduitseraréparéouremplacésinousdéterminons
qu’ilest défectueux. Ceciest laseule garantie expliciteou
implicite,ycompristoutegarantiedequalitémarchandeou
d’adéquationàunusageparticulier.
Pourunecopiedétailléedelagarantie,vousrendresur
le site www.baycoproducts.com/nightstick-product-support/
warranties.Gardezcereçucommepreuved’achat.
CONSIGNES DE SÉCURITÉ GÉNÉRALES
yNEPASUTILISERAU-DESSUSDESEMPLACEMENTS
DANGEREUX.
yNE PAS utiliser dans une atmosphère explosive,
près des liquides inammables, ou lorsque des lampes
antidéagrantessontrequises.
yNEPASutiliseràproximitédevéhiculesouéquipements
oùilyarisquedeliquidesinammablesentrantencontact
aveclalampedepoche.
yNEPASexposerlespilesdansl’eauoul’eausalée,ou
permettreauxpilesd’êtremouillées.
yNEPASentreposerlespilesavecdesobjetsmétalliques
quirisquentdecauseruncourt-circuit.
yCesser immédiatement d’utiliser les piles si elles
émettentuneodeurinhabituelle, sontchaudes,changent
decouleur,deformeouellesontuneapparenceanormale.
yGarderhorsdelaportéedesenfants.
INSTALLATION DES PILES
AVERTISSEMENT DE SÉCURITÉ: ASSUREZ-VOUS
TOUJOURS QUE L’ARME EST SÉCURITAIRE ET
DÉCHARGÉE AVANT DE CHANGER LA BATTERIE..
yDévissezetretirezlecache.
yInsérez la pile CR123A fournie avec le pôle positif (+)
enpremier.
yReplacez le cache et serrez-le jusqu’à ce qu’il soit
complètementenplace.
INSTALLATION DE LA LAMPE SUR
L’ARME À FEU
LalampeTCMestconçuepourêtrefacilementattachée
et détachée du rail tactique de l’arme à feu. Cependant,
l’armeàfeudoitavoirunrailtactiqueetdoitavoiraumoins
unefentedexation àrails.LeTCMn’est pasconçupour
êtreutilisésurunearmeàfeuquinedétientpasdefentede
xationàrails.
IMPORTANT: Votre TCM est préconguré avec l’insert
modulaire C1. Si l’ajustement n’est pas correct pour
votre modèle d’armes de poing spécique, passez à
l’insert C2, C3, C4 ou C5 qui convient le mieux à votre
arme à feu. L’installation correcte des clés est vériée
par la lumière positionnée près du pontet avec seulement
un léger espace visible. L’espace minimal assure un bon
ajustement avec la plupart des étuis.
yPousser vers l’intérieur sur la tête de la vis à serrage
à main de tension du dispositif à rails pour ouvrir
complètementlaportionajustabledudispositifàrails.
yAlignerl’insertion delaxationà railsavecla fentede
votrearmeàfeu.
yTournerlalampeTCMsurlerailtactiqueetpuisrelâcher
lapressionsurlavisàserrageàmaindetensionenvous
assurantquelalampeagrippefermementlesdeuxcôtés
durailtactiquedevotrearmeàfeuetvérierquel’insertion
delaxationàrailsestbienajustéedanslafentedurail
tactiquedevotrearmeàfeu.
yPendantquevousmaintenezfermementlalampeTCM
sur le rail tactique, serrer fermement à la main la vis à
serragedetension.
yPuis utiliser une pièce de monnaie pour serrer
complètementlesystèmedemontagedelalampe.
IMPORTANT: Vériez régulièrement que les vis à six pans
creux et la vis de tension du serre-rail sont bien serrées.