WARNING: IT IS IMPERATIVE THAT SAFETY MEASURES BE EMPLOYED AT
ALL TIMES WHILE HANDLING A FIREARM.
WATCH COMPLETE INSTALLATION VIDEO AT: http://bit.ly/2oN4VXC
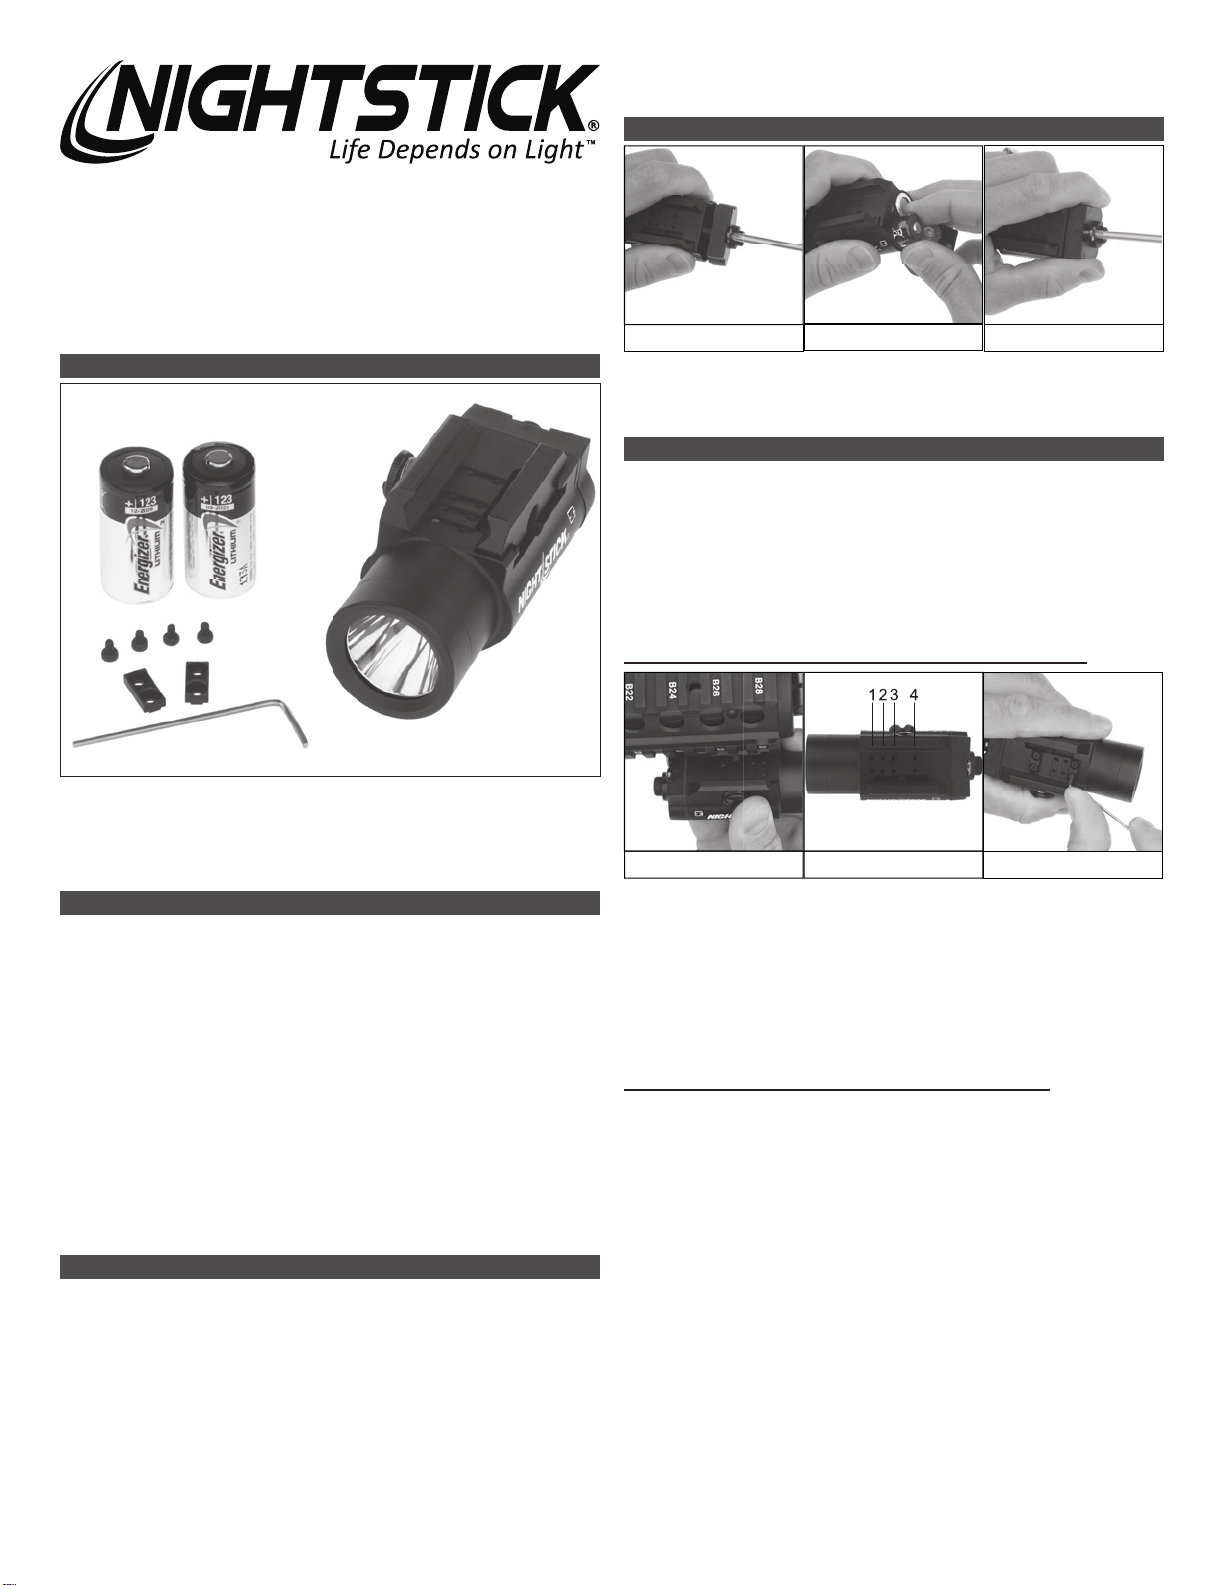
INSTALL BATTERIES
Image 1 Image 2 Image 3
yOpen the Battery Door Screw using a Phillips head screwdriver. (Image 1)
yInsert the included CR-123 Batteries using the battery orientation markings on
the side of the light. (Image 2)
yRe-install the Battery Door Screw until fully tightened. (Image 3)
INSTALL THE TWM ON TO YOUR FIREARM
Your TWM comes with both cross rail inserts pre-installed in cross rail slots 1 & 4.
yIf the location of one or both of these is not correct for your speci c installation,
remove either or both of the inserts and then proceed to step 1.
yIf the location of the pre-installed inserts is correct for your rearm, proceed
to step 3.
WARNING: DO NOT INSTALL THE TWM ONTO A FIREARM WITHOUT
USING THE CROSS RAIL INSERT. FAILURE TO USE A CROSS RAIL INSERT
COULD RESULT IN THE TWM COMING LOOSE FROM THE FIREARM
UNDER EVEN NORMAL RECOIL.
STEP 1: DETERMINE WHICH CROSS RAIL INSERT SLOT TO USE
Image 4 Image 5 Image 6
yHold the TWM alongside the Picatinny rail on your rearm and determine which
of the 4 Cross Rail Insert Slots milled into the top of the TWM is best suited for
your rearm. (Image 4)
yAsingle Cross Rail Insert can be installed in any of the 4 Cross Rail Insert Slots
milled into the top of the TWM.
ySlots 1, 3 & 4 (Image 5) are set up at a standard 1913 spacing, meaning that
all 3 will line up with a Mil-STD-1913 Picatinny Rail. If the desired installation
location on your rearm will allow it, both of the 2 included Cross Rail Inserts may
be installed in any combination of slots 1, 3 or 4. Using both of the Cross Rail
Inserts will increase the retention of the TWM onto the Picatinny rail.
STEP 2: INSTALL THE CROSS RAIL INSERT INTO THE TWM
yLine up the Insert into the correct slot and make sure it is fully seated into the
slot.
yUsing the 2 Cross Rail Insert Cap Head Screws and the suppliedAllen Wrench,
begin installing the Cap Head Screws.
yIf installing a second insert, repeat the rst two steps using the additional insert.
yFully tighten all Cap Head Screws using the long side of the Allen Wrench.
(Image 6)
NOTE: The Allen Wrench should ex a very small amount when the Cap Head
Screws have been tightened correctly.
WARNING: NIGHTSTICK STRONGLY RECOMMENDS PERIODICALLY
CHECKING TO INSURE THAT THE CROSS RAIL INSERT SCREWS REMAIN
TIGHTENED. FAILURE TO KEEP THESE SCREWS TIGHT CAN RESULT IN
DAMAGE TO THE TWM AND/OR THE CROSS RAIL INSERTS UNDER RECOIL.
Instruction Manual
TWM-352/852
Please read these instructions before using your Nightstick TWM-352/852.
They include important assembly and operating instructions.
PACKAGE CONTENTS
y1 - Weapon Mounted Light – Long Gun Single Switch
y2 - CR-123 Lithium Batteries
y1 - Set of Cross Rail Inserts (pre-installed)
y4 - Cross Rail Mounting Cap Head Screws (pre-installed)
y1 - Allen Wrench
WEAPON SAFETY
PLEASE BE SURE TO READ, UNDERSTAND AND FOLLOW THESE SAFETY
AND OPERATING INSTRUCTIONS WHEN HANDLING A FIREARM OR THE
NIGHTSTICK TWM WHEN MOUNTED ON A FIREARM. FAILURE TO DO SO
CAN BE DANGEROUS AND COULD RESULT IN SERIOUS INJURY, DAMAGE
TO PROPERTY, OR DEATH.
Use of a rearm under any circumstance is inherently dangerous. SERIOUS
INJURY OR EVEN DEATH may result without proper training in the safe handling
of rearms. Proper training should be obtained from an accredited rearms safety
program conducted by a quali ed instructor.
Read, understand and follow all of the safety instructions that came with your
rearm before attaching your new TWM.
yAlways assume every rearm is loaded and treat that rearm as such.
yNever point a rearm at anything that you are not willing to destroy.
yNever service your rearm or your TWM when mounted on a rearm without
rst activating the weapon’s safety (if applicable), removing the magazine,
opening the action and physically and visually inspecting to make sure that no
ammunition is installed in the rearm.
BEFORE ATTACHING, INSPECTING OR SERVICING THE TWM
yEngage the safety on the rearm (if applicable).
yRemove the magazine from the rearm (if applicable).
yOpen the action and visually and physically inspect the chamber to be sure it
is empty.
yKeep the barrel pointed in a safe direction at all times and never place your
hand in front of the muzzle.


