manuals.online logo
Brands
  1. Home
  2. •
  3. Brands
  4. •
  5. NiteRider
  6. •
  7. Bicycle Accessories
  8. •
  9. NiteRider PRO 2800 User manual

NiteRider PRO 2800 User manual

USB OUTPORT PORT
150-23508-001 Rev A
PRO 2800 ENDURO REMOTE
PRO 3600 ENDURO REMOTE
USER GUIDE
BATTERY CHARGING AND CARE
1. Plug the AC Adapter into an electric outlet, then plug the cable
from the AC Adapter into the battery.
2. The LED indicator on the battery will turn red while the battery
is charging. When the battery is fully charged, the LED will
turn blue.
3. Unplug the AC Adapter from the battery by grasping the
connectors rather than the cable.
4. Always store your battery away with a full charge.
For extended periods, charge the battery every three months
to maximize its lifespan.
USB OUTPUT PORT
Your battery pack is equipped with a USB output port for
convenient recharging of electronic devices.
1. Plug in your USB adapter cord (not supplied) into USB output
port, then connect your electronic device to charge.
Please note to power o lighting system before recharging your electronic device
RUN TIMES
RIDING AT NIGHT
While a Pro 2800 / 3600 Enduro lighting system will improve your
view, control and enjoyment of night riding, please remember that
cycling at night is an inherently dangerous activity. In addition to
using your lighting system properly and riding with extreme
caution, NiteRider®urges you to:
• Never ride alone
• Always let someone know where you are going
• Wear a helmet and reective clothing
• Carry an auxiliary light and emergency supplies
• Make sure the headlamp, mounting bracket
and battery are securely fastened
• Always disconnect the battery from the headlamp
when transporting the light system
PROTECTING YOUR INVESTMENT
Properly charge your battery to maximize its lifespan (see the
“Battery Charging and Care” section for detailed information).
The Pro 2800 / 3600 Enduro will perform in wet weather
conditions, but submerging it in water will damage the system.
SUPPORT
If you experience diculties during product installation or
operation, NiteRider®provides free telephone support on
weekdays from
8:00 am to 4:30 pm (Pacic Time) at 800.466.8366, Ext 4.
You may also e-mail us at support@niterider.com.
WARRANTY
NiteRider®stands behind its products with the following
warranties:
• Lifetime warranty: Covers any defects in material
and workmanship, mechanical components (housings, covers,
mounts and fasteners) and LEDs
• 2-year warranty: Printed circuit boards, switches,
and AC adapters
• 1-year Warranty: Rechargeable battery cells
To obtain warranty service have your original sales receipt.
Contact the NiteRider® Customer Service
Department at 800.466.8366, Ext. 4 to obtain a Return
Merchandise Authorization (RMA) number. The RMA number
must be prominently displayed on the outside of your package.
The product must be properly packaged to prevent damage
in transit.
For complete warranty information, please visit our website
at www.NiteRider.com
NiteRider®Technical Lighting Systems, Inc.
8295 Aero Place, Suite 200
San Diego, CA 92123
www.NiteRider.com
*Run times are approximations and will vary.
**Race mode is intended for endurance races.
PRO 2800 Enduro Remote
Low 6:00h 825 Lumens
Med 3:00h 1400 Lumens
High 1:30h 2800 Lumens
Flash >56:00h
Race 17:00h 375 Lumens
Walk 56:00h 125 Lumens
PRO 3600 Enduro Remote
Low 6:00h 1000 Lumens
Med 3:30h 1800 Lumens
High 1:30h 3600 Lumens
Flash >16:30h
Race 16:30h 450 Lumens
USE THE LIGHT THAT PROS USE
NiteRider®provides cyclists the most durable, reliable, and best
performing lights in the market. It’s not a statement we make
lightly, as the backbone of our success has been built on providing
lights of exceptional quality to this very demanding market sector.
Through 24 years of actively supporting professional riders at 12
and 24 hour endurance events, we have learned what
it takes to become the stand alone leader in bike lighting.
PARTS LIST AND IDENTIFICATION
Please verify the contents of your Pro 2800 / 3600 Enduro system:
A. Pro 2800 / 3600 Enduro Headlamp
B. Remote Switch
C. Li-Ion Enduro Battery
D. Universal Handlebar Mount (UHM)
E. 36” Extension Cable (Pro 2800 Enduro only)
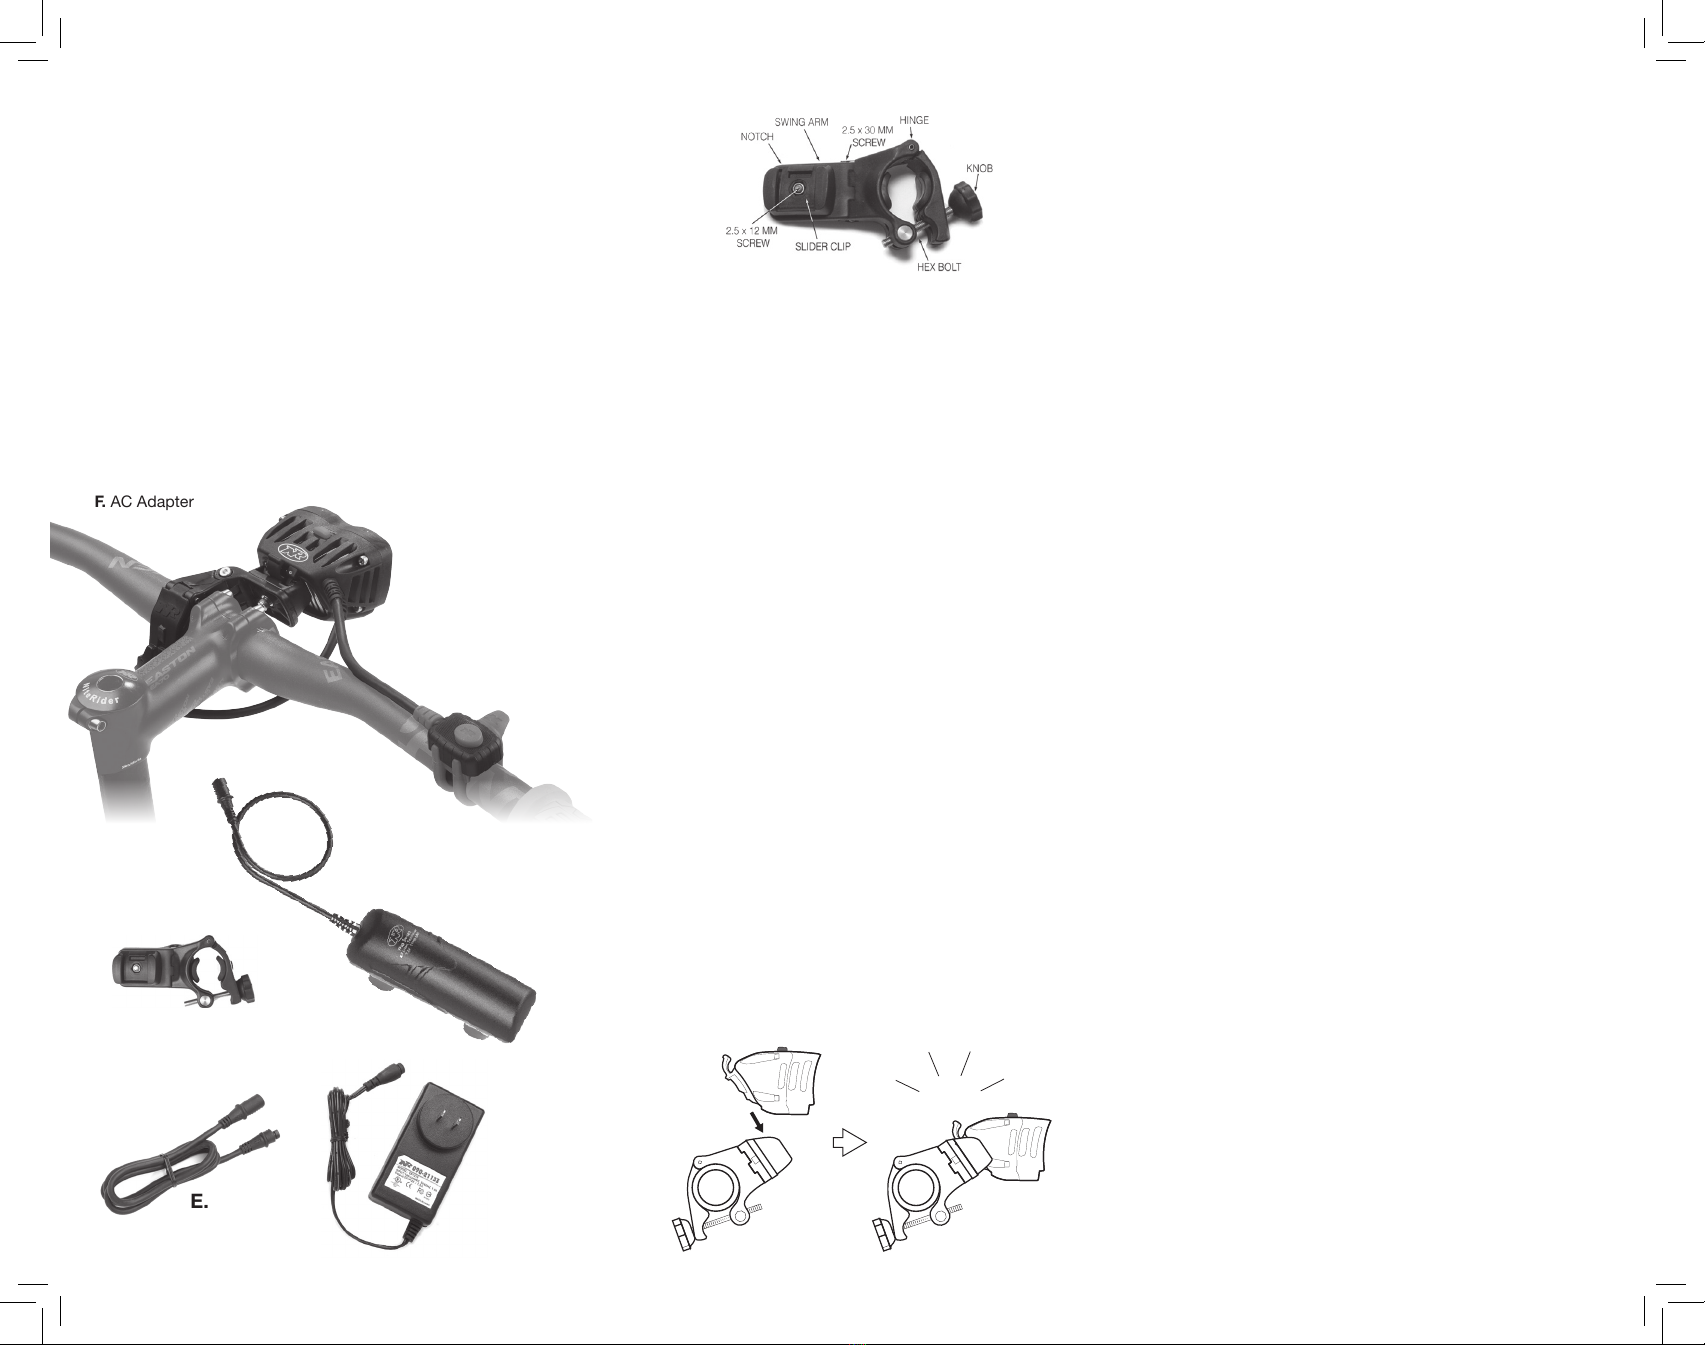
F. AC Adapter
C.
D.
F.E.
A.
B.
Handlebars not included
MOUNTING THE HEADLAMP
Universal Handlebar Mount
The Universal Handlebar Mount (UHM) is designed to t on virtually
any handlebar (25.4mm - 35mm diameter handlebars with the
included extra length screw). Included with the mount is a 2.5 mm
Allen wrench for adjusting the mount.
1. Turn the knob counter-clockwise, allowing the hinge
to swing open.
2. Place the UHM on the handlebar on the left side of the stem,
orienting the rectangular notch in the slider clip to the rear.
3. Swing the hinge down to make contact with the handlebar.
4. Swing the bolt up, seating the knob into its recess.
5. Turn the knob clockwise to tighten and secure the mount
to the handlebar.
The UHM can be adjusted to accommodate any handlebar angle.
By loosening the 2.5 x 30 mm Allen screw, you can move the swing
arm back and forth to straighten the headlamp.
Tighten the 2.5 x 30 mm screw after the adjustment. To pivot
the headlamp, loosen the 2.5 x 12 mm screw located under the
slider clip and swing arm and rotate the headlamp to the desired
position. Make this adjustment before tightening the 2.5 x 30 mm
screw.
Inserting the Headlamp into the Handlebar
Insert the headlamp into the handlebar slider clip from the rear
moving forward. Gently rocking the lamp as you slide it may help.
Do not push the release lever when inserting the headlamp into the
slider clip; let the lamp snap into place by itself.
To remove the headlamp, push the release lever forward and slide
the lamp backward.
Note: After mounting the headlamp, adjust it so the beam illuminates the road
without distracting oncoming riders.
CLICK!
MOUNTING THE BATTERY
Warning: For safety reasons, a cyclist should never be tethered
to the bike. When the headlamp is mounted to the handlebar,
do not place the battery in a pocket or pack.
Mounting the Battery to the Bike Frame
1. Thread the hook/loop straps through the two slots on the
bottom of the battery.
2. Attach the concave surface of the battery to a safe, convenient
location on the frame (typically under the top or down tube),
placing the hook/loop strap over the tube, but under any shift
or brake cables. The cable from the battery should extend
toward the stem.
3. Secure the headlamp and battery cable to the frame using
the thin hook/loop strapettes. Make sure the cables do not
interfere with any moving parts.
OPERATION
1. Connect the headlamp cable to the battery.
2. Press and release the Remote Switch power button to turn the
light on. Cycle through the four brightness levels by pressing
and releasing the power button.
3. To access the daylight safety ash mode, press and hold the
power button until the headlamp starts to ash.
4. With the headlamp in ash mode, press and release the power
button to access beacon, SOS or walk modes. From walk
mode you can return to normal mode by pressing and
releasing the power button.
5. To turn the headlamp o from normal, ash or walk modes,
press and hold the power button until the headlamp shuts o.
6. Always disconnect the battery from the headlamp when
transporting the light system. This prevents accidentally
turning the headlamp on, which may cause overheating
and potential damage from high heat or even a risk of re
Fuel Gauge
The 8-step, LED Fuel Gauge is located on top of the headlamp
in front of the power button. When all four LED’s are lit solid
green, the battery is fully charged. As the battery discharges
⅛ increments of capacity, the LED’s from right to left,
successively go from solid green to blinking green, to out.
With only the nal ⅛ capacity remaining one LED blinks red.
At this time, the headlamp should be turned o and the
battery recharged.

This manual suits for next models

1

Other NiteRider Bicycle Accessories manuals

NiteRider PRO 1800 Race User manual

NiteRider

NiteRider PRO 1800 Race User manual

NiteRider Lumina Micro 220 User manual

NiteRider

NiteRider Lumina Micro 220 User manual

NiteRider MiNewt Mini 300-USB User manual

NiteRider

NiteRider MiNewt Mini 300-USB User manual

NiteRider MiNewt.200 User manual

NiteRider

NiteRider MiNewt.200 User manual

NiteRider PRO 3600 DIY REMOTE User manual

NiteRider

NiteRider PRO 3600 DIY REMOTE User manual

NiteRider Evolution User manual

NiteRider

NiteRider Evolution User manual

NiteRider PRO Series User manual

NiteRider

NiteRider PRO Series User manual

NiteRider PRO 2800 ENDURO REMOTE User manual

NiteRider

NiteRider PRO 2800 ENDURO REMOTE User manual

NiteRider Pro Series User manual

NiteRider

NiteRider Pro Series User manual

NiteRider PRO 2200 RACE User manual

NiteRider

NiteRider PRO 2200 RACE User manual

NiteRider FireStorm User manual

NiteRider

NiteRider FireStorm User manual

NiteRider RoadRat User manual

NiteRider

NiteRider RoadRat User manual

NiteRider Solas 250 User manual

NiteRider

NiteRider Solas 250 User manual

NiteRider PRO 1400 RACE User manual

NiteRider

NiteRider PRO 1400 RACE User manual

NiteRider LUMINA MAX 2500 User manual

NiteRider

NiteRider LUMINA MAX 2500 User manual

NiteRider Evolution Smart User manual

NiteRider

NiteRider Evolution Smart User manual

NiteRider MiNewt Dual User manual

NiteRider

NiteRider MiNewt Dual User manual

Popular Bicycle Accessories manuals by other brands

Galeo Galeo user guide

Galeo

Galeo Galeo user guide

Shimano DURA-ACE FC-R9100 Dealer's manual

Shimano

Shimano DURA-ACE FC-R9100 Dealer's manual

BAFANG BT C01.340.UART Customer's manual

BAFANG

BAFANG BT C01.340.UART Customer's manual

Minshine T154 Series manual

Minshine

Minshine T154 Series manual

Cateye TRIPLE SHOT PRO HL-EL830RC instruction manual

Cateye

Cateye TRIPLE SHOT PRO HL-EL830RC instruction manual

Navad Trail 200 Quick manual guide

Navad

Navad Trail 200 Quick manual guide

Specialized Elite CylcoComputer user manual

Specialized

Specialized Elite CylcoComputer user manual

Sigma BC 16.16 manual

Sigma

Sigma BC 16.16 manual

Playcore Dero Setbacks installation instructions

Playcore

Playcore Dero Setbacks installation instructions

VDO Cyclecomputing x3dw instruction manual

VDO Cyclecomputing

VDO Cyclecomputing x3dw instruction manual

Cateye RAPID X2 manual

Cateye

Cateye RAPID X2 manual

buratti meccanica Clorofilla Trail Use and maintenance manual

buratti meccanica

buratti meccanica Clorofilla Trail Use and maintenance manual

Shimano SG-8R20 Service instructions

Shimano

Shimano SG-8R20 Service instructions

BOB YAK owner's manual

BOB

BOB YAK owner's manual

APLIC 303303/20190717TW012 user manual

APLIC

APLIC 303303/20190717TW012 user manual

Polini HI-SPEED E-BIKE quick start guide

Polini

Polini HI-SPEED E-BIKE quick start guide

SRAM AXS BlipBox user manual

SRAM

SRAM AXS BlipBox user manual

Shimano FD-RX810 Dealer's manual

Shimano

Shimano FD-RX810 Dealer's manual

manuals.online logo
manuals.online logoBrands
  • About & Mission
  • Contact us
  • Privacy Policy
  • Terms and Conditions

Copyright 2025 Manuals.Online. All Rights Reserved.