manuals.online logo
Brands
  1. Home
  2. •
  3. Brands
  4. •
  5. Nitsuko
  6. •
  7. Voicemail
  8. •
  9. Nitsuko NVM-Series User manual

Nitsuko NVM-Series User manual

17600QRC04
Voice Mail and Automated Attendant
Quick Reference Guide
NVM-
Series
Part No. 17600QRC04
Issue 1-0 January 1998
Printed in U.S.A. (183)
4 Forest Parkway, Shelton, CT 06484
TEL: 203-926-5400 FAX: 203-929-0535
Sending Calls to a Mailbox
For ONYX/DS01: Get Intercom dial tone
●
Press #
●
Dial NVM-
Series
master ext.
●
Press 1 to forward unanswered calls or 2
for busy and unanswered calls or 3 for all calls
●
Hang up
For 124i/384i Keysets: Press idle CALL key
●
Press Call Forwarding key or dial *2
●
Dial Call Forwarding Type (2 on busy; 6 on
no-answer; 4 to forward all calls)
●
Press Voice Mail key or dial NVM-
Series
master ext.
●
Select type of calls to be forwarded (dial
2 for all calls, 3 for outside calls or 4 for Intercom calls)
●
Hang up
For Portrait: Press SPK
●
Press TRFR
●
Dial Voice Mail ext
●
Dial Call Forwarding type (0 for all calls, 1 for busy, 2 for no
answer, 3 for busy/no answer)
●
Press SPK
For ONYX/DS01: Get Intercom dial tone
●
Press #
●
Hang up
For 124i/384i Keysets: Press idle CALL key
●
Dial *20
For Portrait: Press SPK
●
Press TRFR twice
●
Press SPK
For ONYX/DS01: Press TRF (if none, press Intercom key)
●
Press MSG key
●
Dial mailbox
●
Hang up
For 124i/384i Keysets: Press HOLD
●
Press Voice Mail key
●
Call extension
●
Hang up
For Portrait: Press ICM
●
Dial ext.
●
Press 3
●
Press TRFR
●
Hang up
For ONYX/DS01/124i/384i/Portrait:Press RECORD key to start/stop (conversation goes into your mailbox)
To record your phone
conversation
To transfer your outside call
to a mailbox
To cancel forwarding
To forward your incoming
calls to your mailbox
Additional Ways to Call the Auto Attendant or Your Mailbox
For ONYX/DS01/124i/384i: Forward calls to your mailbox (see above)
●
Call your line
●
Wait for greeting
●
Dial
❋
before
beep for Auto Attendant or # before beep for mailbox
To call Auto Attendant or
mailbox
Additional Ways to Record a Message
Dial Auto Attendant number
●
Wait for greeting
●
Press
❋●
Dial ext.
●
Leave message
●
Hang up
For ONYX/DS01: Press Message key (or dial 6 if no key)
●
Leave message after tone
●
Hang up
For 124i/384i: Press Voice Mail key (or dial 8 if no key)
For Portrait: Dial 3
After you make an Intercom
call to busy/no-answer/DND
extension
Quick Message from outside
17600QRC04_04.QXD 7/10/98 3:47 PM Page 1
Voice Mail
lets outside callers leave recorded messages for you and lets you leave recorded messages for co-workers. Messages get stored
in each person’s mailbox. To listen to your messages or use other Voice Mail features, you call your mailbox and access the Main Menu.
Automated Attendant
answers your company’s calls with a recorded Welcome Message and gives dialing instructions for callers to follow.
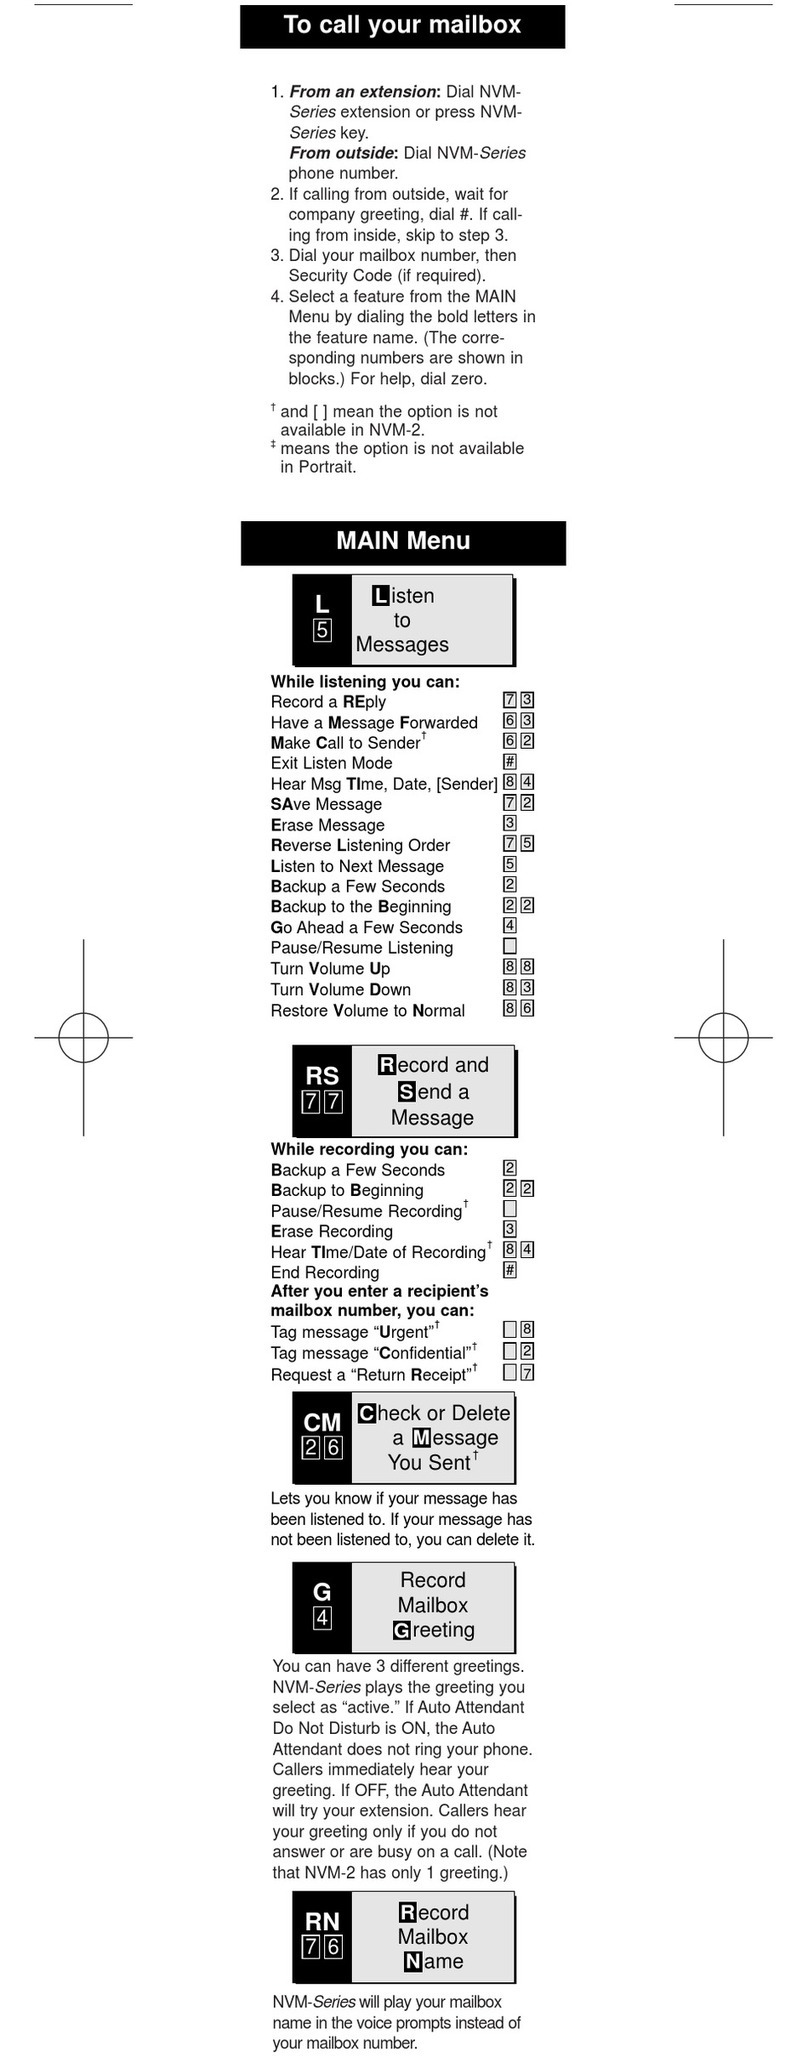
L 5Listen to Messages
RE
MF
MC
TI
SA
E
73
63
62
84
72
3
Record REply
Have Msg Forwarded
Make Call to Sender
†
Get Time, Date, [Sender]
SAve Message
Erase Msg
VU
VD
VN
#
88
83
86
#
Turn Volume Up
Turn Volume Down
Restore Volume to Normal
Exit Listen Mode
See also “Select Listen
Mode” on the Main Menu
RL
L
B
BB
G
✽
75
5
2
22
4
✽
Reverse Listening Order
Listen to Next Msg
Backup a Few Secs
Backup to Beginning
Go Ahead a Few Secs
Pause/Resume Listening
While listening you can:
B
BB
✽
E
TI
#
2
22
✽
3
84
#
Backup a Few Secs
Backup to Beginning
Pause/Resume
†
Erase Recording
Hear Time/Date
†
End Recording
While recording you can:
✽
N
✽✽
✽
6
✽✽
When done recording you can:
Main Menu
RS 77Record & Send a Message
Enter mailbox numbers to
receive msg, up to 10.
Specify recipients by name.
After you press *N, follow the
voice prompts.
Erase msg and return to
Main Menu.
CM 26
Check or Delete Message
†
Lets you know if a msg that
you sent has been listened
to. If not listened to, you can
delete it. NVM-
Series
also
lets you listen to the msg
before you delete it.
✽
R
✽
U
✽
C
#
✽
N
✽
✽✽
✽
7
✽
8
✽
2
#
✽
6
✽
✽✽
After entering a mailbox number or name you can:
Enter another mailbox number. Or, press
N to enter another mailbox name.
Request a return receipt. As soon as the
recipient listens to your msg, NVM-
Series
lets you know by placing a “receipt” in your
mailbox. The receipt consists of two parts:
the voice prompt “
The following return
receipt arrived on (date/time) from
(name or number),”
followed by the
msg that was listened to. After you press
*R, you can go to the top of this menu.
†
Tag a message as “urgent” so the mes-
sage gets priority handling in the recipient’s
mailbox. Upon logging on to their mailbox,
the recipient hears
“This is an urgent
message”
followed by the message.
†
Tag a message as “confidential.”
Recipients of confidential messages can-
not use the MF command or Auto
Forward feature to send the message to
another mailbox.
†
Send msg and return to Main Menu.
Specify next recipient by the opposite
method, then go to the top of this menu.
Cancel previous mailbox. If no mailbox
recipients remain, go to previous menu.
Otherwise, go to the top of this menu.
Erase msg and go to Main Menu.
G 4
Mailbox Greetings
You can have 3 different
greetings. NVM-
Series
plays
the greeting you select as
“active.” If Auto Attendant
DND is ON, the Auto
Attendant does not ring your
phone. Callers immediately
hear your greeting. If OFF, the
Auto Attendant will try your
extension. Callers hear your
greeting only if you do not
answer or are busy. (Note that
NVM-2 has only one greeting.)
RN 76
Record Mailbox Name
NVM-
Series
will play your
mailbox name in the voice
prompts instead of your
mailbox number.
FD 33
Future Delivery Message
NVM-
Series
sends the mes-
sage on the date and time
you specify.
PG 74
PaGing Message
†
When a caller tries to reach
you, NVM-
Series
uses the
message to page you. If the
message is ON, NVM-
Series
pages immediately. If OFF,
NVM-
Series
pages only if
you do not answer. See also
the User’s Guide.
OP 67Mailbox OPtions
TI 84TIme and Date
SA 72
Sys Admin Options
(For Sys Admin Mailboxes only)
1N
1S
1H
1A
16
17
14
12
Select Listen Mode
†
New Messages
Saved Messages
Held Messages
All Messages
These options are also avail-
able while listening to a msg.
X 9EXit Mailbox
S
N
AH
AF
7
6
24
23
Security Code
Changes or erases your
mailbox security code.
Message Notification
Calls co-worker
‡
or outside
number when you get a msg.
Auto Help
†
Turns some voice prompts
on/off.
Auto Forward
†
Copies your msgs to any
mailbox you choose.
The mailbox options are as follows:
To call your mailbox and access the Main Menu:
1. From outside: Dial NVM-
Series
phone number ________.
From any ext: Get intercom dial tone. Dial NVM-
Series
Master ext ________.
From your ONYX/DS01 ext: Press MSG key (or dial *6 if no key).
From your 124i/384i ext: Press Voice Mail key. Or, press CALL key, dial *8. On single lines, dial *8.
From your Portrait ext: Press ICM, dial *.
2. If you hear the company greeting, dial # (or other log-on code ________). Otherwise, go to step 3.
3. If requested, dial your mailbox number________.
4. If requested, dial your security code ________.
If you dial * at this point, NVM-Series will ask you to enter a mailbox number.
5. Select the desired feature from the Main Menu.
To access a feature, dial the letters shown to the left of the feature name. For your convenience, their
corresponding numbers are shown to the right. You’ll notice that the letters you dial to access a fea-
ture match some of the letters in the feature name. To get a recorded help message at any time,
press 0. For detailed information on the features, see the User’s Guide.
AT
CW
CA
#
28
29
22
#
Auto Time-Stamp
†
Plays the msg time, date
and sender after the msg.
Call Waiting
†
Lets a caller send beeps to
your ext while you are busy
on a call.
Call Announcing
†
‡
Lets you know who is calling.
Exit Menu
†
and [ ] mean the option is not available in NVM-2.
‡
means the option is not available in Portrait.
17600QRC04_04.QXD 7/10/98 3:47 PM Page 2
17600QRC04
Voice Mail and Automated Attendant
Quick Reference Guide
NVM-
Series
Part No. 17600QRC04
Issue 1-0 January 1998
Printed in U.S.A. (183)
4 Forest Parkway, Shelton, CT 06484
TEL: 203-926-5400 FAX: 203-929-0535
Sending Calls to a Mailbox
For ONYX/DS01: Get Intercom dial tone
●
Press #
●
Dial NVM-
Series
master ext.
●
Press 1 to forward unanswered calls or 2
for busy and unanswered calls or 3 for all calls
●
Hang up
For 124i/384i Keysets: Press idle CALL key
●
Press Call Forwarding key or dial *2
●
Dial Call Forwarding Type (2 on busy; 6 on
no-answer; 4 to forward all calls)
●
Press Voice Mail key or dial NVM-
Series
master ext.
●
Select type of calls to be forwarded (dial
2 for all calls, 3 for outside calls or 4 for Intercom calls)
●
Hang up
For Portrait: Press SPK
●
Press TRFR
●
Dial Voice Mail ext
●
Dial Call Forwarding type (0 for all calls, 1 for busy, 2 for no
answer, 3 for busy/no answer)
●
Press SPK
For ONYX/DS01: Get Intercom dial tone
●
Press #
●
Hang up
For 124i/384i Keysets: Press idle CALL key
●
Dial *20
For Portrait: Press SPK
●
Press TRFR twice
●
Press SPK
For ONYX/DS01: Press TRF (if none, press Intercom key)
●
Press MSG key
●
Dial mailbox
●
Hang up
For 124i/384i Keysets: Press HOLD
●
Press Voice Mail key
●
Call extension
●
Hang up
For Portrait: Press ICM
●
Dial ext.
●
Press 3
●
Press TRFR
●
Hang up
For ONYX/DS01/124i/384i/Portrait:Press RECORD key to start/stop (conversation goes into your mailbox)
To record your phone
conversation
To transfer your outside call
to a mailbox
To cancel forwarding
To forward your incoming
calls to your mailbox
Additional Ways to Call the Auto Attendant or Your Mailbox
For ONYX/DS01/124i/384i: Forward calls to your mailbox (see above)
●
Call your line
●
Wait for greeting
●
Dial
❋
before
beep for Auto Attendant or # before beep for mailbox
To call Auto Attendant or
mailbox
Additional Ways to Record a Message
Dial Auto Attendant number
●
Wait for greeting
●
Press
❋●
Dial ext.
●
Leave message
●
Hang up
For ONYX/DS01: Press Message key (or dial 6 if no key)
●
Leave message after tone
●
Hang up
For 124i/384i: Press Voice Mail key (or dial 8 if no key)
For Portrait: Dial 3
After you make an Intercom
call to busy/no-answer/DND
extension
Quick Message from outside
17600QRC04_04.QXD 7/10/98 3:47 PM Page 1

Other manuals for NVM-Series

2

Other Nitsuko Voicemail manuals

Nitsuko NVM-2 How to use

Nitsuko

Nitsuko NVM-2 How to use

Nitsuko NVM-22 User manual

Nitsuko

Nitsuko NVM-22 User manual

Nitsuko NVM-2e User manual

Nitsuko

Nitsuko NVM-2e User manual

Nitsuko NVM-Series User manual

Nitsuko

Nitsuko NVM-Series User manual

Nitsuko NVM-Series Parts list manual

Nitsuko

Nitsuko NVM-Series Parts list manual

Nitsuko NVM-2002 User manual

Nitsuko

Nitsuko NVM-2002 User manual

Nitsuko NVM-2000 Parts list manual

Nitsuko

Nitsuko NVM-2000 Parts list manual

Nitsuko NVM-NT Parts list manual

Nitsuko

Nitsuko NVM-NT Parts list manual

Nitsuko NVM-2 Operating instructions

Nitsuko

Nitsuko NVM-2 Operating instructions

Popular Voicemail manuals by other brands

Panasonic KX-NCV200 brochure

Panasonic

Panasonic KX-NCV200 brochure

Panasonic KX-TVS50 Subscriber's guide

Panasonic

Panasonic KX-TVS50 Subscriber's guide

Toshiba Strata GVMU/LVMU user guide

Toshiba

Toshiba Strata GVMU/LVMU user guide

PCS Digital PCS Mail installation manual

PCS Digital

PCS Digital PCS Mail installation manual

manuals.online logo
manuals.online logoBrands
  • About & Mission
  • Contact us
  • Privacy Policy
  • Terms and Conditions

Copyright 2025 Manuals.Online. All Rights Reserved.