2
Isolation - Before commencing work
make sure that the unit is electrically isolated
from the mains and switched live supply.
11. 05. 17. Leaflet Number 671227
Electrical installation
All units are supplied with a 1.5Mtre length of cable connected to
the fan, to ease installation without having to part the case and to
facilitate connection to a fixed electrical supply, via appropriate
switched/fused spur.
Wiring details
Wire coding: Live = L, Neutral = N, Switched live = 2, Earth =
Installation and Maintenance GENIE M 230V Duct Mounted Toilet & Bathroom Fans
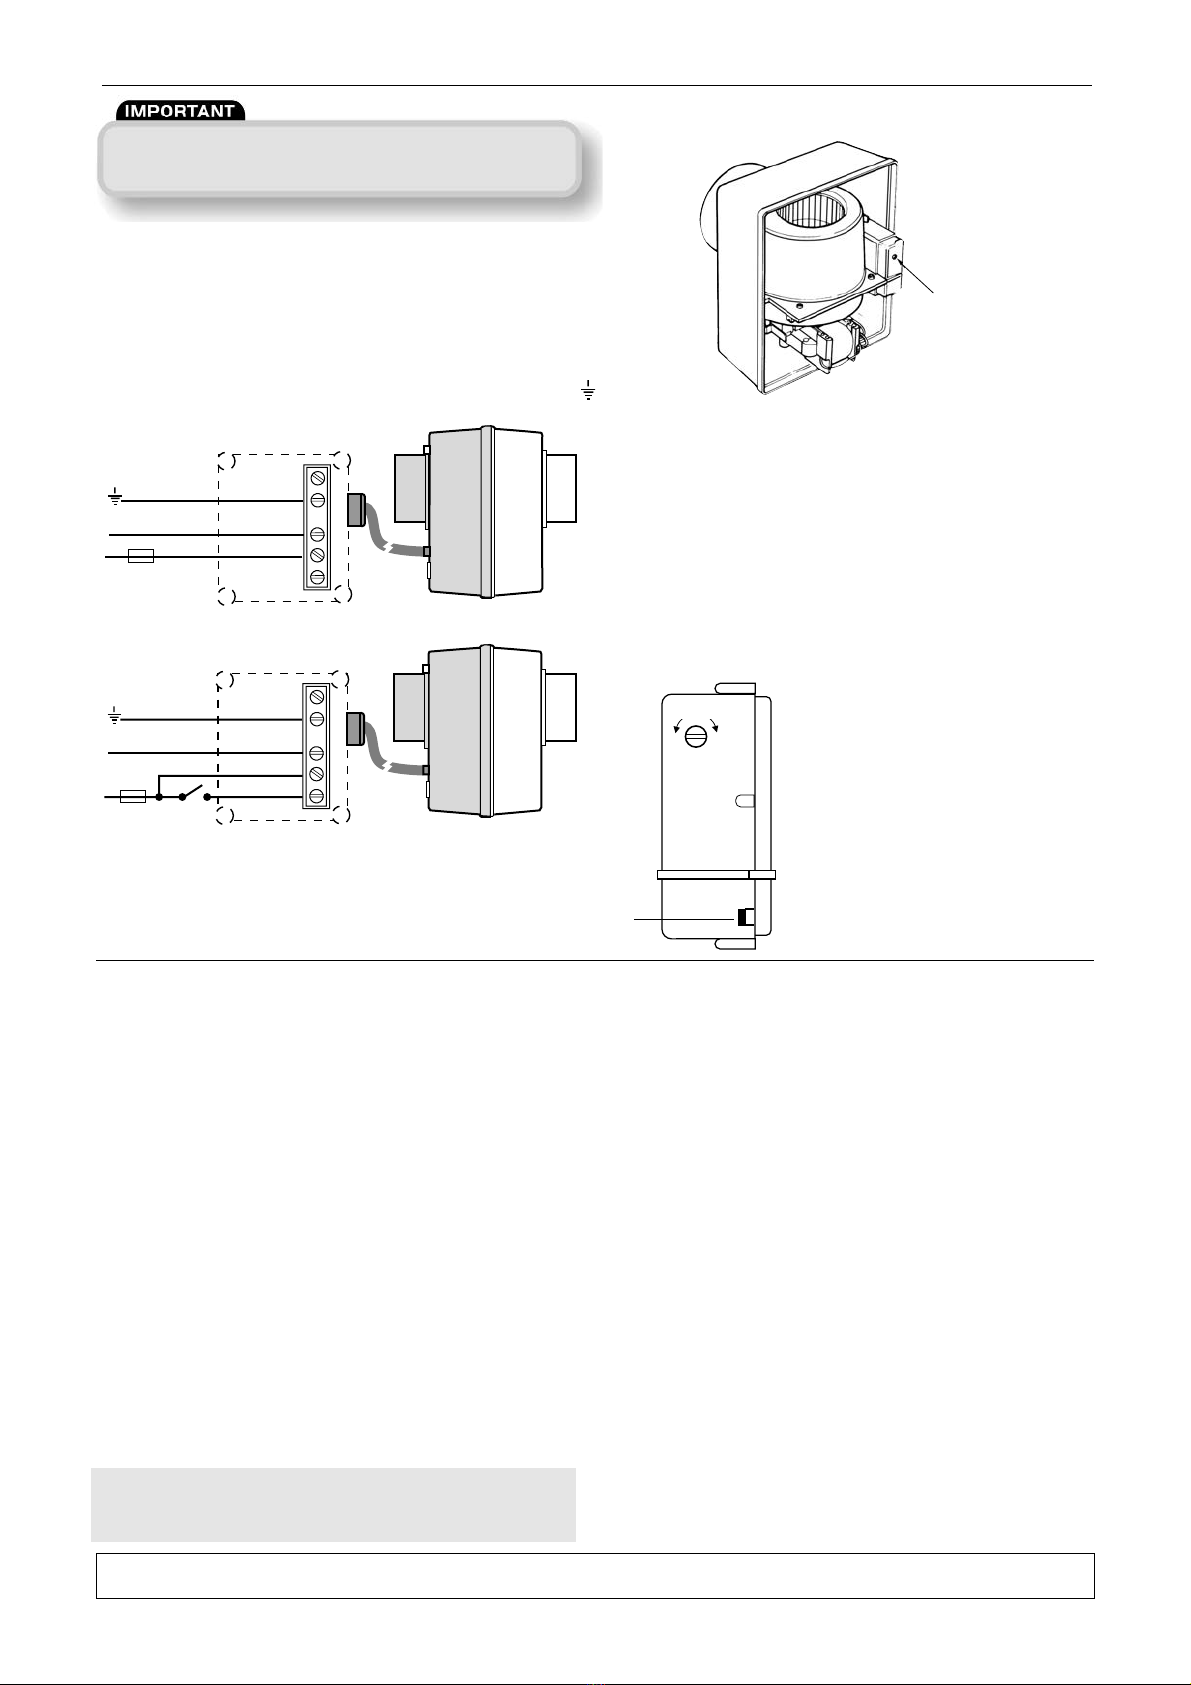
Timer adjuster screw.
(Also see fig 6).
Maintenance
General
Dust, fluff etc. if allowed to build up on the motor and impellers will
effect the efficiency of the fan, shortening the working life and, in
severe cases lead to overheating of the motors. It is therefore
strongly recommended that all units are fitted with inlet filters at
the grilles to prevent contamination, the unit should also be
inspected and cleaned at least every six months.
Procedure
Before carrying out any work, isolate the unit from the mains
supply.
At all times take care not to damage, distort or disturb the balance
of the impeller. Remove the electronic control module. Spring aside
the two clips and remove the fan module Inspect and replace any
damaged items.
Using a soft brush or dry cloth remove dust and dirt from the fan
module. Wash cover in warm soapy water and dry thoroughly.
Re-fit fan and electronic control module, replace front cover and
secure with screws. Wash grille filter in tepid water to which a little
mild detergent has been added. Shake out excess water and allow
to dry naturally. Replace filter.
Replacement of Parts
Should any component need replacing Nuaire keep extensive stocks
for quick delivery. Ensure that the unit is electrically isolated,
before carrying out any work.
When ordering spare parts, please quote the serial number of the
unit and the ARC number of the purchase if possible.
(This information will be available on the fan label).
Warranty
The 5 year warranty starts from the day of delivery and includes
parts and labour for the first year.
The remaining period covers replacement parts only. This
warranty is void if the equipment is modified without
authorisation, is incorrectly applied, misused, disassembled, or
not installed, commissioned and maintained in accordance with
the details contained in this manual and general good practice.
The product warranty applies to the UK mainland and in
accordance with Clause 14 of our Conditions of Sale. Customers
purchasing from outside of the UK should contact Nuaire
International Sales office for further details.
After Sales Enquiries
For technical assistance or further product information, please
contact the After Sales Department.
Telephone 02920 858 400
Technical or commercial considerations may, from time to time, make it necessary to alter the design, performance and
dimensions of equipment and the right is reserved to make such changes without prior notice.
N
L
E
N
L
E
2 amp
fuse
2 amp
fuse
2
Figure 4. Genie MS and Genie MX. Via. remote switch.
Figure 3. Genie M.
Figure 5. Adjusting the overrun time (only the Genie-MS).
Run-on timer
When installing a unit with run-on timer the adjuster should initially
be turned fully anti-clockwise. (This equates to a run-on of
approximately 5 minutes).
Isolate unit from supply and remove front cover. Locate the
electronic control module situated to the right of the fan/motor
assembly.
Using a small screwdriver, turn the adjuster to the fully anti-clock-
wise position. Adjustment to the timer can subsequently be made
to suit individual preferences. Turn timer clockwise to increase run
on time - maximum run on time is 30 mins.
The Genie-MS will activate only
when 230V is presented to the
brown wire and 230v is presented
to the black wire (Via light switch,
door switch).
The Genie-MX will activate only on
trickle speed when 230V is pre
sented to the brown wire but will
boost to high speed when 230V
is additionally presented to the
black wire (via light switch, door
switch).
Setting to work
Upon completion of installation switch the mains supply on.
The GENIE-M will run continuously when 230V is presented to the
brown wire.
Figure 6. Run-on timer.
- +
TIMER
Adjust ment
Green
LED


