Nuna Pipa TW 2 User manual

Designed
around your life

1 1
3
2
1 2 4 7
8
9
5
6
3

Position 1 Position 2 Position 3
1
2
1
10 13 16
17 19
2018
14
15
11
12

21 24 26 29
30
31
27
28
25
22
23

32 33
34

PIPA instructions 2
1
EN
EN
PIPA instructions
Contents
Product information 3
Product Registration 3
Warranty 3
Contact 3
Child Usage Requirements 4
For use without base 4
Parts List 5
Warnings 7
Product Use 11
Cleaning and Maintenance 16
IMPORTANT!
KEEP THESE
INSTRUCTIONS FOR
FUTURE REFERENCE:
READ CAREFULLY

PIPA instructions 4
3
EN
EN
PIPA instructions
Product Information
Model Number: _____________________________________________
Manufactured in (date): __________________________________
Product Registration
Please fill in the above information. The model
number and the manufactured in date are located on
a label on the bottom of your child restraint.
To register your product please visit:
www.nuna.eu/register-gear
Warranty
We have purposely designed our high-quality
products so that they can grow with both your child
and your family. Because we stand by our product,
our gear is covered by a custom warranty per product,
starting from the day it was purchased. Please
have the proof of purchase, model number and
manufactured in date available when you contact us.
For warranty information please visit:
www.nuna.eu/warranty
Contact
For replacement parts, service, or additional warranty
questions, please contact our customer service
department.
www.nuna.eu
In the United Kingdom:
www.nuna.eu
Child Usage Requirements
This Infant child restraint is suitable for use with
children who meet the following requirements:
Weight: under 13 kg (approximately 1.5 years old or
under)
Group: 0+
For use
without base
1- This Infant child restraint is a ‘Universal’ child
restraint. It is approved to European Regulation
No. 44, 04 series of amendments, for general
use in vehicles and it will fit most, but not all, car
seats.
2- A correct fit is likely if the vehicle manufacturer
has declared in the vehicle handbook that the
vehicle is capable of accepting a ‘Universal’
child restraint for this age group.
3- This Infant child restraint child restraint has
been classified as ‘Universal’ under more
stringent conditions than those which applied to
earlier designs which do not carry this notice.
4- This Infant child restraint is only suitable for use
in the listed vehicles fitted with 3-point retractor
safety-belts and approved to European Regulation
No. 16 or other equivalent standards.
5- If in doubt, please consult the child restraint
manufacturer or the retailer.

PIPA instructions 6
5
EN
EN
PIPA instructions
12
13
10
11
1
8
9
5
6
7
2
3
4
Parts List
1Seat Pad
2Side Guides
3Infant Insert
4Adjustment Webbing
5Adjustment Button
6Safety Buckle
7Shoulder Harness
Straps
8Canopy Mount
9Canopy
10 Handle
11 Handle Button
12 Rear Guide
13 Stroller Release
Handle
Please keep the instruction manual in the infant child
restraint as figure. Read these instructions carefully
before use and keep them for future reference.

PIPA instructions 8
7
EN
EN
PIPA instructions
WARNING
This Infant child restraint is designed ONLY
for child weighing under 13kg.
Any straps holding the restraint to the
vehicle should be tight, that any straps
restraining the child should be adjusted to
the child’s body, and that straps should not
be twisted.
The importance of ensuring that any lap
strap is worn low down, so that the pelvis is
firmly engaged, shall be stressed.
The Infant child restraint should be changed
when it has been subject to violent stresses
in an accident.
Concern the danger of making any
alterations or additions to the device without
the approval of the Type Approval Authority,
and a danger of not following closely the
installation instructions provided by the
Infant child restraint manufacturer.
The Infant child restraint should be kept
away from sunlight, otherwise it may be too
hot for the child’s skin.
Child is not left in the Infant child restraint
system unattended.
Any luggage or other objects liable to cause
injuries in the event of a collision shall be
properly secured.
The Infant child restraint shall not be used
without the soft goods.
The soft goods should not be replaced with
any besides the ones recommended by the
manufacturer. The soft goods constitute
an integral part of the Infant child restraint
performance.
DO NOT use any load bearing contact
points other than those described in the
instructions and marked on the Infant child
restraint.
The rigid items and plastic parts of a Infant
child restraint shall be so located and
installed that they are not liable, during
everyday use of the vehicle, to become
trapped by a movable seat or in a door of the
vehicle.
Do not to use the Infant child restraint in
seating positions where an active frontal
airbag installed.
NO Infant child restraint can guarantee
full protection from injury in an accident.
However, proper use of this Infant child
restraint will reduce the risk of serious injury
or death to your child.
DO NOT use or install this Infant child
restraint until you read and understand
the instructions in this manual and in your
vehicle owner’s manual.

PIPA instructions 10
9
EN
EN
PIPA instructions
DO NOT use this Infant child restraint if it
has damaged or missing parts.
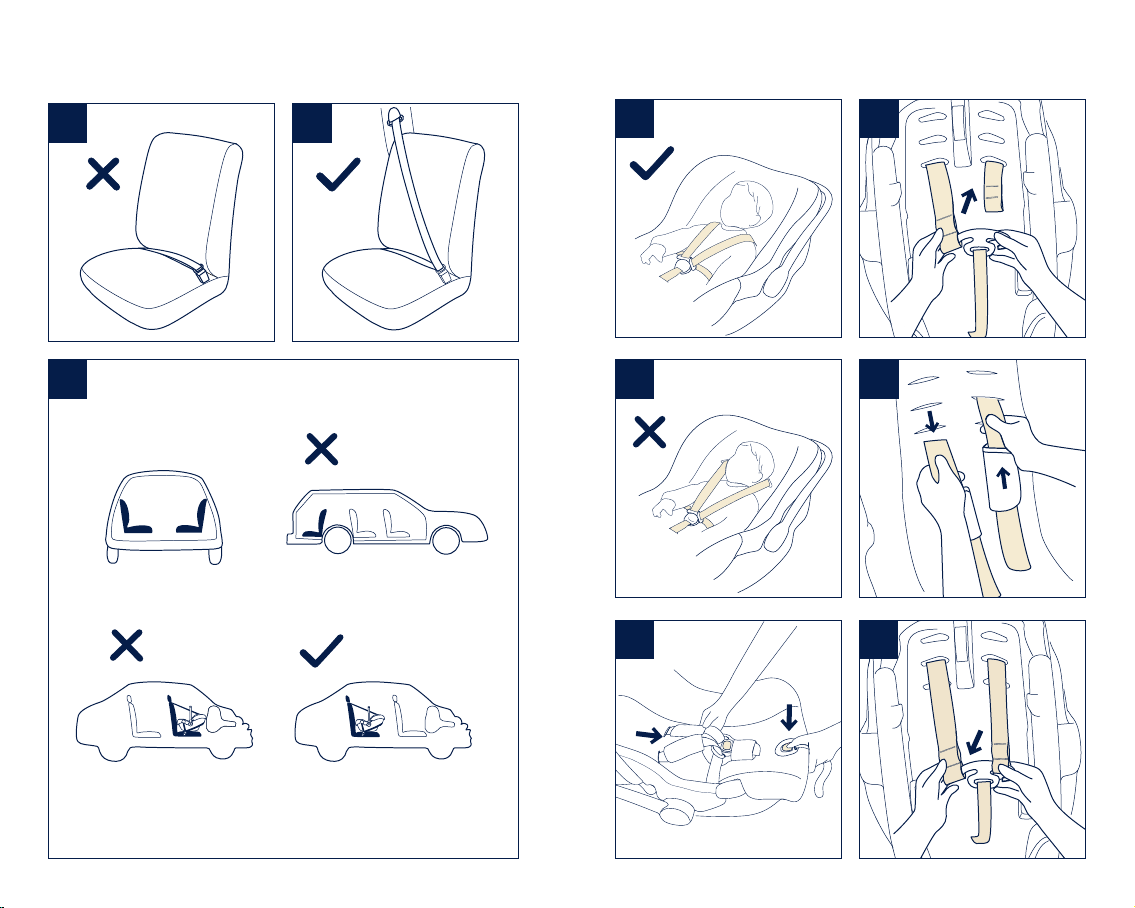
DO NOT have your child in large/oversized
clothes because this may prevent your child
from being properly and securely fastened
by the shoulder harness straps and the
harnesses between thighs.
DO NOT leave this Infant child restraint or
other items unbelted or unsecured in your
vehicle because unsecured Infant child
restraint can be thrown around and may
injure occupants in a sharp turn, sudden
stop, or collision.
NEVER use a second-hand Infant child
restraint or an infant child restraint whose
history you do not know because they may
have structural damage that endangers your
child’s safety.
NEVER use ropes or any other substitutes
to secure Infant child restraint in vehicle or
to secure child into Infant child restraint.
Only use vehicle belt to secure Infant child
restraint in vehicle.
Remove this infant child restraint from the
vehicle seat when it is not in regular use.
Consult the distributor for issues concerning
maintenance, repair and part replacement.
To avoid the risk of falling out, always secure
the child using the safety harness when the
child is placed in Infant child restraint, even
when the Infant child restraint is not in the
vehicle.
Before carrying the infant child restraint by
hand, ensure that the child is fastened with
the safety harness, and that the handle is
correctly locked in a vertical position.
DO NOT put anything other than the
recommended inner cushions in this Infant
child restraint.
To avoid serious injury or death, NEVER
place infant child restraint on elevated
surface seat with child in it.
The parts of this Infant child restraint should
not be lubricated in any way.
Always secure child in Infant child restraint,
even on short trips, as this is when most
accidents occur.
DO NOT use this Infant child restraint for
more than 5 years after the purchase date
as parts may degrade over time, or from
exposure to sunlight, and may not perform
adequately in a crash.

PIPA instructions 12
11
EN
EN
PIPA instructions
Product Use
Installation Concerns
DO NOT install this Infant child restraint on vehicle
seats with 2-Point Retractor Safety Belts without the
Base. (1)
This Infant child restraint is suitable for vehicle seats
with a 3-point Retractor Safety Belt (with or without
base) ONLY. (2)
DO NOT install this Infant child restraint on vehicle
seats that face sideways (3) or rearward (3) with
respect to the moving direction of the vehicle.
DO NOT place rear-facing child restraint on front seat
with air bag. Death or serious injury may occur. (3)
Please reference vehicle owner’s manual for more
information.
It is recommended to install this Infant child restraint
on the rear vehicle seat. (3)
DO NOT install this Infant child restraint on vehicle
seats unstable during installation.
Shoulder harness position
Check that Shoulder Harness Straps are set at the
proper height. Please choose the proper pair of
shoulder harness slots according to the child’s height.
Shoulder Harness Straps must go into the harness
slots nearest to your childs shoulders (4), but not
above the shoulder line. (5)
If the Shoulder Harness Straps are not at proper
height, the child might be ejected the infant child
restraint if there is a crash.
Shoulder harness
straps height adjustment
Use extreme care in threading the Shoulder Harness
Straps according to the figure. If the Shoulder
Harness Straps are not secure, they will not protect
your baby.
The ends of the Shoulder Harness Straps must hang
in front of the junction plate.
Ensure that the shoulder harness straps are not
twisted before reassembling the ends onto the
junction plate.
1- Press the adjustment button at the front of the
seat and pull on the shoulder harnesses to loosen
them. (6)
2- At the back of the seat, take the harness ends off
the metal junction plate. (7)
3- Pull the harnesses through the slots in the seat.
Insert them into the appropriate set of slots. (8)
4- Reassemble the harness ends onto the junction
plate. (9)
The ends of the Shoulder Harness Straps have two
loops.
For a smaller baby, use the upper shoulder
harness loops. (10)
For a larger baby, use the end shoulder harness
loops. (11)

PIPA instructions 14
13
EN
EN
PIPA instructions
Crotch belts
Identify crotch belt slot that will achieve a snug fit.
Change crotch belt slot if necessary. (12)
1- Smaller babies use this position. Crotch belt is
threaded through rear slot and up through front
slot as shown. (13)
2- Medium sized babies use this position. Crotch belt
is threaded into rear slot as shown. (14)
3- Larger babies use this position. Crotch belt is
threaded through front slot as shown. (15)
Handle adjustment
1- The handle of the infant child restraint can be
adjusted to 3positions.
Baby chair position. (16) -2
Rocking position. (16) -1
Position for car, hand or stroller transportation.
(16) -3
2- To adjust the handle positon, squeeze handle
buttons on both sides to release it. (17) -1
3- Rotate handle until it clicks into any of the 3
positions. (17) -2
Installation without base
1- Place the infant child restraint onto the vehicle
seat where you wish to put it. Pull the vehicle
safety belt out and lock it into the vehicle buckle,
sliding the vehicle lap belt into the side guides of
the infant child restraint. (18)
The child restraint can not be used if the vehicle
safety belt buckle (female buckle end) is too long
to anchor the child restraint securely. (18)-1
2- Pull the diagonal belt behind the front end of the
child restraint and then through the blue belt
guide. (19)
3- Pull the vehicle shoulder belt to fasten the infant
child restraint tightly and securely. (20)
4- Level line on carrier must be level to the ground
when the child restraint is installed. (34)
Tension the vehicle safety belt as much as
possible, checking that it is not loose or twisted.
After installing the infant child restraint, always
check that the vehicle belts are routed correctly
and securely fastened into the vehicle buckle. (21)
Securing child
Foam inside infant insert is present to ensure that
harness fits child properly. Infant insert must be used
for children 0-6 months.
After the child is placed into the seat, check whether
the Shoulder Harness Straps are at proper height.
1- While pressing the adjustment button located
at the front of the infant child restraint, pull
completely the two Shoulder Harness Straps of
the infant child restraint. (22)
2- Unlock the buckle of the harnesses by pressing
the red button. (23)

PIPA instructions 16
15
EN
EN
PIPA instructions
3- Place the child into the infant child restraint and
lock the buckle. (24) Please refer to (25).
4- Tighten the shoulder harness straps by pulling the
adjustment webbing. (26)
Make sure the space between the child and the
Shoulder Harness Straps is about the thickness of
one hand.
Canopy
1- Unzip the zipper behind the front canopy bow. (27)
2- Pull the canopy out of the compartment. (28)
3- Attach the magnets on each corner to the front of
the child restraint. (29)
Detach canopy and seat pad
1- To disassemble the canopy, press the button in the
canopy mount and pull the canopy bow out. (30)
2- Pull the fastening pieces underneath the edge of
the seat out. (31)
3- Pull the harness out of the metal junction plate. (7)
4- Remove the seat pad from the adjustment button
as shown in. (32)
5- Remove the seat pad from the Stroller release
button as shown in. (33)
Cleaning and Maintenance
After child is older than 6 months, please remove the
foam from the infant insert and store it somewhere
your child cannot access it.
Please wash the soft goods with cold water under
30°C.
Do not iron the soft goods.
Do not bleach or dry clean the soft goods.
Do not use undiluted neutral detergent, gasoline
or other organic solvent to wash the infant child
restraint. It may cause damage to the infant child
restraint.
Use only mild detergent, water and a soft cloth to
clean the child restraint shell, handle and harness
straps.
Do not twist the soft goods to dry with great force. It
may leave the soft goods with wrinkles.
Please hang dry the soft goods in the shade.
Please remove the infant child restraint from the
vehicle seat if not in use for a long period of time.
Put the infant child restraint in a cool, dry place and
somewhere your child can not access it.
©2018 Nuna International B.V. Nuna and all associated logos are
trademarks.

PIPA 說明書 18
17
CH
PIPA 說明書
CH
目錄
產品資訊 19
保固與售後服務 19
保固條件 19
聯絡我們 19
寶寶使用要求 20
單獨使用嬰兒提籃 20
產品組件及各部件名稱 21
警告 23
產品使用 26
保養與維護 30
請妥善保存本說明書
以備不時之需!
使用產品前請仔細閱讀本說明書,並妥善保存以供日
後參照。不依照本說明書的指示操作,可能會影響到您
寶寶的安全。

PIPA 說明書 20
19
CH
PIPA 說明書
CH
委製商英商巧兒宜實業有限公司台灣分公司
JOIE CHILDREN’S PRODUCTS (UK) LIMITED
TAIWAN BRANCH
產品名稱pipa
主要材質塑膠、五金、布
產地中國
進口商巧兒宜國際股份有限公司
統一編號52603333
地址台北市內湖區瑞光路431號2樓
電話02-27973000
網址www.nuna.com
寶寶使用要求
本產品適合於滿足下列要求的寶寶:
適用範圍13公斤(約1.5歲)以下的寶寶
適用群組0+
單獨使用嬰兒提籃
1- 此為通用型兒童保護裝置,符合台灣標準CNS 11497
及歐洲標準ECE R44。作為通用兒童保護裝置,其適
用大部分(並非全部)之車輛座椅。
2 - 若車輛製造商在車主使用手冊中述明其可適用此質
量等級之「通用型」兒童保護裝置,則本裝置可安
裝於該車輛上。
產品資訊
產品名稱:___________________________________________
生產日期:___________________________________________
保固與售後服務
產品於保固期間內發生問題,請與零售商聯絡;若零售
商無法提供服務,他們會聯絡當地的Nuna經銷商。請
留意產品底部的產品型號與生產日期序號。當有保固需
求時,請提供以上產品資訊。請至nuna.eu網站登記您
購買的產品。
保固條件
保固始於產品購買日,我們提供維修服務,但不提
供產品退換。保固期限不會因零件更換或維修而延
長。Nuna有權利針對產品進行改善設計,此前製造的
產品則無更換義務。
相關保固資訊,詳見官網 : www.nuna.eu/warranty
聯絡我們
我們期望不停改進並開發新的產品,請隨時告知您對
Nuna產品的批評與指教。
www.nuna.eu

PIPA 說明書 22
21
CH
PIPA 說明書
CH
3 - 此兒童保護裝置歸類為“通用型”,比其他無標示
此注意事項之兒童保護裝置可適用於較多車輛。
4 - 本兒童保護裝置適用於符合CNS 3972或ECE R16或
其它等效標準之3點式安全帶之車輛座椅使用。
5 - 若有疑問,請洽兒童保護裝置進口商。
請將本說明書存放在嬰兒提籃上(如下圖)。組裝和使用
本產品之前,請務必詳細閱讀說明書。
1 座墊
2 側面卡槽
3 小座墊
4 調整織帶
5 調整按鈕
6 安全扣
7 肩帶
8遮陽篷固定座
9遮陽篷
10把手
11把手按鈕
12后向卡槽
13推車釋鎖手把
產品組件及各部件名稱
12
13
10
11
1
8
9
5
6
7
2
3
4

PIPA 說明書 24
23
CH
PIPA 說明書
CH
警告
本嬰兒提籃適用於體重13公斤以下的寶寶。
任何束縛兒童保護裝置至車輛之織帶應束緊,任何束
縛兒童之織帶應根據兒童身體進行調整,且此織帶不
應扭曲。
將您的寶寶放入嬰兒提籃後,必須正確的扣合及使用
嬰兒提籃安全帶,並確保腰部織帶能有效束縛骨盆
部位。
本兒童保護裝置若於意外中遭受劇烈撞擊後,不可繼
續使用,應立即更換兒童保護裝置。意外可能導致兒
童保護裝置產生潛在危險。
請勿在兒童保護裝置上進行未經驗證許可之改裝或增
加其他裝置以及未依兒童保護裝置製造商提供之安裝
說明使用,以免造成受傷或死亡。
請讓座椅遠離日光,以免產品溫度過高對兒童的皮膚
造成傷害。
在無人照料下,不得讓兒童留在兒童保護裝置內。
任何行李或其他可能在碰撞中造成傷害之物品應適當
牢固。
當本嬰兒提籃沒有座布時,請勿使用。
請勿使用任何非製造商所推薦的座布進行取代,因為
座布是保證束縛裝置性能完整的組件。
不可使用除使用說明書中所標注以外之其他受力點。
請勿讓汽車車門卡住嬰兒提籃的任何組件。
嚴禁將本嬰兒提籃裝置於有空氣囊的座位上使用。
沒有任何嬰兒提籃可以保證100%遠離傷亡,然而正
確的使用本嬰兒提籃可以降低寶寶傷亡的機率。
請勿在未閱讀或了解本嬰兒提籃說明書及汽車說明書
之前,使用或安裝本嬰兒提籃。
本嬰兒提籃如有任何損壞或零件缺失時,請勿繼續
使用。
請勿讓您的寶寶穿著過大的衣物,所穿的衣物必須能
讓嬰兒提籃的安全帶適當而安全地扣在寶寶兩腿之間。
請勿將未使用汽車安全帶固定住的嬰兒提籃留在車內,
以免緊急刹車時,傷害到其他乘客。若不經常使用嬰
兒提籃時,請將其搬離汽車座椅。
請勿使用二手嬰兒提籃或來歷不明的嬰兒提籃,因為
它們可能存在危害寶寶安全的潛在危險。
不可使用繩子等其他物件代替汽車安全帶,以避免兒
童被粗細繩索意外勒住。
長期不使用嬰兒提籃時,請將其搬離汽車座椅。
有關零件更換或維修問題,請向進口商查詢。

PIPA 說明書 26
25
CH
PIPA 說明書
CH
不管在哪種狀況下使用,把寶寶放入提籃後,請一直
為寶寶繫好安全帶,以免寶寶從提籃內跌出。
手提嬰兒提籃前,請確認寶寶已繫好安全帶,且把手
固定於直立段位。
請勿使用其他廠商的小座墊來配合本嬰兒提籃使用。
如需更換配件時,請與進口商聯繫。
請勿將嬰兒提籃置於桌子、椅子等高於地面的平台上。
請勿使用任何潤滑劑擦拭本兒童安全座椅。
即使是在短途旅行上,寶寶也必須在兒童安全座椅內,
因為這是大多數事故發生的時間。
購買五年後不可以再使用本兒童安全座椅,因為時間
久了兒童安全座椅零件的性能可能會降低,或長期暴
露在陽光下,這些情況都可能使兒童安全座椅在事故
中不能充分發揮其保護作用。
產品使用
安裝注意事項
請勿將此嬰兒提籃安裝在二點式安全帶的汽車座
椅上,由於此種安全帶功能不完善,使用是非常危
險的(1)
此嬰兒提籃適合安裝在設置有三點式安全帶的汽車
座椅上(2)
請勿將此嬰兒提籃安裝在相對於汽車的行駛方向橫
向或後向或有空氣囊(3)的汽車座椅上。
請勿將此嬰兒提籃安裝在前座上,防止意外發生時
造成寶寶傷亡(3)
請勿將此嬰兒提籃安裝於可移動的汽車座椅上。
肩帶正確位置
請依照寶寶的身高,選擇一對高度合適的肩帶孔。
肩帶須穿過最接近寶寶肩膀位置的肩帶孔(4),肩
帶位置太高是不正確的(5)
若肩帶位置不合適,意外發生時可能造成寶寶被拋
出嬰兒提籃的危險。

PIPA 說明書 28
27
CH
PIPA 說明書
CH
調整肩帶高度
請注意肩帶在安裝過程中必須要正確。如果安裝不正
確,將不能保護您的寶寶安全。
肩帶末端必須固定在T型鐵片上。
請確認肩帶末端固定在T型鐵片之前没被缠绕。
1 - 按壓嬰兒提籃前端的調整按鈕,並向外拉肩帶,以
調鬆肩帶(6)
2 - 將嬰兒提籃背面的兩條肩帶從T型鐵片上取下(7)
3 - 拉出肩帶,再將肩帶穿入高度合適的肩帶孔(8)
4 - 將T型鐵片重新穿入肩帶末端的織帶環中(9)
肩帶末端有兩個肩帶環可供選擇。
較小的寶寶可以使用上面肩帶環(10)
較大的寶寶可以使用末端肩帶環(11)
調整胯帶位置
依寶寶大小,胯帶有3個段位可供調節(12)
1 - 小寶寶使用時,胯帶穿過兩個胯帶孔(13)
2 - 一般的寶寶使用時,胯帶穿過靠近寶寶的胯帶孔(14)
3 - 更大的寶寶使用時,胯帶穿過遠離寶寶的胯帶孔(15)
調整把手
1 - 把手有3個段位可供調整。
當作搖椅使用時,請用段位(16)-1
當作嬰兒椅使用時,請用段位(16)-2
手提或置於汽車、推車內時,請用段位(16)-3
2 - 調整把手位置時,先按壓兩邊的把手按鈕(17)-1
3 - 將把手旋轉到適合段位後再鬆開把手按鈕(17)-2
單獨安裝嬰兒提籃
1 - 將嬰兒提籃置於合適的汽車座椅上,拉出汽車安全
帶後扣好汽車安全扣,再將汽車腰帶卡入嬰兒提籃
兩邊的卡槽內(18)
汽車安全帶母扣段若太長,汽車安全帶無法綁緊不
能使用(18)-1
2 - 將汽車肩帶卡入嬰兒提籃後面的卡槽內(19)
3 - 用力拉緊汽車安全帶,使汽車安全帶緊實的繫住嬰
兒提籃(20)
4 - 當嬰兒提籃安裝在汽車座椅上時,貼標上的水平線
必須與地面平行(34)
盡力拉緊汽車安全帶,並確定汽車安全帶沒有鬆弛
或扭曲。
請檢查汽車安全帶是否正確固定嬰兒提籃(21)

PIPA 說明書 30
29
CH
PIPA 說明書
CH
寶寶乘坐
小座墊的作用是為了保護寶寶,0-6個月的寶寶必須使
用小座墊。使用小座墊前,請裝上填充物。
將寶寶放入提籃後,請確認肩帶高度是否合適。
1 - 按壓座椅前端的調整按鈕,並向外拉肩帶,以完全
調鬆肩帶(22)
2 - 按壓紅色按鈕,鬆開安全扣(23)
3 - 將寶寶放入座椅,並扣合安全扣(24)(25)
4 - 向外拉調整織帶,調緊肩帶(26)
請注意,寶寶與肩帶之間須有一個手掌的間距。
使用遮陽片
1 - 拉開遮陽篷上方的拉鏈(27)
2 - 拉出遮陽片(28)
3 - 通過磁鐵固定在嬰兒提籃兩側(29)
拆卸遮陽篷和座墊
1 - 拆卸遮陽篷時,按壓遮陽篷卡座內的凸點,同時拔
出遮陽篷條即可(30)
2 - 將位於嬰兒提籃邊緣背面的固定片拉出(31)
3 - 將嬰兒提籃背面的兩條肩帶從T型鐵片上取下(7)
4 - 依(32)所示做法將座墊從調整按鈕周圍移除。
5 - 將座墊從推車釋鎖按鈕上分離(33)
保養與維護
當寶寶大於6個月時,小座墊填充物拆除後,請將其存
放於寶寶無法接觸到的地方。
請以30度以下水溫清洗。
請勿使用熨斗熨燙。
請勿使用漂白劑及乾洗。
請勿使用未經稀釋的中性清潔劑、汽油或其他有機溶劑
清洗本兒童保護裝置,否則可能對保護裝置造成損壞。
請使用柔软的布和溫水清洗嬰兒提籃。
請勿大力扭乾,過分大力扭乾可能留下皺褶。
請於陰涼處鋪平晾乾。
當長時間不使用嬰兒提籃或底座時,請將嬰兒提籃或底
座從汽車座椅上拆除,並存放於陰涼處及寶寶不易接觸
的地方。
©2018 Nuna International B.V. Nuna及所有相關徽標皆為商標
Table of contents
Other Nuna Automobile Accessories manuals
Popular Automobile Accessories manuals by other brands

Heininger
Heininger PortablePet 3048 instructions

Vixen Horns
Vixen Horns VXH4124B installation guide

AMiO
AMiO SSR-01L user manual

BD Diesel Performance
BD Diesel Performance Monitor Cool Engine Shutdown installation instructions

Cequent Performance Products
Cequent Performance Products PRO Series Assembly instructions

ARE
ARE CX CLASSIC Installation sheet