Nuna Zaaz User manual


Designed
around your life
1 7 104
3 9 126
2 8 115

EN
2ZAAZ instructions ZAAZ instructions
Contents
Product Information
Product Registration 3
Warranty 3
Contact 3
Child Usage Requirements 4
Warnings 5
Parts List 7
Product Set Up 8
Product Use 11
Cleaning and Maintenance 13
Nederlands (NL) 15
Francais (FR) 29
Deutsch (DE) 43
Italiano (IT) 57
Espanol (ES) 71
Português (PT) 85
繁中99
簡中111
Čeština (CZ) 127
Slovenština (SK) 141
Korean (KR) 155
IMPORTANT!
KEEP THESE INSTRUCTIONS
FOR FUTURE REFERENCE!
READ CAREFULLY
1
13 1916
15 18
14
20
17

EN
EN
3 4ZAAZ instructions ZAAZ instructions
Product Information
Model Number:_______________________________________
Manufactured in (date):________________________________
Product Registration
Please fill in the above information. The model number
and the manufactured in date are located on a label on the
bottom of the Zaaz.
To register your product please visit:
www.nuna.eu/register-gear
Warranty
We have purposely designed our high-quality products so that
they can grow with both your child and your family. Because
we stand by our product, our gear is covered by a custom
warranty per product, starting from the day it was purchased.
Please have the proof of purchase, model number and
manufactured in date available when you contact us.
For warranty information please visit:
www.nuna.eu/warranty
Contact
For replacement parts, service, or additional warranty
questions, please contact our customer service department
www.nuna.eu
In the United Kingdom:
www.nuna.eu
Child Usage Requirements
This high chair is suitable for use with children who meet the
following requirements:
Child: sit upright unaided (around 6–7 months)
Weight:
up to 15 kg maximum (Complies with EN14988:2017)
up to 100 kg maximum (Complies with BSEN12520)

EN
EN
5 6ZAAZ instructions ZAAZ instructions
WARNING
Failure to follow these warnings and instructions
could result in serious injury or death.
To avoid any danger of suffocation, remove all
plastic covers before using this item and destroy
or keep them away from babies and children!
NEVER leave the child unattended!
Always use the restraint system.
DO NOT use the product unless all components
are correctly fitted and adjusted.
DO NOT use the high chair if any parts are torn,
broken or missing!
Be aware of the risk of open fires and other
sources of strong heat in the vicinity of the
product.
The tray and armbar alone DO NOT guarantee the
restraint of your child.
Falling hazard: Prevent your child from climbing on
the product.
Be sure to use the high chair always on a level,
stable surface.
Keep the high chair away from steps, stairs,
windows and walls.
Any weight attached to the high chair or on the
tray will have a negative impact on the stability
of the high chair and increase the risk of the high
chair tipping over.
DO NOT adjust the height of the high chair while
the child is sitting in it.
DO NOT use the high chair as a step stool.
Never place small items, toxic substances, hot
objects, electrical cables etc. near the high chair
where the child can reach them, as they may cause
choking, poisoning or other injuries.
The cushion is meant to be used in combination
of the armbar, the harness restraint or both
eventually.
Use original Nuna parts and accessories only.
Be aware of the risk of tilting when your child can
push its feet against a table or any other structure.
DO NOT use the highchair until the child can sit up
unaided.
WARNING To make sure that any harness is
correctly fitted.

EN
EN
7 8ZAAZ instructions ZAAZ instructions
Parts List
Check that you have all the parts for this product before
assembling it.
Refer to the illustrations provided at the beginning of this
manual to identify each part.
Product Set Up
Check that you have all the parts for this product before
assembling it. The assembly should be performed only by
adults
Assemble Seat onto Leg Frame
Once the seat is attached to the legs of the chair, it is
considered to be a permanent assembly. However, it is
possible to reverse this assembly if the seat needs to be put
into storage or shipped. We recommend this should not be a
regular occurrence.
1 - Place the leg frame on the floor facing you, as illustrated.
(1)
2 - Take the seat. Release the lock by pulling down the latch
at the rear of the seat flap. Then pull the flap forward
completely. (2)
3 - Position the seat over the leg frame to line up the slots
behind the seat flap with the white tracks on the leg
frame, as illustrated. (3)
4 - Once the seat is correctly positioned over the white
tracks, keep the flap up and firmly push the seat
downward until you hear a click.
If the flap is not completely up you will not be able to
push the seat down. Continue to push firmly on the
sitting surface until the seat reaches its lowest position.
5 - To lock the seat, lower the flap and listen for the click as
the lock clicks back into position.
The seat is now permanently mounted to the legs and can be
adjusted within the range between the highest and lowest
positions.
1 Nuna key (Harness
restraint removal tool)
2 Tray
3 Harness restraint 5 pts
4 Armbar
5 Seat cushion
6 Seat (with flap and height
adjustment lock on
reverse side)
7 Footrest
8 Leg frame
9 Cushion Retainer
Tools Needed:
Nuna key to remove harness
restraint when desired
(included in the box)
12
4
6
7
5
8
3
9

EN
EN
9 10ZAAZ instructions ZAAZ instructions
Assemble Footrest onto Seat
1 - Slide down the lock behind the flap and lift the flap
completely. The seat automatically rises up to its highest
position. (2)
2 - Attach the footrest on one side of the flap and then flex
the footrest to attach it on the other side. (4)
3 - Lower the flap down into position. Listen for the click as
the lock clicks back into position.
Assemble Seat Cushion onto Seat
1 - First remove the tray, the armbar and the harness
restraint if necessary.
2 - Insert the cushion retainer into the slot. Listen for the
click sound means locked. (5)
3 - Then place the seat cushion onto the seat. (6)
Assemble Harness Restraint onto Seat
WARNING When used as a high chair, the child must always
wear the harness restraint correctly fitted and adjusted.
The chair complies with the high chair European standard
(EN14988:2017 & BSEN12520) only when the harness is fitted.
1 - Insert waist clips into the lower backrest holes (around
the seat cushion, when cushion in use) and listen for a
click. (7)
2 - Insert shoulder harness clips into the upper backrest
holes and listen for click. (7)
3 - Insert the remaining crotch clip (through the seat
cushion, when cushion in use) into the inner of two holes
in the sitting surface of the seat and listen for a click. (7)
4 - Check that the harness attachment is secure by pulling
on each attachment point.
Assemble Armbar onto Seat
WARNING The armbar alone DOES NOT guarantee the
restraint of your child!
1 - With the arm bar tilted up, hook both the ends of the arm
bar into the holes in the backrest to the right and left of
the seating area. (8)
2 - Rotate the armbar down, locking the ends of the armbar
to the seat back and insert the front center attachment
into the outer slot until it locks in place, listen for the
click. (9)
3 - Check that the armbar is secure:
• by pulling out on the front of the arm bar.
• by pulling up on the front center attachment
Assemble Tray onto Armbar
WARNING The tray and the armbar alone DO NOT
guarantee the restraint of your child!
1 - Position the tray over the armbar. Insert the tabs at the
back of the tray into the slots between the armbar and
the backrest of the seat, as illustrated. (10)
2 - Push the tray down until the side clips fasten around the
armbar. (11)
3 - Check that the tray is secure by pulling up on the front of
the tray.

EN
EN
11 12ZAAZ instructions ZAAZ instructions
Product Use
Adjusting the Seat Height
WARNING DO NOT adjust the height of the chair while a
child is in the seat!
1 - Slide down the lock behind the flap and lift the flap
completely. The seat automatically rises up to the
highest position. (2)
2 - To lower the seat, keep the flap lifted completely and
push down firmly on the sitting surface of the seat until it
reaches the desired position. (12)
3 - Lower the flap down into position. Listen for the click as
the lock clicks back into position. The seat position is
now locked.
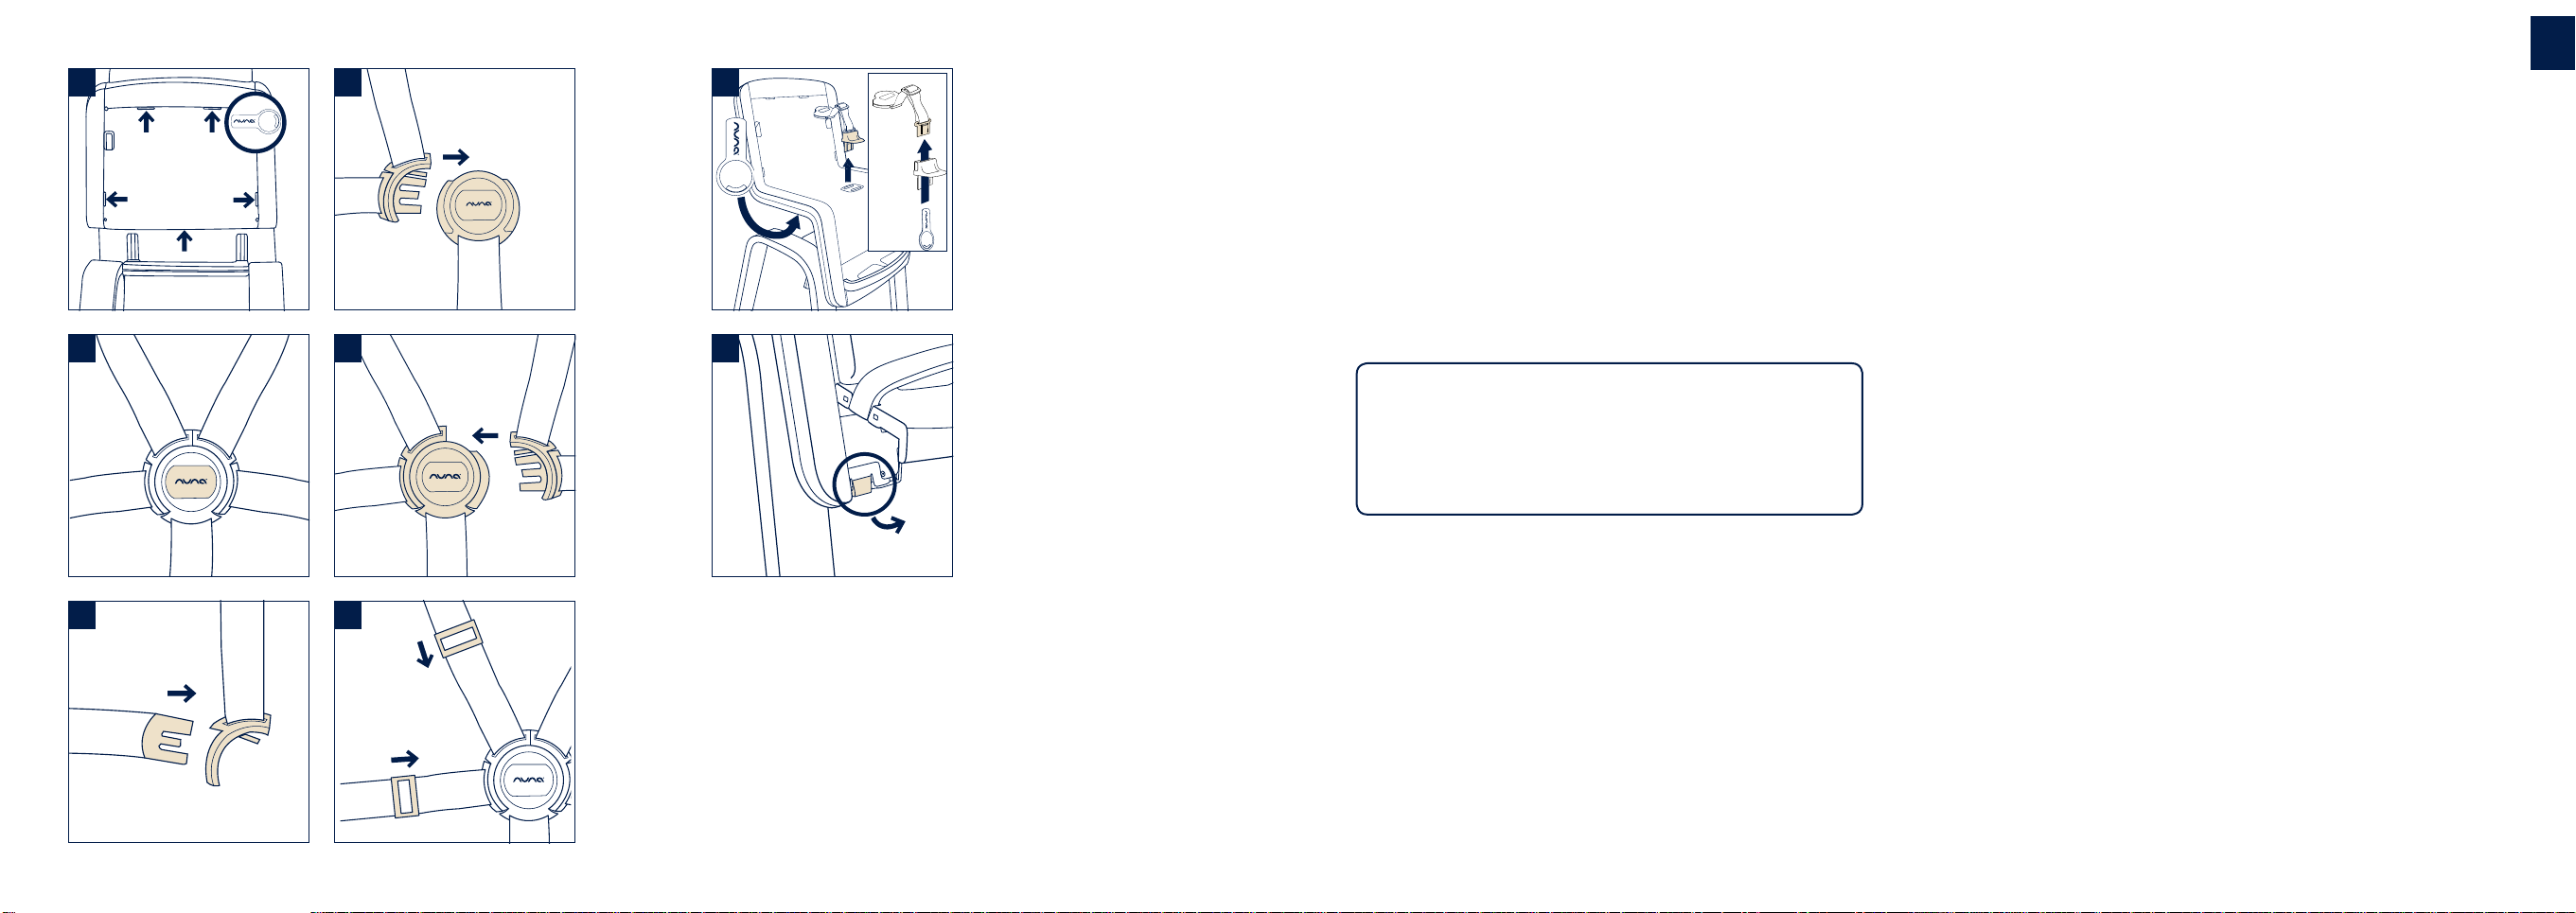
Adjust the Harness Restraint and Buckle
1 - To release the buckle, push on the Nuna button at the
center and remove the two clips. (14)
2 - To lock the harness, insert each clip into the buckle and
listen for a click. (15, 16, 17)
3 - Don’t forget to check and adjust the harness to fit your
child snugly. (18)
Remove the Tray
1 - Release the two clips on both sides under the tray. (11)
2 - Gently lift the tray upwards so that it clears the armbar
and pull away from the back of the seat.
Remove the Armbar
1 - Push the button on the front of the armbar and pull the
armbar up to release it from the seat. (9)
2 - Unhook the two ends from the backrest and remove. (8)
When removing the armbar for cleaning, ensure that the
armbar is securely reassembled when placing it back on
the high chair. Refer to “Assemble ArmBar onto Seat.”
Remove the Harness Restraint
WARNING When used as a high chair, the child must always
wear the harness restraint correctly fitted and adjusted.
The chair complies with the high chair European standard
(EN14988:2017) only when the harness is fitted.
The harness can be removed for cleaning or when the chair
is used for an older child.
Insert the Nuna key into each of the slots of the harness
restraint at the back and underside of the seat to release the
plastic clips. Pull on the belts to remove. (13)
Remove the Seat Cushion
1 - To remove the seat cushion, first remove the tray, the
armbar and the harness restraint if necessary.
2 - When removing the seat cushion always remove the
cushion retainer by inserting the Nuna key into the slot
on the underside of the seat. (19)
Remove the Footrest
1 - Slide down the lock behind the flap and lift the flap
completely.The seat automatically rises up to the highest
position. (2)
2 - Firmly flex one end of the footrest and unhook it from the
flap. Unhook the other end and remove it. (4)
3 - Remember to lower the flap and listen for the click as the
lock clicks back into position.

EN
EN
13 14ZAAZ instructions ZAAZ instructions
Dismantling the Seat from the Leg Frame
Once the seat is attached to the legs of the chair, it is
considered to be a permanent assembly. However, it is
possible to reverse this assembly if the seat needs to be put
into storage or shipped. We recommend this should not be a
regular occurrence.
1 - Slide down the lock behind the flap and lift the flap
completely.The seat automatically rises up to the highest
position. (2)
2 - Gently pull forward the two clips on each side, as
illustrated. (20)
3 - Slide the seat up and remove from the legs. If the flap is
not completely up, you will not be able to slide the seat
upwards.
Cleaning and maintenance
You can clean the high chair and accessories with a damp
cloth or a neutral detergent, but do not use abrasive
detergents or solvents which could damage the material.
The anodised aluminium legs are maintenance free but will
be damaged by impact or scratching.
Continued and extended exposure to sunlight can change
the colour of many materials.
Inspect your high chair regularly in order to detect any
damage.
©2018 Nuna International B.V. Nuna and all associated logos are trademarks.

NL
NL
15 16Zaaz instructies Zaaz instructies
BELANGRIJK!
DEZE INSTRUCTIES BEWAREN
VOOR LATER GEBRUIK.
AANDACHTIG LEZEN
Inhoud
Productinformatie
Productregistratie 17
Garantie 17
Contact 17
Vereisten kindergebruik 18
Waarschuwingen 19
Onderdelenlijst 21
Installeren 22
Gebruiken 25
Reiniging en onderhoud 28

NL
NL
17 18Zaaz instructies Zaaz instructies
Vereisten kindergebruik
Deze kinderstoel is geschikt voor gebruik met kinderen die
aan de volgende eisen voldoen:
Kind:
zonder hulp rechtop kan zitten (ongeveer 6–7 maanden)
Gewicht: maximaal 50 kg
Deze stoel is ontworpen voor gebruik door kinderen en niet
door volwassenen.
Productinformatie
Modelnummer: _______________________________________
Fabricagedatum: _____________________________________
Productregistratie
Vul de bovenstaande informatie in. Het model en de
fabricagedatum bevinden zich op een etiket onderop de
Zaaz.
Ga voor het registreren van uw product naar:
https://www.nuna.eu/register-gear
Garantie
Wij hebben onze hoogwaardige producten opzettelijk zo
ontworpen dat ze kunnen mee kunnen groeien met zowel
uw kind als uw familie. Omdat wij achter ons product staan,
wordt onze uitrusting gedekt door een aangepaste garantie
per product, beginnend op de dag van aanschaf. Houd het
aankoopbewijs, het modelnummer en de fabricagedatum
klaar als u contact met ons opneemt.
Ga voor garantie-informatie naar:
http://www.nuna.eu/warranty
Contact
Neem contact op met onze klantenservice-afdelingen voor
vervangende onderdelen, service of aanvullende vragen over
de garantie.
www.nuna.eu
In het Verenigd Koninkrijk:
www.nuna.eu

NL
NL
19 20Zaaz instructies Zaaz instructies
WAARSCHUWING
Niet-naleving van de waarschuwingen en
de instructies kan ernstig letsel of de dood
veroorzaken.
Om gevaar voor verstikking te voorkomen, moet u
alle plastic zakken verwijderen voordat u dit artikel
gebruikt en deze vernietigen of uit de buurt van
baby’s en kinderen houden.
Laat uw kind NOOIT zonder toezicht achter.
Het kind moet altijd de gordels dragen die correct
zijn vastgemaakt en afgesteld.
Gebruik de kinderstoel NIET tenzij alle onderdelen
zijn vastgemaakt en afgesteld.
Gebruik de stoel NIET in geval van gescheurde,
gebroken of ontbrekende onderdelen.
Gebruik de kinderstoel nooit in de nabijheid
van een krachtige warmtebron (elektrische of
gasverwarming/haardvuur...) of open vuur!
Het blad en de veiligheidsbeugel alleen bieden
GEEN garantie voor de veilige bevestiging van uw
kind.
Laat een kind NOOIT dicht bij de kinderstoel
spelen of erop klimmen.
Zorg dat u de stoel altijd op een effen, stabiel
oppervlak gebruikt.
Plaats de stoel altijd weg van treden, trappen,
vensters en muren.
Elk gewicht dat aan de kinderstoel is bevestigd of
op het blad is staat, heeft een negatieve impact op
de stabiliteit van de kinderstoel en verhoogt het
risico dat de stoel kantelt.
Stel de hoogte van de kinderstoel NIET af terwijl
het kind in de stoel zit.
Gebruik de kinderstoel niet als opstapje.
Plaats nooit kleine onderdelen, giftige stoffen,
warme objecten, elektrische kabels, enz. in de
buurt van de stoel waar ze bereikbaar zijn voor
het kind, anders ontstaat het risico op stikken,
vergiftiging of andere verwondingen.
Het kussen is bedoeld voor gebruik in combinatie
met de veiligheidsbeugel, met de gordels of met
beide.
Gebruik alleen originele onderdelen en
accessoires van Nuna.
Houd rekening met het gevaar van kantelen als uw
kind de voeten tegen een tafel of iets anders kan
drukken.
Gebruik de hoge kinderstoel NIET totdat uw kind
in staat is om zonder hulp rechtop te zitten.

NL
NL
21 22Zaaz instructies Zaaz instructies
Onderdelenlijst Installeren
Controleer of alle onderdelen aanwezig zijn voordat u ze
monteert. De montage mag alleen door volwassenen worden
uitgevoerd.
Zitting monteren op de poten
Zodra de zitting is bevestigd op de poten van de stoel, wordt
dit beschouwd als permanente montage. Het is echter
mogelijk deze montage ongedaan te maken als de stoel moet
worden opgeborgen of vervoerd. Wij adviseren u echter hier
geen gewoonte van te maken.
1 - Plaats de poten tegenover u op de vloer, zoals
weergegeven. (1)
2 - Pak de zitting. Ontgrendel het slot door de grendel
aan de achterkant van de voetensteunklep omlaag te
trekken. Trek vervolgens de klep volledig naar voren. (2)
3 - Plaats de zitting boven de poten zodat de ijzeren
buisjes zich boven de witte sleuven bevinden, zoals
weergegeven. (3)
4 - Zodra de zitting correct is geplaatst boven de witte
sleuven, houdt u de voetensteunklep omhoog en duwt u
de zitting stevig omlaag tot u een klik hoort. Als de klep
niet volledig omhoog staat, kunt u de zitting niet omlaag
duwen. Blijf hard drukken op het zitvlak tot de zitting de
laagste positie bereikt heeft.
5 - Om de zitting te vergrendelen, laat u de klep zakken en
luistert u tot het slot op zijn plaats hoort klikken.
De zitting is nu permanent gemonteerd op de poten en kan
worden afgesteld binnen het bereik tussen de hoogste en
laagste posities.
Controleer of alle onderdelen aanwezig zijn voordat u
ze monteert. Raadpleeg de illustraties aan het begin van
deze handleiding om elk onderdeel te identificeren.
12
4
6
7
5
8
3
9
1 Nuna-sleutel
(gereedschap voor het
verwijderen van de
gordels)
2 Blad
3 5-punts gordel
4 Veiligheidsbeugel
5 Stoelkussen
6 Zitje (met
voetensteunklep en
hoogteafstelling-
svergrendeling op
achterzijde)
7 Voetensteun
8 Poten
9 Kussenhouder
Benodigd gereedschap:
Nuna-sleutel voor het
verwijderen van de
gordels indien dat nodig is
(bijgeleverd in de doos)

NL
NL
23 24Zaaz instructies Zaaz instructies
Voetensteun op zitting monteren
1 - Schuif het slot omlaag achter de voetensteunklep en
til de klep helemaal op. De zitting gaat automatisch
omhoog naar de hoogste positie. (2)
2 - Bevestig de voetensteun aan een zijde van de klep en
buig vervolgens de voetensteun om deze aan de andere
zijde te bevestigen. (4)
3 - Laat de klep zakken tot de geschikte positie. Luister of u
een klik hoort die aangeeft dat het slot in zijn positie is
geklikt.
Kussen op zitting leggen
1 - Indien nodig, verwijder eerst het blad, de
veiligheidsbeugel en de gordels.
2 - Plaats de kussenhouder in de gleuf. Luister voor het
klikgeluid betekent vergrendeld. (5)
3 - En plaats vervolgens het kussen op de zitting. (6)
Gordels op zitting monteren
WAARSCHUWING Wanneer de stoel als kinderstoel wordt
gebruikt, moet het kind altijd goed zittende en afgestelde
gordels dragen. De stoel voldoet alleen aan de Europese
standaard voor kinderstoelen (EN14988:2017) wanneer de
gordel is bevestigd.
1 - Steek de tailleclips in de onderste openingen in de
rugsteun (rond het kussen, wanneer het kussen in
gebruik is) en luister of u een klik hoort. (7)
2 - Steek de schouderclips in de bovenste openingen in de
rugsteun en luister of u een klik hoort. (7)
3 - Steek het overgebleven tussenbeenstuk (door het
kussen heen wanneer het kussen in gebruik is) in de
binnenste van de twee openingen in het zitvlak van de
zitting en luister of u een klik hoort. (7)
4 - Controleer of de gordelbevestiging stevig vastzit door
aan elk bevestigingspunt te trekken.
Veiligheidsbeugel op zitting monteren
WAARSCHUWING De veiligheidsbeugel alleen biedt GEEN
garantie voor het veilig vastzetten van uw kind.
1 - Licht de armsteun op en haak beide einde van de
armstoel in de gaten in de rugsteun rechts en links van
het zitvlak. (8)
2 - Draai de armsteun omlaag en zet de einden van de
armsteun vast in derug van de stoel en steek de
bevestiging middenvoor in de buitenste sleuf tot hijop
zijn plaats klikt - let op de klik. (9)
3 - Controleer of de armsteun goed vast zit:
•
door de voorkant van de armsteun naar vorten te trekken.
• door de middenbevestiging omhoog te trekken
Blad op veiligheidsbeugel monteren
WAARSCHUWING Het blad en de veiligheidsbeugel alleen
bieden GEEN garantie voor de veilige bevestiging van uw
kind!
1 - Plaats het blad boven de veiligheidsbeugel. Steek de
lipjes aan de achterkant van het blad in de sleuven
tussen de veiligheidsbeugel en de rugleuning van de
zitting, zoals weergegeven. (10)

NL
NL
25 26Zaaz instructies Zaaz instructies
2 - Duw het blad omlaag tot de zijclips vastklemmen om de
veiligheidsbeugel. (11)
3 - Controleer of het blad stevig vastzit door de voorkant
van het blad omhoog te trekken.
Gebruiken
De zittinghoogte aanpassen
WAARSCHUWING Stel de hoogte van de stoel NIET af
terwijl een kind in de stoel zit!
1 - Schuif achter de voetensteun de ontgrendeling naar
beneden en klap de voetensteunklep helemaal naar
voren. De zitting gaat automatisch omhoog naar de
hoogste positie. (2)
2 - Om de zitting te verlagen, houdt u de klep volledig
opgetild en duwt u stevig op het zitvlak van de zitting tot
deze de gewenste positie bereikt heeft. (12)
3 - Klap de voetensteun weer terug bij de juiste positie.
Luister of u een klik hoort die aangeeft dat het slot
vergrendeld is. De zittingpositie is nu vergrendeld.
Gordels en gesp aanpassen
1 - Om de gesp te ontgrendelen, drukt u op de Nuna-knop
in het midden en verwijdert u de twee clips. (14)
2 - Om de gordels vast te maken, steekt u elke clip in de
gesp en luistert u of u een klik hoort. (15, 16, 17)
3 - Vergeet de gordel niet te controleren en zonodig aan te
passen zodat de gordel goed past. (18)
Blad verwijderen
1 - Ontgrendel de twee clips aan beide zijden onder het
blad. (11)
2 - Til het blad voorzichtig op zodat het van de
veiligheidsbeugel loskomt en trek het uit de achterkant
van de zitting.
Veiligheidsbeugel verwijderen
1 - Druk op de knop op de voorkant van de
veiligheidsbeugel en trek de veiligheidsbeugel omhoog
om deze los te maken van de zitting. (9)
2 - Haak de twee uiteinden van de rugsteun los en verwijder
de beugel. (8)
Zorg er bij het verwijderen van de armsteun om schoon te
maken voor dat de armsteun stevig gemonteerd is bij het
terugplaatsen op de hoge stoel. Zie “De armsteun op het
stoeltje bevestigen.”
Gordels verwijderen
WAARSCHUWING Wanneer het zitje als kinderstoel wordt
gebruikt, moeten altijd goed zittende en afgestelde gordels
gebruikt worden. De stoel voldoet alleen aan de Europese
standaard voor kinderstoelen (EN14988:2017) wanneer de
gordel is bevestigd.
De gordels kunnen worden verwijderd om de stoel te
reinigen of als de stoel wordt gebruikt voor een ouder kind.
Steek de Nuna-sleutel in elk van de sleuven van de gordels
aan de achterkant en onderkant van de zitting om de plastic
clips los te maken. Trek aan de riemen om ze te verwijderen.
(13)

NL
NL
27 28Zaaz instructies Zaaz instructies
Kussen verwijderen
1 - Om het kussen te verwijderen, verwijdert u eerst het
blad, de veiligheidsbeugel en de gordels indien nodig.
2 - Als u het kussen wilt verwijderen, maak dan ook de
kussenhouder los met de Nuna sleutel in de sleuf aan de
onderkant van de zitting. (19)
Voetensteun verwijderen
1 - Schuif achter de voetensteun de ontgrendeling naar
beneden en klap de voetensteunklep helemaal naar
voren . De zitting gaat automatisch omhoog naar de
hoogste positie. (2)
2 - Buig het ene uiteinde van de voetensteun en trek deze
los van de klep. trek het andere uiteinde ook los en
verwijder het. (4)
3 - Denk eraan de klep dicht te doen en luister of u het slot
op zijn plaats hoort klikken.
Zitting losmaken van de poten
Zodra de zitting is bevestigd op de poten van de stoel, wordt
dit beschouwd als permanente montage. Het is echter
mogelijk deze montage ongedaan te maken als de stoel
moet worden opgeborgen of vervoerd.
Wij adviseren u echter hier geen gewoonte van te maken.
1 - schuif achter de voetensteun de ontgrendeling naar
beneden en klap de voetensteun helemaal naar voren.
De zitting gaat automatisch omhoog naar de hoogste
positie. (2)
2 - Trek de twee clips aan beide zijden voorzichtig naar
voren, zoals weergegeven. (20)
3 - Schuif de zitting omhoog en verwijder deze van de
poten. Als de klep niet volledig omhoog staat, kunt u de
zitting niet omhoog schuiven.
Reiniging en onderhoud
U kunt de kinderstoel en accessoires reinigen met een
vochtige doek of een neutraal schoonmaakmiddel. Gebruik
echter geen schurende reinigingsmiddelen of oplosmiddelen
die het materiaal kunnen beschadigen.
De geanodiseerde aluminium poten zijn onderhoudsvrij,
maar zullen beschadigd raken door stoten of krassen.
Doorlopende en langdurige blootstelling aan zonlicht kan de
kleur van veel materialen veranderen.
Inspecteer uw kinderstoel regelmatig om eventuele schade
te detecteren.
©2018 Nuna International B.V.
Nuna en alle bijbehorende logo’s zijn handelsmerken.

FR
FR
29 30Instructions ZAAZ Instructions ZAAZ
Sommaire
Informations sur le produit
Enregistrement du produit 31
Garantie 31
Contact 31
Exigences d’utilisation par les enfants 32
Avertissements 33
Liste des pièces 35
Configuration du produit 36
Utilisation du produit 39
Nettoyage et maintenance 42
IMPORTANT !
CONSERVEZ CES
INSTRUCTIONS POUR UNE
UTILISATION FUTURE !
LIRE ATTENTIVEMENT

FR
FR
31 32Instructions ZAAZ Instructions ZAAZ
Exigences d’utilisation
par les enfants
Cette chaise haute est adaptée à une utilisation avec des
enfants qui respectent les exigences suivantes :
Enfant : peut tenir sans aide en position assise
(vers 6 ou 7 mois)
Poids : usqu’à 50 kg maximum
Cette chaise est conçue pour être utilisée uniquement par
des enfants et non par des adultes.
Informations sur le produit
Numéro de modèle : __________________________________
Fabriqué le (date) : ____________________________________
Enregistrement du produit
Veuillez remplir les informations ci-dessus. Le numéro de
modèle et la date de fabrication se situent sur une étiquette
sur la Zaaz.
Pour enregistrer votre produit, veuillez vous rendre sur le
site suivant :
https://www.nuna.eu/register-gear
Garantie
Nous avons conçu spécialement nos produits de haute
qualité afin qu’ils puissent accompagner le développement
de votre enfant et de votre famille. Nous soutenons
notre produit en couvrant notre matériel par une garantie
personnalisée, commençant le jour de son achat. Ayez
la preuve d’achat, le numéro de modèle et la date de
fabrication à votre disposition lorsque vous nous contactez.
Pour des informations sur la garantie, veuillez vous rendre
sur le site suivant :
http://www.nuna.eu/warranty
Contact
Pour des informations sur les pièces de rechange, le service
ou des questions supplémentaires sur la garantie, veuillez
contacter notre service client.
www.nuna.eu
Au Royaume-Uni:
www.nuna.eu

FR
FR
33 34Instructions ZAAZ Instructions ZAAZ
AVERTISSEMENT
Ne pas suivre ces avertissements et instructions
peut conduire à de sérieuses blessures ou la mort.
Pour éviter tout risque de suffocation, retirez tous
les emballages en plastique avant d’utiliser cet
objet et détruisez-les ou tenez-les hors de portée
des bébés et des enfants !
NE JAMAIS laisser l’enfant sans surveillance !
L’enfant doit porter le harnais de maintien
correctement installé et ajusté !
NE PAS utiliser la chaise haute tant que tous les
composants n’ont pas été installés et ajustés !
NE PAS utiliser la chaise haute si des pièces sont
abimées, cassées ou manquantes !
Ne jamais utiliser la chaise haute à proximité d’une
forte source de chaleur (radiateur électrique ou à
gaz/feu…) ou d’une flamme !
La tablette et l´arceau de sécurité seuls NE
GARANTISSENT PAS le maintien de votre enfant.
NE PAS laisser un enfant jouer à proximité de la
chaise haute ni monter dessus.
Toujours utiliser la chaise haute sur une surface
plate et stable.
Tenir la chaise haute à l’écart des marches, des
escaliers, des fenêtres et des murs.
Tout poids attaché à la chaise haute ou à la
tablette risque de déstabiliser la chaise haute et
augmente le risque de basculement de la chaise.
NE PAS régler la hauteur de la chaise pendant que
l’enfant est assis dessus.
NE PAS utiliser la chaise haute comme un marche
pied.
Ne pas placer de petits objets, des substances
toxiques, des objets chauds, des câbles
électriques, etc. à proximité de la chaise haute
ou à un endroit où l’enfant pourrait les atteindre,
car ils présentent des risques d’étouffement,
d’empoisonnement ou d’autres blessures.
Le coussin est prévu pour être utilisé en
combinaison de l´arceau de sécurité, du harnais
de maintien ou encore des deux à la fois.
Utiliser exclusivement les pièces et accessoires
Nuna.
Soyez conscient du risque de basculement si votre
enfant peut pousser ses pieds contre une table ou
une autre structure.
NE PAS utiliser la chaise haute tant que l’enfant ne
peut pas rester assis sans aide.

FR
FR
35 36Instructions ZAAZ Instructions ZAAZ
Contenu de l’emballage
Vérifiez que vous disposez de toutes les pièces de
ce produit avant de le monter. Reportez-vous aux
illustrations fournies au début de ce mode d’emploi pour
identifier les différentes pièces.
Configuration du produit
Vérifiez que vous disposez de toutes les pièces de ce
produit avant de le monter. Le montage doit être effectué
exclusivement par des adultes.
Montage du siège sur les pieds
Une fois le siège fixé aux pieds de la chaise, il est considéré
comme un montage permanent. On peut cependant inverser
ce montage si le siège doit être stocké ou expédié. Nous
recommandons de ne pas le faire trop souvent.
1 - Placer les pieds de la chaise sur le sol face à vous,
comme illustré. (1)
2 - Prendre le siège. Déverrouiller le panneau mobile en
abaissant le loquet à l’arrière de celui-ci. Ensuite relever
le panneau vers le haut. (2)
3 - Positionner le siège sur les pieds en alignant les orifices
situés à l´arrière du siège sur les rails blancs situés sur
les pieds, comme illustré. (3)
4 - Une fois le siège correctement positionné sur les rails
blancs, relever le panneau mobile et pousser fermement
le siège vers le bas jusqu’à ce qu’il s’enclenche. Si le
panneau mobile n’est pas entièrement levé, vous ne
pourrez pas pousser le siège vers le bas. Continuer à
appuyer fermement sur le siège jusqu’à ce qu’il atteigne
sa position la plus basse.
5 - Pour verrouiller le siège, abaisser le panneau mobile et
écoutez le clic du verrou qui s´enclenche à nouveau.
Le siège est maintenant fixé de manière permanente sur les
pieds et peut être réglé en hauteur entre la position la plus
haute et la plus basse.
12
4
6
7
5
8
3
9
1 Clé Nuna
(outil de retrait du harnais)
2 Tablette
3 Harnais à 5 points de
retenue
4 Arceau de securité
5 Coussin
6 Siège (panneau mobile
pour régler la hauteur
du siège et à l’arrière de
celui-ci, loquet qui permet
de le verrouiller)
7 Repose-pieds
8 Pieds
9 Retenue de coussin
Outils nécessaires :
Clé Nuna pour retirer
le harnais de maintien
au besoin (incluse dans
l’emballage).
Other manuals for Zaaz
6
Table of contents
Languages:
Other Nuna High Chair manuals