NuTone LA522WH Manual

1
WIRELESS DOOR
CHIME PUSHBUTTON
To register this product, visit: www.nutone.com
THIS PACKAGE INCLUDES:
nWireless Pushbutton and Battery
INSTALLATION
The wireless pushbutton (A) is compatible with NuTone wireless
chimes. (Purchase separately) Refer to installation instructions
provided with wireless chime.
1. Open battery cover (B) by sliding it in direction indicated by arrow.
(Figure 1)
2. Install battery (C) into wireless pushbutton. (Figure 2)
INSTALLATION & OPERATING INSTRUCTIONS
READ AND SAVE THESE INSTRUCTIONS
FIGURE 3
1
2
FIGURE 1
FIGURE 2
A
B
C
+ -
3. Insert wireless pushbutton mechanism into escutcheon as shown.
(Figure 3)
4. Test operation. Hold wireless pushbutton near chime and press
pushbutton. If chime does not sound - see a. through c. on page 2.
ESCUTCHEON
(NOT INCLUDED)

2
If chime does not sound when wireless pushbutton is pushed:
a. Confirm that code settings on chime mechanism and wireless
pushbutton are the same. (Figure 4)
b. Verify proper installation batteries in chime mechanism and
pushbutton. (Figure 2)
c. Check condition of batteries in chime mechanism and pushbutton.
Replace if required.
6. Close battery cover on wireless pushbutton.
7. To install wireless pushbutton / escutcheon assembly, drill a straight
and level 3/4” diameter x 3-1/2” deep hole.
8. Insert wireless pushbutton / escutcheon assembly into hole and
secure to wall using hardware provided.
More than one pushbutton can be used with NuTone wireless chimes.
Refer to Figure 5 to assign a door or tune to each wireless pushbutton.
BATTERY REPLACEMENT
Wireless Chime
Replace batteries following door chime instructions.
Wireless Pushbutton
Remove wireless pushbutton / escutcheon assembly from wall and follow
Step 1. Replace battery with one N Cell, 1.5V alkaline battery. Close
battery cover and re-install wireless pushbutton / escutcheon assembly
with hardware.
ADDITIONAL WIRELESS DOOR
CHIMES & PUSHBUTTONS
When installing other Wireless Door Chime sets, select different code
settings to avoid interference. If you want all chimes to ring at the same
time, set chimes to the same code settings.
TROUBLESHOOTING FOR WIRELESS
INSTALLATIONS
The range of the door chime depends on location, temperature and battery
condition. If you are having problems with this product, please try the
solutions listed below.
Chime rings on its own:
• A neighbor may have a wireless chime set with the same code settings.
Change the chime and pushbutton code settings. (Figure 4)
Chime doesn’t sound:
• Make sure the pushbutton and the chime code settings are the same.
• Check the batteries in the chime and wireless pushbutton. (Figure 2, 4)
Batteries are OK, but chime does not work when installed:
• Mounting the chime or pushbutton directly on metal, concrete or near
metal studs reduces the range.
• Do not mount the chime too close to ground level concrete slabs which
may also reduce the range. Mount the chime away from the floor.
• Try different locations for the chime closer to the pushbutton. Also, try
to orient the chime at a different angle to increase the range. Range is
most effective to the sides of the pushbutton.
Regulatory Information
The user is cautioned that changes or modifications not expressly
approved by the party responsible for regulatory compliance
could void the user’s authority to operate this equipment.
NUTONE ONE YEAR LIMITED WARRANTY
NuTone warrants to the original consumer purchaser of its products that such products
will be free from defects in materials or workmanship for a period of one year from the
date of original purchase. THERE ARE NO OTHER WARRANTIES, EXPRESS OR IMPLIED,
INCLUDING, BUT NOT LIMITED TO, IMPLIED WARRANTIES OF MERCHANTABILITY OR
FITNESS FOR A PARTICULAR PURPOSE.
During this one-year period, NuTone will, at its option, repair or replace, without charge,
any product or part which is found to be defective under normal use and service.
THIS WARRANTY DOES NOT EXTEND TO FLUORESCENT LAMP STARTERS, TUBES,
HALOGEN AND INCANDESCENT BULBS, FUSES, FILTERS, DUCTS, ROOF CAPS, WALL
CAPS AND OTHER ACCESSORIES FOR DUCTING. This warranty does not cover (a) normal
maintenance and service or (b) any products or parts which have been subject to misuse,
negligence, accident, improper maintenance or repair (other than by NuTone), faulty instal-
lation or installation contrary to recommended installation instructions.
The duration of any implied warranty is limited to the one-year period as specified for the
express warranty. Some states do not allow limitation on how long an implied warranty
lasts, so the above limitation may not apply to you.
NUTONE’S OBLIGATION TO REPAIR OR REPLACE, AT NUTONE’S OPTION, SHALL BE
THE PURCHASER’S SOLE AND EXCLUSIVE REMEDY UNDER THIS WARRANTY. NUTONE
SHALL NOT BE LIABLE FOR INCIDENTAL, CONSEQUENTIAL OR SPECIAL DAMAGES
ARISING OUT OF OR IN CONNECTION WITH PRODUCT USE OR PERFORMANCE. Some
states do not allow the exclusion or limitation of incidental or consequential damages, so
the above limitation or exclusion may not apply to you.
This warranty gives you specific legal rights, and you may also have other rights, which
vary from state to state. This warranty supersedes all prior warranties.
To qualify for warranty service, you must (a) notify NuTone at the address or telephone
number below, (b) give the model number and part identification and (c) describe the
nature of any defect in the product or part. At the time of requesting warranty service, you
must present evidence of the original purchase date.
Broan-NuTone LLC, 926 W. State Street, Hartford, Wisconsin 53027
www.nutone.com 888-336-6151
WARRANTY
99528456B
123456
ON
WIRELESS CHIME - EXAMPLE CODE SETTING
(Chime will have jumpers or switches)
JUMPERS REMOVED (OFF) FROM 2, 4, 6
SWITCHES 2, 4, 6 IN OFF POSITION
WIRELESS
CHIME
JUMPERS
{
WIRELESS
CHIME
SWITCHES
{
FIGURE 4
123456
ON
7 8
SWITCHES 2, 4, 6
IN OFF POSITION
CODE SET
SWITCHES 1-6
{
WIRELESS PUSHBUTTON - EXAMPLE CODE SETTING
CODE SET
SWITCHES 1-6
{
CODE SET SWITCHES 7 & 8
{
WIRELESS PUSHBUTTON - ASSIGN TUNE(S) OR DOOR(S)
Models 7 8 7 8 7 8 7 8
LA203WH
LA203RWH
LA204WH
LA204RWH
LA205WH 1 Note 2 Note 3 Note 4 Note
LA206WH
LA522WH
LA532WH
LA533WH
LA600WH Front Back Front Back
ON
1 8
1 8
FIGURE 5

3
BOTÓN PARA TIMBRE
DE INALÁMBRICO
Para registrar este producto, visite: www.nutone.com
ESTE PAQUETE CONTIENE:
nBotón inalámbrico y pila
INSTALACIÓN
El botón inalámbrico (A) es compatible con los timbres inalámbricos
de NuTone. (Se compra por separado). Consulte las instrucciones de
instalación suministradas con el timbre inalámbrico.
1. Abra la cubierta de la pila (B) deslizándola en la dirección señalada por
la flecha. (Figura 1)
2. Instale la pila (C) en el botón inalámbrico. (Figura 2)
INSTRUCCIONES DE INSTALACIÓN Y OPERACIÓN
LEA Y CONSERVE ESTAS INSTRUCCIONES
FIGURA 3
1
2
FIGURA 1
A
B
FIGURA 2
C
+ -
4. Inserte el mecanismo del botón inalámbrico en el escudo como se
muestra. (Figura 3)
5. Pruebe el funcionamiento. Sostenga el botón inalámbrico cerca del timbre
y presione el botón. Si el timbre no suena, consulte los puntos a. – c. en
la página 4.
ESCUDO
(NO INCLUYE)

4
Si el timbre no suena cuando se presiona el botón inalámbrico:
a. Confirme que la configuración del código en el mecanismo del
timbre y en el botón inalámbrico sea la misma. (Figura 4)
b. Verifique la instalación adecuada de las pilas en el mecanismo del
timbre y en el botón. (Figura 2)
c. Verifique la condición de las pilas en el mecanismo del timbre y en el
botón. Reemplace si se requiere.
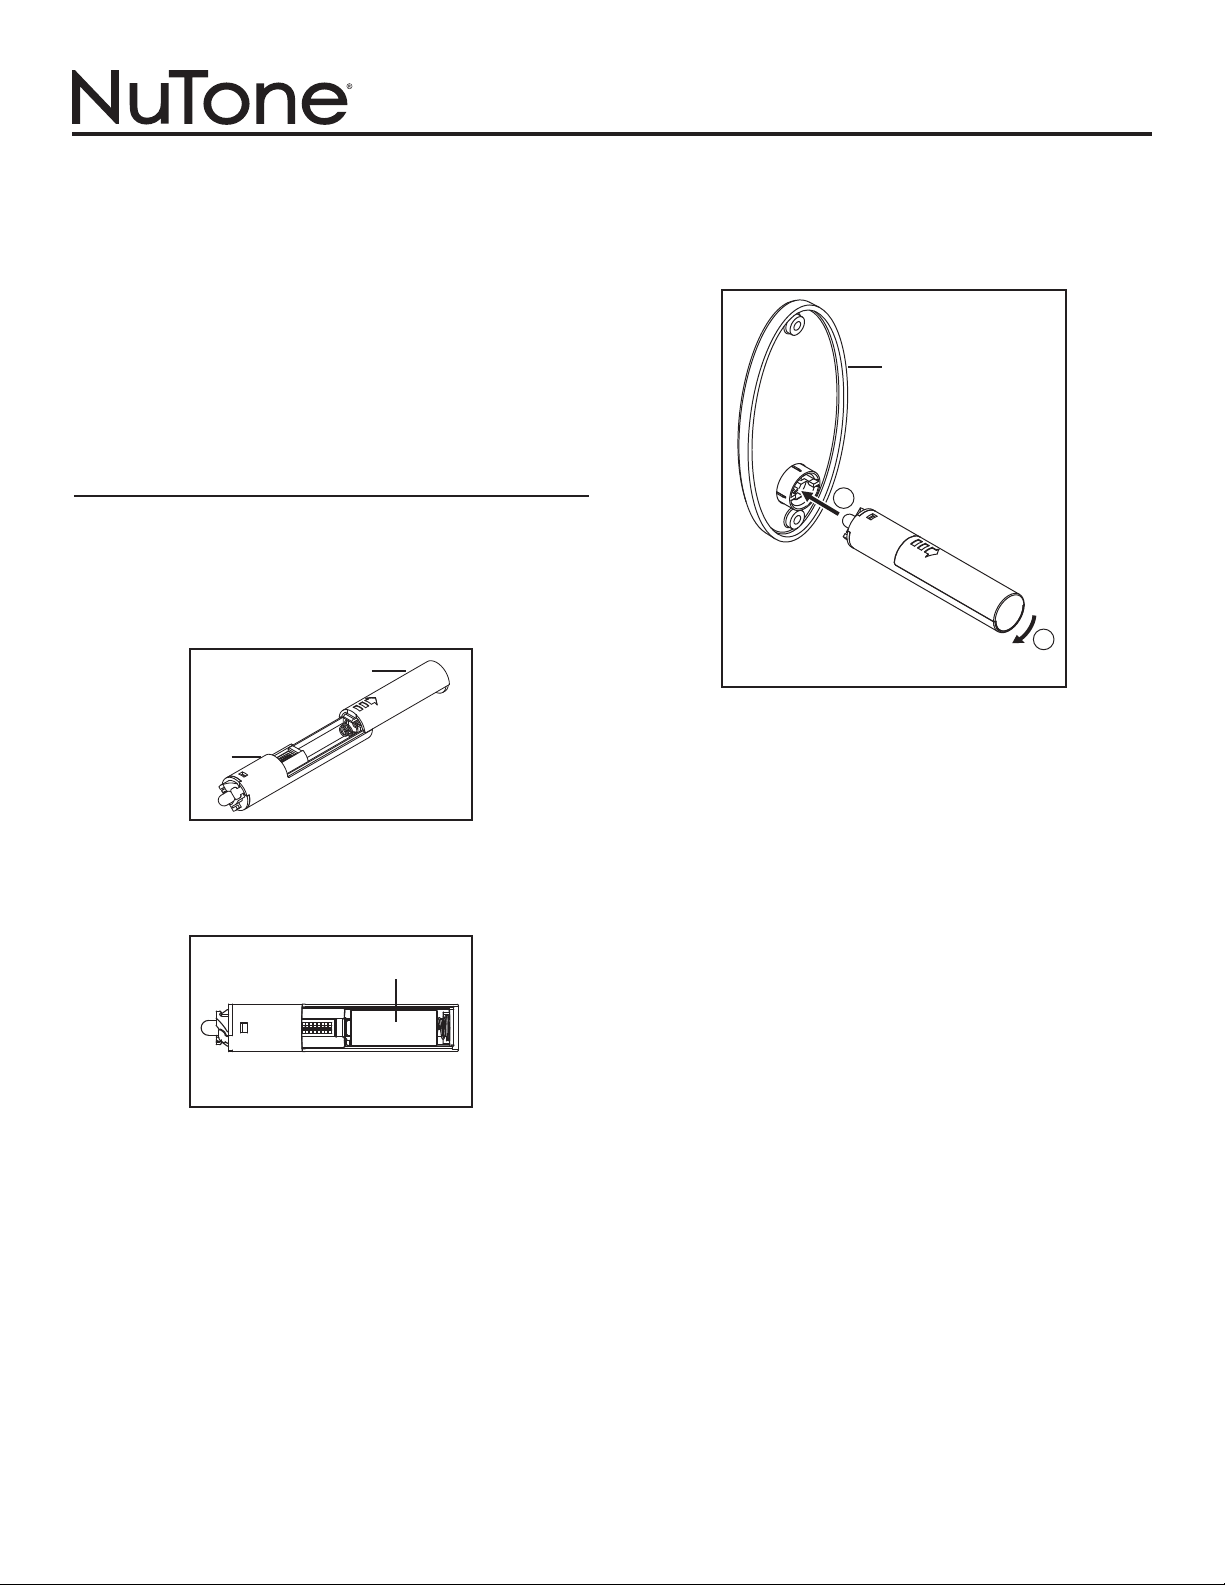
6. Cierre la cubierta de la pila en el botón inalámbrico.
7. Para instalar el conjunto del botón inalámbrico/escudete, perfore un
orificio recto y nivelado de ¾ pulg. (19 mm) de diámetro x 3 ½ pulg.
(89 mm) de fondo.
8. Inserte el conjunto del botón inalámbrico/escudete en el orificio y
asegúrelo a la pared utilizando el herraje suministrado.
Se puede usar más de un botón con los timbres inalámbricos NuTone.
Consulte la Figura 5 para asignar una puerta o una melodía a cada botón
inalámbrico.
CAMBIO DE LAS PILAS
Timbre inalámbrico
Cambie las pilas siguiendo las instrucciones correspondientes al timbre de
la puerta.
Botón inalámbrico
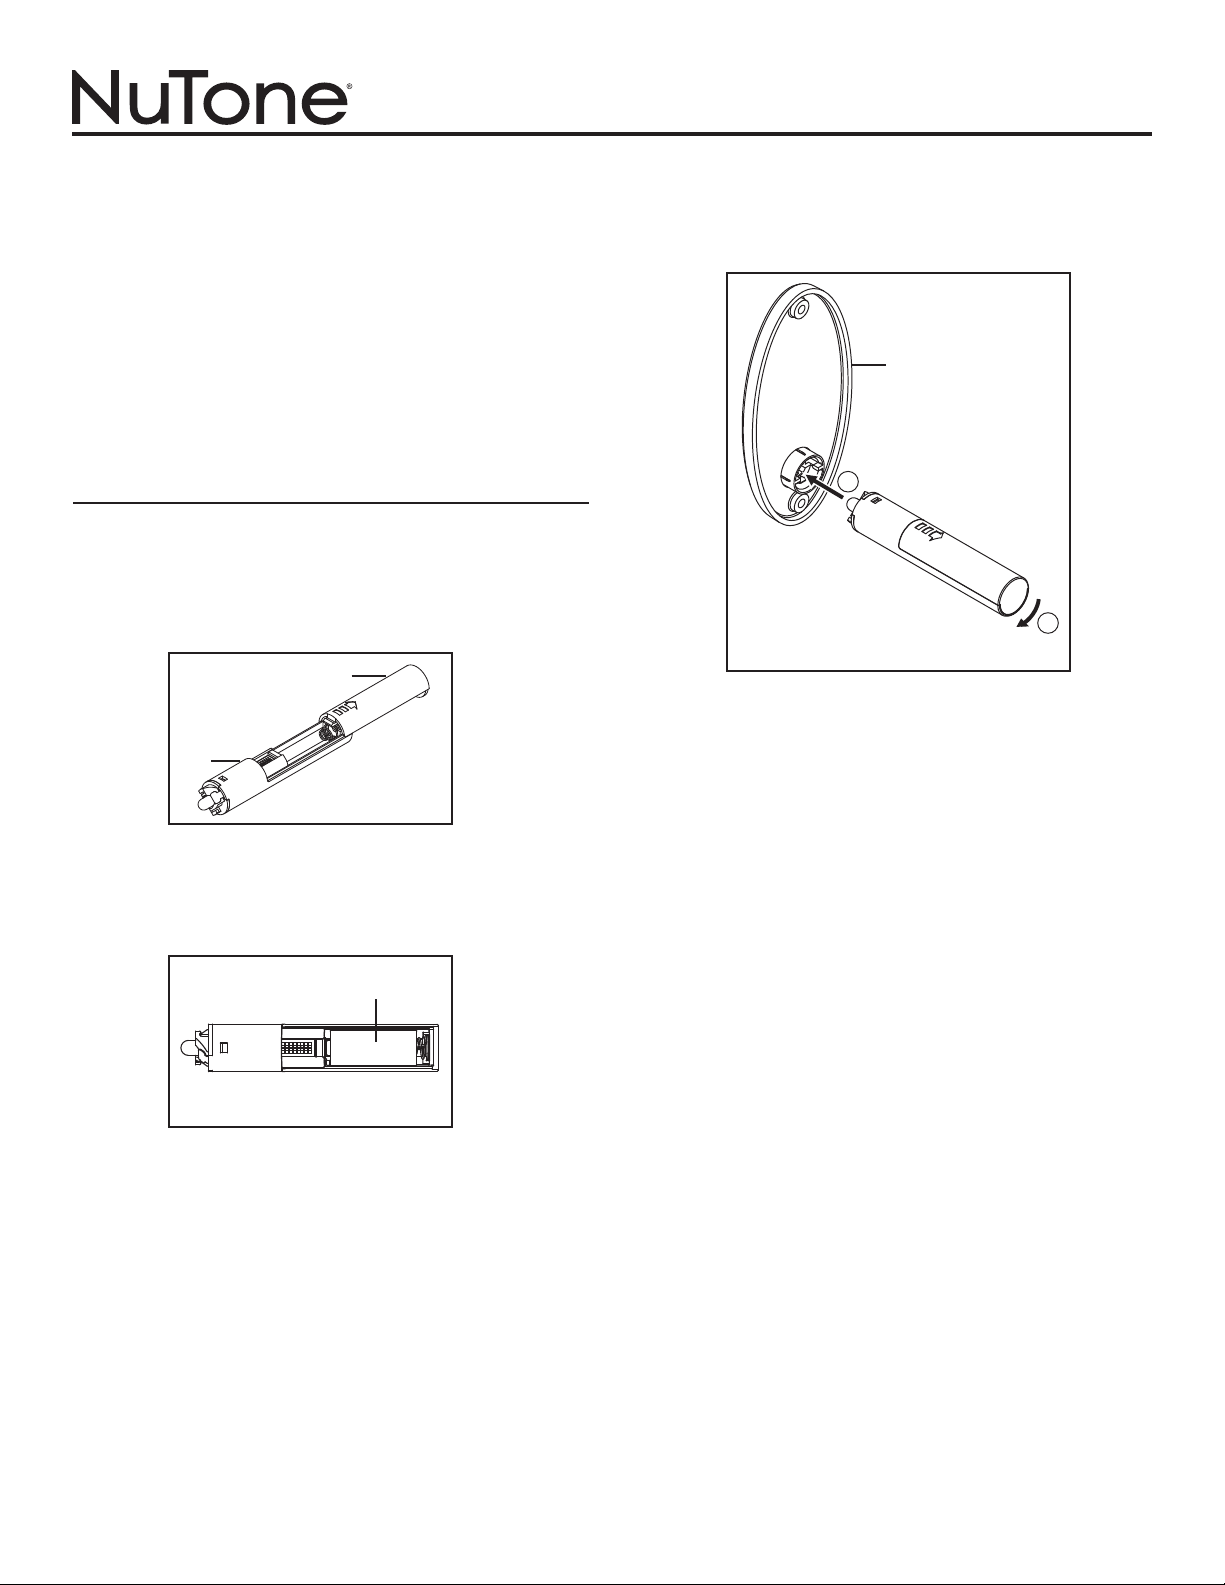
Retire de la pared el conjunto del botón inalámbrico/escudete y siga el paso
1. Reemplace la pila con una pila alcalina de celda N, de 1.5 V. Cierre la cubierta
de la pila y vuelva a instalar con el herraje el conjunto del botón inalámbrico/
escudete.
TIMBRES PARA PUERTAY BOTONES
INALÁMBRICOS ADICIONALES
Cuando instale otros juegos de timbre para puerta inalámbricos, seleccione
códigos diferentes para evitar interferencia. Si desea que todos los timbres
suenen al mismo tiempo, configure los timbres con el mismo código.
RESOLUCIÓN DE PROBLEMAS PARA
LAS INSTALACIONES INALÁMBRICAS
El alcance del timbre de la puerta varía según la ubicación, temperatura y
condición de la pila. En caso de que tenga problemas con este producto, intente
las soluciones descritas a continuación.
El timbre suena por sí solo:
• Es posible que un vecino tenga un juego de timbre inalámbrico con la misma
configuración de los códigos. Cambie la configuración del código del timbre
y el botón. (Figura 4)
El timbre no suena:
• Asegúrese de que el botón y el código del timbre tengan la misma
configuración.
• Verifique las pilas en el timbre y en el botón inalámbrico. (Figuras 2, 4)
Las pilas están buenas, pero el timbre no funciona al instalarse:
• El montaje del timbre o del botón directamente sobre metal, concreto o cerca
de pasadores metálicos reduce el alcance.
• No instale el timbre muy cerca de losas de concreto de piso, puesto que así
también se reduce el alcance. Instale el timbre lejos del piso.
• Trate de colocar el timbre en diferentes puntos más cercanos al botón.
Igualmente, trate de orientar el timbre a ángulos diferentes para aumentar al
alcance. El alcance es óptimo a los lados del botón.
Información normativa
Se advierte al usuario que cualquier cambio o modificación no
aprobado específicamente por las autoridades normativas podría dar
lugar a la anulación del permiso del usuario para operar este equipo.
GARANTÍA LIMITADA DE UN AÑO DE NUTONE
NuTone garantiza al comprador original de sus productos que dichos productos carecerán de
defectos en materiales o en mano de obra por un período de un año a partir de la fecha original
de compra. NO EXISTEN OTRAS GARANTÍAS, EXPLÍCITAS O IMPLÍCITAS, INCLUYENDO, ENTRE
OTRAS, GARANTÍAS IMPLÍCITAS DE COMERCIALIZACIÓN O APTITUD PARA UN PROPÓSITO
PARTICULAR.
Durante este período de un año, NuTone, a su criterio, reparará o reemplazará, sin cargo alguno,
cualquier pieza o producto que se encuentre defectuoso bajo condiciones normales de uso y servicio.
LA PRESENTE GARANTÍA NO CUBRE TUBOS O ARRANCADORES DE LÁMPARAS
FLUORESCENTES, BOMBILLAS HALÓGENAS E INCANDESCENTES, FUSIBLES, FILTROS,
CONDUCTOS, TAPAS DE TECHO O DE PARED Y DEMÁS ACCESORIOS DE CANALIZACIÓN. Esta
garantía no cubre: (a) mantenimiento y servicio normales ni (b) ningún producto o piezas que se
hayan sometido a uso inadecuado, negligencia, accidente, mantenimiento o reparación inadecuada
(no hecha por NuTone), instalación incorrecta o instalación que vaya en contravención de las
instrucciones de instalación recomendadas.
La duración de cualquier garantía implícita se limita a un período de un año, como se especifica en la
garantía expresa. Algunos estados no permiten limitaciones en cuanto al tiempo de vencimiento de
una garantía implícita, por lo que la limitación antes mencionada podría no aplicarse a usted.
LA OBLIGACIÓN DE NUTONE DE REPARAR O REEMPLAZAR, A OPCIÓN DE NUTONE, SERÁ EL
ÚNICO Y EXCLUSIVO RECURSO DEL COMPRADOR BAJO ESTA GARANTÍA. NUTONE NO SERÁ
RESPONSABLE POR DAÑOS INCIDENTALES, RESULTANTES O ESPECIALES QUE SURJAN DE, O
EN RELACIÓN CON, EL USO O RENDIMIENTO DEL PRODUCTO. Algunos estados no permiten la
exclusión o limitación de daños incidentales o resultantes, por lo que la limitación antes mencionada
podría no aplicarse a usted.
Esta garantía le otorga derechos legales específicos, y usted podría tener otros derechos que varían
de un estado a otro. Esta garantía sustituye a todas las garantías anteriores.
Para tener derecho al servicio de la garantía, usted debe (a) notificar a NuTone a la dirección y
número de teléfono que aparecen abajo, (b) proporcionar el número de modelo y la identificación
de la pieza y (c) describir la naturaleza de cualquier defecto en el producto o pieza. En el momento
de solicitar el servicio cubierto por la garantía, debe presentar un comprobante de la fecha de
compra original.
Broan-NuTone LLC, 926 W. State Street, Hartford, Wisconsin 53027
www.nutone.com 888-336-6151
GARANTÍA
99528456B
123456
ON
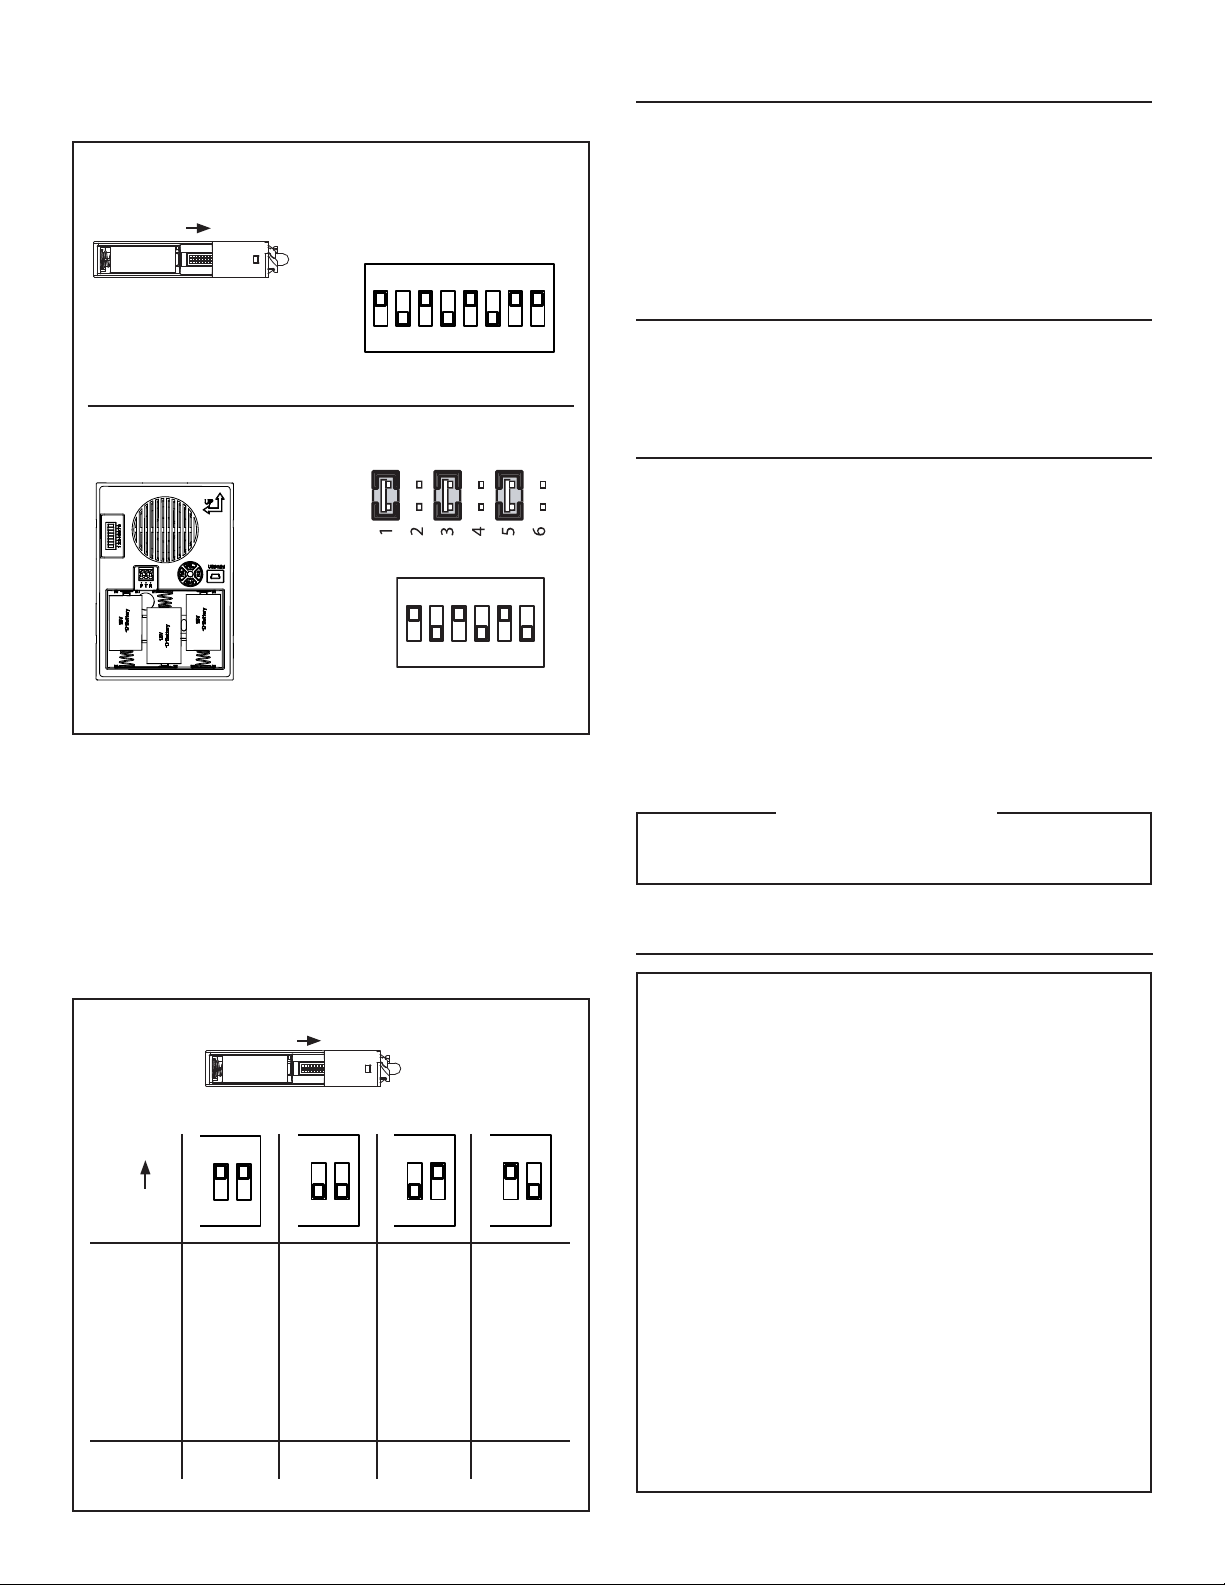
TIMBRE INALÁMBRICO – EJEMPLO DE CONFIGURACIÓN
DE CÓDIGO
(El timbre tendrá puentes o interruptores)
PUENTES RETIRADOS (APAGADOS) DE 2, 4, 6
ENCENDIDOS
INTERRUPTORES 2, 4, 6 EN LA POSICIÓN
DE APAGADO
PUENTES
DEL TIMBRE
INALÁMBRICO
{
INTERRUPTORES
DEL TIMBRE
INALÁMBRICO
{
FIGURA 4
123456
ENCENDIDOS
7 8
INTERRUPTORES 2, 4, 6 EN
LA POSICIÓN DE APAGADO
INTERRUPTORES
PARA CONFIGURAR
CÓDIGOS 1-6
{
BOTÓN INALÁMBRICO – EJEMPLO DE CONFIGURACIÓN
DE CÓDIGO
INTERRUPTORES 2, 4, 6 EN
LA POSICIÓN DE APAGADO
{
INTERRUPTORES PARA CONFIGURAR CÓDIGOS 7 Y 8
{
BOTÓN INALÁMBRICO – ASIGNE MELODÍAS O PUERTAS
Modelos 7 8 7 8 7 8 7 8
LA203WH
LA203RWH
LA204WH
LA204RWH
LA205WH 1 nota 2 notas 3 notas 4 notas
LA206WH
LA522WH
LA532WH
LA533WH
LA600WH Frente Atrás Frente Atrás
ENCENDIDO
FIGURA 5
1 8
1 8
Other manuals for LA522WH
1
This manual suits for next models
10
Table of contents
Languages:
Other NuTone Accessories manuals

NuTone
NuTone PORTABLE PILOT LA553WH Manual

NuTone
NuTone C905 User manual

NuTone
NuTone LB-55 User manual

NuTone
NuTone LB-18 series User manual

NuTone
NuTone BK142LWH User manual

NuTone
NuTone Knock DCAM100RB User manual

NuTone
NuTone C905 Service manual

NuTone
NuTone LA225WH User manual

NuTone
NuTone Rough0In IR-3 User manual

NuTone
NuTone LA224WH Manual