NUTRIBULLET JUICER PRO User manual

User guide

32
Contents
Thank you for purchasing the nutribullet Juicer Pro™.
03 Important safeguards
08 What’s included
09 Assembly guide
10 Assembly & use
10 Usage instructions
17 Control panel
18 Juicing tips
22 Disassembly
24 Care and maintenance
25 Juice and unit storage
26 Troubleshooting guide
26 Replacement parts
GENERAL SAFETY
INFORMATION
• This juicer system has sharp
blades and moving parts, and
is
NOT
intended for use by
children who lack experience
and knowledge of its safe
operation. They require close
supervision and thorough
instruction on its proper use and
safe operation.
• This appliance shall not be used
by children. Keep the appliance
and its cord out of reach of
children.
• Children shall not play with
the appliance. The appliances
can be used by persons with
reduced physical, sensory or
mental capabilities or lack of
experience and knowledge
if they have been given
supervision or instruction
concerning use of the appliance
Important safeguards
Warning! To avoid the risk of serious injury, carefully
read all instructions before operating your nutribullet
Juicer Pro™. When using any electrical appliance, basic
safety precautions should always be observed, including
the following important information.
Save these instructions!
FOR HOUSEHOLD USE ONLY
in a safe way and if they under-
stand the hazards involved.
• To protect against fire, electrical
shock and injury to persons, do
not immerse the juicer, Motor
Base, cord or plug in water or
any other liquid.
• Turn the juicer OFF, then unplug
from the outlet when not in
use, before assembling or
disassembling parts and before
cleaning. To unplug, grasp the
plug and pull from the outlet.
Never pull from the power cord.
AVOID CONTACT WITH
MOVING PARTS.
• Regularly inspect the power
supply cord, plug, and actual
juicer for any damage
• Do not operate this or any
appliance with a damaged cord
or plug or after the appliance
malfunctions or is dropped or
damaged in any manner.

54
• If the supply cord is damaged,
it must be replaced by the
manufacturer, its service agent
or similarly qualified persons in
order to avoid a hazard
• The use of attachments not
recommended or sold by
nutribullet
®
may cause fire,
electric shock, or injury.
• This juicer is for household use
only. Do not use this juicer for
anything other than its intended
use. Do not use in moving
vehicles or boats. Do not use
outdoors. Misuse may cause
injury.
• Do not let the power cord hang
over the edge of a table or
counter top.
• Do not let the power cord touch
hot surfaces, such as a stove
or let it become tangled or
knotted.
• Always make sure the pulp
basin cover is securely in place
(with locking handle in its
upright and locked position)
before the motor is turned
on. Do not unlock the locking
handle while the juicer is in
operation.
Always ensure the juicer is
turned OFF after each use.
Before disassembling, make
sure the sieve has stopped
rotating and the motor has
completely stopped.
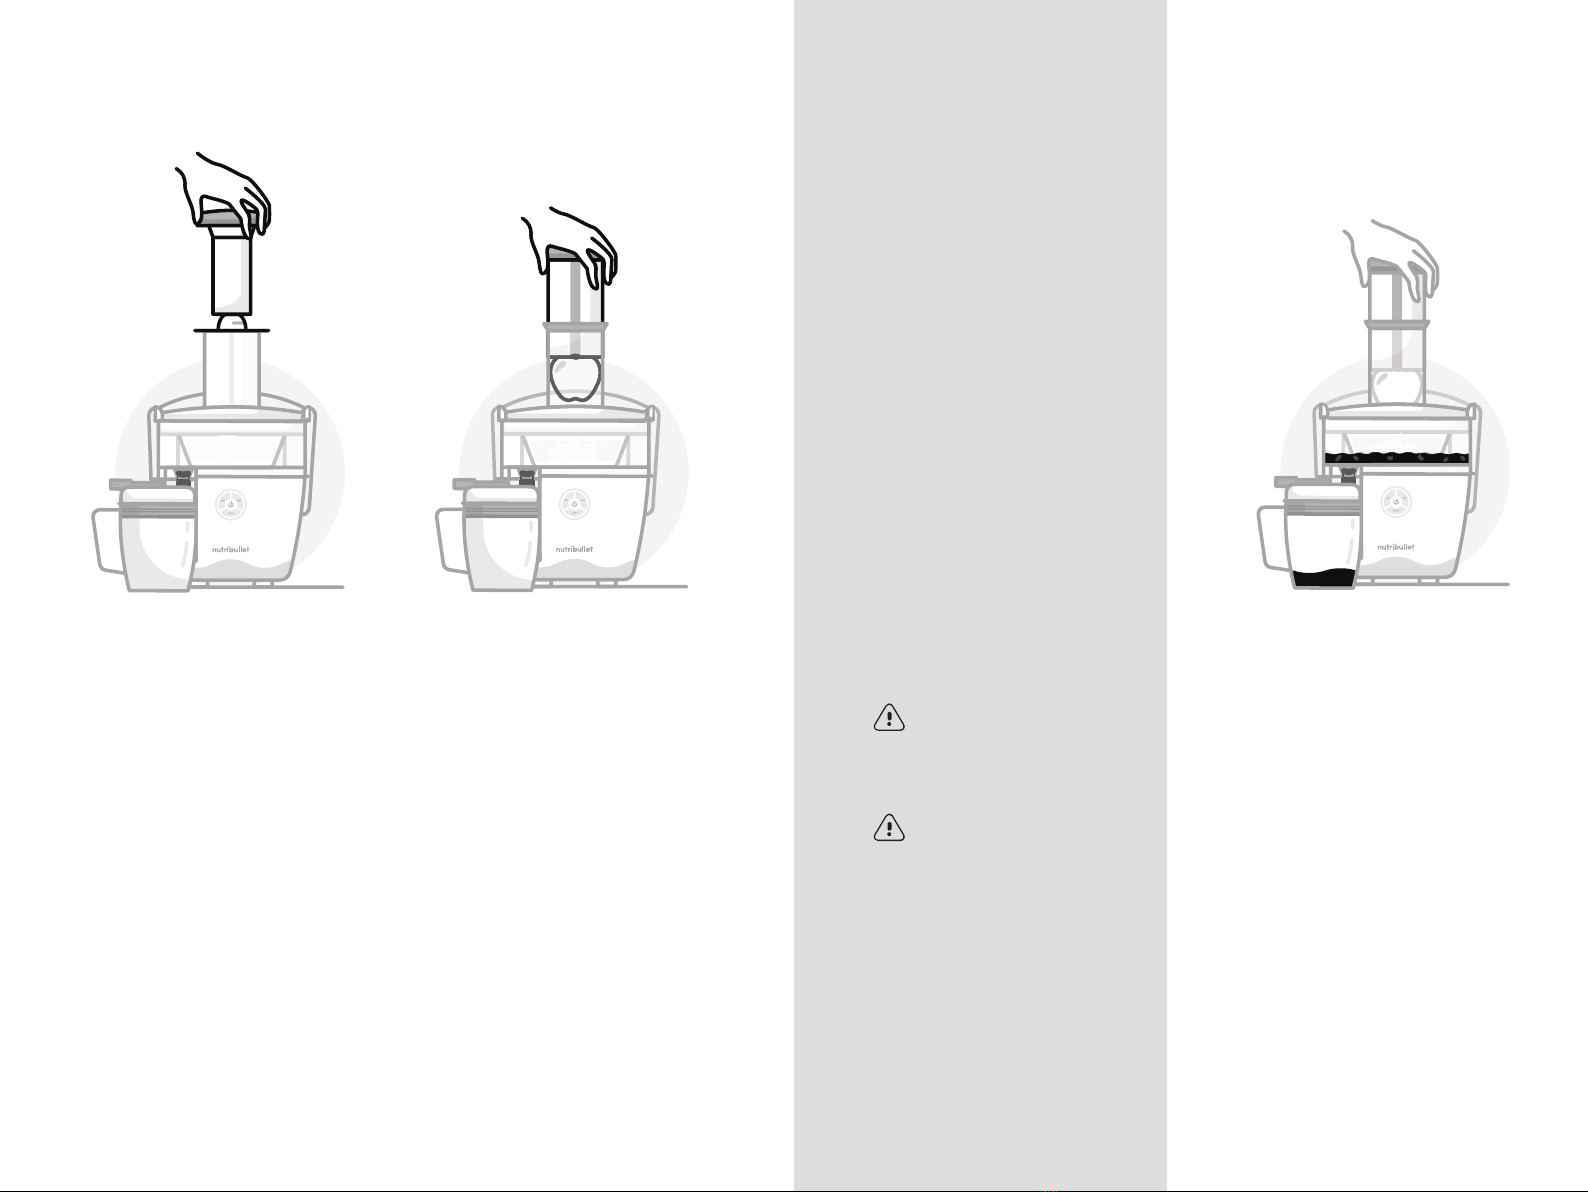
• Do not push food into the feed
chute with your fingers or
utensils. Always use the food
pusher provided. Do not place
your hand or fingers into the
feed chute when it is attached
to the juicer. If food becomes
lodged in the feed chute, use
the food pusher provided
or another piece of fruit or
vegetable to push it down. Turn
the motor o and ensure that
all moving parts have stopped
before disassembling the juicer
to remove the remaining pulp.
• Do not use the juicer if the
rotating sieve is damaged.
• Do not use the juicer without
the pulp basin and basin
cover attached to the motor
base. Please see assembly
instructions for proper
placement.
• Switch o the appliance and
disconnect from supply before
changing accessories or
approaching parts that move
in use.
ADDITIONAL
SAFEGUARDS
Remove and safely discard
any packaging material or
promotional labels before using
the juicer for the first time.
• To eliminate a choking hazard
for young children, remove and
safely discard the protective
cover fitted to the power plug of
this juicer.
• Do not touch the small cutting
blades/teeth on the bottom/
base of the sieve.
BLADES
ARE SHARP! HANDLE WITH
EXTREME CARE!
• Keep fingers away from the
sharp blade in the feed chute.
Always make sure the Juicer
is properly and completely
assembled before connecting to
power outlet and operating.
Ensure that the surface where
the appliance operates is stable,
level, clean and dry.
• Vibration can occur during
normal operation.
•
CAUTION:
In order to avoid
a hazard due to inadvertent
resetting of the thermal cut-
out, this appliance must not be
supplied through an external
switching device, such as a
timer, or connected to a circuit
that is regularly switched on
and o by the utility.
• If extreme vibration occurs,
discontinue use and call
Customer Service.
• Do not use the appliance if the
rotating sieve or the protecting
cover is damaged or has visible
cracks.
• If the juicer leaks or there is a
spill under or around the juicer,
or onto the juicer itself, clean
and dry before continuing use.
• When using this juicer, make
sure there is adequate air space
around and under it for proper
air circulation.
This juicer is only designed to
juice fruits and vegetables.
Please refer to the juicing guide
to determine the correct speed
for the fruits and vegetables
selected for juicing. Do not use
any frozen fruits or vegetables.
• Hard fruits and vegetables will
put excess strain onto the motor
if a low speed is selected.
•
Remove rind from all citrus
fruits before juicing.
• Do not juice stone fruit unless
pits or seed stone has been
removed.
WARNING!
Do not leave the appliance
unattended while in use.
Keep hands, fingers, hair,
clothing as well as spatulas and
other utensils away from the
appliance during operation.
Keep the juicer clean. Refer to
care and cleaning section for
further information.
Any maintenance other than
cleaning should be performed
by an authorized electrician.
Do not attempt to repair or
service this juicer, contact

76
Customer Service for assistance
at
nutribullet.com
.
If any of the instructions or
warnings are not understood
please contact Customer
Service for assistance at
nutribullet.com
.
Save these
instructions!
FOR HOUSEHOLD
USE ONLY

98
What’s included
1000 WATT MOTOR
BASE WITH LOCKING
HANDLE
PULP BASIN COVER
WITH 76 MM FEED
CHUTE
DUAL-SIZE FOOD
PUSHER
2L PULP BASIN WITH
NO-DRIP SPOUT
STAINLESS STEEL SIEVE 800 ML JUICE PITCHER
JUICE PITCHER LID WITH
FROTH SEPARATOR CLEANING BRUSH TWO 350 ML GLASS
STORAGE BOTTLES
118 ML FREEZER TRAY60 ML FREEZER TRAY
Assembly guide
dual-size food pusher
76 mm feed chute
locking handle
basin cover
2L pulp basin
stainless steel
sieve (inside basin)
no-drip spout
800 ml juice
pitcher
multi-speed
control panel
motor base
juice pitcher lid

1110
Assembly & use
1 Place the
Motor Base
on
a dry, level counter top.
Ensure the dial is set to the
“OFF”
position and the unit is
unplugged.
2 Place the
Pulp Basin
on top of
the Motor Base. Align the
Pulp
Basin
with the Motor Base so
that the spout is aligned with
the dimpled side of the Motor
Base.
3 Align the
Sieve
with the motor
drive coupling and push
down until it clicks into place.
Handle the
Sieve
by gripping
the top edges being careful
not touch the sharp teeth on
the base of the
Sieve
. Ensure
the
Sieve
is properly seated
in place and securely inside of
the Pulp Basin.
4 Place the
Basin Cover
over
the Sieve and Pulp Basin.
The side “ears” on the
Basin
Cover
should align with the
“ears” on the sides of the Pulp
Basin.
5 Raise the
Locking Handl
e
and move it into the “ears” on
each side of the Basin Cover.
The
Locking Handle
should
be in a vertical position and
locked into place.
NOTE: if the Locking Handle is not
securely in place, the juicer will not
power on.
6 Swing the
No-Drip Spout
cover up vertically so that it is
no longer covering the juice
spout.
7 Place the
Juice Pitcher Lid
on
top of the Juice Pitcher, and
open the locking lid latch.
8 Slightly angle the
Juice
Pitcher
and place it under the
juice spout. Align the spout
with the hole in the
Juice
Pitcher Lid
and level out the
Juice Pitcher
. It will fi t snuggly
into the spout to hold it in
place.

1312
Usage instructions
1 Gather all of your desired
ingredients. Wash and
prepare them for juicing.
2 After the juicer is fully
assembled, plug the power
cord into an outlet.
NOTE: If no speed is selected after
10 minutes, the unit will power o
3 Select a speed to begin
juicing. The speed selected
will illuminate on the control
panel. You may start at
any speed and can toggle
between speeds as desired
depending on the type of
produce (refer to the chart on
page 18 for recommended
speeds for each type of
produce).
NOTE: always start the juicer before
putting food in the feed chute.
4 To operate the
Dual-Size
Food Pusher
, grip the outer
edge of the top of the pusher
with one hand and the bottom
of the pusher with the other
hand. Twist the top of the
pusher clockwise to unlock
the inner pusher. (The inner
pusher is thinner than the full
pusher.)

1514
5 If you are using smaller
ingredients (smaller fruits,
leafy greens, stalk vegetables
like celery or carrots), place
the outer part of the pusher
into the chute, making the
chute more narrow. While the
motor is running, begin gently
guiding ingredients into the
internal chute using the inner
pusher.
TIP: When using the narrow chute
for juicing leafy greens, take
a small handful of greens and
squeeze them into a tighter bunch.
Place the bunch into the chute and
slowly push down into the Sieve.
Using the narrow chute will help to
prevent any pieces from fl ying up
out of the chute.
6 If you are using larger
ingredients, keep the feed
chute empty (creating a wider
chute) and lock the inner
pusher back inside the outer
pusher. While the motor is
running, begin gently guiding
your ingredients into the feed
chute using the full
Dual-Size
Food Pusher
.
7 Juice will begin to fl ow out of
the spout and into the
Juice
Pitcher
, while the pulp will be
separated and stored in the
Pulp Basin
.
NOTE: You may alternate
between the two chute sizes
(narrow and wide) as you
are juicing.
WARNING: Do not use
excess force when pushing
food down with the Food
Pusher, as it will not allow
for maximum juice yield.
WARNING: Never use hands/
fi ngers or other tools to push
ingredients down the feed
chute into the Sieve. Only the
Food Pusher should be used
to push down ingredients.

1716
10 Remove the
Juice Pitcher
from under the spout. You
may close the
Juice Pitcher
Lid
and store juice in the
Juice
Pitcher
if desired.
NOTE: To do this, you’ll fi rst need to
tip the Juice Pitcher forward at a
slight angle, so that the lid’s large
hole has some separation from the
spout, then you can slide out the
pitcher. This is the reverse of what
you did during assembly.
9 To stop juicing, press the speed
at which you are currently
juicing. To completely power o
the juicer, press the center power
button and wait for the Sieve to
stop spinning. Unplug the unit
after each use.
8 When the
Pulp Basin
is
completely full, it must be
emptied before continuing
juicing. See disassembly
instructions.
11 Immediately move the
No-
Drip Spout
cover downward
over the spout to avoid any
residual drips onto the unit
or onto the surface below the
juicer.
TIP: We recommend using your
left hand to pull the Juice Pitcher
away, while using your right hand
to swing the No-Drip Spout cover
down and over the spout opening.
Control panel
OFF:
Power is
OFF
. If the unit is
ON
,
the center power button will be
illuminated. Pressing the center
button will turn the unit
OFF
.
LOW:
Best for juicing softer fruits and
vegetables.
HIGH:
Best for harder produce like
pineapples.
TURBO:
Best for juicing the toughest
vegetables like beets or carrots.
MULTISPEED CONTROL PANEL
& JUICING SETTINGS

1918
Juicing tips
JUICING SPEED SELECTION GUIDE
INGREDIENTS SPEEDS SEASONS VITAMINS / NUTRIENTS
Apple
Turbo All Year source of quercetin
Beets
Turbo Summer / Fall / Winter excellent source of folate
Blueberry
Turbo Summer good source of vitamin C
Broccoli
Turbo Fall / Spring high in vitamin C, high in folate, good source of potassium
Brussels Sprouts
Turbo Fall / Winter high in vitamin C, good source of folate
Cabbage
Low Fall / Winter / Spring high in vitamin C
Carrots
Turbo All Year excellent source of vitamin A, good source of vitamin C
Cauliflower
Turbo Fall high in vitamin C, good source of folate
Celery
Turbo All Year good source of vitamin C, good source of vitamin A
Cucumber
High Summer good source of vitamin C
Fennel
Turbo All Year good source of vitamin C and potassium
Ginger
Turbo Fall contains vitamin C, magnesium, and potassium
Grapes
Low Fall good source of vitamin K
Grapefruit
Low Winter high in vitamin A, high in vitamin C
Kale
High Fall / Winter / Spring
excellent source of vitamin A and vitamin C, good source of calcium and potassium
Kiwi
Low Fall / Winter / Spring high in vitamin C, good source of potassium and vitamin E
Lemon
Low All Year high in vitamin C
Lime
Low All Year high in vitamin C
Melons (all)
Low Summer high in vitamin A, high in vitamin C
Orange
Turbo Winter high in vitamin C
Peaches
High Summer good source of vitamin C
Pears
High Fall / Winter good source of vitamin C
Pineapple
High Fall / Winter / Spring high in vitamin C
Plums
High Summer good source of vitamin C
Raspberries
Low Summer / Fall high in vitamin C
Spinach
Low Fall / Spring high in vitamin A, vitamin C, iron, and folate, good source of magnesium
Sweet Potato (raw)
Turbo Fall / Winter good source of potassium, high in vitamin A and vitamin C
Tomatoes
Low Summer high in vitamin A, high in vitamin C, good source of potassium

2120
PROPER PRODUCE PREP
Prepare fruit and veggies before
inserting them into the juicer:
• Properly clean produce
(rinse with produce wash, or
lukewarm water and apple
cider vinegar).
• Peel or remove skin as needed,
and chop food items down
to the right size – just small
enough to fit easily into the feed
chute, without having to force
the pieces down with the
Food
Pusher.
• Remove rind from all citrus fruits
before juicing.
• Remove large pits and seeds
from stone fruits before juicing.
FEED CHUTE
Selecting which
Food Pusher
to
use (narrow or wide) aects feed
chute thickness. If you pull out the
thinner inner food pusher from
within the full pusher, you’ll place
the outer part into the chute,
making the chute narrow. If you
use the full (wide) pusher, the feed
chute will be wider.
• Never place your hand or
fingers into the feed chute when
it is attached to the juicer.
• Always start the juicer before
adding food to the feed chute.
The unit must be running when
items enter it.
• Do not overload the feed chute.
Items must be added gradually,
at a pace the juicer can keep up
with.
• Use only the provided
Food
Pusher
to push food into the
feed chute. Never use fingers,
utensils, or any other apparatus.
• Never use excessive force to
push items into the feed chute.
• When juicing, ensure all
produce has moved through the
feed chute and into the
Sieve
before adding more.
• If any food gets stuck in the feed
chute, use the
Food Pusher
to
move it down the chute and into
the
Sieve
.
CONSUMING JUICE AND PULP
Instead of composting or
throwing away the pulp left over
after juicing, you can choose to
consume it. See our
Recipe Guide
for some fun tips on what to do
with the leftover pulp. By using
these creative ideas, you can
enjoy pulp in a variety of delicious
(and healthy) ways.
• Whether you prefer sweet or
savory, you can use pulp to
create some tasty treats!
• For best taste, consume fresh
juice and pulp within 48 hours
of juicing.
NO-GO FOODS
Foods that should NEVER be
used in this juicer:
• Thicker foods that do not
contain juice to extract
(for example, bananas or
avocados).
• Frozen fruits or vegetables.
• Stone fruits that have large pits
or seeds that have not been
removed. Stone fruits may be
used only if the seed or pit has
been removed.
OVERHEATING, SPEED
SELECTION, & AUTO SHUT-OFF
• If the motor overheats, the juicer
will turn o.
• If the juicer stops working,
unplug it and allow it to cool
down for at least fifteen minutes
before attempting to use again.
• Refer to the Troubleshooting
Guide for instructions on what
to do if the unit turns o or is not
working.

2322
Disassembly
1 Ensure the unit is powered
“OFF”
and unplugged.
2 Remove the pitcher from
under the spout. To prevent
drips, use the
No-Drip Spout
cover to close the juice spout.
3 Unlock the
Locking Handle
from the
Basin Cover
by
pulling the handle backward
out of the “ears” on either side
of the
Basin Cover
. Move the
handle down.
4 Remove the
Pulp Basin
from
the Motor Base by pulling
upwards with the
Basin Cover
and
Sieve
still in place and
take it directly to your sink.
5 Remove the
Food Pusher
by
lifting it out of the feed chute.
6 Lift the Basin Cover vertically
o of the Pulp Basin and
remove any pulp from the
inside of the cover. You
may use the fl at end of the
Cleaning Brush
to scrape
pulp o of the cover.
7 Gently lift the
Sieve
vertically
out of the center of the Pulp
Basin. Clean the
Sieve
right
away (see care instructions).
8 Empty the
Pulp Basin
. Use
the fl at end of the
Cleaning
Brush
to easily scrape out the
pulp and set it aside for use in
other recipes or composting.
Or empty the pulp into your
waste bin or compost.

2524
Please follow the below cleaning
instructions before the first use,
and after each use.
Cleaning the nutribullet Juicer
Pro™ is quick and easy. All
components except for the
Food Pusher and Motor Base
are dishwasher safe. Read on
for some cleaning tips and best
practices.
1 Always ensure the
Motor
Base
is unplugged before you
begin assembly, disassembly,
cleaning or storage of the
unit.
2 Once the
Pulp Basin
is
emptied, rinse all parts under
running water.
3 Use the
Cleaning Brush
to
scrub the
Sieve
under running
water. Be sure to properly
clean the
Sieve
every time
you juice, as minerals from
fruits and vegetables can
cause build-up in the
Sieve
which may prohibit maximum
juice extraction.
WARNING: Always use precaution
when cleaning the Sieve, as it
contains sharp blade teeth on the
flat disc part.
TIP: Always clean the Sieve as soon
as possible after juicing using the
Cleaning Brush. If allowed to sit,
pulp will dry on the Sieve and it
will become more dicult to scrub
blocked holes. If this happens, be
sure to allow the Sieve to soak in
hot water for 30 minutes.
4 All Juicer Pro components
except the
Food Pusher
and
Motor Base
are dishwasher
safe. You may also hand wash
with warm soapy water.
TIP: Do not use the Sterilize cycle
on your dishwasher to clean your
juicer as it may cause parts to
deform.
5 Wipe down
Motor Base
with
a clean, damp cloth.
WARNING: Never submerge Motor
Base into water or other liquid.
Cleaning instructions for your
nutribullet Juicer Pro™ storage
accessories:
•
Glass Storage Bottles
and
lids are dishwasher safe.
•
Freezer Trays
and lids are
dishwasher safe.
Care & maintenance
Included with your Juicer Pro are some great storage accessories:
a Juice Pitcher, two Juice Storage Bottles, and two Freezer Trays.
Juice & unit storage
The storage accessories give
you three options for storing
juice:
1
IN THE PITCHER:
The
Juice Pitcher
stores up
to 800 ml. Make sure to store
the pitcher upright in your
refrigerator, with lid tightly
sealed, latch closed, and
nothing atop the lid.
2
IN THE BOTTLES:
Use each
Storage Bottle
to
save up to 350 ml of juice, so
you can enjoy it later — either
at home or on the go. Fill up
the bottles leaving about a
quarter of an inch of room at
the top, leaving just enough
air in the bottle.
3
IN THE TRAYS:
Each
Freezer Tray
holds a
total of 480 ml: one tray has
eight 60 ml wells, and the
other tray has four 120 ml
wells. These are a great way
to preserve juice longer-term,
then defrost it anytime for a
full drinkable portion. Or, use
the trays to make frozen juice
shots. (See our
Recipe Guide
for some inspiring recipes for
frozen juice shots to add to
your favorite beverages, or to
drink on their own.)
For best taste, consume fresh
juice and pulp within 48 hours of
juicing.
Do not place anything on top of
the Pitcher Lid when storing in
the refrigerator.
Store remaining pieces of the
unit in a safe place where they
will not be damaged and won’t
cause harm as some pieces are
sharp!

2726
Replacement parts
To order additional parts and accessories, please visit our website at
nutribullet.com/shop/accessories
.
1
PROBLEM:
The power button
flashes three times and then
remains illuminated when I
select a speed.
SOLUTION:
This means
that the unit is not properly
assembled. Ensure the
Pulp
Basin
is properly seated on
top of the
Motor Base
, and
the
Locking Handle
is locked
into place.
2
PROBLEM:
The juicer stopped
in the middle of juicing, and
the power button flashed.
SOLUTION:
Ensure the
Locking Handle is securely
locked into place.
Troubleshooting guide
3
PROBLEM:
The juicer stopped
in the middle of juicing, and
the power button remains
illuminated.
SOLUTION:
You have
exceeded 10 minutes of
continuous running time.
Unplug the juicer and keep
the unit o for 15 minutes
before continuing use.
4
PROBLEM:
The juicer has
stopped running, and all lights
flashed three times.
SOLUTION:
The juicer has
overheated. Unplug the unit
and allow it to cool down for
15 minutes before continuing
use.
EN/ Explanation of the markings
EN/ This marking indicates that this product should not
be disposed with other household wastes throughout
the EU. To prevent possible harm to the environment or
human health from uncontrolled waste disposal; recycle it
responsibly to promote the sustainable reuse of material
resources. To return your used device, please use the
return and collection systems or contact the retailer where
the product was purchased. They can take this product for
environmental safe recycling.
EN/ This product complies with the European regulation
no. 1935/2004 on materials and articles intended to come
into contact with food.

1 (800) 523-5993 | nutribullet.com
nutribullet® is the registered trademark of CAPBRAN HOLDINGS, LLC
Copyright © 2020 CAPBRAN HOLDINGS, LLC. Distributed by CAPITAL BRANDS
DISTRIBUTION, LLC. LOS ANGELES, CA 90025 USA
All Rights Reserved. MADE IN CHINA
Illustrations may dier from the actual product. We are constantly striving to improve
our products, therefore the specifications contained herein are subject to change
without notice.
210927_NBJ93200

Manuale d’uso

32
Sommario
Grazie per aver acquistato nutribullet Juicer Pro™.
03 Avvertenze di sicurezza
08 Contenuto della confezione
09 Guida al montaggio
10 Assemblaggio e utilizzo
10 Istruzioni per l'uso
17 Pulsantiera
18 Suggerimenti per la centrifugazione
22 Smontaggio
24 Pulizia e manutenzione
25 Conservazione dei centrifugati
26 Guida alla risoluzione dei problemi
26 Parti di ricambio
INFORMAZIONI
GENERALI DI
SICUREZZA
• Questa centrifuga ha lame
alate e parti mobili e
NON
è destinato all'uso da parte
di bambini senza esperienza
e conoscenze per poterlo
utilizzare in tutta sicurezza.
Essi dovrebbero essere
attentamente sorvegliati e
istruiti sull’uso corretto e sicuro
dell’apparecchio.
• Questo apparecchio non deve
essere utilizzato da bambini.
Tenere l’apparecchio e il cavo
di alimentazione fuori dalla
portata dei bambini.
• I bambini non devono
giocare con l’apparecchio.
L’apparecchio può essere
utilizzato da persone con ridotte
Avvertenze di sicurezza
Avvertenza: Prima di utilizzare nutribullet Juicer Pro™
leggere attentamente tutte le istruzioni per evitare il
rischio di gravi lesioni. Quando si utilizza un apparecchio
elettrico, oltre alle più elementari misure di sicurezza, è
necessario osservare le seguenti avvertenze.
Conservare queste istruzioni!
QUESTO APPARECCHIO È
DESTINATO ESCLUSIVAMENTE
ALL’USO DOMESTICO
capacità fisiche, sensoriali o
mentali o con mancanza di
esperienza e di conoscenza
qualora siano sorvegliate o
abbiano ricevuto istruzioni
sull’utilizzo in sicurezza
dell’apparecchio e siano
consapevoli dei rischi che l’uso
può comportare.
• Per prevenire incendi, scosse
elettriche e lesioni personali,
non immergere la centrifuga, la
base motore, il cavo o la spina
in acqua o altri liquidi.
• Spegnere la centrifuga e
scollegarla dalla presa di
corrente quando non è in
uso, prima di montare o
smontare componenti e prima
della pulizia. Per scollegare
l’apparecchio dalla presa di
corrente, aerrare la spina e

54
tirare. Mai tirare per il cavo di
alimentazione.
EVITARE IL CONTATTO CON LE
PARTI IN MOVIMENTO.
• Controllare regolarmente che
il cavo di alimentazione, la
spina e la centrifuga non siano
danneggiati.
• Non utilizzare l’apparecchio
se il cavo o la spina risultano
danneggiati, dopo un caso di
malfunzionamento o qualora
l'apparecchio sia caduto o sia
stato danneggiato in qualche
modo.
• In caso di danneggiamento
del cavo, farlo sostituire
tempestivamente dal
costruttore o dal servizio
assistenza, o comunque da
personale qualificato, per
prevenire ogni rischio.
• L'uso di accessori non originali
nutribullet
®
può essere causa
di incendio, scosse elettriche o
lesioni.
• Questa centrifuga dev’essere
utilizzata solo per uso
domestico. Non utilizzare la
centrifuga per un uso diverso da
quello previsto. Non utilizzare
in veicoli o imbarcazioni in
movimento. Non utilizzare
all’aperto. L'uso improprio può
causare lesioni.
• Non lasciare che il cavo penda
dal bordo del tavolo o del piano
di lavoro.
• Evitare che il cavo di
alimentazione venga a contatto
con superfici calde, una stufa
ad esempio, né che si aggrovigli
o si annodi.
• Prima di accendere
l’apparecchio, verificare sempre
che il coperchio del contenitore
della polpa sia ben chiuso
(con la barra di bloccaggio in
posizione verticale e bloccata).
Non sbloccare la maniglia
mentre la centrifuga è in
funzione.
Dopo ogni utilizzo, accertarsi
sempre di aver spento la
centrifuga. Prima di scomporre
l’apparecchio, assicurarsi che il
filtro abbia smesso di ruotare e
che il motore sia completamente
fermo.
• Non spingere gli alimenti nello
scivolo di alimentazione con
le dita o con utensili. Utilizzare
sempre il pressino in dotazione.
Non mettere le mani o le dita
nello scivolo di alimentazione
quando quest’ultimo è installato
sulla centrifuga. Se l’alimento
si blocca nello scivolo di
alimentazione, utilizzare il
pressino in dotazione o un
pezzo di frutta o verdura
per spingerlo verso il basso.
Spegnere il motore e assicurarsi
che tutte le parti in movimento
siano ferme prima di smontare
la centrifuga per rimuovere la
polpa residua.
• Non usare l’apparecchio se il
filtro rotante è danneggiato.
• Non utilizzare la centrifuga
senza il raccoglitore della polpa
e il relativo coperchio installati
sulla base motore. Consultare
le istruzioni di montaggio per il
corretto posizionamento.
• Spegnere e scollegare
l’apparecchio dalla presa di
corrente prima di sostituire gli
accessori o avvicinare le mani
alle parti in movimento.
AVVERTENZE
DI SICUREZZA
ADDIZIONALI
Rimuovere ed eliminare in
modo sicuro qualsiasi materiale
di imballaggio o etichette
promozionali prima di utilizzare
la centrifuga per la prima volta.
• Per salvaguardare i più piccini
dal rischio di soocamento,
rimuovere ed eliminare in modo
sicuro la protezione montata
sulla spina di alimentazione
della centrifuga.
• Non toccare le piccole lame
taglienti sulla base del filtro.
LE LAME SONO AFFILATE!
MANEGGIARE CON LA
MASSIMA CURA!
• Tenere le dita lontane dalle
lame alate in fondo allo
scivolo di alimentazione.
Assicurarsi sempre che la
centrifuga sia correttamente
e completamente assemblata
prima di collegarla alla presa di
corrente e metterla in funzione.
Assicurarsi che la superficie su
cui è collocato l'apparecchio
sia stabile, in piano, pulita e
asciutta.
• Durante il normale
funzionamento possono
verificarsi vibrazioni.
•
ATTENZIONE:
per evitare i
rischi connessi all’intervento
accidentale della protezione
termica, l’apparecchio non
deve essere alimentato tramite
un dispositivo di accensione/
spegnimento esterno, come un
timer, né collegato a un circuito
che venga acceso e spento
regolarmente dal fornitore di
energia.
• In caso di vibrazioni eccessive,
interrompere l'utilizzo
dell’apparecchio e contattare il
servizio clienti.
• Non utilizzare la centrifuga se
il filtro rotante o il coperchio di
protezione sono danneggiati o
presentano incrinature visibili.
• Se la centrifuga perde o si nota
una fuoriuscita di liquido sotto,
intorno o sopra l’apparecchio,
pulire e asciugare prima di
continuare l'utilizzo.
• Prima di utilizzare la centrifuga,
verificare che vi sia uno spazio

76
adeguato intorno e sotto
l’apparecchio per una corretta
circolazione dell'aria.
Questo apparecchio è
progettato solo per centrifugare
frutta e verdura. Consultare
l’apposita guida per selezionare
la corretta velocità di
centrifugazione di frutta e
verdura. Non utilizzare frutta o
verdura congelata.
• Se si seleziona una bassa
velocità, frutta e verdura dure
sottopongono il motore a una
sollecitazione eccessiva.
•
Rimuovere la scorza da
tutti gli agrumi prima della
centrifugazione.
• Non centrifugare drupacee
senza aver prima rimosso il
nocciolo.
AVVERTENZA!
Non lasciare l’apparecchio
incustodito mentre è in
funzione.
Tenere mani, dita, capelli,
indumenti, spatole e altri
utensili lontani dall'apparecchio
durante il funzionamento.
Mantenere la centrifuga pulita.
Per ulteriori informazioni,
fare riferimento alla sezione
manutenzione e pulizia.
A parte la pulizia, qualsiasi
manutenzione deve essere
eseguita da un tecnico
autorizzato. Non cercare
di riparare la centrifuga!
Contattare il servizio clienti per
assistenza su
nutribullet.com
Se una qualsiasi delle istruzioni
o avvertenze non vi è chiara,
contattate il servizio clienti
per assistenza all'indirizzo
nutribullet.com
.
Conservare
queste
istruzioni!
QUESTO
APPARECCHIO
È DESTINATO
ESCLUSIVAMENTE
ALL’USO DOMESTICO

98
Contenuto della
confezione
BASE MOTORE DA 1000
WATT CON BARRA DI
BLOCCAGGIO
COPERCHIO RACCO
GLITORE POLPA CON
SCIVOLO DI ALIMENTA
ZIONE DA 76 MM
PRESSINO DOPPIA
MISURA
RACCOGLITORE POLPA
DA 2L CON BECCUCCIO
ANTIGOCCIA
FILTRO IN ACCIAIO
INOX CARAFFA SUCCO DA
800 ML
COPERCHIO CARAFFA
SUCCO CON SEPARATORE
DI SCHIUMA
SPAZZOLA PER LA
PULIZIA DUE BOTTIGLIE IN
VETRO DA 350 ML PER
LA CONSERVAZIONE DEI
CENTRIFUGATI
VASSOIO PER
CONGELATORE DA 118 ML
VASSOIO PER
CONGELATORE DA 60 ML
Guida al montaggio
pressino doppia misura
scivolo di alimentazione
da 76 mm
barra di bloccaggio
coperchio del raccoglitore
polpa
raccoglitore polpa
da 2 litri
fi ltro in acciaio inox
(contenitore interno)
beccuccio antigoccia
cara a succo da
800 ml
Pulsantiera a più
velocità
base motore
coperchio cara a succo
Other manuals for JUICER PRO
6
Table of contents
Languages:
Other NUTRIBULLET Juicer manuals

NUTRIBULLET
NUTRIBULLET NBJ100G User manual

NUTRIBULLET
NUTRIBULLET NBJ07100 User manual

NUTRIBULLET
NUTRIBULLET JUICER PRO User manual

NUTRIBULLET
NUTRIBULLET JUICER PRO User manual

NUTRIBULLET
NUTRIBULLET Juicer User manual

NUTRIBULLET
NUTRIBULLET Juicer Quick guide

NUTRIBULLET
NUTRIBULLET JUICER PRO NBJ-200 User manual

NUTRIBULLET
NUTRIBULLET JUICER PRO User manual

NUTRIBULLET
NUTRIBULLET JUICER PRO User manual

NUTRIBULLET
NUTRIBULLET Slow Juicer User manual