NUUO NV-2040 User manual

The Intelligent Surveillance Solution
NVRmini
Quick Start Guide

1
Table of Contents
English.............................................................................................................2
Čeština..........................................................................................................25
Deutsch..........................................................................................................49
Français ........................................................................................................74
Italiano ...........................................................................................................98
Español........................................................................................................122
Pусский .......................................................................................................146
日本語..........................................................................................................170
繁體中文.......................................................................................................196

2
Step 1: Unpacking the Unit
This package contains the following items:
The unit
Quick Start Guide
Screws for disk drives (1 package)
Power cord
Warranty card
12V DC power transformer (2 bay unit)
CD with Install Wizard, Backup, Live View, and Playback
application, user manual, and quick start guide
Warning
The electronic components within the unit can be damaged by
Electro-Static Discharge (ESD). Please take precautions at all
times when handling the unit or its sub-assemblies.
Important
To configure the unit, you must install the software onto a
desktop/ laptop running Windows Vista, 2003, XP Professional,
or 2000.
2 bay unit (4 channels) front view
Disk Drive
Drive Carrier
Drive Status LED
Drive Activity LED
Ethernet Activity
LED
Power button
System Status LED

3
2 bay unit (4 channels) rear view
4 bay unit (8 channels) front view
Disk Drive
Drive Carrier
Drive Status LED
Drive Activity LED
Ethernet Activity
LED
Power button
System Status
LED

4
4 bay unit (8 channels) rear view
Step 2: Installing Disk Drives
You can populate this unit with SATA 1.5 Gb/s or 3.0 Gb/s disk drives. For
optimal performance, install disk drives of the same model and capacity.
Your disk drives will become a RAID Volume on this unit.
1. Open the lid on the front of the unit enclosure.
2. Pull a disk drive carrier from the enclosure. See the front view figure.
3. Carefully lay the disk drive into the drive carrier, making sure that the
screw holes on the sides of the carrier align with the screw holes in the
drive.
4. Insert the screws through the holes in the drive carrier and into the sides
of the disk drive.
Install only the counter-sink screws supplied with the unit.
Install four screws per disk drive.
Make sure each screw is securely tightened, but be careful not to
over-tighten.
5. Reinstall the drive carrier into the unit enclosure.
6. Repeat step 2 through 5 for the other disk drives.
7. Close the lid on the front of the unit.
Cooling Fan
RJ45 Network
Connection
USB Connec
tions
Power Supply Fan
Power Connection

5
Step 3: Connecting to the Network
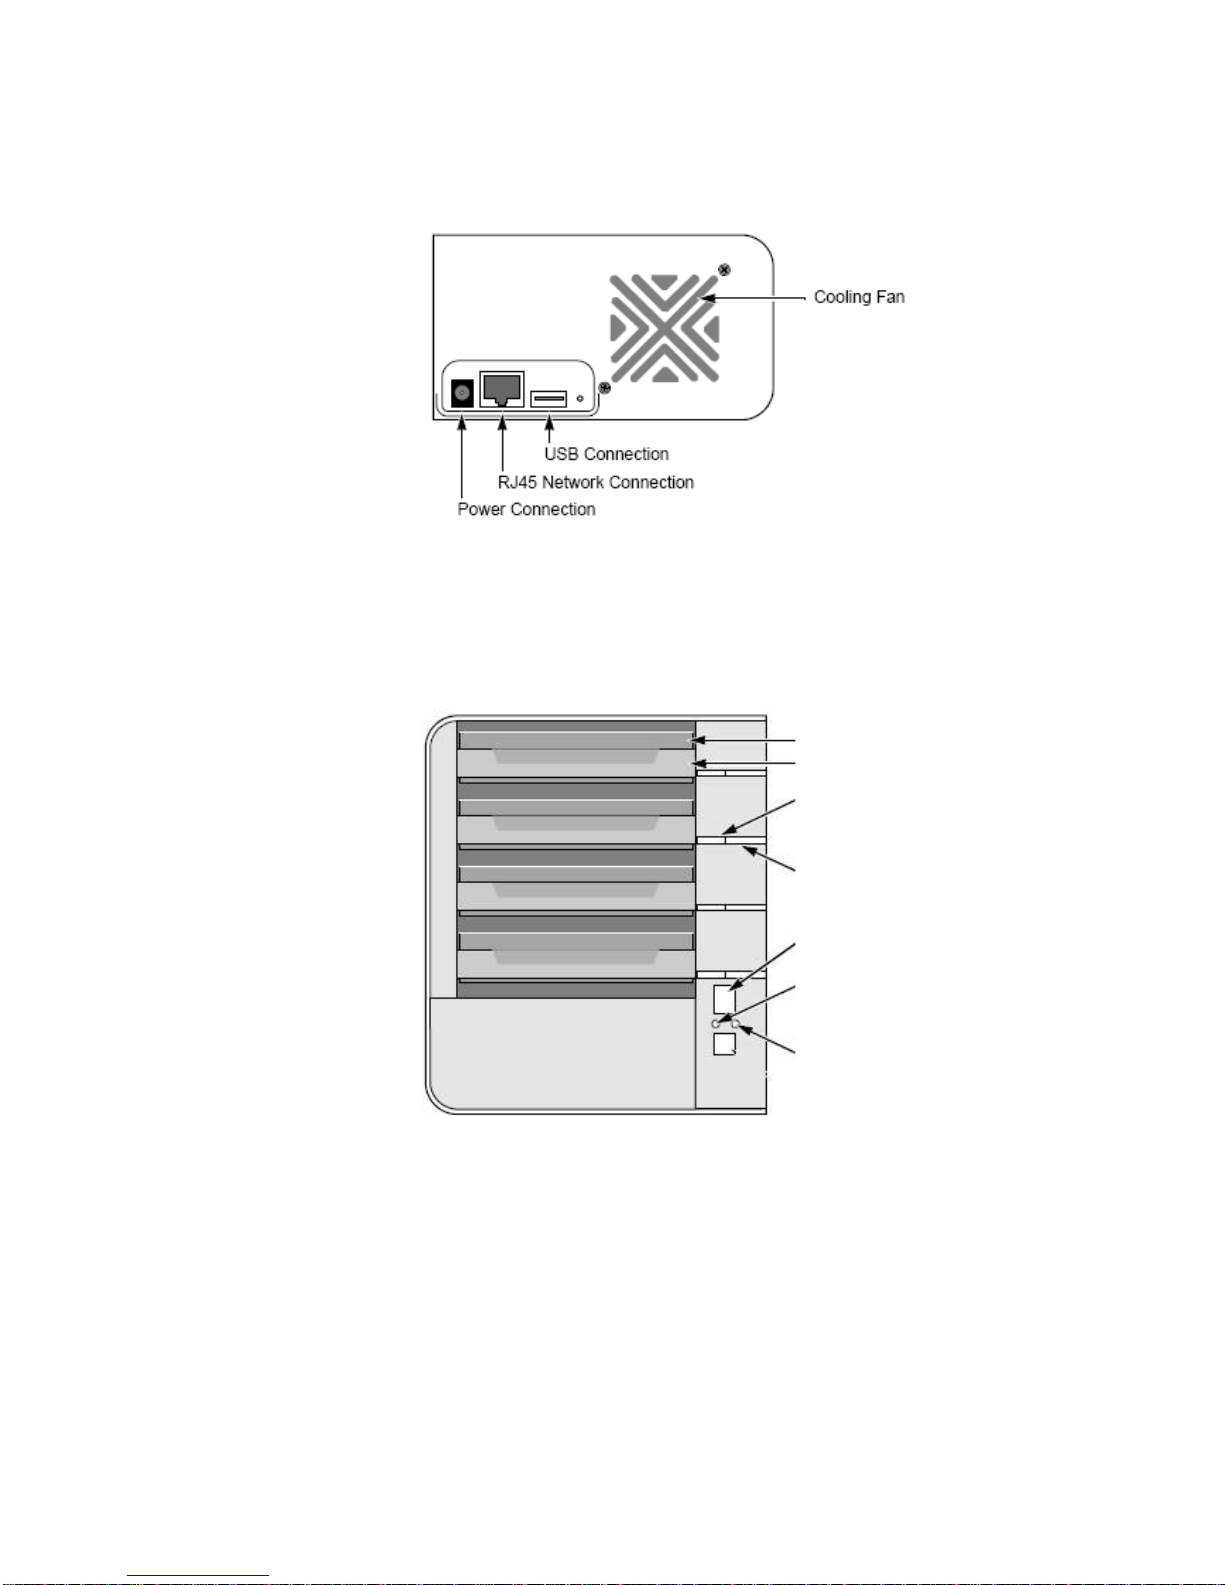
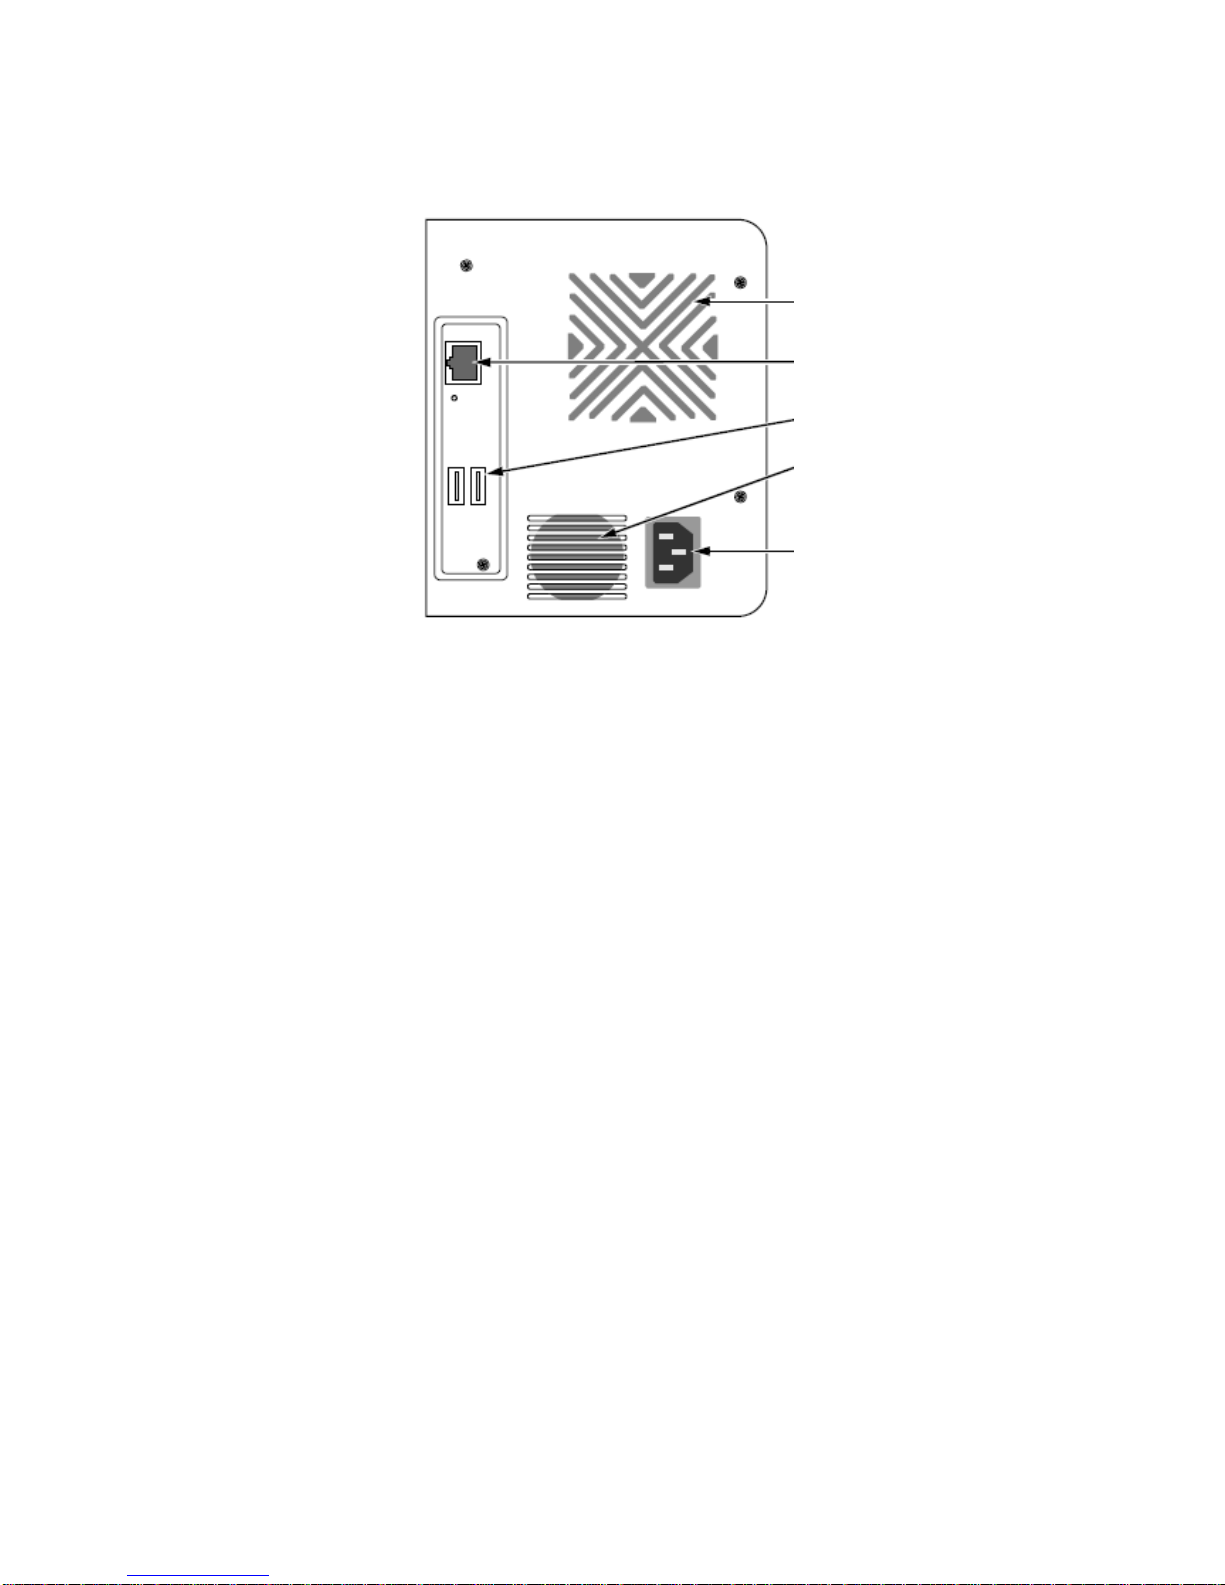
1. Attach one end of the network cable to the RJ45 network connection.
See the rear view figure.
2. Attach the other end of the network cable to your Ethernet hub or
switch.
Important
If there are multiple networks at your facility, note the network to
which you connect the unit. You will need this information during
the setup process.
Step 4: Connecting the Power
1. Attach the power cord from the power source to the power adapter.
2. Connect the power adapter to the back of the unit enclosure. See the
rear view figure.
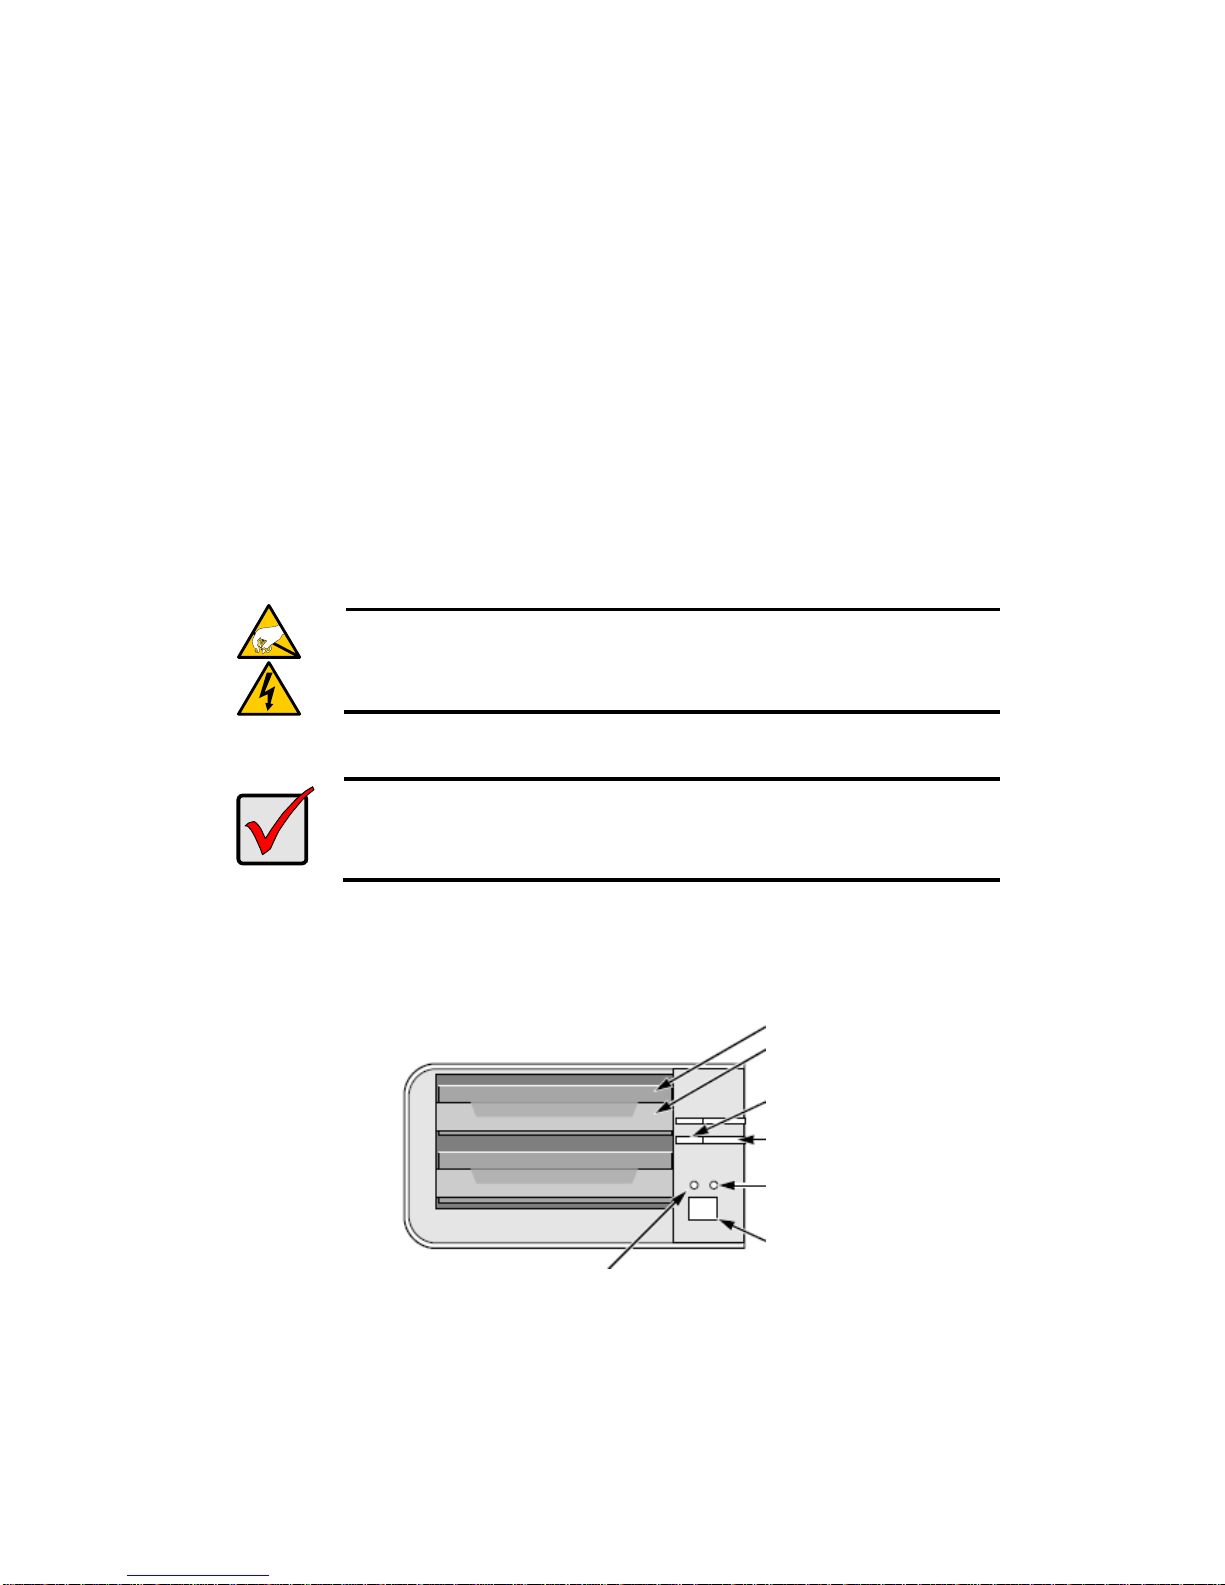
3. On the front of the unit, press the power button. See the front view
figure.
Important
Before pressing the power button, please make sure the two
ends of the network cable are attached to the unit and the
Ethernet router, respectively. Please also enable the DHCP
function within the network, as the unit will retrieve an IP address
through DHCP by default.
It takes about a minute for the unit to fully power up. Once it is powered up:
The System Status LED turns green. See the front view figure.
The buzzer beeps one time.
Step 5: Installing the Software
1. Insert the CD into your CDROM.
2. Double-click Setup.exe to begin installation.
3. Click the Next button to continue with the installation.

6
4. Click the “I accept the terms of the license agreement” option, and then
click the Next button.
5. Insert your “User Name” and “Company Name”, and then click the Next
button.
6. Select the setup type, and then click the Next button.
7. Click the Install button to proceed with installation.
8. When the above-mentioned installation processes are finished, a final
installation screen appears. Click the Finish button to close the installer.
Step 6: Setting up the Unit
The software Install Wizard performs the setup procedures on your unit.
After the procedure, you can begin using this unit.
1. Go to Start > NUUO NVRmini > Install Wizard.
2. This program will show the default language setting and initiation mode.
3. Choose your preferred language and initiation mode, and then click the
Next button.
Express Mode: you don’t need to set the date, time, network settings,
and RAID level. (After step 5, jump to step 9 directly.)
Advance Mode: you need to set your specific date, time, and
network settings.
4. The Install Wizard program will search for all the units on the internet
right now. Choose one of them, and then click the Next button.

7
5. Type in the password, and then click the OK button.
Note
The default Administrator password is “admin”.
6. Set the time zone, date, and time, and then click the Next button.

8
7. Select the network settings, and then click the Next button.
Obtain network settings automatically from DHCP server or
wizard: apply all settings which are automatically generated by the
DHCP server, such as IP, netmask, gateway, and DNS.
Make network settings manually: select your preferred settings one
by one.
8. If you need to set a new disk(s), check the “Create new storage” option.
After checking, click the Next button.

9
Data Protection: set the RAID level to RAID 1 (2 bay). Set the RAID
level to RAID 5 (4 bay).
Maximum Capacity: set the RAID level to RAID 0 (2 bay). Set the
RAID level to RAID 0 (4 bay).
9. Review your settings. If the settings are correct, click the Finish button
to exit the settings procedure and activate the system.
Caution
Once the “Finish” button is clicked, the unit will start working. In
order to ensure the stability of your unit, never pull any disks out
when the system is running.

10
Step 7: Adding Cameras
Add UPnP Cameras
1. Open Internet Explorer and log in to the unit.
2. Click IP Camera/ Camera Settings.
3. Click the Camera Search tab.
4. Click the Search button to search for UPnP cameras.
5. The system will list all the cameras it can currently find. Click the
icon to add a camera into your camera list.
6. After clicking the icon, the camera settings page will pop-up. Click
the item to which you want to add a camera.
7. Enter the camera name, user name, and password of the camera.
IP Address Vendor Model Name Mac Address

11
Note
Some cameras will limit the login authority to the administrator. In
this case, you will need to change the user name and password
to the administrator’s to log into those cameras.
8. Click the Add button to add finish adding the camera.
9. After clicking the Add button, the updated camera list will be displayed
in the Camera Settings tab.
10.Repeat step 5 through 8 to add other cameras in your list.
Camera Name IP Address
Vendor
Model Name
IP Address
Model NameVendor

12
Add Cameras without UPnP function
1. Open Internet Explorer and login the unit.
2. Click IP Camera/ Camera Settings.
3. Click the Camera Settings tab, and the camera list will be displayed in
the bottom of the page.
4. Click the item which you want to add a camera.
5. Insert the information of this camera on the top of the page.
Camera name: name this camera.
Address: the IP address.
Port: the transmission port.
User name: login user name.
Password: login password.
Video Channel: select the number of analog cameras supported by
one video server from the list.
Protocol: data transmission protocol.
Vendor: camera vendor name.
Model: camera model name.

13
Note
Some cameras will limit the login authority to the administrator
only. In this condition, you need to change the login user name
and password to the administrator’s to login those cameras.
6. Click the Save button.
Save: save the information of this camera.
Reset: return to the latest saved settings of the selected camera.
Auto Detection: after inserting IP address, port, user name, and
password, click this button to automatically find out all the information
of this camera. (such as Camera Channel, Protocol, Vendor, Model)
7. Repeat step 4 through 6 to add other cameras in your list.
Step 8: Live View Function
There are two ways to implement the live view function: through Internet
Explorer or through the Remote Live Viewer application.
Internet Explorer
1. Open Internet Explorer and log in to the unit.
2. Set the cameras.
3. Click the Live view button on the top of the page.
4. Select a camera(s) from the camera list on the right and then drag it to
where you wish the image to be displayed.

14
Important
When running Internet Explorer, do not use the function “Open in
New Window”, as it may cause the browser to become unstable.
Remote Live Viewer Application
1. Go to Start > NUUO NVRmini > Remote Live Viewer.
2. Click the Live View Setting button.

15
3. Insert the unit name.
4. Insert the IP address.
5. Modify the port if necessary.
6. Insert the user name.
7. Insert the password.
8. Check the Save Password/ Auto Login option.
9. Click the Test Server button to test the connection between the local
application and the remote unit.
10.Click the Add button to add this unit into your remote server list.
11.Click the OK button.
12.Click the unit you wish to access in your remote server list.
13.Click the Log In button to access your unit.
14.Select a camera(s) from the camera list on the right and then drag it to
where you wish the image to be displayed.

16
Step 9: Set Recording
1. Open Internet Explorer and log in to the unit.
2. Click Recording & Event/Recording settings.
3. Click the Recording Mode tab.
4. If selecting Always Recording, the chosen cameras will begin to
record immediately.
No Recording: turn off the recording.
Recording by Schedule: record according to a schedule.
Always Recording: the chosen cameras are constantly recording
Automatic Recycle: check the Enable option to recycle disk space

17
automatically when the disk space is full.
Keep Video: set a period during which the recorded video clips will
be kept intact.
5. If selecting Recording by Schedule, you need to set the schedules of
the cameras.
6. Click Recording & Event/Recording settings.
7. Click the Recording Schedule tab.
8. Click the schedule of the camera which needs to be modified.
9. Click the column in the bottom of the page.
Insert: insert new schedules.
Delete: delete the selected schedule.
Configure: modify the schedule and recording mode setting.
10.The default setting of the camera’s recording schedule is from 00:00 to
24:00. If you want to modify the time slot, click the Configure button to
modify the default setting first.

18
11.Choose the recording mode.
Always Record: always record.
Record on Event: record only when triggered by an event. The event
can be triggered by Motion or Digital input.
12.If you want to add another new schedule, click the Insert button to add
a new one.
13.Repeat step 12 to add new schedules for the selected camera.
14.Repeat step 8 through 12 to set other cameras.
15.Click the Save button.
Step 10: Playback Function
There are two ways to implement the playback function: through Internet
Explorer or through the Playback System application.
Internet Explorer
1. Open Internet Explorer and log in to the unit.
2. Click the Playback button on the top of the page.
3. Click the Open Record button.
4. The Record Display Window will show the information of the available
video clips. Select the date of the record you wish to search for. See
user manual for more details about this Record Display Window.
5. Highlight the video records that you want to review. See user manual for

19
more details.
6. Click the OK button.
Playback System Application
1. Go to Start > NUUO NVRmini > Playback System.
2. Click the Remote Server button.
3. Insert the name of your unit.
Table of contents
Languages:
Other NUUO DVR manuals