NuVinci N170S User manual

N170S/N171B
Technical
Manual
December 2008
20072007200720072008

Technical Manual - December 2008 © 2008 Fallbrook Technologies Inc. 2
Table of Contents
Introduction 3
Technical Data 4
Operation 5
Wheel Building Tips and Guidelines 6
Hub Installation 9
CruiseController Installation 14
Maintenance and Care 19
Warranty 20

Technical Manual - December 2008 © 2008 Fallbrook Technologies Inc. 3
Introduction
The NuVinci CVP is a revolutionary bicycle drivetrain that will deliver the quietest,
smoothest ride ever; completely eliminating the jerkiness of missed shifts, dropped
gears and gear lash. A simple twist of the CruiseController seamlessly adjusts the
gear ratio to easily adapt to the terrain and your personal
riding style. Thank you for joining the NuVinci Smooth Revolution.
This manual contains important information about the installation and use
of the NuVinci CVP and CruiseController. Please take time to carefully read
these instructions.
Please note the following:
• The illustrations in this document show a Model N171B but apply
to Model 170S as well. A data sheet for the N170S is available at
www.fallbrooktech.com.
• The NuVinci CVP (Models N170S and N171B) was designed for normal use as
a rear wheel hub in most bicycle applications by riders of all proficiency levels.
The hub is not approved for any application in which input torque to the hub
exceeds 130Nm (96 lb-ft) or extreme applications, such as freeride or downhill
use, where excessive forces can be expected to cause damage to rear wheel
components like the rims, spokes or the hub.
• Installation and repairs must be made by a qualified bicycle specialist.
• This manual assumes a level of knowledge and skill consistent with that of an
experienced bicycle assembler or bicycle mechanic.
• If you have any questions about the NuVinci CVP or CruiseController,
please contact our customer service department at +1 888.NuVinci
(688.4624), +1 512.279.6200 or visit www.nuvinci.com

Technical Manual - December 2008 © 2008 Fallbrook Technologies Inc. 4
NuVinci CVP Technical Data
Speed Ratio Steps. . . . . . . . . . . . . . . . . . . Infinitely variable within ratio range
Shifting . . . . . . . . . . . . . . . . . . . . . . . . . . Variable, twist shifting
Brake options. . . . . . . . . . . . . . . . . . . . . . Rim, Disc and Roller brake
Hub Shell Material . . . . . . . . . . . . . . . . . . Aluminium
Corrosion resistant Coating . . . . . . . . . . . Yes
Controller Material. . . . . . . . . . . . . . . . . . Nylon, 30% Glass Filled
Speed Ratio Range . . . . . . . . . . . . . . . . . . 350% (0.5 Under-Drive to 1.75 Over-Drive)
Average Weight . . . . . . . . . . . . . . . . . . . . 3.8 to 3.9 kg (includes freewheel and hardware)
Hub Colors . . . . . . . . . . . . . . . . . . . . . . . Satin Black, Satin Silver
CruiseController color . . . . . . . . . . . . . . . . Satin Black
Maximum Input Torque: 130Nm (96 ft. lbs.)
Minimum Allowable Chainring/ Freewheel ratio: 2 to 1 (Example: 32/16, 44/22)
Dimensions:
Drop-out width . . . . . . . . . . . . . . . . . . . . 135mm
Spoke Hole #. . . . . . . . . . . . . . . . . . . . . . 32 or 36
Chainline. . . . . . . . . . . . . . . . . . . . . . . . . 51 +/- 0.5mm
Flange diameter right/ left . . . . . . . . . . . . 148mm
Center to left Flange . . . . . . . . . . . . . . . . 25.6mm
Center to right Flange . . . . . . . . . . . . . . . 25.2mm
Recommended spoke patterns one and two cross.
Three cross and radial lacing are not recommended.
Technical Data

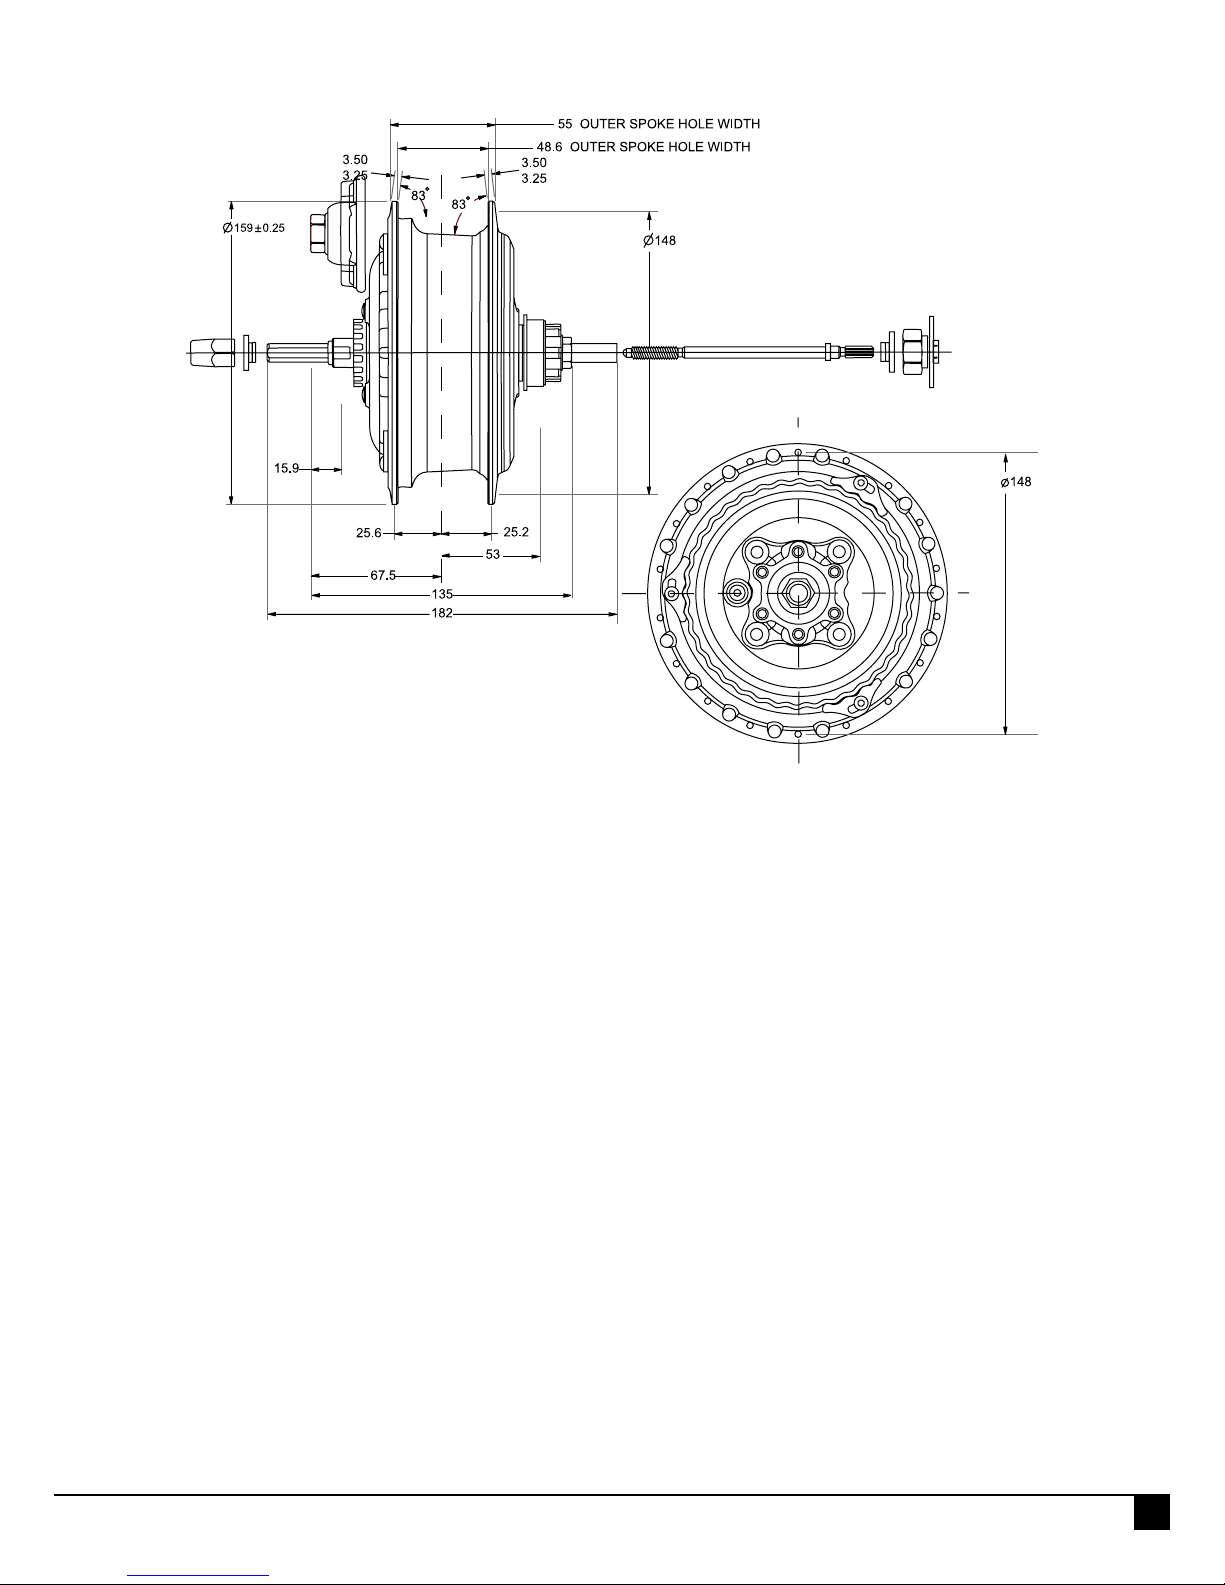
Technical Manual - December 2008 © 2008 Fallbrook Technologies Inc. 5
Controlling the ratio of the
NuVinci CVP
Controlling the ratio of a drivetrain
equipped with a NuVinci CVP is simply
a matter of moving the CruiseController
to the indicated position for the desired
ratio. Since there are no fixed gears,
the desired ratio is determined by your
comfort level. Ratio changes can be
made while pedaling, coasting; even
while stopped.
Which ratio should I be in?
The lowest ratio on a NuVinci CVP is for the steepest hills. The highest ratio is for
the greatest speed. Shifting from an easier, “slower” ratio to a harder “faster” ratio
is called an upshift. Shifting from a harder, “faster” ratio to an easier, “slower” ratio
is called a downshift. It is not necessary to shift ratios in sequence. Instead, find the
“starting ratio” for the conditions –a ratio that is hard enough for quick
acceleration but easy enough to let you start from a stop without wobbling –and
experiment with upshifting and downshifting to get a feel for the different ratios.
At first, practice shifting where there are no obstacles, hazards or other traffic, until
you’ve built up your confidence. Learn to anticipate the need to change ratios and
change to a lower ratio before the hill gets too steep. Once you’ve learned the ba-
sics, experience will teach you which ratio is appropriate for which condition, and
practice will help you shift smoothly and at precisely the optimum moment.
Operation

Technical Manual - December 2008 © 2008 Fallbrook Technologies Inc. 6
The NuVinci hub is a high flanged hub and this
results in a relatively tangential running spoke if
used with traditional three crossed laced spoke
pattern. Most rims do not allow for such angle of
the spoke nipples. This results in an undesirable
kink between nipple and spoke.
In order to make sure that the spoke and nipple
align, we recommend the following:
26”/ 559mm – one cross
28”/ 700c/ 622mm – two cross maximum
Spoke length:
• Refer to the spoke length table below.
• On request we can determine the correct spoke
length for your specific specification. In order
to offer this service, we need to know the inner
diameter of your rim (ERD).
• We recommend to trial fit with the calculated
spoke length¬ and adjust if necessary.
Wheel building tips and guidelines

Technical Manual - December 2008 © 2008 Fallbrook Technologies Inc. 7
• To correctly interlace the one cross spoke pattern all of the spoke heads
should be on the same side of the flange.
Wheel building tips and guidelines
interlaced

Technical Manual - December 2008 © 2008 Fallbrook Technologies Inc. 8
Spoke length table:
Wheel building tips and guidelines
Lacing and installing the NuVinci hub.
• Maximum spoke diameter is #13 / 2.34mm.
• Minimum spoke diameter is #14 / 2mm.
• Never build more than 2 cross lacing pattern
• Only use a 2 cross lacing pattern if the rim
allows the nipples to be in line with the spoke,
if there is any doubt use a 1 cross lacing
pattern.
• For 26” or smaller wheels, always use a
1 cross lacing pattern.
• For the wheel truing machines we can supply
an adaptor to compensate for the different axle
thickness. Part #: BK17-SVTL-P109-00.
Wheel size 26”/ 26”/ 700c/28/ 700c/28/ 700c/28/ 700c/28/ 700c/28/ 700c/28/
559 559 622 622 622 622 622 622
ERD 545 547 574 584 589 593 610 612
Spoke length:
Cross 1X
32 holes 206 207 220 225 228 230 238 240
36 holes 204 206 219 224 226 228 237 238
Cross 2X
32 holes 226 227 240 245 248 250 258 259
36 holes 221 222 235 240 242 244 253 254

Technical Manual - December 2008 © 2008 Fallbrook Technologies Inc. 9
Tools Required
11mm, 15mm & 17mm socket
21mm Crows foot
Torque wrench
10mm wrench
5mm hex wrench
Step 1. Install the Freewheel
Lightly grease the freewheel threads and
thread onto the freewheel adapter.
Removing a freewheel will require
a special tool. Please contact your
distributor or Fallbrook customer
service if the tool is required.
(PN: BK17-SVTL-P110-00A)
Step 2. If using a Roller Brake
a. Slide the roller brake onto the left hand
existing image (non drive side) jam nut and the
splined interface on the hub cover.
b. With a 17mm socket and a torque wrench,
tighten the 17mm locknut over the roller brake
to 30Nm (22 ft. lbs.)
c. Proceed to step 5 on page 11
Hub Installation

Technical Manual - December 2008 © 2008 Fallbrook Technologies Inc. 10
Step 3. If using a Disc Brake
a. Place the rubber o-ring over the splines
of the non drive side of the hub.
b. Slide the disc brake adaptor plate over the
splines. The adaptor plate has a cutout for the
fluid drain plug.
c. Apply Loctite© 242 thread locker on the
5mm bolts and torque them to 7Nm.
d. Install the dust shield.
e. Install the cup washer with edges
facing down.
f. Secure the 17mm locknut over the cup
washer and tighten to 30Nm.
g. Proceed to step 5 on page 11
Step 4. If using a Rim Brake
a. Put the plastic dust shield over the
splines on the non drive side of the hub.
b. Install the cup washer with edges
facing down.
c. Secure the 17mm locknut over the
cup washer and tighten to 30Nm.

Technical Manual - December 2008 © 2008 Fallbrook Technologies Inc. 11
Step 5. Install the Wheel
a. Put the chain on the freewheel; orient
the axle flats so the axle can enter the
dropouts; and place the wheel in the
dropouts.
b. Install the no-turn washers on each axle
end. Orientation of the no-turn washer tabs
is determined by chain length. Place the
tabs behind the axle only if there is not
sufficient room in front.
Improper installation of the
no-turn washer will result in damage
to the dropout and the hub.
c. Grease the o-ring and the adjacent
shoulder on the shift rod and thread the
shift rod into the drive side axle by rotating
it clockwise until it stops and the shift rod
shoulder is flush with the axle.
Only use your fingers to install,
and be careful not to bend or
damage the end of the shift rod.
d. Keeping the main shaft nut tight against
the shift rod retainer nut, screw the
shift rod retainer nut onto the drive side
axle and tighten with an 11mm socket
and torque wrench to 20Nm (15 ft. lbs.)
e. Screw the acorn nut onto the non drive
side axle, but do not tighten.
f. If applicable, attach the roller brake arm
to the bike frame clamp. Do not fully tighten
the bolt until the wheel is secured in the
frame; then tighten the bolt to the torque
specified by the brake manufacturer.

Technical Manual - December 2008 © 2008 Fallbrook Technologies Inc. 12
g. Pull the wheel back in the dropout,
tightening the chain to the desired level.
Pull back on the shift rod
retaining nut, not the shift rod.
h. Keeping the wheel centered, tighten the acorn
nut with a 15mm socket and torque wrench to
40Nm (29 ft. lbs.).
Over-tightening may damage parts.
Under-tightening will result in the axle
sliding in the dropouts.
i. Still holding the wheel tight, tighten the main
shaft nut with a 21mm crows foot and torque
wrench to 50Nm (37 ft. lbs.).
Step 6. Install the rear pulley housing
NOTE: If the control cables have
been pre-installed on the Cruise-
Controller and rear pulley housing
assembly, follow steps a, b and c.
If not, turn to the CruiseController
Installation section of this manual.
a. Rotate the shift rod clockwise with
your fingers until it stops; this is full
overdrive.
Be careful not to bend or
damage the end of the shift rod.
Only use your fingers.

Technical Manual - December 2008 © 2008 Fallbrook Technologies Inc. 13
b. Rotate the CruiseController
until the Inchworm is flat. Gently
slide the rear pulley housing onto
the shift rod, with the cable housing
facing forwards.
c. After aligning the rear pulley
housing with the shift rod, push it
onto the shift retainer nut until the
three lock tabs are fully engaged.

Technical Manual - December 2008 © 2008 Fallbrook Technologies Inc. 14
Tools Required
2.5mm hex wrench
Diagonal cutter
Phillips screwdriver
Torque wrench
300mm Metric Ruler
Step 1. CruiseController Ratio Control
Unit Installation
a. Orient the barrel adjusters so they are
one turn from flush against the pulley housing.
b. Rotate the CruiseController handgrip
towards the rider until the shifter is in full
overdrive and the inchworm is completely flat.
c. If the CruiseController came with
pre-installed cables, go to 3.
Mounting the CruiseController
Step 2. Installing or replacing control cables
a. Using a Phillips screw driver, remove the
small Phillips screw located on the back of the
pulley housing. This will allow the cable
retention plate to be removed.
b. Remove the cable retention plate and the ratio
control pulley. Install two 1.1mm shifter cables;
one from the top, cable A, and one from the
bottom, cable B.
c. Partially slide the ratio control pulley into
the housing. Run cable A through the cable
groove and out of the pulley housing.
d. Take cable B and run it through the
other cable groove and out of
the pulley housing.
CruiseController™Installation

Technical Manual - December 2008 © 2008 Fallbrook Technologies Inc. 15
e. While the cables are still routed through the
pulley housing, begin to wrap cable A around
the pulley, following the groove around the pulley.
f. Wrap cable A around the pulley twice,
making sure to keep the cable taught.
g. Once the pulley is almost fully seated,
without rotating it, pull the cables taught on
the outside of the pulley housing.
Replace the cable retention plate.
Tighten the small screw located on the back
of the pulley housing to 0.2 - 0.3Nm. (2 - 3 in. lbs.)
Step 3. Mounting the CruiseController
Never use lubricants or solvents to
install the CruiseController on the
handlebars.
a. With the barrel adjusters still one turn from
flush against the CruiseController housing and
the controller in full overdrive (Inchworm
completely flat) place the CruiseController
Assembly onto the handlebars.
b. With a 2.5mm hex bit and torque wrench,
secure the CruiseController to the handlebars
by tightening the bolt on the back of the unit
to 2.0 - 2.5Nm (17-22 in. lbs.)
Step 4. Installing the Rear pulley housing
a. With the shift rod rotated clockwise until it
stops (full overdrive) install the rear pulley
housing onto the shift rod retaining nut. Orient
the rear pulley housing so the cable slots are
forward and level with the chainstays.

Technical Manual - December 2008 © 2008 Fallbrook Technologies Inc. 16
b. Cable A is the shorter of the two cables,
and is routed through the top cable guide
of the rear pulley housing.
The “dark” inner pulley is attached to cable A.
c. With the hex bolt at the 12:00 o’clock
position, install the dark lower pulley on the
shift rod. Pull cable A tight in the direction of
the curve of the lower dark pulley.
When tensioning the cable, be care-
ful not to pull with too much force.
If you pull with too much force you
will cause the Ratio Control to rotate
away from full overdrive and out of
sequence with the hub.
d. Make sure the cable is fully tucked under the hex bolt before tightening the screw
with a 2.5 mm hex bit and torque wrench to 1.13 Nm. (10 in. lbs.)
The cable may slip if under torqued.
Over tightening may cause damage
to the cable.
e. Begin to slide the silver pulley onto cable B, then pull cable B tight in the
direction of the curve of the silver pulley to a length of 230mm from cable housing
end to center of the hex bolt.
f. Make sure the cable is fully tucked under the hex bolt before tightening the 2.5mm
screw to 1.13Nm (10 inch lbs.)
g. Run the excess cable B through the slot adjacent
to the hex bolt and out the bottom of the pulley.

Technical Manual - December 2008 © 2008 Fallbrook Technologies Inc. 17
h. Pull the cable tight and use diagonal cutters
to cut flush. Make sure there is no excess
cable protruding below the silver upper pulley
i. Begin to wrap cable B around the
silver upper pulley, following the cable
grooves on the pulley.
j. Guide cable A through the bottom of
the silver upper pulley.
k. Slide the silver upper pulley over the
dark pulley. They will fit in only one
position. If cables are too tight, slack
the cables by turning the barrel adjusters
in the CruiseController.
l. Pull cable A tight and cut
flush with diagonal cutters.
Make sure there is no excess
cable protruding above the
silver upper pulley.

Technical Manual - December 2008 © 2008 Fallbrook Technologies Inc. 18
m. With a 2.5mm hex bit and torque wrench,
secure the two pulleys together by tightening the
supplied 2.5mm allen bolt to 1.13Nm
(10 in. lbs.)
n. Grease the inside of the pulley
sleeve and slide it over the pulleys.
o. Replace the rear housing cover
and secure it with the supplied
three screws and a Phillips screw
driver to .2 - .3Nm (2 – 3 in. lbs.)
p. Place the NuVinci sticker on
the rear pulley housing, aligning it to
be horizontal when the bicycle wheels
are on a level road surface.
q. Make sure the three lock tabs are
fully engaged on the shift rod
retaining nut.

Technical Manual - December 2008 © 2008 Fallbrook Technologies Inc. 19
Lubrication
The NuVinci CVP is equipped with a special traction
fluid that is considered to be permanent lubrication.
Unauthorized removal and replacement of this fluid
will void the warranty and may result in damage
to the CVP.
Cleaning
Regular cleaning of the NuVinci CVP exterior is
recommended. However, do not use water under
pressure (such as a power washer) as a method of
cleaning. This may cause water penetration, which
can lead to a malfunction of the hub.
The exterior of the NuVinci CVP and CruiseContoller
should be cleaned with a mild detergent. Use of
aggressive or abrasive cleaners could result in
deterioration of the finish. Keep the hub free of
winter road salt.
After cleaning spray some oil or Teflon on the
rubber seals around the axle. This will avoid a
squeaky sound when the bike is slowly moved.
Maintenance and Care

Technical Manual - December 2008 © 2008 Fallbrook Technologies Inc. 20
LIMITED WARRANTY STATEMENT
Fallbrook Technologies Inc. (Fallbrook) warrants that it will repair, replace or refund, at Fallbrook’s sole option, any NuVinci®
continuously variable planetary (CVP) that is defective in materials or workmanship for a period of six years from the date of original
purchase. Fallbrook also similarly warrants the CruiseController™ against defects in materials or workmanship for a period of two years
from the date of original purchase. This warranty only applies to the original purchaser and is not transferable.
Implied warranties (including, without limitation, warranties of merchantability or fitness for a particular purpose) shall not apply to
the product, except where local law prohibits the exclusion of such implied warranties, in which case the duration of such implied
warranties shall be limited to the duration of the express warranty set forth above. In no event shall Fallbrook be liable for any loss,
inconvenience or damage, whether direct, indirect, incidental, consequential or otherwise, resulting from breach of any express or
implied warranty with respect to the product except as expressly set forth herein. Laws in some locations may not permit (i) the
exclusion of implied warranties, (ii) limitations on how long an implied warranty lasts, or (iii)the exclusion or limitation of certain kinds
of damages, so the above limitations or exclusion may not apply to you. To the extent that this warranty statement is inconsistent with
local law, this warranty shall be deemed modified only to the extent necessary to be consistent with such law.
If you purchased your NuVinci CVP as part of another product, this warranty in no way replaces or is an extension of the warranty
of the manufacturer of that product, which warranty is the sole responsibility of the product’s manufacturer.
LIMITATIONS OF WARRANTY
This warranty does not apply to any of the following:
• A product that has been incorrectly installed and/or not adjusted according to the
NuVinci technical installation manual.
• Except as pre-approved in writing by Fallbrook, a product utilized for commercial purposes.
• Damage to the product
- determined by Fallbrook to be caused by a crash, impact, abuse of the product.
- resulting from use of the product in what Fallbrook, in its sole discretion, considers extreme
applications such as, but not limited to downhill, freeride, “North Shore” style, BMX, etc. or
any powering of the product with electric motors or internal combustion engines.
• A product that has been modified or where the serial number has been altered,
defaced or removed.
• Normal wear and tear to components subject to wear such as, for example, rubber seals and rings, jockey wheels on chain ten-
sioner (if applicable), twist grip rubber, shifter cables.
• Damage to parts not manufactured by Fallbrook Technologies (dropouts, chain, freewheel, etc.).
• Damage caused by the use of parts that are not compatible, suitable and/or authorized by
Fallbrook for use with the product.
• Damage caused during shipment of the product.
• Labor required to remove, re-fit or re-adjust the product within the bicycle assembly.
THIS LIMITED WARRANTY IS THE SOLE AND EXCLUSIVE WARRANTY MADE BY FALLBROOK WITH RESPECT TO THE PRODUCT, AND IS
GIVEN IN LIEU OF ANY OTHER WARRANTY. TO THE EXTENT ALLOWED BY APPLICABLE LAW, ANY AND ALL EXPRESS OR IMPLIED
WARRANTIES NOT SET FORTH HEREIN ARE WAIVED AND DISCLAIMED, INCLUDING ANY IMPLIED WARRANTY OF MERCHANTABILITY
OR FITNESS FOR A PARTICULAR USE. FALLBROOK LIABILITY UNDER THIS LIMITED WARRANTY IS LIMITED SOLELY TO THOSE
LIABILITIES SET FORTH ABOVE. IN THE EVENT THAT ANY PROVISION OF THIS LIMITED WARRANTY SHOULD BE OR BECOME INVALID
OR UNENFORCEABLE UNDER APPLICABLE LAW, THE REMAINING TERMS AND CONDITIONS HEREOF SHALL REMAIN IN FULL FORCE
AND EFFECT AND SUCH INVALID OR UNENFORCEABLE PROVISION SHALL BE CONSTRUED IN SUCH A MANNER AS TO BE VALID
AND ENFORCEABLE.
NuVinci, CruiseController and their stylized logos and associated elements are trademarks or registered
trademarks of Fallbrook Technologies Inc. All rights reserved. © 2008
FOR WARRANTY SERVICE
To obtain service under this warranty, you must first contact Fallbrook customer service in the United States at
[email protected] or 1 888-NuVinci (+1 512 279-6200 outside of the U.S.A.) to obtain a Warranty Return Authorization.
You will then need to return the product to Fallbrook together with satisfactory proof of the date of purchase. Any postage, insurance
or shipping costs incurred in sending the product to Fallbrook for service are your responsibility.
Other manuals for N170S
1
This manual suits for next models
3
Table of contents
Other NuVinci Bicycle Accessories manuals