Nyos TORQ G2 Dock User manual

TORQ® G2 Dock & TORQ® G2 Body 0.75 | 1.0 | 2.0
TORQ® G2
system reactor for filter media
INSTRUCTIONS
EN

2
CONGRATULATIONS
Congratulations to your new Nyos®TORQ®G2 media reactor.
Please read the instructions and safety information carefully
before you use the device.
CONTENTS
SAFETY INFORMATION................................................................ 3
WARRANTY................................................................................. 4
INSTALLATION AND OPERATION.................................................. 6
RECOMMENDED MEDIA CAPACITIES AND TANK SIZES.. ............. 12
FAQ AND TROUBLE SHOOTING................................................... 13
GENERAL INFORMATION.............................................................14
MAINTENANCE AND CLEANING.................................................. 15
SPARE PARTS AND EXPLODED DRAWINGS ................................ 16

3
EN
SAFETY INFORMATION
• Only connect the unit if the electrical data of the unit and
the power supply coincide. The unit data is to be found
on the unit type plate.
• The pump may only be connected to an outlet with earth
contact.
• The pump must be supplied through a residual current
device (RCD) with a rated residual current of no more than
30 mA. Ask your electrician.
• Unplug all devices submerged in the water prior to any
contact with aquarium water.
• This device is only approved for inside use and only for
aquarium purposes.
• The power cord of this device cannot be replaced. If
damaged, the device must be scrapped. Do not bend the
power cord and do not carry device on power cord.
• The device may not run dry. It may only be used for liquids
between the temperatures of +4°C to +35°C (39°F to
95°F). The pump motor is protected from overheating.

4
• This device is not intended for the use by persons (inclu-
ding children) with limited physical, sensory or mental
capacities, unless they are supervised by a person respon-
sible for the safety or this person instructed them on how
to use the device. Children must be supervised to ensure
they do not play with the device.
The device may not be disposed of in the
standard household rubbish. It must be
professionally disposed.
WARRANTY
The consumer receives for this product a 12-month warranty
for material defects and assembly errors from the date of
purchase.
For being granted the warranty, the device must be submitted
completely and together with the sales slip. Any shipments to
us must be postage paid. If the warranty claim is justified, the
defective part is at our discretion either repaired or replaced.

5
EN
EXCLUSION OF WARRANTY
This warranty does not cover:
• Soiling and lime scale deposits
• Dry running of the pump
• Wear and tear damages on wear and tear parts (e.g. rotor,
seals)
• Improper handling and use (including the use of products
from other manufacturers)
• Any kind of damages (e.g. wires of electrical devices)
• Technical changes and modifications to any of the compo-
nents
• Faulty installation
• Consequential damages from improper use, lack of main-
tenance or non-compliance with safety regulations

6
INSTALLATION AND OPERATION
STEP 01 Positioning the Nyos®TORQ® G2 Dock in your sump
• You receive your Nyos®TORQ® G2 Dock as plug-and-play
model. The pump has already been installed.
• Nyos®TORQ® G2 has been designed for in sump use. The
unit cannot be used outside the sump.
• Put Nyos®TORQ® G2 Dock in your sump. Please ensure
that the bottom of the sump is even. This helps ensure
that the water can run off evenly. A constant water level
in the sump is not required.
• The unit must not be in contact with the side panes of
the sump (Fig. 1).
• Only plug in the device when body has been placed on the
dock (see Step 03).
(Fig. 1)

7
EN
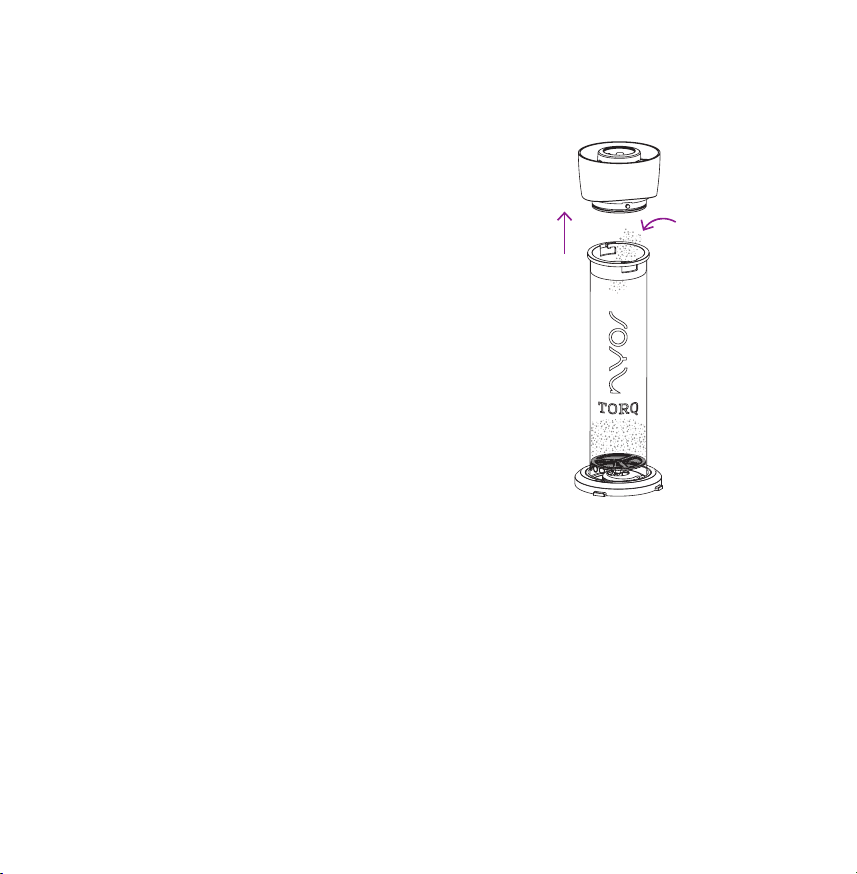
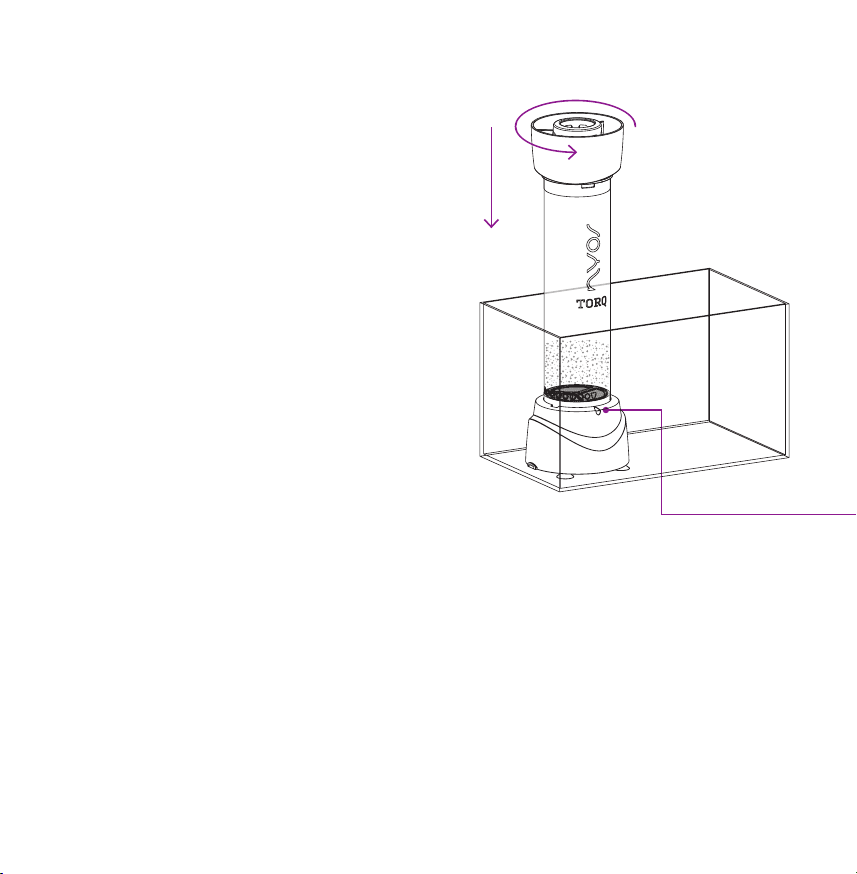
STEP 02 Filling the TORQ® G2 Bodies
General information on filling Nyos®TORQ® G2 Bodies
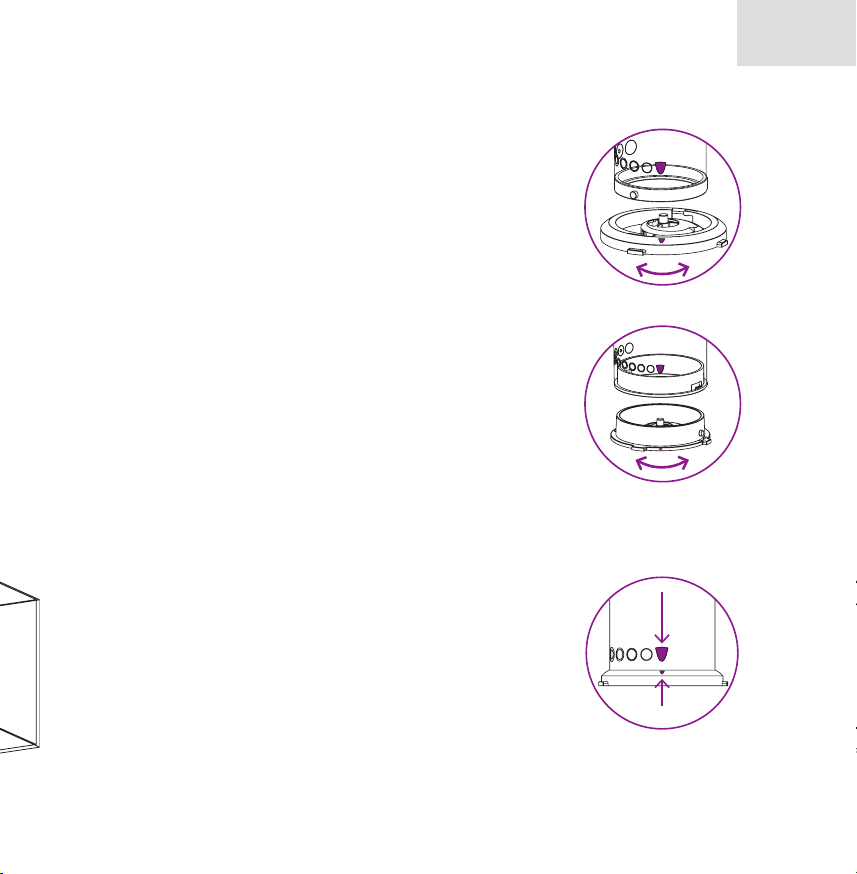
• The lower insert and the lid can be removed from the tube
with a slight turn (Fig. 2a and 2b).
• Make sure both marks are aligned when connecting tube
and insert (Fig. 3).
• The filter sponge for the lid has a hole in the center
(emergency overflow). If water exits though the hole, the
sponge needs to be cleaned.
• The 0.8mm grid is recommended for small grain filter me-
dia. The 1.5mm grid is recommended for lager grain filter
media like activated carbon. The use of an additional
filter sponge is not necessary.
• Please refer to the filling quantities in the table on page
12.
• Only Body 2.0: The separating grid with the acrylic stick in
the middle has a slightly higher diameter than the lower
grid. It needes to be bent a little bit when inserted and
removed.
(Fig. 3)
(Fig. 2a)
(Fig. 2a)

8
Filling with one filter media
1. Remove the lid by slightly turning it.
2. The separating grid included with Body 1.0
and 2.0 (part no. 5, page 17) can be removed
when only one filter media is used.
3. Add the filter media from the top. Put the lid
back on and turn it to lock position (Fig. 4).
Filling with two filter media (TORQ® G2 Body 1.0
and Body 2.0 only)
Hint: The media in the upper chamber can be
changed easier. We therefore recommend to
place the media with the shorter run time in the
upper chamber.
1. Turn the body upside down and remove the
grid insert.
2. Keep hold of the acrylic stick, and insert the
first filter media.
(Fig. 4)
3.
1.

9
EN
3. Put the insert on the acrylic stick and close the tube by
turning the insert.
4. Turn the body again and remove the lid. Add the second
filter media and put the lid back on (Fig. 5).
(Fig. 5)
1.
2. 3.
4.

10
STEP 03 Insert TORQ® G2 Body and start
operation
• Place the filled body on the dock. The
body can only be placed on the dock if
the two violet markings point to each
other. This is the position for removal and
insertion. In this position, the flow rate
is zero.
• Plug in the pump. By turning the body
counter-clockwise, you can increase the
flow rate. The flow rate can be read from
the scale at the bottom end of the body.
• The filter media (exception: zeolite)
should be hold in suspense at all times. If
the filter media collects at the top spon-
ge, the flow rate is too high. If you cannot
detect any motion in the filter media, the
flow rate is too low.

11
EN
• The Nyos®TORQ® G2 media reactor was
designed in such a way that it is virtually
bubble-free and silent at optimum use.
This requires a run-in period of several
days. A smear layer is created on the out-
side of the body, so that the water fully
moistens the body.
Removal position
Setting the flow rate
(Fig. 6)
(Fig. 7)

12
TORQ® G2 Body 0.75 TORQ® G2 Body 1.0 TORQ® G2 Body 2.0
Usage of one filter media
Phosphate remover (Nyos®PHOSI-EX)
Maxium capacity 450 ml (15 fl oz) 750 ml (25 fl oz) 1.500 ml (50 fl oz)
Optimal capacity 350 ml (12 fl oz) 500 ml (17 fl oz) 1.000 ml (34 fl oz)
Tank size up to 675 l (180 gal) 1.125 l (300 gal) 2.250 l (600 gal)
Activated Carbon (Nyos®ACTIVE CARB)
Maxium capacity 650 ml (22 fl oz) 900 ml (30 fl oz) 1.800 ml (60 fl oz)
Optimal capacity 450 ml (15 fl oz) 650 ml (22 fl oz) 1.300 ml (44 fl oz)
Tank size up to 650 l (170 gal) 900 l (240 gal) 1.800 l (475 gal)
Zeolite (Nyos®ZEO)
Maxium capacity 750 ml (25 fl oz) 1.000 ml (34 fl oz) 2.000 ml (68 fl oz)
Tank size up to 300 l (80 gal) 400 l (100 gal) 800 l (200 gal)
Usage of two filter media
Phosphate remover (Nyos®PHOSI-EX)
Maxium capacity – 375 ml (12.5 fl oz) 750 ml (25 fl oz)
Optimal capacity – 250 ml (8.5 fl oz) 500 ml (17 fl oz)
Tank size up to – 550 l (145 gal) 1.125 l (300 gal)
Activated Carbon (Nyos®ACTIVE CARB)
Maxium capacity – 450 ml (15 fl oz) 900 ml (30 fl oz)
Optimal capacity – 300 ml (10 fl oz) 650 ml (22 fl oz)
Tank size up to – 450 l (120 gal) 900 l (240 gal)
Zeolite (Nyos®ZEO)
Maxium capacity – 500 ml (17 fl oz) 1.000 ml (34 fl oz)
Tank size up to – 200 l (50 gal) 400 l (100 gal)
RECOMMENDED MEDIA CAPACITIES AND TANK SIZES

PROBLEM CAUSE SOLUTION
Bubbles in the outlet and
splattering
Water does not fully moisten
the outside of the body
Wait for a few days (even after
cleaning) to allow the smear layer on
the outside of the body to regenerate
itself
Flow rate is too high Reduce flow rate
TORQ® G2 is on uneven surface Place TORQ® G2 on an even surface
Filter sponge cloggs fast Too much detritus in sump Clean sump; use filter socks
Filter media is not being properly
floated
Filter sponge or grid clogged Clean sponge or grid
Flow rate is too low Increase flow rate
Pump is clogged Clean the pump
Use of too much filter media Reduce amount of filter media
(see table on page 12)
Filter media collects at the top filter
sponge and clogs it
Flow rate is too high Reduce flow rate
Too much filter media is used Reduce amount of filter media
(see table on page 12)
Filter media goes into sump Filter media is too fine Use a larger filter media
If necessary add filter floss to the
lid (Fig. 6)
Flow rate is too high Reduce flow rate
Use of too much filter media Reduce the amount of filter media
(see table on page 12)
Lid can only be placed on acryic tube
with difficulty
Clamp effect too strong Rub the silicone rings with Vaseline,
silicone grease or similar
13
EN
FAQ AND TROUBLE SHOOTING

14
GENERAL INFORMATION
Emergency overflow
The filter sponge of the lid of Nyos®TORQ® G2 has a hole in
the middle (emergency overflow). In case water exits the
hole, clean the sponge.
Using filter floss
For very dirty or abrasive filter media, you can use filter
floss in the free space of the lid (Fig. 8). Generally speaking,
however, this is not necessary.
Reducion in pump performance
At the time of delivery, the pump is set to a maximum per-
formance of 1.000 l/h (264 gph). Should you use very little
filter media in the long term, you can regulate your pump
downwards manually in order to achieve finer nuances in
the setting. To do this, please take the pump out of the
dock and turn the slider on the suction side of the pump.
Usually, however, this will not be necessary.

15
EN
MAINTENANCE AND CLEANING
• Nyos®TORQ® G2 Bodies can be cleaned easily with tap
water. There is no need to use detergents.
• The grid of the pump should be cleaned regularly in order
to ensure constant performance. To do this, please remove
the pump from the dock. The grid of the pump can be
removed easily.
• When changing filter media, please clean filter sponge
and grid.
Filter floss in case of
severe soiling
(Fig. 8)

Number TORQ® G2 Body 0.75 TORQ® G2 Body 1.0 TORQ® G2 Body 2.0
1Lid 70
Art.: T-BSP_4331
Lid 70
Art.: T-BSP_4331
Lid 100
Art.: T-BSP_4348
2
Filter sponge for
lid 70
Art.: T-BSP_2535
Filter sponge for
lid 70
Art.: T-BSP_2535
Filter sponge for
lid 100
Art.: T-BSP_2542
3
O-Ring
for lid 70
Art.: T-BSP_2559
O-Ring
for lid 70
Art.: T-BSP_2559
O-Ring
for lid 100
Art.: T-BSP_2566
4Tube 750 ml
Art.: T-BSP_4355
Tube 1.000 ml
Art.: T-BSP_4362
Tube 2.000 ml
Art.: T-BSP_4379
5
Separating grid with
acrylic stick 70
(0.8 mm)
Art.: T-BSP_4386
Separating grid with
acrylic stick 100
(0.8 mm)
Art.: T-BSP_4393
6Grid 70 (0.8 mm)
Art.: T-BSP_4409
Grid 70 (0.8 mm)
Art.: T-BSP_4409
Grid 100 (0.8 mm)
Art.: T-BSP_4416
7Grid 70 (1.5 mm)
Art.: T-BSP_ 4454
Grid 70 (1.5 mm)
Art.: T-BSP_ 4454
Grid 100 (1.5 mm)
Art.: T-BSP_ 4461
8Insert 70
Art.: T-BSP_ 4423
Insert 70
Art.: T-BSP_4423
Insert 100
Art.: T-BSP_4430
PARTS LIST TORQ® G2 BODIES
16

17
EN
EXPLODED DRAWINGS TORQ® G2 BODIES
TORQ® G2 Body 0.75 TORQ® G2 Body 2.0TORQ® G2 Body 1.0
4
5 5
6/7
88
6/7
44
33
3
22
1 1
2
1
6/7
8

18
17
16
15
11
12, 13, 14
18
Number TORQ® G2 Dock
11 Motor block
Part No.: T-DSP_Motor
12 Impeller
Part No.: T-DSP_Imp
13 Shaft
Part No.: T-DSP_2740
14 Bearing
Part No.:T-DSP_2757
15
Pump housing with
slider
Part No.: T-DSP_2764
16 Dock housing
Part No.:T-DSP_2771
17 Dock base plate
Part No.:T-DSP_2788
18 Sucion Cups 4x
Part No.: T-DSP_4447
PARTS LIST AND EXPLODED DRAWING TORQ® G2 DOCK
TORQ® G2 DOCK

19
EN
NOTES

www.facebook.com/nyos.aquatics
Manufactured by
Nyos®Aquatics GmbH
Siemensstr. 26
70825 Korntal-Muenchingen, Germany
www.nyos.info, [email protected]
Patents pending in EU, US and elsewhere. TORQ®is a protected
trademark of Nyos®Aquatics GmbH.
This manual suits for next models
3
Table of contents
Other Nyos Aquarium manuals
Popular Aquarium manuals by other brands

TMC Aquarium
TMC Aquarium V2 PowerPump Instructions for installation and use

TMC Aquarium
TMC Aquarium REEF-Skim Series Instructions for installation and use

velda
velda FISH FEEDER PRO User instructions

TMC Aquarium
TMC Aquarium V2 Auto Top Up Compact manual

koller
koller AP30000GF-FFP user manual

AQUA DREAM
AQUA DREAM REEF-450-SILVER Assembly instructions