OCULUS Easygraph 70620 User manual

Copyright by
G/70620/0906/e
Easygraph 70620
Instruction Manual
Measurement and Evaluation System for Corneal Topography

Page 2
Instruction Manual Easygraph
0 Foreword
Thank you for the confidence which you have placed
in us by buying this OCULUS product. With this unit
you have made your decision for a modern, highly
developed product which has been manufactured
and tested according to the highest standards of
quality. Research and development at OCULUS,
which always aim at serving your best interests, can
lead to changes in the design and scope of standard
equipment. For this reason the illustrations in this
Instruction Manual may differ in some respects from
the unit as delivered.
Our company can look back on a history that
stretches more than 100 years into the past.
OCULUS today is a middle-sized company whose
only focus is to support physicians and optometrists
in their demanding work with a line of top-quality
products for ocular examinations and operations.
The Easygraph before you belongs to the latest
generation of topographic measuring instruments. It
combines keratometric measurement with the
measurement of corneal topography. The unit's
extreme accuracy of measurement and simplicity in
use are the result of our careful development.
Proper use is indispensable for safety in working with
the unit. Therefore, please familiarize yourself
thoroughly with the contents of this Instruction
Manual before using the unit for the first time.
Should you have questions or need further
information on your unit, please contact us by
telephone or send us a fax message. Our service
team will be happy to help you.
OCULUS Optikgeräte GmbH -
The Management and Staff

Instruction Manual Easygraph Page 3
1 Table of Contents
0Foreword...........................................................................................................................................2
1Table of Contents.............................................................................................................................3
2Scope of Supplies and Optional Accessories...................................................................................5
3Safety Precautions ...........................................................................................................................6
4Description of the Unit and its Functions..........................................................................................7
5Appropriate Use / Intended Application............................................................................................7
6Start-up.............................................................................................................................................7
6.1 Directions for Transport and Storage........................................................................................ 7
6.2 Before First Use ........................................................................................................................8
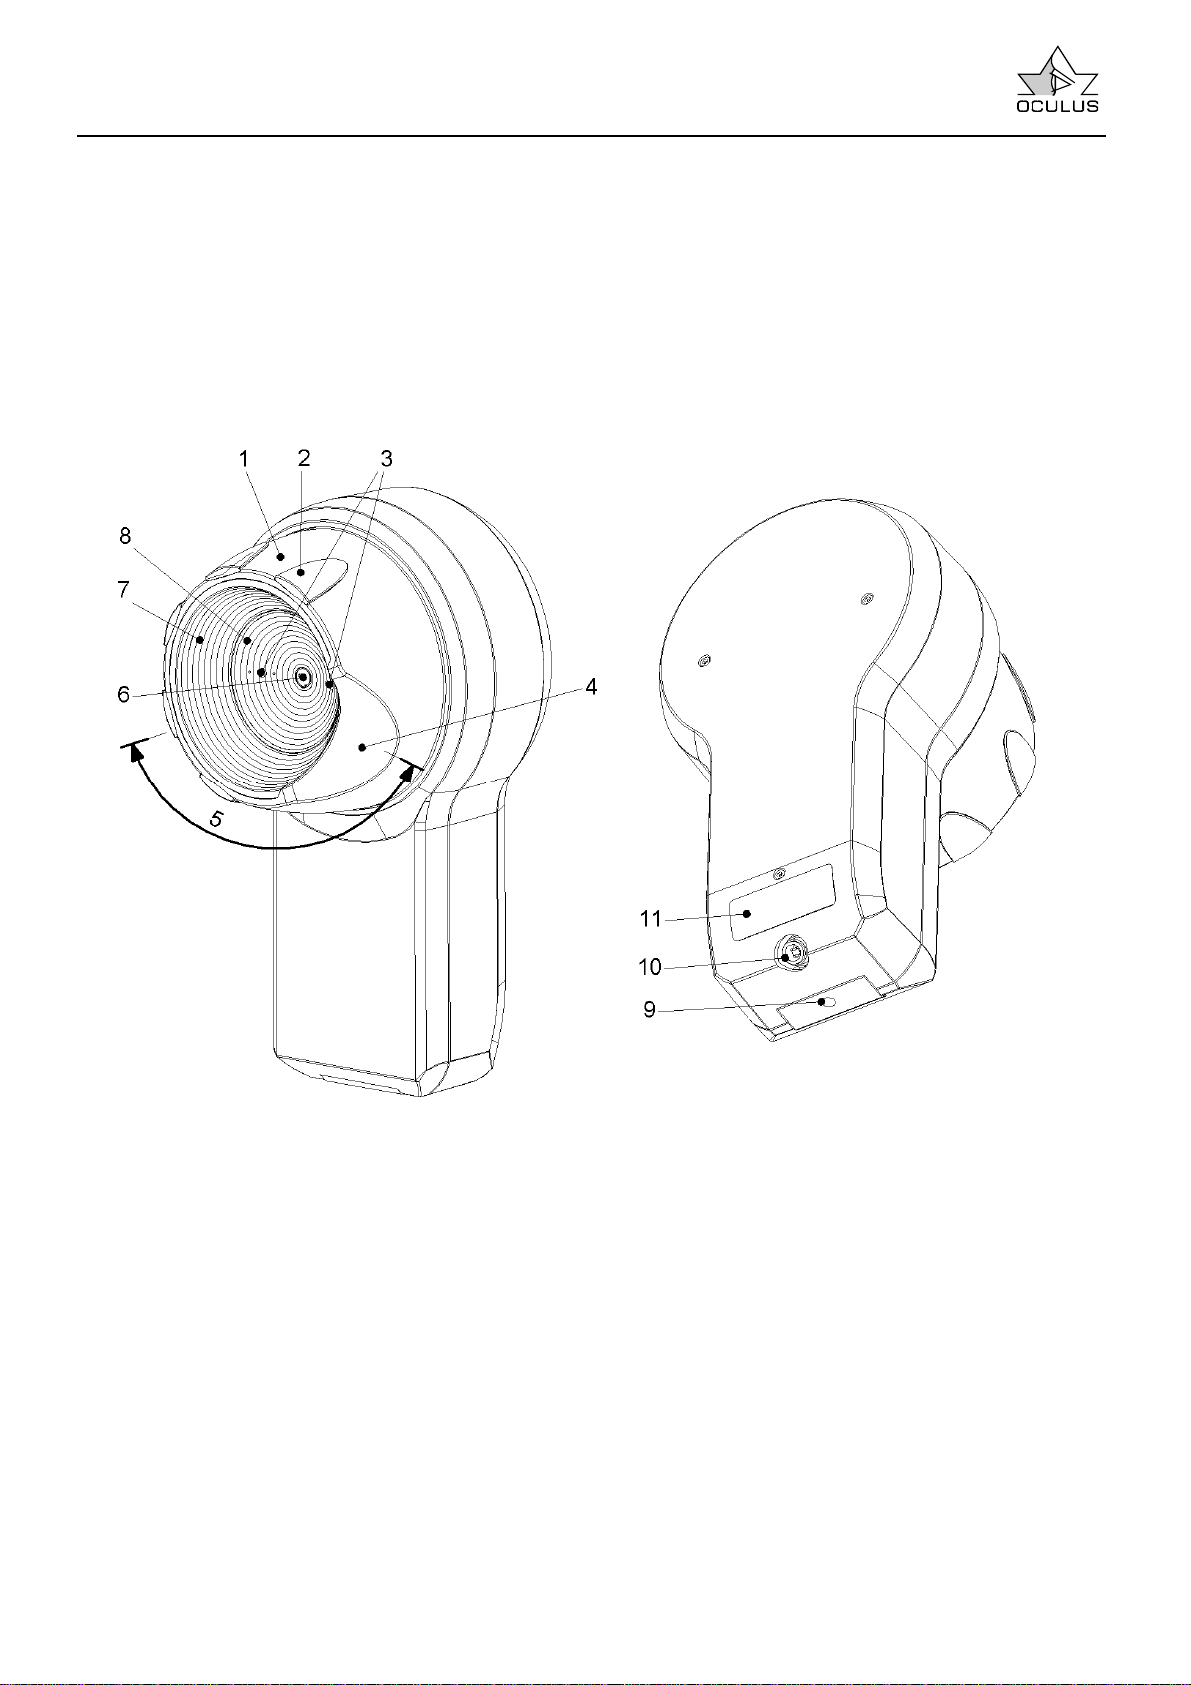
6.3 Components of the Device........................................................................................................8
6.4 Installation.................................................................................................................................9
6.5 Electrical Connection.................................................................................................................9
6.6 Installation of Software............................................................................................................10
6.6.1 General ............................................................................................................................10
6.6.2 Installation of the USB driver ...........................................................................................10
6.6.3 OCULUS – Bootloader.....................................................................................................11
6.6.4 OCULUS – Easygraph.....................................................................................................12
6.6.5 Switch off the USB-Powersaving.....................................................................................13
7Operation........................................................................................................................................14
7.1 Before the Examination.........................................................................................................144
7.2 After every Examination..........................................................................................................15
7.3 Starting Patient Data Management.........................................................................................15
7.4 Patient Data Management ......................................................................................................15
7.4.1 Selection of a Patient.......................................................................................................15
7.4.2 Entering a New Patient ....................................................................................................16
7.4.3 To Start the Examination Program................................................................................... 16
7.4.4 Deleting / Moving Examination Data................................................................................16
7.4.5 Patient Data .....................................................................................................................17
7.4.5.1 Rename Patient........................................................................................................17
7.4.5.2 Deleting Patient Data................................................................................................17
7.4.5.3 Exporting Patient Data..............................................................................................17
7.4.5.4 Importing Patient Data.............................................................................................. 18
7.4.6 Backup Copies of Data .................................................................................................... 19
7.4.6.1 Backing Up Data.......................................................................................................19
7.4.6.2 Data Restoration.......................................................................................................19
7.4.6.3 Auto-Backup .............................................................................................................19
7.4.7 Changing Settings............................................................................................................ 20
7.5 The Examination Program.......................................................................................................21
7.5.1 How to Carry Out a Measurement...................................................................................21
7.5.2 Using Different Types of Display to Evaluate Examination.............................................. 23
7.5.2.1 Overview Display......................................................................................................23
7.5.2.2 Color Map large ........................................................................................................25
7.5.2.3 3D Cornea.................................................................................................................25
7.5.2.4 Fourier Analysis........................................................................................................27
7.5.2.4.1 Applications of the Fourier Display Mode in Keratokonus....................................29
7.5.2.5 Zernike Analysis (optional) .......................................................................................31
7.5.2.5.1 General.................................................................................................................31
7.5.2.5.2 Zernike Analysis Using the Easygraph.................................................................33
7.5.2.5.3 Zernike Fit Parameters ......................................................................................... 34
7.5.2.5.4 Zernike: Normal Values and Aberration Coefficient .............................................34
7.5.2.5.5 Zernike 2D Display Mode .....................................................................................35
7.5.2.6 Indices (optional).......................................................................................................36
7.5.2.6.1 Vertical Decentration.............................................................................................39
7.5.2.7 Refractive Display Mode...........................................................................................40
7.5.2.8 Height Data...............................................................................................................42
7.5.2.9 Camera Image..........................................................................................................45
7.5.2.10 Refractive Compare.................................................................................................. 45
7.5.2.11 Comparing Examinations..........................................................................................47
7.5.3 Contact Lens Fitting (optional).........................................................................................48

Page 4
Instruction Manual Easygraph
7.5.3.1 Selecting a Contact Lens..........................................................................................49
7.5.3.2 Fluo Image Simulation / [Calc. fluo.]......................................................................... 50
7.5.3.2.1 Fluo Icon Selection Switches................................................................................51
7.5.3.2.2 Shifting and Rotating the Contact Lens................................................................51
7.5.3.2.3 Setting Contact Lens Parameters / [Details].........................................................52
7.5.3.2.4 Changing the Scale of the Fluo Image .................................................................53
7.5.3.2.5 Top Test................................................................................................................53
7.5.3.2.6 Using Hecht Fitting Software / [Hecht CL]............................................................54
7.5.3.3 Refraction Module / [Refraction]...............................................................................55
7.5.3.3.1 Power Calculation for Toric Lenses......................................................................56
7.5.3.3.2 Power Calculation for Soft Lenses........................................................................58
7.5.3.4 Storing and Loading the Fitted Contact Lens...........................................................58
7.5.4 Changing Settings............................................................................................................ 60
7.5.4.1 “Change System Settings” Button [System->]..........................................................63
7.5.4.2 Contact Lens Database............................................................................................54
7.5.4.3 Input New Contact Lens Types / [Lens geometry ->]...............................................65
7.5.4.3.1 Creating Contact Lens Geometries (Rigid)........................................................... 66
7.5.4.3.2 Creating Soft Lens Geometries ............................................................................68
7.5.4.3.3 Import and Export of Contact Lens Data ..............................................................69
7.5.5 Other Functions of the Examination Program..................................................................70
7.5.5.1 Loading old Examinations.........................................................................................70
7.5.5.2 Printout......................................................................................................................71
7.6 The Easygraph Measurement System....................................................................................71
7.6.1 Reference Measurement .................................................................................................71
7.6.2 Other Functions................................................................................................................71
8Maintenance...................................................................................................................................72
8.1 Care and Cleaning ..................................................................................................................72
8.2 Eliminating Errors or Malfunction............................................................................................72
8.2.1 Troubleshooting ...............................................................................................................72
9Terms of Warranty and Service......................................................................................................73
9.1 Terms of Warranty...................................................................................................................73
9.1.1 Liability for Malfunction or Damage..................................................................................73
9.1.2 Manufacturer’s and Service Address...............................................................................73
10 Disposal ......................................................................................................................................74
11 Appendix.....................................................................................................................................74
11.1.1 Technical Data.................................................................................................................74
11.1.2 Minimum PC requirements ..............................................................................................74
12 Literature.....................................................................................................................................75
13 Index ...........................................................................................................................................76

Instruction Manual Easygraph Page 5
2 Scope of Supplies and Optional Accessories
Easygraph Type 70620 70620 01 000
Y-Cable USB 70620 00 001
Plug-in
power supply unit 5V,1A 05150070
Adapter for
power supply Euro 05150071
Adapter for
power supply USA/Japan 05150072
Dust cover 70620 00 004
Reference globe 70500 05 000
Holder (for slitlamp) 70620 00 010
CD with Easygraph Software 70620 00 005
User manual G/70620/..../ed
Easygraph parking unit 70620 00 006
(for table top mounting)
Optional:
Adapter for
power supply UK 05170073
Sliding holder (enables using
of the slitlamp while the Easy-
graph remains on the holder) 70585
Software module
Keratoconus Screening
and Zernike Analysis 70624
Software module
Contact Lens Fitting 70626

Page 6
Instruction Manual Easygraph
3 Safety Precautions
The manufacturer is required by law to inform the
user explicitly on the safety aspects of dealing with
this unit. This chapter contains a summary of the
most important points to be noted regarding
technical safety.
Other safety precautions are contained in the text of
this Instruction Manual and are designated with the
following symbol:
Please pay special attention to these directions.
Keep this Instruction Manual carefully in a place
where it is accessible at all times for those using the
unit. The unit may only be used for its intended
purpose as described in this Instruction Manual in
Point Appropriate Use / Intended Application and
only by persons whose training and practical
experience ensure that they will use the unit
properly.
Before the unit is operated for the first time, an
introductory training in its use must be carried out by
us or an authorized dealer.
Please operate the unit only with original parts and
accessories delivered by us and in a technically
flawless condition. Do not attempt to use it if it is
damaged, but rather contact your supplier.
Please abide by accident prevention laws where
applicable.
The unit may be used in medical areas only if they
are equipped according to VDE 0107 norms or the
equivalent (Association of German Electrotechnical
Engineers).
Always disconnect the electric plugs of the
Easygraph and all units connected to it, e.g., the PC
and the printer, from their power sources before
carrying out maintenance or cleaning work.
Do not exert main force to connect electrical plugs
and sockets. If it is not possible to connect them,
check whether the plug is correct for the socket. If
you find damage in either a plug or a socket, have
them repaired by our service personnel.
To disconnect electric plugs from their sockets, do
not pull on the cable, but rather on the plug itself.
Any auxiliary equipment connected to the analog or
digital interfaces of this unit must be certified as
meeting applicable EN and/or IEC-specifications. In
addition, all configurations must fulfill IEC-Norm No.
601-1 for systems.
Do not connect the Easygraph with non-medical
electrical equipment (e.g. data processing devices)
for purposes of creating an electromedical system if
this will result in a safety level for the patient which is
below that specified by IEC-Norm No. 601-1. If
permissible levels for leakage currents are exceeded
due to such connections, appropriate safety
measures, including a disconnecting device, must be
present.
Do not use the units contained in the Standard
Equipment List
•in places where there is danger of explosion,
•in the presence of combustible anesthetics or
volatile solvents such as alcohol, benzine or the
like.
Do not store or use the unit in damp rooms. Avoid
placing the unit near dripping, or splashing water,
and make certain that no liquids can enter the unit.
For this reason, please do not place any containers
of liquid on top of the unit, and also take care when
cleaning the unit with a damp cloth that no liquid gets
into the unit.
Do not cover the air vents.
Note: This unit is a high-quality technical product. To
ensure that it performs flawlessly and safely, we
recommend having the unit inspected by our service
personnel every two years. Should any problem
arise which you cannot solve with the enclosed
"Troubleshooting" list (Section 8.2.1), please label
the unit "Out of Order" and contact our service
department.

Instruction Manual Easygraph Page 7
4 Description of the Unit and its Functions
The OCULUS Easygraph belongs to the most
modern generation of precision topographic
measuring instruments. It combines keratometric and
topographic measuring methods in a single unit.
Measurement of the corneal surface is carried out
through a system of rings which are reflected at the
cornea. The resulting data are evaluated by the
computer.
Technical Principle:
A illumination system with a special reflector
illuminates a transparent calotte or "skullcap" with
concentric circles from behind.
The image of this "cap" is reflected from the
examinee's eye, which is opposite to it.
This virtual image is captured by a precision lens and
a tandem-arranged CCD camera.
All distortions found in the radii of curvature of the
examinee's eye thus become available for use by the
measuring process.
The image is then processed by the measuring unit
for evaluation, i.e. it is made available to the PC in
digitized and compressed form for further
processing.
After receiving appropriate data from a screen
diagram, the PC uses this information to develop a
topographic image of the cornea.
It then shows the measurement results on the screen
not only in color but also in the form of a diagram
and a 3-dimensional image.
5 Appropriate Use / Intended Application
The OCULUS Easygraph is a measuring instrument
which is intended for eye examinations and only for
the uses described in this Instruction Manual.
The unit is used for measuring corneal topography
and has been designed for use in fitting contact
lenses.
It may therefore be used only by persons who have
been instructed in its use and whose professional
training, knowledge, and practical experience ensure
that they will work with the unit appropriately.
The OCULUS Easygraph has been designed for use
in the examination rooms of practicing
ophthalmologists, for hospital departments, opticians
and optometrists. It may be used only at locations
specifically designated for it or when attached to an
examination unit.
The OCULUS Easygraph may be used only with
original parts and accessories delivered by us and in
a technically flawless condition.
Electric power must be supplied by the special power
pack (cf. the electrical equipment specifications).
Other types of connection are not permissible.
Please also observe the safety precautions described
above!
6 Start-up
6.1 Directions for Transport and Storage
Should you transport the unit to another location,
please do so very carefully.
Avoid the vicinity of heating units and humidity both
during use of the instrument and when it is stored.
Check the unit for damage after each relocation.
Under no circumstances should you put a damaged
unit into operation; rather, please get in contact with
our service department.
The optic components in the unit may become
covered by condensation if you store the unit in a
cold room or in a vehicle during the cold part of the
year or if there are wide changes from cold to warm
in the ambient temperature.
Please give the unit time to acclimatize to its new
surroundings before using it for the first time.
The conditions set by IEC-Norm No. 601-1 for
transport and storage are:
Ambient temperature: -40°C to +70°C
Relative Humidity: 10 % to 100%
including condensation
Air pressure: 500 hPa...1060hPa
(7.3 psi...15.3 psi)
These levels apply for a period of 15 weeks at most
if the unit is kept in an appropriate case.

Page 8
Instruction Manual Easygraph
6.2 Before First Use
Please remove the device as well as the accessories
from the packaging and keep this. You can use it for
correctly sending or transporting the device in the
case of service or repair. In this way you avoid
unnecessary damage and costs.
Read these operating instructions carefully.
Being an optical device this unit must be handled
with care. Do not expose it to any vibration, impacts,
contamination and high temperatures.
6.3 Components of the Device
1 Rotatable reflector
2 Gripping surfaces for better grip
3 Targets
4 Recess for the nose
5 Turning range for setting
the right/left eye
6 Camera opening and fixing mark
7 Rotatable part of the calotte
8 Fixed part of the calotte
9 Mounting thread
10 Connection socket
11 Name plate

Instruction Manual Easygraph Page 9
6.4 Installation
For operation the Easygraph must be fastened with
the enclosed holder on a slitlamp.
This holder is designed for slitlamps with a drilling of
8mm diameter. It is possible to get other holders on
request.
For this purpose first screw the enclosed holder with
the knurled screw on the mounting thread (Item 9) of
the Easygraph.
Remove a cover of the support possibly present on
the slitlamp. Then set the shaft of the Easygraph
holder in the receptacle of the slitlamp.
As an alternative the Easygraph can also be mounted
on an optionally available guide rail.
The Easygraph can be pushed with this into a rest
position, so that examinations can then be made with
the slitlamp. However, note that the guide rail can
also move when moving the slitlamp and the
microscope attachment. Hold the guide rail or the
Easygraph firmly if necessary so that they do not
collide with the head support.
6.5 Electrical Connection
The Easygraph may be operated only with the
supplied plug-in power supply unit.
To adapt to different countries the plug-in power
supply unit has replaceable plug adapters for
connection to the mains and a wide range input.
Select the adapter corresponding to your country
and push it into the plug-in power supply unit until it
snaps into place.

Page 10
Instruction Manual Easygraph
Connect the supplied Y-cable with the Easygraph,
USB interface of the PC and low-voltage socket of
the plug-in power supply unit.
The coupling of the Y-cable for the Easygraph has a
bayonet lock. Observe, when put in the plug that the
groove of the coupling and lug in the plug of the
Easygraph agree. For your assistance, there are two
red dots on coupling, as well as a third red dot on the
Easygraph housing. When connecting, all the dots
should be in arow.
Secure the plug connection by turning the knurled
sleeve of the coupling by approx. 1/8 turn.
If the coupling cannot be inserted without exerting
force, the knurled sleeve of the coupling may be in
the locking position. Then turn the knurled sleeve
back first of all.
Plug the plug-in power supply unit into the wall outlet
only on conclusion.
When separating the plug connections first separate
the power supply from the Easygraph (at the wall
outlet or at the low-voltage socket).
6.6 Installation of Software
6.6.1 General
The OCULUS Easygraph Software needs the
operation system Windows™ with the support of the
USB interface. At the time of printing this manual
these are: Windows 98SE, Windows ME, Windows
2000 and Windows XP. Of course there must a free
USB interface be available in the used PC.
6.6.2 Installation of the USB driver
When you use the Easygraph for the first time, two
drivers have to be installed. Initially the Easygraph is
registered in the system by „OCULUS – Bootloader“.
The actual firmware is copied into the Easygraph
only during using the PC software. This makes future
firmware-updates more easy, without the necessity
of the user’s interference.

Instruction Manual Easygraph Page 11
6.6.3 OCULUS – Bootloader
After having connected the Easygraph correctly to
the PC, the operation system shows that a new
instrument “OCULUS – Bootloader” has been found
and that it is necessary to install a driver:
Please chose the point “Install from a list or
specific location (Advanced)” and click the button
“Next >”.
In the following window please type in the correct
position of the driver.
Therefore please deactivate the entry “Search
removable media (floppy, CD-ROM...” and activate
the entry “Include this location in the search:”.
Please chose as a path “X:\driver”, in which you
substitute “X“ with the capital letter of your CD ROM
drive. Please insert the OCULUS Easygraph
installation-CD and click on the button “Next >”
After a short time the operation system is searching
for the driver possibly a window appears with the
remark that the Windows logo test has not been
passed.
Then click on the button “Continue Anyway”
Now the driver is being installed.
And after successful copying this is confirmed once
more by the operation system.
It is not necessary to re-boot the system.

Page 12
Instruction Manual Easygraph
6.6.4 OCULUS – Easygraph
When the Easygraph software is started the first time
the operation system shows that a new instrument
“OCULUS – Easygraph” has been found and that it
is necessary to install a driver:
Please chose the point “Install from a list or
specific location (Advanced)” and click the button
“Next >”.
In the following window please type in the correct
position of the driver.
Therefore please deactivate the entry “Search
removable media (floppy, CD-ROM...” and activate
the entry “Include this location in the search:”.
Please chose as a path “X:\driver”, in which you
substitute “X“ with the capital letter of your CD ROM
drive. Please insert the OCULUS Easygraph
installation-CD and click on the button “Next >”
After a short time the operation system is searching
for the driver possibly a window appears with the
remark that the Windows logo test has not been
passed.
Then click on the button “Continue Anyway”
Now the driver is being installed.
And after successful copying this is confirmed once
more by the operation system.
It is not necessary to re-boot the system. The PC-
Software though should be restarted.

Instruction Manual Easygraph Page 13
6.6.5 Switch off the USB-Powersaving
If Windows is allowed to turn off the device to save
energy, it can cause communication problems.
To prevent this, switch off the USB power
management as per the following steps:
Start the Device Manager by clicking "Start / Settings
/ Control Panel / System / Hardware / Device
Manager".
Extend the section "Universal Serial Bus controllers"
and click with the right mouse button "USB-Root-
Hub" and activate "Properties".
If there are more than one USB-Root-Hub the
powersaving should be switched off for each hub.
Activate the index-tab "Power Management" and
deactivate the button "Allow the computer to turn off
this device to save power.".
Click "OK"

Page 14
Instruction Manual Easygraph
7 Operation
7.1 Before the Examination
Before starting the examination the device must be
aligned parallel to the chin support.
Always take care in further measurements that the
Easygraph is aligned parallel.
To achieve high measuring accuracy, a reference
measurement must be performed with the Easygraph
before the first examination and then around once
per month.
Reference measurement must be performed for both
right and left reflector position separately (see
chapter on reference measurement, page 71).
Turn the reflector corresponding to the following
pictures into the correct position. This position is
detected automatically by the program. If the reflector
is not in one of the two end positions, then no
measurement can be performed.
For measuring the right eye turn the reflector (Item
1) clockwise / to the left until it snaps in noticeably.
The nose recess on the reflector is then on the left
side of the reflector.
To measure the left eye turn the reflector (Item 1)
counterclockwise / to the left until it snaps in
noticeably. The nose recess on the reflector is then
on the right side of the reflector.

Instruction Manual Easygraph Page 15
7.2 After every Examination
Please use the supplied dust protection cover to
prevent soiling of the ring system. To be able to
perform examinations with the slitlamp, pull the
Easygraph out of the slitlamp receptacle again and
place it on a soft base. If the optional guide rail is
used, the Easygraph can remain on the slitlamp in
most cases. Then push it to the side into the rest
position until the guide rail snaps into place.
7.3 Starting Patient Data Management
Start the OCULUS Easygraph software after
switching on the PC and loading the operating
system. The OCULUS logo appears. You reach the
patient data management with a mouse click or by
pressing any key.
7.4 Patient Data Management
To start the examination program, simply select a
patient name or enter a new patient name in the data
management system.
The following screen display is used for this purpose:
7.4.1 Selection of a Patient
All previously examined patients are listed
alphabetically at the left.
If there are more patients than can be displayed on
the screen, the list can be scrolled up or down with
the help of the Windows slide bar.
In order to find the desired patient in the list quickly,
it is helpful to type the name of the patient in the
"Patient" boxes (at the upper left). As you enter each
letter, the nearest corresponding name is found and
displayed in the list.
In addition, the patient can also be searched for via
his ID-number. (For this purpose, however, the "Last
name" field must be empty.)
If the patient name is found in the list, it is transferred
into the "Patient" boxes by clicking the name in the
list, and any previous examinations of the patient are
simultaneously listed in the "Previous Examinations"
window (at the lower right).

Page 16
Instruction Manual Easygraph
7.4.2 Entering a New Patient
In order to enter a new patient into the patient data
management system, the [Clear] button should be
activated in order to erase patient data from the
"Patient" boxes. Then the full last name, first name
and date of birth must be entered in the "Patient"
boxes (at the upper left).
An ID-number of the patient can be entered but is
not necessary.
If the screen button [File] is now activated, the
following message appears:
"Patient data does not exist!"
"File new patient?". Activating the button
[File patient] causes the patient to be entered into
the patient data base.
7.4.3 To Start the Examination Program
After having chosen a patient the examination
program (cf.7.5, page 21) can be started by clicking
of the [Easygraph] button. If, besides that, an
examination is clicked on in the examination window,
this is loaded in the examination program
automatically.
By double clicking on a patient’s name the
examination program is also started.
Furthermore it is possible to start the examination
program by double clicking on a „previous
examination“, and this examination is then loaded in
the examination program automatically.
7.4.4 Deleting / Moving Examination Data
Two screen buttons are found below the "Previous
Examinations" list. The functions which they activate
always affect the last examination clicked:
[Delete Exam.]
This function permits the deletion of individual
examinations from the patient data management
system. After activating the screen button, the user is
asked again whether this examination should in fact
be deleted.
[Move Exam.]
If the wrong patient name was inadvertently selected
in the "Patient list" during an examination, the
examination results can subsequently be allocated to
the correct patient as follows:

Instruction Manual Easygraph Page 17
Activate the screen button [Move Exam.] in the
patient data management system window. The
patient list then appears.
Now the correct patient can be selected in this list
(with the scroll bar and by clicking on the correct
line).
Once the correct patient name has been found and
selected, the corresponding examination data are
now allocated to it by activating the screen button
[Move Examination].
7.4.5 Patient Data
7.4.5.1 Rename Patient
Patient data can subsequently be changed by
activating the screen button [Rename Pat.] (below
the list of patients).
The patient data can be corrected in the "Change
Patient Data" window, which then appears (at the
upper right).
Activating the [Update] button puts the changes into
effect.
7.4.5.2 Deleting Patient Data
Patient data can be deleted with the screen button
[Delete Pat.].
Caution! ⇒Double confirmation is required before
the data are actually deleted, since here not only all
examinations of the patient but also the patient data
are removed from the patient data management
system.
7.4.5.3 Exporting Patient Data
This function makes it possible to transfer patients
and examination data from the host PC to other data
storage media (e.g. disks).
After activation of the screen button [Export] a
window appears which consists of two areas.
The upper area describes the data set which is to be
exported, the lower is used to determine the storage
medium which will receive it.
Enter the disk drive to which the data set is to be
transferred in the "Directory" box under "Data
medium dest.:" (e.g.: "A:\" if diskettes are to be
used).
A subdirectory can also be entered (example:
A:\February\).

Page 18
Instruction Manual Easygraph
"Data Set"
Use this field to select whether all examinations of
the patient are to be exported or only one.
If only one examination is to be exported, select it in
the Previous Examinations List before activating
[Export].
"Including CCD Images"
Moreover, the camera images can be extracted from
the data set so that less memory storage space is
required without camera images.
"Memory Available"
The two items of information concerning memory
storage space show how much memory space is
required and how much is available on the storage
medium which will receive it.
The data set is transferred by activating the
[Export] screen button, whereas [Cancel]
terminates the function without a transfer of data.
7.4.5.4 Importing Patient Data
(e.g. from a floppy to the hard disk or to a directory of
the PC).
Activate [Import] to start this function.
"Directory"
Enter the drive letter here and - if there is one - the
sub-directory of the source from which the import is
to take place.
A patient list shows which patients are present on
the data storage medium. In addition, the
examinations of a patient are shown after that patient
has been selected.
If only a single examination is to be imported, click
that examination in the "Existing examinations" list.
The import is started with the screen button
[Import data].

Instruction Manual Easygraph Page 19
7.4.6 Backup Copies of Data
7.4.6.1 Backing Up Data
The [Backup] button opens the "Backup" window,
which consists of two areas:
Save and Restore
These areas are used to specify the directory in
which backup-copies of data are to be created or
from which data are to be called to the screen. For
example, this is "F:\" in the case of an external drive
with exchangeable data storage media (removable
hard disks).
The backup can take place according to different
criteria:
•"Save All Data"
Copies are made of all examinations and patient
data.
•"Changed and New Data Only"
Only those data are copied which have changed
or been newly created since the last backup.
•"Including CCD Images"
This function can be turned off to reduce memory
requirements. This is useful for data backup to
floppies.
Note: ⇒Backup of data can take a long time,
depending on the volume of data; therefore it is best
to use this function when the PC (and the
Easygraph) will not be needed for a while.
Activate [Save] in order to start the data backup.
7.4.6.2 Data Restoration
The restoration of already stored data can likewise
be carried out according to different criteria:
•"Delete Existing Data First"
This function removes all presently stored
examination data of a patient before restoring it to
the backup data storage medium. After
restoration, therefore, only those examinations
will be present which have been restored on the
backup data storage medium.
•"Add Examination Data"
This function adds the examination data of the
data storage medium to the already existing
examination data of the patient.
[Restore] Uploads data from the backup medium
into the system.
7.4.6.3 Auto-Backup
It is also possible to save data via an automatic
backup. In this case a backup copy of the new
examination data is always made at the end of the
examination program.
This function is activated in the menu "Change
Settings".
This function should only be used if an additional
drive with an exchangeable data storage medium is
present.

Page 20
Instruction Manual Easygraph
7.4.7 Changing Settings
After the [Settings] screen button has been acti-
vated, the menu "Change Settings" appears. Here
the patient data management system can be
modified according to your specific wishes:
•Language
Is used to select the language (German, English,
French or Italian) in which the program is to be
displayed.
•Date Format
Is used to set the date display. The following
formats can be selected:
Day/Month/Year (DMY),
Month/Day/Year (MDY),
or Year/Month/Day (YMD),
as well as the sign separating month, day, and
year.
•Automatic Backup
This box can be used to turn on the automatic
backup function. (Click the "Enable" checkbox).
The backup directory into which data are to be
saved must be preset. This directory is also used
as backup directory for the normal backup
function.
Moreover, It is possible to determine whether
camera images are also to be saved during
automatic backup or not.
•Sort by
The patient list can be sorted according to either
patient names or ID-numbers.
(If you plan to use names to find patients, it is
helpful to sort the list by names.)
If you plan to use ID-numbers to call patient data
to the screen, the sorting list should be sorted
accordingly.
•Date
This field is used to change the system time and
date.
•Import / Export
This is used to name the drive and, if necessary,
the sub-directory from which information is to be
imported or to which exports are to be sent.
•Keyboard
If you select “simulated”, an additional button
labelled [Keyboard] appears next to the field for
entering the patient’s name. Activating this button
produces a virtual keyboard as an alternative
means of entering the patient’s name.
•Keyboard size
Here you can select the size of the virtual
keyboard.
The [Use] button confirms the setting for the duration
of the present session of the program. Thereafter,
however, the previous settings are reloaded each
time the program is restarted.
The setting just made can be made permanent with
the [Save] button. The setting will then be loaded
each time the program is started again.
The [Cancel] button rejects the changes just made
and exits from the function.
Table of contents
Other OCULUS Medical Equipment manuals

OCULUS
OCULUS GramaDerm User manual

OCULUS
OCULUS Pentacam AXL User manual

OCULUS
OCULUS BIOM ready User manual

OCULUS
OCULUS UB 4 User manual

OCULUS
OCULUS ImageCam 3 User manual

OCULUS
OCULUS Pentacam User manual

OCULUS
OCULUS Corvis ST User manual

OCULUS
OCULUS Easyfield User manual

OCULUS
OCULUS Myopia Master Basic User manual

OCULUS
OCULUS Myopia Master Advanced User manual