OHAUS SHRK07AL1 User manual

EN - English . . . . . . . . . . . . 1
CZ - Czech . . . . . . . . . . . . 100
KR - Korean . . . . . . . . . . . . 105
JP - Japanese . . . . . . . . . . . . 117
Instruction Manual
Shaker, Rocking, 1 Tier, SHRK07AL1
Revision 5
2/14/2020

1
If the troubleshooting section does not resolve or describe your problem, contact your
authorized OHAUS service agent. For service assistance or technical support in the
United States call toll-free 1-800-672-7722 ext. 7852 between 8:00 AM and 5:00 PM EST.
An OHAUS product service specialist will be available to provide assistance. Outside the
USA, please visit our web site, www.ohaus.com to locate the Ohaus office nearest you.
Serial Number:
Date of Purchase:
Supplier:
PACKAGE CONTENTS
Rocking Shaker 1 Tier or
Rocking Shaker 2 Tier or
Waving Shaker Analog or
Waving Shaker Digital
Non-skid rubber mat
Power Cord
Tier kit (analog rocker 2 tier)
Instruction manual
Warranty card
EN
TAblE Of CONTENTS
Package contents . . . . . . . . . . . . . . . . . . . . . . . . . . . . . . . . . 1
Service information . . . . . . . . . . . . . . . . . . . . . . . . . . . . . . . . 1
Installation. . . . . . . . . . . . . . . . . . . . . . . . . . . . . . . . . . . . . 2
Maintenance & servicing . . . . . . . . . . . . . . . . . . . . . . . . . . . . . 2
Intended use . . . . . . . . . . . . . . . . . . . . . . . . . . . . . . . . . . . 2
Environmental conditions . . . . . . . . . . . . . . . . . . . . . . . . . . . . . 2
Equipment disposal . . . . . . . . . . . . . . . . . . . . . . . . . . . . . . . . 2
Safety instructions. . . . . . . . . . . . . . . . . . . . . . . . . . . . . . . . . 3
Standards & regulations. . . . . . . . . . . . . . . . . . . . . . . . . . . . . . 3
Analog Rocking/Waving Shaker Specifications. . . . . . . . . . . . . . . . . . 4
Analog Rocking/Waving Shaker Control Panel . . . . . . . . . . . . . . . . . . 5
Analog Rocking/Waving Shaker Operating Instructions . . . . . . . . . . . . . 5
Digital Rocking Shaker Specifications . . . . . . . . . . . . . . . . . . . . . . 6
Digital Waving Shaker Specifications . . . . . . . . . . . . . . . . . . . . . . . 7
Digital Rocking/Waving Shaker Control Panel . . . . . . . . . . . . . . . . . . 8
Digital Rocking/Waving Shaker Operating Instructions . . . . . . . . . . . . 9-10
Troubleshooting . . . . . . . . . . . . . . . . . . . . . . . . . . . . . . . . . 11

2
Upon receiving the Ohaus Rocking/Waving Shaker, check to ensure that no damage
has occurred during shipment. It is important that any damage that occurred in
transport is detected at the time of unpacking. If you do find such damage the carrier
must be notified immediately.
After unpacking, place the Rocking/Waving Shaker on a level bench or table, away
from explosive vapors. Ensure that the surface on which the unit is placed will
withstand typical heat produced by the unit. Always place the unit on a sturdy work
surface.
The Rocking/Waving Shaker is supplied with a power cord that is inserted into the IEC
connector on the back of the unit first, then it can be plugged into a properly grounded
outlet. The 120V unit plugs into a 120 volt, 50/60 Hz source. The 230V unit plugs into
a 230 volt, 50/60 Hz source.
MAINTENANCE & SERVICING
The Rocking/Waving Shaker is built for long, trouble-free, dependable service. No
lubrication or other technical user maintenance is required. However at least every
three (3) months you should:
• Unplug the unit.
• Remove any accumulated dirt from the base and tray.
• Check all accessible items to make sure they are properly tightened.
The unit should be given the care normally required for any electrical appliance. Avoid
wetting or unnecessary exposure to fumes. Spills should be removed promptly. DO
NOT use a cleaning agent or solvent on the front panel which is abrasive or harmful to
plastics, nor one which is flammable. Always ensure the power is disconnected from
the unit prior to any cleaning. If the unit ever requires service, contact your Ohaus
representative.
INTENDED USE
The Rocker/Waver is intended for general laboratory use.
INSTAllATION ENVIRONMENTAl CONDITIONS
Operating Conditions: Indoor use only.
*For use in CO2 environments, incubators or cold rooms.
*Temperature: -10 to 60°C (14 to 140°F).
Humidity: maximum 80% relative humidity, non-condensing
Altitude: 0 to 6,562 ft (2000 M) above sea level
Mains supply voltage: Fluctuations are not to exceed 10 percent of the nominal supply
voltage.
Non-Operating Storage:
*Temperature: -20 to 65°C (-4 to 149°F)
Humidity: maximum 80% relative humidity, non-condensing
Installation Category II and Pollution Degree 2 in accordance with IEC 664.
*Avoid cold starts: Unit is not designed to start after being in a cold room environment.
Bring unit into cold room from a room temperature environment, operate and remove
unit from cold room as soon as operation is complete.
EQUIPMENT DISPOSAl
This equipment must not be disposed of with unsorted waste. It is your
responsibility to correctly dispose of the equipment at life-cycle-end by
handing it over to an authorized facility for separate collection and recy-
cling. It is also your responsibility to decontaminate the equipment in case
of biological, chemical and/or radiological contamination, so as to protect
the persons involved in the disposal and recycling of the equipment from health hazards.
For more information about where you can drop off your waste of equipment, please
contact your local dealer from whom you originally purchased this equipment. By doing
so, you will help to conserve natural and environmental resources and you will ensure that
your equipment is recycled in a manner that protects human health.
EN

3
Please read the entire instruction manual before operating the Rocking/Waving
Shaker.
WARNING! DO NOT use the Rocking/Waving Shaker in a hazardous
atmosphere or with hazardous materials for which the unit was not designed.
Also, the user should be aware that the protection provided by the equipment
may be impaired if used with accessories not provided or recommended by
the manufacturer, or used in a manner not specified by the manufacturer.
Always operate unit on a level surface for best performance and maximum
safety.
DO NOT lift unit by the tray.
CAUTION! To avoid electrical shock, completely cut off power to the unit by
disconnecting the power cord from the unit or unplug from the wall outlet.
Disconnect unit from the power supply prior to maintenance and servicing.
Spills should be removed promptly. Biohazard spills should be cleaned up
using approved laboratory procedures. Solvent spills are a fire hazard. Stop
the unit immediately, and DO NOT operate until clean up is complete and
vapors have dissipated (motor brushes arc and may ignite flammable vapors).
DO NOT immerse the unit for cleaning.
DO NOT operate the unit if it shows signs of electrical or mechanical damage.
The main supply cord provided with this product is rated to safely handle the
products electrical load under the stated environmental conditions. DO NOT
replace this cord with an inadequately rated main supply cord.
Earth Ground - Protective Conductor Terminal
Alternating Current
Compliance to the following standards and regulations is indicated by the corresponding mark
on the product.
Mark Standards and Regulations
OHAUS Corporation declares that the SHRK, SHWV series shakers comply with direc-
tives 2011/65/EU, 2014/30/EU, 2014/35/EU and standards EN 50581, EN 61010-1, EN
61010-2-051, EN 61326-1.
The full text of the EU declaration of conformity is available at the following internet
address: www.ohaus.com/ce.
This product complies with directive 2012/19/EU. Please dispose of this product in
accordance with local regulations at the collecting point specified for electrical and
electronic equipment.
For disposal instructions in Europe, refer to www.ohaus.com/weee.
EN 61326-1
CAN/CSA C22.2 61010-1, CAN/CSA C22.2 61010-2-051
UL 61010-1, UL 61010-2-051
Global Notice
Warning: This is a Class A product. In a domestic environment this product may cause radio
interference in which case the user may be required to take adequate measures.
Canada Notice
This Class A digital apparatus complies with Canadian ICES-003.
FCC Notice
NOTE: This equipment has been tested and found to comply with the limits for a Class A digital device,
pursuant to Part 15 of the FCC Rules. These limits are designed to provide reasonable protection
against harmful interference when the equipment is operated in a commercial environment. This
equipment generates, uses, and can radiate radio frequency energy and, if not installed and used
in accordance with the instruction manual, may cause harmful interference to radio communications.
Operation of this equipment in a residential area is likely to cause harmful interference in which case
the user will be required to correct the interference at his own expense.
Changes or modifications not expressly approved by Ohaus Corporation could void the user’s authority
to operate the equipment.
SAfETY INSTRUCTIONS STANDARDS & REGUlATIONS
EN

4
Overall dimensions (L x W x H):
Rocker: 16.8 x 11.0 x 5.5” (42.5 x 27.9 x 14.0cm)
Waver: 16.8 x 11.0 x 6.5” (42.5 x 27.9 x 16.5cm)
Tray dimensions (L x W): 14 x 11” (35.5 x 27.9cm)
Electrical (50/60 Hz): Rocker: 120 volts, 15 watts
230 volts, 15 watts
Waver: 120 volts, 25 watts
230 volts, 25 watts
Fuses: 5mm x 20mm, 5 amp quick acting
Speed range: 1 to 75rpm*
Tilt angle: Rocker: 0 to 15°*
Waver: 0 to 16°*
Weight capacity: Rocker: 16lbs (7.3kg)**
Waver: 5lbs (2.3kg)**
Timer: 1 minute to 120 minutes
Controls: see page 5
Ship weight: 15.5lbs (7kg)
* Maximum speed/tilt angle may vary with heavy or unbalanced loads.
** Centered on tray.
ANAlOG ROCKING/WAVING SHAKER SPECIfICATIONS
Rocking Shaker 2 Tier
EN

5
1. Getting ready:
a. Rocker switch should be in the center Standby position.
b. Plug the power cord into a properly grounded outlet. Manually move the tray to a near
horizontal “home” position before powering the unit.
c. Position Speed and Tilt knobs between 2 and 3 on the dial.
d. Push rocker switch to the “I” On position. The rocker will automatically level and begin
running at a moderate speed and tilt.
2. Setting speed and tilt:
a. Turn Speed and Tilt knobs to achieve the desired settings.
3. Setting time:
a. To run in timed mode, set timer, speed, and tilt knobs to the
desired settings.
b. Press the rocker switch down to the Time position and release.
c. The unit will now run for the set time.
d. To exit the Time mode, press the rocker switch up and return it to the center
Standby position.
NOTE: After the timer is set, any time adjustments will not take affect. To reset time,
exit Time mode (see step 3d above) and enter new time following the steps above.
OPERATING TIPS:
Centering your sample and even weight distribution on the tray helps balance and
stability.
ANAlOG ROCKING/WAVING SHAKER CONTROl PANEl
The front panel of the Analog Rocker contains all the controls and displays needed
to operate the unit.
speed adjust
knob
tllt adjust
knob
time adjust
knob
rocker
switch
ANAlOG ROCKING/WAVING SHAKER OPERATING
INSTRUCTIONS
EN

6
Overall dimensions (L x W x H): 16.8 x 10.0 x 5.5” (42.5 x 25.4 x 140cm)
Tray dimensions (L x W): 12.75 x 10” (32.4 x 25.4cm)
Electrical (50/60 Hz): 120 volts: 25 watts
230 volts: 25 watts
Fuses: 5mm x 20mm, 5 amp quick acting
Speed range: 1 to 50rpm *
Speed accuracy: ±1rpm
Tilt angle: 0 to 15° *
Timer: 1 second to 9999 minutes
(increased in 1 second increments)
Maximum weight capacity: 10lbs (4.5kg) **
Controls: see page 8
Tray material: aluminum
Ship weight: 15.5lbs (7kg)
* Maximum speed/tilt angle may vary with heavy or unbalanced loads.
** Centered on tray.
Digital Rocking Shaker with glassware and plasticware
DIGITAl ROCKING SHAKER SPECIfICATIONS
EN

7
Overall dimensions (L x W x H): 17 x 11 x 6” (43.2 x 27.9 x 15.2cm)
Tray dimensions (L x W): 11.75 x 8.75” (29.9 x 22.2cm)
Electrical (50/60 Hz): 120 volts: 25 watts
230 volts: 25 watts
Fuses: 5mm x 20mm, 5 amp quick acting
Speed range: 1 to 30rpm *
Speed accuracy: ±1rpm
Tilt angle: 0 to 20° *
Timer: 1 second to 9999 minutes
(increased in 1 second increments)
Maximum weight capacity: 5lbs (2.3kg) **
Controls: see page 8
Tray material: aluminum
Ship weight: 16lbs (7.3kg)
* Maximum speed/tilt angle may vary with heavy or unbalanced loads.
** Centered on tray.
Digital Waving Shaker
DIGITAl WAVING SHAKER SPECIfICATIONS
EN

8
The front panel of the Rocking/Waving Shaker contains all the controls and displays
needed to operate the unit.
A. Standby button/standby indicator light: The standby indicator light will illuminate
when the unit is plugged in. The unit will be in standby mode. Press the standby
button to activate the speed/tilt angle and time functions. The standby indicator light
will shut off and the speed/tilt angle display and time display will illuminate. Press
the standby button again and the unit will once again be in standby mode.
B. Speed/tilt angle display: Displays the speed and tilt angle of the unit. C. Up/down
arrows for set-point control. On/off button starts/stops the rocking/waving function.
D. The speed/tilt angle indicator light will be illuminated when the unit is rocking/
waving.
E. Function button: Press to choose the function you are setting: speed or tilt.
F. Speed indicator light: Illuminates when the speed is displayed.
G. Tilt indicator light: Illuminates when the tilt angel is displayed.
H. Time display: Displays accumulated time (continuous mode) or how much time is
remaining (timed mode). The display range is from 0 to 9,999 minutes in one (1)
second increments. The display will indicate minutes and seconds until the timer
reaches 99 minutes and 59 seconds (99:59), then the display will automatically
display minutes up to 9,999.
I. Up/down arrows for set-point control. On/off button starts/stops the time function
DIGITAl ROCKING/WAVING SHAKER CONTROl PANEl
B.F.
C.
D.
A.
E.
G. H.
I.
EN

9
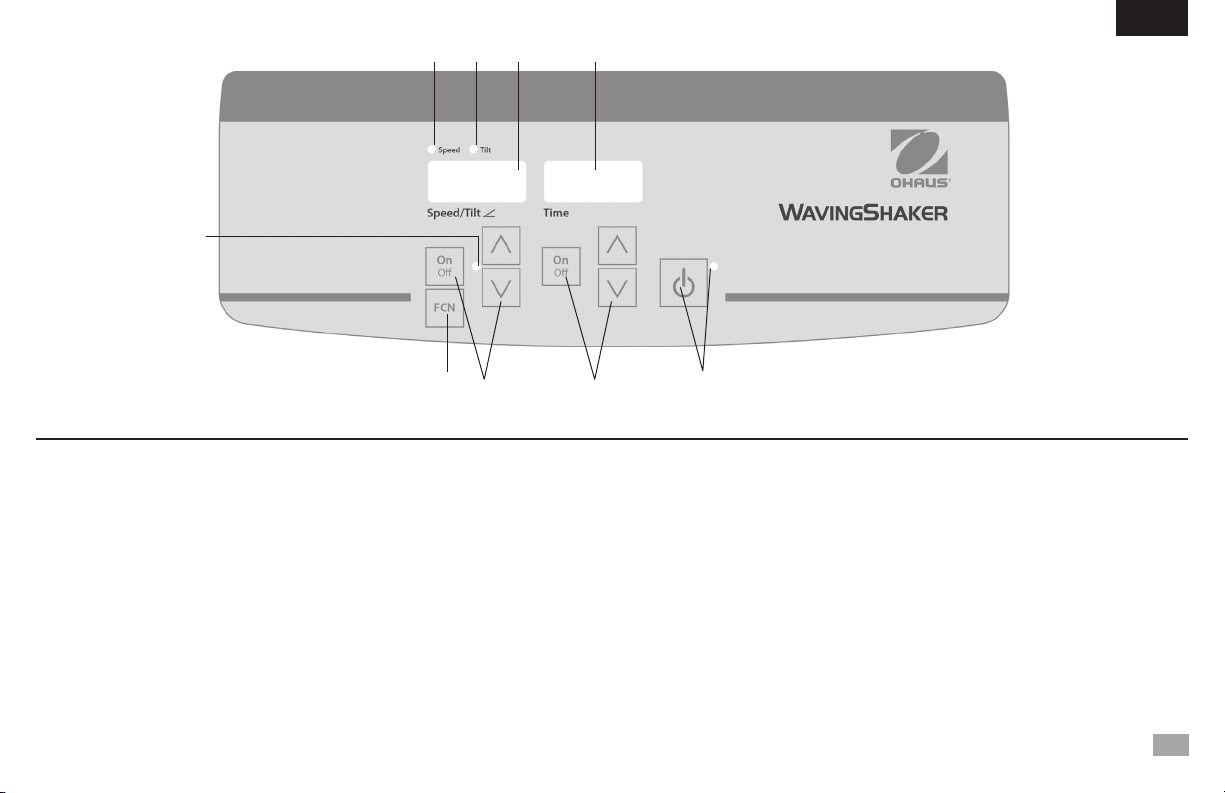
The Rocking/Waving Shakers have been designed for the speed/tilt angle and
time functions to work independently of one another. The speed/tilt angle can be
reset without resetting the timer and the timer can be stopped and started without
interrupting the rocking/waving function.
1. Getting ready:
a. Plug the power cord into a properly grounded outlet. The standby indicator
light will illuminate, verifying power to the unit. Manually move the tray to a near
horizontal “home” position before powering unit.
b. Press the standby button to move the unit from standby mode. The standby
indicator light will turn off and the speed/tilt angle and time displays will
illuminate, displaying the previously used settings.
2. Setting tilt angle: Electronic tilt enables the user to adjust the angle of tray
movement while the unit is rocking/waving or while the unit is stopped.
a. Press the function button below the speed/tilt angle display until the tilt indicator
light illuminates. You are now ready to set the tilt angle.
b. Press the up/down arrows below the speed/tilt angle display until you reach
the desired angle. When you release the button, the display will blink off and
then on indicating the new set angle has been accepted. The unit will complete
one rotation at the previously set angle, then smoothly change to the newly
programmed angle. The tilt indicator light will flash until the transition to the new
tilt angle is complete.
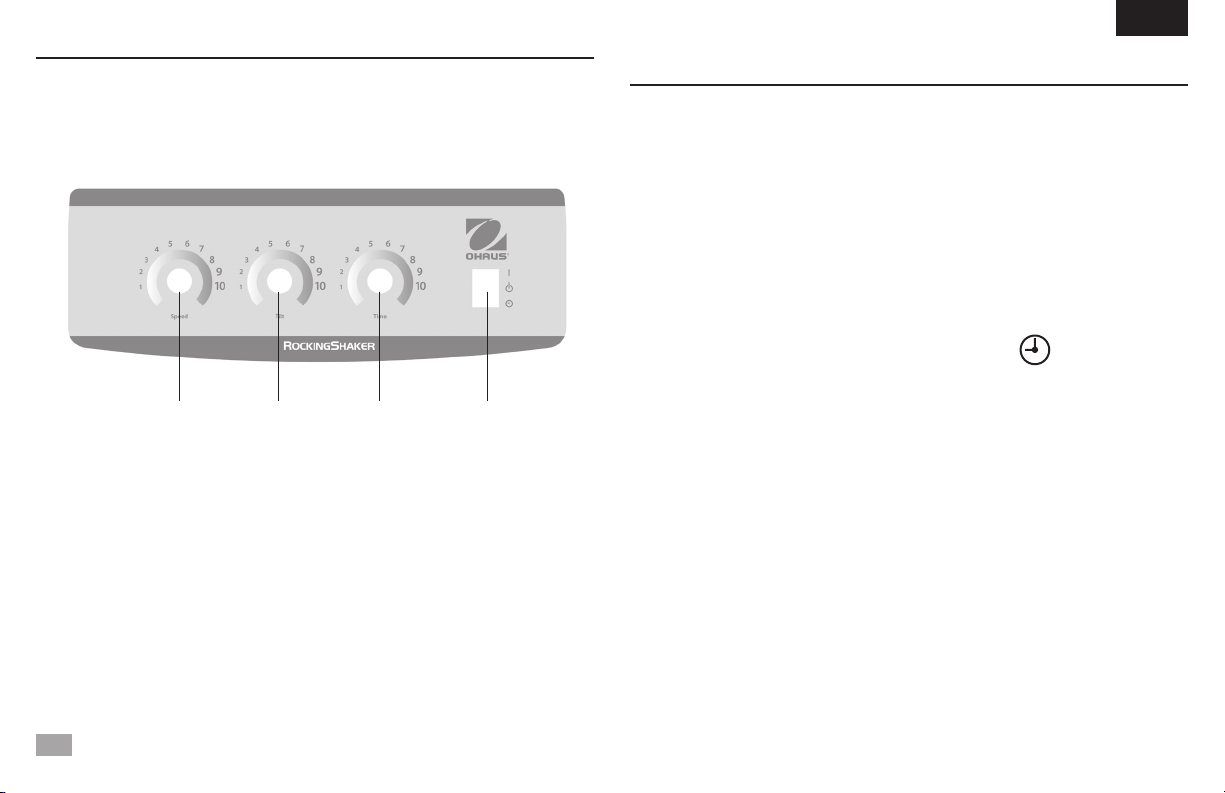
3. Setting speed:
a. Press the function button below the speed/tilt angle display until the speed
indicator light illuminates. You are now ready to set the speed.
b. Press the up/down arrows below the speed/tilt angle display until you reach the
desired speed. When you release the button, the display will blink off and then
on indicating the new set speed has been accepted.
c. Press the on/off button to start the rocking/waving function. The indicator light
below the speed/tilt angle display will illuminate and blink until the set-point is
reached. Once the set-point is reached the light will stop blinking and remain lit
until rocking/waving has ceased.
d. To stop the rocking/waving function, press the on/off button below the speed/tilt
angle display. The unit will complete one full rotation then stop in the horizontal
“home” position. The speed indicator light will flash until the rotation is complete.
When the cycle is complete,the unit will automatically move to standby mode
and the standby indicator light will illuminate.
OPERATING TIPS
When the unit is running at slow speeds or high angles, making large changes to
the tilt angle or speed may take several minutes to complete. The quickest way to
make large changes is to stop the unit, change the speed or tilt angle, then restart by
pressing the on/off button below the speed/tilt angle display.
4. Setting time to zero (0:00) and continuous mode: Accumulated time.
a. Press and hold the on/off button below the time display. After three (3) seconds
the display will indicate the previous set time.
b. Simultaneously press both the up and down arrows, the display will indicate
zero (0:00). The unit time is now set to zero (0:00) minutes. Alternately, you can
use the up/down arrows to get to zero (0:00).
c. Press the on/off button below the time display. The display will indicate
accumulated time. The up/down arrows will become inactive. To stop timer,
press the on/off button again. IMPORTANT: This will NOT interrupt the rocking/
waving function. Press the on/off button below the speed/tilt angle display to
interrupt the rocking/waving function.
d. To reset, press and hold the on/off button below the time display. After three (3)
seconds the display will indicate the previous set time, which was zero (0:00).
DIGITAl ROCKING/WAVING SHAKER OPERATING INSTRUCTIONS
EN

10
5. Setting timed mode: Programmed time.
a. Press the up/down arrows below the time display until you reach the desired
time.
b. Start this function by pressing the on/off button below the time display. The unit
will run for the selected time, the up/down arrows will become inactive while the
timer is running. The unit will stop rocking/waving when the time display reaches
zero (0:00). Four (4) audible beeps will indicate the count down function is
complete. The time display will default back to the set time. To repeat for the
same time, simply press the on/off button again.
c. To interrupt an automatic timing cycle before it is completed, press the on/off
button below the time display. The time display will flash off and on to indicate
the time function is on “hold”. IMPORTANT: This will NOT interrupt the rocking/
waving function. Press the on/off button below the speed/tilt angle display to
interrupt the rocking/waving function. Restart the timer by pressing the on/off
button below the time display. Unit will continue counting down to zero (0:00).
When the display reaches zero (0:00), you will hear the four (4) audible beeps
that indicate the count down function is complete and the rocking/waving
function will cease.
6. Turning unit off:
a. To turn the unit off, press the standby button. The speed/tilt angle and time
displays will be blank, the standby indicator light will illuminate. The Rocking/
Waving Shaker should be kept in standby mode when not in use. To completely
cut off power to the unit, disconnect the power cord from the unit or unplug from
the wall outlet.
DIGITAl ROCKING/WAVING SHAKER OPERATING INSTRUCTIONS CONT’D
OPERATING TIPS
As a safety feature, a built-in program will shut power off to the motor if the tray is
prevented from rocking/waving, or the unit is overloaded beyond its recommended
weight capacity.
Built-in memory maintains the last used speed/tilt angle and time settings during a
power interruption.
EN

11
TROUblESHOOTING ANAlOG ROCKER/WAVER
If the tray motion is obstructed or the unit is mechanically overloaded, the unit will beep and attempt to restore controlled rocking motion. If unit can not recover on its own,
disconnect power cord, reduce load, speed or tilt setting and repeat run.
Problem Cause Solution
E03
Mechanical obstruction
Ceased motor
Drive belt broken
The E03 error can be addressed by the user. Press the standby button to clear
this error. If the E03 error persists, along with grinding, knocking or rubbing noises,
un-plug the unit and contact your Ohaus representative for repairs.
In the event of an errant E03 error, such as someone inadvertently touching
the platform tray while the unit is running, the unit will automatically go to the
horizontal “home” position and restart. In the event of an obstruction left under the
tray, which would cause the unit to continually restart, the unit will attempt to auto
home and restart four (4) times and then stop running, displaying an E03 error. This
error can be cleared by the user by pressing the standby button.
E04 Maximum load exceeded
The E04 error can be addressed by the user. Press the standby button to clear
this error. Be sure the load is within the maximum load specification before
restarting the unit. If the E04 code persists, un-plug the unit and contact your
Ohaus representative for repairs.
TROUblESHOOTING DIGITAl ROCKER/WAVER
EN
Table of contents
Other OHAUS Scale manuals

OHAUS
OHAUS 2400-11 User manual

OHAUS
OHAUS YA Series User manual

OHAUS
OHAUS Navigator Balance User manual

OHAUS
OHAUS Adventurer series User manual

OHAUS
OHAUS Navigator NV212 User manual

OHAUS
OHAUS Defender 3000 Series User manual

OHAUS
OHAUS B10P User manual

OHAUS
OHAUS Pioneer PX Series User manual

OHAUS
OHAUS RS Series User manual

OHAUS
OHAUS CKW Series User manual

OHAUS
OHAUS VE1500P User manual

OHAUS
OHAUS Defender 3000 User manual

OHAUS
OHAUS TA152 User manual

OHAUS
OHAUS HH 120D User manual

OHAUS
OHAUS DS Series User manual

OHAUS
OHAUS TROOPER COUNT User manual

OHAUS
OHAUS Ranger Count 3000 Series User manual

OHAUS
OHAUS TAJ Carat TAJ203 User manual

OHAUS
OHAUS Defender 3000 Series User manual

OHAUS
OHAUS SJX323 User manual