manuals.online logo
Brands
  1. Home
  2. •
  3. Brands
  4. •
  5. Ohlins
  6. •
  7. Motorcycle Accessories
  8. •
  9. Ohlins FGHO 691 User manual

Ohlins FGHO 691 User manual

Mounting Instructions
Öhlins front fork kit FGHO 691
for HONDA CR 125/ 250, CRF 250/ 450 2006
Kit Contents
Before installing this front fork kit, please
check the contents of the kit, listed below.
If any part is missing, please contact your
Öhlins dealer.
Öhlins Racing AB, Box 722, S-194 27 Upplands Väsby, Sweden.
Phone +46 8 590 025 00. Fax +46 8 590 025 80.
www.ohlins.com
FGHO 691 - Issued 2005 12 29
© Öhlins Racing AB. All rights reserved. Any reprinting or
unauthorized use without the written permission of Öhlins
Racing AB is prohibited. Printed in Sweden.
Front fork 48MXF FGHO691 (1 pair)
Tool for End Cap 01873-01 (1)
Spring 43.6/467/3.9 02428-39 (2)
Spring 43.6/467/4.5 02428-45 (2)
Preload tube 20 mm MX48 02437-20 (2)
Triple clamp, lower 02443-01 (1)
Triple clamp, upper 02443-02 (1)
Handlebar clamp, lower 04315-01 (2)
Screw M8 02456-03 (8)
Screw MC6S 01046-45 (2)
Sticker “ÖHLINS” 00197-01 (2)
Sticker Front Fork 02332-11 (2)
Owner’s manual (1)
ADJUSTMENTS
NOTE!
Read more about compression, rebound
and spring pre-load in your Öhlins Owner’s
manual.
CAUTION!
The front fork springs are delivered separately
and must be installed before the front fork is
mounted to the bike. See section “Installing
springs” in this manual.
The Öhlins front fork is an upside down type
featuring the following adjusters:
Compression damping adjuster
The compression adjuster is located at the bottom
of the fork leg. Adjust by turning the screw. Use a
slot screw driver.
Rebound damping adjuster
The rebound adjuster is located on the top of
the fork leg. Adjust by turning the screw. Use a
slot screw driver.
Compression
damping
adjustment
Rebound damping
adjuster
NOTE!
When delivered the Öhlins front fork is dialed
to recommended settings for the specific
brand and make of the vehicle. If you have
changed the settings, reset according to the
following:
The adjusters have a normal right hand thread.
Turn the damping adjusters clockwise to fully
closed (pos. zero [0]). Turn counter clockwise
to open and count the clicks until you reach the
recommended number of clicks. See Setup data
on the last page of this manual.
CAUTION!
Do not use too much force, delicate sealing
surfaces can be damaged.
Please read before installing
Öhlins Racing AB cannot be held responsible
for any damage to the front fork kit, vehicle or
injury to persons, if the instructions for fitting
and maintenance are not followed exactly.
Similarly, the warranty will become null and
void if the instructions are not adhered to.
In this manual
Safety precautions
Mounting instructions
Before riding
Set-up data
Adjustments
SAFETY PRECAUTIONS
1 6
Read this manual carefully!
Pay special attention to statements pro-
ceded by the following notations:
The Safety alert symbol means: Attention!
Your safety is involved!
Failure to follow these warning instructions
may result in severe or fatal injury to any-
one working with, inspecting or using this
front fork kit, or to bystanders.
Caution indicates that special precautions
must be taken to avoid damage to the
front fork kit.
Indicates information that is of importance
regarding mounting procedures.
!
WARNING
CAUTION!
NOTE!
WARNING!
1. Installing a front fork, that is not
approved by the vehicle manufacturer,
may affect the vehicle’s stability. Öhlins
Racing AB cannot be held responsible for
any personal injury or damage that may
occur after fitting the front fork. Contact
an Öhlins dealer or other qualified person
for advice.
2. The vehicle service manual must
be referred to when installing this front
fork kit.
3. Please study and make certain you fully
understand the mounting instructions and
the owner’s manual before handling this
front fork kit. If you have any questions
regarding proper installation procedures,
contact an Öhlins dealer or other quali-
fied person.
!
!
NOTE!
During storage and transportation, espe-
cially at high ambient temperature, the oil
and grease used for assembling may run out
inside the packing and damage the expanded
polystyrene packing material. This is not
unusual and is in no way detrimental to the
front fork kit.
NOTE!
Öhlins products are subject to continuous
improvement and development. Therefore,
although these instructions include the most
up-to-date information available at the time
of printing, there may be minor differences
between your front fork and this manual.
Please consult your Öhlins dealer if you
have any questions regarding the contents
of this manual.
1
Including:
Safety
Tuni ng the
suspension
Design
features
Function
Basic
adjustments
Fine tuning
Inspection,
maintenance
Owner’s Manual
Öhlins shock absorbers, MX/ENDURO/OFFROAD
Your vehicle OEM
BEFORE RIDING
SET-UP DATA
IMPORTANT NOTICE!
Before riding your bike, check sag and ride
height according to your Öhlins Owner’s
manual.
To get the most out of your suspension com-
ponent it is of great importance to make proper
settings and to use the correct spring for your
weight - full riding equipment on!
We recommend you to read your Öhlins
Owner’s manual carefully to understand the
different effects of the different settings.
Recommended settings
Rebound adjustment 15 clicks
Compression adjustment 12 clicks
Spring pre-load 0 mm
Front fork position 4 mm
General facts
Front fork length 940 mm
Stroke 300 mm
?
?
? kg
? lbs
Recommendations
CR 125
Spring rate 3.9 N/mm
Oil level 110 mm
CR 250
Spring rate 4.2 N/mm
Oil level 110 mm
CRF 250
Spring rate 4.2 N/mm
Oil level 110 mm
CRF 450
Spring rate 4.4 N/mm
Oil level 105 mm
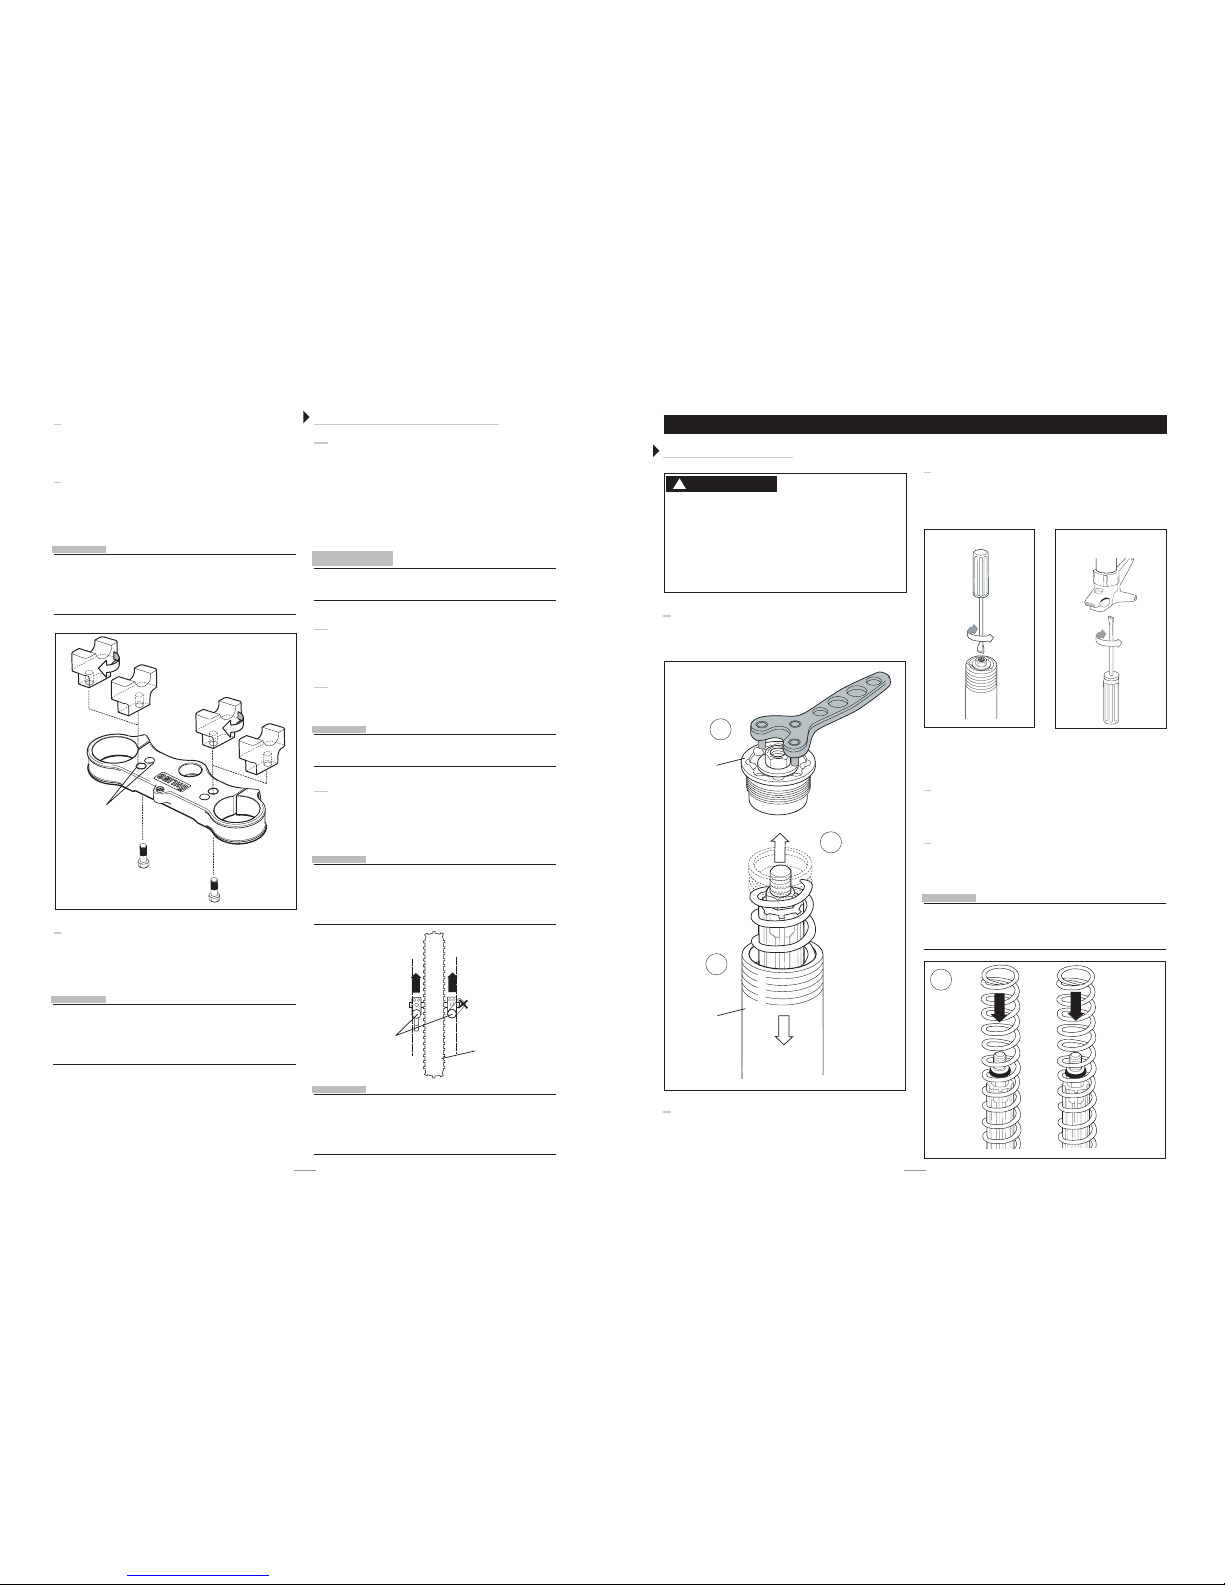
Measure fork position
Measure oil level
Measure from the
top of the fork leg
to the top surface of
the triple clamp.
Measure from the
top of the outer leg,
with the top nut
off, fork fully com-
pressed and no
spring installed.
NOTE!
All spring rates above cannot be achieved
with the provided springs. Please contact
your Öhlins dealer for advice.
NOTE!
When delivered, the oil level is 105 mm. For
some models you need to drain some oil to
achieve the recommended level.
WARNING!
1. It is advisable to have an Öhlins dealer or other
qualified person install the front fork.
2. Follow the instructions in the vehicle service
manual when changing the front fork.
3. When working on a raised vehicle, make sure that
it is securely supported to prevent it from falling.
1
Put the motorcycle on a workstand to raise the
front wheel off the ground.
2
Remove the front wheel, front leg covers, caliper
protection covers and brake caliper. Let the
brake caliper stay attached to the brake hose.
3
Remove the original front fork legs from the
triple clamps.
4
Remove the handlebar brackets. Loosen the
stem nut and remove it.
5
Remove the upper triple clamp. Remove the
nut that holds the steering stem and the lower
triple clamp.
MOUNTING INSTRUCTIONS
25
!
Removing the original front fork and triple clamps
Front leg
cover
Front
wheel
Upper triple
clamp
Lower triple
clamp
Brake
caliper
Caliper
protection cover
3
2
2
6
Install the pre-load tube, spring adjuster and the
top cap on the front fork legs.
7
Tighten the top cap, 30 Nm. Use a 17 mm and
a 24 mm wrench, tighten the top cap to the
lock nut by holding the wrenches as seen in the
figure below.
8
Pull up the fork leg. Attach the top cap to the
fork leg using the top cap tool 1873-01.
NOTE!
The top cap should only be hand tightened!
9
Adjust the compression and the rebound valves
according to the sections: Set-up data and Ad-
justments in this manual.
Top cap
Pre-load
tube
Spring
adjuster
17 mm
wrench
24 mm
wrench
8
7
Top cap tool
1873-01
7
6
10
Continue your work according to page 3,step 8
Installing the Öhlins front fork.
WARNING!
Replacing the steering stem is a demanding
task and must be carried out by an authorized
dealer or other qualified workshop.
!
Replacing the lower triple clamp
6
This front fork is provided with specially de-
signed triple clamps. Replacing triple clamps
is an operation that requires high mechanic
competence. To perform this task you will
need a hydraulic press.
steering stem
Upper triple
clamp
Lower triple
clamp
4
5
WARNING!
Faulty handling when reattaching the steering
stem can cause damage to the triple clamps
and may affect the riding characteristics of
the motorcycle.
!
6!
!
MOUNTING INSTRUCTIONS
3 4
WARNING!
1. It is advisable to have an Öhlins dealer or other
qualified person install the front fork.
2. Follow the instructions in the vehicle service
manual when changing the front fork.
3. When working on a raised vehicle, make sure that
it is securely supported to prevent it from falling.
!
1
Unscrew the top cap, using the top cap tool
1873-01.
Installing the springs
Read more about rebound and compression on
the last page of this manual.
4
Pull out the damper rod until it comes to a
stop.
3
Close the compression and rebound valves. This
will keep the damper rod extended and make it
easier to install the new spring.
Top cap tool
1873-01
Top cap
Fork leg
1
2
5
5
Install the correct springs. In this kit, there are
two pairs of springs provided.
NOTE!
A spring ratio of 4.2 N/mm is obtained by
using a 3.9 N/mm in one leg and a 4.5 N/mm
in the other.
Rebound adjuster Compression adjuster
4
2
Pull down the fork leg.
CAUTION!
Do not overtighten the triple clamps. The fork
leg tubes can be deformed.
11
Reattach the brake caliper, caliper protection
and front leg covers.
12
Put the wheel back in position.
NOTE!
Make sure that all bolts are tightened to the
correct torque, and that nothing restrains
the front fork when the suspension is fully
compressed.
Make sure
the front
fork legs are
aligned!
Front wheel
Front fork
legs
View from above
NOTE!
Do not tighten the front wheel axle before the
front fork legs are aligned!
Installing the Öhlins front fork
10
Attach the Öhlins front fork legs to the tri-
ple clamps, make sure the triple clamps are
aligned.
Tighten the torques:
Upper triple clamp: 20 Nm
Lower triple clamp: 10 Nm
7
When the triple clamps are installed, reattach
the stem nut.
8
Reattach the handlebar brackets. Put the han-
dlebar in place before tightening the screws
holding the handlebar brackets.
NOTE!
Before you continue, make sure that the
front fork springs are installed. If they are
not installed, proceed with the instructions
on page 4
Alter between
these two
positions on
the upper
triple clamp.
Rotate the
bracket to alter
position.
13
Align the front fork legs. Put the motorcycle on
the ground and compress the front suspension
as hard as possible a few times.
NOTE!
An alternative way to align the front fork legs
is to rotate the front wheel as fast as possible,
and then bring the wheel to a fast stop, using
the brake.
NOTE!
You can alter the position of the handlebar
by using the different available positions on
the triple clamp and by rotating the handlebar
brackets. See figure below.
9
When you have decided on position for the
handlebar, tighten the screws holding the han-
dlebar brackets.

Other Ohlins Motorcycle Accessories manuals

Ohlins FG 670 User manual

Ohlins

Ohlins FG 670 User manual

Ohlins HUSABERG MX 2000 User manual

Ohlins

Ohlins HUSABERG MX 2000 User manual

Ohlins HUSABERG MX 2000 User manual

Ohlins

Ohlins HUSABERG MX 2000 User manual

Ohlins SD 021 User manual

Ohlins

Ohlins SD 021 User manual

Ohlins HA 192 User manual

Ohlins

Ohlins HA 192 User manual

Ohlins HO424 User manual

Ohlins

Ohlins HO424 User manual

Ohlins FGK 135 User manual

Ohlins

Ohlins FGK 135 User manual

Ohlins YA 469 User manual

Ohlins

Ohlins YA 469 User manual

Ohlins BMZ MN01 User manual

Ohlins

Ohlins BMZ MN01 User manual

Ohlins SU 145 User manual

Ohlins

Ohlins SU 145 User manual

Ohlins SUPERBIKE FG 570 User manual

Ohlins

Ohlins SUPERBIKE FG 570 User manual

Ohlins HD 022 User manual

Ohlins

Ohlins HD 022 User manual

Ohlins HO 944 User manual

Ohlins

Ohlins HO 944 User manual

Ohlins KA 037 User manual

Ohlins

Ohlins KA 037 User manual

Ohlins BM 205 User manual

Ohlins

Ohlins BM 205 User manual

Ohlins SD197 User manual

Ohlins

Ohlins SD197 User manual

Ohlins HO 819 User manual

Ohlins

Ohlins HO 819 User manual

Ohlins FGR 156 User manual

Ohlins

Ohlins FGR 156 User manual

Ohlins HD 159 User manual

Ohlins

Ohlins HD 159 User manual

Ohlins SU 932 User manual

Ohlins

Ohlins SU 932 User manual

Ohlins FGRT 219 User manual

Ohlins

Ohlins FGRT 219 User manual

Ohlins HO 810 User manual

Ohlins

Ohlins HO 810 User manual

Ohlins TTX25 Instruction manual

Ohlins

Ohlins TTX25 Instruction manual

Ohlins SU 789 User guide

Ohlins

Ohlins SU 789 User guide

Popular Motorcycle Accessories manuals by other brands

hepco & becker 654550 01 01 Mounting instructions

hepco & becker

hepco & becker 654550 01 01 Mounting instructions

hepco & becker 4207536-01 manual

hepco & becker

hepco & becker 4207536-01 manual

SCORPION SR-i900 Series manual

SCORPION

SCORPION SR-i900 Series manual

Razor A5 CARBON LUX quick start guide

Razor

Razor A5 CARBON LUX quick start guide

LSL 506B068A FITTING INSTRUCTION

LSL

LSL 506B068A FITTING INSTRUCTION

hepco & becker Alurack Assembling instructions

hepco & becker

hepco & becker Alurack Assembling instructions

IRC SGRACE-CUT instructions

IRC

IRC SGRACE-CUT instructions

Cellularline U-COM 6R user manual

Cellularline

Cellularline U-COM 6R user manual

N-Com B902 quick guide

N-Com

N-Com B902 quick guide

hepco & becker C-Bow Mounting instructions

hepco & becker

hepco & becker C-Bow Mounting instructions

hepco & becker 6549523 01 02 manual

hepco & becker

hepco & becker 6549523 01 02 manual

Hemisphere GPS ISB B.Y.O.B. MODULAR RACK installation manual

Hemisphere GPS

Hemisphere GPS ISB B.Y.O.B. MODULAR RACK installation manual

DYNATEK D3K7-6 installation instructions

DYNATEK

DYNATEK D3K7-6 installation instructions

3M 600 Series User instructions

3M

3M 600 Series User instructions

Schubert F220 manual

Schubert

Schubert F220 manual

Kicker 46HDS144 installation guide

Kicker

Kicker 46HDS144 installation guide

Sena RUMBA quick start guide

Sena

Sena RUMBA quick start guide

hepco & becker 6317602 00 01 L quick start guide

hepco & becker

hepco & becker 6317602 00 01 L quick start guide

manuals.online logo
manuals.online logoBrands
  • About & Mission
  • Contact us
  • Privacy Policy
  • Terms and Conditions

Copyright 2025 Manuals.Online. All Rights Reserved.