Oki ES 1624n MFP Service manual


1
Contents
Replacement Supplies ............. 2
Where to Purchase............... 2
Part Numbers...................... 2
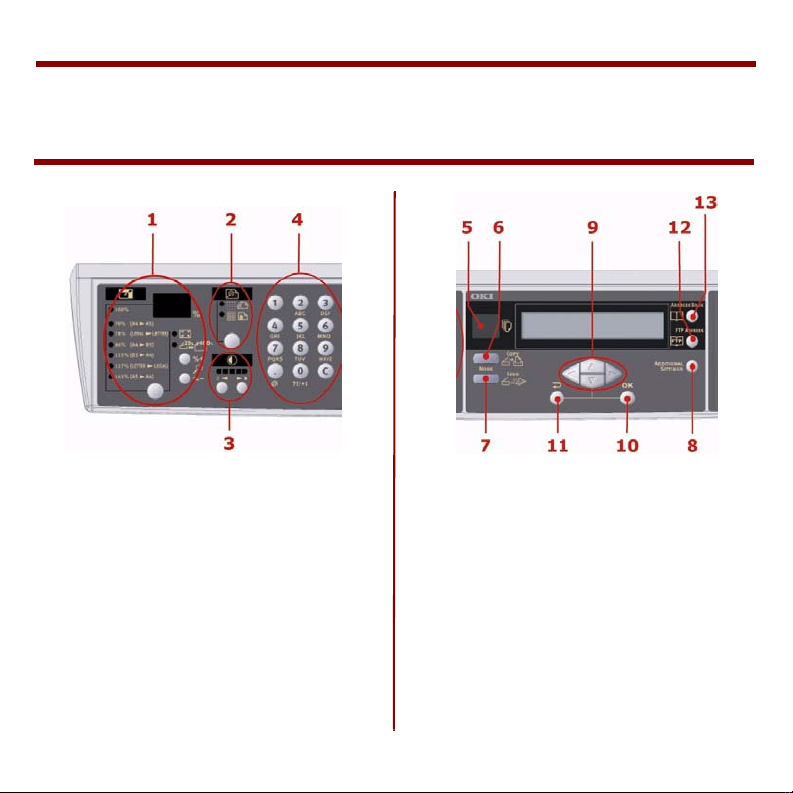
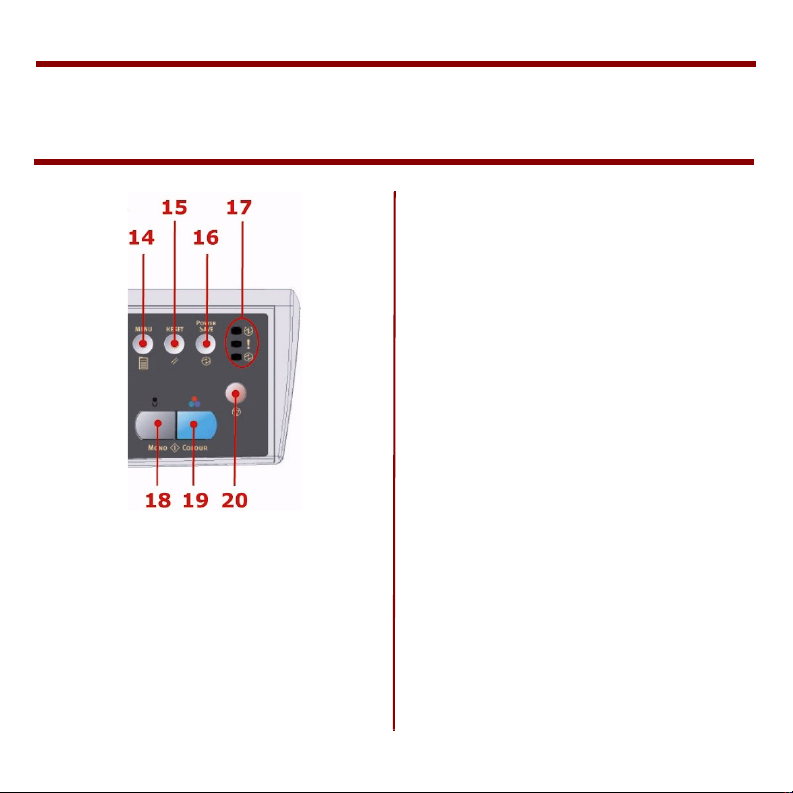
Scanning Unit Control Panel ..... 4
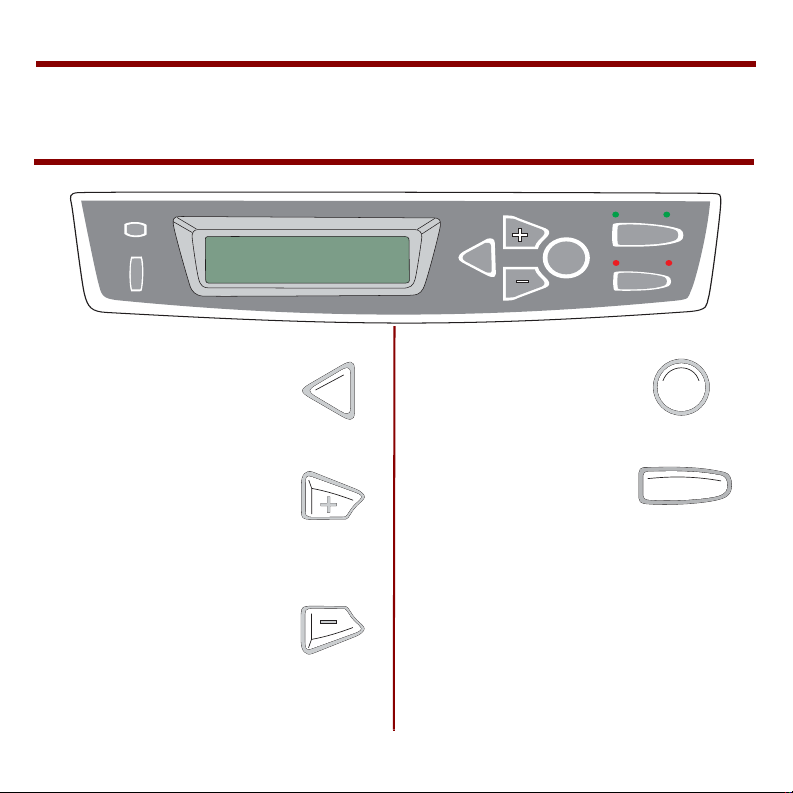
Printing Unit
Control Panel ......................... 7
Loading Documents ................ 9
In the ADF.......................... 9
On the Glass ...................... 10
Sending Document(s) Via
E-mail................................. 11
Sending Document(s) to FTP.. 13
Making Copies...................... 14
Increasing Copy Count ........ 14
Improve Copy Quality ......... 14
Changing Scale .................. 15
Adjusting Density ............... 15
Using the Address Book......... 16
Using Profiles ....................... 17
Loading Media...................... 18
Paper Cassette Tray .............. 18
Face Down Stacker ............ 19
Face up Stacker................. 19
Multi-purpose Tray................ 20
Transparencies & Labels ..... 21
Envelopes ......................... 22
Setting Power Save Mode ...... 23
Cleaning the ADF.................. 24
Rollers and Pad .................... 24
Glass .................................. 25
Replacing the ADF Pad .......... 26
Replacing the Toner Cartridge 28
Cleaning the LED heads ......... 31
Troubleshooting ................... 32
Paper Jams .......................... 32
In the ADF ........................ 32
In the Printing unit............. 32
Printer Messages .................. 37
Service and Support ............. 41
59377501

2
Replacement Supplies
Where to Purchase
• Consult the dealer where you
purchased your MFP
Part Numbers
ADF Pad ...................... 43103001
Toner Cartridges
Color OKI Part #
Black .......................... 52115904
Cyan........................... 52115903
Magenta...................... 52115902
Yellow ......................... 52115901

3
Replacement Supplies
Image Drums
Color OKI #
Black .......................... 56119204
Cyan .......................... 56119203
Magenta...................... 56119202
Yellow......................... 56119201
Other Consumables
Consumable Oki #
Fuser ................ 57101701, 120V
............... 57101702, 230V
Transfer Belt ............... 57101801

4
Scanning Unit Control Panel
Copy Area
1. Zoom - Increase or decrease
scaling in 1% increments up to
400% and down to 25%.
2. Copy Quality - Select copy
quality.
3. Copy Density - Change the
density level.’’
4. Copy Count - Enter copy
quantity or e-mail address.
Display and Function Area
5. Copy Count - Indicates the
number of copies selected.
6. Copy Mode - Select copy mode.
7. Scan Mode - Select the Scan
mode (also the default working
mode).

5
Scanning Unit Control Panel(cont’d)
8. Additional Settings - Execute
additional settings of "Copy" and
"Scan" modes. (The settings are
available only for three minutes.
After three minutes, the settings
automatically return to the
default value).
9. Up/Down/Left/Right Keys -
Move the cursor in the display
up/down/left/right. The up/down
keys switches function
indication. The left key returns
to the upper level of the setting.
The right key goes to the lower
lever of the setting.
10.OK/Select - Select and confirm
current setting selections.
11.Cancel/Return - Cancel
selections and go back to the
top level of the setting. The key
cancels any previous input.
12.FTP Address - Indicates the
existing FTP address for the
"Scan to" mode.
13.Address book - Indicates the
existing mail address for the
"Scan to" function. This key is
only available in the "Scan to"
mode.

6
Scanning Unit Control Panel (cont’d)
Start and Other Keys
14.Menu - Access the menu to set
up the MFP.
15.Reset - Change the scanner to
the factory default settings.
16.Power save - Press once to go
to "sleep" mode (continuous
press is invalid).
17.Power LEDs
Power - Lights to indicate
"power on and ready."
Alarm - Lights to indicate
error conditions.
Sleep - Lights to indicate
power save mode.
18.Mono - Select to send or copy
document(s) in black/white.
19.Color - Select to send or copy in
color.
20.Stop - Select to stop all
operations (display shifts to
stand-by screen for each
function). Does not affect
settings.

7
Printing Unit
Control Panel
Back
Press this button to go
back to the previous Item
or Category, or to place
the printer back on line.
Menu +
Press MENU + to enter
the Menu mode or to go
to the next Category in
the Menu.
Menu –
Press MENU – to go
back to the previous
Category in the Menu or
to exit the Menu mode.
Enter
Press ENTER to select
the Item or Value.
On Line
Press ON LINE to
switch the printer
between on line
and off line status.
When the printer is in the Menu
mode, press ON LINE to exit the
Menu mode and return the printer
to its previous status (on or off
line).
BACK ENTER
OLN INE
READY
ATTENTION
BACK
MENU
ENTER
ON LINE
CANCEL

8
Printing Unit
Control Panel (cont’d)
If there is a paper size mismatch
error, press ON LINE to force the
job to print.
Press ON LINE to start a manual
print job from the MP Tray.
If there is a memory overflow,
press ON LINE to recover and place
the printer back on line.
Cancel
Press CANCEL to stop
printing the current job.
Ready LED
(Green)
On: printer is on line.
Off: printer is off line.
Flashing: printer is
receiving data.
Attention LED
(Red)
On: Warning or Error
status
Off: Normal status.
Flashing: Alarm status.
READY
ATTENTION
CANCEL

9
Loading Documents
The MFP can scan/copy/send
documents either in the ADF
(Automatic Document Feeder) or
on the glass. The ADF can hold up
to 50 pages.
Make sure your documents meet
the following specifications:
•Size: 4.5" x 5.5" (114.3 x
139.7mm) to 8.5" x 14" (215.9
x 355.6mm)
•Weight: 16 to 28 lb. (9.002" to
0.006" sheet thickness)
•Documents should be:
square or rectangular and in
good condition (not fragile or
worn); free of curl, wrinkle,
tears, wet ink, or punch holes,
staples, paper clips, paper sticky
notes.
For irregular type of documents,
use the glass or make a copy first
and then transmit the copy.
In the ADF
1. Make sure your document is free
of staples, paper clips and is not
torn.
2. If your have multiple pages, fan
your documents to avoid
occasional paper jams. The ADF
holds up to 50 pages sheets of
20 lb. paper.
3. Place your document with the
text FACE UP in the ADF and
make sure that the top of each
page feeds in first.
4. Adjust the paper guides (1) to
center the document(s) in the
ADF.

10
Loading Documents (cont’d)
On the Glass
If you need to scan/copy/send
pages from books, newspaper
clippings, or paper with wrinkles,
use the glass.
1. Open the document cover to
reveal the glass.
2. Place your document with the
text FACE DOWN on the glass
and align the document in the
upper-left corner.
3. Close the document cover.
Keep the glass clean and do not
leave documents on it.

11
Sending Document(s) Via E-mail
Note: An Address Book is created
using the Homepage web tool and/
or the Network Setup Tool (NST).
See “Using the Address Book” on
page 16.
1. Place documents with text face
UP in the ADF or DOWN on the
glass.
2. Press on the
control panel. The e-mail screen
appears. (Press the down key to
display next item.)
3. In the “To” field, enter the
destination e-mail address from
the Address Book by pressing
on the control panel.
Use the up and down arrows on
the control panel to select
multiple e-mail addresses and
press the button. Or
simply type the initial letter of
the e-mail address. Press
to return to the e-mail
main screen.
4. Enter or select CC and BCC
address as well, if necessary.
Enter the subject of your e-mail.
If not entered, “Default Subj.”
displays.
5. Press the to send
your document in black and
white, or to send
your document in color.

12
Sending Document(s) Via E-mail (cont’d)
Notes:
> If you make a mistake, press
STOP to cancel the operation.
> If you stop typing in the
From, Subject, To, CC, or BCC
fields for 3 minutes, the
display clears what you have
typed.
> To send scanned documents
to multiple e-mail addresses,
add a comma between each
address.
> To scan a multi-page
document and convert it to a
single image file, choose
MTIFF or PDF (default) output
file.

13
Sending Document(s) to FTP
Note: Profiles are created using the
Homepage Web Tool or Network
Setup Tool (NST). See “Using
Profiles” on page 17.
1. Place your document with text
face UP in the ADF or face
DOWN on the glass.
2. Press and
button on the Control Panel. The
display prompts the profile filing
screen.
3. Choose the required profile
(filing destination) and press
.
4. Press to send your
document in black and white, or
to send your
document in color.
Note: you can create up to 20 filing
profiles from the machine’s web
site or from the Network Setup
Tool.

14
Making Copies
1. Place your document with text
face UP in the ADF or face
DOWN on the glass.
2. Press to copy your
document in black and white, or
to copy your
document in color.
Note: If you make a mistake, press
STOP to cancel the operation.
Increasing Copy Count
To make more than one copy:
1. Press to prompt the
Copy screen.
2. Enter the desired copy count
using the numeric keypad. The
display shows the copy count.
Improve Copy Quality
The machine is preset to Speed
mode. Change to Fine mode to
improve copy quality.
1. Press to prompt
the copy screen.
2. Click the Copy Quality button
to choose Fine.

15
Making Copies (cont’d)
Changing Scale
To enlarge your original up to 400%
or reduce it down to 25%:
1. Press to prompt
the Copy screen.
2. Press Variable (1), then press ▲
or ▼ to enlarge or reduce your
document in 1% increments. Or,
press the Select button (2) to
choose a preset value.
Adjusting Density
Adjust quality by changing your
original document to a lighter or
darker contrast.
Press the “Copy” button on the
panel to prompt the Copy screen.
Press the Density
button to choose your
desired density.
Note: After you have completed
copying, the machine will return to
the preset value.
1
2

16
Using the Address Book
Note: The address book cannot be
assigned on the control panel.
Create an address book, by
entering either the machine’s web
page or the Network Setup Tool.
Note: Requires a password.
Web Page
1. Type the Address of the MFP in
the URL field of your browser
and then press Enter.
2. Click Address Book Manager and
follow the instructions.
Network Setup Tool
1. Install the Network Setup Tool
(Oki MFP Management) from the
supplied CD.
2. To start it, from the Taskbar,
click Start > Settings > OKI MFP
Network Setup Tool.
3. Click Address Book Manager and
follow the instructions.

17
Using Profiles
A profile contains a list of filing
parameters such as your filing
protocol, directory, file name, and
other scanner parameters. You can
create up to 20 profiles. To create a
filing profile:
Note: Requires a password.
Web Page
1. Type the Address of the MFP in
the URL field of your browser
and then press Enter.
2. Click Profile Manager and follow
the instructions.
Network Setup Tool
1. Install the Network Setup Tool
(Oki MFP Management) from the
supplied CD.
2. To start it, click Start > Settings
> OKI MFP Network Setup Tool.
3. Click Profile Manager and follow
the instructions.

18
Loading Media
Paper Cassette Tray
For more information, see the on-
line User's Guide.
Recommended Paper
weight=17 to 32 lb.
1. Remove the paper Tray from
the printer.
2. Fan the paper to be loaded.
3. Load the paper.
4. Adjust the rear stopper (1) and
paper guides (2).
5. Replace the paper tray.
Letterhead
Load paper face down, top edge
towards the front of printer unit.

19
Loading Media
Paper Stackers
Face Down Stacker
The face down stacker is on the top
of the printer unit
> Holds up to 250 sheets of 20
lb. standard paper
> Feeds documents face down,
last page on top.
Face up Stacker
The face up stacker (1) at the rear
of the printer unit should be opened
and the tray extender (2) pulled
out when required for use.
The face up stacker
> Feeds documents face up
> Holds up to 100 sheets of 20
lb. standard paper,
> Handles stocks up to 54 lb.
>Alwaysusethisstackerand
the multi-purpose feeder for
paper stock heavier than 32
lb (120g/m2.)
12
Other manuals for ES 1624n MFP
3
Table of contents
Other Oki All In One Printer manuals

Oki
Oki MC361dn User manual

Oki
Oki CX 1145 MFP Installation and maintenance instructions

Oki
Oki MC560 Specification sheet

Oki
Oki ES9160 MFP/ES9170 MFPES9460 MFP User manual

Oki
Oki OF5650 User manual

Oki
Oki ES 1624n MFP Original instructions

Oki
Oki B4545 MFP User manual

Oki
Oki C3530n MFP Configuration guide

Oki
Oki MB441MFP Original instructions

Oki
Oki CX 1145 MFP User manual