Oki OKICOLOR8cccs User manual

OKICOLOR8 Convenience Color Copier System
Installation/User's Manual
READ THIS INFORMATION BEFORE YOU START THE INSTALLATION !
Before you install the DS600C Flatbed Copier Unit, you must ensure that the OKICOLOR 8 Printer has
been installed. REFER TO THE OKICOLOR 8 SETUP GUIDE INCLUDED WITH YOUR PRINTER.
IF YOU ARE USING THIS PRODUCT AS A CONVENIENCE COLOR COPIER SYSTEM (NOT
ATTACHED TO A COMPUTER), you'll need to visit the Oki Data Web Site at:
www.okidata.com/copier
and download the instructions for the alternative method of calibrating the color output of your
OKICOLOR 8 Printer. These instructions will replace Step 11 in the OKICOLOR 8 SETUP GUIDE.
Also, you do not have to perform Step 10 in the OKICOLOR 8 SETUP GUIDE.


Trademarks
Microsoft is a U.S. registered trademark of Microsoft Corporation.
Windows and MS-DOS are trademarks of Microsoft Corporation.
IBM, PC, AT, XT are registered trademarks of International Business Machines Corp.
Other brands and product names herein are trademarks or registered trademarks of their respective holders.
Copyright
All rights reserved. No part of this publication may be reproduced, transmitted, transcribed, stored in a retrieval system, or translated into any
language or computer language, in any form or by any means, electronic, mechanical, magnetic, optical, chemical, manual, or otherwise, without
the prior written permission of the manufacturer.
Material scanned by this product may be protected by governmental laws and other regulations, such as copyright laws, the customer is solely
responsible for complying with all such laws and regulations.
Warranty
The information contained in this document is subject to change without notice.
The manufacturer makes no warranty of any kind with regard to this material, including, but not limited to, the implied warranties of fitness for
a particular purpose.
The manufacturer shall not be liable for errors contained herein or for incidental or consequential damages in connection with the furnishing,
performance, or use of this material.
i

FCC Radio Frequency Interference Statement
This equipment has been tested and found to comply with the limits for a Class B digital device, pursuant to Part 15 of the FCC rules.
These limits are designed to provide reasonable protection against harmful interference in a residential installation. This equipment
generates, uses, and can radiate radio frequency energy and, if not installed and used in accordance with the instructions, may cause
harmful interference to radio communication. However, there is no guarantee that interference will not occur in a particular installation. If
this equipment does cause harmful interference to radio or television reception, which can be determined by turning the equipment off and
on, the user is encouraged to try to correct the interference by one or more of the following measures:
* Reorient or relocate the receiving antenna.
* Increase the separation between the equipment and receiver.
* Connect the equipment into an outlet on a circuit different from that to which the receiver is connected.
* Consult the dealer or an experienced radio/TV technician for help.
FCC CAUTION: To assure continued compliance use only shielded interface cables when connecting to computer or peripheral devices. Any
changes or modifications not expressly approved by the party responsible for compliance could void the user's authority to operate the
equipment. This device complies with Part 15 of the FCC Rules. Operation is subject to the following two conditions: (1) This device may not
cause harmful interference, and (2) this device must accept any interference received, including interference that may cause undesired operation.
Responsible Party: AVISION LABS INC.
6815 Mowry Ave. Newark CA 94560 Tel: (510) 739-2369
ii

Table of Contents
1. Introduction ______________________________________________________________________________1-1
2. DS600C Installation _______________________________________________________________________2-1
2.1 Precautions ____________________________________________________________________________2-1
2.2 Unlocking the DS600C ___________________________________________________________________2-2
2.3 Connecting the DS600C and OKICOLOR 8 Printer as a Convenience Copier ________________________2-3
2.4 Connecting the DS600C so you can also Print to the OKICOLOR 8________________________________2-4
2.5 Document Placement_____________________________________________________________________2-5
3. Operating the DS600C Copier _______________________________________________________________3-1
3.1 The DS600C Control Panel _______________________________________________________ 3-1, 3-2, 3-3
3.2 Before Making Copies ___________________________________________________________________3-4
3.3 Making Simple Copies ___________________________________________________________________3-5
iii

3.4 Using the Copier Features ________________________________________________________________3-6
3.4.1 Mirror Function ____________________________________________________________________3-6
3.4.2 Enlarging or Reducing your Original ____________________________________________________3-7
3.4.3 Auto Zooming your Original __________________________________________________________3-8
3.4.4 Changing your Copy Density __________________________________________________________3-9
3.4.5 Changing Color Intensity ____________________________________________________________ 3-10
3.4.6 Choosing your Copy Quantity ________________________________________________________3-17
3.4.7 Enhancing your Copy Quality ________________________________________________________3-18
3.4.8 Photo Copy, Text Copy, or Auto Copy Modes ___________________________________________3-19
3.4.9 Making Copies of a 3D object ________________________________________________________3-20
3.4.10 Automatic Power Saving Mode _______________________________________________________3-21
4. Technical Support ________________________________________________________________________ 4-1
5. Specifications ____________________________________________________________________________5-1
iv
1. INTRODUCTION
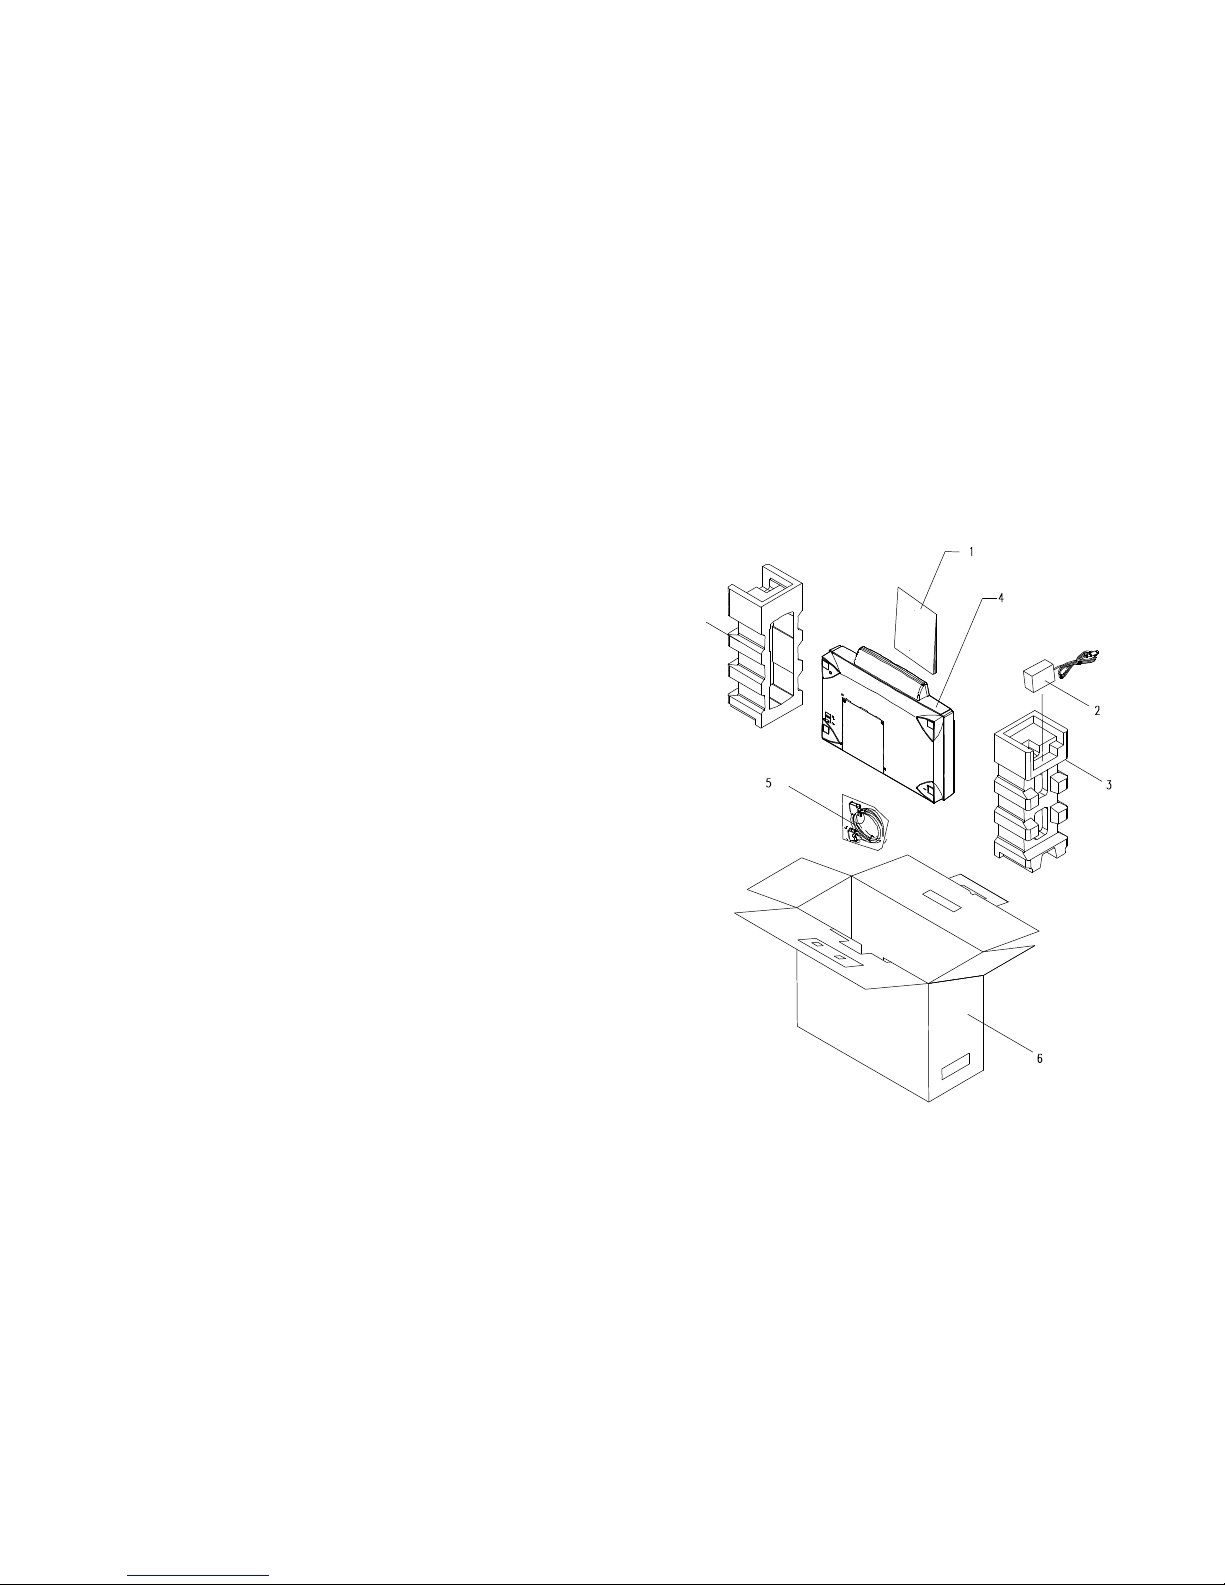
Figure 1-1 shows how the DS600C is packed.
Please check all the items against Figure 1-1. If
there are any parts missing or damaged, please
contact 1 (800) OKI-DATA (800-654-3282).
1.
Installation/User's Guide
2. Power Adapter
3. Shipping Foam
4. DS600C Main SUnit
5. Cable (DS600C to PC)
6. Carton
Figure 1-1 DS600C Packing
1-1

2. DS600C INSTALLATION
2.1 PRECAUTIONS
ŸKeep the DS600C out of direct sunlight. Direct exposure to the sun or excessive heat may cause
damage to the unit.
ŸDo not install the DS600C in a humid or dusty location.
ŸBe sure to use a 115 vac 60 hz. AC power source.
ŸPlace the DS600C securely on an even, flat surface. Tilted or uneven surfaces may cause mechanical
problems.
ŸRetain the DS600C box and packing materials for shipping purposes.
2-1

2.2 UNLOCKING THE DS600C
To protect the scanning head from damage during shipment, the DS600C is designed with a lock switch
beneath the main unit. Therefore, before using the DS600C, you MUST unlock the DS600C by
moving the lock switch to the USE position (See Figure 2-1.)
#1. Shipping Position
#2 Use Position
Figure 2-1 Unlocking the DS600C
2-2

2.3 CONNECTING THE DS600C AND OKICOLOR 8 PRINTER AS A CONVENIENCE COPIER
Connect the unit as shown below. This configuration provides copying capabilityonly.
1.
DS600C main unit
2. “To Printer” port
3. Printer Cable(Not Included - See
Note)
4. Power Jack
5. Power Adapter
6. OKICOLOR 8 Printer
Figure 2-2 Convenience Copier
Cable Connection
NOTE:
The cable included with the DS600C
Copier isnot required in this
configuration.
An IEEE-1284 bi-directional parallel
cable (maximum length 10 feet) is
required.
2-3
This manual suits for next models
2
Table of contents
Other Oki Copier manuals


